 ✨博客主页: XIN-XIANG荣
✨系列专栏:【Java实现数据结构】
✨一句短话: 难在坚持,贵在坚持,成在坚持!
文章目录
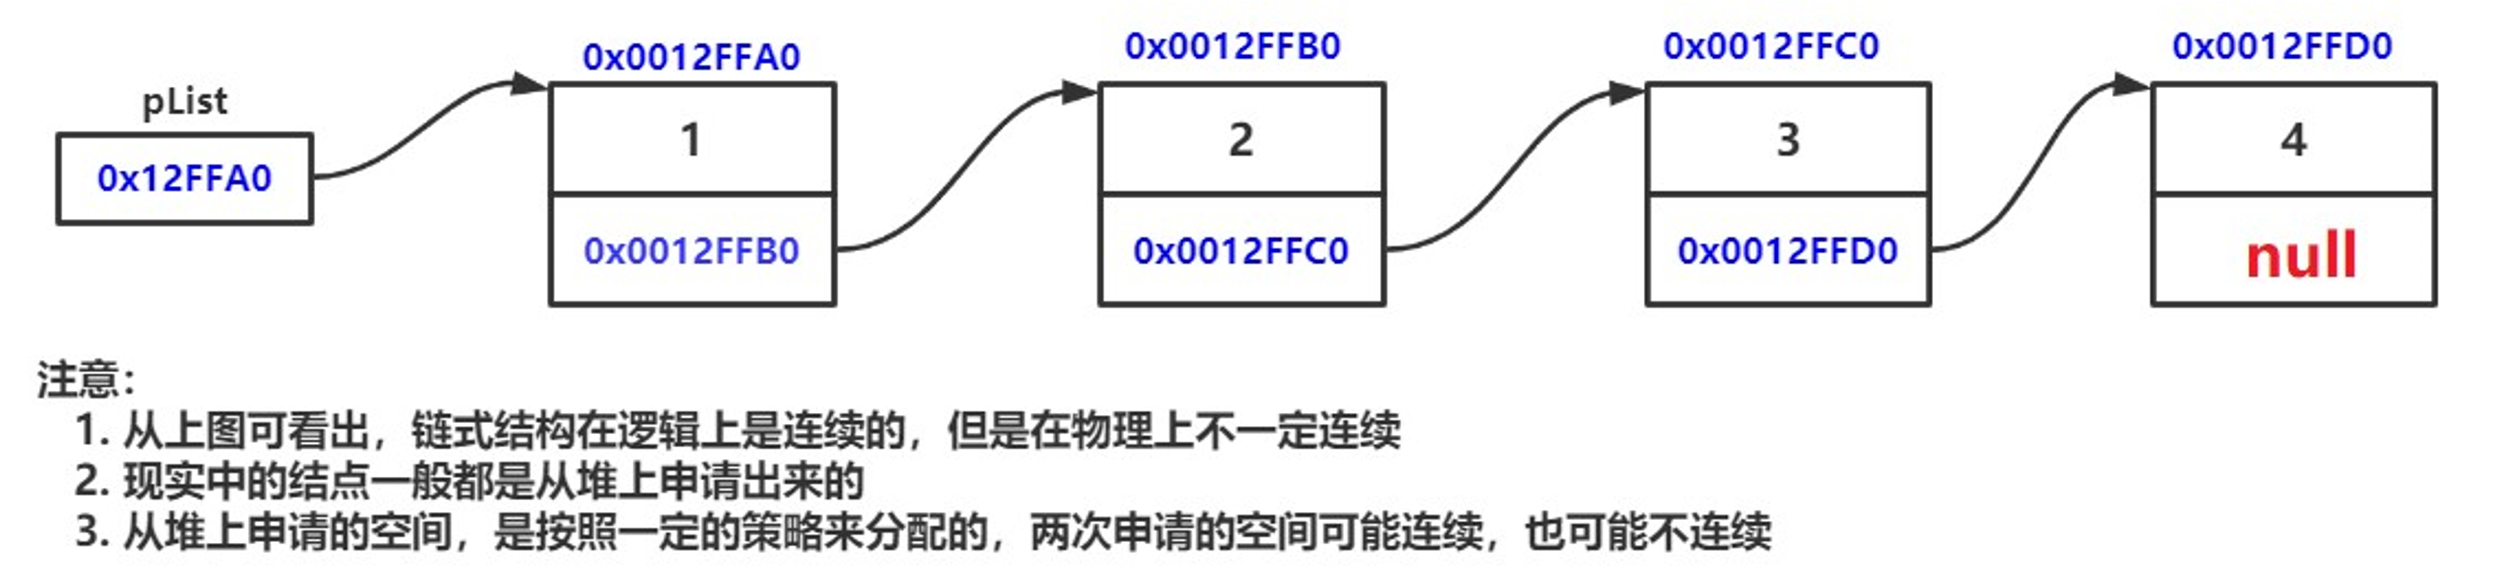
链表是一种物理存储结构上非连续存储结构,数据元素的逻辑顺序是通过链表中的引用链接次序实现的 。
 实际中链表的结构非常多样,以下情况组合起来就有8种链表结构:
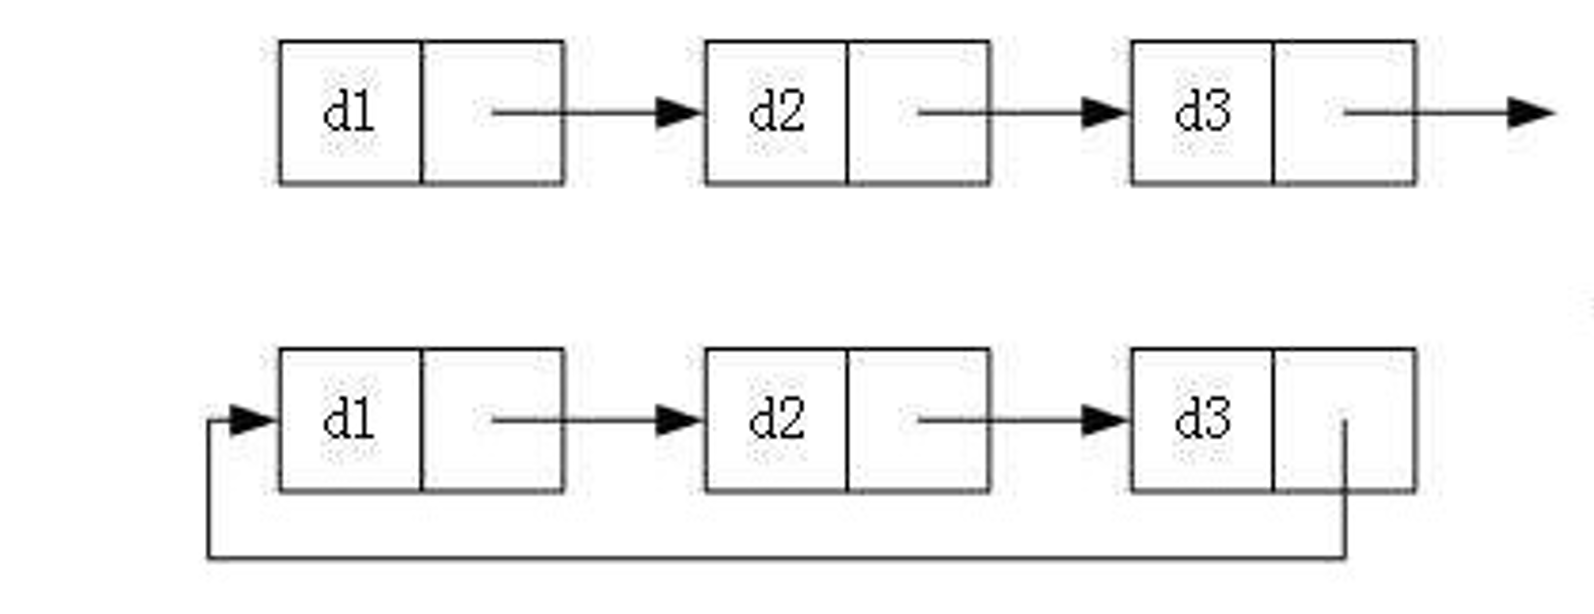
这里列出这8种链表结构
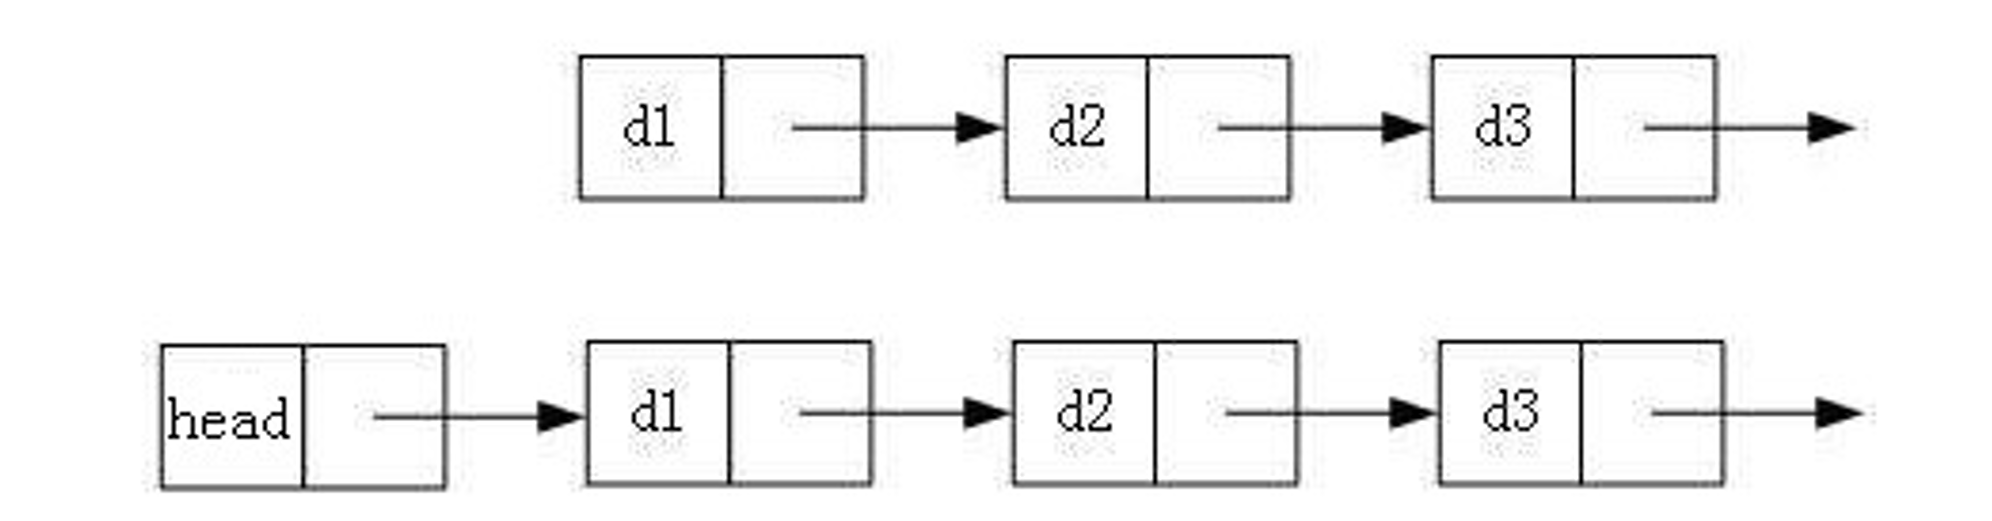
这里对于带头和不带头要注意区分一下 , 带头链表中链表的头节点是固定不变的且头节点的数值域是虚拟的 (无效的 , 不存放数据) , 不管数据在哪里插入和删除 , 头节点都不会变化 ; 而不带头链表 , 链表的第一个节点 (头节点) 是有效节点 , 数值域是有效的 , 如果在不带头链表中进行头插或者删除第一个节点 , 头节点会发生变化 .
本篇博客重点介绍下面两种链表 , 使用Java语言去实现 :
结构简单,一般不会单独用来存数据 ; 实际中更多是作为其他数据结构的子结构,如 哈希桶、图的邻接表等等。
在Java的集合框架库中LinkedList底层实现就是无头双向循环链表。
下图所示为无头单向非循环链表的结构

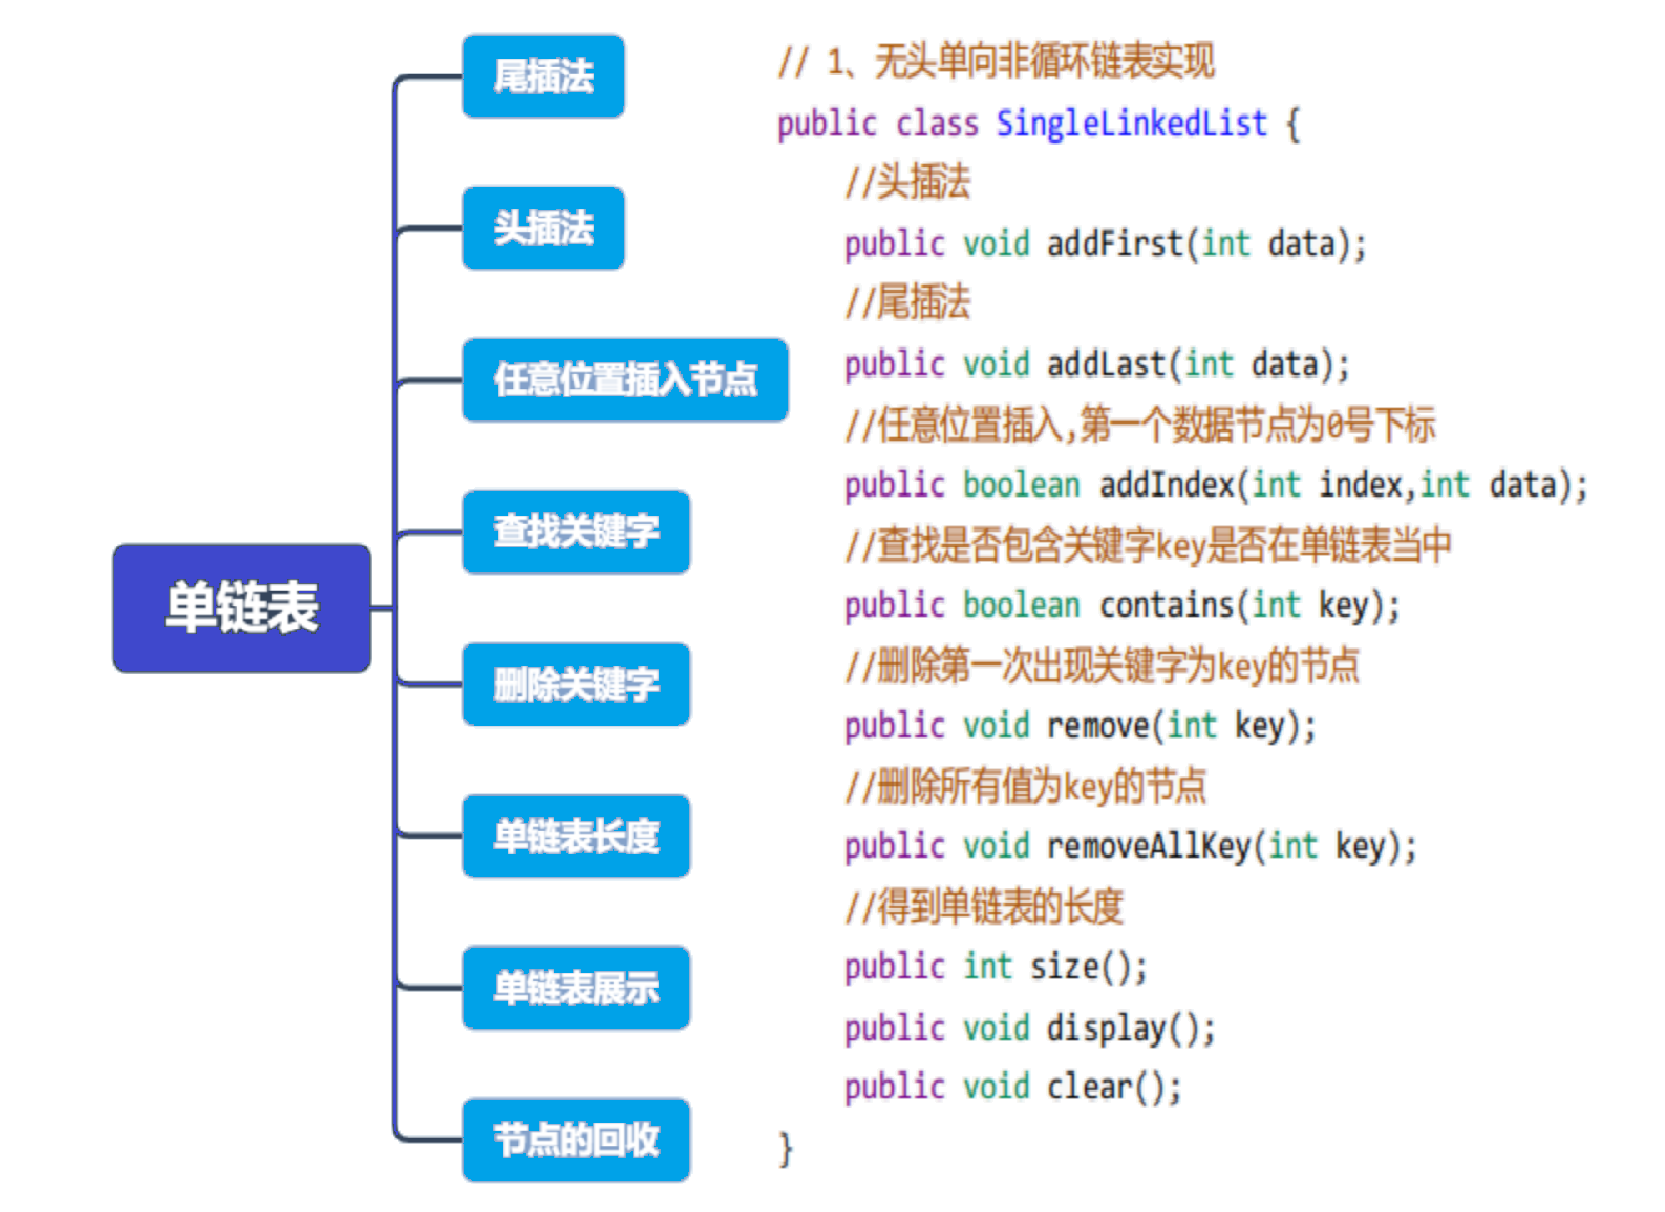
public class MySigleLinkedList {
    //内部类实现节点
    static class ListNode {
        public int val;//存放元素
        public ListNode next;//记录下一个节点的引用

        public ListNode(int val) {
            this.val = val;
        }
    }
    public ListNode head;//记录头节点的引用

    //打印链表里面的数据,默认从头开始打印
    public void display() {
        ListNode cur = this.head;
        //条件不能是cur.next,否则最后一个节点无法打印
        while(cur != null) {
            System.out.print(cur.val+" ");
            cur = cur.next;
        }
        System.out.println();
    }

    //获取单链表的长度
    public int size() {
        int count = 0;
        ListNode cur = this.head;
        while (cur != null) {
            count++;
            cur = cur.next;
        }
        return count;
    }

    //查找某个数据key是否在单链表中
    public boolean contains(int key) {
        ListNode cur = this.head;
        while(cur != null) {
            if(cur.val == key) {
                return true;
            }
            cur = cur.next;
        }
        return false;
    }

    //头插法
    public void addFirst(int data) {
        ListNode node = new ListNode(data);
        node.next = this.head;
        this.head = node;
    }

    //尾插法
    public void addLast(int data) {
        ListNode node = new ListNode(data);
        ListNode cur = this.head;
        if(cur == null) {
            this.head = node;
        }else {
            //找到最后一个节点
            while (cur.next != null) {
                cur = cur.next;
            }
            cur.next = node;
        }
    }

    //在任意位置插入,第一个数据节点为0号下标
    public void addIndex(int index, int data) throws IndexWrongfulException{
        if(index < 0 || index > size()) {
            throw new IndexWrongfulException("index位置不合法!");
        }
        if(index == 0) {
            addFirst(data);
            return;
        }
        if(index == size()) {
            addLast(data);
            return;
        }
        //先走index-1步,找到要插入位置的前一个位置
        ListNode cur = findIndexSubOne(index);
        ListNode node = new ListNode(data);
        //插入,修改指向
        node.next = cur.next;
        cur.next = node;
    }

    private ListNode findIndexSubOne(int index) {
        ListNode cur = this.head;
        while(index-1 != 0) {
            cur = cur.next;
            index--;
        }
        return cur;
    }
    //删除第一次出现数据key的节点
    public void remove(int key) {
        if(this.head == null) {
            return;
        }
        //判断头节点
        if(this.head.val == key) {
            this.head = this.head.next;
            return;
        }
        //先找到key位置的上一个位置
        ListNode cur = findPrevOfKey(key);
        if(cur == null) {
            System.out.println("不存在你要删除的元素"+key);
            return;
        }
        //删除
        cur.next = cur.next.next;
    }

    private ListNode findPrevOfKey(int key) {
        ListNode cur = this.head;
        while(cur.next != null) {
            if(cur.next.val == key) {
                return cur;
            }
            cur = cur.next;
        }
        return null;
    }

    //删除所有值为key的节点
    public void removeAllKey(int key) {
        if(this.head == null) {
            return;
        }
        //从第二个节点开始判断
        ListNode cur = this.head.next;
        ListNode prev = this.head;//记录要判断节点的上一个节点
        while(cur != null) {
            if(cur.val == key) {
                //删除
                prev.next = cur.next;
                cur = cur.next;
            }else {
                prev = cur;
                cur = cur.next;
            }
            //最后判断头节点
            if(this.head.val == key) {
                this.head = this.head.next;
            }
        }
    }
    /*public ListNode removeElements(int val) {
        if(head == null) {
            return null;
        }
        //从第二个元素开始判断
        ListNode cur = this.head;
        while(cur.next != null) {
            if(cur.next.val == val) {
                cur.next = cur.next.next;
            }else {
                cur = cur.next;
            }
        }
        //最后判断头节点
        if(this.head.val == val) {
            this.head = this.head.next;
        }
        return this.head;
    }*/

    //清空单链表
    public void clear() {
        this.head = null;
    }
}
public class IndexWrongfulException extends RuntimeException{
    public IndexWrongfulException() {
    }

    public IndexWrongfulException(String message) {
        super(message);
    }
}
public class TestList {
public static void main(String[] args) {
MySigleLinkedList linkedList = new MySigleLinkedList();
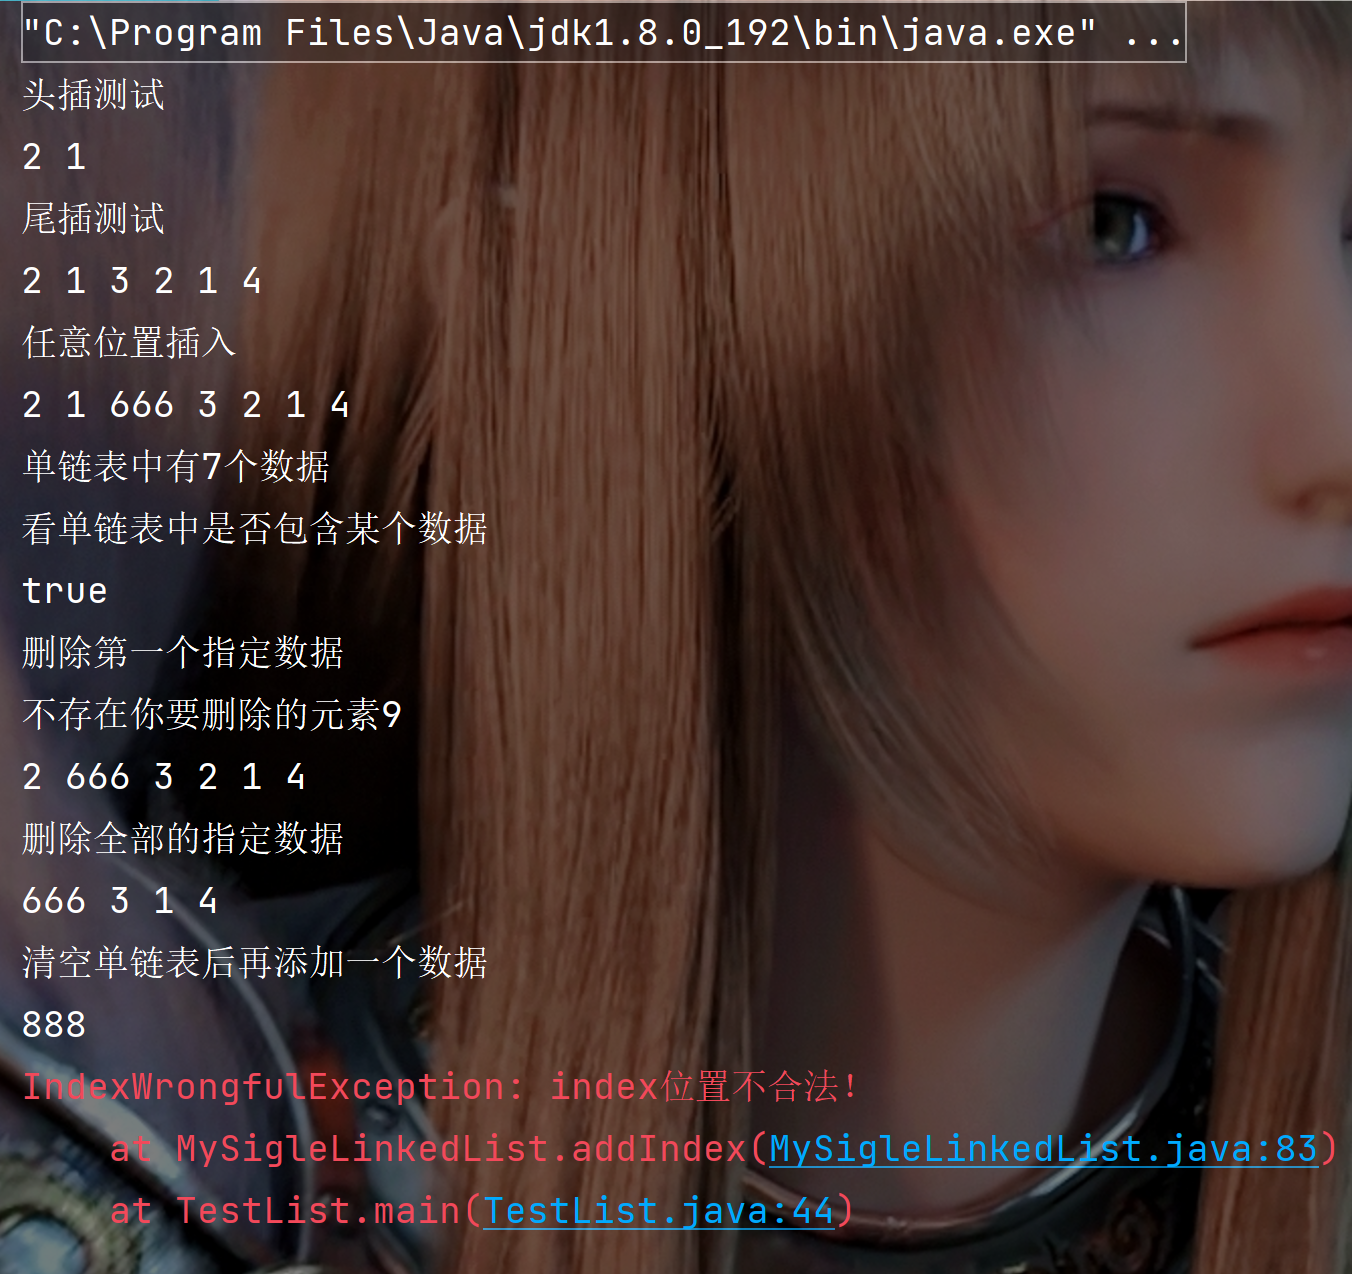
System.out.println("头插测试");
linkedList.addFirst(1);
linkedList.addFirst(2);
linkedList.display();
System.out.println("尾插测试");
linkedList.addLast(3);
linkedList.addLast(2);
linkedList.addLast(1);
linkedList.addLast(4);
linkedList.display();
System.out.println("任意位置插入");
try {
linkedList.addIndex(2,666);
linkedList.addIndex(8,666);
} catch(IndexWrongfulException e) {
e.printStackTrace();
}
linkedList.display();
System.out.println("单链表中有"+linkedList.size()+"个数据");
System.out.println("看单链表中是否包含某个数据");
System.out.println(linkedList.contains(666));
System.out.println("删除第一个指定数据");
linkedList.remove(1);
linkedList.remove(9);
linkedList.display();
System.out.println("删除全部的指定数据");
linkedList.removeAllKey(2);
linkedList.display();
System.out.println("清空单链表后再添加一个数据");
linkedList.clear();
linkedList.addFirst(888);
linkedList.display();
}
}
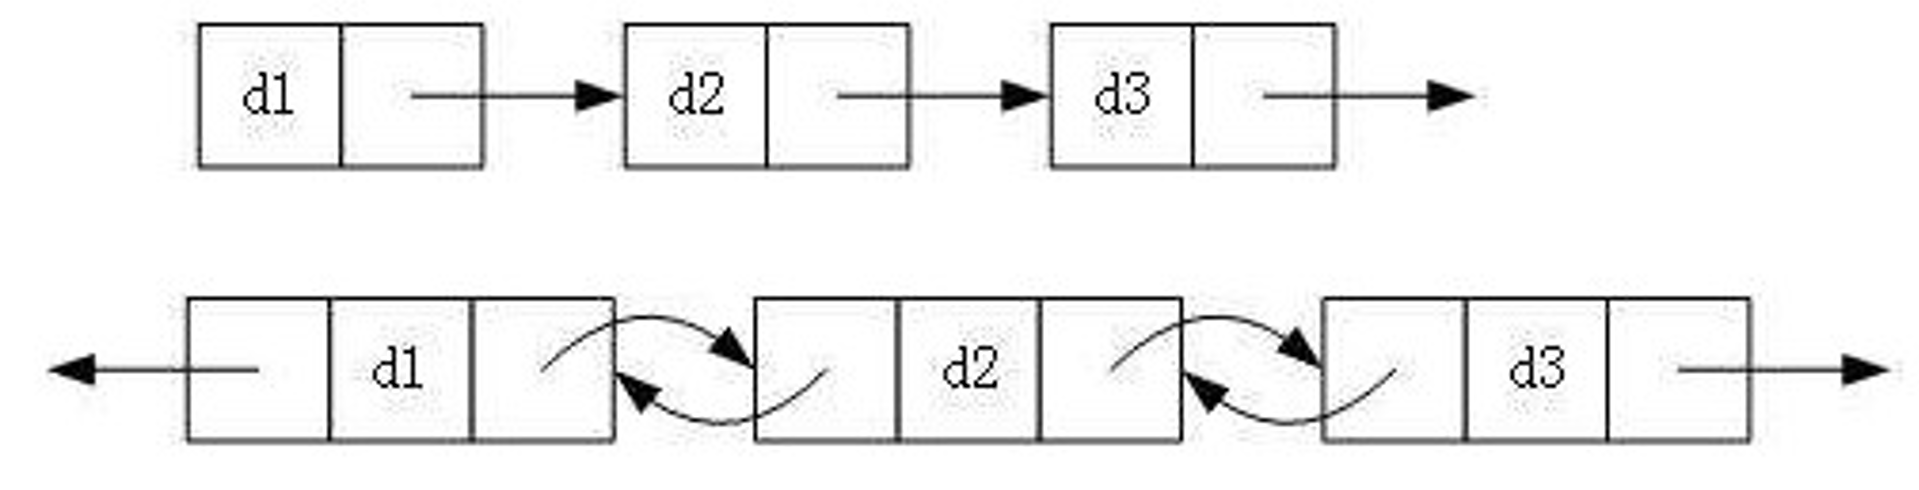
给出结构图
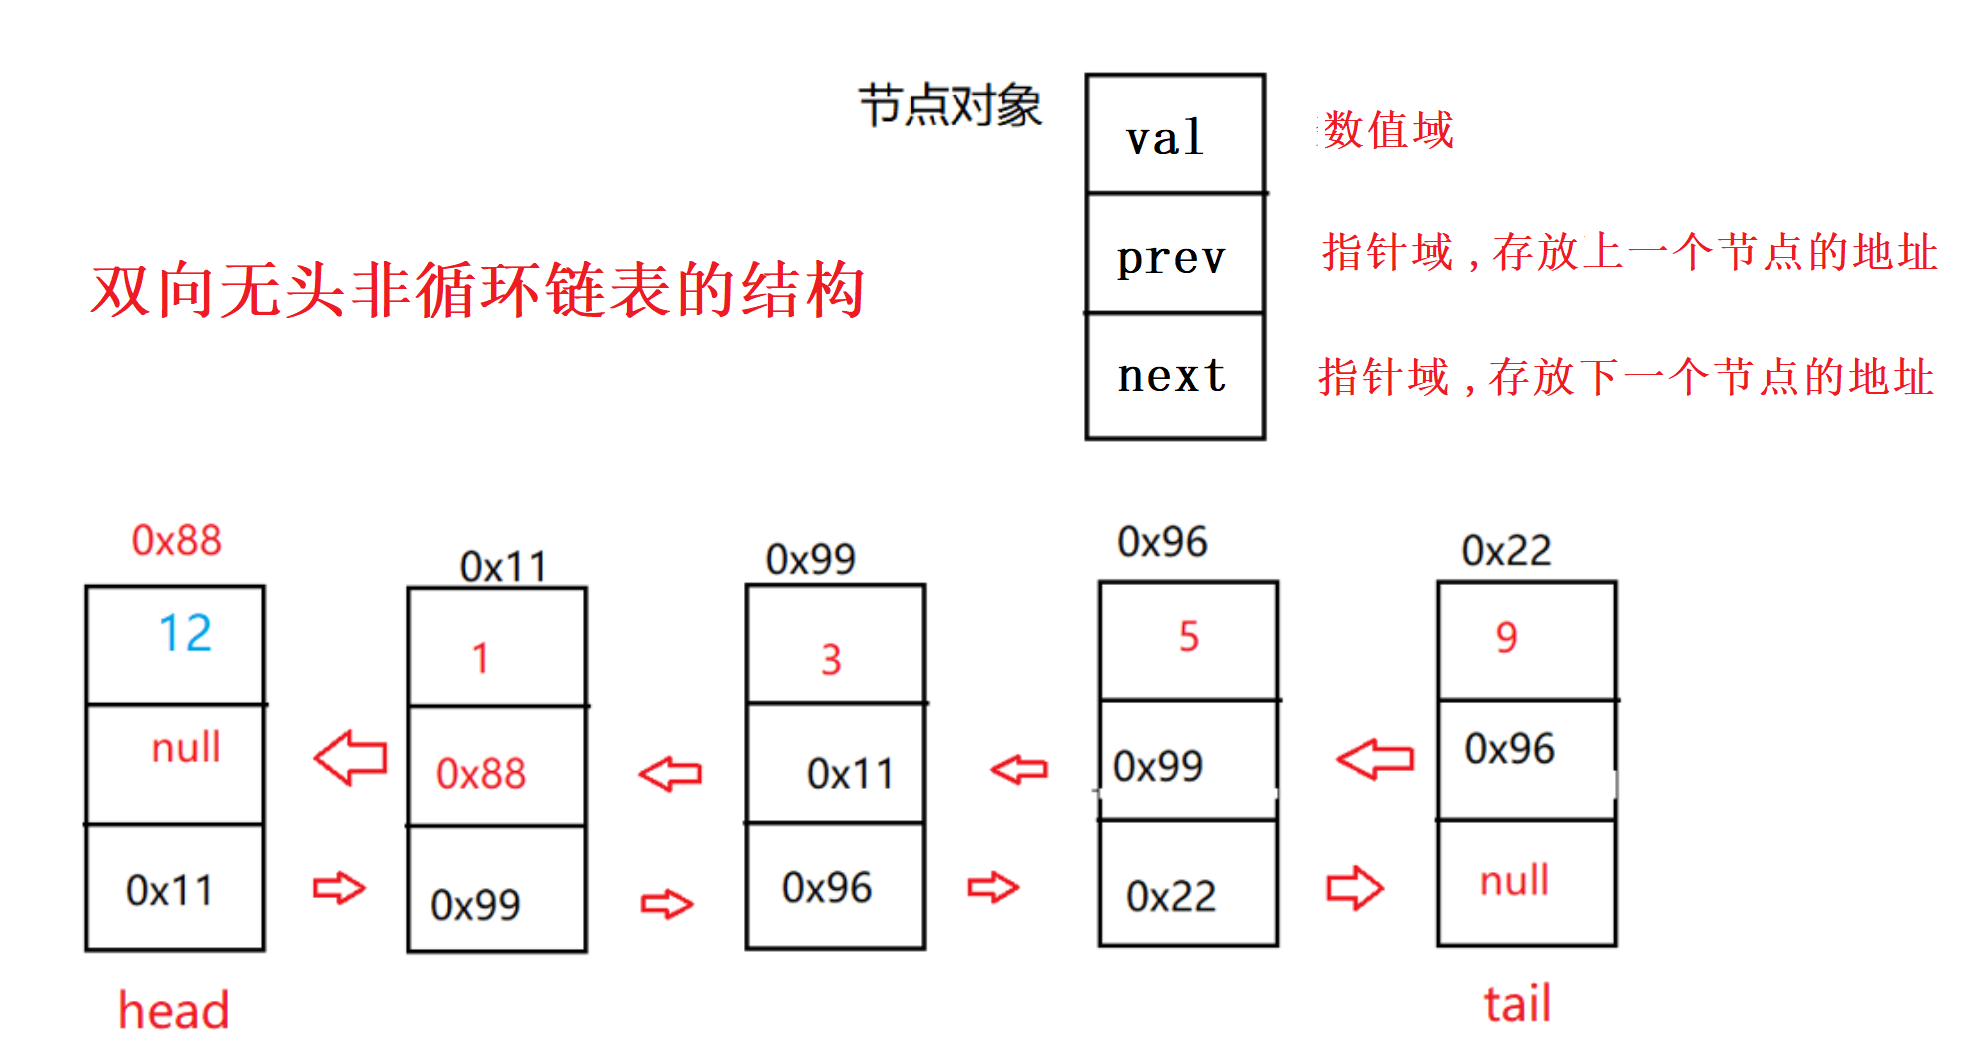
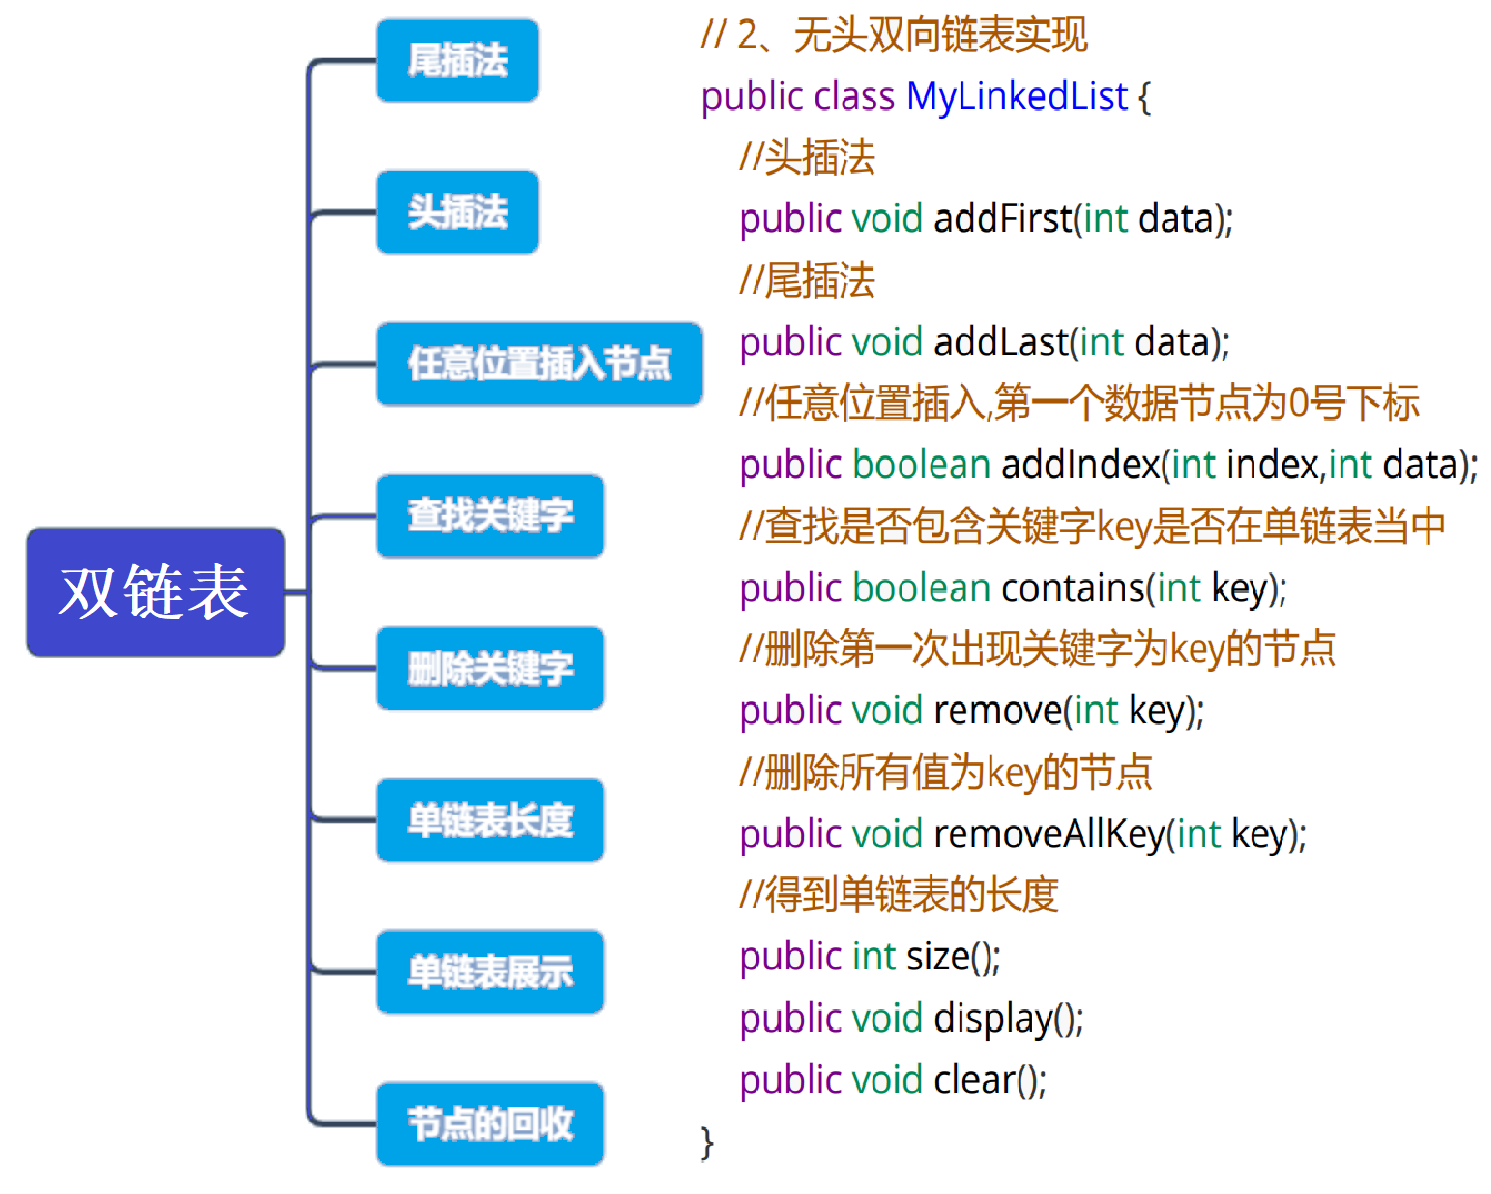
public class MyLinkedList {
    //内部类定义节点
    static class ListNode {
        public int val;
        public ListNode next;//记录下一个节点
        public ListNode prev;//记录前一个节点

        public ListNode(int val) {
            this.val = val;
        }
    }

    public ListNode head;//指向头节点
    public ListNode tail;//指向尾巴节点

    //打印链表
    public void display() {
        ListNode cur = this.head;
        while(cur != null) {
            System.out.print(cur.val+" ");
            cur = cur.next;
        }
        System.out.println();
    }

    //获取链表中元素的个数
    public int size() {
        ListNode cur = this.head;
        int count = 0;
        while(cur != null) {
            count++;
            cur = cur.next;
        }
        return count;
    }

    //判断数据在链表中是否存在
    public boolean contains(int key) {
        ListNode cur = this.head;
        while(cur != null) {
            if(cur.val == key) {
                return true;
            }
            cur = cur.next;
        }
        return false;
    }

    //头插法
    public void addFirst(int data) {
        ListNode node = new ListNode(data);
        if(this.head == null) {
            this.head = node;
            this.tail = node;
            return;
        }
        node.next = this.head;
        this.head.prev = node;
        this.head = node;
    }

    //尾插法
    public void addLast(int data) {
        ListNode node = new ListNode(data);
        if(this.head == null) {
            this.head = node;
            this.tail = node;
            return;
        }
        this.tail.next = node;
        node.prev = this.tail;
        this.tail = node;
    }

    //在任意位置插入, 认为头节点为0位置
    public void addIndex(int index, int data) {
        if(index < 0 || index > this.size()) {
            throw new IndexWrongfulException("index位置不合法");
        }
        if(index == 0) {
            this.addFirst(data);
            return;
        }
        if(index == size()) {
            this.addLast(data);
            return;
        }
        ListNode node = new ListNode(data);
        ListNode cur = findIndexListNode(index);
        node.next = cur;
        node.prev = cur.prev;
        cur.prev.next = node;
        cur.prev = node;
    }

    public ListNode findIndexListNode(int index) {
        ListNode cur = this.head;
        while(index != 0) {
            cur = cur.next;
            index--;
        }
        return cur;
    }

    //删除第一个出现的指定元素
    public void remove(int key) {
        ListNode cur = this.head;
        while(cur != null) {
            if(cur.val == key) {
                //如果要删除的是头节点
                if(this.head == cur) {
                    this.head = this.head.next;
                    //如果链表中只有一个节点
                    if(this.head != null){
                        this.head.prev = null;
                    }
                }else{
                    cur.prev.next = cur.next;
                    if(cur.next != null) {
                        cur.next.prev = cur.prev;
                    }else {//如果要删除的是尾巴节点
                        this.tail = cur.prev;
                    }
                }
                return;
            }
            cur = cur.next;
        }
    }

    //删除全部的指定元素
    public void removeAll(int key) {
        ListNode cur = this.head;
        while(cur != null) {
            if(cur.val == key) {
                //如果要删除的是头节点
                if(this.head == cur) {
                    this.head = this.head.next;
                    //如果链表中只有一个节点
                    if(this.head != null){
                        this.head.prev = null;
                    }
                }else{
                    cur.prev.next = cur.next;
                    if(cur.next != null) {
                        cur.next.prev = cur.prev;
                    }else {//如果要删除的是尾巴节点
                        this.tail = cur.prev;
                    }
                }
            }
            cur = cur.next;
        }
    }

    //清空
    public void clear() {
        ListNode cur =this.head;
        while(cur != null) {
            cur.prev = null;
            cur.next = null;
            cur = cur.next;
        }
        this.head = null;
        this.tail = null;
    }
}
public class IndexWrongfulException extends RuntimeException{
    public IndexWrongfulException() {
    }

    public IndexWrongfulException(String message) {
        super(message);
    }
}
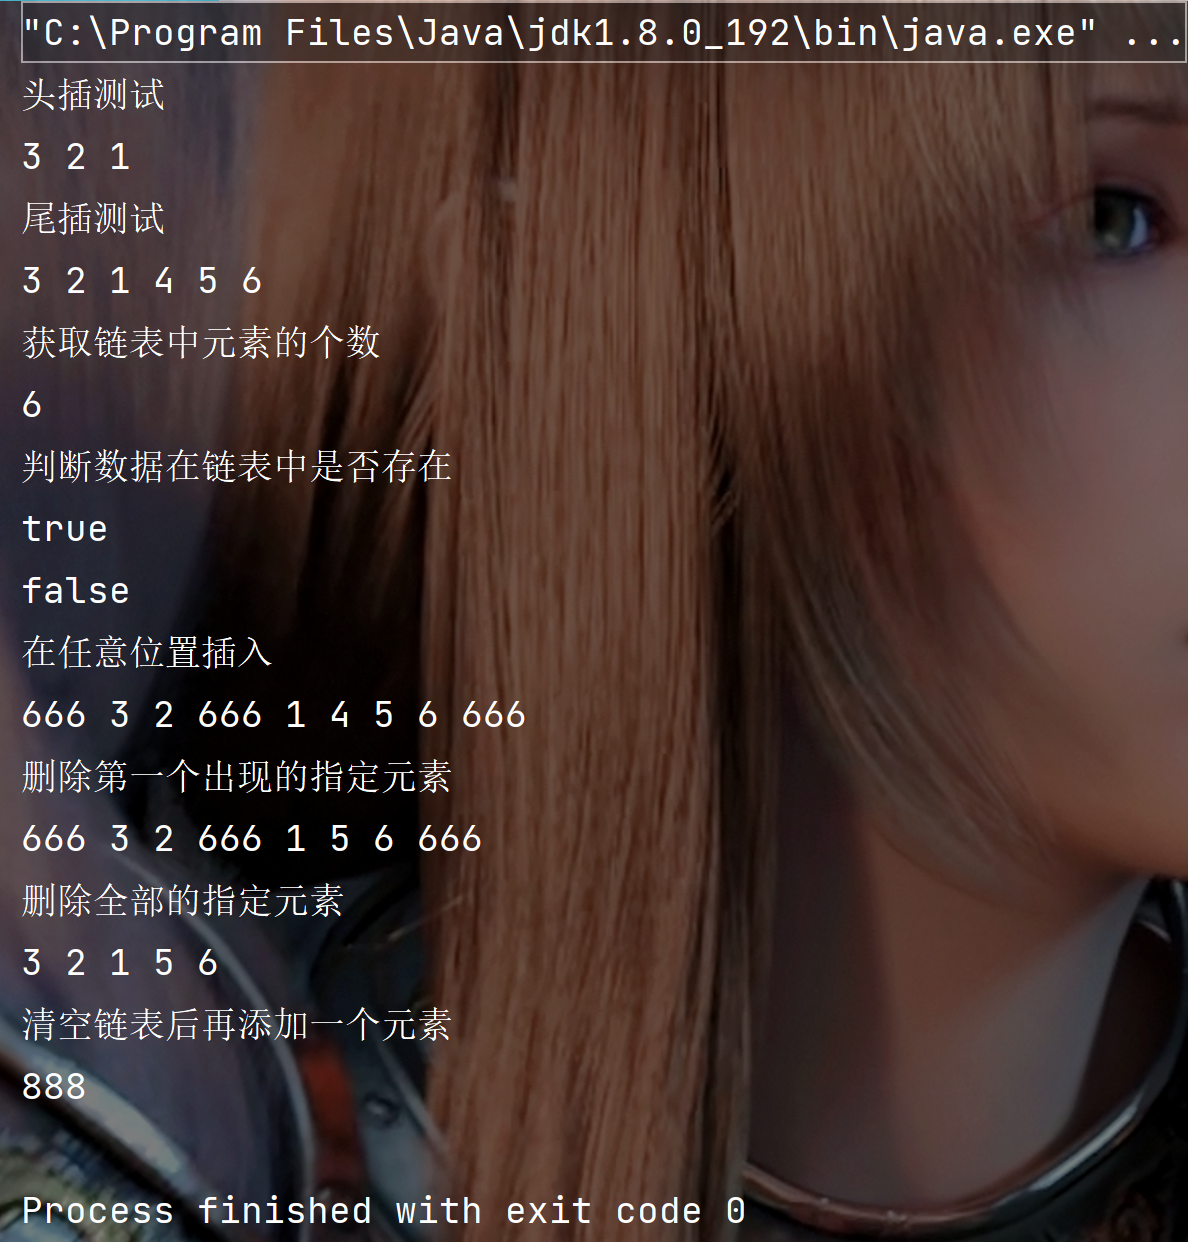
public class TestList {
    public static void main(String[] args) {
        MyLinkedList list = new MyLinkedList();
        System.out.println("头插测试");
        list.addFirst(1);
        list.addFirst(2);
        list.addFirst(3);
        list.display();

        System.out.println("尾插测试");
        list.addLast(4);
        list.addLast(5);
        list.addLast(6);
        list.display();

        System.out.println("获取链表中元素的个数");
        System.out.println(list.size());

        System.out.println("判断数据在链表中是否存在");
        System.out.println(list.contains(4));
        System.out.println(list.contains(8));

        System.out.println("在任意位置插入");
        list.addIndex(0, 666);
        list.addIndex(3, 666);
        list.addIndex(list.size(), 666);
        list.display();

        System.out.println("删除第一个出现的指定元素");
        list.remove(4);
        list.display();

        System.out.println("删除全部的指定元素");
        list.removeAll(666);
        list.display();

        System.out.println("清空链表后再添加一个元素");
        list.clear();
        list.addFirst(888);
        list.display();
    }
}
?博客主页:https://xiaoy.blog.csdn.net?本文由呆呆敲代码的小Y原创,首发于CSDN??学习专栏推荐:Unity系统学习专栏?游戏制作专栏推荐:游戏制作?Unity实战100例专栏推荐:Unity实战100例教程?欢迎点赞?收藏⭐留言?如有错误敬请指正!?未来很长,值得我们全力奔赴更美好的生活✨------------------❤️分割线❤️-------------------------
这个问题有两个部分。在RubyProgrammingLanguage一书中,有一个使用模块扩展字符串对象和类的示例(第8.1.1节)。第一个问题。为什么如果您使用新方法扩展类,然后创建该类的对象/实例,则无法访问该方法?irb(main):001:0>moduleGreeter;defciao;"Ciao!";end;end=>nilirb(main):002:0>String.extend(Greeter)=>Stringirb(main):003:0>String.ciao=>"Ciao!"irb(main):004:0>x="foobar"=>"foobar"irb(main):
目录H2数据库入门以及实际开发时的使用1.H2数据库的初识1.1H2数据库介绍1.2为什么要使用嵌入式数据库?1.3嵌入式数据库对比1.3.1性能对比1.4技术选型思考2.H2数据库实战2.1H2数据库下载搭建以及部署2.1.1H2数据库的下载2.1.2数据库启动2.1.2.1windows系统可以在bin目录下执行h2.bat2.1.2.2同理可以通过cmd直接使用命令进行启动:2.1.2.3启动后控制台页面:2.1.3spring整合H2数据库2.1.3.1引入依赖文件2.1.4数据库通过file模式实际保存数据的位置2.2H2数据库操作2.2.1Mysql兼容模式2.2.2Mysql模式
前文,我们实现了认识了链表这一结构,并实现了无头单向非循环链表,接下来我们实现另一种常用的链表结构,带头双向循环链表。如有仍不了解单向链表的,请看这一篇文章(7条消息)【数据结构和算法】认识线性表中的链表,并实现单向链表_小王学代码的博客-CSDN博客目录前言一、带头双向循环链表是什么?二、实现带头双向循环链表1.结构体和要实现函数2.初始化和打印链表3.头插和尾插4.头删和尾删5.查找和返回结点个数6.在pos位置之前插入结点7.删除指定pos结点8.摧毁链表三、完整代码1.DSLinkList.h2.DSLinkList.c3.test.c总结前言带头双向循环链表,是链表中最为复杂的一种结
提示:文章写完后,目录可以自动生成,如何生成可参考右边的帮助文档文章目录一、设计原理1.DS1302介绍2.闹钟音乐播放原理二、程序设计1.DS1302.h2.ds1302.c3.music.h4.main.c三、电路图四、运行结果1.proteus仿真2.开发板实验五、总结六、附件提示:以下是本篇文章正文内容,下面案例可供参考一、设计原理1.DS1302介绍DS1302是美国DALLAS公司推出的一种高性能、低功耗、带RAM的实时时钟电路,它可以对年、月、日、周、时、分、秒进行计时,具有闰年补偿功能,工作电压为2.0V~5.5V。该芯片采用普通32.768kHz晶振,DS1302工作时功耗很
为什么需要服务网关传统的单体架构中只需要开放一个服务给客户端调用,但是微服务架构中是将一个系统拆分成多个微服务,如果没有网关,客户端只能在本地记录每个微服务的调用地址,当需要调用的微服务数量很多时,它需要了解每个服务的接口,这个工作量很大。有了网关之后,网关作为系统的唯一流量入口,封装内部系统的架构,所有请求都先经过网关,由网关将请求路由到合适的微服务。使用网关的好处1)简化客户端的工作。网关将微服务封装起来后,客户端只需同网关交互,而不必调用各个不同服务;(2)降低函数间的耦合度。一旦服务接口修改,只需修改网关的路由策略,不必修改每个调用该函数的客户端,从而减少了程序间的耦合性(3)解放开发
我发现python的细节自动完成很好RubyonRails有类似的方法描述吗? 最佳答案 有篇不错的文章"UsingVIMasacompleteRubyonRailsIDE"其中引用rails.vim.这似乎是RailsforVIM的实际标准。(不过,我还没有使用过它,但很快就会尝试。)这允许你做很多与Rails相关的任务,但对自动完成没有帮助。还有一篇"RubyAutocompleteinVim"(遗憾的是不再可用)这就是您要搜索的内容。我不知道,理解Rails的所有插件魔法和元编程的东西是否足够聪明。它至少在vim的配置中提到了
防火墙防火墙分类第一代防火墙:包过滤防火墙包过滤防火墙的缺点第二代防火墙:代理防火墙第三代防火墙:状态防火墙第四代防火墙:UTM防火墙第五代防火墙:下一代防火墙华为防火墙介绍安全策略防火墙的会话表防火墙分类第一代防火墙:包过滤防火墙属于第一代防火墙技术,在没有专用防火墙设备时,一般由路由器实现该功能。将网络上传送数据包的IP首部以及TCP/UDP首部,获取发送源的IP地址和端口号,以及目的地的IP地址和端口号,并将这些信息作为过滤条件,决定是否将该分组转发至目的地网络分组过滤的执行需要设置访问控制列表。访问控制列表也可以称为安全策略(简称策略)或安全规则(简称规则)。类似于进站检票的做法,符合
内容来自Qt样式表之QSS语法介绍-3YL的博客Qt样式表是一个可以自定义部件外观的十分强大的机制,可以用来美化部件。Qt样式表的概念、术语和语法都受到了HTML的层叠样式表(CascadingStyleSheets, CSS教程)的启发,不过与CSS不同的是,Qt样式表应用于部件的世界。类型选择器QPushButton匹配QPushButton及其子类的实例ID选择器QPushButton#okButton匹配所有objectName为okButton的QPushButton实例。 CSS常用样式1CSS文字属性注:px:相对长度单位,像素(Pixel)。pt:绝对长度单位,点(Point
简介:我们都知道在Android开发中,当我们的程序在与用户交互时,用户会得到一定的反馈,其中以对话框的形式的反馈还是比较常见的,接下来我们来介绍几种常见的对话框的基本使用。前置准备:(文章最后附有所有代码)我们首先先写一个简单的页面用于测试这几种Dialog(对话框)代码如下,比较简单,就不做解释了一、提示对话框(即最普通的对话框)首先我们给普通对话框的按钮设置一个点击事件,然后通过AlertDialog.Builder来构造一个对象,为什么不直接Dialog一个对象,是因为Dialog是一个基类,我们尽量要使用它的子类来进行实例化对象,在实例化对象的时候,需要将当前的上下文传过去,因为我这