根据公司要求,需要将项目集成到nacos中,当前项目是基于若依前后端分离版开发的,若依的版本为3.8.3,若依框架中整合的springBoot版本为2.5.14。Nacos核心提供两个功能:服务注册与发现,动态配置管理。
1、引入pom依赖
     </dependency>-->
        <!-- 在SpringBoot 2.4.x的版本之后,对配置文件加载方式进行了重构,需要导入如下的依赖;
        详情见官网:https://docs.spring.io/spring-cloud-config/docs/current/reference/html/#config-first-bootstrap -->
        <dependency>
            <groupId>org.springframework.cloud</groupId>
            <artifactId>spring-cloud-starter-bootstrap</artifactId>
            <version>3.0.1</version>
        </dependency>

        <!-- 服务注册与发现依赖 -->
        <dependency>
            <groupId>com.alibaba.cloud</groupId>
            <artifactId>spring-cloud-starter-alibaba-nacos-discovery</artifactId>
            <version>2021.1</version>
        </dependency>
2、bootstrap.yml配置
spring:
  # nacos配置
  cloud:
    nacos:
      discovery:
        server-addr: 10.2.XX.XX:8848
    compatibility-verifier:
      enabled: false
3、添加注解
在项目启动类上添加 @EnableDiscoveryClient 注解:
@EnableDiscoveryClient
@SpringBootApplication(exclude = { DataSourceAutoConfiguration.class })
public class RiskExamineApplication
{
    public static void main(String[] args)
    {
        // System.setProperty("spring.devtools.restart.enabled", "false");
        SpringApplication.run(RiskExamineApplication.class, args);
        System.out.println("(♥◠‿◠)ノ゙  若依启动成功   ლ(´ڡ`ლ)゙  \n" +
                " .-------.       ____     __        \n" +
                " |  _ _   \\      \\   \\   /  /    \n" +
                " | ( ' )  |       \\  _. /  '       \n" +
                " |(_ o _) /        _( )_ .'         \n" +
                " | (_,_).' __  ___(_ o _)'          \n" +
                " |  |\\ \\  |  ||   |(_,_)'         \n" +
                " |  | \\ `'   /|   `-'  /           \n" +
                " |  |  \\    /  \\      /           \n" +
                " ''-'   `'-'    `-..-'              ");
    }
}
4、验证
项目启动后,登录nacos,在服务列表中,点击查询即可看到注册到nacos的服务,如下图:
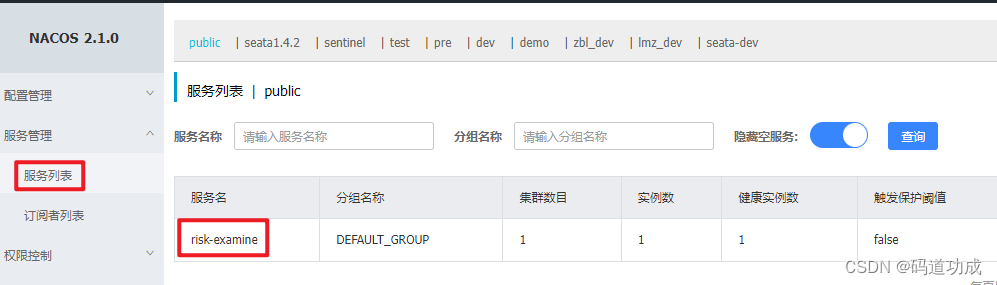
服务名默认为yml配置里spring.application.name的名称,也可通过spring.cloud.nacos.discovery.service配置指定。
遇到问题:Your project setup is incompatible with our requirements due to following reasons:
- Spring Boot [2.5.14] is not compatible with this Spring Cloud release train
Change Spring Boot version to one of the following versions [2.3.x, 2.4.x]
***************************
APPLICATION FAILED TO START
***************************

Description:

Your project setup is incompatible with our requirements due to following reasons:

- Spring Boot [2.5.14] is not compatible with this Spring Cloud release train


Action:

Consider applying the following actions:

- Change Spring Boot version to one of the following versions [2.3.x, 2.4.x] .
You can find the latest Spring Boot versions here [https://spring.io/projects/spring-boot#learn].
If you want to learn more about the Spring Cloud Release train compatibility, you can visit this page [https://spring.io/projects/spring-cloud#overview] and check the [Release Trains] section.
If you want to disable this check, just set the property [spring.cloud.compatibility-verifier.enabled=false]
解决办法:出现这个问题是由于springBoot和springCloud版本不一致导致的,如果是自己手动搭建的框架,可以根据提示将springBoot版本降到[2.3.x, 2.4.x];但是由于我用的是若依的框架,担心将springBoot版本降低后会引起其它问题,所以根据提示设置spring.cloud.compatibility-verifier.enabled=false这个属性,但是引入后发现配置不生效,最后根据研究一番之后,根据网上的提示需将配置文件名称application.yml改为bootstrap.yml,然后再引入依赖spring-cloud-starter-bootstrap 即可解决。
注意:如果只需要nacos的服务注册与发现功能,不用服务配置功能的话,一定要将服务配置的pom依赖(spring-cloud-starter-alibaba-nacos-config)去掉,否则启动时会报错:currentServerAddr:http://localhost:8848, err : connect timed out 。
1、引入pom依赖
  <!-- nacos -->
        <dependency>
            <groupId>com.alibaba.cloud</groupId>
            <artifactId>spring-cloud-starter-alibaba-nacos-config</artifactId>
            <version>2021.1</version>
        </dependency>
        <dependency>
            <groupId>org.springframework.cloud</groupId>
            <artifactId>spring-cloud-starter-bootstrap</artifactId>
            <version>3.0.1</version>
        </dependency>
        <dependency>
            <groupId>com.alibaba.cloud</groupId>
            <artifactId>spring-cloud-starter-alibaba-nacos-discovery</artifactId>
            <version>2021.1</version>
        </dependency>
2、bootstrap.yml配置
spring:
  cloud:
    nacos:
      discovery:
        server-addr: 124.70.XX.XX:32389
        namespace: zs-smart
        group: dev
      config:
        server-addr: 124.70.XX.XX:32389
        namespace: zs-smart
        group: dev
        name: zs-smart
        file-extension: yaml
    compatibility-verifier:
      enabled: false
3、nacos配置
1)新建命名空间

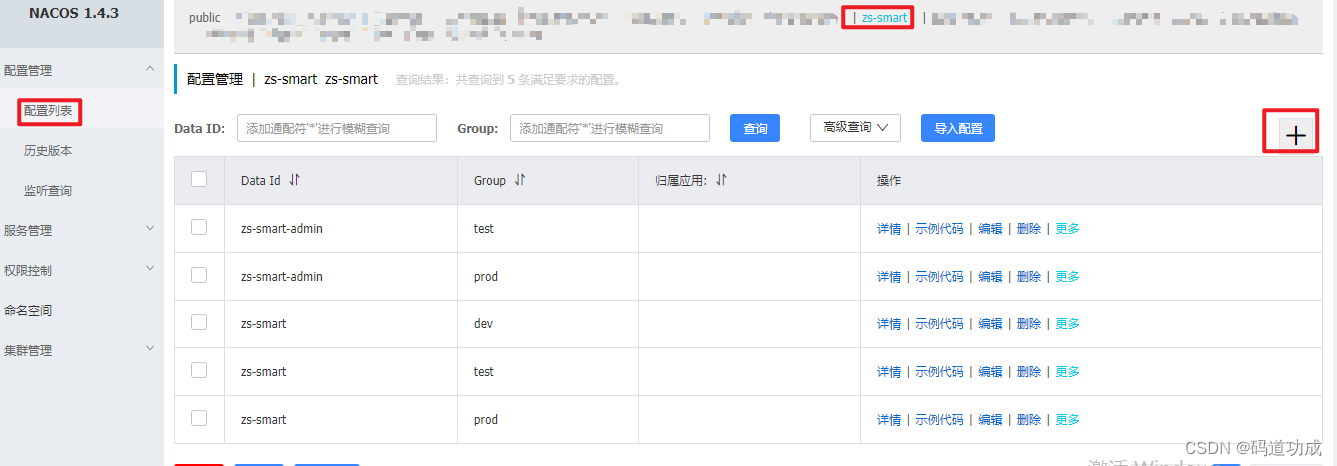
2) 新建配置
打开配置列表,选择刚刚创建的zs-smart,点击右上角的“+”号,如下图:
3)填写配置
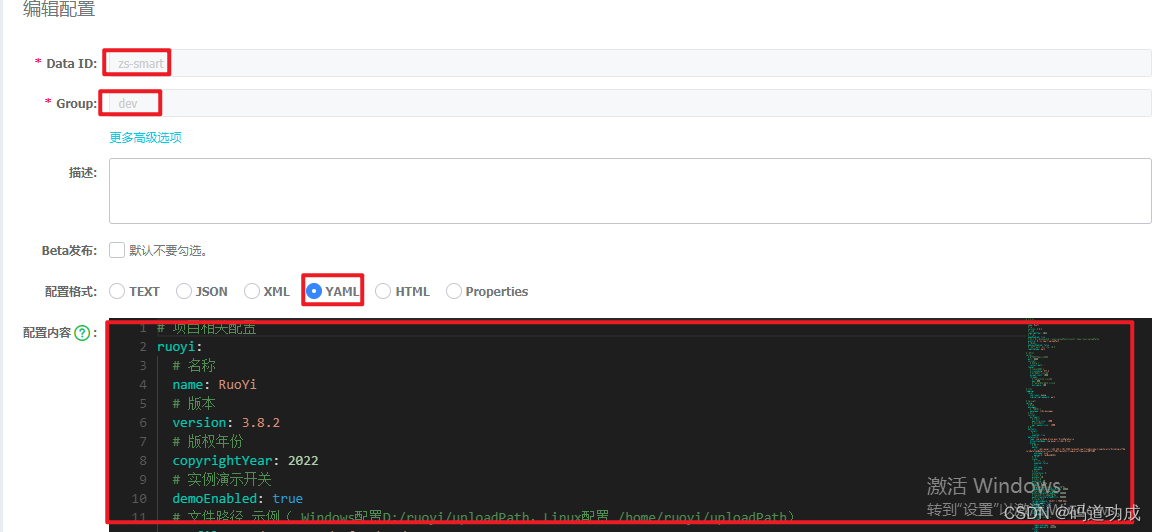
然后启动项目,如果项目启动成功,即说明配置没问题!
我在app/helpers/sessions_helper.rb中有一个帮助程序文件,其中包含一个方法my_preference,它返回当前登录用户的首选项。我想在集成测试中访问该方法。例如,这样我就可以在测试中使用getuser_path(my_preference)。在其他帖子中,我读到这可以通过在测试文件中包含requiresessions_helper来实现,但我仍然收到错误NameError:undefinedlocalvariableormethod'my_preference'.我做错了什么?require'test_helper'require'sessions_hel
我一直很高兴地使用DelayedJob习惯用法:foo.send_later(:bar)这会调用DelayedJob进程中对象foo的方法bar。我一直在使用DaemonSpawn在我的服务器上启动DelayedJob进程。但是...如果foo抛出异常,Hoptoad不会捕获它。这是任何这些包中的错误...还是我需要更改某些配置...或者我是否需要在DS或DJ中插入一些异常处理来调用Hoptoad通知程序?回应下面的第一条评论。classDelayedJobWorker 最佳答案 尝试monkeypatchingDelayed::W
前置步骤我们都操作完了,这篇开始介绍jenkins的集成。话不多说,看操作1、登录进入jenkins后会让你选择安装插件,选择第一个默认的就行。安装完成后设置账号密码,重新登录。2、配置JDK和Git都需要执行路径,所以需要先把执行路径找到,先进入服务器的docker容器,2.1JDK的路径root@69eef9ee86cf:/usr/bin#echo$JAVA_HOME/usr/local/openjdk-82.2Git的路径root@69eef9ee86cf:/#whichgit/usr/bin/git3、先配置JDK和Git。点击:ManageJenkins>>GlobalToolCon
我想在随机字符串前后添加一个空格。我试过使用"Random_string".center(1,"")但它不起作用。谢谢 最佳答案 我发现这是最优雅的解决方案:padded_string="#{random_string}"走简单的路没有错。 关于ruby-在ruby中的字符串前后添加空格?,我们在StackOverflow上找到一个类似的问题: https://stackoverflow.com/questions/3357897/
三分钟集成Tap防沉迷SDK(Unity版)一、SDK介绍基于国家对上线所有游戏必须增加防沉迷功能的政策下,TapTap推出防沉迷SDK,供游戏开发者进行接入;允许未成年用户在周五、六、日以及法定节假日晚上8:00-9:00进行游戏,防沉谜时间段进入游戏会弹窗进行提示!开发环境要求:Unity2019.4或更高版本iOS10或更高版本Android5.0(APIlevel21)或更高版本🔗Unity集成Demo参考链接🔗UnityTapSDK功能体验APK下载链接二、集成前准备1.创建应用进入开发者后台,按照提示开始创建应用;2.开通服务在使用TDS实名认证和防沉迷服务之前,需要在上面创建的应
我被这个难住了。到目前为止教程中的一切都进行得很顺利,但是当我将这段代码添加到我的/spec/requests/users_spec.rb文件中时,事情开始变得糟糕:describe"success"doit"shouldmakeanewuser"dolambdadovisitsignup_pathfill_in"Name",:with=>"ExampleUser"fill_in"Email",:with=>"ryan@example.com"fill_in"Password",:with=>"foobar"fill_in"Confirmation",:with=>"foobar"cl
我需要一些指导来了解如何将Angular整合到rails中。选择Rails的原因:我喜欢他们偏执的做事方式。还有迁移,gem真的很酷。使用angular的原因:我正在研究和寻找最适合SPA的框架。Backbone似乎太抽象了。我不得不在Angular和Ember之间做出选择。我首先开始阅读Angular,它对我来说很有意义。所以我从来没有去读过关于ember的文章。使用Angular和Rails的原因:我研究并尝试使用小型框架,例如grape、slim(是的,我也使用php)。但我觉得需要坚持项目的长期范围。我个人喜欢用Rails的方式做事。这就是我需要帮助的地方,我在Rails4中有
有没有人有在Maven中运行用Ruby编写的单元测试的经验。任何输入,如要使用的库/maven插件,将不胜感激!我们已经在使用Maven+hudson+Junit。但是我们正在引入Ruby单元测试,找不到任何同样好的组合。 最佳答案 我建议让Maven使用ExecMavenPlugin启动rake测试(exec:exec目标)并使用ci_reportergem生成单元测试结果的XML文件,Hudson、Bamboo等可以读取该文件,以与JUnit测试相同的格式显示测试结果。如果您不需要使用mvntest运行Ruby测试,您也可以只使
我的第一个想法是这样的:classAbstractBuilderattr_reader:time_takendefbuild_with_timerstarted_at=Time.nowbuild@time_taken=Time.now-started_atenddefbuildraise'Implementthismethodinasubclass'endendclassMyBuilder我怀疑有更好的方法可以提供更好的灵active,例如理想情况下,我想在MyBuilder的实例上调用“build”而不是“build_with_timer”,并且始终记录执行时间。我确实考虑过使用al
目前我有一小套针对我的网络服务器运行的集成测试,它发出请求并断言一些关于响应应该是什么的假设。这些是用Ruby编写的,生成http请求。我一直在看Gatling作为压力测试工具,但我想知道它是否也可以用于集成测试。这样,所有端点请求都可以在压力测试和集成测试中重复使用。我可能在这里失去了一些东西,因为没有RSpec的BDD,但不必两次创建相同的测试。有没有人有这样使用gatling的经验? 最佳答案 您可以使用AssertionAPI并设置验收标准。但是,Gatling不是浏览器,不会运行/测试您的Javascript,因此这种方法