转载请标明出处:http://blog.csdn.net/zhaoyanjun6/article/details/127967304
本文出自【赵彦军的博客】
文章目录


MD风格的底部弹窗,比自定义dialog或popupwindow使用更简单,功能也更强大。
其实细分来说,是BottomSheet、BottomSheetDialog、BottomSheetDialogFragment
代码 https://gitee.com/zhaoyanjun/bottomSheetDialogFragmentDemo
与主界面同层级关系,可以事件触发,如果有设置显示高度的话,也可以拉出来,且不会影响主界面的交互。
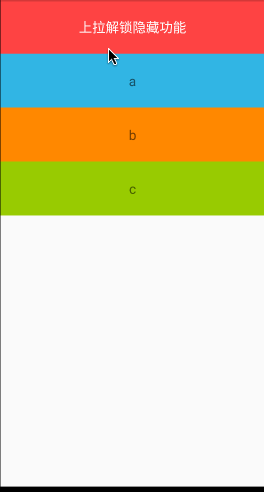
XML
<?xml version="1.0" encoding="utf-8"?>
<android.support.design.widget.CoordinatorLayout xmlns:android="http://schemas.android.com/apk/res/android"
    xmlns:app="http://schemas.android.com/apk/res-auto"
    android:layout_width="match_parent"
    android:layout_height="wrap_content"
    android:background="@color/white">

    <LinearLayout
        android:id="@+id/ll_bottom_sheet"
        android:layout_width="match_parent"
        android:layout_height="wrap_content"
        android:orientation="vertical"
        app:behavior_peekHeight="80dp"
        app:layout_behavior="@string/bottom_sheet_behavior"
        app:layout_constraintBottom_toBottomOf="parent"
        app:layout_constraintLeft_toLeftOf="parent">

        <TextView
            android:layout_width="match_parent"
            android:layout_height="80dp"
            android:background="@android:color/holo_red_light"
            android:gravity="center"
            android:text="上拉解锁隐藏功能"
            android:textColor="@color/white"
            android:textSize="20sp" />

        <TextView
            android:layout_width="match_parent"
            android:layout_height="80dp"
            android:background="@android:color/holo_blue_light"
            android:gravity="center"
            android:text="a"
            android:textSize="20sp" />

        <TextView
            android:layout_width="match_parent"
            android:layout_height="80dp"
            android:background="@android:color/holo_orange_dark"
            android:gravity="center"
            android:text="b"
            android:textSize="20sp" />

        <TextView
            android:layout_width="match_parent"
            android:layout_height="80dp"
            android:background="@android:color/holo_green_light"
            android:gravity="center"
            android:text="c"
            android:textSize="20sp" />

    </LinearLayout>

</android.support.design.widget.CoordinatorLayout>
注意,
以上3个条件都是必须的。
代码
 View bottomView = findViewById(R.id.ll_bottom_sheet);
        bottomView.setOnClickListener(v -> {
            BottomSheetBehavior behavior = BottomSheetBehavior.from(bottomView);
            if (behavior.getState() == BottomSheetBehavior.STATE_EXPANDED) {
                //如果是展开状态,则关闭,反之亦然
                behavior.setState(BottomSheetBehavior.STATE_COLLAPSED);
            } else {
                behavior.setState(BottomSheetBehavior.STATE_EXPANDED);
            }
        });
可以看到弹出来之后是有一个半透明的蒙层的,这时候是影响主界面交互的,也就意味着此时BottomSheetDialog的优先级是要高于主界面的。
代码
public class MyBottomSheetDialog extends BottomSheetDialog {

    public MyBottomSheetDialog(@NonNull Context context) {
        super(context);
    }

    public MyBottomSheetDialog(@NonNull Context context, int theme) {
        super(context, theme);
    }

    protected MyBottomSheetDialog(@NonNull Context context, boolean cancelable, OnCancelListener cancelListener) {
        super(context, cancelable, cancelListener);
    }
}
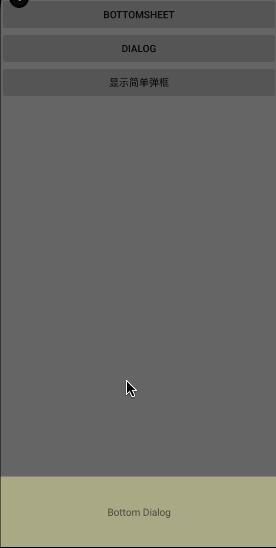
显示 Dialog
MyBottomSheetDialog bottomSheetDialog = new MyBottomSheetDialog(this);
bottomSheetDialog.setContentView(R.layout.bottom_dialog_layout);
bottomSheetDialog.show();
bottom_dialog_layout :
<?xml version="1.0" encoding="utf-8"?>
<LinearLayout xmlns:android="http://schemas.android.com/apk/res/android"
    xmlns:app="http://schemas.android.com/apk/res-auto"
    android:layout_width="match_parent"
    android:layout_height="wrap_content"
    android:background="@color/white"
    android:orientation="vertical">

    <TextView
        android:id="@+id/button"
        android:layout_width="match_parent"
        android:layout_height="100dp"
        android:background="#aa8"
        android:text="Bottom Dialog"
        android:gravity="center"
        android:layout_gravity="center"
        app:layout_constraintEnd_toEndOf="parent"
        app:layout_constraintStart_toStartOf="parent"
        app:layout_constraintTop_toTopOf="parent" />

</LinearLayout>
比较简单的使用方式,直接实例化之后setContentView,然后调用show就可以了。
这里只是一个展示效果,实际上使用场景可能会复杂一些,还要做一些操作等等,所以,也可以自定义dialog继承自BottomSheetDialog,然后处理自己的业务逻辑。
效果跟BottomSheetDialog差不多,代码跟DialogFragment差不多。
代码
public class MyDialogFragment extends BottomSheetDialogFragment {

    @Nullable
    @Override
    public View onCreateView(@NonNull LayoutInflater inflater, @Nullable ViewGroup container, @Nullable Bundle savedInstanceState) {
        View view = inflater.inflate(R.layout.bottom_dialog_fragment_layout, container, false);
        return view;
    }
}
bottom_dialog_fragment_layout
<?xml version="1.0" encoding="utf-8"?>
<LinearLayout xmlns:android="http://schemas.android.com/apk/res/android"
    xmlns:app="http://schemas.android.com/apk/res-auto"
    android:layout_width="match_parent"
    android:layout_height="wrap_content"
    android:orientation="vertical"
    android:background="@color/white">

    <Button
        android:id="@+id/button"
        android:layout_width="match_parent"
        android:layout_height="100dp"
        android:background="#ff0"
        app:layout_constraintEnd_toEndOf="parent"
        app:layout_constraintStart_toStartOf="parent"
        app:layout_constraintTop_toTopOf="parent" />

    <Button
        android:id="@+id/button2"
        android:layout_width="match_parent"
        android:layout_height="100dp"
        android:layout_marginTop="10dp"
        android:background="#f00"
        app:layout_constraintEnd_toEndOf="parent"
        app:layout_constraintStart_toStartOf="parent"
        app:layout_constraintTop_toTopOf="parent" />

</LinearLayout>
显示
MyDialogFragment dialog = new MyDialogFragment();
Bundle bundle = new Bundle();
dialog.setArguments(bundle);
dialog.show(getSupportFragmentManager(), "dialog_fragment");
但是在实际开发中,我们的需求可能并不能满足于此,比如上部分圆角效果、指定高度等
先设置原有背景透明
style.xml
 <style name="MyBottomSheetDialog" parent="Theme.Design.Light.BottomSheetDialog">
        <item name="bottomSheetStyle">@style/BottomSheetStyleWrapper</item>
        <item name="android:background">@android:color/transparent</item>
        <item name="android:windowBackground">@android:color/transparent</item>
        <item name="android:windowNoTitle">true</item>
        <item name="android:windowIsFloating">false</item>
    </style>

    <style name="BottomSheetStyleWrapper" parent="Widget.MaterialComponents.BottomSheet.Modal">
        <item name="android:background">@android:color/transparent</item>
    </style>
onCreate中设置style
public class MyDialogFragment extends BottomSheetDialogFragment {

    @Override
    public void onCreate(@Nullable Bundle savedInstanceState) {
        super.onCreate(savedInstanceState);
        setStyle(STYLE_NORMAL, R.style.MyBottomSheetDialog);
    }

    @Nullable
    @Override
    public View onCreateView(@NonNull LayoutInflater inflater, @Nullable ViewGroup container, @Nullable Bundle savedInstanceState) {
        View view = inflater.inflate(R.layout.bottom_dialog_fragment_layout, container, false);
        return view;
    }
}
在根布局的 view上设置 background
<?xml version="1.0" encoding="utf-8"?>
<LinearLayout xmlns:android="http://schemas.android.com/apk/res/android"
    xmlns:app="http://schemas.android.com/apk/res-auto"
    android:layout_width="match_parent"
    android:layout_height="wrap_content"
    android:orientation="vertical"
    android:padding="6dp"
    android:background="@drawable/fragment_dialog_bg">

    <Button
        android:id="@+id/button"
        android:layout_width="match_parent"
        android:layout_height="100dp"
        android:background="#ff0"
        app:layout_constraintEnd_toEndOf="parent"
        app:layout_constraintStart_toStartOf="parent"
        app:layout_constraintTop_toTopOf="parent" />

    <Button
        android:id="@+id/button2"
        android:layout_width="match_parent"
        android:layout_height="100dp"
        android:layout_marginTop="10dp"
        android:background="#f00"
        app:layout_constraintEnd_toEndOf="parent"
        app:layout_constraintStart_toStartOf="parent"
        app:layout_constraintTop_toTopOf="parent" />

</LinearLayout>
特别注意:根布局除了设置 android:background 属性外,还需要设置 android:padding 属性,否则圆角显示不出来。
fragment_dialog_bg
<?xml version="1.0" encoding="utf-8"?>
<shape xmlns:android="http://schemas.android.com/apk/res/android"
    android:shape="rectangle">
    <corners
        android:topLeftRadius="10dp"
        android:topRightRadius="10dp" />
    <solid android:color="@android:color/white" />

</shape>
需要在 style 中增加 android:backgroundDimEnabled 属性
<!--  没有蒙版的style-->
    <style name="MyBottomSheetDialog" parent="Theme.Design.Light.BottomSheetDialog">
        <item name="bottomSheetStyle">@style/BottomSheetStyleWrapper</item>
        <item name="android:background">@android:color/transparent</item>
        <item name="android:windowBackground">@android:color/transparent</item>
        <item name="android:windowNoTitle">true</item>
        <item name="android:windowIsFloating">false</item>
        <item name="android:backgroundDimEnabled">false</item>
    </style>
在 style 中增加 android:backgroundDimAmount 属性,属性值范围 0 - 1 .
    <style name="MyBottomSheetDialog2" parent="Theme.Design.Light.BottomSheetDialog">
        <item name="bottomSheetStyle">@style/BottomSheetStyleWrapper</item>
        <item name="android:background">@android:color/transparent</item>
        <item name="android:windowBackground">@android:color/transparent</item>
        <item name="android:windowNoTitle">true</item>
        <item name="android:windowIsFloating">false</item>
        <item name="android:backgroundDimAmount">0.4</item>
    </style>
重写 onCreateDialog 方法,设置 setCanceledOnTouchOutside 值为 false
public class MyDialogFragment extends BottomSheetDialogFragment {

    @Override
    public void onCreate(@Nullable Bundle savedInstanceState) {
        super.onCreate(savedInstanceState);
        setStyle(STYLE_NORMAL, R.style.MyBottomSheetDialog);
    }

    @Override
    public Dialog onCreateDialog(Bundle savedInstanceState) {
        Dialog dialog =  super.onCreateDialog(savedInstanceState);
        dialog.setCanceledOnTouchOutside(false);
        return dialog;
    }

    @Nullable
    @Override
    public View onCreateView(@NonNull LayoutInflater inflater, @Nullable ViewGroup container, @Nullable Bundle savedInstanceState) {
        View view = inflater.inflate(R.layout.bottom_dialog_fragment_layout, container, false);
        return view;
    }
}
bottomSheetBehavior.setHideable(false);
具体使用方法:
   @Override
    public Dialog onCreateDialog(Bundle savedInstanceState) {
        Dialog dialog = super.onCreateDialog(savedInstanceState);
        if (dialog instanceof BottomSheetDialog) {
            BottomSheetDialog bottomSheetDialog = (BottomSheetDialog) dialog;
            bottomSheetDialog.setOnShowListener(dialogInterface -> {
                FrameLayout bottomSheet = bottomSheetDialog.findViewById(android.support.design.R.id.design_bottom_sheet);
                BottomSheetBehavior bottomSheetBehavior = BottomSheetBehavior.from(bottomSheet);
                bottomSheetBehavior.setHideable(false);
            });
        }
        return dialog;
    }
bottomSheetBehavior.setPeekHeight(1200);
使用:
    @Override
    public Dialog onCreateDialog(Bundle savedInstanceState) {
        Dialog dialog = super.onCreateDialog(savedInstanceState);
        if (dialog instanceof BottomSheetDialog) {
            BottomSheetDialog bottomSheetDialog = (BottomSheetDialog) dialog;
            bottomSheetDialog.setOnShowListener(dialogInterface -> {
                FrameLayout bottomSheet = bottomSheetDialog.findViewById(android.support.design.R.id.design_bottom_sheet);
                BottomSheetBehavior bottomSheetBehavior = BottomSheetBehavior.from(bottomSheet);
                bottomSheetBehavior.setPeekHeight(1200);
            });
        }
        return dialog;
    }

    @Nullab
当内容特别多,比如有 recyclerView 时,我们希望 dialog 展开的高度是全屏的。
//默认展开
bottomSheetBehavior.setState(BottomSheetBehavior.STATE_EXPANDED);
使用
 @Override
    public Dialog onCreateDialog(Bundle savedInstanceState) {
        Dialog dialog = super.onCreateDialog(savedInstanceState);
        if (dialog instanceof BottomSheetDialog) {
            BottomSheetDialog bottomSheetDialog = (BottomSheetDialog) dialog;
            bottomSheetDialog.setOnShowListener(dialogInterface -> {
                FrameLayout bottomSheet = bottomSheetDialog.findViewById(android.support.design.R.id.design_bottom_sheet);
                BottomSheetBehavior bottomSheetBehavior = BottomSheetBehavior.from(bottomSheet);
                //默认展开
                bottomSheetBehavior.setState(BottomSheetBehavior.STATE_EXPANDED);
            });
        }
        return dialog;
    }
bottomSheetBehavior.setBottomSheetCallback()
使用
public class MyDialogFragment extends BottomSheetDialogFragment {

    @Override
    public void onCreate(@Nullable Bundle savedInstanceState) {
        super.onCreate(savedInstanceState);
        setStyle(STYLE_NORMAL, R.style.MyBottomSheetDialog);
    }

    @Override
    public Dialog onCreateDialog(Bundle savedInstanceState) {
        Dialog dialog = super.onCreateDialog(savedInstanceState);
        if (dialog instanceof BottomSheetDialog) {
            BottomSheetDialog bottomSheetDialog = (BottomSheetDialog) dialog;
            bottomSheetDialog.setOnShowListener(dialogInterface -> {
                FrameLayout bottomSheet = bottomSheetDialog.findViewById(android.support.design.R.id.design_bottom_sheet);
                BottomSheetBehavior bottomSheetBehavior = BottomSheetBehavior.from(bottomSheet);
                //默认展开
                bottomSheetBehavior.setBottomSheetCallback(new BottomSheetBehavior.BottomSheetCallback() {
                    @Override
                    public void onStateChanged(@NonNull View view, int newState) {
                        switch (newState) {
                            case BottomSheetBehavior.STATE_EXPANDED:

                                break;
                            case BottomSheetBehavior.STATE_COLLAPSED:

                                break;
                            case BottomSheetBehavior.STATE_DRAGGING:

                                break;
                            case BottomSheetBehavior.STATE_SETTLING:

                                break;
                            case BottomSheetBehavior.STATE_HIDDEN:

                                break;
                        }
                    }

                    @Override
                    public void onSlide(@NonNull View view, float v) {

                    }
                });
            });
        }
        return dialog;
    }

    @Nullable
    @Override
    public View onCreateView(@NonNull LayoutInflater inflater, @Nullable ViewGroup container, @Nullable Bundle savedInstanceState) {
        View view = inflater.inflate(R.layout.bottom_dialog_fragment_layout, container, false);
        return view;
    }
}
在 BottomSheetDialogFragment 实现底部常驻布局是比较难的,好在有些人通过巧妙的方式实现了。
https://github.com/dorianpavetic/StickyBottomSheet
Android: Sticky view at the bottom of bottom sheet dialog fragment
我正在学习如何使用Nokogiri,根据这段代码我遇到了一些问题:require'rubygems'require'mechanize'post_agent=WWW::Mechanize.newpost_page=post_agent.get('http://www.vbulletin.org/forum/showthread.php?t=230708')puts"\nabsolutepathwithtbodygivesnil"putspost_page.parser.xpath('/html/body/div/div/div/div/div/table/tbody/tr/td/div
我有一个Ruby程序,它使用rubyzip压缩XML文件的目录树。gem。我的问题是文件开始变得很重,我想提高压缩级别,因为压缩时间不是问题。我在rubyzipdocumentation中找不到一种为创建的ZIP文件指定压缩级别的方法。有人知道如何更改此设置吗?是否有另一个允许指定压缩级别的Ruby库? 最佳答案 这是我通过查看rubyzip内部创建的代码。level=Zlib::BEST_COMPRESSIONZip::ZipOutputStream.open(zip_file)do|zip|Dir.glob("**/*")d
类classAprivatedeffooputs:fooendpublicdefbarputs:barendprivatedefzimputs:zimendprotecteddefdibputs:dibendendA的实例a=A.new测试a.foorescueputs:faila.barrescueputs:faila.zimrescueputs:faila.dibrescueputs:faila.gazrescueputs:fail测试输出failbarfailfailfail.发送测试[:foo,:bar,:zim,:dib,:gaz].each{|m|a.send(m)resc
很好奇,就使用rubyonrails自动化单元测试而言,你们正在做什么?您是否创建了一个脚本来在cron中运行rake作业并将结果邮寄给您?git中的预提交Hook?只是手动调用?我完全理解测试,但想知道在错误发生之前捕获错误的最佳实践是什么。让我们理所当然地认为测试本身是完美无缺的,并且可以正常工作。下一步是什么以确保他们在正确的时间将可能有害的结果传达给您? 最佳答案 不确定您到底想听什么,但是有几个级别的自动代码库控制:在处理某项功能时,您可以使用类似autotest的内容获得关于哪些有效,哪些无效的即时反馈。要确保您的提
假设我做了一个模块如下:m=Module.newdoclassCendend三个问题:除了对m的引用之外,还有什么方法可以访问C和m中的其他内容?我可以在创建匿名模块后为其命名吗(就像我输入“module...”一样)?如何在使用完匿名模块后将其删除,使其定义的常量不再存在? 最佳答案 三个答案:是的,使用ObjectSpace.此代码使c引用你的类(class)C不引用m:c=nilObjectSpace.each_object{|obj|c=objif(Class===objandobj.name=~/::C$/)}当然这取决于
我正在尝试使用ruby和Savon来使用网络服务。测试服务为http://www.webservicex.net/WS/WSDetails.aspx?WSID=9&CATID=2require'rubygems'require'savon'client=Savon::Client.new"http://www.webservicex.net/stockquote.asmx?WSDL"client.get_quotedo|soap|soap.body={:symbol=>"AAPL"}end返回SOAP异常。检查soap信封,在我看来soap请求没有正确的命名空间。任何人都可以建议我
关闭。这个问题是opinion-based.它目前不接受答案。想要改进这个问题?更新问题,以便editingthispost可以用事实和引用来回答它.关闭4年前。Improvethisquestion我想在固定时间创建一系列低音和高音调的哔哔声。例如:在150毫秒时发出高音调的蜂鸣声在151毫秒时发出低音调的蜂鸣声200毫秒时发出低音调的蜂鸣声250毫秒的高音调蜂鸣声有没有办法在Ruby或Python中做到这一点?我真的不在乎输出编码是什么(.wav、.mp3、.ogg等等),但我确实想创建一个输出文件。
我在使用omniauth/openid时遇到了一些麻烦。在尝试进行身份验证时,我在日志中发现了这一点:OpenID::FetchingError:Errorfetchinghttps://www.google.com/accounts/o8/.well-known/host-meta?hd=profiles.google.com%2Fmy_username:undefinedmethod`io'fornil:NilClass重要的是undefinedmethodio'fornil:NilClass来自openid/fetchers.rb,在下面的代码片段中:moduleNetclass
我在我的项目目录中完成了compasscreate.和compassinitrails。几个问题:我已将我的.sass文件放在public/stylesheets中。这是放置它们的正确位置吗?当我运行compasswatch时,它不会自动编译这些.sass文件。我必须手动指定文件:compasswatchpublic/stylesheets/myfile.sass等。如何让它自动运行?文件ie.css、print.css和screen.css已放在stylesheets/compiled。如何在编译后不让它们重新出现的情况下删除它们?我自己编译的.sass文件编译成compiled/t
我想将html转换为纯文本。不过,我不想只删除标签,我想智能地保留尽可能多的格式。为插入换行符标签,检测段落并格式化它们等。输入非常简单,通常是格式良好的html(不是整个文档,只是一堆内容,通常没有anchor或图像)。我可以将几个正则表达式放在一起,让我达到80%,但我认为可能有一些现有的解决方案更智能。 最佳答案 首先,不要尝试为此使用正则表达式。很有可能你会想出一个脆弱/脆弱的解决方案,它会随着HTML的变化而崩溃,或者很难管理和维护。您可以使用Nokogiri快速解析HTML并提取文本:require'nokogiri'h