文章目录
Stable diffusion是一个基于 Latent Diffusion Models(潜在扩散模型,LDMs)的文图生成(text-to-image)模型。具体来说,得益于 Stability AI 的计算资源支持和在 LAION-5B 的一个子集数据支持训练,用于文图生成。
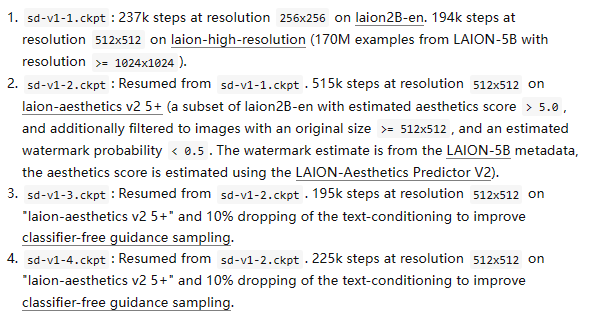
Latent Diffusion Models 通过在一个潜在表示空间中迭代“去噪”数据来生成图像,然后将表示结果解码为完整的图像,让文图生成能够在消费级GPU上,在10秒级别时间生成图片。目前,Stable Diffusion发布了v2版本。v1版是Latent Diffusion Models的一个具体实现,模型架构设置:自动编码器下采样因子为8,UNet大小为860M,文本编码器为CLIP ViT-L/14。官方目前提供了以下权重:
提示:以下是本篇文章正文内容,下面案例可供参考
隐空间是压缩数据的一个表示。数据压缩的目的是学习数据中较重要的信息。以编码器-解码器网络为例,首先使用全卷积神经网(FCN)络学习图片特征,我们将特征提取中对数据的降维看作一种有损压缩。由于解码器需要重建(reconstruct)数据,模型必须学习如何储存所有相关信息并且忽略噪音,压缩(降维)的好处在于可以去掉多余的信息从而关注于最关键的特征。
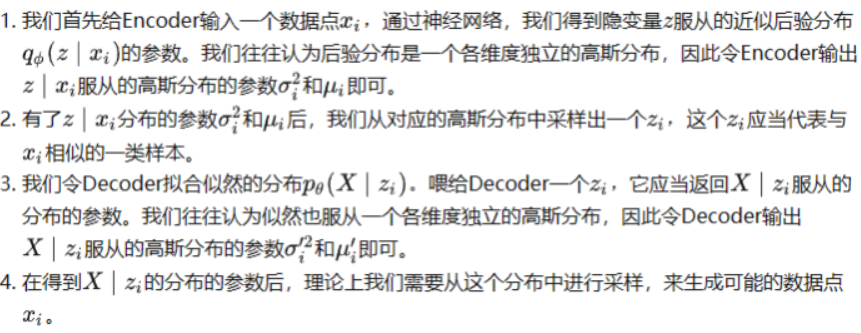
(1)AE是一个预训练的自编码器,优化目标是通过 Encoder 压缩数据,再通过decoder 还原数据,使得输入输出的数据尽量相同
(2)对于图像数据,decoder 还原数据可以看做是一个生成器,由于 decoder 输入数据z属于R空间,输入z的分布无法被固定住,所以大部分生成的图片是无意义的。
(1)给定输入解码器的z一个分布可以解决上述问题,假设一个服从标准多元高斯分布的多维随机变量的数据集X,根据已知分布采样得到的zi,来训练decoder神经网络,从而得到多元高斯分布的均值和方差,从而成功得到一个逼近真实分布p(X)的p’(X)
(2)求解p’(X|z)的概率分布
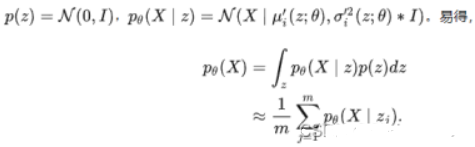
(3)通过极大似然估计,最大化p’(X)的概率,但由于xi的维度很大,zi的维度也很大,需要准确找到与xi分布相关的zi,需要大量的采样,因此需要在encoder中引入后验分布p’(z|xi),让xi与zi关联起来
(4)利用encoder通过假设已知数据的分布,拟合其参数,从而逼近真实的后验分布p’(z|xi),在这里假设后验分布是基于多元高斯分布,则让encoder输出分布的均值和方差
(5)总体流程
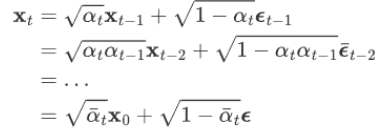
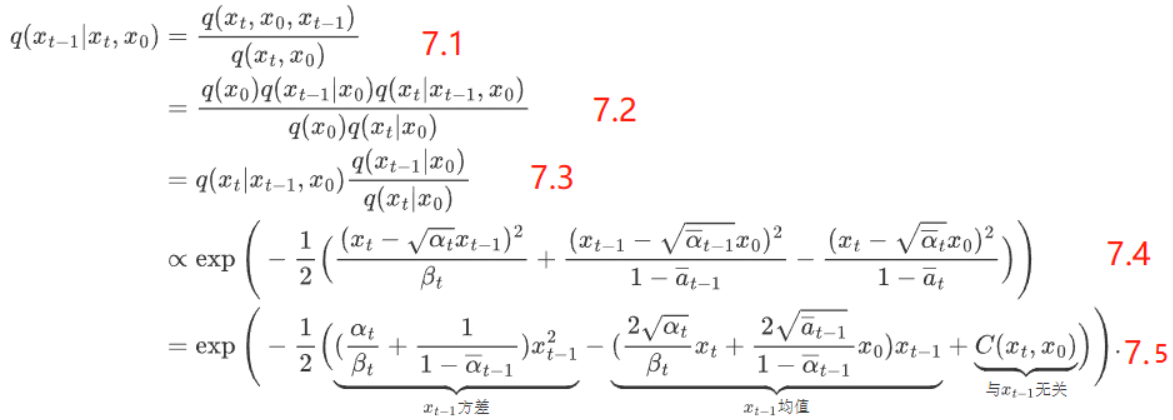
1.t 时刻的分布等于 t-1 时刻的分布+随机高斯分布的噪音,其中α是噪音的衰减值
2.任意时刻的分布 Xt ,都可以通过 X0 初始状态,以及步数计算出来:
已知 Xt,求初始状态的 X0,这里利用贝叶斯公式来预测 X0:
首先求已知 Xt 的分布求 **Xt-1**时刻的分布 (详细推导见上篇博客) :
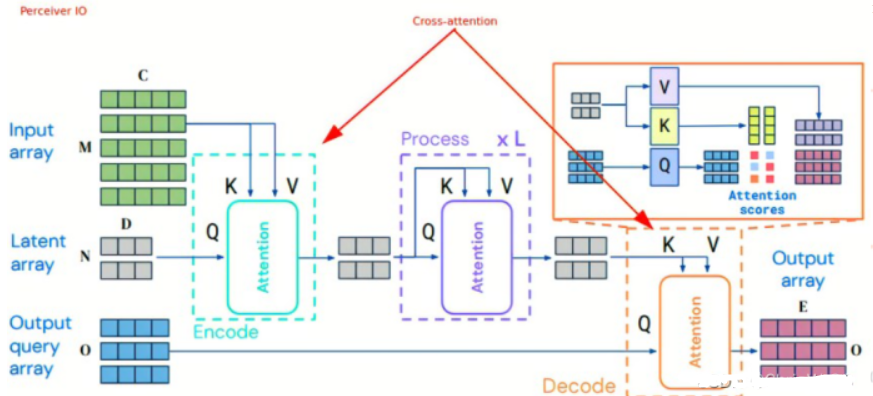
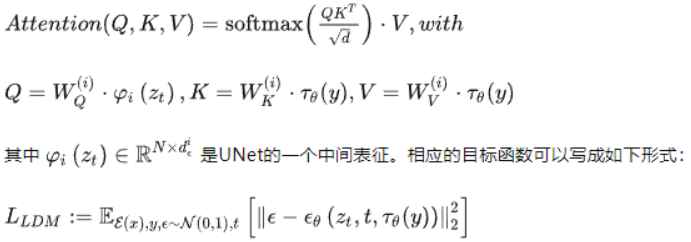
在 Unet 中间层引入cross attention,加入多模态的条件(文本,类别,layout,mask),实现如下:其中Q来自latent space,K,V来自文本等另一序列:
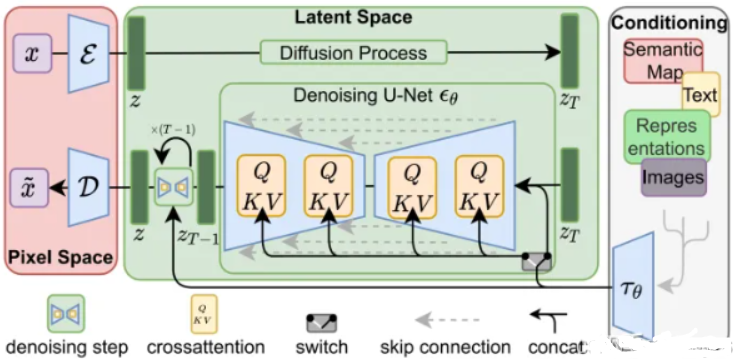
(1)使用预训练的CLIP模型,对需要训练的图像数据生成对应的描述词语。
(2)使用预训练的通用VAE,先用Encoder,将输入图片降维到 latent space(通常降采样倍数4-16)
(3) 将latent space输入diffusion model,进行扩散(正向采样),一步步生成噪声(在这个过程中,通过权重 β 控制每步生成噪声的强度,直到生成纯噪声,并记录每步生成噪声的数据,作为GT
(4)利用cross attention 将 latent space的特征与另一模态序列的特征融合,并添加到diffusion model的逆向过程,通过Unet逆向预测每一步需要减少的噪音,通过GT噪音与预测噪音的损失函数计算梯度。
(5)其中Denoising Unet的结构如下:
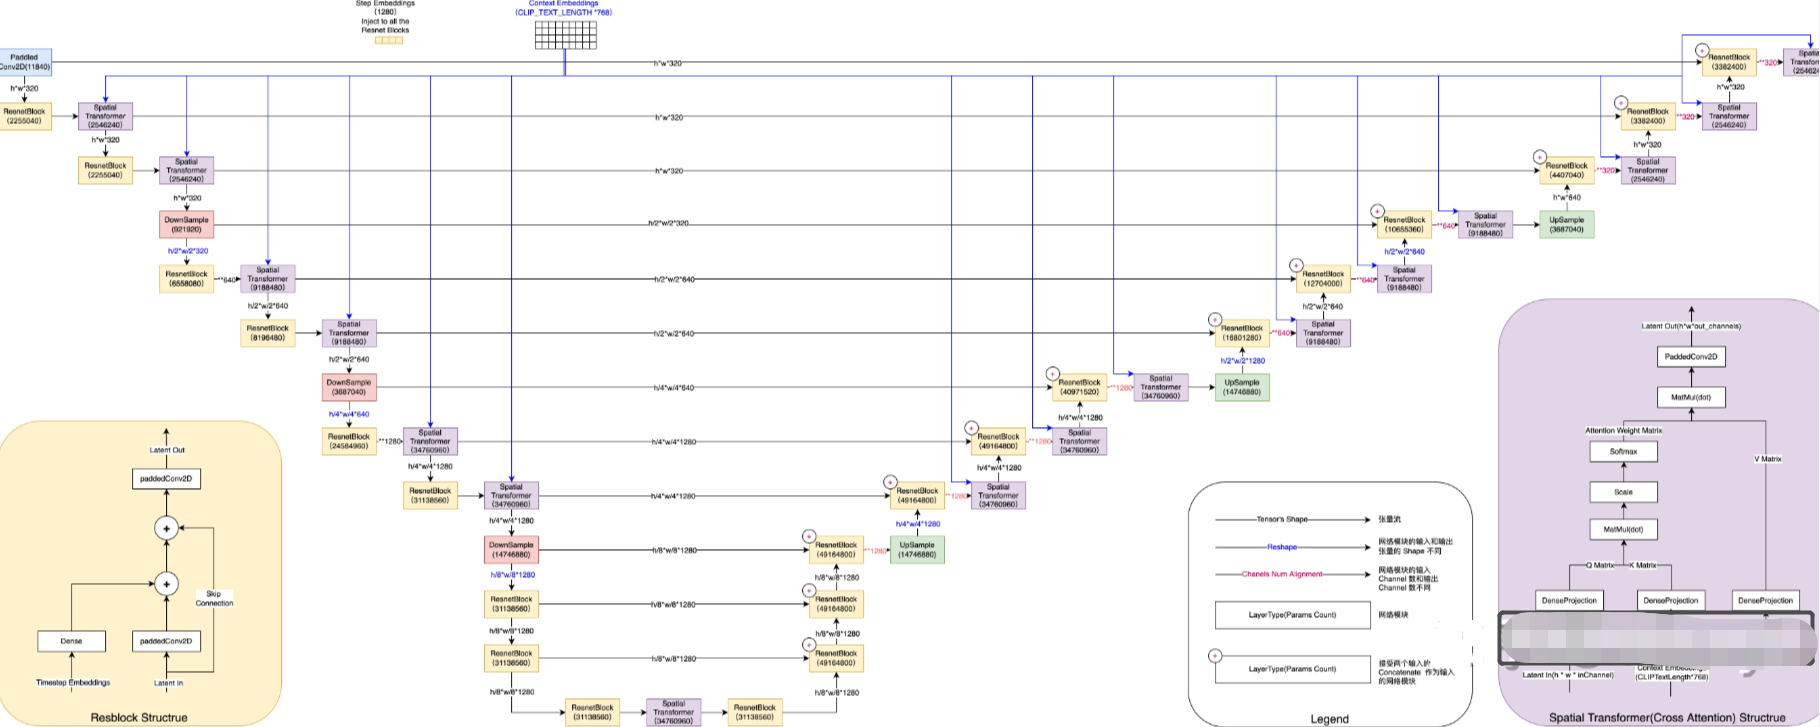
左下角小图所示, ResnetBlock 接受两个输入:latent 向量经过卷积变换后和经过全连接投影的 timestep_embedding 做加和,再和经过 skip connection 的原始 latent 向量做加和,送入另一个卷积层,得到经 Resnet 编码变换后的 latent 输出。
注意左侧的 ResnetBlock 和右侧的 ResnetBlock 的细微不同。左侧的 Resnet Block 接受的 latent 向量从 UNET 的上一层传入,而右侧的 ResnetBlock 除了接受 UNET 上一层的结果 latent 外,还需要接受左侧对应的 UNET 层的输出,两个 latent concat 起来作为 输入。所以,如果右侧的 ResnetBlock 上层的输出结果 shape 为 (64, 64, 320),左侧对应 UNET 层的输出结果为 (64, 64, 640),那么这个 ResnetBlock 得到的输入 latent 的 shape 为 (64, 64, 960)。
右下角小图所示,Spatial Transformer 同样接受两个输入:经过上一个网络模块(一般为 ResnetBlock)处理和变换后的 latent 向量(对应的是是图片 token),及对应的 context embedding(文本 prompt 经过 CLIP 编码后的输出), cross attention 之后,得到变换后的 latent 向量(通过注意力机制,将 token 对应的语义信息注入到模型认为应该影响的图片 patch 中)。 Spatial Transformer 输出的 shape 和输入一致,但在对应的位置上融合了语义信息。
DownSample 将 latent 向量的前两个轴的大小缩减 50%,而 UpSample 将 latent 向量的前两个轴的大小增大一倍。DownSample 使用一个步长为 2 的二维卷积来实现,同时将输入 latent 向量的 channel 数变化成输出 latent 向量的 channel 数;而 UpSample 使用插值算法来实现,在插值之后进行一个步长为 1 的卷积,同时通过一个步长为 1 的二维卷积来将输入 latent 向量的 channel 数变化成输出 latent 向量的 channel 数。
需要注意的是,在整个 UNET 执行一次的过程中,timestep_embedding 和 content embedding 始终保持不变。而在 UNET 反复执行多次的过程中,timestep_embedding 每次都会发生变化,而 content embedding 始终保持不变。在迭代过程中,每次 UNET 输出的 noise_slice 都与原来 latent 向量相减,作为下次迭代时,UNET 的 Latent 输入。
一个 Image Auto Encoder-Decoder,用于将 Image 编码成隐含向量
,或者从隐含向量
中还原出图片;
一个 UNET 结构,使用 UNET 进行迭代降噪,在文本引导下进行多轮预测,将随机高斯噪声
转化成图片隐含向量
。
1.用文本编码器( CLIP 的 ViT-L/14 ),将用户输入的 Prompt 文本转化成 text embedding;
2.根据假定分布(一般是多元高斯分布),生成一张纯噪音图像;
3.利用VAE encoder 压缩到latent space;
4.执行Denoising Unet,利用cross attention融合多模态信息,并预测每一步需要减去的噪音:
5.利用VAE decoder还原到同一分布下的原图大小
1、prompt编码为token。编码器为FrozenCLIPEmbedde(包括1层的 CLIPTextEmbeddings 和12层的自注意力encoder)
c = self.cond_stage_model.encode(c)    # (c为输入的提示语句,重复2次)  输出:(2,77,768)
    batch_encoding = self.tokenizer(text, truncation=True, max_length=self.max_length, return_length=True,
                                        return_overflowing_tokens=False, padding="max_length", return_tensors="pt")
    # self.tokenizer来自 transformers包中的 预训练CLIPTokenizer
    tokens = batch_encoding["input_ids"].to(self.device)             # (2,77)一句话编码为77维
    outputs = self.transformer(input_ids=tokens).last_hidden_state   # 12层self-atten,结果(2,77,768)

2、samples_ddim, _ = sampler.sample(S=opt.ddim_steps,
                                   conditioning=c,
                                   batch_size=opt.n_samples,
                                   shape=shape,
                                   verbose=False,
                                   unconditional_guidance_scale=opt.scale,
                                   unconditional_conditioning=uc,
                                   eta=opt.ddim_eta,
                                   x_T=start_code)
     01、self.make_schedule(ddim_num_steps=S, ddim_eta=eta, verbose=verbose)    # S=50
     # 这一步是ddim中,预先register超参数,如a的连乘等
     # Data shape for PLMS sampling is (2, 4, 32, 32)
     02、samples, intermediates = self.plms_sampling(conditioning, size,
                                                callback=callback,
                                                img_callback=img_callback,
                                                quantize_denoised=quantize_x0,
                                                mask=mask, x0=x0,
                                                ddim_use_original_steps=False,
                                                noise_dropout=noise_dropout,
                                                temperature=temperature,
                                                score_corrector=score_corrector,
                                                corrector_kwargs=corrector_kwargs,
                                                x_T=x_T )
          img = torch.randn(shape, device=device)    # (2,4,32,32)
          for i, step in enumerate(iterator):
                index = total_steps - i - 1                                        # index=50-i-1, step=981
                ts = torch.full((b,), step, device=device, dtype=torch.long)       # [981,981]
                outs = self.p_sample_plms(img, cond, ts, index=index, use_original_steps=ddim_use_original_steps,
                                          quantize_denoised=quantize_denoised, temperature=temperature,
                                          noise_dropout=noise_dropout, score_corrector=score_corrector,
                                          corrector_kwargs=corrector_kwargs,
                                          unconditional_guidance_scale=unconditional_guidance_scale,
                                          unconditional_conditioning=unconditional_conditioning,
                                          old_eps=old_eps, t_next=ts_next)
                    c_in = torch.cat([unconditional_conditioning, c])    # 添加一个空字符,与promt拼接
                    e_t_uncond, e_t = self.model.apply_model(x_in, t_in, c_in).chunk(2)
                          t_emb = timestep_embedding(timesteps, self.model_channels, repeat_only=False)    # timesteps:[981,981,981,981] -> (4,320)
                          emb = self.time_embed(t_emb)           # 2*linear:(4,320) -> (4,1280)

                          # unet中带入embed与prompt,具体代码见下节
                          for module in self.input_blocks:
                              h = module(h, emb, context)        # 输入(4,4,32,32) (4,1280) (4,77,768)
                              hs.append(h)
                          h = self.middle_block(h, emb, context)
                          for module in self.output_blocks:
                              h = th.cat([h, hs.pop()], dim=1)   # (4,1280,4,4) -> (4,2560,4,4)
                              h = module(h, emb, context)

                          return self.out(h)                     # (4,320,32,32)卷积为(4,4,32,32)

3、e_t_uncond, e_t = self.model.apply_model(x_in, t_in, c_in).chunk(2)   # 上步中得到的结果拆开:(2,4,32,32
   e_t = e_t_uncond + unconditional_guidance_scale * (e_t - e_t_uncond)  # 用7.5乘以二者差距,再加回空语句生成的图
   x_prev, pred_x0 = get_x_prev_and_pred_x0(e_t, index)                  # DDIM计算:e_t(2,4,32,32) index:49  -> (2,4,32,32)

4、x_samples_ddim = model.decode_first_stage(samples_ddim)    # (2,4,32,32)
        h = self.conv_in(z)    # 卷积4->512
        x = torch.nn.functional.interpolate(h, scale_factor=2.0, mode="nearest")  #(2,512,64,64)
        h = self.up[i_level].block[i_block](h)    # 经过几次卷积与上采样
        h = self.norm_out(h)   # (2,128,256,256)
        h = nonlinearity(h)    # x*torch.sigmoid(x)
        h = self.conv_out(h)   # conv(128,3) -》(2,3,256,256)

5、后处理
x_samples_ddim = torch.clamp((x_samples_ddim + 1.0) / 2.0, min=0.0, max=1.0)
x_samples_ddim = x_samples_ddim.cpu().permute(0, 2, 3, 1).numpy()
x_checked_image, has_nsfw_concept = check_safety(x_samples_ddim)
x_checked_image_torch = torch.from_numpy(x_checked_image).permute(0, 3, 1, 2)
x_sample = 255. * rearrange(x_sample.cpu().numpy(), 'c h w -> h w c')
img = Image.fromarray(x_sample.astype(np.uint8))
img.save(os.path.join(sample_path, f"{base_count:05}.png"))
DDIM中的Unet 包含输入模块、中间模块、输出模块三部分:
包含12个不同的 TimestepEmbedSequential结构,下面列举三种:
1、self.input_blocks
ModuleList(
  (0): TimestepEmbedSequential(
    (0): Conv2d(4, 320, kernel_size=(3, 3), stride=(1, 1), padding=(1, 1))
  )
  (1): TimestepEmbedSequential(
    (0): ResBlock(
      (in_layers): Sequential(
        (0): GroupNorm32(32, 320, eps=1e-05, affine=True)
        (1): SiLU()
        (2): Conv2d(320, 320, kernel_size=(3, 3), stride=(1, 1), padding=(1, 1))
      )
      (h_upd): Identity()
      (x_upd): Identity()
      (emb_layers): Sequential(
        (0): SiLU()
        (1): Linear(in_features=1280, out_features=320, bias=True)
      )
      (out_layers): Sequential(
        (0): GroupNorm32(32, 320, eps=1e-05, affine=True)
        (1): SiLU()
        (2): Dropout(p=0, inplace=False)
        (3): Conv2d(320, 320, kernel_size=(3, 3), stride=(1, 1), padding=(1, 1))
      )
      (skip_connection): Identity()
    )
    (1): SpatialTransformer(
      (norm): GroupNorm(32, 320, eps=1e-06, affine=True)
      (proj_in): Conv2d(320, 320, kernel_size=(1, 1), stride=(1, 1))
      (transformer_blocks): ModuleList(
        (0): BasicTransformerBlock(
          (attn1): CrossAttention(
            (to_q): Linear(in_features=320, out_features=320, bias=False)
            (to_k): Linear(in_features=320, out_features=320, bias=False)
            (to_v): Linear(in_features=320, out_features=320, bias=False)
            (to_out): Sequential(
              (0): Linear(in_features=320, out_features=320, bias=True)
              (1): Dropout(p=0.0, inplace=False)
            )
          )
          (ff): FeedForward(
            (net): Sequential(
              (0): GEGLU(
                (proj): Linear(in_features=320, out_features=2560, bias=True)
              )
              (1): Dropout(p=0.0, inplace=False)
              (2): Linear(in_features=1280, out_features=320, bias=True)
            )
          )
          (attn2): CrossAttention(
            (to_q): Linear(in_features=320, out_features=320, bias=False)
            (to_k): Linear(in_features=768, out_features=320, bias=False)
            (to_v): Linear(in_features=768, out_features=320, bias=False)
            (to_out): Sequential(
              (0): Linear(in_features=320, out_features=320, bias=True)
              (1): Dropout(p=0.0, inplace=False)
            )
          )
          (norm1): LayerNorm((320,), eps=1e-05, elementwise_affine=True)
          (norm2): LayerNorm((320,), eps=1e-05, elementwise_affine=True)
          (norm3): LayerNorm((320,), eps=1e-05, elementwise_affine=True)
        )
      )
      (proj_out): Conv2d(320, 320, kernel_size=(1, 1), stride=(1, 1))
    )
  )

  (6): TimestepEmbedSequential(
    (0): Downsample(
      (op): Conv2d(640, 640, kernel_size=(3, 3), stride=(2, 2), padding=(1, 1))
    )
  )
前向过程:
为h添加emb和交与propmt的交叉注意力,会执行多次
emb_out = self.emb_layers(emb)      # (4,1280)卷积为(4,320)
h = h + emb_out                     # (4,320,32,32)+(4,320,1,1)

x = self.attn1(self.norm1(x)) + x                     # 自注意力:x(4,1024,320)映射到qkv,均320维
x = self.attn2(self.norm2(x), context=context) + x    # 交叉注意力:context(4,77,768)映射到kv的320维
x = self.ff(self.norm3(x)) + x
噪音图像h(4,4,32,32)在其中变化为:(4,320,32,32)(4,320,16,16)(4,640,16,16)(4,1280,8,8)(4,1280,4,4)
TimestepEmbedSequential(
  (0): ResBlock(
    (in_layers): Sequential(
      (0): GroupNorm32(32, 1280, eps=1e-05, affine=True)
      (1): SiLU()
      (2): Conv2d(1280, 1280, kernel_size=(3, 3), stride=(1, 1), padding=(1, 1))
    )
    (h_upd): Identity()
    (x_upd): Identity()
    (emb_layers): Sequential(
      (0): SiLU()
      (1): Linear(in_features=1280, out_features=1280, bias=True)
    )
    (out_layers): Sequential(
      (0): GroupNorm32(32, 1280, eps=1e-05, affine=True)
      (1): SiLU()
      (2): Dropout(p=0, inplace=False)
      (3): Conv2d(1280, 1280, kernel_size=(3, 3), stride=(1, 1), padding=(1, 1))
    )
    (skip_connection): Identity()
  )
  (1): SpatialTransformer(
    (norm): GroupNorm(32, 1280, eps=1e-06, affine=True)
    (proj_in): Conv2d(1280, 1280, kernel_size=(1, 1), stride=(1, 1))
    (transformer_blocks): ModuleList(
      (0): BasicTransformerBlock(
        (attn1): CrossAttention(
          (to_q): Linear(in_features=1280, out_features=1280, bias=False)
          (to_k): Linear(in_features=1280, out_features=1280, bias=False)
          (to_v): Linear(in_features=1280, out_features=1280, bias=False)
          (to_out): Sequential(
            (0): Linear(in_features=1280, out_features=1280, bias=True)
            (1): Dropout(p=0.0, inplace=False)
          )
        )
        (ff): FeedForward(
          (net): Sequential(
            (0): GEGLU(
              (proj): Linear(in_features=1280, out_features=10240, bias=True)
            )
            (1): Dropout(p=0.0, inplace=False)
            (2): Linear(in_features=5120, out_features=1280, bias=True)
          )
        )
        (attn2): CrossAttention(
          (to_q): Linear(in_features=1280, out_features=1280, bias=False)
          (to_k): Linear(in_features=768, out_features=1280, bias=False)
          (to_v): Linear(in_features=768, out_features=1280, bias=False)
          (to_out): Sequential(
            (0): Linear(in_features=1280, out_features=1280, bias=True)
            (1): Dropout(p=0.0, inplace=False)
          )
        )
        (norm1): LayerNorm((1280,), eps=1e-05, elementwise_affine=True)
        (norm2): LayerNorm((1280,), eps=1e-05, elementwise_affine=True)
        (norm3): LayerNorm((1280,), eps=1e-05, elementwise_affine=True)
      )
    )
    (proj_out): Conv2d(1280, 1280, kernel_size=(1, 1), stride=(1, 1))
  )
  (2): ResBlock(
    (in_layers): Sequential(
      (0): GroupNorm32(32, 1280, eps=1e-05, affine=True)
      (1): SiLU()
      (2): Conv2d(1280, 1280, kernel_size=(3, 3), stride=(1, 1), padding=(1, 1))
    )
    (h_upd): Identity()
    (x_upd): Identity()
    (emb_layers): Sequential(
      (0): SiLU()
      (1): Linear(in_features=1280, out_features=1280, bias=True)
    )
    (out_layers): Sequential(
      (0): GroupNorm32(32, 1280, eps=1e-05, affine=True)
      (1): SiLU()
      (2): Dropout(p=0, inplace=False)
      (3): Conv2d(1280, 1280, kernel_size=(3, 3), stride=(1, 1), padding=(1, 1))
    )
    (skip_connection): Identity()
  )
与输入模块相同,包含12个 TimestepEmbedSequential,顺序相反
整体结构比较简单,先用预训练CLIP将prompt变为token; DDIM模型将噪音与token逆扩散为图像;再采用VAE的decoder将图像复原到正常大小:
我有一个Ruby程序,它使用rubyzip压缩XML文件的目录树。gem。我的问题是文件开始变得很重,我想提高压缩级别,因为压缩时间不是问题。我在rubyzipdocumentation中找不到一种为创建的ZIP文件指定压缩级别的方法。有人知道如何更改此设置吗?是否有另一个允许指定压缩级别的Ruby库? 最佳答案 这是我通过查看rubyzip内部创建的代码。level=Zlib::BEST_COMPRESSIONZip::ZipOutputStream.open(zip_file)do|zip|Dir.glob("**/*")d
我有一个模型:classItem项目有一个属性“商店”基于存储的值,我希望Item对象对特定方法具有不同的行为。Rails中是否有针对此的通用设计模式?如果方法中没有大的if-else语句,这是如何干净利落地完成的? 最佳答案 通常通过Single-TableInheritance. 关于ruby-on-rails-Rails-子类化模型的设计模式是什么?,我们在StackOverflow上找到一个类似的问题: https://stackoverflow.co
如何在buildr项目中使用Ruby?我在很多不同的项目中使用过Ruby、JRuby、Java和Clojure。我目前正在使用我的标准Ruby开发一个模拟应用程序,我想尝试使用Clojure后端(我确实喜欢功能代码)以及JRubygui和测试套件。我还可以看到在未来的不同项目中使用Scala作为后端。我想我要为我的项目尝试一下buildr(http://buildr.apache.org/),但我注意到buildr似乎没有设置为在项目中使用JRuby代码本身!这看起来有点傻,因为该工具旨在统一通用的JVM语言并且是在ruby中构建的。除了将输出的jar包含在一个独特的、仅限ruby
在rails源中:https://github.com/rails/rails/blob/master/activesupport/lib/active_support/lazy_load_hooks.rb可以看到以下内容@load_hooks=Hash.new{|h,k|h[k]=[]}在IRB中,它只是初始化一个空哈希。和做有什么区别@load_hooks=Hash.new 最佳答案 查看rubydocumentationforHashnew→new_hashclicktotogglesourcenew(obj)→new_has
我需要从一个View访问多个模型。以前,我的links_controller仅用于提供以不同方式排序的链接资源。现在我想包括一个部分(我假设)显示按分数排序的顶级用户(@users=User.all.sort_by(&:score))我知道我可以将此代码插入每个链接操作并从View访问它,但这似乎不是“ruby方式”,我将需要在不久的将来访问更多模型。这可能会变得很脏,是否有针对这种情况的任何技术?注意事项:我认为我的应用程序正朝着单一格式和动态页面内容的方向发展,本质上是一个典型的网络应用程序。我知道before_filter但考虑到我希望应用程序进入的方向,这似乎很麻烦。最终从任何
我有一个包含模块的模型。我想在模块中覆盖模型的访问器方法。例如:classBlah这显然行不通。有什么想法可以实现吗? 最佳答案 您的代码看起来是正确的。我们正在毫无困难地使用这个确切的模式。如果我没记错的话,Rails使用#method_missing作为属性setter,因此您的模块将优先,阻止ActiveRecord的setter。如果您正在使用ActiveSupport::Concern(参见thisblogpost),那么您的实例方法需要进入一个特殊的模块:classBlah
在MRIRuby中我可以这样做:deftransferinternal_server=self.init_serverpid=forkdointernal_server.runend#Maketheserverprocessrunindependently.Process.detach(pid)internal_client=self.init_client#Dootherstuffwithconnectingtointernal_server...internal_client.post('somedata')ensure#KillserverProcess.kill('KILL',
我有一个表单,其中有很多字段取自数组(而不是模型或对象)。我如何验证这些字段的存在?solve_problem_pathdo|f|%>... 最佳答案 创建一个简单的类来包装请求参数并使用ActiveModel::Validations。#definedsomewhere,atthesimplest:require'ostruct'classSolvetrue#youcouldevencheckthesolutionwithavalidatorvalidatedoerrors.add(:base,"WRONG!!!")unlesss
我想向我的Controller传递一个参数,它是一个简单的复选框,但我不知道如何在模型的form_for中引入它,这是我的观点:{:id=>'go_finance'}do|f|%>Transferirde:para:Entrada:"input",:placeholder=>"Quantofoiganho?"%>Saída:"output",:placeholder=>"Quantofoigasto?"%>Nota:我想做一个额外的复选框,但我该怎么做,模型中没有一个对象,而是一个要检查的对象,以便在Controller中创建一个ifelse,如果没有检查,请帮助我,非常感谢,谢谢
我正在编写一个小脚本来定位aws存储桶中的特定文件,并创建一个临时验证的url以发送给同事。(理想情况下,这将创建类似于在控制台上右键单击存储桶中的文件并复制链接地址的结果)。我研究过回形针,它似乎不符合这个标准,但我可能只是不知道它的全部功能。我尝试了以下方法:defauthenticated_url(file_name,bucket)AWS::S3::S3Object.url_for(file_name,bucket,:secure=>true,:expires=>20*60)end产生这种类型的结果:...-1.amazonaws.com/file_path/file.zip.A