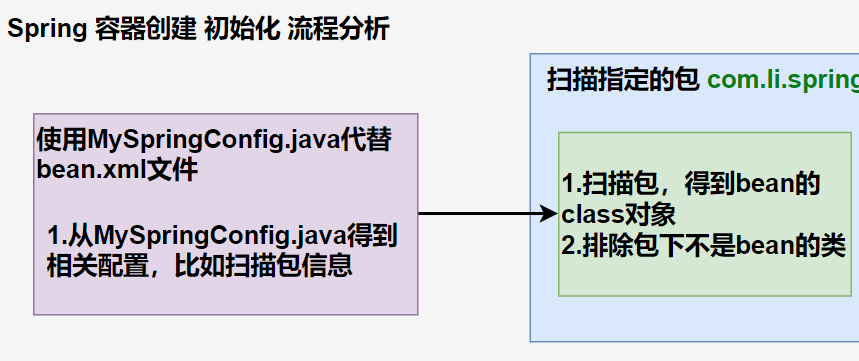
阶段1目标:编写自己的spring容器,实现扫描包,得到bean的class对象
1.创建新的maven项目,注意把项目的 language level 改为支持 java8
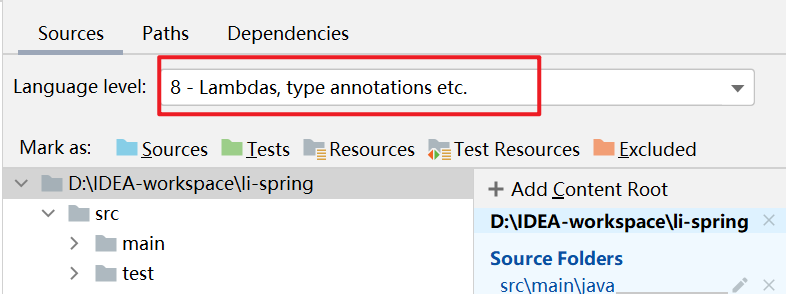
在pom.xml文件中指定编译版本:
<properties>
    <maven.compiler.source>8</maven.compiler.source>
    <maven.compiler.target>8</maven.compiler.target>
</properties>
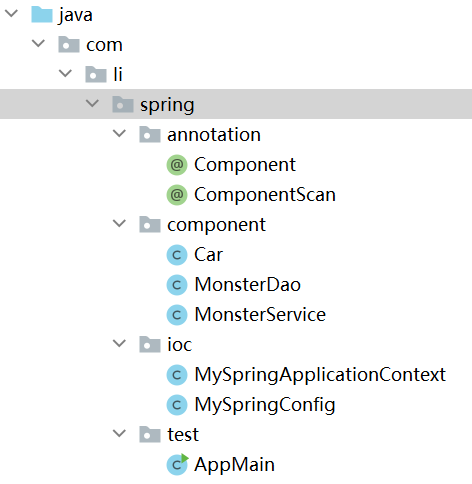
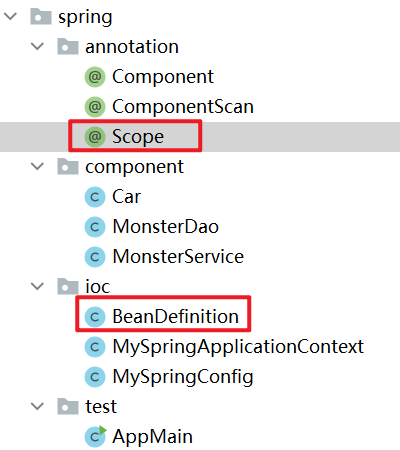
2.创建的架构如下:
3.自定义ComponentScan注解,用于标记要扫描的包
package com.li.spring.annotation;

import java.lang.annotation.ElementType;
import java.lang.annotation.Retention;
import java.lang.annotation.RetentionPolicy;
import java.lang.annotation.Target;

/**
 * @author 李
 * @version 1.0
 * 模仿spring原生注解,自定义一个注解
 * 1. @Target(ElementType.TYPE) 指定ComponentScan注解可以修饰TYPE元素
 * 2. @Retention(RetentionPolicy.RUNTIME) 指定ComponentScan注解 的保留范围
 * 3. String value() default "";  表示 ComponentScan 可以传入一个value值
 */
@Target(ElementType.TYPE)
@Retention(RetentionPolicy.RUNTIME)
public @interface ComponentScan {
    //通过value指定要扫描的包
    String value() default "";
}
4.自定义Component注解,用于标记要扫描的类
package com.li.spring.annotation;

import java.lang.annotation.ElementType;
import java.lang.annotation.Retention;
import java.lang.annotation.RetentionPolicy;
import java.lang.annotation.Target;

@Target(ElementType.TYPE)
@Retention(RetentionPolicy.RUNTIME)
public @interface Component {
    //通过value给要注入的bean指定名字
    String value() default "";
}
5.自定义配置类,相当于原生spring的容器配置文件
package com.li.spring.ioc;

import com.li.spring.annotation.ComponentScan;

/**
 * @author 李
 * @version 1.0
 * 这是一个配置类,作用类似我们原生 spring 的容器配置文件 beans.xml
 */
@ComponentScan(value = "com.li.spring.component")
public class MySpringConfig {

}
6.自定义spring容器,类似原生ioc容器。(未完成)
目前的功能:
(1)在初始化时,根据传入的配置类.class文件,读取要扫描的包路径
(2)遍历包路径下的文件,找出需要注入的bean
package com.li.spring.ioc;

import com.li.spring.annotation.Component;
import com.li.spring.annotation.ComponentScan;

import java.io.File;
import java.net.URL;

/**
 * @author 李
 * @version 1.0
 * MySpringApplicationContext 类的作用类似Spring原生的ioc容器
 */
public class MySpringApplicationContext {
    private Class configClass;

    //构造器
    public MySpringApplicationContext(Class configClass) {
        this.configClass = configClass;
        //步骤一:获取要扫描的包
        //1.先得到 MySpringConfig配置类的注解 @ComponentScan(value = "com.li.spring.component")
        ComponentScan componentScan =
                (ComponentScan) this.configClass.getDeclaredAnnotation(ComponentScan.class);
        //2.通过 componentScan的 value=>得到要扫描的包路径
        String path = componentScan.value();
        System.out.println("要扫描的包=" + path);

        //步骤二:得到要扫描的包下的所有资源(类.class)
        //1.得到类的加载器-->App 类加载器
        ClassLoader classLoader = MySpringApplicationContext.class.getClassLoader();
        //2.通过类的加载器获取到要扫描的包的资源 url=>类似一个路径
        path = path.replace(".", "/");//将原先路径的.替换成/ ==> com/li/component
        URL resource = classLoader.getResource(path);
        //resource=file:/D:/IDEA-workspace/spring/out/production/spring/com/li/component
        System.out.println("resource=" + resource);
        //3.将要加载的资源(.class)路径下的文件进行遍历
        File file = new File(resource.getFile());
        if (file.isDirectory()) {
            File[] files = file.listFiles();//将当前目录下的所有文件放到files数组中(这里没有实现递归)
            for (File f : files) {
                //System.out.println("============");
                //System.out.println("AbsolutePath=" + f.getAbsolutePath());
                //获取文件的绝对路径
                String fileAbsolutePath = f.getAbsolutePath();

                //只处理.class文件
                if (fileAbsolutePath.endsWith(".class")) {

                    //步骤三:获取全类名反射对象,并放入容器中
                    //将其转变为 com.li.spring.component.MyComponent.class 形式
                    //1.先获取到类名
                    String className = fileAbsolutePath.substring(
                            fileAbsolutePath.lastIndexOf("\\") + 1,
                            fileAbsolutePath.indexOf(".class"));
                    //2.获取类的完整路径(全类名)
                    // path.replace("/", ".") => com.li.component
                    String classFullName = path.replace("/", ".") + "." + className;
                    //3.判断该class文件是否要注入到容器中(该类是否有特定注解)
                    try {
                        /*
                        得到该类的Class对象:
                        (1)Class.forName(className) 可以反射加载类
                        (2)classLoader.loadClass(className)也可以反射类的Class
                        主要区别是:(1)的方式会调用该类的静态方法,(2)的方法不会
                         */
                        //因为这里只是要判断该类有没有注解,因此使用比较轻量级的方式
                        Class<?> clazz = classLoader.loadClass(classFullName);
                        //判断该类是否有特定注解
                        if (clazz.isAnnotationPresent(Component.class)) {
                            //以 Component注解为例,如果有其他注解,逻辑一致
                            //如果该类使用了 @Component ,说明是spring bean
                            System.out.println("是一个spring bean=" + clazz + " 类名=" + className);
                        } else {
                            //如果没有使用,则说明不是spring bean
                            System.out.println("不是一个 spring bean=" + clazz + " 类名=" + className);
                        }
                    } catch (Exception e) {
                        e.printStackTrace();
                    }
                }
            }
            System.out.println("===========================");
        }
    }

    //编写方法,返回容器对象
    public Object getBean(String name) {
        return null;
    }
}
7.创建两个自定义 Spring bean,一个普通类作为测试
(1)MonsterService
package com.li.spring.component;

import com.li.spring.annotation.Component;

/**
 * @author 李
 * @version 1.0
 * MonsterService 是一个 Service
 * 1.如果指定了value,那么在注入spring容器时,以你指定的为准
 * 2.如果没有指定value,则使用类名(首字母小写)作为默认名
 */
@Component(value = "monsterService") //将 MonsterService注入到自己的spring容器中
public class MonsterService {
}
(2)MonsterDao
package com.li.spring.component;

import com.li.spring.annotation.Component;

/**
 * @author 李
 * @version 1.0
 */
@Component(value = "monsterDao")
public class MonsterDao {
}
(3)Car,普通类
package com.li.spring.component;

/**
 * @author 李
 * @version 1.0
 */
public class Car {
}
8.进行测试
package com.li.spring.test;

import com.li.spring.ioc.MySpringApplicationContext;
import com.li.spring.ioc.MySpringConfig;

/**
 * @author 李
 * @version 1.0
 */
public class AppMain {
    public static void main(String[] args) {
        MySpringApplicationContext ioc =
                new MySpringApplicationContext(MySpringConfig.class);
    }
}
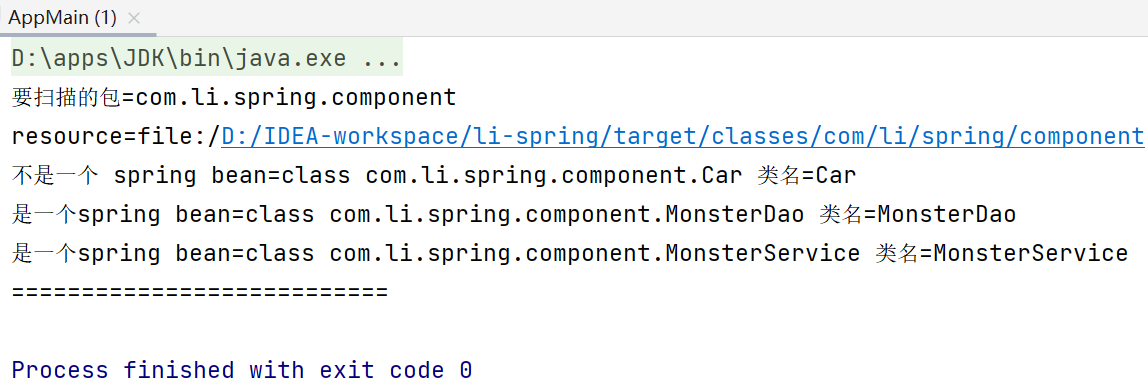
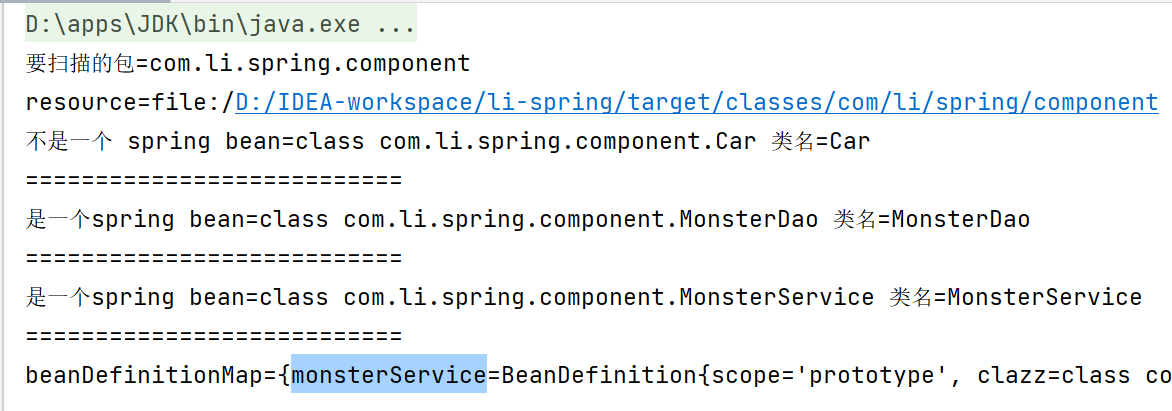
测试结果:成功区分指定包下的 bean 和普通类
阶段2目标:扫描指定包,将bean信息封装到BeanDefinition对象,并放入到Map
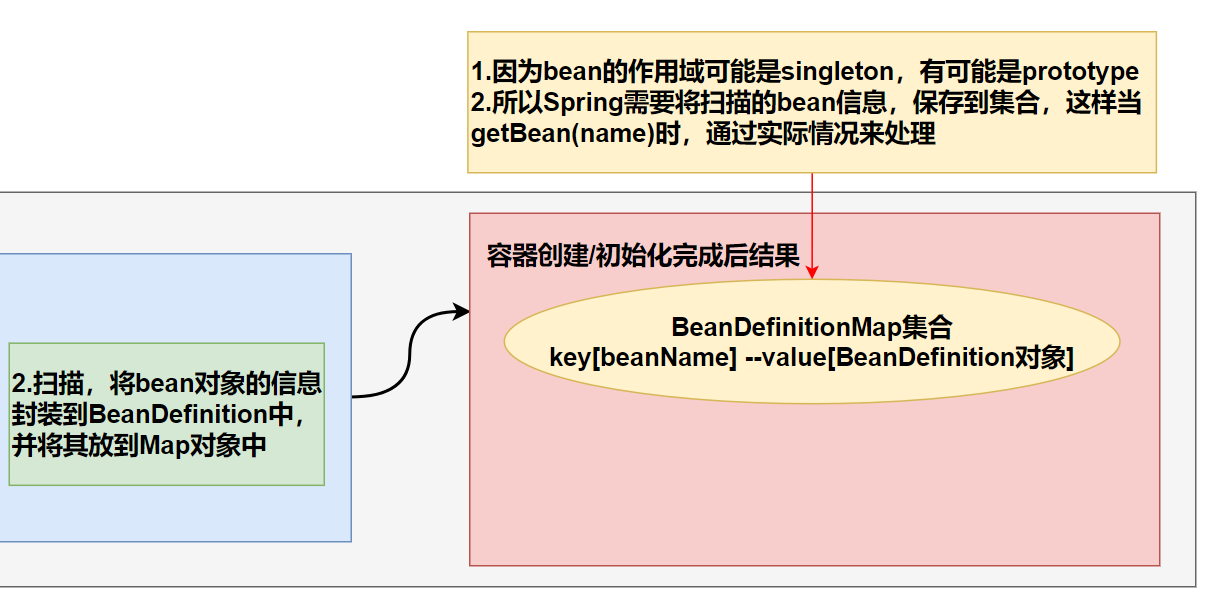
BeanDefinitionMap以k-v形式存放bean对象的信息。
新添加的注解和类:
1.自定义注解,用于指定 bean 是单例还是多例
package com.li.spring.annotation;

import java.lang.annotation.ElementType;
import java.lang.annotation.Retention;
import java.lang.annotation.RetentionPolicy;
import java.lang.annotation.Target;

/**
 * @author 李
 * @version 1.0
 * Scope 用于指定 bean的作用范围 [singleton/prototype]
 */
@Target(ElementType.TYPE)
@Retention(RetentionPolicy.RUNTIME)
public @interface Scope {
    //通过 value 指定 bean 是 singleton 或 prototype
    String value() default "";
}
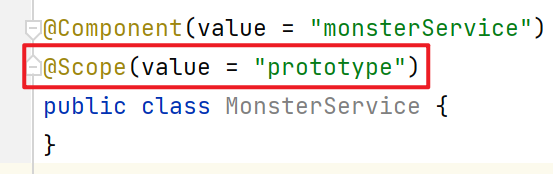
2.修改MonsterService,添加Scope注解
3.BeanDefinition 用于封装/记录 Bean对象的信息
package com.li.spring.ioc;

/**
 * @author 李
 * @version 1.0
 * 用于封装/记录 Bean对象的信息:
 * 1.scope
 * 2.Bean对应的 Class对象,用于反射生成对应对象
 */
public class BeanDefinition {
    private String scope;
    private Class clazz;

    public String getScope() {
        return scope;
    }

    public void setScope(String scope) {
        this.scope = scope;
    }

    public Class getClazz() {
        return clazz;
    }

    public void setClazz(Class clazz) {
        this.clazz = clazz;
    }

    @Override
    public String toString() {
        return "BeanDefinition{" +
                "scope='" + scope + '\'' +
                ", clazz=" + clazz +
                '}';
    }
}
4.修改自定义spring容器 MySpringApplicationContext
增加的功能:
(1)定义属性beanDefinitionMap,用于存放BeanDefinition对象,BeanDefinition对象存储bean信息,包括bean是单例还是多例,bean的class对象
(2)将MySpringApplicationContext构造器的所有代码封装成一个方法。
部分代码:
package com.li.spring.ioc;

//...

/**
 * @author 李
 * @version 1.0
 * MySpringApplicationContext 类的作用类似Spring原生的ioc容器
 */
public class MySpringApplicationContext {
    private Class configClass;
    //定义属性 BeanDefinitionMap->存放BeanDefinition对象
    private ConcurrentHashMap<String, BeanDefinition> beanDefinitionMap = new ConcurrentHashMap<>();

    //构造器
    public MySpringApplicationContext(Class configClass) {
        beanDefinitionByScan(configClass);
        System.out.println("beanDefinitionMap=" + beanDefinitionMap);
    }

    //该方法完成对指定包的扫描,并将Bean信息封装到BeanDefinition对象,再放入map中
    public void beanDefinitionByScan(Class configClass) {
        //步骤一:获取要扫描的包
        //...

        //步骤二:得到要扫描的包下的所有资源(类.class)
        //...

        //步骤三:获取全类名反射对象,并放入容器中
        //...
        //判断该类是否有特定注解
        if (clazz.isAnnotationPresent(Component.class)) {
            //如果该类使用了 @Component ,说明是spring bean
            System.out.println("是一个spring bean=" + clazz + " 类名=" + className);
            //-------------------新增代码----------------------
            //得到 BeanName-key
            //1.得到 Component 注解
            Component componentAnnotation = clazz.getDeclaredAnnotation(Component.class);
            //2.得到Component注解的value值
            String beanName = componentAnnotation.value();
            //如果没有指定,就使用类名(首字母小写)作为beanName
            if ("".equals(beanName)) {
                beanName = StringUtils.uncapitalize(className);
            }
            //将 Bean信息封装到 BeanDefinition对象-value
            BeanDefinition beanDefinition = new BeanDefinition();
            beanDefinition.setClazz(clazz);
            //1.获取scope
            if (clazz.isAnnotationPresent(Scope.class)) {
                //如果配置了Scope,就设置配置的值
                Scope scopeAnnotation = clazz.getDeclaredAnnotation(Scope.class);
                beanDefinition.setScope(scopeAnnotation.value());
            } else {
                //如果没有配置Scope,就设置默认值singleton
                beanDefinition.setScope("singleton");
            }

            //将beanDefinition对象放入Map中
            beanDefinitionMap.put(beanName, beanDefinition);
            //--------------------新增代码------------------------
        } else {
            //如果没有使用,则说明不是spring bean
            System.out.println("不是一个 spring bean=" + clazz + " 类名=" + className);
        }
    } catch (Exception e) {
        e.printStackTrace();
    }
}
System.out.println("===========================");
}}}

    //编写方法,返回容器对象
    public Object getBean(String name) {
        return null;
    }
}
ps:这里使用了一个工具包
<dependencies>
    <dependency>
        <groupId>commons-lang</groupId>
        <artifactId>commons-lang</artifactId>
        <version>2.6</version>
    </dependency>
</dependencies>
5.为了测试,将MonsterService的@Component的value注释

6.测试类
//...
public class AppMain {
    public static void main(String[] args) {
        MySpringApplicationContext ioc =
                new MySpringApplicationContext(MySpringConfig.class);
    }
}
测试结果:成功扫描指定包,并将bean对象的信息放入到beanDefinitionMap中,没有指定beanId的对象以默认规则作为id。
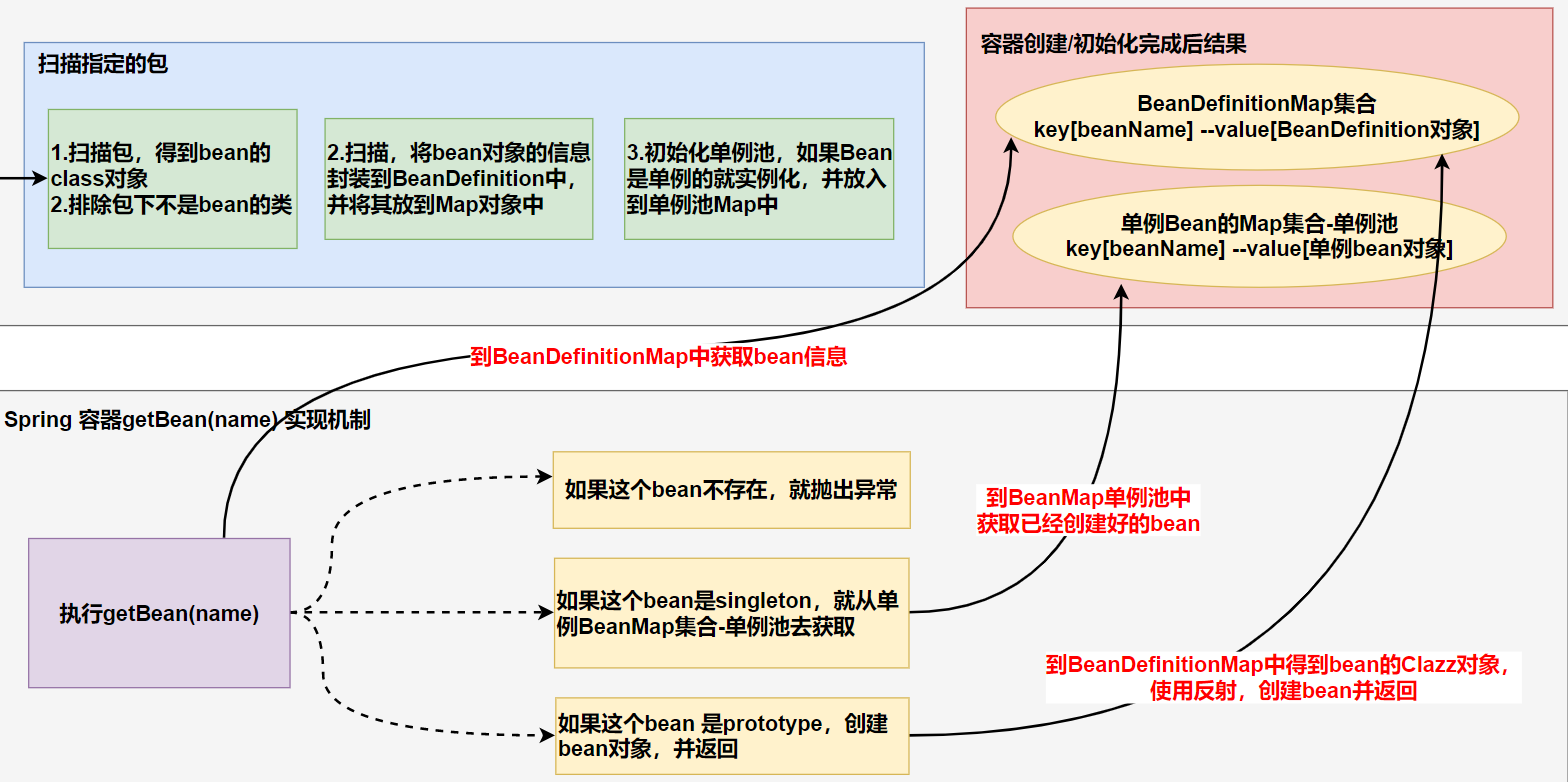
阶段3目标:初始化bean单例池,并完成getBean方法,createBean方法
1.修改自定义spring容器 MySpringApplicationContext
增加的功能:
(1)增加方法createBean(),用于通过反射创建bean对象
(2)在构造方法中,初始化单例池:如果bean是单例,就通过createBean()将其实例化,然后放入单例池。
(3)实现getBean方法:通过beanName,返回bean对象。
部分代码:
//构造器
public MySpringApplicationContext(Class configClass) {
    beanDefinitionByScan(configClass);
    //后期封装成方法---------
    Enumeration<String> keys = beanDefinitionMap.keys();
    //遍历
    while (keys.hasMoreElements()) {
        //得到 beanName
        String beanName = keys.nextElement();
        //通过beanName得到对应的 beanDefinition 对象
        BeanDefinition beanDefinition = beanDefinitionMap.get(beanName);
        //判断该 bean 是单例还是多例
        if ("singleton".equals(beanDefinition.getScope())) {
            //将该bean实例放入到singletonObjects中
            singletonObjects.put(beanName, createBean(beanDefinition));
        }
    }
    System.out.println("singletonObjects 单例池=" + singletonObjects);
    //------------
    System.out.println("beanDefinitionMap=" + beanDefinitionMap);
}

//完成createBean(BeanDefinition)方法
public Object createBean(BeanDefinition beanDefinition) {
    //得到Bean的class对象
    Class clazz = beanDefinition.getClazz();
    try {
        //反射创建bean实例
        Object instance = clazz.getDeclaredConstructor().newInstance();
        return instance;
    } catch (InstantiationException e) {
        e.printStackTrace();
    } catch (IllegalAccessException e) {
        e.printStackTrace();
    } catch (InvocationTargetException e) {
        e.printStackTrace();
    } catch (NoSuchMethodException e) {
        e.printStackTrace();
    }
    //如果反射对象失败
    return null;
}

//编写方法,返回容器对象
public Object getBean(String name) {
    //传入的beanName是否在 beanDefinitionMap中存在
    if (beanDefinitionMap.containsKey(name)) {//存在
        //从 beanDefinitionMap中获取 beanDefinition对象
        BeanDefinition beanDefinition = beanDefinitionMap.get(name);
        if ("singleton".equalsIgnoreCase(beanDefinition.getScope())) {
            //如果是单例 bean,直接从单例池获取
            return singletonObjects.get(name);
        } else {//如果不是单例,调用createBean(),反射创建对象
            return createBean(beanDefinition);
        }
    } else {//不存在
        //抛出空指针异常
        throw new NullPointerException("不存在该bean=" + name);
    }
}
2.测试类
//...
public class AppMain {
    public static void main(String[] args) {
        MySpringApplicationContext ioc =
                new MySpringApplicationContext(MySpringConfig.class);
        //Object xxx = ioc.getBean("xxx");//抛出空指针异常
        //多实例对象的获取
        MonsterService monsterService = (MonsterService) ioc.getBean("monsterService");
        MonsterService monsterService2 = (MonsterService) ioc.getBean("monsterService");
        System.out.println("monsterService=" + monsterService);
        System.out.println("monsterService2=" + monsterService2);
        //单实例对象的获取
        MonsterDao monsterDao = (MonsterDao) ioc.getBean("monsterDao");
        MonsterDao monsterDao2 = (MonsterDao) ioc.getBean("monsterDao");
        System.out.println("monsterDao=" + monsterDao);
        System.out.println("monsterDao2=" + monsterDao);
    }
}
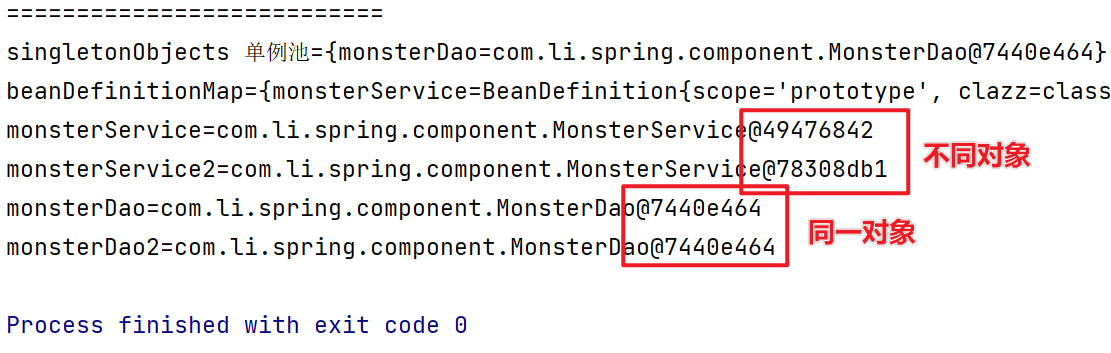
测试结果:在创建MySpringApplicationContext对象时,成功初始化了单例池,beanDefinitionMap。并根据beanName返回bean对象。MonsterService添加了Scope=“prototype”注解,因此每一次获取的对象都是不同的。
阶段4目标:完成依赖注入
1.自定义注解AutoWired,用于标记需要依赖注入的属性
package com.li.spring.annotation;

import java.lang.annotation.ElementType;
import java.lang.annotation.Retention;
import java.lang.annotation.RetentionPolicy;
import java.lang.annotation.Target;

/**
 * @author 李
 * @version 1.0
 */
@Target({ElementType.METHOD, ElementType.FIELD})
@Retention(RetentionPolicy.RUNTIME)
public @interface AutoWired {
    //如果为true,就完成依赖注入
    boolean required() default true;
}
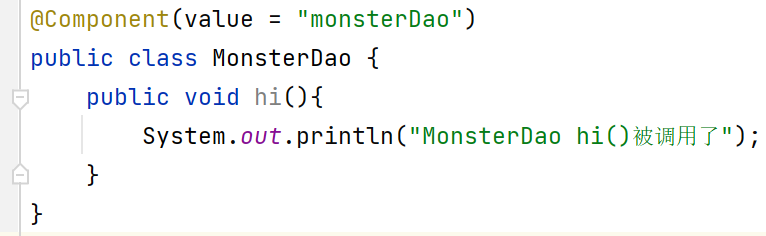
2.为了测试,在MonsterDao,MonsterService中添加测试代码。
(1)修改MonsterDao,在该类中增加方法
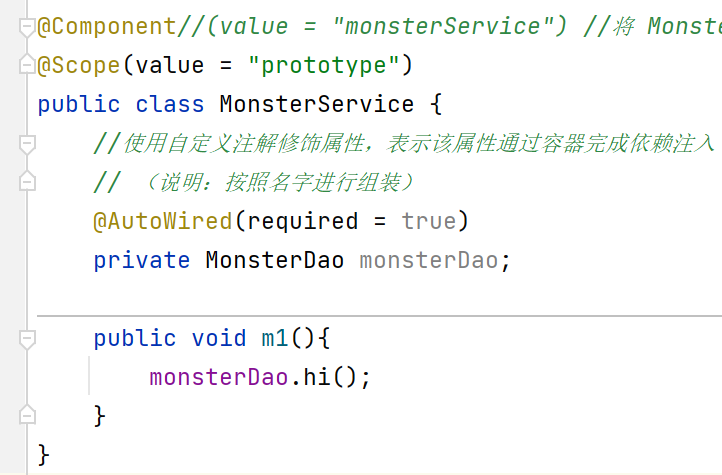
(2)修改MonsterService,在该类中添加属性monsterDao,并使用AutoWired注解修饰。在方法m1()中调用属性对象的方法。
3.修改自定义spring容器 MySpringApplicationContext (部分代码)
修改方法createBean(),因为依赖注入需要在反射创建bean对象时完成。
//完成createBean(BeanDefinition)方法
public Object createBean(BeanDefinition beanDefinition) {
    //得到Bean的class对象
    Class clazz = beanDefinition.getClazz();
    try {
        //反射创建bean实例
        Object instance = clazz.getDeclaredConstructor().newInstance();
        //todo 这里要加入依赖注入的业务逻辑
        //1.遍历当前要创建对象的所有属性字段
        for (Field declaredField : clazz.getDeclaredFields()) {
            //2.判断字段是否有AutoWired注解
            if (declaredField.isAnnotationPresent(AutoWired.class)) {
                //判断是否需要自动装配
                AutoWired autoWiredAnnotation =
                        declaredField.getAnnotation(AutoWired.class);
                if (autoWiredAnnotation.required()) {
                    //3.得到字段的名称
                    String name = declaredField.getName();
                    //4.通过getBean()方法获取要组装的对象
                    //如果name对应的对象时单例的,就到单例池去获取,如果是多例的,就反射创建并返回
                    Object bean = getBean(name);
                    //5.进行组装
                    //暴破
                    declaredField.setAccessible(true);
                    declaredField.set(instance, bean);
                }
            }
        }
        return instance;
    } catch (InstantiationException e) {
        e.printStackTrace();
    } catch (IllegalAccessException e) {
        e.printStackTrace();
    } catch (InvocationTargetException e) {
        e.printStackTrace();
    } catch (NoSuchMethodException e) {
        e.printStackTrace();
    }
    //如果反射对象失败
    return null;
}
4.测试类
//...
public class AppMain {
public static void main(String[] args) {
MySpringApplicationContext ioc =
new MySpringApplicationContext(MySpringConfig.class);
MonsterService monsterService = (MonsterService) ioc.getBean("monsterService");
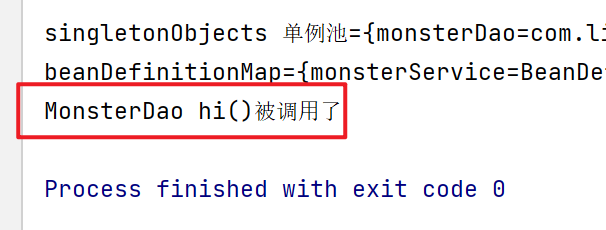
monsterService.m1();
}
}
测试结果:自动装配成功
我正在使用Ruby2.1.1和Rails4.1.0.rc1。当执行railsc时,它被锁定了。使用Ctrl-C停止,我得到以下错误日志:~/.rvm/gems/ruby-2.1.1/gems/spring-1.1.2/lib/spring/client/run.rb:47:in`gets':Interruptfrom~/.rvm/gems/ruby-2.1.1/gems/spring-1.1.2/lib/spring/client/run.rb:47:in`verify_server_version'from~/.rvm/gems/ruby-2.1.1/gems/spring-1.1.
我有一个用户工厂。我希望默认情况下确认用户。但是鉴于unconfirmed特征,我不希望它们被确认。虽然我有一个基于实现细节而不是抽象的工作实现,但我想知道如何正确地做到这一点。factory:userdoafter(:create)do|user,evaluator|#unwantedimplementationdetailshereunlessFactoryGirl.factories[:user].defined_traits.map(&:name).include?(:unconfirmed)user.confirm!endendtrait:unconfirmeddoenden
华为OD机试题本篇题目:明明的随机数题目输入描述输出描述:示例1输入输出说明代码编写思路最近更新的博客华为od2023|什么是华为od,od薪资待遇,od机试题清单华为OD机试真题大全,用Python解华为机试题|机试宝典【华为OD机试】全流程解析+经验分享,题型分享,防作弊指南华为o
C#实现简易绘图工具一.引言实验目的:通过制作窗体应用程序(C#画图软件),熟悉基本的窗体设计过程以及控件设计,事件处理等,熟悉使用C#的winform窗体进行绘图的基本步骤,对于面向对象编程有更加深刻的体会.Tutorial任务设计一个具有基本功能的画图软件**·包括简单的新建文件,保存,重新绘图等功能**·实现一些基本图形的绘制,包括铅笔和基本形状等,学习橡皮工具的创建**·设计一个合理舒适的UI界面**注明:你可能需要先了解一些关于winform窗体应用程序绘图的基本知识,以及关于GDI+类和结构的知识二.实验环境Windows系统下的visualstudio2017C#窗体应用程序三.
//1.验证返回状态码是否是200pm.test("Statuscodeis200",function(){pm.response.to.have.status(200);});//2.验证返回body内是否含有某个值pm.test("Bodymatchesstring",function(){pm.expect(pm.response.text()).to.include("string_you_want_to_search");});//3.验证某个返回值是否是100pm.test("Yourtestname",function(){varjsonData=pm.response.json
MIMO技术的优缺点优点通过下面三个增益来总体概括:阵列增益。阵列增益是指由于接收机通过对接收信号的相干合并而活得的平均SNR的提高。在发射机不知道信道信息的情况下,MIMO系统可以获得的阵列增益与接收天线数成正比复用增益。在采用空间复用方案的MIMO系统中,可以获得复用增益,即信道容量成倍增加。信道容量的增加与min(Nt,Nr)成正比分集增益。在采用空间分集方案的MIMO系统中,可以获得分集增益,即可靠性性能的改善。分集增益用独立衰落支路数来描述,即分集指数。在使用了空时编码的MIMO系统中,由于接收天线或发射天线之间的间距较远,可认为它们各自的大尺度衰落是相互独立的,因此分布式MIMO
遍历文件夹我们通常是使用递归进行操作,这种方式比较简单,也比较容易理解。本文为大家介绍另一种不使用递归的方式,由于没有使用递归,只用到了循环和集合,所以效率更高一些!一、使用递归遍历文件夹整体思路1、使用File封装初始目录,2、打印这个目录3、获取这个目录下所有的子文件和子目录的数组。4、遍历这个数组,取出每个File对象4-1、如果File是否是一个文件,打印4-2、否则就是一个目录,递归调用代码实现publicclassSearchFile{publicstaticvoidmain(String[]args){//初始目录Filedir=newFile("d:/Dev");Datebeg
1.在Python3中,下列关于数学运算结果正确的是:(B)a=10b=3print(a//b)print(a%b)print(a/b)A.3,3,3.3333...B.3,1,3.3333...C.3.3333...,3.3333...,3D.3.3333...,1,3.3333...解析: 在Python中,//表示地板除(向下取整),%表示取余,/表示除(Python2向下取整返回3)2.如下程序Python2会打印多少个数:(D)k=1000whilek>1: print(k)k=k/2A.1000 B.10C.11D.9解析: 按照题意每次循环K/2,直到K值小于等
转自:spring.profiles.active和spring.profiles.include的使用及区别说明下文笔者讲述spring.profiles.active和spring.profiles.include的区别简介说明,如下所示我们都知道,在日常开发中,开发|测试|生产环境都拥有不同的配置信息如:jdbc地址、ip、端口等此时为了避免每次都修改全部信息,我们则可以采用以上的属性处理此类异常spring.profiles.active属性例:配置文件,可使用以下方式定义application-${profile}.properties开发环境配置文件:application-dev
通常,数组被实现为内存块,集合被实现为HashMap,有序集合被实现为跳跃列表。在Ruby中也是如此吗?我正在尝试从性能和内存占用方面评估Ruby中不同容器的使用情况 最佳答案 数组是Ruby核心库的一部分。每个Ruby实现都有自己的数组实现。Ruby语言规范只规定了Ruby数组的行为,并没有规定任何特定的实现策略。它甚至没有指定任何会强制或至少建议特定实现策略的性能约束。然而,大多数Rubyist对数组的性能特征有一些期望,这会迫使不符合它们的实现变得默默无闻,因为实际上没有人会使用它:插入、前置或追加以及删除元素的最坏情况步骤复