目录
Git是目前世界上最先进的分布式版本控制系统。
工作原理 / 流程:
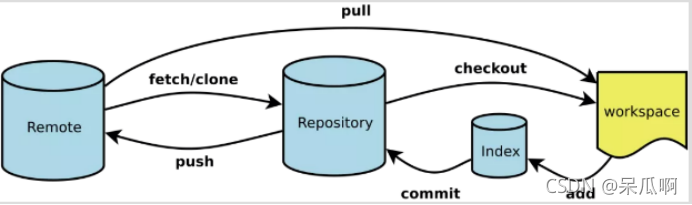
Workspace:工作区
Index / Stage:暂存区
Repository:仓库区(或本地仓库)
Remote:远程仓库
SVN是集中式版本控制系统,版本库是集中放在中央服务器的,而干活的时候,用的都是自己的电脑,所以首先要从中央服务器哪里得到最新的版本,然后干活,干完后,需要把自己做完的活推送到中央服务器。集中式版本控制系统是必须联网才能工作,如果在局域网还可以,带宽够大,速度够快,如果在互联网下,如果网速慢的话,就纳闷了。
Git是分布式版本控制系统,那么它就没有中央服务器的,每个人的电脑就是一个完整的版本库,这样,工作的时候就不需要联网了,因为版本都是在自己的电脑上。既然每个人的电脑都有一个完整的版本库,那多个人如何协作呢?比如说自己在电脑上改了文件A,其他人也在电脑上改了文件A,这时,你们两之间只需把各自的修改推送给对方,就可以互相看到对方的修改了。
官方地址:**https://git-scm.com/

选择下载64-bit Git for Windows Setup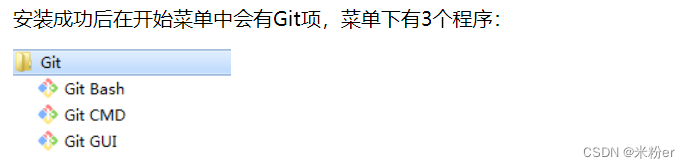
Git Bash:Unix与Linux风格的命令行,使用最多,推荐最多
安装后配置用户名邮箱(必要)
> git config --global user.name "yxm"   #配置用户名
> git config --global user.email "yxm@163.com"   #配置邮箱
查询用户名邮箱
> git config --system --list   #查询全局配置信息
> git config --global user.name  #查看用户名
> git config --global user.email #查看邮箱
已提交(committed)、已修改(modified) 和 已暂存(staged)。
工作区域:就是你平时存放项目代码的地方
暂存区:保存了下次将要提交的文件列表信息,一般在 Git 仓库目录中。
仓库区(或本地仓库):就是安全存放数据的位置,这里面有你提交到所有版本的数据。
创建本地仓库的方法有两种:一种是创建全新的仓库,另一种是克隆远程仓库。
创建全新仓库 需要在管理的项目根目录执行,执行成功后会出现.git目录
git init
克隆远程仓库
git clone [url]
例如:
git clone https://gitee.com/yangxumin/js.git
Untracked: 未跟踪, 此文件在文件夹中, 但并没有加入到git库, 不参与版本控制. 通过git add 状态变为Staged.
Unmodify: 文件已经入库, 未修改, 即版本库中的文件快照内容与文件夹中完全一致. 这种类型的文件有两种去处, 如果它被修改, 而变为Modified. 如果使用git rm移出版本库, 则成为Untracked文件
Modified: 文件已修改, 仅仅是修改, 并没有进行其他的操作. 这个文件也有两个去处, 通过git add可进入暂存staged状态, 使用git checkout 则丢弃修改过, 返回到unmodify状态, 这个git checkout即从库中取出文件, 覆盖当前修改
Staged: 暂存状态. 执行git commit则将修改同步到库中, 这时库中的文件和本地文件又变为一致, 文件为Unmodify状态. 执行git reset HEAD filename取消暂存, 文件状态为Modified
git status [filename]
创建一个文件并查看状态
yxm@USER-20200712WE MINGW64 /d/yxm/testgit (master)
$ touch readme.txt

yxm@USER-20200712WE MINGW64 /d/yxm/testgit (master)
$ echo hello yxm > readme.txt

yxm@USER-20200712WE MINGW64 /d/yxm/testgit (master)
$ cat readme.txt
hello yxm

yxm@USER-20200712WE MINGW64 /d/yxm/testgit (master)
$ git status readme.txt
On branch master

No commits yet

Untracked files:
  (use "git add <file>..." to include in what will be committed)
        readme.txt

nothing added to commit but untracked files present (use "git add" to track)

yxm@USER-20200712WE MINGW64 /d/yxm/testgit (master)
文件状态Untracked files:未跟踪,说明文件没有参与版本控制,只是存放在文件夹中
git add 文件名   #添加单个文件
git add .       #添加所有文件
git add readme.txt
git rm --cached 文件名    #直接从暂存区删除文件,工作区则不做出改变
git rm -f 文件名          #不但从暂存中删除,同时删除物理文件
rm 文件名                 #删除文件
git diff 文件名
工作区创建b.txt文件,提交到暂存区,修改工作区b.txt文件的内容,查询文件修改后的差异
yxm@USER-20200712WE MINGW64 /d/yxm/testgit (master)
$ touch b.txt

yxm@USER-20200712WE MINGW64 /d/yxm/testgit (master)
$ echo hello 123 >b.txt

yxm@USER-20200712WE MINGW64 /d/yxm/testgit (master)
$ git add b.txt
warning: in the working copy of 'b.txt', LF will be replaced by CRLF the next time Git touches it

yxm@USER-20200712WE MINGW64 /d/yxm/testgit (master)
$ echo hello 456 >b.txt

yxm@USER-20200712WE MINGW64 /d/yxm/testgit (master)
$ git diff b.txt
warning: in the working copy of 'b.txt', LF will be replaced by CRLF the next time Git touches it
diff --git a/b.txt b/b.txt
index 257299b..3a3c3e2 100644
--- a/b.txt
+++ b/b.txt
@@ -1 +1 @@
-hello 123
+hello 456
如果仓库中已经存在文件b.txt,在工作区中对b.txt修改了,如果想撤销可以使用checkout,签出覆盖
签出命令git checkout是git最常用的命令之一,同时也是一个很危险的命令,因为这条命令会重写工作区
yxm@USER-20200712WE MINGW64 /d/yxm/testgit (master)
$ git checkout b.txt
Updated 1 path from the index

yxm@USER-20200712WE MINGW64 /d/yxm/testgit (master)
$ cat b.txt
hello 123
通过add只是将文件或目录添加到了index暂存区,使用commit可以实现将暂存区的文件提交到本地仓库。
git commit 文件名 -m "注释信息"  #提交单个文件
git commit . -m "注释信息"      #提交所有文件
yxm@USER-20200712WE MINGW64 /d/yxm/testgit (master)
$ git commit b.txt -m "first commit"
[master (root-commit) 0cf58fb] first commit
 1 file changed, 1 insertion(+)
 create mode 100644 b.txt

yxm@USER-20200712WE MINGW64 /d/yxm/testgit (master)
$ git status b.txt
On branch master
nothing to commit, working tree clean
、、、
git log
yxm@USER-20200712WE MINGW64 /d/yxm/testgit (master)
$ git log
commit 7142a00af8d147747f7031a3712fc51b1ecac688 (HEAD -> master)
Author: yxm <yxm3568@163.com>
Date:   Thu Sep 8 15:23:00 2022 +0800

    yxmcommit

commit 0cf58fb6dead7aec39f732df3810a94a8dcb5676
Author: yxm <yxm3568@163.com>
Date:   Thu Sep 8 15:20:29 2022 +0800

    first commit
git reset --hard HEAD~1

创建r.txt,文件,写入内容111第一次提交,修改r.txt文件,写入内容222添加222后提交,修改r.txt文件。写入333后提交,查看提示,回退。
yxm@USER-20200712WE MINGW64 /d/yxm/testgit (master)
$ touch r.txt
yxm@USER-20200712WE MINGW64 /d/yxm/testgit (master)
$ echo 111 >r.txt
yxm@USER-20200712WE MINGW64 /d/yxm/testgit (master)
$ git add r.txt
yxm@USER-20200712WE MINGW64 /d/yxm/testgit (master)
$ git commit r.txt -m 'r.txt submit'
[master a762292] r.txt submit
1 file changed, 0 insertions(+), 0 deletions(-)
create mode 100644 r.txt
yxm@USER-20200712WE MINGW64 /d/yxm/testgit (master)
$ git add r.txt
warning: in the working copy of 'r.txt', LF will be replaced by CRLF the next time Git touches it
yxm@USER-20200712WE MINGW64 /d/yxm/testgit (master)
$ git commit r.txt -m "增加222提交"
warning: in the working copy of 'r.txt', LF will be replaced by CRLF the next time Git touches it
[master c31134c] 增加222提交
1 file changed, 2 insertions(+), 1 deletion(-)
yxm@USER-20200712WE MINGW64 /d/yxm/testgit (master)
$ echo 333 >> r.txt
yxm@USER-20200712WE MINGW64 /d/yxm/testgit (master)
$ git add r.txt
warning: in the working copy of 'r.txt', LF will be replaced by CRLF the next time Git touches it
yxm@USER-20200712WE MINGW64 /d/yxm/testgit (master)
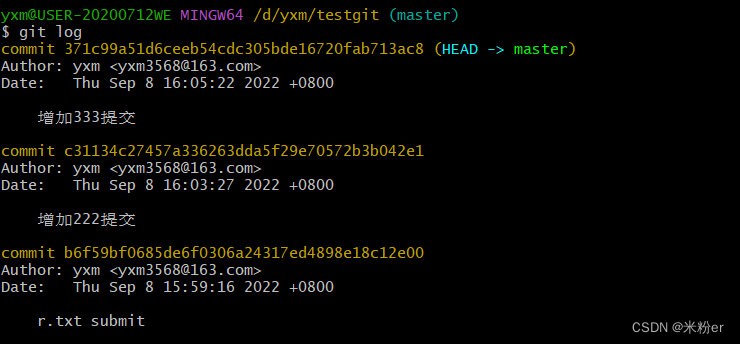
$ git commit r.txt -m "增加333提交"
warning: in the working copy of 'r.txt', LF will be replaced by CRLF the next time Git touches it
[master 371c99a] 增加333提交
1 file changed, 1 insertion(+)
使用git log查看提交日志
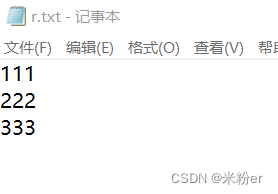
r.txt文件内容为
回退到上一个版本222添加
yxm@USER-20200712WE MINGW64 /d/yxm/testgit (master)
$ git reset --hard HEAD^
HEAD is now at c31134c 增加222提交

yxm@USER-20200712WE MINGW64 /d/yxm/testgit (master)
$ cat r.txt
111
222
再恢复回退到最新的版本到添加333
使用命令方法如下:
git reset --hard 版本号
查看版本号
git reflog
yxm@USER-20200712WE MINGW64 /d/yxm/testgit (master)
$ git reflog
c31134c (HEAD -> master) HEAD@{0}: reset: moving to HEAD^
371c99a HEAD@{1}: commit: 增加333提交
c31134c (HEAD -> master) HEAD@{2}: commit: 增加222提交
b6f59bf HEAD@{3}: commit: r.txt submit
yxm@USER-20200712WE MINGW64 /d/yxm/testgit (master)
$ git reset --hard 371c99a
HEAD is now at 371c99a 增加333提交
再次查看r.txt内容
yxm@USER-20200712WE MINGW64 /d/yxm/testgit (master)
$ cat r.txt
111
222
333
git branch                  #列出所有分支
git checkout -b [分支名字]   #创建一个分支并切换到该分支
git merge [分支名字]          # 合并指定分支到当前分支
git branch -d [分支名字]  # 删除分支
创建dev分支,然后切换到dev分支上
git checkout -b dev
在dev分支操作r.txt,合并到master主分支
yxm@USER-20200712WE MINGW64 /d/yxm/testgit (dev)
$ cat r.txt
111
222
333
444
555

yxm@USER-20200712WE MINGW64 /d/yxm/testgit (dev)
$ git add r.txt
warning: in the working copy of 'r.txt', LF will be replaced by CRLF the next time Git touches it

yxm@USER-20200712WE MINGW64 /d/yxm/testgit (dev)
$ git commit -m "dev branch"
[dev 4f3b785] dev branch
 1 file changed, 2 insertions(+)
切换主分支并合并
yxm@USER-20200712WE MINGW64 /d/yxm/testgit (dev)
$ git checkout master
Switched to branch 'master'

yxm@USER-20200712WE MINGW64 /d/yxm/testgit (master)
$ cat r.txt
111
222
333

yxm@USER-20200712WE MINGW64 /d/yxm/testgit (master)
$ git merge dev
Updating cf7e35d..4f3b785
Fast-forward
 r.txt | 2 ++
 1 file changed, 2 insertions(+)

yxm@USER-20200712WE MINGW64 /d/yxm/testgit (master)
$ cat r.txt
111
222
333
444
555
删除dev分支
yxm@USER-20200712WE MINGW64 /d/yxm/testgit (master)
$ git branch -d dev
Deleted branch dev (was 4f3b785).

yxm@USER-20200712WE MINGW64 /d/yxm/testgit (master)
$ git branch
* master
Git代码托管平台,首先推荐的是GitHub,好多好的开源项目都来自GitHub,但是GitHub只能新建公开的Git仓库,私有仓库要收费,有时候访问比较卡,如果你做的是一个开源项目,可以首选GitHub。下面推荐几个比较好的Git代码托管平台:

已存在仓库
 git remote add origin https://gitee.com/yangxumin/test.git
 git push -u origin "master"
git pull 命令用于从远程获取代码并合并本地的版本
yxm@USER-20200712WE MINGW64 /d/yxm/testgit2
$ git init
Initialized empty Git repository in D:/yxm/testgit2/.git/

yxm@USER-20200712WE MINGW64 /d/yxm/testgit2 (master)
$ git pull https://gitee.com/yangxumin/test.git
system-view进入系统视图quit退到系统视图sysname交换机命名vlan20创建vlan(进入vlan20)displayvlan显示vlanundovlan20删除vlan20displayvlan20显示vlan里的端口20Interfacee1/0/24进入端口24portlink-typeaccessvlan20把当前端口放入vlan20undoporte1/0/10删除当前VLAN端口10displaycurrent-configuration显示当前配置02配置交换机支持TELNETinterfacevlan1进入VLAN1ipaddress192.168.3.100
嗨~大家好,这里是可莉!今天给大家带来的是7个C语言的经典基础代码~那一起往下看下去把【程序一】打印100到200之间的素数#includeintmain(){ inti; for(i=100;i 【程序二】输出乘法口诀表#includeintmain(){inti;for(i=1;i 【程序三】判断1000年---2000年之间的闰年#includeintmain(){intyear;for(year=1000;year 【程序四】给定两个整形变量的值,将两个值的内容进行交换。这里提供两种方法来进行交换,第一种为创建临时变量来进行交换,第二种是不创建临时变量而直接进行交换。1.创建临时变量来
文章目录git常用命令(简介,详细参数往下看)Git提交代码步骤gitpullgitstatusgitaddgitcommitgitpushgit代码冲突合并问题方法一:放弃本地代码方法二:合并代码常用命令以及详细参数gitadd将文件添加到仓库:gitdiff比较文件异同gitlog查看历史记录gitreset代码回滚版本库相关操作远程仓库相关操作分支相关操作创建分支查看分支:gitbranch合并分支:gitmerge删除分支:gitbranch-ddev查看分支合并图:gitlog–graph–pretty=oneline–abbrev-commit撤消某次提交git用户名密码相关配置g
关于如何使用git设置类似Dropbox的服务,您有什么建议吗?您认为git是解决此问题的合适工具吗?我在考虑使用git+rush解决方案,你觉得怎么样? 最佳答案 检查这个开源项目:https://github.com/hbons/SparkleShare来自项目的自述文件:Howdoesitwork?SparkleSharecreatesaspecialfolderonyourcomputer.Youcanaddremotelyhostedfolders(or"projects")tothisfolder.Theseprojec
我编写了一个非常简单的“部署”脚本,作为我的裸git存储库中的post-updateHook运行。变量如下livedomain=~/mydomain.comstagingdomain=~/stage.mydomain.comgitrepolocation=~/git.mydomain.com/thisrepo.git(bare)core=~/git.mydomain.com/thisrepo.gitcore==addedremoteintoeachlive&stagegitslive和stage都初始化了gitrepos(非裸),我已经将我的裸仓库作为远程添加到它们中的每一个(名为co
我正在安装gitlabhq,并且在Gemfile中有对某些资源的“git://...”的引用。但是,我在公司防火墙后面,所以我必须使用http://。我可以手动编辑Gemfile,但我想知道是否有另一种方法告诉bundler使用http://作为git存储库? 最佳答案 您可以通过运行gitconfig--globalurl."https://".insteadOfgit://或通过将以下内容添加到~/.gitconfig:[url"https://"]insteadOf=git://
Activeadmingem已添加到我的rails项目中,但每次我尝试安装railsgactive_admin:install时,我都会收到类似的错误git://github.com/activeadmin/activeadmin.git(atmaster)isnotyetcheckedout.Runbundleinstallfirst.我肯定在运行“railsgactive_admin:install”之前运行了bundle。运行“bundleshow”后,我看到我已将“*activeadmin(1.0.0.pre3f916d6)”添加到我的项目中,但不断收到此错误消息。我的gem文
我在bitbucket上创建了一个私有(private)git存储库并提交了代码。现在我想导出所有(提交、代码、历史记录)并将其导入github上的gitrepo。有没有办法做到这一点?谢谢 最佳答案 在本地检查所有内容到您的计算机和gitpull。创建一个github存储库将此存储库添加为您的第二个远程(“使用gitremote添加githubURL”)推送到第二个Remote 关于ruby-git:从bitbucket导出并导入github(带提交),我们在StackOverflow
亲测可用。Anerroroccurredwhileresolvingpackages:Projecthasinvaliddependencies: com.unity.xxx:No'git'executablewasfound.PleaseinstallGitonyour systemthenrestartUnityandUnityHub在我们使用PackageManager时,Unity允许我们使用Git上的package(点击加号,选择addpackagefromgitURL,或者是直接在Asset/Packages/manifest.json中添加包名)。但是这种操作需要我们事先装好g
我在Windows上使用GitBash来完成我的大部分Rails工作,每次我运行bundleexecrspecspec它都会提醒我“你必须geminstallwin32console才能使用Windows上的颜色”,然后以纯黑色和白色运行RSpec。但是我确实安装了win32console,当我在列表中运行gemlist时,它有win32console(1.3.0x86-mingw32)。RSpec工作正常,但我希望它有一些颜色。我用谷歌搜索了这个并找到了多种解决方案,但似乎没有一个适合我。有人可以写出在GitBashforWindows上使用RSpec获取颜色的“循序渐进”方法吗?