Spring Boot 的定时任务:
代码:
package com.accord.task;

import java.text.SimpleDateFormat;
import java.util.Date;

import org.springframework.scheduling.annotation.Scheduled;
import org.springframework.stereotype.Component;

/**
 * 从配置文件加载任务信息
 * @author 王久印
 */
@Component
public class ScheduledTask {

  private static final SimpleDateFormat dateFormat = new SimpleDateFormat("HH:mm:ss");

  //@Scheduled(fixedDelayString = "${jobs.fixedDelay}")
  @Scheduled(fixedDelayString = "2000")
  public void getTask1() {
    System.out.println("任务1,从配置文件加载任务信息,当前时间:" + dateFormat.format(new Date()));
  }

  @Scheduled(cron = "${jobs.cron}")
  public void getTask2() {
    System.out.println("任务2,从配置文件加载任务信息,当前时间:" + dateFormat.format(new Date()));
  }
}
application.properties文件:
jobs.fixedDelay=5000
jobs.cron=0/5 * *  * * ?
SpringBootCron2Application.java中:
package com.accord;

import org.springframework.boot.SpringApplication;
import org.springframework.boot.autoconfigure.SpringBootApplication;
import org.springframework.scheduling.annotation.EnableScheduling;

@SpringBootApplication
@EnableScheduling
public class SpringBootCron2Application {
 public static void main(String[] args) {
  SpringApplication.run(SpringBootCron2Application.class, args);
 }
}
Spring Boot 基础就不介绍了,推荐看这个免费教程:
注:@EnableScheduling 这个一定要加上;否则,不会定时启动任务!
@Scheduled中的参数说明:
@Scheduled(fixedRate=2000):上一次开始执行时间点后2秒再次执行;@Scheduled(fixedDelay=2000):上一次执行完毕时间点后2秒再次执行;@Scheduled(initialDelay=1000, fixedDelay=2000):第一次延迟1秒执行,然后在上一次执行完毕时间点后2秒再次执行;@Scheduled(cron="* * * * * ?"):按cron规则执行。package com.accord.task;
import org.slf4j.Logger;
import org.slf4j.LoggerFactory;
import org.springframework.scheduling.annotation.Scheduled;
import org.springframework.stereotype.Component;
/**
* 构建执行定时任务
* @author 王久印
* TODO
*/
@Component
public class ScheduledTask2 {
private Logger logger = LoggerFactory.getLogger(ScheduledTask2.class);
private int fixedDelayCount = 1;
private int fixedRateCount = 1;
private int initialDelayCount = 1;
private int cronCount = 1;
@Scheduled(fixedDelay = 5000) //fixedDelay = 5000表示当前方法执行完毕5000ms后,Spring scheduling会再次调用该方法
public void testFixDelay() {
logger.info("===fixedDelay: 第{}次执行方法", fixedDelayCount++);
}
@Scheduled(fixedRate = 5000) //fixedRate = 5000表示当前方法开始执行5000ms后,Spring scheduling会再次调用该方法
public void testFixedRate() {
logger.info("===fixedRate: 第{}次执行方法", fixedRateCount++);
}
@Scheduled(initialDelay = 1000, fixedRate = 5000) //initialDelay = 1000表示延迟1000ms执行第一次任务
public void testInitialDelay() {
logger.info("===initialDelay: 第{}次执行方法", initialDelayCount++);
}
@Scheduled(cron = "0 0/1 * * * ?") //cron接受cron表达式,根据cron表达式确定定时规则
public void testCron() {
logger.info("===initialDelay: 第{}次执行方法", cronCount++);
}
}
使用 @Scheduled来创建定时任务 这个注解用来标注一个定时任务方法。
通过看 @Scheduled源码可以看出它支持多种参数:
package com.accord;

import org.springframework.boot.SpringApplication;
import org.springframework.boot.autoconfigure.SpringBootApplication;
import org.springframework.scheduling.annotation.EnableScheduling;

@SpringBootApplication
@EnableScheduling
public class SpringBootCron2Application {
 public static void main(String[] args) {
  SpringApplication.run(SpringBootCron2Application.class, args);
 }
}
注:这里的 @EnableScheduling 注解,它的作用是发现注解 @Scheduled的任务并由后台执行。没有它的话将无法执行定时任务。
引用官方文档原文:
@EnableScheduling ensures that a background task executor is created. Without it, nothing gets scheduled.
就完成了一个简单的定时任务模型,下面执行springBoot观察执行结果:
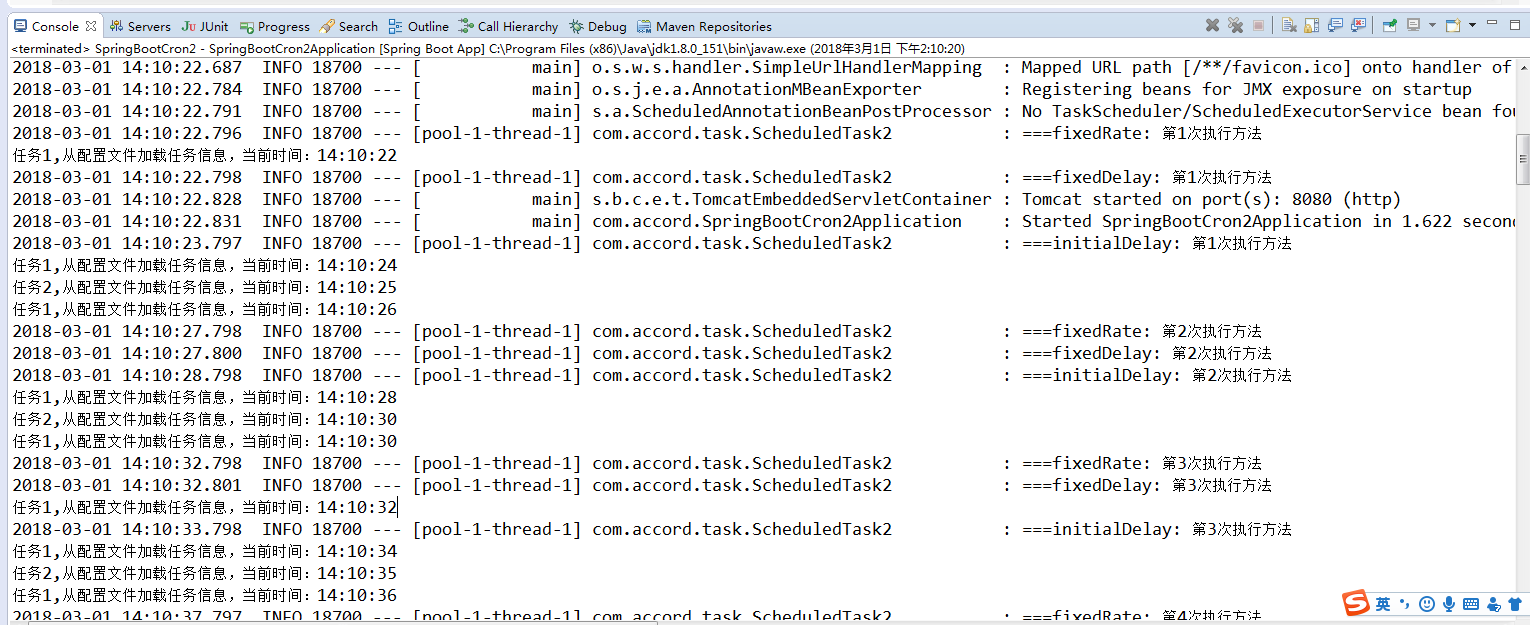
从控制台输入的结果中我们可以看出所有的定时任务都是在同一个线程池用同一个线程来处理的,那么我们如何来并发的处理各定时任务呢,请继续向下看。
看到控制台输出的结果,所有的定时任务都是通过一个线程来处理的,我估计是在定时任务的配置中设定了一个SingleThreadScheduledExecutor,于是我看了源码,从ScheduledAnnotationBeanPostProcessor类开始一路找下去。果然,在ScheduledTaskRegistrar(定时任务注册类)中的ScheduleTasks中又这样一段判断:
if (this.taskScheduler == null) {
 this.localExecutor = Executors.newSingleThreadScheduledExecutor();
 this.taskScheduler = new ConcurrentTaskScheduler(this.localExecutor);
}
这就说明如果taskScheduler为空,那么就给定时任务做了一个单线程的线程池,正好在这个类中还有一个设置taskScheduler的方法:
public void setScheduler(Object scheduler) {
 Assert.notNull(scheduler, "Scheduler object must not be null");
 if (scheduler instanceof TaskScheduler) {
  this.taskScheduler = (TaskScheduler) scheduler;
 }
 else if (scheduler instanceof ScheduledExecutorService) {
  this.taskScheduler = new ConcurrentTaskScheduler(((ScheduledExecutorService) scheduler));
 }
 else {
  throw new IllegalArgumentException("Unsupported scheduler type: " + scheduler.getClass());
 }
}
这样问题就很简单了,我们只需用调用这个方法显式的设置一个ScheduledExecutorService就可以达到并发的效果了。我们要做的仅仅是实现SchedulingConfigurer接口,重写configureTasks方法就OK了;
package com.accord.task;

import org.springframework.context.annotation.Configuration;
import org.springframework.scheduling.annotation.SchedulingConfigurer;
import org.springframework.scheduling.config.ScheduledTaskRegistrar;

import java.util.concurrent.Executors;

/**
 * 多线程执行定时任务
 * @author 王久印
 */
@Configuration
//所有的定时任务都放在一个线程池中,定时任务启动时使用不同都线程。
public class ScheduleConfig implements SchedulingConfigurer {
    @Override
    public void configureTasks(ScheduledTaskRegistrar taskRegistrar) {
        //设定一个长度10的定时任务线程池
        taskRegistrar.setScheduler(Executors.newScheduledThreadPool(10));
    }
}
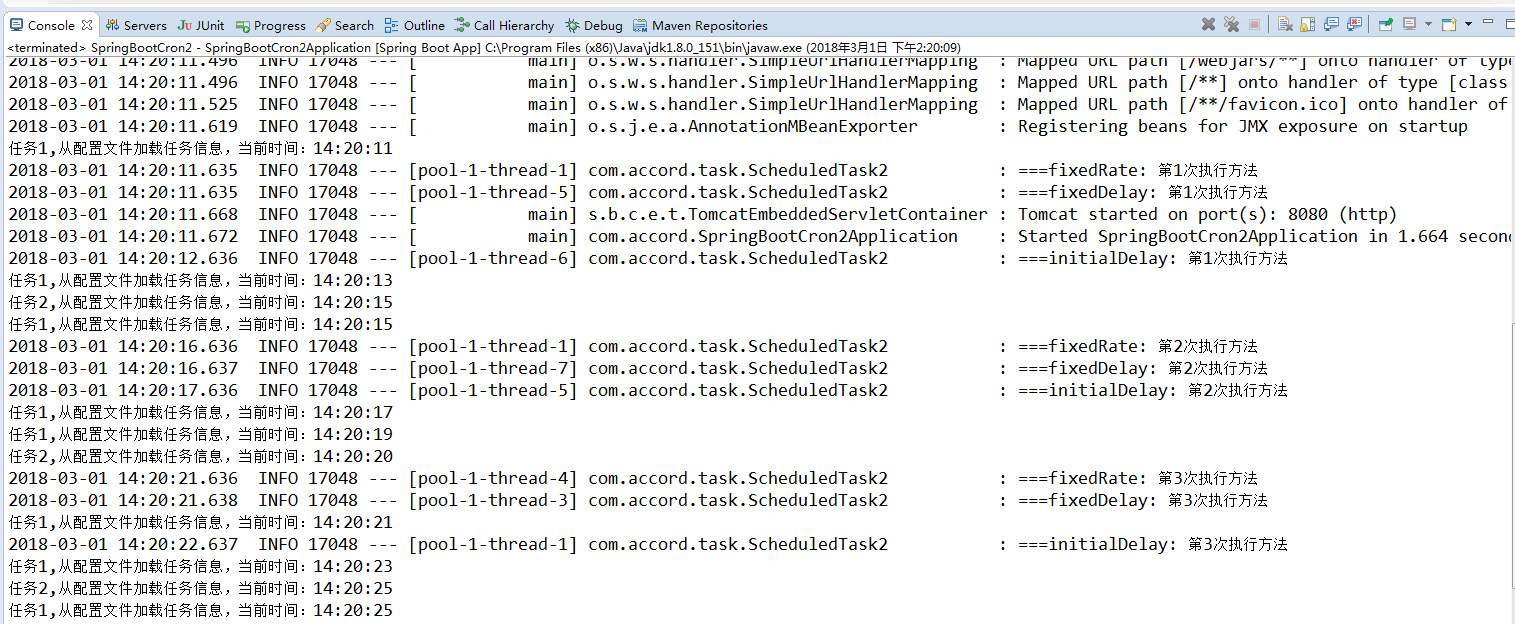
通过控制台输出的结果看出每个定时任务都是在通过不同的线程来处理了。
来源:wangjiuyin.blog.csdn.net/article/details/79411952
近期热文推荐:
1.1,000+ 道 Java面试题及答案整理(2022最新版)
4.别再写满屏的爆爆爆炸类了,试试装饰器模式,这才是优雅的方式!!
觉得不错,别忘了随手点赞+转发哦!
我试图在一个项目中使用rake,如果我把所有东西都放到Rakefile中,它会很大并且很难读取/找到东西,所以我试着将每个命名空间放在lib/rake中它自己的文件中,我添加了这个到我的rake文件的顶部:Dir['#{File.dirname(__FILE__)}/lib/rake/*.rake'].map{|f|requiref}它加载文件没问题,但没有任务。我现在只有一个.rake文件作为测试,名为“servers.rake”,它看起来像这样:namespace:serverdotask:testdoputs"test"endend所以当我运行rakeserver:testid时
我试图获取一个长度在1到10之间的字符串,并输出将字符串分解为大小为1、2或3的连续子字符串的所有可能方式。例如:输入:123456将整数分割成单个字符,然后继续查找组合。该代码将返回以下所有数组。[1,2,3,4,5,6][12,3,4,5,6][1,23,4,5,6][1,2,34,5,6][1,2,3,45,6][1,2,3,4,56][12,34,5,6][12,3,45,6][12,3,4,56][1,23,45,6][1,2,34,56][1,23,4,56][12,34,56][123,4,5,6][1,234,5,6][1,2,345,6][1,2,3,456][123
我主要使用Ruby来执行此操作,但到目前为止我的攻击计划如下:使用gemsrdf、rdf-rdfa和rdf-microdata或mida来解析给定任何URI的数据。我认为最好映射到像schema.org这样的统一模式,例如使用这个yaml文件,它试图描述数据词汇表和opengraph到schema.org之间的转换:#SchemaXtoschema.orgconversion#data-vocabularyDV:name:namestreet-address:streetAddressregion:addressRegionlocality:addressLocalityphoto:i
如何使用RSpec::Core::RakeTask初始化RSpecRake任务?require'rspec/core/rake_task'RSpec::Core::RakeTask.newdo|t|#whatdoIputinhere?endInitialize函数记录在http://rubydoc.info/github/rspec/rspec-core/RSpec/Core/RakeTask#initialize-instance_method没有很好的记录;它只是说:-(RakeTask)initialize(*args,&task_block)AnewinstanceofRake
我有一个用户工厂。我希望默认情况下确认用户。但是鉴于unconfirmed特征,我不希望它们被确认。虽然我有一个基于实现细节而不是抽象的工作实现,但我想知道如何正确地做到这一点。factory:userdoafter(:create)do|user,evaluator|#unwantedimplementationdetailshereunlessFactoryGirl.factories[:user].defined_traits.map(&:name).include?(:unconfirmed)user.confirm!endendtrait:unconfirmeddoenden
question的一些答案关于redirect_to让我想到了其他一些问题。基本上,我正在使用Rails2.1编写博客应用程序。我一直在尝试自己完成大部分工作(因为我对Rails有所了解),但在需要时会引用Internet上的教程和引用资料。我设法让一个简单的博客正常运行,然后我尝试添加评论。靠我自己,我设法让它进入了可以从script/console添加评论的阶段,但我无法让表单正常工作。我遵循的其中一个教程建议在帖子Controller中创建一个“评论”操作,以添加评论。我的问题是:这是“标准”方式吗?我的另一个问题的答案之一似乎暗示应该有一个CommentsController参
华为OD机试题本篇题目:明明的随机数题目输入描述输出描述:示例1输入输出说明代码编写思路最近更新的博客华为od2023|什么是华为od,od薪资待遇,od机试题清单华为OD机试真题大全,用Python解华为机试题|机试宝典【华为OD机试】全流程解析+经验分享,题型分享,防作弊指南华为o
在应用开发中,有时候我们需要获取系统的设备信息,用于数据上报和行为分析。那在鸿蒙系统中,我们应该怎么去获取设备的系统信息呢,比如说获取手机的系统版本号、手机的制造商、手机型号等数据。1、获取方式这里分为两种情况,一种是设备信息的获取,一种是系统信息的获取。1.1、获取设备信息获取设备信息,鸿蒙的SDK包为我们提供了DeviceInfo类,通过该类的一些静态方法,可以获取设备信息,DeviceInfo类的包路径为:ohos.system.DeviceInfo.具体的方法如下:ModifierandTypeMethodDescriptionstatic StringgetAbiList()Obt
C#实现简易绘图工具一.引言实验目的:通过制作窗体应用程序(C#画图软件),熟悉基本的窗体设计过程以及控件设计,事件处理等,熟悉使用C#的winform窗体进行绘图的基本步骤,对于面向对象编程有更加深刻的体会.Tutorial任务设计一个具有基本功能的画图软件**·包括简单的新建文件,保存,重新绘图等功能**·实现一些基本图形的绘制,包括铅笔和基本形状等,学习橡皮工具的创建**·设计一个合理舒适的UI界面**注明:你可能需要先了解一些关于winform窗体应用程序绘图的基本知识,以及关于GDI+类和结构的知识二.实验环境Windows系统下的visualstudio2017C#窗体应用程序三.
MIMO技术的优缺点优点通过下面三个增益来总体概括:阵列增益。阵列增益是指由于接收机通过对接收信号的相干合并而活得的平均SNR的提高。在发射机不知道信道信息的情况下,MIMO系统可以获得的阵列增益与接收天线数成正比复用增益。在采用空间复用方案的MIMO系统中,可以获得复用增益,即信道容量成倍增加。信道容量的增加与min(Nt,Nr)成正比分集增益。在采用空间分集方案的MIMO系统中,可以获得分集增益,即可靠性性能的改善。分集增益用独立衰落支路数来描述,即分集指数。在使用了空时编码的MIMO系统中,由于接收天线或发射天线之间的间距较远,可认为它们各自的大尺度衰落是相互独立的,因此分布式MIMO
