本文覆盖华为数通HCIA和HCIP的全套实验,考试代码为H12-811、H12-821、H12-831。
来看看具体实验目录:

HCIA目录详情
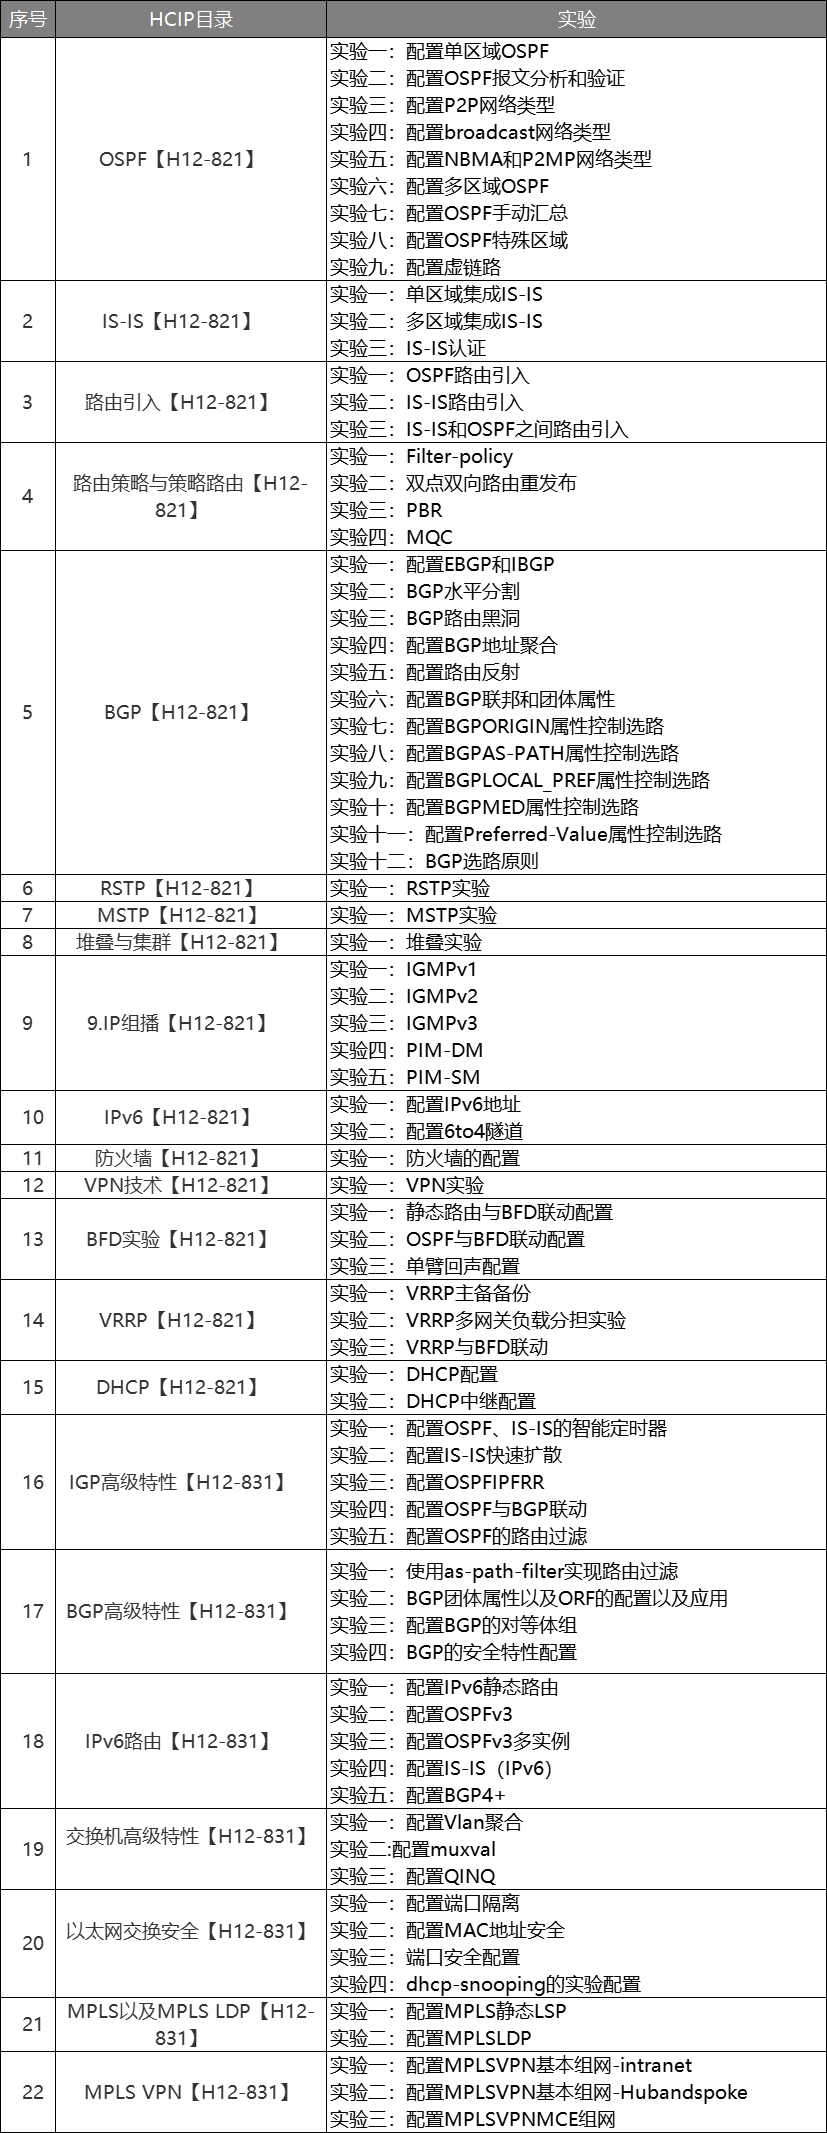
HCIP目录详情
由于实验内容太多,本篇在此列举一个综合实验详细脚本,更多实验讲持续更新。
需要全套实验拓扑的朋友,可以关注+点赞后,给我私信【实验】获取。

HCIA全套实验拓扑

HCIP全套实验拓扑
需要全套实验拓扑的朋友,可以关注+点赞后,给我私信【实验】获取。

市场部属于VLAN10,财务部属于VLAN20,技术部属于VLAN30,生产部属于VLAN40,接待中心属于VLAN50,数据中心属于VLAN60。
LSW1与LSW2之间的链路带宽要求为2G
通过STP的配置阻塞LSW3的e0/0/4,阻塞LSW4的e0/0/3
通过DHCP让市场部、财务部、技术部、生产部获得IP地址,IP规则如下:

接待中心通过AC下发配置给AP1让客户可以通过无线上网
把数据中心的服务器搭建好,可以为用户提供服务
AR1通过拨号上网
LSW1的配置
<Huawei>system-view
Enter system view, return user view with Ctrl+Z.
[Huawei]undo info-center enable
Info: Information center is disabled.
[Huawei]sysname LSW1
[LSW1]vlan batch 10 20 30 40 50 60
[LSW1]quit
LSW2的配置
<Huawei>system-view
Enter system view, return user view with Ctrl+Z.
[Huawei]undo info-center enable
[Huawei]sysname LSW2
[LSW2]vlan batch 10 20 30 40 50 60
[LSW2]quit
LSW3的配置
<Huawei>system-view
Enter system view, return user view with Ctrl+Z.
[Huawei]undo info-center enable
[Huawei]sysname LSW3
[LSW3]vlan batch 10 20 30 40 50 60
[LSW3]quit
LSW4的配置
<Huawei>system-view
Enter system view, return user view with Ctrl+Z.
[Huawei]undo info-center enable
Info: Information center is disabled.
[Huawei]sysname LSW4
[LSW4]vlan batch 10 20 30 40 50 60
[LSW4]quit
LSW6的配置
<Huawei>system-view
Enter system view, return user view with Ctrl+Z.
[Huawei]undo info-center enable
Info: Information center is disabled.
[Huawei]sysname LSW6
[LSW6]vlan batch 10 20 30 40 50 60
[LSW6]quit
LSW1的配置
LSW2的配置
LSW3的配置
[LSW3]interface e0/0/1
[LSW3-Ethernet0/0/1]port link-type access
[LSW3-Ethernet0/0/1]port default vlan 10
[LSW3-Ethernet0/0/1]quit
[LSW3]interface e0/0/2
[LSW3-Ethernet0/0/2]port link-type access
[LSW3-Ethernet0/0/2]port default vlan 20
[LSW3-Ethernet0/0/2]quit
LSW4的配置
[LSW4]interface e0/0/1
[LSW4-Ethernet0/0/1]port link-type access
[LSW4-Ethernet0/0/1]port default vlan 30
[LSW4-Ethernet0/0/1]quit
[LSW4]interface e0/0/2
[LSW4-Ethernet0/0/2]port link-type access
[LSW4-Ethernet0/0/2]port default vlan 40
[LSW4-Ethernet0/0/2]quit
LSW6的配置
[LSW6]interface g0/0/1
[LSW6-GigabitEthernet0/0/1]port link-type access
[LSW6-GigabitEthernet0/0/1]port default vlan 60
[LSW6-GigabitEthernet0/0/1]quit
[LSW6]interface g0/0/2
[LSW6-GigabitEthernet0/0/2]port link-type access
[LSW6-GigabitEthernet0/0/2]port default vlan 60
[LSW6-GigabitEthernet0/0/2]quit
LSW1的配置
[LSW1]port-group 1
[LSW1-port-group-1]group-member g0/0/1 g0/0/4 g0/0/6
[LSW1-port-group-1]port link-type trunk
[LSW1-port-group-1]port trunk allow-pass vlan 10 20 30 40 50 60
[LSW1-port-group-1]quit
LSW2的配置
[LSW2]port-group 1
[LSW2-port-group-1]group-member GigabitEthernet 0/0/1 g0/0/4 g0/0/5
[LSW2-port-group-1]quit
[LSW2-port-group-1]port link-type trunk
[LSW2-port-group-1]port trunk allow-pass vlan 10 20 30 40 50 60
[LSW2-port-group-1]quit
LSW3的配置
[LSW3]port-group 1
[LSW3-port-group-1]group-member e0/0/3 e0/0/4
[LSW3-port-group-1]port link-type trunk
[LSW3-port-group-1]port trunk allow-pass vlan 10 20 30 40 50 60
[LSW3-port-group-1]quit
LSW4的配置
[LSW4]port-group 1
[LSW4-port-group-1]group-member e0/0/3 to e0/0/5
[LSW4-port-group-1]port link-type trunk
[LSW4-port-group-1]port trunk allow-pass vlan 10 20 30 40 50 60
[LSW4-port-group-1]quit
LSW6的配置
[LSW6]interface g0/0/3
[LSW6-GigabitEthernet0/0/3]port link-type trunk
[LSW6-GigabitEthernet0/0/3]port trunk allow-pass vlan 10 20 30 40 50 60
[LSW6-GigabitEthernet0/0/3]quit
LSW1的配置
[LSW1]interface Eth-Trunk 1
[LSW1-Eth-Trunk1]trunkport GigabitEthernet 0/0/2 to 0/0/3
[LSW1-Eth-Trunk1]port link-type trunk
[LSW1-Eth-Trunk1]port trunk allow-pass vlan all
[LSW1-Eth-Trunk1]quit
LSW2的配置
[LSW2]interface Eth-Trunk 1
[LSW2-Eth-Trunk1]trunkport GigabitEthernet 0/0/2 to 0/0/3
[LSW2-Eth-Trunk1]port link-type trunk
[LSW2-Eth-Trunk1]port trunk allow-pass vlan all
[LSW2-Eth-Trunk1]quit[LSW1]stp root primary
[LSW2]stp root secondary市场部
[LSW1]interface Vlanif 10
[LSW1-Vlanif10]ip address 192.168.10.1 24
[LSW1-Vlanif10]quit

[LSW1]dhcp enable

[LSW1]ip pool vlan10
[LSW1-ip-pool-vlan10]network 192.168.10.0 mask 24
[LSW1-ip-pool-vlan10]dns-list 3.3.3.3 4.4.4.4
[LSW1-ip-pool-vlan10]gateway-list 192.168.10.1
[LSW1-ip-pool-vlan10]quit

[LSW1]interface Vlanif 10
[LSW1-Vlanif10]dhcp select global
[LSW1-Vlanif10]quit
财务部
[LSW1]interface Vlanif 20
[LSW1-Vlanif20]ip address 192.168.20.1 24
[LSW1-Vlanif20]quit

[LSW1]ip pool vlan20
[LSW1-ip-pool-vlan20]network 192.168.20.0 mask 24
[LSW1-ip-pool-vlan20]gateway-list 192.168.20.1
[LSW1-ip-pool-vlan20]dns-list 3.3.3.3 4.4.4.4
[LSW1-ip-pool-vlan20]quit

[LSW1]interface Vlanif 20
[LSW1-Vlanif20]dhcp select global
[LSW1-Vlanif20]quit
技术部
[LSW2]dhcp enable

[LSW2]interface Vlanif 30
[LSW2-Vlanif30]ip address 192.168.30.1 24
[LSW2-Vlanif30]dhcp select interface
[LSW2-Vlanif30]dhcp server dns-list 3.3.3.3 4.4.4.4
生产部
[LSW2]interface Vlanif 40

[LSW2-Vlanif40]ip address 192.168.40.1 24
[LSW2-Vlanif40]dhcp select interface
[LSW2-Vlanif40]dhcp server dns-list 3.3.3.3 4.4.4.4
[LSW2-Vlanif40]quit交换机LSW4的配置
[LSW4]vlan 70
[LSW4-vlan70]quit

[LSW4]interface e0/0/5
[LSW4-Ethernet0/0/5]port trunk pvid vlan 70
[LSW4-Ethernet0/0/5]port trunk allow-pass vlan 70   //trunk之前已创建

[LSW4-Ethernet0/0/5]quit

[LSW4]interface e0/0/4 // 因为e0/0/3阻塞了
[LSW4-Ethernet0/0/3]port trunk allow-pass vlan 70  //trunk之前已创建
[LSW4-Ethernet0/0/3]quit
LSW2的配置
[LSW2]vlan 70
[LSW2-vlan70]quit

[LSW2]interface g0/0/1
[LSW2-GigabitEthernet0/0/1]port trunk allow-pass vlan 70
[LSW2-GigabitEthernet0/0/1]quit

[LSW2]interface g0/0/5
[LSW2-GigabitEthernet0/0/5]port trunk allow-pass vlan 50 70
[LSW2-GigabitEthernet0/0/5]quit

[LSW2]interface Vlanif 50
[LSW2-Vlanif50]ip address 192.168.50.1 24
[LSW2-Vlanif50]dhcp select interface  //为无线客户分配IP地址
AC的配置
<AC6005>system-view
Enter system view, return user view with Ctrl+Z.
[AC6005]undo info-center enable

[AC6005]sysname AC

[AC]vlan batch 50 70

[AC]interface g0/0/1
[AC-GigabitEthernet0/0/1]port link-type trunk
[AC-GigabitEthernet0/0/1]port trunk allow-pass vlan 50 70
[AC-GigabitEthernet0/0/1]quit

[AC]dhcp enable

[AC]interface Vlanif 70
[AC-Vlanif70]ip address 192.168.70.1 24
[AC-Vlanif70]dhcp  select interface
[AC-Vlanif70]quit

[AC-wlan-view]regulatory-domain-profile name x1
[AC-wlan-regulate-domain-x1]country-code CN
[AC-wlan-regulate-domain-x1]quit

[AC-wlan-view]ap-group name x
[AC-wlan-ap-group-x]regulatory-domain-profile x1
Warning: Modifying the country code will clear channel, power and antenna gain c
onfigurations of the radio and reset the AP. Continue?[Y/N]:y

[AC]capwap source interface Vlanif 70

[AC]wlan
[AC-wlan-view]ap auth-mode mac-auth
[AC-wlan-view]ap-id 1 ap-mac 00e0-fc0f-47d0
[AC-wlan-ap-1]ap-name client
[AC-wlan-ap-1]ap-group x
Warning: This operation may cause AP reset. If the country code changes, it will
 clear channel, power and antenna gain configurations of the radio, Whether to c
ontinue? [Y/N]:y

注意:为什么AP拿不到地址,因为STP把e0/0/3阻塞了,所以其它交换机还要创建VLAN70,trunk要允许70通过

[AC]wlan
[AC-wlan-view]security-profile name y1
[AC-wlan-sec-prof-y1]security wpa-wpa2 psk pass-phrase huawei@123 aes
[AC-wlan-sec-prof-y1]quit
[AC-wlan-view]ssid-profile name y2
[AC-wlan-ssid-prof-y2]ssid hcia
Info: This operation may take a few seconds, please wait.done.
[AC-wlan-ssid-prof-y2]quit
[AC-wlan-view]vap-profile name y
[AC-wlan-vap-prof-y]forward-mode tunnel
Info: This operation may take a few seconds, please wait.done.
[AC-wlan-vap-prof-y]service-vlan vlan-id 50
[AC-wlan-vap-prof-y]security-profile y1
[AC-wlan-vap-prof-y]ssid-profile y2
[AC-wlan-vap-prof-y]quit
[AC-wlan-view]ap-group name x
[AC-wlan-ap-group-x]vap-profile y wlan 1 radio 0
[LSW1]interface Vlanif 60
[LSW1-Vlanif60]ip address 192.168.60.1 24
[LSW1-Vlanif60]quit
第一步:LSW1与AR1的地址
[LSW1]interface Vlanif 200
[LSW1-Vlanif200]ip address 10.1.1.1 24
[LSW1-Vlanif200]quit
[LSW1]interface g0/0/5
[LSW1-GigabitEthernet0/0/5]port link-type access
[LSW1-GigabitEthernet0/0/5]port default vlan 200
[LSW1-GigabitEthernet0/0/5]quit
第二步:路由器的配置
<Huawei>system-view
Enter system view, return user view with Ctrl+Z.
[Huawei]undo info-center enable
Info: Information center is disabled.
[Huawei]sysname R1
[R1]int
[R1]interface g0/0/0
[R1-GigabitEthernet0/0/0]ip address 10.1.1.254 24
[R1-GigabitEthernet0/0/0]quit
第三步:运行OSPF
[R1]ospf router-id 1.1.1.1
[R1-ospf-1]area 0
[R1-ospf-1-area-0.0.0.0]network 10.1.1.0 0.0.0.255
[R1-ospf-1-area-0.0.0.0]quit

[LSW1]ospf router-id 2.2.2.2
[LSW1-ospf-1]area 0
[LSW1-ospf-1-area-0.0.0.0]network 192.168.60.0 0.0.0.255
[LSW1-ospf-1-area-0.0.0.0]network 192.168.10.0 0.0.0.255
[LSW1-ospf-1-area-0.0.0.0]network 192.168.20.0 0.0.0.255
[LSW1-ospf-1-area-0.0.0.0]quit


[LSW2]ospf router-id 3.3.3.3
[LSW2-ospf-1]area 0
[LSW2-ospf-1-area-0.0.0.0]network 192.168.30.0 0.0.0.255
[LSW2-ospf-1-area-0.0.0.0]network 192.168.40.0 0.0.0.255
[LSW2-ospf-1-area-0.0.0.0]network 192.168.50.0 0.0.0.255
注意:LSW1和LSW2没有直连接口,所以在要LSW2上创建int vlan 10,int vlan 20,并宣告进OSPF
第一步:拨号服务器的配置
<Huawei>system-view
Enter system view, return user view with Ctrl+Z.
[Huawei]undo info-center enable
Info: Information center is disabled.
[Huawei]sysname AR2
[AR2]interface LoopBack 0
[AR2-LoopBack0]ip address 8.8.8.8 24
[AR2-LoopBack0]quit

[AR2]ip pool lw
Info: It's successful to create an IP address pool.
[AR2-ip-pool-lw]network 100.1.1.0 mask 24
[AR2-ip-pool-lw]gateway-list 100.1.1.1
[AR2-ip-pool-lw]quit

[AR2]aaa
[AR2-aaa]local-user huawei password cipher 1234
[AR2-aaa]local-user huawei service-type ppp

[AR2]interface Virtual-Template 1
[AR2-Virtual-Template1]ip address 100.1.1.1 24
[AR2-Virtual-Template1]pp authentication-mode chap
[AR2-Virtual-Template1]remote address pool lw
[AR2-Virtual-Template1]quit

[AR2]interface g0/0/0
[AR2-GigabitEthernet0/0/0]pppoe-server bind virtual-template 1
[AR2-GigabitEthernet0/0/0]quit
第二步:拨号客户端的配置
[R1]interface Dialer 0
[R1-Dialer0]dialer user user1
[R1-Dialer0]dialer bundle 1
[R1-Dialer0]ppp chap user huawei
[R1-Dialer0]ppp chap password cipher 1234
[R1-Dialer0]ip address ppp-negotiate
[R1-Dialer0]quit
[R1]interface g0/0/1
[R1-GigabitEthernet0/0/1]pppoe-client dial-bundle-number 1
[R1-GigabitEthernet0/0/1]
注意:要在R1上写一条默认路由、做NAT,在OSPF里面下发默认路由,
更多实验,我将继续更新。
需要以上实验拓扑,可关注+点赞后私信我【实验】获取
我正在寻找执行以下操作的正确语法(在Perl、Shell或Ruby中):#variabletoaccessthedatalinesappendedasafileEND_OF_SCRIPT_MARKERrawdatastartshereanditcontinues. 最佳答案 Perl用__DATA__做这个:#!/usr/bin/perlusestrict;usewarnings;while(){print;}__DATA__Texttoprintgoeshere 关于ruby-如何将脚
在我的应用程序中,我有一个文本字段,用户可以在其中输入类似这样的内容"1,2,3,4"存储到数据库中。现在,当我想使用内部数字时,我有两个选择:"1,2,3,4".split(',')或string.scan(/\d+/)do|x|a两种方式我都得到一个像这样的数组["1","2","3","4"]然后我可以通过在每个数字上调用to_i来使用这些数字。有没有更好的方法可以转换"1,2,3"to[1,2,3]andnot["1","2","3"] 最佳答案 str.split(",").map{|i|i.to_i}但是这个想法对你来说
我有一个像这样的ruby散列{"stuff_attributes"=>{"1"=>{"foo"=>"bar","baz"=>"quux"},"2"=>{"foo"=>"bar","baz"=>"quux"}}}我想把它变成一个看起来像这样的散列{"stuff_attributes"=>[{"foo"=>"bar","baz"=>"quux"},{"foo"=>"bar","baz"=>"quux"}]}我还需要保留键的数字顺序,并且键的数量是可变的。上面是super简化的,但我在底部包含了一个真实的例子。执行此操作的最佳方法是什么?附言还需要递归就递归而言,这是我们可以假设的:1)
将以下Ruby字符串转换为数组的最佳方法是什么(我使用的是ruby1.9.2/Rails3.0.11)Rails控制台:>Item.first.ingredients=>"[\"Bread,wholewheat,100%,slice\",\"EggSubstitute\",\"new,Eggs,scrambled\"]">Item.first.ingredients.class.name=>"String">Item.first.ingredients.length77期望的输出:>Item.first.ingredients_a["Bread,wholewheat,100%,sl
第一步,先创建一个回环端口,不要用自己的网卡,很不稳定,会断的。①先找到“设备管理器”,点击②进入设备管理器点击“操作”,然后再点击“添加过时硬盘”,记得点击“操作”前先随便在空白处点击一下,不然点击“点击操作”会出现第二张图的内容。 ③点击“下一页”④点击“手动”,然后再点击下一页。 ⑤点击“网络适配器”,点击下一页 ⑥点击“Microsoft”,然后点击“环回适配器”。 创建完成后,在下图中会有一个“环回适配器”, 第二步,ensp和真机进行桥接①打开ensp,并且配置一个“云”②先添加一个内网接口,点击添加③选择“绑定信息”中的以太网2,点击“增加”,添加外网。如果找不到你的环回网卡
一、RIPV2协议简介 RIP(RoutingInformationProtocol)路由协议是一种相对古老,在小型以及同介质网络中得到了广泛应用的一种路由协议。RIP采用距离向量算法,是一种距离向量协议。RIP-1是有类别路由协议(ClassfulRoutingProtocol),它只支持以广播方式发布协议报文。RIP-1的协议报文无法携带掩码信息,它只能识别A、B、C类这样的自然网段的路由,因此RIP-1不支持非连续子网(DiscontiguousSubnet)。RIP-2是一种无类别路由协议(ClasslessRoutingProtocol),支持路由标记,在路由策略中可根据路由标记对
目录一、安装包链接二、安装详细步骤1.安装Wireshark和WinPcap2.安装OracleVMVirtualBox3.安装ensp三、安装后注册四、启动路由器出现40错误怎么解决一、安装包链接二、安装详细步骤链接:https://pan.baidu.com/s/1QbUUYMOMIV2oeIKHWP1SpA?pwd=xftx提取码:xftx1.安装Wireshark和WinPcap找到Wireshark安装包所在文件夹,双击它,按照以下步骤安装。2.安装OracleVMVirtualBox找到OracleVMVirtualBox安装包所在文件夹,双击它,按照以下步骤安装。注:可自定义安装
我想要一个像to_numeric(str)这样的方法,它将数字字符串'str'转换成它的数字形式,否则返回nil。通过数字形式,如果字符串是整数方法应该返回整数,如果字符串是float则应该返回float。我试过以下代码。它工作正常,但如果可能,需要更好的解决方案。defto_numeric(str)Integer(str)rescueFloat(str)ifFloat(str)rescuenilend我忘记提及的一件重要事情是“我不知道我输入的类型”。我的用例:arr=[1,1.5,2,2.5,4]some_input=get_input_from_some_sourceifarr.
目录1.1访问Cisco路由器的方法1.1.1通过Console口访问路由器1.1.2通过Telnet访问路由器1.1.3终端访问服务器1.2终端访问服务器配置命令汇总1.1访问Cisco路由器的方法 路由器没有键盘和鼠标,要初始化路由器需要把计算机的串口和路由器的Console口进行连接。访问Cisco路由器的方法还有Telnet、WebBrowser和网络管理软件(如CiscoWorks)等,本节讨论前2种。1.1.1通过Console口访问路由器 计算机的串口和路由器的Console口是通过反转线(Rollover)进行连接的,反转线的一端接在路由器的Console口上,另一
VXLAN简介定义RFC定义了VLAN扩展方案VXLAN(VirtualeXtensibleLocalAreaNetwork,虚拟扩展局域网)。VXLAN采用MACinUDP(UserDatagramProtocol)封装方式,是NVO3(NetworkVirtualizationoverLayer3)中的一种网络虚拟化技术。目的随着网络技术的发展,云计算凭借其在系统利用率高、人力/管理成本低、灵活性/可扩展性强等方面表现出的优势,已经成为目前企业IT建设的新趋势。而服务器虚拟化作为云计算的核心技术之一,得到了越来越多的应用。服务器虚拟化技术的广泛部署,极大地增加了数据中心的计算密度;同时,为