?博客主页: 微笑的段嘉许博客主页 ?微信公众号:微笑的段嘉许?欢迎关注?点赞?收藏⭐留言??本文由微笑的段嘉许原创!?51CTO首发时间:?2023年2月日12?✉️坚持和努力一定能换来诗与远方!?作者水平很有限,如果发现错误,一定要及时告知作者哦!感谢感谢!⭐本文介绍⭐ 在上一篇文章中已经介绍了Nginx服务器的安装配置,感兴趣的小伙伴可以点击连接阅读配置Nginx虚拟主机,本文主要介绍nginx的优化与防盗链。
Nginx作用:反向代理、负载均衡、动静分离等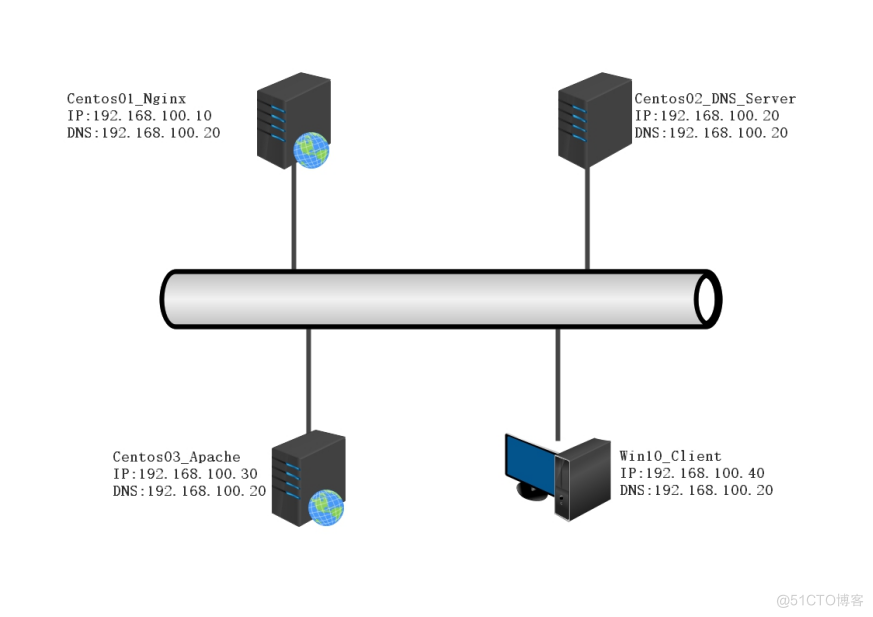 推荐步骤:
推荐步骤:www.duanjiaxu.com访问www.duanjiaxu.com访问,Centos03使用yum安装apache使用域名www.djx.com访问www.duanjiaxu.com域名的网站隐藏Nginx版本、查看Nginx管理用户、设置网页缓存、配置日志切割、配置Nginx日志切割、设置超时时间www.bdqn.com网站配置防盗链防止www.djx.com盗www.duanjiaxu.com的连接[root@centos01 ~]# mount /dev/cdrom /mnt/ //挂载系统光盘
mount: /dev/sr0 写保护,将以只读方式挂载
[root@centos01 ~]# ls /mnt/ //查看是哦福挂载成功
CentOS_BuildTag GPL LiveOS RPM-GPG-KEY-CentOS-7
EFI images Packages RPM-GPG-KEY-CentOS-Testing-7
EULA isolinux repodata TRANS.TBL
[root@centos01 ~]# rm -rf /etc/yum.repos.d/CentOS-* //删除系统自带的yum仓库
[root@centos01 ~]# ls /etc/yum.repos.d/
local.repo
[root@centos01 ~]# cat /etc/yum.repos.d/local.repo //查看yum仓库
[local]
name=centos
baseurl=file:///mnt
enabled=1
gpgcheck=0
[root@centos01 ~]# rz //上传nginx源代码程序
z waiting to receive.**B0100000023be50
[root@centos01 ~]# ls //查看是否上传成功
anaconda-ks.cfg nginx-1.16.1.tar.gz 模板 图片 下载 桌面
initial-setup-ks.cfg 公共 视频 文档 音乐 2)安装nginx依赖程序
[root@centos01 ~]# useradd -M -s /sbin/nologin nginx //创建nginx用户
[root@centos01 ~]# yum -y install pcre-devel zlib-devel //安装nginx依赖程序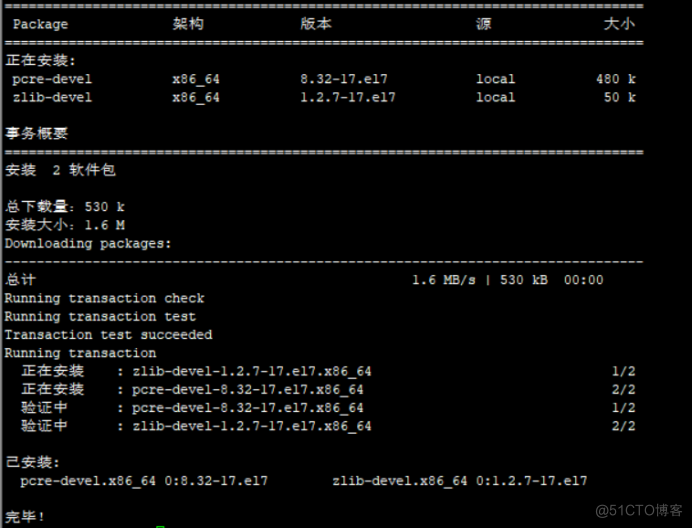 3)解压nginx程序包
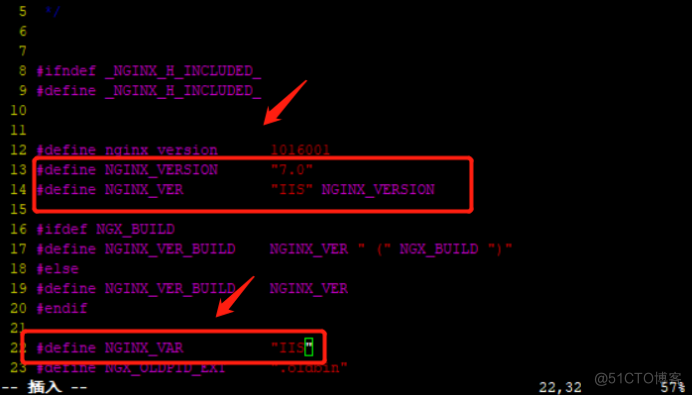
[root@centos01 ~]# tar zxf ./nginx-1.16.1.tar.gz -C /usr/src/ //解压nginx程序包[root@centos01 ~]# vim /usr/src/nginx-1.16.1/src/core/nginx.h //进入nginx源代码目录
---
13 #define NGINX_VERSION "7.0" //版本号
14 #define NGINX_VER "IIS" NGINX_VERSION //版本信息
22 #define NGINX_VAR "IIS"
---
[root@centos01 ~]# vim /usr/src/nginx-1.16.1/src/http/ngx_http_header_filter_module.c
---
49 static u_char ngx_http_server_string[] = "Server: IIS" CRLF; //修改nginx数据包请求头部
 5)安装nginx
[root@centos01 nginx-1.16.1]# ./configure --prefix=/usr/local/nginx --user=nginx --group=nginx --with-http_stub_status_module     //安装模块
[root@centos01 nginx-1.16.1]# make && make install      //编译安装nginx程序
[root@centos01 nginx-1.16.1]# ln -s /usr/local/nginx/sbin/* /usr/local/sbin/ //优化命令[root@centos01 ~]# mkdir /www //创建网站根目录
[root@centos01 ~]# echo "www.duanjiaxu.com" > /www/index.html //设置网站主页[root@centos01 ~]# vim /etc/sysconfig/network-scripts/ifcfg-ens32 //进入网卡配置文件
---
TYPE=Ethernet
BOOTPROTO=static
NAME=ens32
DEVICE=ens32
ONBOOT=yes
IPADDR=192.168.100.10
NETMASK=255.255.255.0
DNS1=192.168.100.20
---
[root@centos01 ~]# systemctl restart network //重新启动网卡服务
[root@centos01 ~]# cat /etc/resolv.conf //查看DNS是否配置成功
# Generated by NetworkManager
nameserver 192.168.100.20[root@centos01 ~]# vim /usr/local/nginx/conf/nginx.conf //进入nginx主配置文件
---
2 user nginx; //nginx管理用户
36 listen 192.168.100.10:80; //监听的IP地址和端口
39 charset utf-8; //支持中文
44 root /www/; //网站根目录[root@centos01 ~]# nginx //启动nginx服务
[root@centos01 ~]# netstat -anptu | grep nginx //监听端口
tcp 0 0 192.168.100.10:80 0.0.0.0:* LISTEN 4193/nginx: master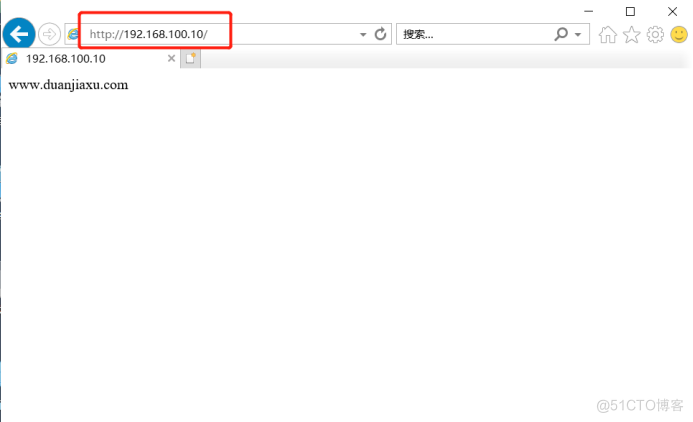 3)在win10虚拟机安装抓包软件查看伪装
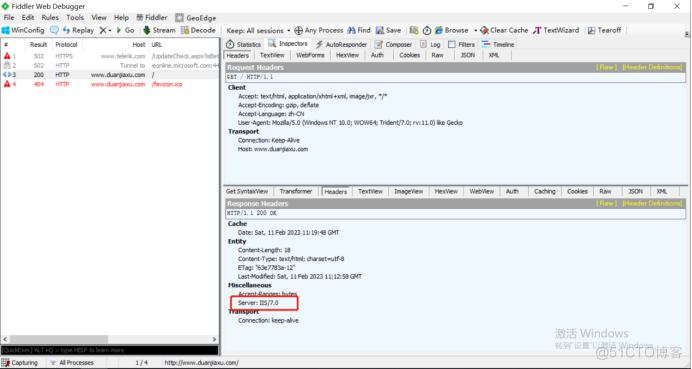
[root@centos02 ~]# vim /etc/sysconfig/network-scripts/ifcfg-ens32     //进入网卡配置文件
---
TYPE=Ethernet
BOOTPROTO=static
NAME=ens32
DEVICE=ens32
ONBOOT=yes
IPADDR=192.168.100.20   //IP地址
NETMASK=255.255.255.0   //子网掩码
DNS1=192.168.100.20   //DNS
----
[root@centos02 ~]# systemctl restart network      //重新启动网卡服务
[root@centos02 ~]# cat /etc/resolv.conf       //查看DNS是否配置成功
# Generated by NetworkManager
nameserver 192.168.100.20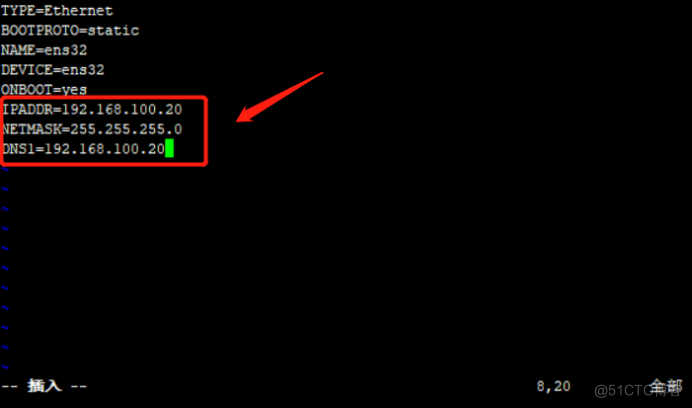
[root@centos02 ~]# mount /dev/cdrom /mnt/   //挂载系统光盘
mount: /dev/sr0 写保护,将以只读方式挂载
[root@centos02 ~]# ls /mnt/     //查看系统光盘是否挂载成功
CentOS_BuildTag  GPL       LiveOS    RPM-GPG-KEY-CentOS-7
EFI              images    Packages  RPM-GPG-KEY-CentOS-Testing-7
EULA isolinux repodata TRANS.TBL[root@centos02 ~]# rpm -ivh /mnt/Packages/bind-9.9.4-50.el7.x86_64.rpm
警告:/mnt/Packages/bind-9.9.4-50.el7.x86_64.rpm: 头V3 RSA/SHA256 Signature, 密钥 ID f4a80eb5: NOKEY
准备中... ################################# [100%]
正在升级/安装...
1:bind-32:9.9.4-50.el7 ################################# [100%]
[root@centos02 ~]# rpm -ivh /mnt/Packages/bind-chroot-9.9.4-50.el7.x86_64.rpm
警告:/mnt/Packages/bind-chroot-9.9.4-50.el7.x86_64.rpm: 头V3 RSA/SHA256 Signature, 密钥 ID f4a80eb5: NOKEY
准备中... ################################# [100%]
正在升级/安装...
1:bind-chroot-32:9.9.4-50.el7 ################################# [100%][root@centos02 ~]# echo "" > /etc/named.conf //清空主配置文件
[root@centos02 ~]# vim /etc/named.conf //进入主配置文件
---
options {
listen-on port 53 { any; };
};
zone "duanjiaxu.com" IN {
type master;
file "var/named/duanjiaxu.com.zone";
};
zone "djx.com" IN {
type master;
file "var/named/djx.com.zone";
};
[root@centos02 ~]# named-checkconf /etc/named.conf //检查主配置文件是否修改正确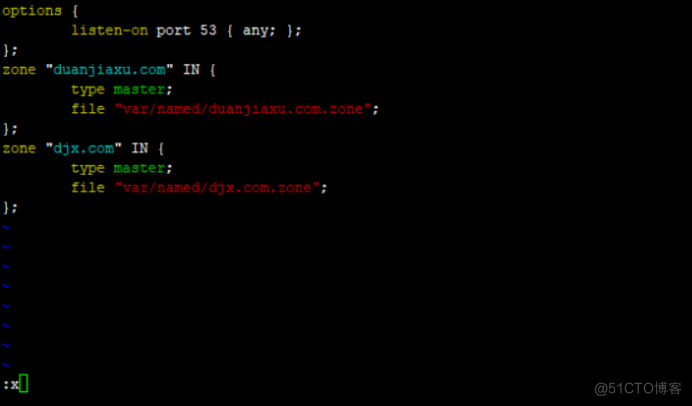 2)修改第一个DNS区域配置文件
[root@centos02 ~]# vim /var/named/duanjiaxu.com.zone    //进入第一个区域配置文件
---
$TTL            86400
@               SOA             duanjiaxu.com.  root.duanjiaxu.com. (
                2023020510
                1H
                15M
                1W
                1D
)
@               NS              centos02.duanjiaxu.com.
centos02        A               192.168.100.20
www             A               192.168.100.10
---
[root@centos02 ~]# named-checkzone duanjiaxu.com /var/named/duanjiaxu.com.zone    //查看区域配置文件语法是否有误
zone duanjiaxu.com/IN: loaded serial 2023020510
OK[root@centos02 ~]# cp /var/named/duanjiaxu.com.zone /var/named/djx.com.zone //复制第一个区域配置文件
[root@centos02 ~]# vim /var/named/djx.com.zone //进入第二个区域配置文件
---
:%s/duanjiaxu.com/djx.com/g //把duanjiaxu.com替换为djx.com
$TTL 86400
@ SOA djx.com. root.djx.com. (
2023020510
1H
15M
1W
1D
)
@ NS centos02.djx.com.
centos02 A 192.168.100.20
www A 192.168.100.30 //IP地址修改为第二台apache服务器的IP地址
---
[root@centos02 ~]# named-checkzone djx.com /var/named/djx.com.zone //查看区域配置文件修改是否有误
zone djx.com/IN: loaded serial 2023021010
OK
 4)重新启动DNS服务
[root@centos02 ~]# systemctl restart named    //重新启动DNS服务
[root@centos02 ~]# netstat -anptu | grep named    //监听网卡
tcp        0      0 192.168.100.20:53       0.0.0.0:*               LISTEN      41066/named
tcp        0      0 127.0.0.1:53            0.0.0.0:*               LISTEN      41066/named
tcp        0      0 127.0.0.1:953           0.0.0.0:*               LISTEN      41066/named
tcp6       0      0 ::1:953                 :::*                    LISTEN      41066/named
udp        0      0 192.168.122.1:53        0.0.0.0:*                           41066/named
udp        0      0 192.168.100.20:53       0.0.0.0:*                           41066/named
udp        0      0 127.0.0.1:53            0.0.0.0:*                           41066/named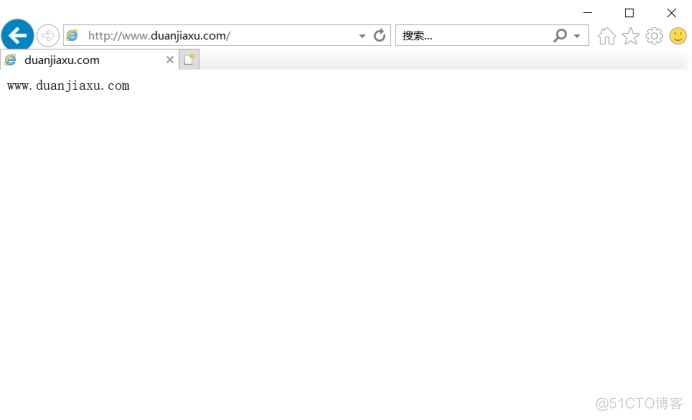
[root@centos03 ~]# vim /etc/sysconfig/network-scripts/ifcfg-ens32       //进入网卡配置文件
---
TYPE=Ethernet
BOOTPROTO=static
NAME=ens32
DEVICE=ens32
ONBOOT=yes
IPADDR=192.168.100.30
NETMASK=255.255.255.0
DNS1=192.168.100.20
[root@centos03 ~]# systemctl restart network        //重新启动网卡服务
[root@centos03 ~]# cat /etc/resolv.conf         //查看DNS配置是否生效
# Generated by NetworkManager
nameserver 192.168.100.20
2)挂载系统光盘
[root@centos03 ~]# mount /dev/cdrom /mnt/     //挂载系统光盘
mount: /dev/sr0 写保护,将以只读方式挂载
[root@centos03 ~]# ls /mnt/     查看是否挂载成功
CentOS_BuildTag  GPL       LiveOS    RPM-GPG-KEY-CentOS-7
EFI              images    Packages  RPM-GPG-KEY-CentOS-Testing-7
EULA             isolinux  repodata  TRANS.TBL
[root@centos03 ~]# rm -rf /etc/yum.repos.d/CentOS-*     //删除系统自带的yum源
[root@centos03 ~]# ls /etc/yum.repos.d/
local.repo
[root@centos03 ~]# cat /etc/yum.repos.d/local.repo
[local]
name=centos
baseurl=file:///mnt
enabled=1
gpgcheck=0
[root@centos03 ~]# yum -y install httpd //使用yum仓库安装apache服务[root@centos03 ~]# mkdir /www //新建网站根目录
[root@centos03 ~]# echo "www.djx.com" > /www/index.html //设置网站主页[root@centos03 ~]# cp /etc/httpd/conf/httpd.conf /etc/httpd/conf/httpd.conf.bak //备份主配置文件避免修改错误原文件丢失
[root@centos03 ~]# vim /etc/httpd/conf/httpd.conf //进入主配置文件
---
119 DocumentRoot "/www" //修改网站根目录
131 <Directory "/www"> //授权网站根目录
132 Options Indexes FollowSymLinks
133 AllowOverride None
134 Require all granted
135 </Directory>
---
[root@centos03 ~]# httpd -t //检查主配置文件是否修改正确
AH00558: httpd: Could not reliably determine the server's fully qualified domain name, using fe80::20c:29ff:fe38:619c. Set the 'ServerName' directive globally to suppress this message
Syntax OK
[root@centos03 ~]# systemctl restart httpd //重新启动apache服务
[root@centos03 ~]# netstat -anptu | grep httpd //监听网卡
tcp6 0 0 :::80 :::* LISTEN 1829/httpd 2、使用域名www.djx.com访问apache网站
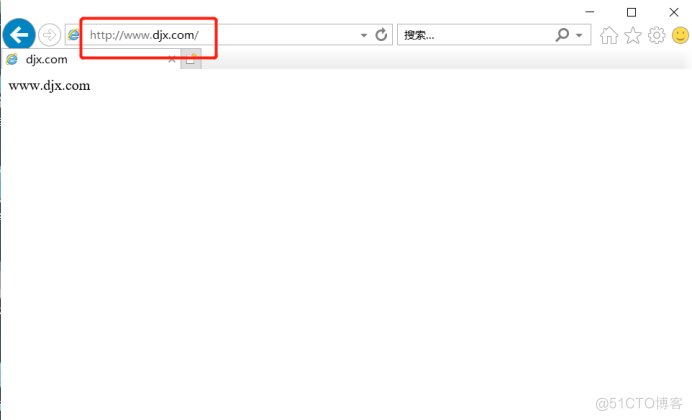
[root@centos01 ~]# vim /usr/local/nginx/conf/nginx.conf //进入nginx主配置文件
---
7 include mime.types;
8 default_type application/octet-stream;
9 sendfile on;
10 keepalive_timeout 65;
11 server_tokens off;
---
[root@centos01 ~]# killall nginx //停止nginx服务
[root@centos01 ~]# nginx //启动nginx服务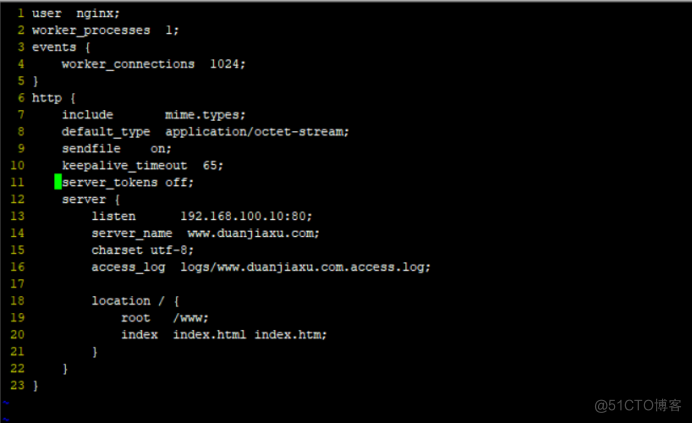 2)使用抓包软件查看版本号是否已经隐藏
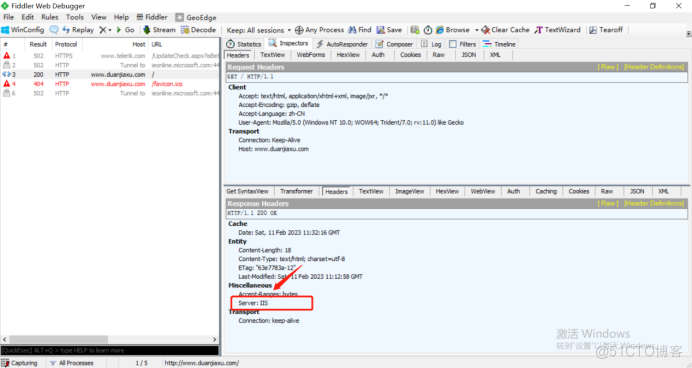 3)使用命令查看
[root@centos01 ~]# curl -I www.duanjiaxu.com
HTTP/1.1 200 OK
Server: IIS //版本号已经隐藏掉
Date: Sat, 11 Feb 2023 11:34:31 GMT
Content-Type: text/html; charset=utf-8
Content-Length: 18
Last-Modified: Sat, 11 Feb 2023 11:12:58 GMT
Connection: keep-alive
ETag: "63e7783a-12"
Accept-Ranges: bytes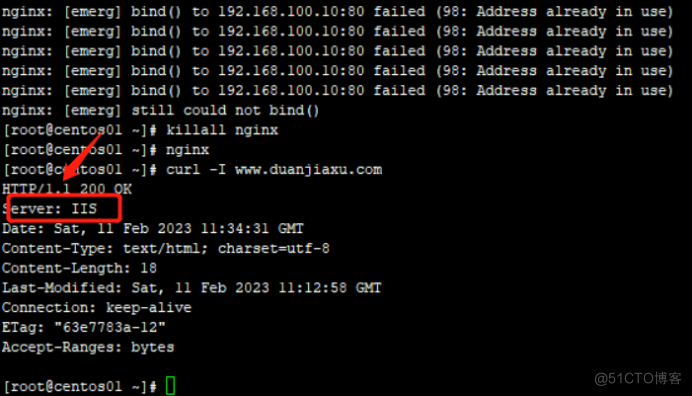 4)查看nginx用户
[root@centos01 ~]# ps -ef | grep nginx
root      51114      1  0 19:30 ?        00:00:00 nginx: master process nginx
nginx     51115  51114  0 19:30 ?        00:00:00 nginx: worker process
root 51254 47883 0 19:43 pts/0 00:00:00 grep --color=auto nginx[root@centos01 ~]# vim /usr/local/nginx/conf/nginx.conf //进入nginx主配置文件
11 server_tokens off;
12 server {
13 listen 192.168.100.10:80;
14 server_name www.duanjiaxu.com;
15 charset utf-8;
16 access_log logs/www.duanjiaxu.com.access.log;
17
18 location / {
19 root /www;
20 index index.html index.htm;
21 expires 1d; //缓存时间1天
22 }
---
[root@centos01 ~]# killall nginx //停止nginx服务
nginx: no process found
[root@centos01 ~]# nginx //启动nginx服务
[root@centos01 ~]# mkdir /nginx_log[root@centos01 ~]# vim /opt/nginx_log_bak.sh
---
#/bin/bash
#Filename:duanjiaxu
d=$(date -d "-1 day" "+%Y%m%d")
logs_path="/nginx_log"
pid_path="/usr/local/nginx/logs/nginx.pid"
[-d $logs_path] || mkdir -p $logs_path
mv /usr/local/nginx/logs/www.duanjiaxu.com.access.log ${logs_path}/www.duanjiaxu
.com-access.log-$d
kill -USR1 $(cat $pid_path)
find $logs_path -mtime +30 |xargs rm -rf
---
[root@centos01 ~]# chmod +x /opt/nginx_log_bak.sh //添加执行权限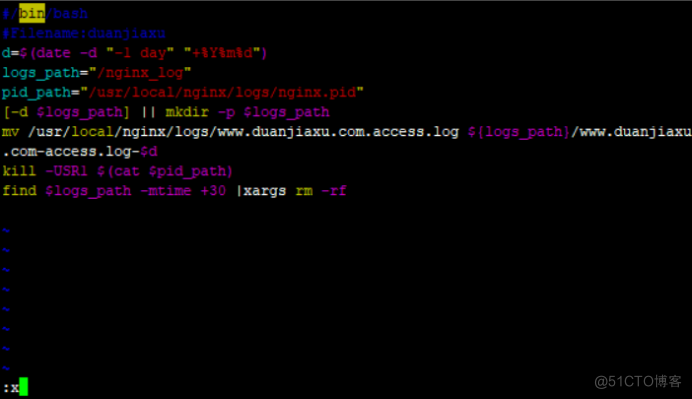 3)设置计划任务周期备份nginx日志,每间隔两分钟备份一次日志
[root@centos01 ~]# crontab -e
---
*/2 * * * * /opt/nginx_log_bak.sh[root@centos01 ~]# ls /nginx_log/
www.duanjiaxu.com-access.log-20230210 //生成的日志[root@centos01 ~]# vim /usr/local/nginx/conf/nginx.conf //进入nginx主配置文件
---
user nginx;
worker_processes 5; //启动5个nginx进程
pid log/nginx.pid;
events {
worker_connections 2048;
}
http {
include mime.types;
default_type application/octet-stream;
access_log logs/access.log;
sendfile on;
keepalive_timeout 10;
client_header_timeout 15; //设置客户端向服务器发送请求头的超时时间为15秒
client_body_timeout 15; //设置服务器向客户端发送请求头的超时时间为15秒
server_tokens off;
server {
listen 192.168.100.10:80;
server_name www.duanjiaxu.com;
charset utf-8;
access_log logs/www.duanjiaxu.com.access.log;
location / {
root /www;
index index.html index.htm;
expires 1d;
}
}
}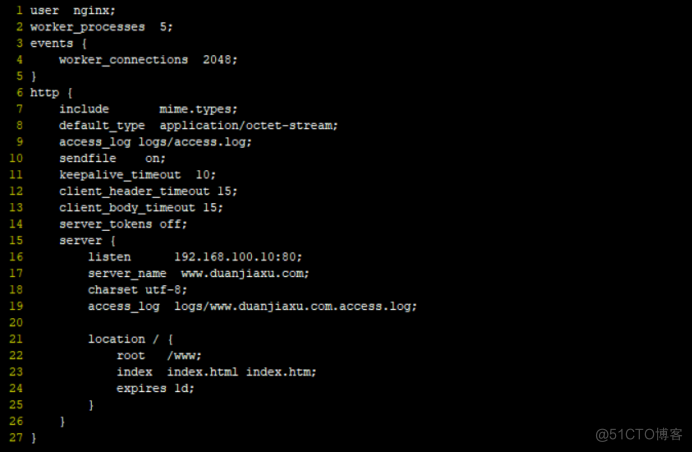 2)重新启动nginx服务
[root@centos01 ~]# killall nginx      //停止nginx服务
nginx: no process found
[root@centos01 ~]# nginx      //启动nginx服务
[root@centos01 ~]# netstat -anptu | grep nginx      //监听网卡
tcp 0 0 192.168.100.10:80 0.0.0.0:* LISTEN 52521/nginx: master[root@centos01 ~]# ps -ef | grep nginx
root 52521 1 0 21:05 ? 00:00:00 nginx: master process nginx
nginx 52522 52521 0 21:05 ? 00:00:00 nginx: worker process
nginx 52523 52521 0 21:05 ? 00:00:00 nginx: worker process
nginx 52524 52521 0 21:05 ? 00:00:00 nginx: worker process
nginx 52525 52521 0 21:05 ? 00:00:00 nginx: worker process
nginx 52526 52521 0 21:05 ? 00:00:00 nginx: worker process
root 52562 47883 0 21:07 pts/0 00:00:00 grep --color=auto nginx[root@centos01 www]# rz //上传图片
z waiting to receive.**B0100000023be50
[root@centos01 www]# rz
z waiting to receive.**B0100000023be50
[root@centos01 www]# ls //查看图片是否上传成功
error.png index.html logo.jpg[root@centos01 www]# vim index.html //进入网站根目录
---
www.duanjiaxu.com</br>
<img src="./logo.jpg"/> //插入图片 4)复制nginx网站的图片链接
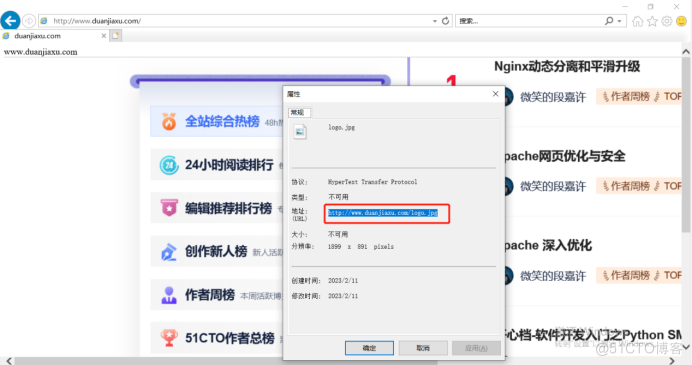 5)设置apache盗用nginx链接
[root@centos03 ~]# vim /www/index.html      //进入apache网站根目录
---
www.djx.com
<img src="http://www.duanjiaxu.com/logo.jpg"/>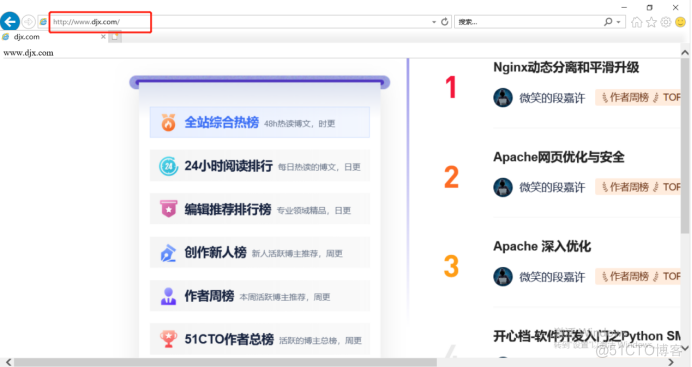 7)修改nginx主配置文件防止盗链接
[root@centos01 ~]# vim /usr/local/nginx/conf/nginx.conf //进入nginx主配置文件
---
1 user nginx;
2 worker_processes 5;
3 events {
4 worker_connections 2048;
5 }
6 http {
7 include mime.types;
8 default_type application/octet-stream;
9 access_log logs/access.log;
10 sendfile on;
11 keepalive_timeout 10;
12 client_header_timeout 15;
13 client_body_timeout 15;
14 server_tokens off;
15 server {
16 listen 192.168.100.10:80;
17 server_name www.duanjiaxu.com;
18 charset utf-8;
19 access_log logs/www.duanjiaxu.com.access.log;
20
21 location / {
22 root /www;
23 index index.html index.htm;
24 expires 1d;
25 }
26 location ~*\.(jpg|gif|swf)$ {
27 valid_referers none blocked *.duanjiaxu.com duanjiaxu.com;
28 if ($invalid_referer) {
29 rewrite ^/ http://www.duanjiaxu.com/error.png; //跳转到错误图片
30 }
31 }
32 }
33 }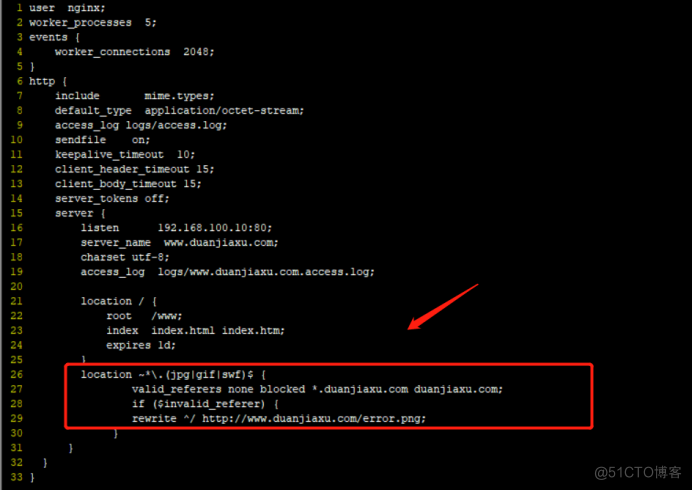 8)重启nginx服务
[root@centos01 ~]# killall nginx      //停止nginx服务
nginx: no process found
[root@centos01 ~]# nginx      //启动nginx服务
[root@centos01 ~]# netstat -anptu | grep nginx      //监听网卡
tcp        0      0 192.168.100.10:80       0.0.0.0:*               LISTEN      53654/nginx: master

我的瘦服务器配置了nginx,我的ROR应用程序正在它们上运行。在我发布代码更新时运行thinrestart会给我的应用程序带来一些停机时间。我试图弄清楚如何优雅地重启正在运行的Thin实例,但找不到好的解决方案。有没有人能做到这一点? 最佳答案 #Restartjustthethinserverdescribedbythatconfigsudothin-C/etc/thin/mysite.ymlrestartNginx将继续运行并代理请求。如果您将Nginx设置为使用多个上游服务器,例如server{listen80;server
A/ctohttp://wiki.nginx.org/CoreModule#usermaster进程曾经以root用户运行,是否可以以不同的用户运行nginxmaster进程? 最佳答案 只需以非root身份运行init脚本(即/etc/init.d/nginxstart),就可以用不同的用户运行nginxmaster进程。如果这真的是你想要做的,你将需要确保日志和pid目录(通常是/var/log/nginx&/var/run/nginx.pid)对该用户是可写的,并且您所有的listen调用都是针对大于1024的端口(因为绑定(
我希望Ruby的解析器会进行这种微不足道的优化,但似乎并没有(谈到YARV实现,Ruby1.9.x、2.0.0):require'benchmark'deffib1a,b=0,1whileb由于这两种方法除了在第二种方法中使用预定义常量而不是常量表达式外是相同的,因此Ruby解释器似乎在每个循环中一次又一次地计算幂常数。是否有一些Material说明为什么Ruby根本不进行这种基本优化或只在某些特定情况下进行? 最佳答案 很抱歉给出了另一个答案,但我不想删除或编辑我之前的答案,因为它下面有有趣的讨论。正如JörgWMittag所说,
我正在尝试从数据库中读取大量单元格(超过100.000个)并将它们写入VPSUbuntu服务器上的csv文件。碰巧服务器没有足够的内存。我正在考虑一次读取5000行并将它们写入文件,然后再读取5000行,等等。我应该如何重构我当前的代码以使内存不会被完全消耗?这是我的代码:defwrite_rows(emails)File.open(file_path,"w+")do|f|f该函数由sidekiqworker调用:write_rows(user.emails)感谢您的帮助! 最佳答案 这里的问题是,当您调用emails.each时,
我有带有gemwebsocket-rails0.7的Rails3.2应用程序。在开发机上,一切正常在生产环境中,我使用Nginx/1.6作为代理服务器,Unicorn作为http服务器。Thin用于独立模式(在https://github.com/websocket-rails/websocket-rails/wiki/Standalone-Server-Mode之后)。nginx配置:location/websocket{proxy_passhttp://localhost:3001/websocket;proxy_http_version1.1;proxy_set_headerUp
Nginx在生产中的重要性通常基于它为慢速客户端提供服务的能力;在RESTfulAPI的设置中,它似乎是生产堆栈的一个不必要的层,尤其是Puma(不像广泛使用的unicorn可以处理nginx工作)。Pumacanallowmultipleslowclientstoconnectwithoutrequiringaworkertobeblockedontherequesttransaction.Becauseofthis,Pumahandlesslowclientsgracefully.HerokurecommendsPumaforuseinscenarioswhereyouexpect
我目前正在运行Foreman在暂存(Ubuntu)上,一旦我开始工作,就会切换到使用upstart。我的Procfile.staging看起来像这样:nginx:sudoservicenginxstartunicorn:bundleexecunicorn-c./config/unicorn.rbredis:bundleexecredis-serversidekiq:bundleexecsidekiq-v-C./config/sidekiq.yml我可以使用以下方法成功启动nginx:$sudoservicenginxstart然而,当我运行$foremanstart时,当其他三个进程成
文章目录前言约束硬约束的轨迹优化Corridor-BasedTrajectoryOptimizationBezierCurveOptimizationOtherOptions软约束的轨迹优化Distance-BasedTrajectoryOptimization优化方法前言可以看看我的这几篇Blog1,Blog2,Blog3。上次基于MinimumSnap的轨迹生成,有许多优点,比如:轨迹让机器人可以在某个时间点抵达某个航点。任何一个时刻,都能数学上求出期望的机器人的位置、速度、加速度、导数。MinimumSnap可以把问题转换为凸优化问题。缺点:MnimumSnap可以控制轨迹一定经过中间的
我对为我的RubyonRails3.1.3应用优化我的Unicorn设置的方法很感兴趣。我目前正在高CPU超大实例上生成14个工作进程,因为我的应用程序在负载测试期间似乎受CPU限制。在模拟负载测试中,每秒大约20个请求重放请求,我的实例上的所有8个内核都达到峰值,盒子负载飙升至7-8个。每个unicorn实例使用大约56-60%的CPU。我很好奇可以通过哪些方式对其进行优化?我希望能够每秒将更多请求汇集到这种大小的实例上。内存和所有其他I/O一样完全正常。在我的测试过程中,CPU越来越低。 最佳答案 如果您受CPU限制,您希望使用
美团外卖搜索工程团队在Elasticsearch的优化实践中,基于Location-BasedService(LBS)业务场景对Elasticsearch的查询性能进行优化。该优化基于Run-LengthEncoding(RLE)设计了一款高效的倒排索引结构,使检索耗时(TP99)降低了84%。本文从问题分析、技术选型、优化方案等方面进行阐述,并给出最终灰度验证的结论。1.前言最近十年,Elasticsearch已经成为了最受欢迎的开源检索引擎,其作为离线数仓、近线检索、B端检索的经典基建,已沉淀了大量的实践案例及优化总结。然而在高并发、高可用、大数据量的C端场景,目前可参考的资料并不多。因此