作者:申红磊,青云QingCloud 容器解决方案架构师,开源项目爱好者,KubeSphere Member。
在实际使用中,会有一些用户,在不同场景中经常碰到 OpenLDAP 对接问题:
在这里可以简单操作一下,以便来抛砖引玉,主要思路为:在 KubeSphere 中直接运行一个 LDAP Server,用 ApacheDirectoryStudio 来验证,然后使用 KubeSphere 进行 LDAP 对接验证。
您需要部署一个 K8s 集群,并在集群中安装 KubeSphere。有关详细信息,请参阅在 Linux 上安装和在 Kubernetes 上安装。
这里通过应用为用户提供完整的业务功能,由一个或多个特定功能的组件组成。来部署 OpenLDAP
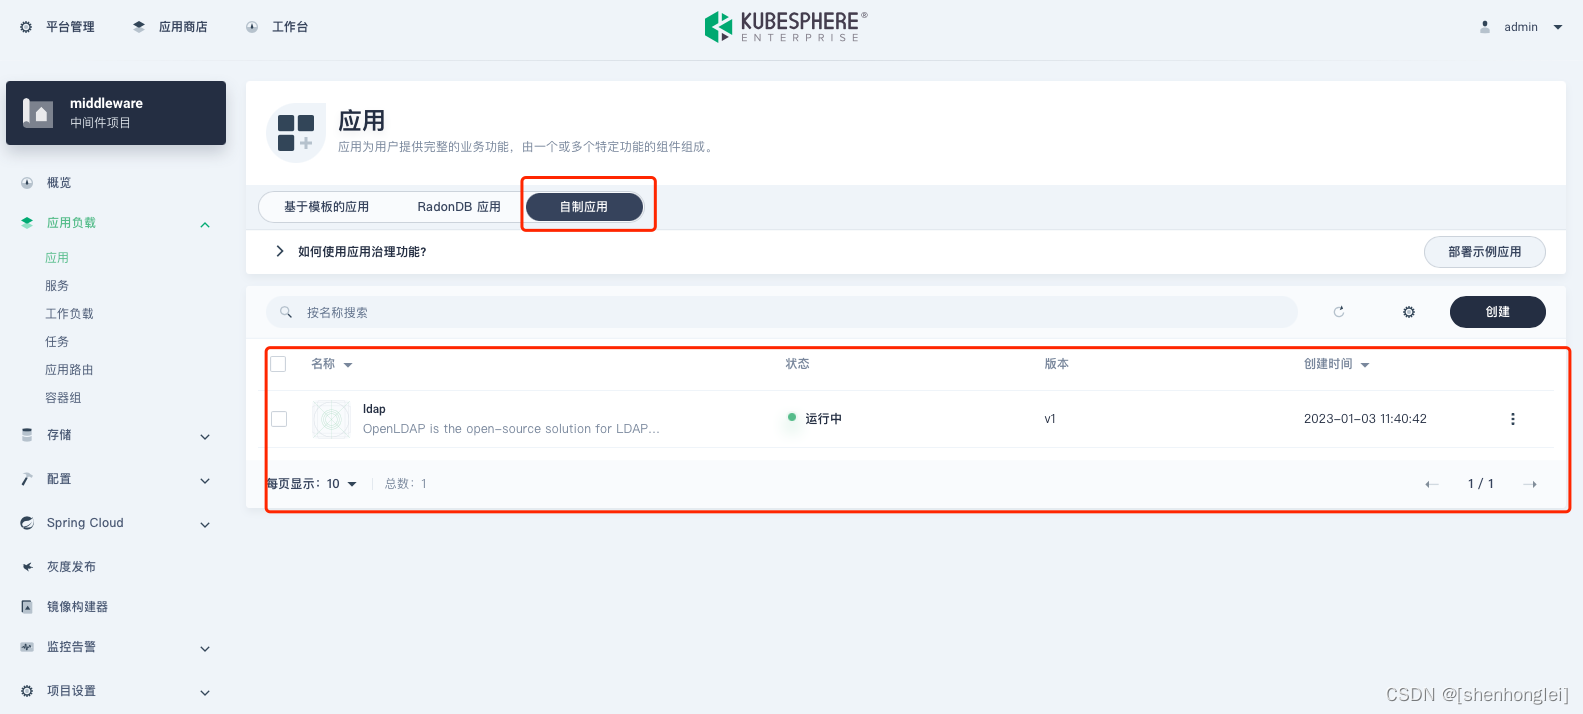
创建无状态服务(演示使用)
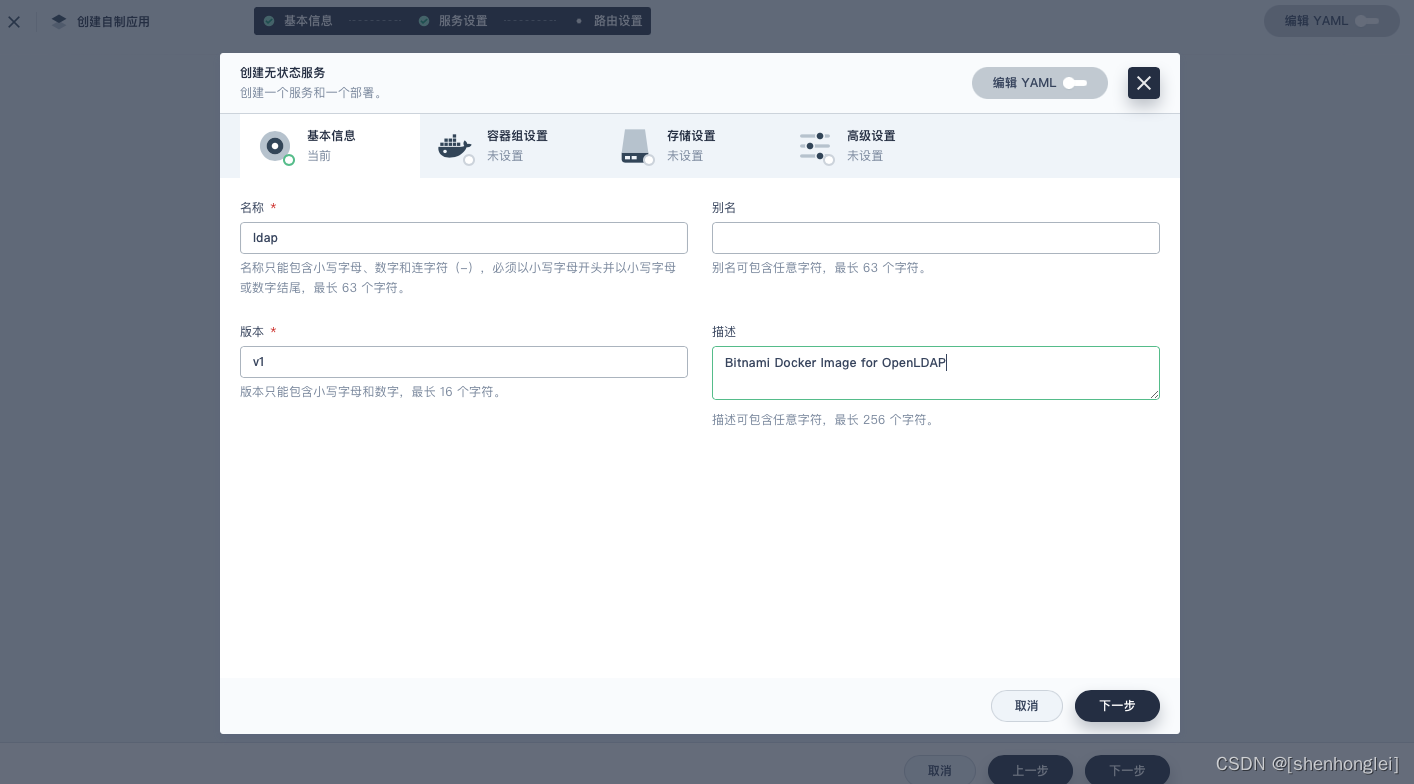
这里使用的镜像为:bitnami/openldap:latest
docker pull bitnami/openldap:latest
# 参考 the OpenLDAP server instance 可以配置 env 在后面使用
$ docker run --detach --rm --name openldap \
  --network my-network \
  --env LDAP_ADMIN_USERNAME=admin \
  --env LDAP_ADMIN_PASSWORD=adminpassword \
  --env LDAP_USERS=customuser \
  --env LDAP_PASSWORDS=custompassword \
  bitnami/openldap:latest
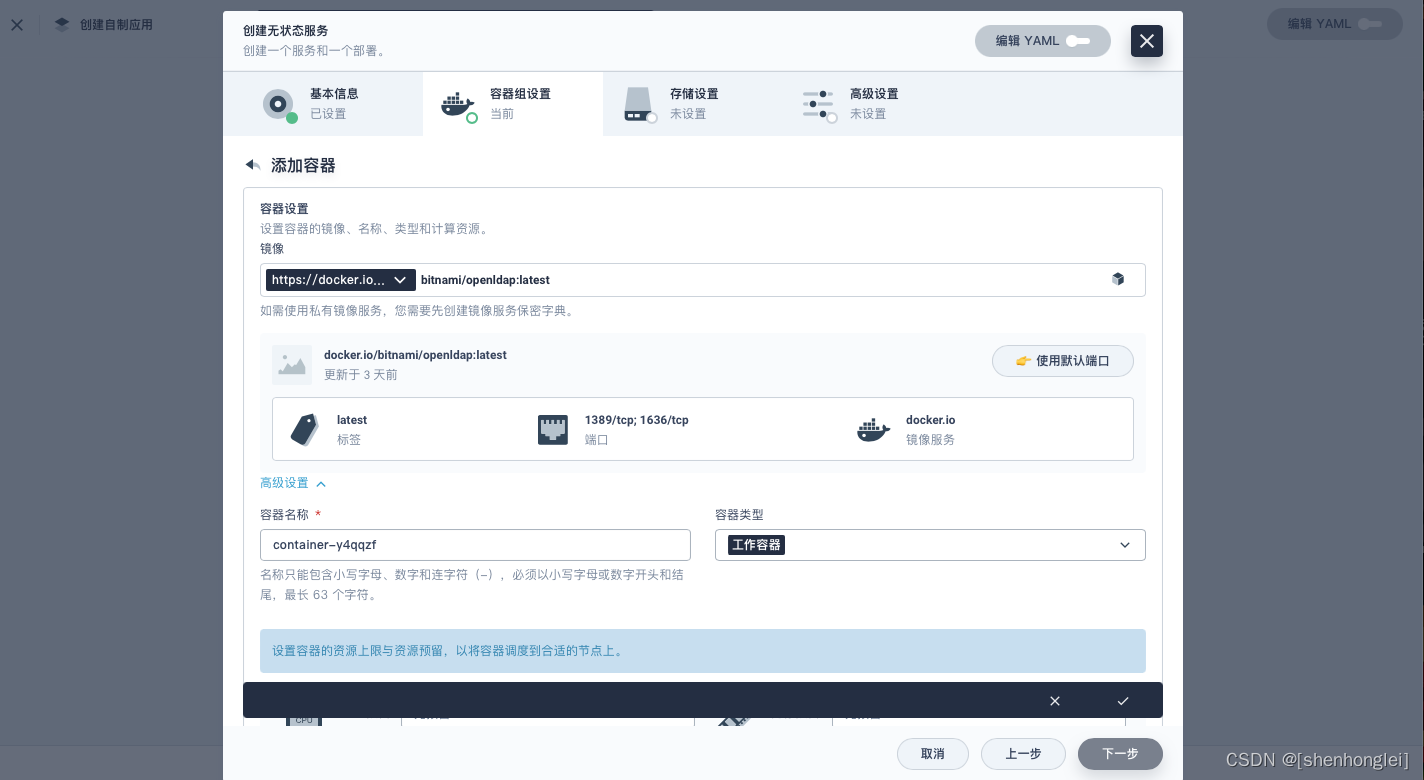
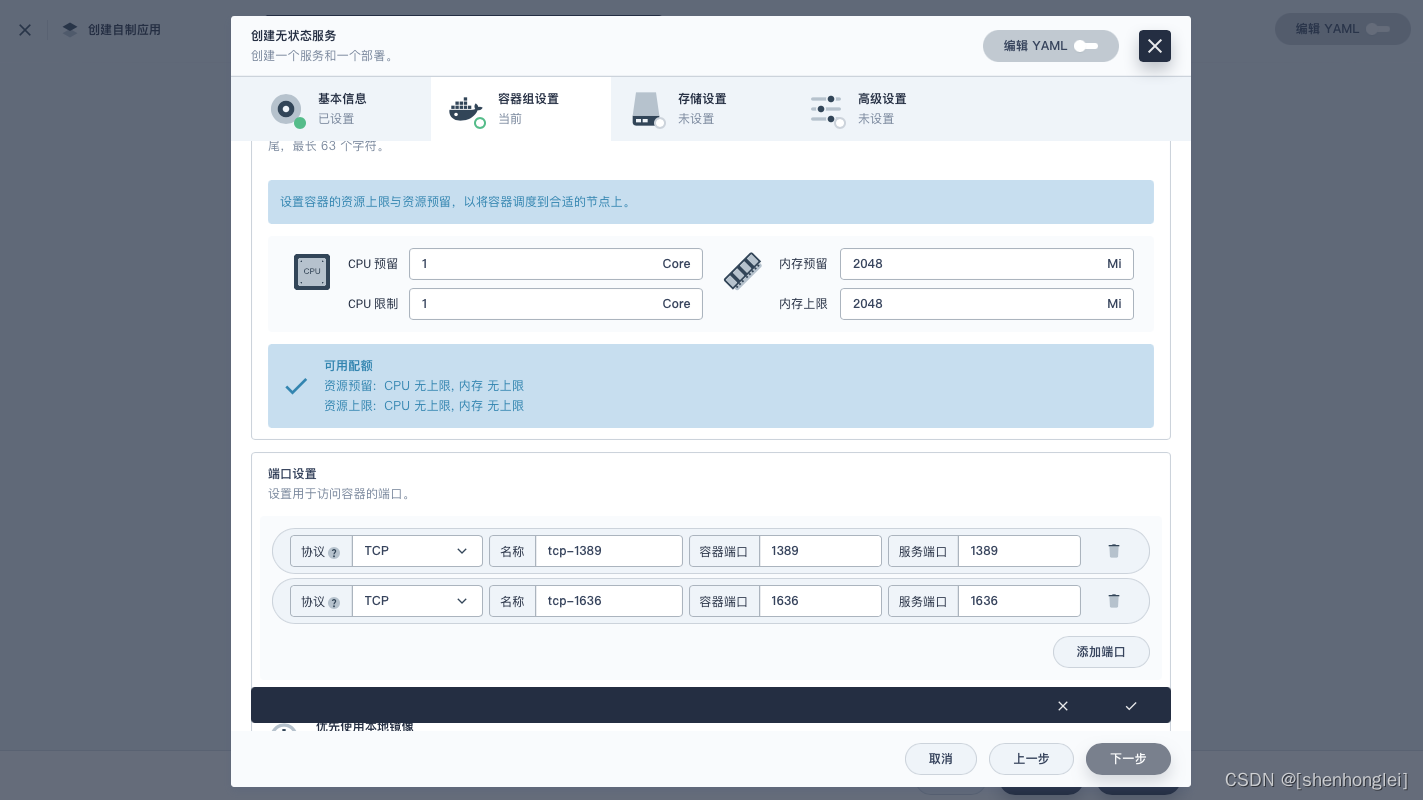
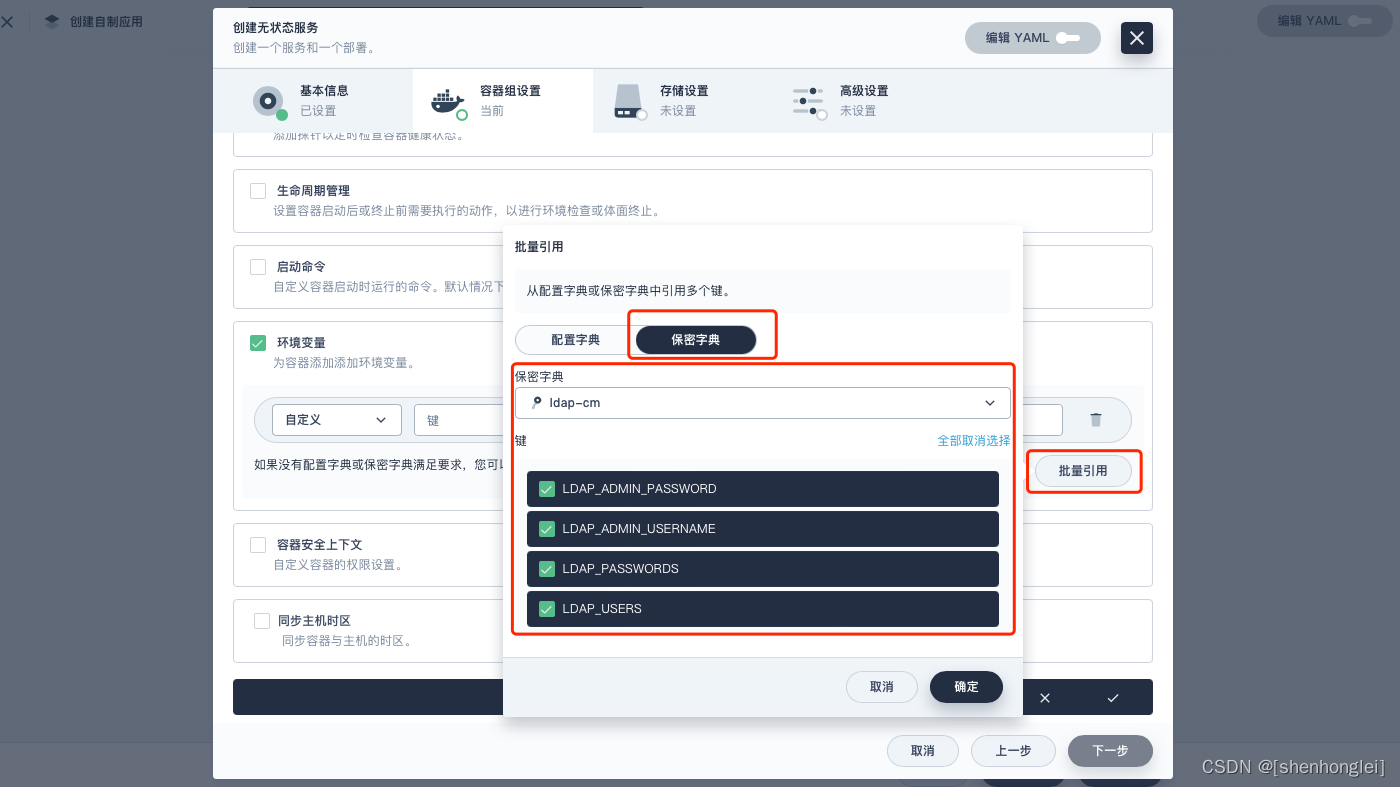
配置 Resources 的 Request 和 Limit ,并使用默认端口:
上面所说的环境变量,可以进行批量引用(KS 很多功能,明亮简洁又好用)。
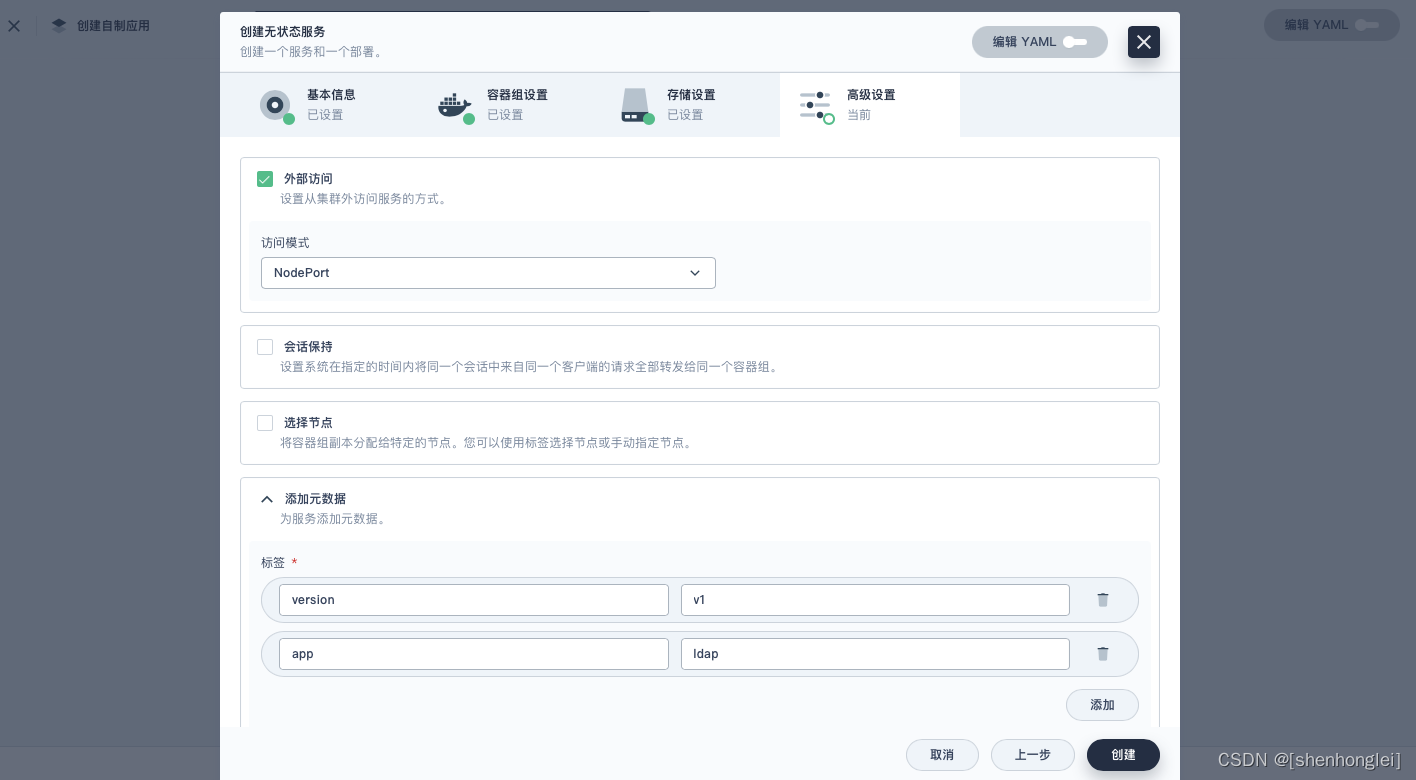
外部访问,这里使用模式为:NodePort。
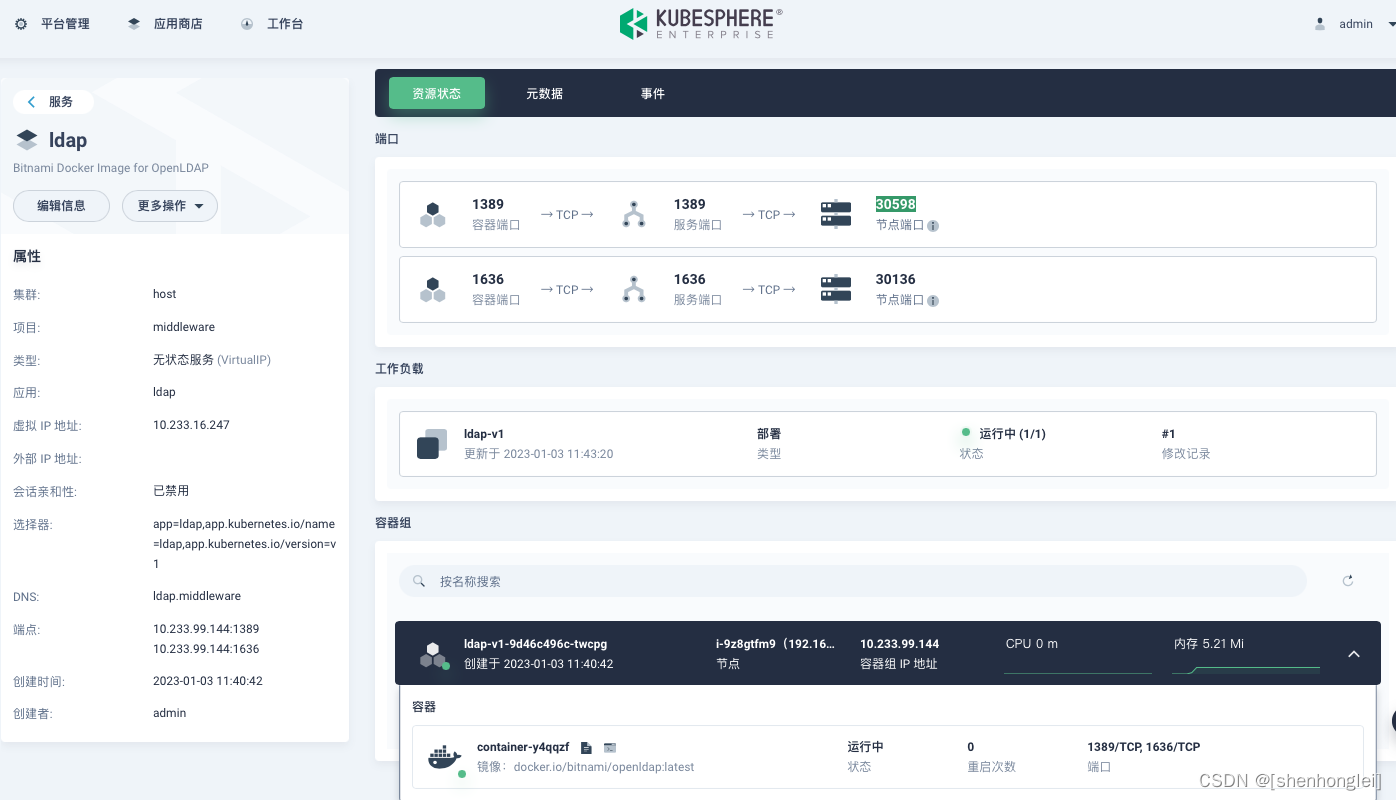
服务如下,通过 1389 对应的 NodePort 30598 来访问。
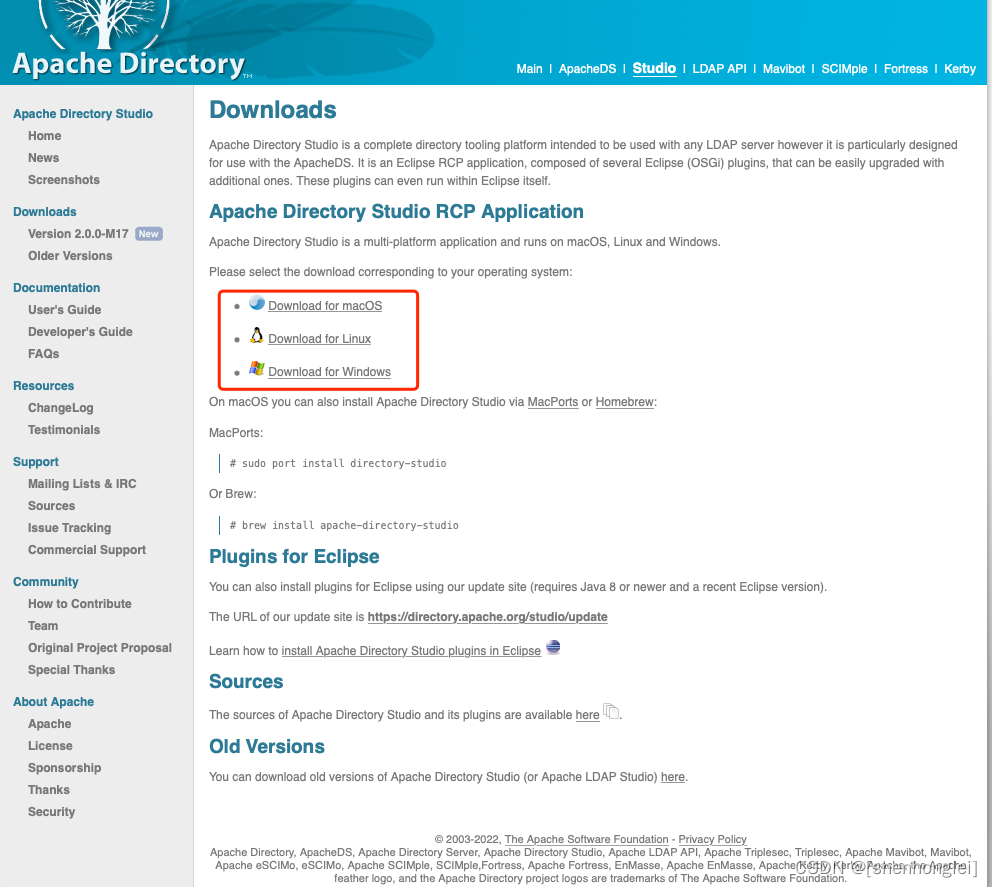
通过 ApacheDirectoryStudio 来直接验证,确认 OpenLDAP server instance 无问题后,再进行 KubeSphere 的对接。首先先下载 Mac 版 ApacheDirectoryStudio。
ApacheDirectoryStudio-2.0.0.v20210717-M17-macosx.cocoa.x86_64.dmg
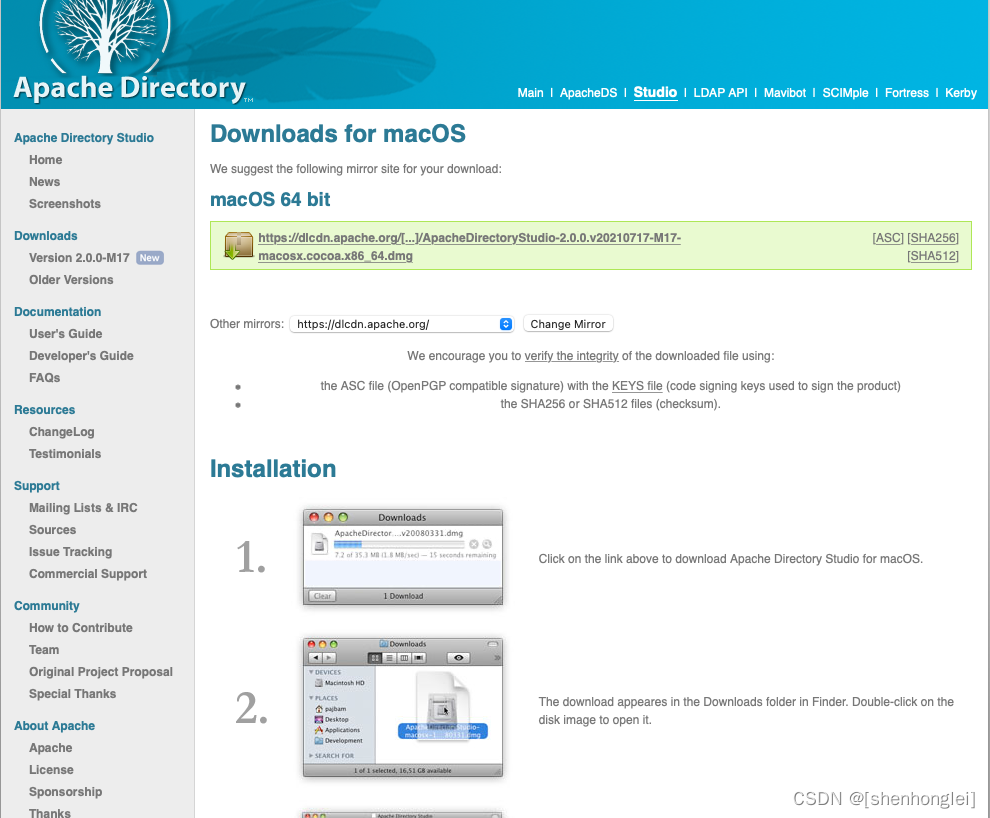
安装部署后 ApacheDirectoryStudio 如下:
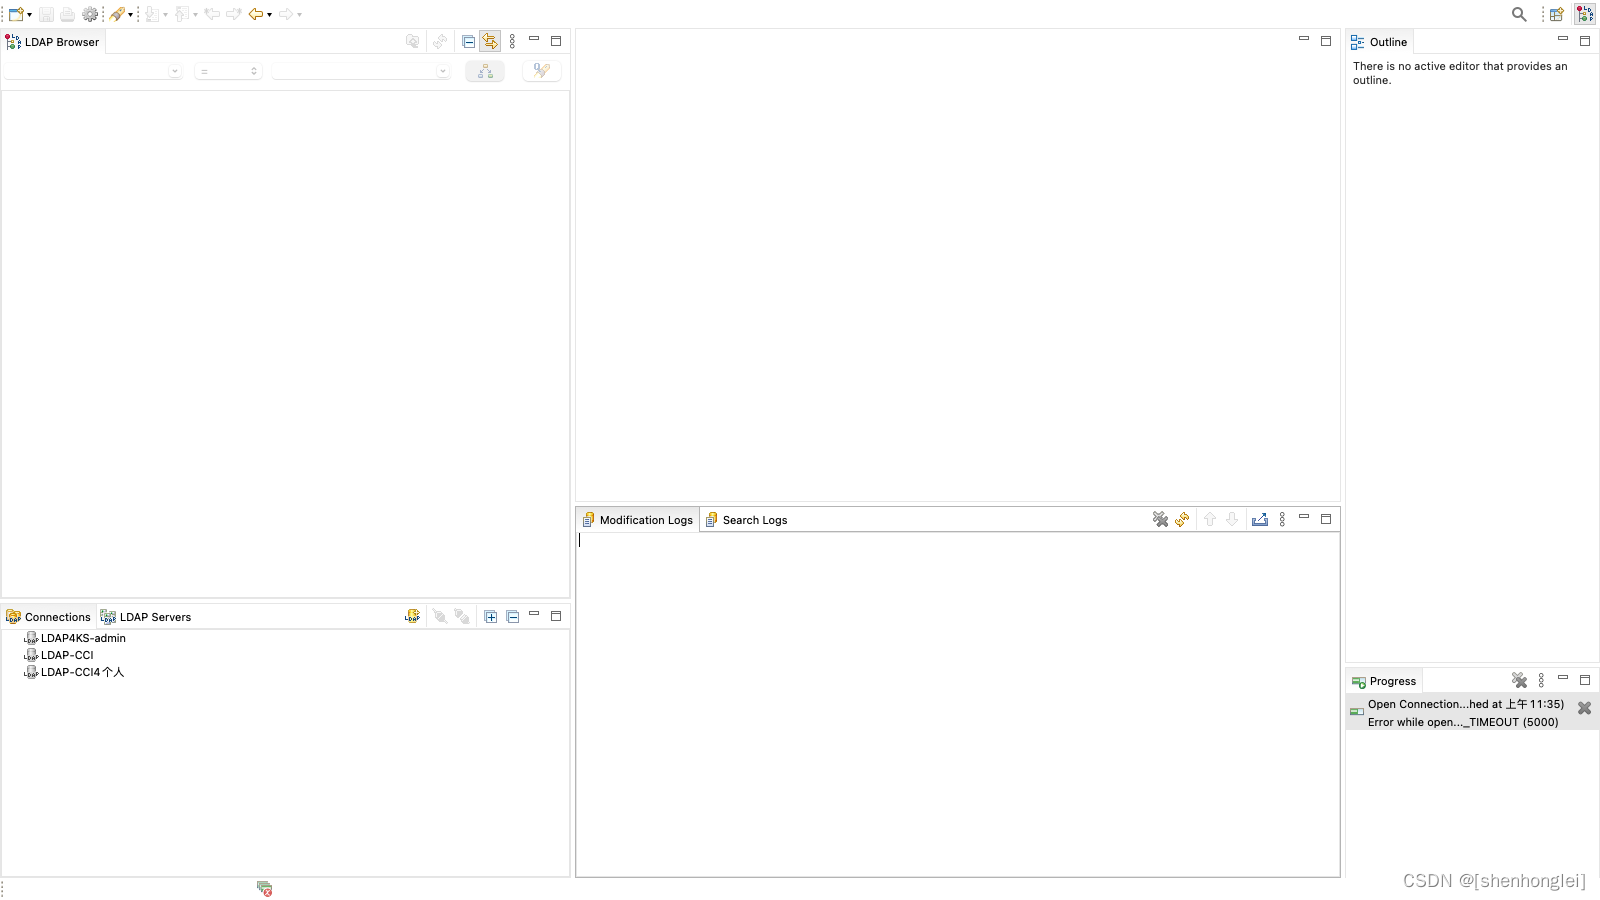
创建 CONNECTIONS:
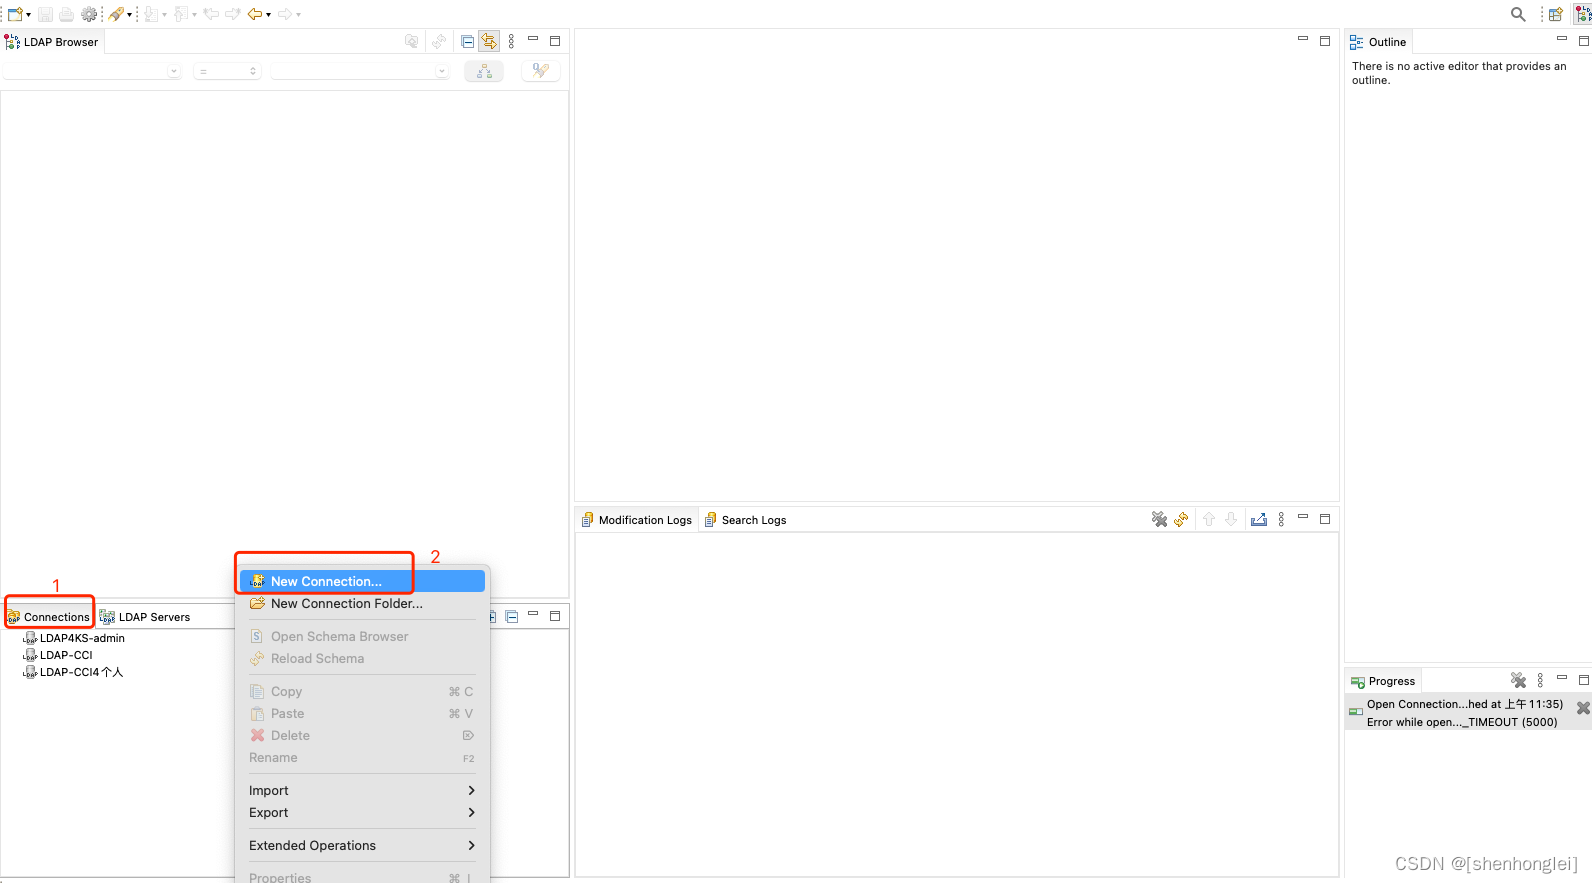
Connection Name: LDAP4KS-admin

NetWork Parameter
HostName: 192.168.100.2
Port: 30598
Connection timeout(s): 30
Encryption method: no encryption

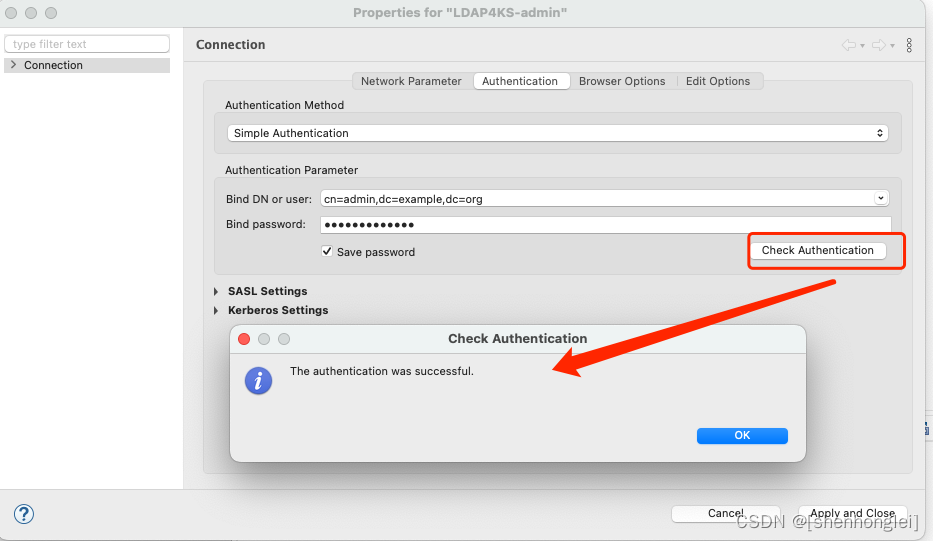
Authentication:
Authentication Method: Simple authentication
#参考上面时设置的 the OpenLDAP server instance 可以配置 env 在后面使用
Authentication Parameter:
Bind DB or User: cn=admin,dc=example,dc=org
Bind password: adminpassword
在 the OpenLDAP server instance 可以配置 env 在后面使用
--env LDAP_ADMIN_USERNAME=admin
--env LDAP_ADMIN_PASSWORD=adminpassword
--env LDAP_USERS=customuser
--env LDAP_PASSWORDS=custompassword \
Browser Options:
# 这里可以通过 FetchBase DNs 获取 Base DN: dc=example,dc=org

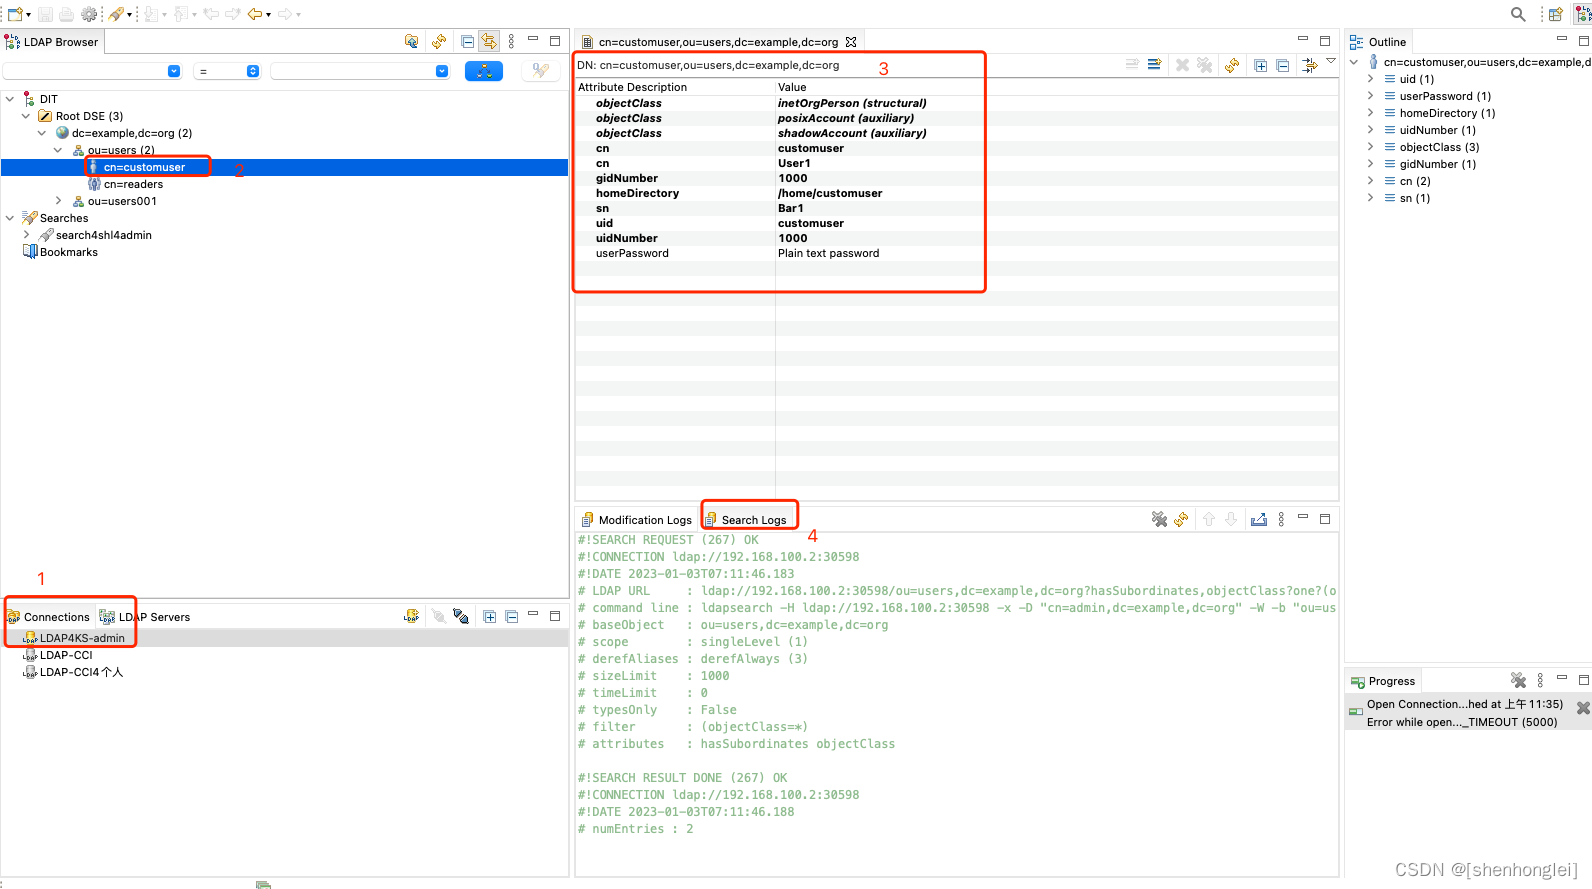
这里有一个小细节,如果对接认证账户不是 admin, 在 ApacheDirectoryStudio 中添加 Entry 时会显示无权限添加,所以 Studio 对接时可以选择使用 admin , 查询对接时可以使用其它账户。
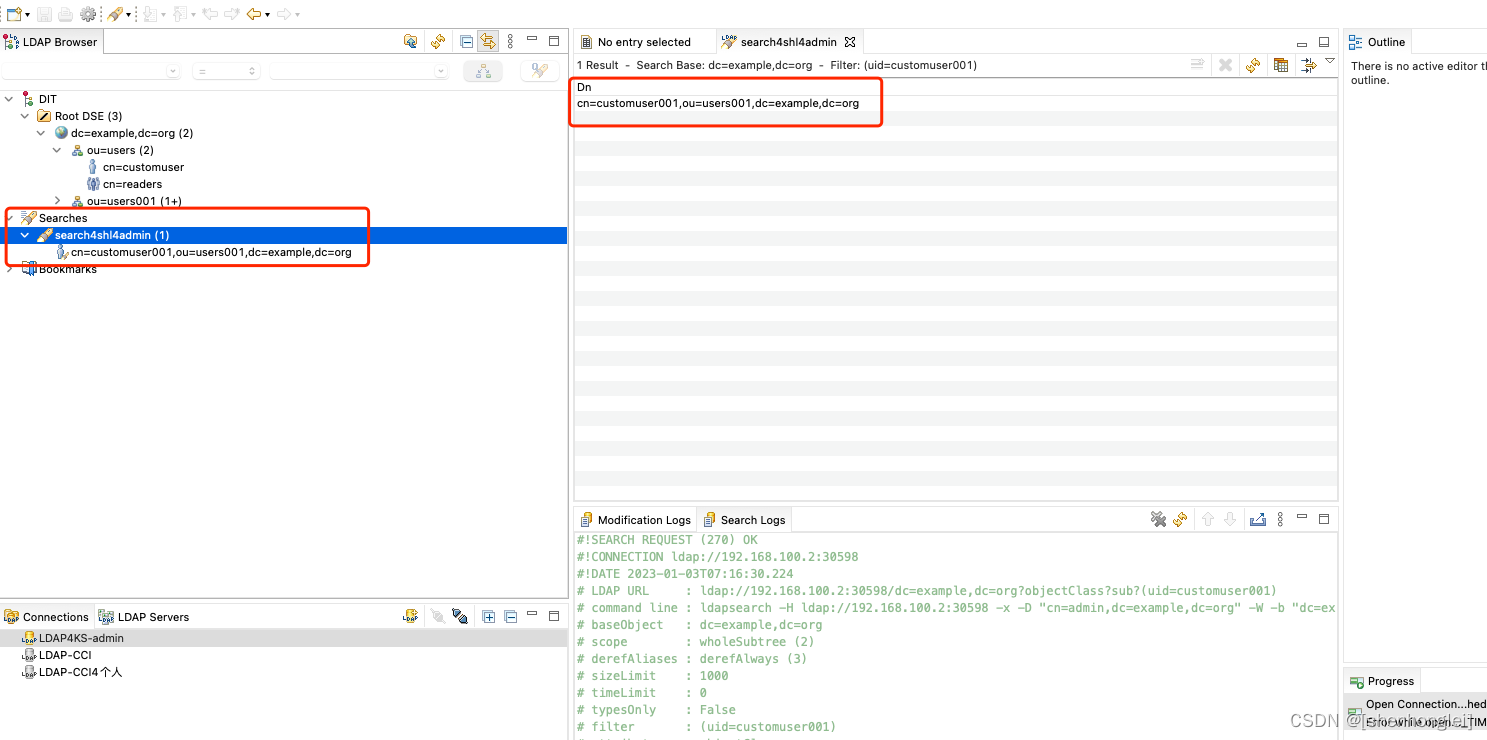
这里举例展示,userSearchFilter 的结果集,可以根据自己业务需求,将符合条件的用户,显示这个 Ldap Search 中,这里只是在 filter 中添加一个条件为:(uid=customuser001)
dc=example,dc=org - Filter: (uid=customuser001)
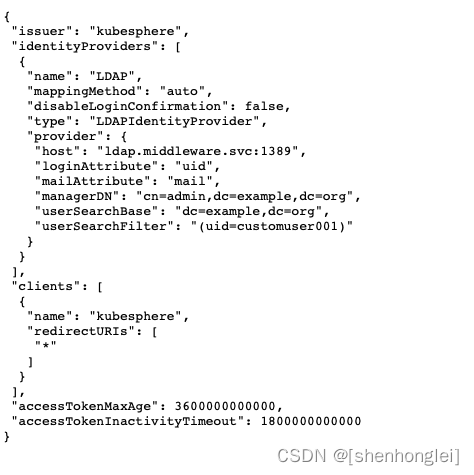
#在 KubeSphere 对接中,这里显示为:
userSearchFilter: (uid=customuser001)
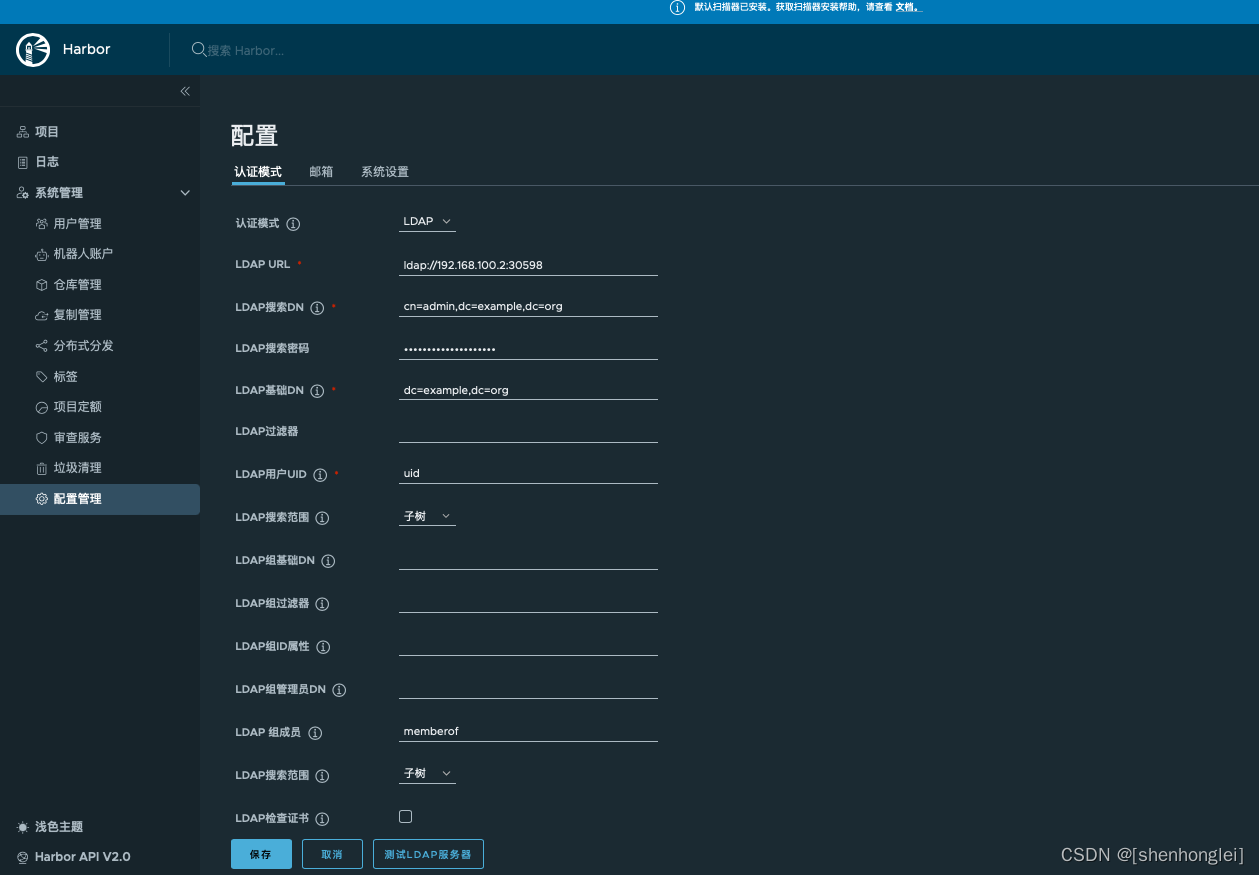
上述 Harbor 对接 LDAP 界面功能,这里同样可以实现。
暂时没有界面,CRD ClusterConfiguration 中的 ks-installer:
kubectl -n kubesphere-system edit cc ks-installer
spec:
  alerting:
    enabled: true
  auditing:
    enabled: true
  authentication:
    jwtSecret: ""
    maximumClockSkew: 10s
    multipleLogin: true
    oauthOptions:
      accessTokenInactivityTimeout: 30m
      accessTokenMaxAge: 1h
      identityProviders:
      - mappingMethod: auto
        name: LDAP
        provider:
          host: ldap.middleware.svc:1389 #这里我填写的为 KS 集群内部访问方式
          loginAttribute: uid
          mailAttribute: mail
          managerDN: cn=admin,dc=example,dc=org
          managerPassword: adminpassword
          userSearchBase: dc=example,dc=org
          userSearchFilter: (uid=customuser001) #这里配置userSearchFilter可根业务灵活配置
        type: LDAPIdentityProvider
排错或者查看日志情况:
#在 cc 里配置好,等待 ks-installer 自动更新;或者手动重启 ks-apiserver
#编辑ks-installer
kubectl edit cc -n kubesphere-system ks-installer
#重启ks-installer
kubectl rollout restart -n kubesphere-system deploy ks-installer
#重启ks-apiserver
kubectl rollout restart -n kubesphere-system deploy ks-apiserver
#查看ks-apiserver日志
kubectl -n kubesphere-system logs ks-apiserver-xxxxxxxxx
http://192.168.100.2:30880/kapis/config.kubesphere.io/v1alpha2/configs/oauth
验证配置内容已经正确更新:
如果 mappingMethod 设置为 lookup,可以运行以下命令并添加标签来进行帐户关联。如果 mappingMethod 是 auto 可以跳过这个部分。

kubectl edit user <KubeSphere username>

labels:
  iam.kubesphere.io/identify-provider: <LDAP service name>
  iam.kubesphere.io/origin-uid: <LDAP username>
首先我在 OpenLDAP 中 ldap search 结果显示只有一个用户 customuser001。
那么就用 customuser001 这个用户来尝试登录试试:
#这个用户是我在 studio 中通过界面添加的一个新用户,customuser001,密码为:custompassword001
customuser001
custompassword001
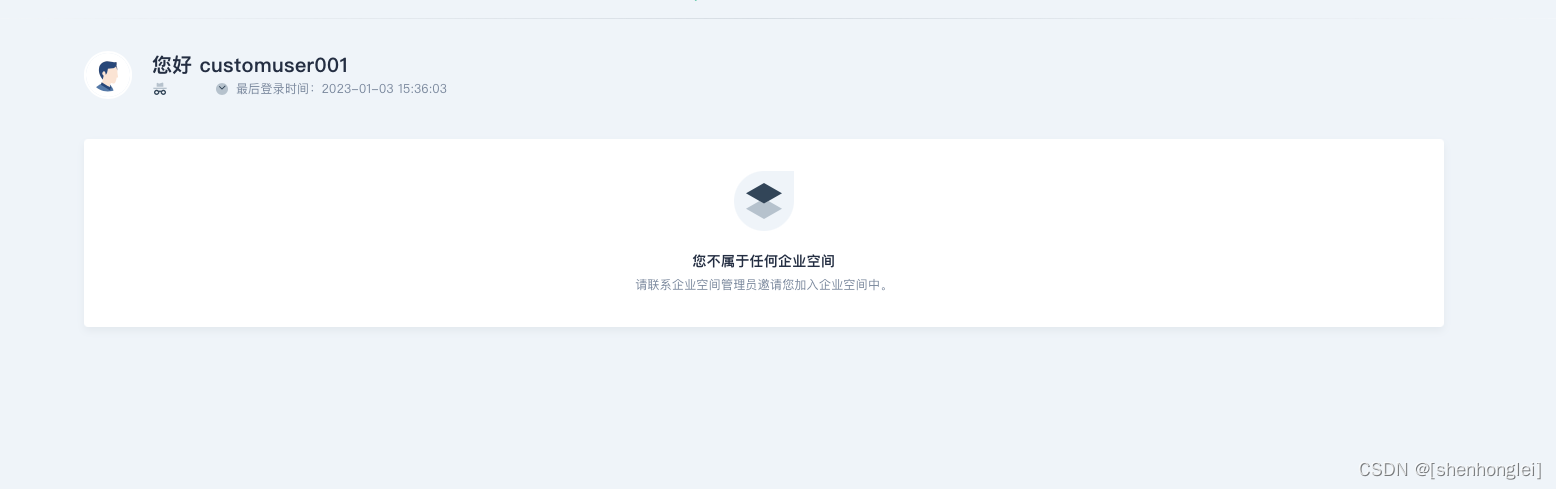
切换回管理员,查看账户同步内容:

目前来看,默认同步的账户可以登录,但是没有赋予角色,需要再人为分配下或者设置成默认角色进行导入。
这里只提供一下思路,批量脚本可自行编写:
#可以在 KubeSphere 中提前导入第三方(eg.ldap)账户并关联平台角色、企业空间
cat << EOF | kubectl apply -f -
apiVersion: iam.kubesphere.io/v1alpha2
kind: User
metadata:
  labels:
    iam.kubesphere.io/identify-provider: <IDENTITY_PROVIDER_NAME> #这里指配置名称为:ldap
    iam.kubesphere.io/origin-uid: <UID> #第三方账户的 UID
  name: <USERNAME> # 关联的 KubeSphere 账户名称
spec:
  email: <EMAIL> # 关联的 KubeSphere 账户email
EOF
#eg.账户数据如下
identify-provider:ldap
origin-uid:customuser002
email:custompasswordaa@ks.com

cat << EOF | kubectl apply -f -
apiVersion: iam.kubesphere.io/v1alpha2
kind: User
metadata:
  labels:
    iam.kubesphere.io/identify-provider: ldap
    iam.kubesphere.io/origin-uid: customuser002
  name: customuser002
spec:
  email: custompasswordaa@ks.com
EOF

root@i-9z8gtfm9:/home/ubuntu# kubectl get user
NAME            EMAIL                     STATUS
admin           admin@kubesphere.io       Active
customuser      customuser@ks.com         Active
customuser001   customusera@example.com   Active
customuser002   custompasswordaa@ks.com   Active
shl             shl@163.com               Active
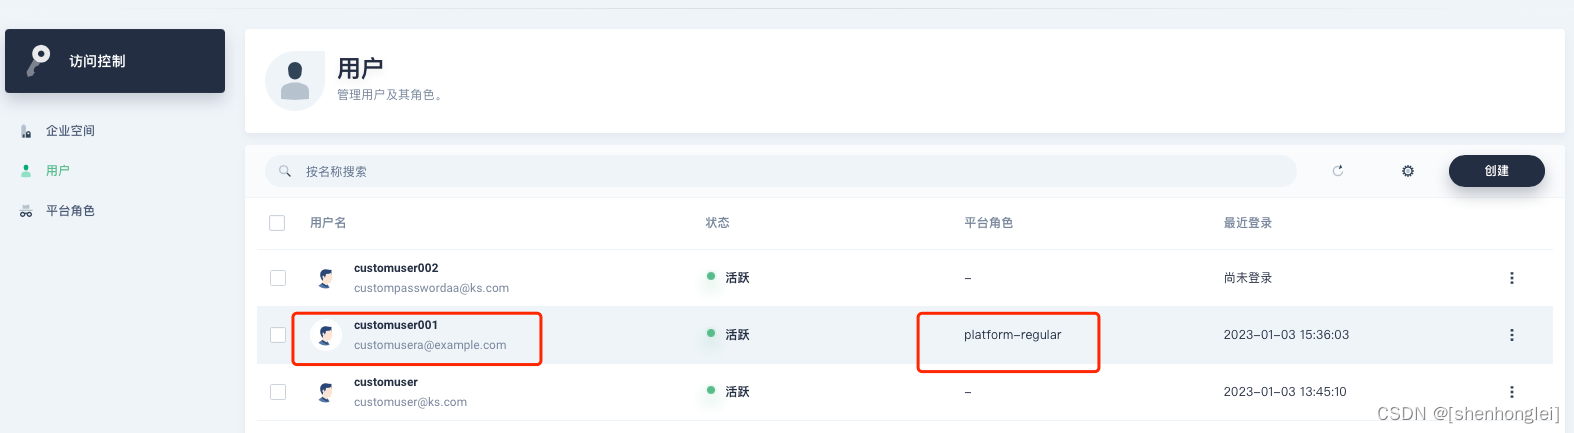
这里将用户 customuser001 关联成 platform-regular 角色:
cat << EOF | kubectl apply -f -
apiVersion: iam.kubesphere.io/v1alpha2
kind: GlobalRoleBinding
metadata:
  labels:
    iam.kubesphere.io/user-ref: customuser001
  name: customuser001-platform-regular
roleRef:
  apiGroup: iam.kubesphere.io
  kind: GlobalRole
  name: platform-regular #查询平台已有的角色
subjects:
- apiGroup: rbac.authorization.k8s.io
  kind: User
  name: customuser001
EOF
执行后,查询结果:
root@i-9z8gtfm9:/home/ubuntu# kubectl get globalrolebinding
NAME                             AGE
admin                            139d
anonymous                        139d
authenticated                    139d
customuser001-platform-regular   93s
pre-registration                 139d
shl-platform-regular             139d
root@i-9z8gtfm9:/home/ubuntu# kubectl get globalrolebinding customuser001-platform-regular -oyaml
apiVersion: iam.kubesphere.io/v1alpha2
kind: GlobalRoleBinding
metadata:
  annotations:
    kubectl.kubernetes.io/last-applied-configuration: |
      {"apiVersion":"iam.kubesphere.io/v1alpha2","kind":"GlobalRoleBinding","metadata":{"annotations":{},"labels":{"iam.kubesphere.io/user-ref":"customuser001"},"name":"customuser001-platform-regular"},"roleRef":{"apiGroup":"iam.kubesphere.io","kind":"GlobalRole","name":"platform-regular"},"subjects":[{"apiGroup":"rbac.authorization.k8s.io","kind":"User","name":"customuser001"}]}
  creationTimestamp: "2023-01-03T08:34:23Z"
  generation: 1
  labels:
    iam.kubesphere.io/user-ref: customuser001
    kubefed.io/managed: "false"
  name: customuser001-platform-regular
  resourceVersion: "3436734"
  uid: 9d7a18a6-b4c9-40f8-8186-7029575e5d2d
roleRef:
  apiGroup: iam.kubesphere.io
  kind: GlobalRole
  name: platform-regular
subjects:
- apiGroup: rbac.authorization.k8s.io
  kind: User
  name: customuser001
#这里注意多集群的企业空间差异
cat << EOF | kubectl apply -f -
apiVersion: tenant.kubesphere.io/v1alpha2
kind: WorkspaceTemplate
metadata:
  name: app
spec:
  # placement: {}
  placement:
    clusters:
    - name: <CLUSTER_NAME>
  template:
    spec:
      manager: <USERNAME>
EOF
cat << EOF | kubectl apply -f -
apiVersion: iam.kubesphere.io/v1alpha2
kind: WorkspaceRoleBinding
metadata:
  labels:
    iam.kubesphere.io/user-ref: <USERNAME>
    kubesphere.io/workspace: <WORKSPACE_NAME>
  name: <USERNAME>-<WORKSPACE_ROLE_NAME>
roleRef:
  apiGroup: iam.kubesphere.io
  kind: WorkspaceRole
  name: <WORKSPACE_ROLE_NAME>
subjects:
- apiGroup: rbac.authorization.k8s.io
  kind: User
  name: <USERNAME>
EOF
# 更为高级灵活的使用方法,可以升级为定期、定时、触发式、差异化增量/全量同步账户信息
本文由博客一文多发平台 OpenWrite 发布!
我正在学习如何使用Nokogiri,根据这段代码我遇到了一些问题:require'rubygems'require'mechanize'post_agent=WWW::Mechanize.newpost_page=post_agent.get('http://www.vbulletin.org/forum/showthread.php?t=230708')puts"\nabsolutepathwithtbodygivesnil"putspost_page.parser.xpath('/html/body/div/div/div/div/div/table/tbody/tr/td/div
我有一个Ruby程序,它使用rubyzip压缩XML文件的目录树。gem。我的问题是文件开始变得很重,我想提高压缩级别,因为压缩时间不是问题。我在rubyzipdocumentation中找不到一种为创建的ZIP文件指定压缩级别的方法。有人知道如何更改此设置吗?是否有另一个允许指定压缩级别的Ruby库? 最佳答案 这是我通过查看rubyzip内部创建的代码。level=Zlib::BEST_COMPRESSIONZip::ZipOutputStream.open(zip_file)do|zip|Dir.glob("**/*")d
类classAprivatedeffooputs:fooendpublicdefbarputs:barendprivatedefzimputs:zimendprotecteddefdibputs:dibendendA的实例a=A.new测试a.foorescueputs:faila.barrescueputs:faila.zimrescueputs:faila.dibrescueputs:faila.gazrescueputs:fail测试输出failbarfailfailfail.发送测试[:foo,:bar,:zim,:dib,:gaz].each{|m|a.send(m)resc
很好奇,就使用rubyonrails自动化单元测试而言,你们正在做什么?您是否创建了一个脚本来在cron中运行rake作业并将结果邮寄给您?git中的预提交Hook?只是手动调用?我完全理解测试,但想知道在错误发生之前捕获错误的最佳实践是什么。让我们理所当然地认为测试本身是完美无缺的,并且可以正常工作。下一步是什么以确保他们在正确的时间将可能有害的结果传达给您? 最佳答案 不确定您到底想听什么,但是有几个级别的自动代码库控制:在处理某项功能时,您可以使用类似autotest的内容获得关于哪些有效,哪些无效的即时反馈。要确保您的提
假设我做了一个模块如下:m=Module.newdoclassCendend三个问题:除了对m的引用之外,还有什么方法可以访问C和m中的其他内容?我可以在创建匿名模块后为其命名吗(就像我输入“module...”一样)?如何在使用完匿名模块后将其删除,使其定义的常量不再存在? 最佳答案 三个答案:是的,使用ObjectSpace.此代码使c引用你的类(class)C不引用m:c=nilObjectSpace.each_object{|obj|c=objif(Class===objandobj.name=~/::C$/)}当然这取决于
我正在尝试使用ruby和Savon来使用网络服务。测试服务为http://www.webservicex.net/WS/WSDetails.aspx?WSID=9&CATID=2require'rubygems'require'savon'client=Savon::Client.new"http://www.webservicex.net/stockquote.asmx?WSDL"client.get_quotedo|soap|soap.body={:symbol=>"AAPL"}end返回SOAP异常。检查soap信封,在我看来soap请求没有正确的命名空间。任何人都可以建议我
关闭。这个问题是opinion-based.它目前不接受答案。想要改进这个问题?更新问题,以便editingthispost可以用事实和引用来回答它.关闭4年前。Improvethisquestion我想在固定时间创建一系列低音和高音调的哔哔声。例如:在150毫秒时发出高音调的蜂鸣声在151毫秒时发出低音调的蜂鸣声200毫秒时发出低音调的蜂鸣声250毫秒的高音调蜂鸣声有没有办法在Ruby或Python中做到这一点?我真的不在乎输出编码是什么(.wav、.mp3、.ogg等等),但我确实想创建一个输出文件。
在控制台中反复尝试之后,我想到了这种方法,可以按发生日期对类似activerecord的(Mongoid)对象进行分组。我不确定这是完成此任务的最佳方法,但它确实有效。有没有人有更好的建议,或者这是一个很好的方法?#eventsisanarrayofactiverecord-likeobjectsthatincludeatimeattributeevents.map{|event|#converteventsarrayintoanarrayofhasheswiththedayofthemonthandtheevent{:number=>event.time.day,:event=>ev
我在我的项目目录中完成了compasscreate.和compassinitrails。几个问题:我已将我的.sass文件放在public/stylesheets中。这是放置它们的正确位置吗?当我运行compasswatch时,它不会自动编译这些.sass文件。我必须手动指定文件:compasswatchpublic/stylesheets/myfile.sass等。如何让它自动运行?文件ie.css、print.css和screen.css已放在stylesheets/compiled。如何在编译后不让它们重新出现的情况下删除它们?我自己编译的.sass文件编译成compiled/t
我想将html转换为纯文本。不过,我不想只删除标签,我想智能地保留尽可能多的格式。为插入换行符标签,检测段落并格式化它们等。输入非常简单,通常是格式良好的html(不是整个文档,只是一堆内容,通常没有anchor或图像)。我可以将几个正则表达式放在一起,让我达到80%,但我认为可能有一些现有的解决方案更智能。 最佳答案 首先,不要尝试为此使用正则表达式。很有可能你会想出一个脆弱/脆弱的解决方案,它会随着HTML的变化而崩溃,或者很难管理和维护。您可以使用Nokogiri快速解析HTML并提取文本:require'nokogiri'h