Android开发之智能聊天机器人
Android实现智能聊天机器人
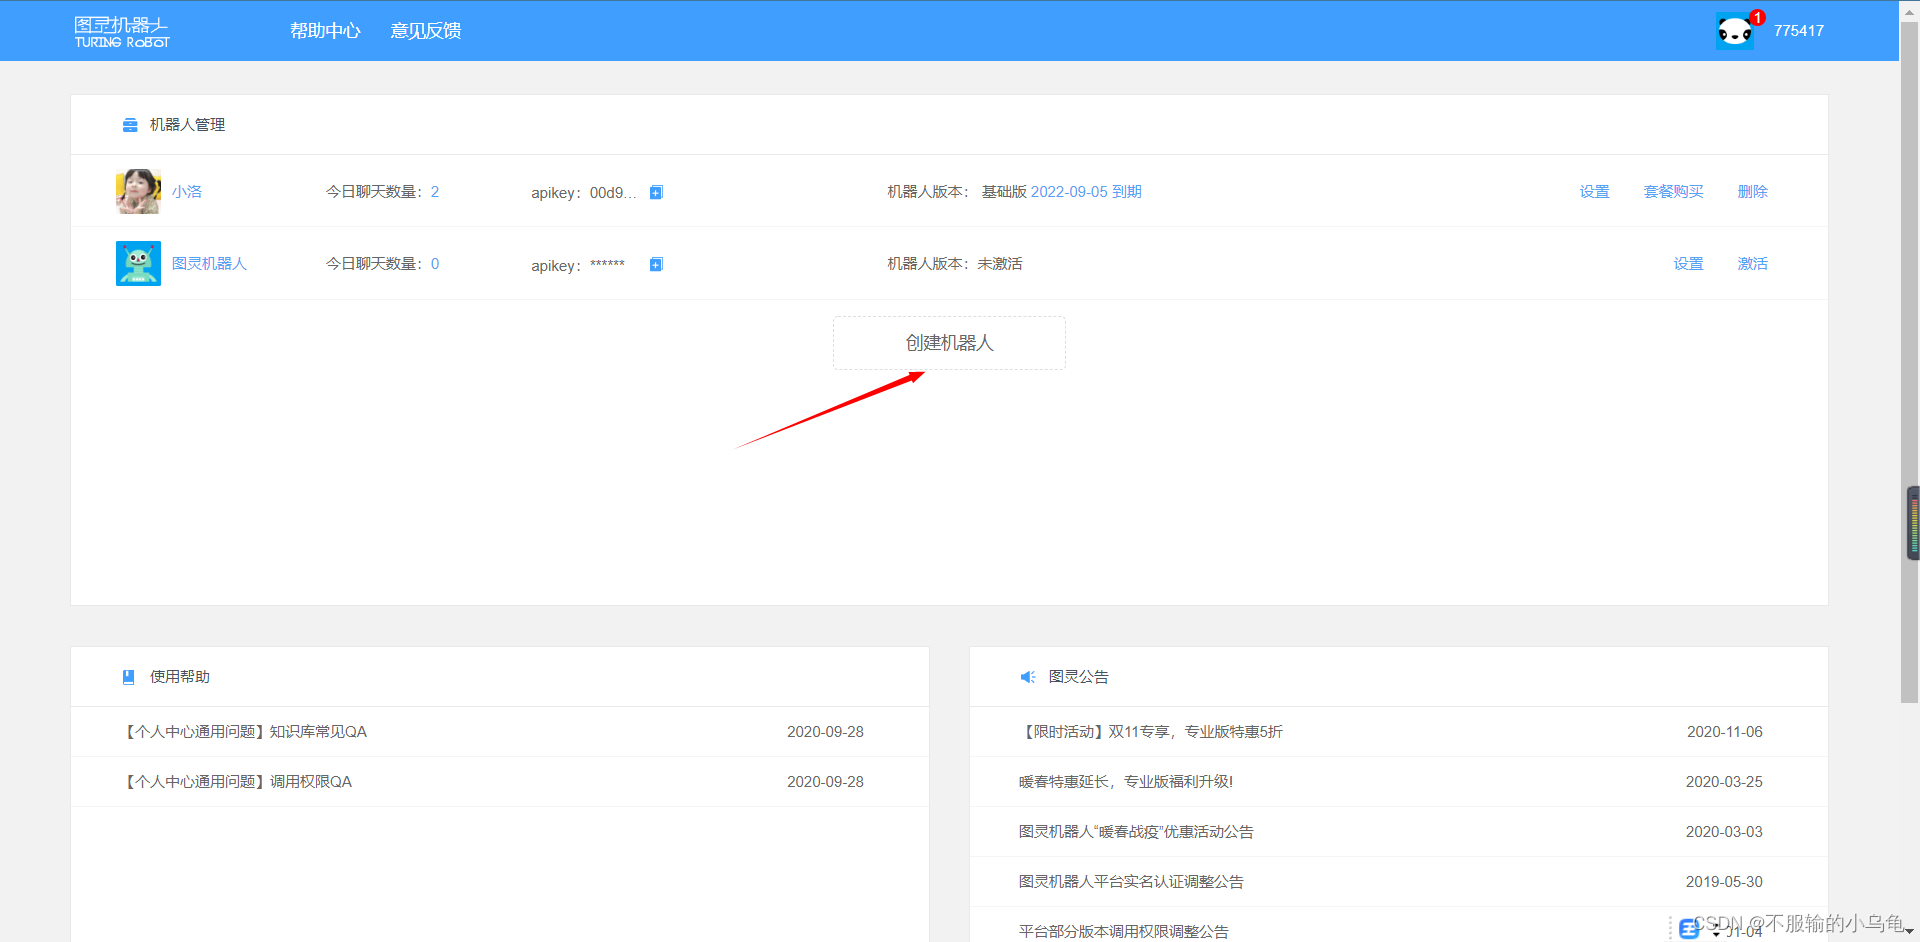
最近在做项目中,突然来了灵感,要做一个聊天机器人.聊天机器人在很多大型App上都有使用,比如QQ群里的QQ小冰,淘宝京东等App上在没有人工客服之前会有机器人跟你聊天,根据你发的问题关键词,向你推荐一些答案,可以省下很多人工的时间以及减小服务器的压力。
此功能主要原理:
1.接入图灵机器人api,拼接上你输入框的消息;
2.根据api完成网络请求消息的接收与发送
3.完成布局页面
4.实现你和小洛的对话
废话不多说,直接上图和代码


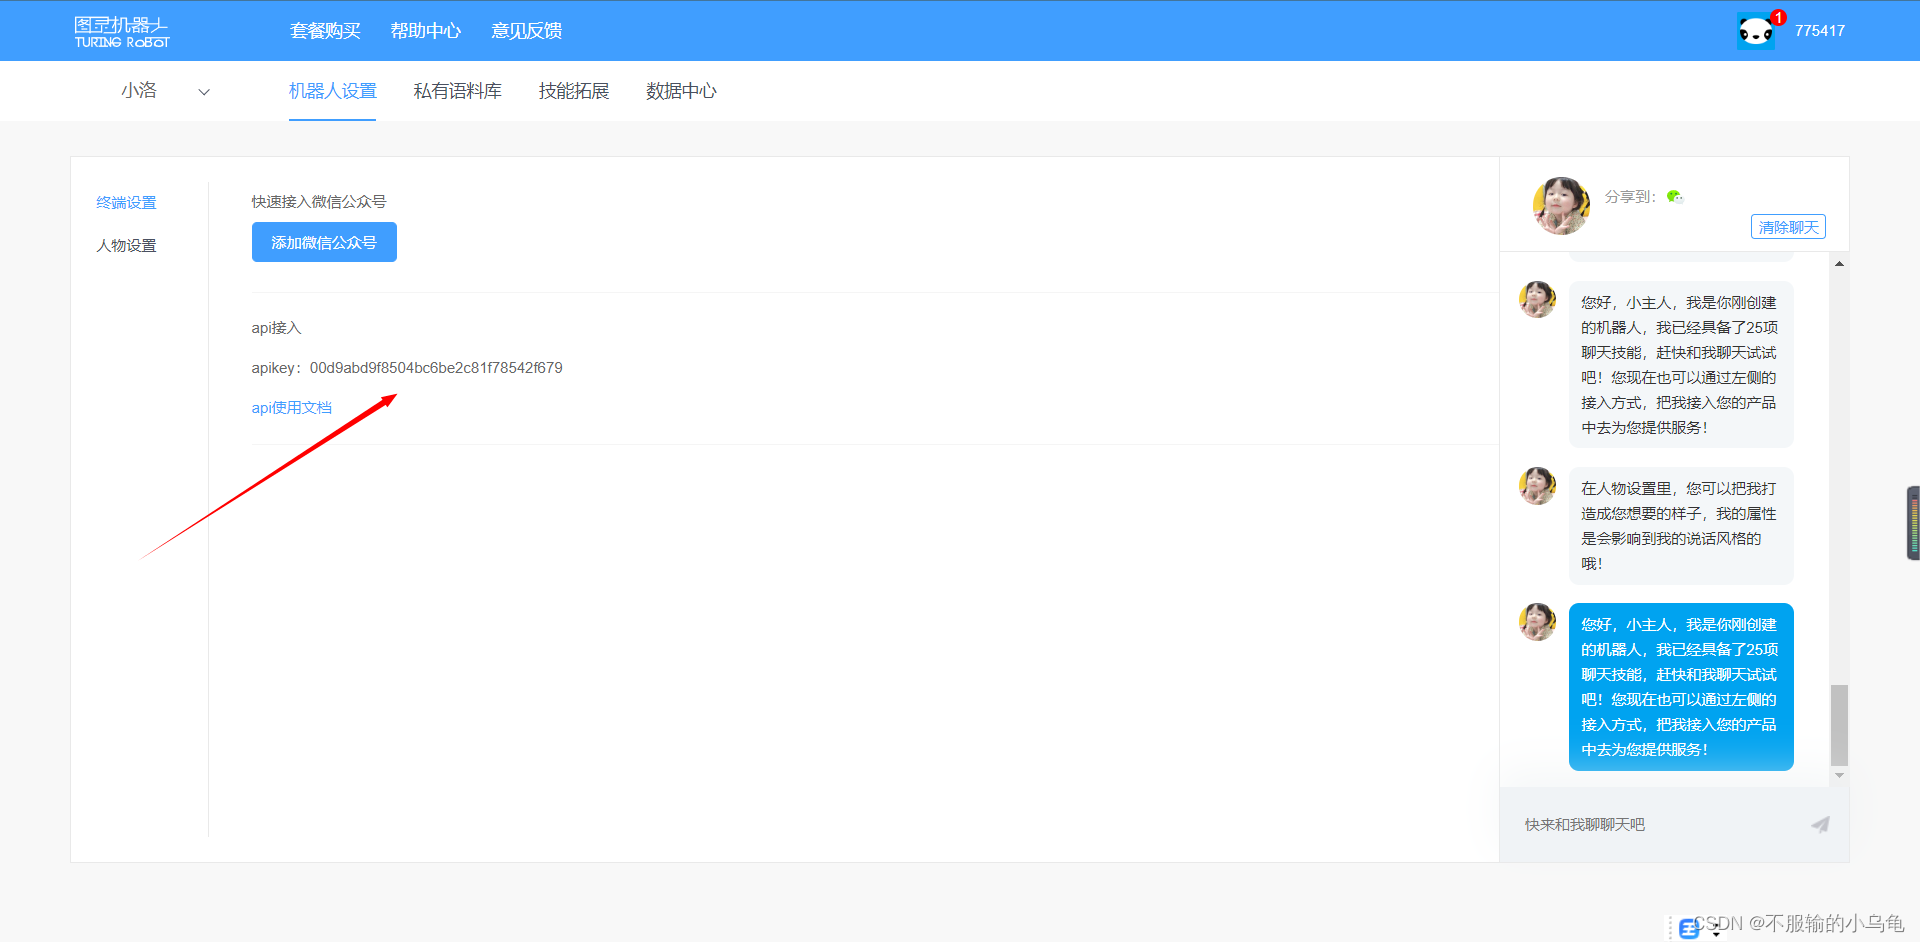
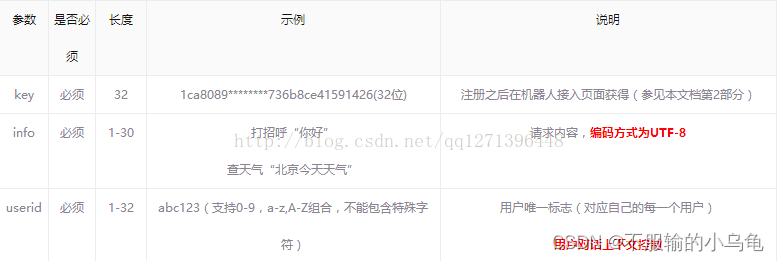
拼接方法:http://www.tuling123.com/openapi/api?key=你自己的apikey&info=你要发送的话&userid=你自己的唯一标示(在代码中会指出)
<LinearLayout xmlns:android="http://schemas.android.com/apk/res/android"
    xmlns:tools="http://schemas.android.com/tools"
    android:id="@+id/LinearLayout1"
    android:layout_width="match_parent"
    android:layout_height="match_parent"
    android:orientation="vertical" >

    <!-- transcriptMode 自动向下滚动    alwaysScroll一直向下滚动状态;   divider设置间隔线效果 ;   listSelector设置没有滑动效果 -->

    <ListView
        android:id="@+id/lv"
        android:layout_width="fill_parent"
        android:layout_height="0dp"
        android:layout_weight="1"
        android:divider="@null"
        android:listSelector="@android:color/transparent"
        android:transcriptMode="alwaysScroll" >
    </ListView>

    <LinearLayout
        android:layout_width="fill_parent"
        android:layout_height="wrap_content"
        android:background="#229dec"
        android:orientation="horizontal" >

        <EditText
            android:id="@+id/et_sendText"
            android:layout_width="0dp"
            android:layout_height="wrap_content"
            android:layout_gravity="center_vertical"
            android:layout_marginLeft="7dp"
            android:layout_weight="1"
            android:background="@drawable/bg_edittext_selector"
            android:paddingBottom="7dp"
            android:paddingTop="7dp" />

        <Button
            android:id="@+id/btn_send"
            android:layout_width="wrap_content"
            android:layout_height="wrap_content"
            android:layout_margin="7dp"
            android:background="@drawable/bg_button"
            android:text="发送" />
    </LinearLayout>

</LinearLayout>
<?xml version="1.0" encoding="utf-8"?>
<RelativeLayout xmlns:android="http://schemas.android.com/apk/res/android"
android:layout_width="match_parent"
android:layout_height="wrap_content">
<TextView
android:id="@+id/tv_time"
android:layout_width="fill_parent"
android:gravity="center_horizontal"
android:layout_height="wrap_content"/>
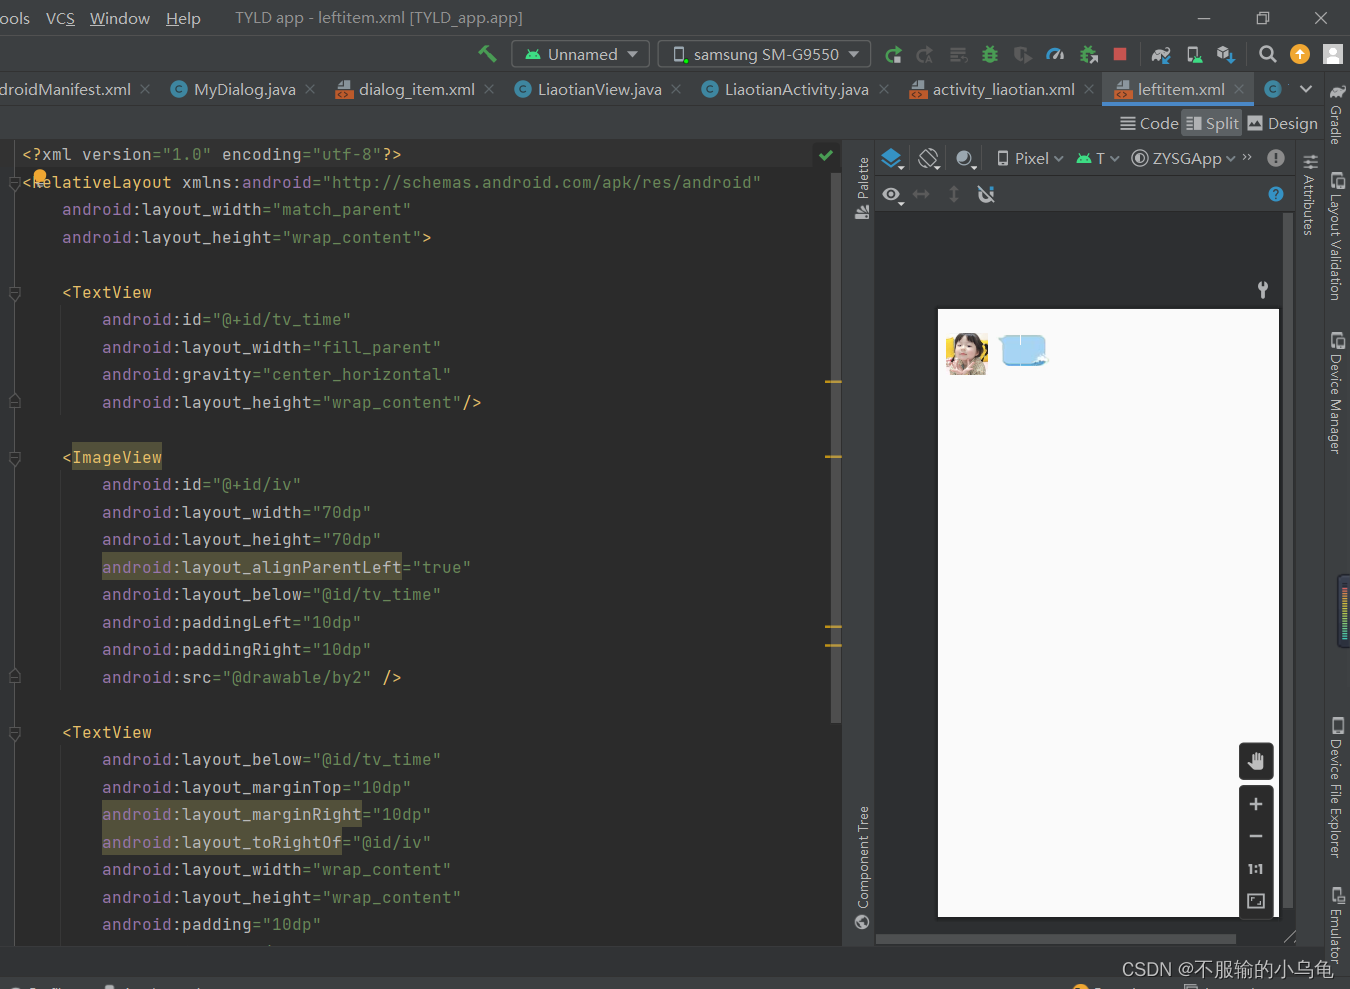
<ImageView
android:id="@+id/iv"
android:layout_width="70dp"
android:layout_height="70dp"
android:layout_alignParentLeft="true"
android:layout_below="@id/tv_time"
android:paddingLeft="10dp"
android:paddingRight="10dp"
android:src="@drawable/by2" />
<TextView
android:layout_below="@id/tv_time"
android:layout_marginTop="10dp"
android:layout_marginRight="10dp"
android:layout_toRightOf="@id/iv"
android:layout_width="wrap_content"
android:layout_height="wrap_content"
android:padding="10dp"
android:id="@+id/tv"
android:gravity="center"
android:background="@drawable/left"/>
</RelativeLayout>
<?xml version="1.0" encoding="utf-8"?>
<RelativeLayout xmlns:android="http://schemas.android.com/apk/res/android"
android:layout_width="match_parent"
android:layout_height="wrap_content">
<TextView
android:id="@+id/tv_time"
android:layout_width="fill_parent"
android:gravity="center_horizontal"
android:layout_height="wrap_content" />
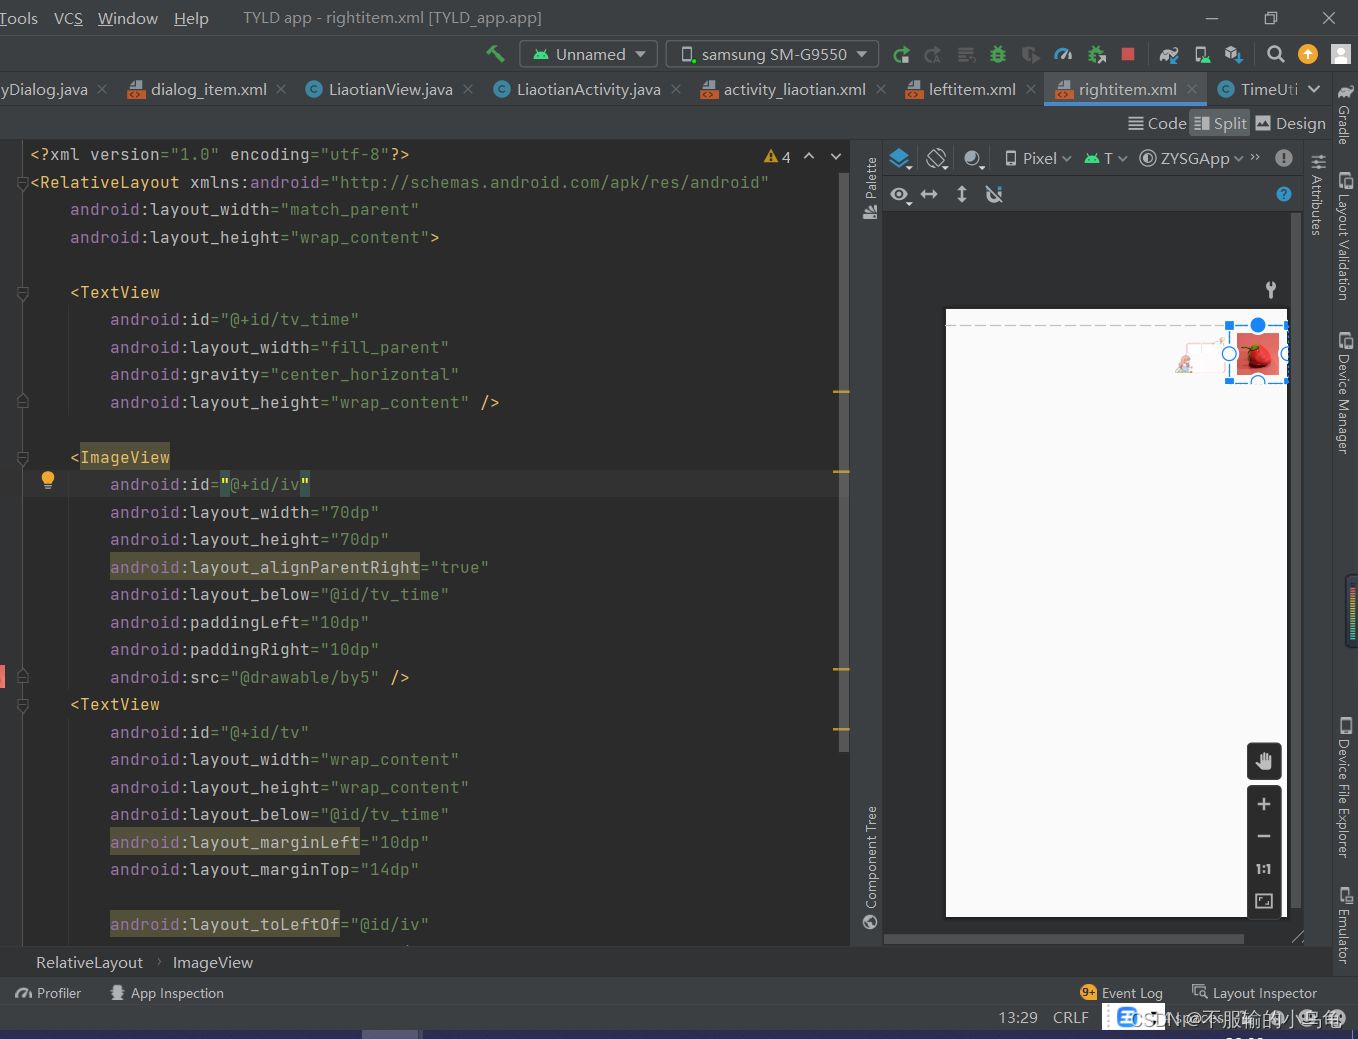
<ImageView
android:id="@+id/iv"
android:layout_width="70dp"
android:layout_height="70dp"
android:layout_alignParentRight="true"
android:layout_below="@id/tv_time"
android:paddingLeft="10dp"
android:paddingRight="10dp"
android:src="@drawable/by5" />
<TextView
android:id="@+id/tv"
android:layout_width="wrap_content"
android:layout_height="wrap_content"
android:layout_below="@id/tv_time"
android:layout_marginLeft="10dp"
android:layout_marginTop="14dp"
android:layout_toLeftOf="@id/iv"
android:background="@drawable/right"
android:gravity="center"
android:padding="12dp" />
</RelativeLayout>
<?xml version="1.0" encoding="utf-8"?>
<shape xmlns:android="http://schemas.android.com/apk/res/android" >

    <solid android:color="#FFFFFF" />

    <corners android:radius="5dip" />

    <stroke
        android:width="1dip"
        android:color="#BDC7D8" />

</shape>
<?xml version="1.0" encoding="utf-8"?>
<shape xmlns:android="http://schemas.android.com/apk/res/android" >

    <solid android:color="#80cccf" /> <!-- 背景色 -->

    <stroke
        android:width="0.01dp"
        android:color="#80cccf" />  <!-- 邊框的顏色 -->

    <corners
        android:bottomLeftRadius="5dp"
        android:bottomRightRadius="5dp"
        android:topLeftRadius="5dp"
        android:topRightRadius="5dp" />

</shape>
package robot.com.myapplication;
import android.os.AsyncTask;
import android.util.Log;
import org.apache.http.HttpEntity;
import org.apache.http.HttpResponse;
import org.apache.http.client.HttpClient;
import org.apache.http.client.methods.HttpGet;
import org.apache.http.impl.client.DefaultHttpClient;
import java.io.BufferedReader;
import java.io.InputStream;
import java.io.InputStreamReader;
/**
*
*/
public class HttpData extends AsyncTask<String, Void, String> {
private HttpClient httpClient;
private HttpGet httpGet;
private HttpResponse httpResponse; //��ȡ���ص�����
private HttpEntity httpEntity;//����httpʵ��
private InputStream in; //����ȡ��������ת��Ϊ���ļ�
private HttpGetDataListener listener;//ʵ���Զ����HttpGetDataListener�ӿ�,���ҹ��컯���ݲ���
private String url;
public HttpData(String url ,HttpGetDataListener listener) {
this.url = url;
this.listener = listener;
}
@Override
protected String doInBackground(String... params) {//ʵ�ֽӿں���д�˷���,�˷����������ǣ�����get�����ȡ����
try {
httpClient = new DefaultHttpClient();//ʵ�����ͻ���
httpGet = new HttpGet(url);//ʹ��get��ʽ��ͨ������URL������
httpResponse = httpClient.execute(httpGet); //ͨ���ͻ��˷�������
httpEntity = httpResponse.getEntity();//ͨ��httpResponse�����ȡ����
Log.i("haha1", "----------"+httpEntity.toString());
in = httpEntity.getContent();//��ȡʵ��ľ�������
BufferedReader br = new BufferedReader(new InputStreamReader(in));//��ȡ���������ݺ�ͨ�����������ж�ȡ
Log.i("haha2", "----------"+br.toString());
String line = null; //��ȡ����
StringBuffer sb = new StringBuffer();//������������
while((line = br.readLine()) != null){ //��ȡ������������
sb.append(line); //�洢���ݵ�StringBuffer��
}
Log.i("haha3", "----------"+sb.toString());
return sb.toString();//ת��ΪString����
} catch (Exception e) {
// TODO: handle exception
}
return null;
}
/**����
* ��д�˷�����ͨ���ⷽ����ȡ����
*/
@Override
protected void onPostExecute(String result) {
listener.getDataUrl(result);//��������
Log.i("haha4", "----------"+result);
super.onPostExecute(result);
}
}
package robot.com.myapplication;

public interface HttpGetDataListener {
	void getDataUrl(String data);
}
package robot.com.myapplication;
/**
 *
 */
public class ListData {
	public static final int  SEND = 1;
	public static final int  RECEIVE = 2;
	private String content;
	private int flag;//��ʶ
	private String time;

	public ListData(String content, int flag, String time) {
		setContent(content);
		setFlag(flag);
		setTime(time);
	}

	public String getContent() {
		return content;
	}

	public void setContent(String content) {
		this.content = content;
	}

	public int getFlag() {
		return flag;
	}

	public void setFlag(int flag) {
		this.flag = flag;
	}

	public String getTime() {
		return time;
	}

	public void setTime(String time) {
		this.time = time;
	}


}
package robot.com.myapplication;

import android.content.Context;
import android.view.LayoutInflater;
import android.view.View;
import android.view.ViewGroup;
import android.widget.BaseAdapter;
import android.widget.RelativeLayout;
import android.widget.TextView;

import java.util.List;

/**
 *
 */
public class TextAdapter extends BaseAdapter{

	private List<ListData> lists;//���ϵ���������
	private Context mContext;//�н������ĵ�Context

	private RelativeLayout layout;

	public TextAdapter(List<ListData> lists, Context mContext) {
		this.lists = lists;
		this.mContext = mContext;
	}

	@Override
	public int getCount() {//����lists�����ص�����
		return lists.size();
	}

	@Override
	public Object getItem(int position) {
		return lists.get(position);
	}

	@Override
	public long getItemId(int position) {
		return position;
	}

	@Override
	public View getView(int position, View convertView, ViewGroup parent) {
		LayoutInflater inflater = LayoutInflater.from(mContext);
		if(lists.get(position).getFlag() == ListData.RECEIVE){
			layout = (RelativeLayout) inflater.inflate(R.layout.leftitem, null);
		}
		if(lists.get(position).getFlag() == ListData.SEND){
			layout = (RelativeLayout) inflater.inflate(R.layout.rightitem, null);
		}
		TextView tv = (TextView) layout.findViewById(R.id.tv);//�Ի�textView
		TextView tv_time = (TextView) layout.findViewById(R.id.tv_time);//ʱ��textView
		tv.setText(lists.get(position).getContent());  //���������ݷ��MTextView��
		tv_time.setText(lists.get(position).getTime());//���¼�д��TextView
		return layout;
	}

}
package robot.com.myapplication;

import android.view.View;

import java.text.SimpleDateFormat;
import java.util.Date;

import java.text.SimpleDateFormat;
import java.util.ArrayList;
import java.util.Date;
import java.util.List;

import org.json.JSONException;
import org.json.JSONObject;

import android.os.Bundle;
import android.support.v7.app.AppCompatActivity;
import android.util.Log;
import android.view.View;
import android.view.View.OnClickListener;
import android.widget.Button;
import android.widget.EditText;
import android.widget.ListView;


public class MainActivity extends AppCompatActivity implements
        HttpGetDataListener,View.OnClickListener {

    private HttpData httpData;// �첽�������
    private List<ListData> lists;
    private ListView lv;
    private EditText et_sendText;
    private Button btn_send;
    private String content_str; // �惦��EditText�@ȡ���Ĕ���
    private TextAdapter adapter;
    private String[] welcome_arry;//��ӭ��
    private double currentTime,oldTime = 0;//�Ի�ʱ��

    @Override
    protected void onCreate(Bundle savedInstanceState) {
        super.onCreate(savedInstanceState);
        setContentView(R.layout.activity_main);
        Log.i("haha7", "----------7");
        initView();
        Log.i("haha8", "----------8");
    }

    /**
     * ʵ��������
     */
    private void initView(){
        lists = new ArrayList<ListData>();
        lv = (ListView) findViewById(R.id.lv);
        et_sendText = (EditText) findViewById(R.id.et_sendText);
        btn_send = (Button) findViewById(R.id.btn_send);
        btn_send.setOnClickListener(this);
        adapter = new TextAdapter(lists, this);
        lv.setAdapter(adapter);//��adapter
        ListData listData;
        listData = new ListData(getRandomWelcomeTips(),ListData.RECEIVE, getTime());
        lists.add(listData);//��ӻ�ӭ��
    }

    /**
     * ���û�ӭ��
     */
    public String getRandomWelcomeTips(){
//        String welcome_tip = null;
//        welcome_arry = this.getResources().getStringArray(getResources().getString(R.string.welcome_tips));//��string.xml�л�ȡ��Ϊwelcome_tips���ַ�������
//        int index = (int)(Math.random()*(welcome_arry.length - 1));//��ȡһ�������
//        welcome_tip = welcome_arry[index];
        return getResources().getString(R.string.welcome_tips);
    }

    /**
     * ����ʱ��
     * @return
     */
    private String getTime(){
        currentTime = System.currentTimeMillis();
        SimpleDateFormat format = new SimpleDateFormat("yyyy��MM��dd��   HH:mm:ss");
        Date curDate = new Date();
        String str = format.format(curDate);
        if(currentTime - oldTime >= 5*60*1000){//�������5���ӣ���ʾʱ��
            oldTime = currentTime;
            return str;
        }else{
            return "";
        }
    }


    @Override
    public void getDataUrl(String data) {
        Log.i("haha---data=","------" + data);
        parseText(data);
    }

    public void parseText(String str){//����json
        try {
            JSONObject jb = new JSONObject(str);
            ListData listData;
            listData = new ListData(jb.getString("text"),ListData.RECEIVE, getTime());
            lists.add(listData);
            adapter.notifyDataSetChanged();//�����m�䣿��
        } catch (JSONException e) {
            e.printStackTrace();
        }
    }

    @Override
    public void onClick(View v) {
        getTime();//����ʱ��
        content_str = et_sendText.getText().toString();//�@ȡEditText����
        et_sendText.setText("");
        String dropk = content_str.replace(" ", "");//ȥ���ո�
        String droph = dropk.replace("\n", "");//ȥ���س�
        ListData listData;
        listData = new ListData(content_str, ListData.SEND, getTime());
        lists.add(listData);
        Log.i("haha9", "----------content_str="+content_str);
        adapter.notifyDataSetChanged();//ˢ��

        Log.i("haha6", "----------content_str="+content_str);

        httpData = (HttpData) new HttpData(
                "http://www.tuling123.com/openapi/api?key=02dfb86de93f8a3e81dabd214a50c8fa&info=" + droph + "&userid=15602229049",
                this).execute();// �����Ѿ�ȥ���ո�ͻس�content_str������droph   ; execute()�����첽ͨ��

        Log.i("haha5", "----------"+httpData);

        if(lists.size() > 30){//�����Ļ�ϵĶԻ����ݶ���30�����Ƴ�ǰ�������
            for (int i = 0; i < lists.size(); i++) {
                lists.remove(i);
            }
        }
    }

}
<uses-permission android:name="android.permission.INTERNET" />
下载地址:Android开发之智能聊天机器人
至此,一个智能聊天机器人就实现了,你可以尽情的和它玩耍了,记住别玩坏了哦😏😏😏
不懂的地方可以问我哦
我正在编写一个包含C扩展的gem。通常当我写一个gem时,我会遵循TDD的过程,我会写一个失败的规范,然后处理代码直到它通过,等等......在“ext/mygem/mygem.c”中我的C扩展和在gemspec的“扩展”中配置的有效extconf.rb,如何运行我的规范并仍然加载我的C扩展?当我更改C代码时,我需要采取哪些步骤来重新编译代码?这可能是个愚蠢的问题,但是从我的gem的开发源代码树中输入“bundleinstall”不会构建任何native扩展。当我手动运行rubyext/mygem/extconf.rb时,我确实得到了一个Makefile(在整个项目的根目录中),然后当
我已经在Sinatra上创建了应用程序,它代表了一个简单的API。我想在生产和开发上进行部署。我想在部署时选择,是开发还是生产,一些方法的逻辑应该改变,这取决于部署类型。是否有任何想法,如何完成以及解决此问题的一些示例。例子:我有代码get'/api/test'doreturn"Itisdev"end但是在部署到生产环境之后我想在运行/api/test之后看到ItisPROD如何实现? 最佳答案 根据SinatraDocumentation:EnvironmentscanbesetthroughtheRACK_ENVenvironm
我们的git存储库中目前有一个Gemfile。但是,有一个gem我只在我的环境中本地使用(我的团队不使用它)。为了使用它,我必须将它添加到我们的Gemfile中,但每次我checkout到我们的master/dev主分支时,由于与跟踪的gemfile冲突,我必须删除它。我想要的是类似Gemfile.local的东西,它将继承从Gemfile导入的gems,但也允许在那里导入新的gems以供使用只有我的机器。此文件将在.gitignore中被忽略。这可能吗? 最佳答案 设置BUNDLE_GEMFILE环境变量:BUNDLE_GEMFI
这似乎非常适得其反,因为太多的gem会在window上破裂。我一直在处理很多mysql和ruby-mysqlgem问题(gem本身发生段错误,一个名为UnixSocket的类显然在Windows机器上不能正常工作,等等)。我只是在浪费时间吗?我应该转向不同的脚本语言吗? 最佳答案 我在Windows上使用Ruby的经验很少,但是当我开始使用Ruby时,我是在Windows上,我的总体印象是它不是Windows原生系统。因此,在主要使用Windows多年之后,开始使用Ruby促使我切换回原来的系统Unix,这次是Linux。Rub
我正在玩HTML5视频并且在ERB中有以下片段:mp4视频从在我的开发环境中运行的服务器很好地流式传输到chrome。然而firefox显示带有海报图像的视频播放器,但带有一个大X。问题似乎是mongrel不确定ogv扩展的mime类型,并且只返回text/plain,如curl所示:$curl-Ihttp://0.0.0.0:3000/pr6.ogvHTTP/1.1200OKConnection:closeDate:Mon,19Apr201012:33:50GMTLast-Modified:Sun,18Apr201012:46:07GMTContent-Type:text/plain
无论您是想搭建桌面端、WEB端或者移动端APP应用,HOOPSPlatform组件都可以为您提供弹性的3D集成架构,同时,由工业领域3D技术专家组成的HOOPS技术团队也能为您提供技术支持服务。如果您的客户期望有一种在多个平台(桌面/WEB/APP,而且某些客户端是“瘦”客户端)快速、方便地将数据接入到3D应用系统的解决方案,并且当访问数据时,在各个平台上的性能和用户体验保持一致,HOOPSPlatform将帮助您完成。利用HOOPSPlatform,您可以开发在任何环境下的3D基础应用架构。HOOPSPlatform可以帮您打造3D创新型产品,HOOPSSDK包含的技术有:快速且准确的CAD
在应用开发中,有时候我们需要获取系统的设备信息,用于数据上报和行为分析。那在鸿蒙系统中,我们应该怎么去获取设备的系统信息呢,比如说获取手机的系统版本号、手机的制造商、手机型号等数据。1、获取方式这里分为两种情况,一种是设备信息的获取,一种是系统信息的获取。1.1、获取设备信息获取设备信息,鸿蒙的SDK包为我们提供了DeviceInfo类,通过该类的一些静态方法,可以获取设备信息,DeviceInfo类的包路径为:ohos.system.DeviceInfo.具体的方法如下:ModifierandTypeMethodDescriptionstatic StringgetAbiList()Obt
@作者:SYFStrive @博客首页:HomePage📜:微信小程序📌:个人社区(欢迎大佬们加入)👉:社区链接🔗📌:觉得文章不错可以点点关注👉:专栏连接🔗💃:感谢支持,学累了可以先看小段由小胖给大家带来的街舞👉微信小程序(🔥)目录自定义组件-behaviors 1、什么是behaviors 2、behaviors的工作方式 3、创建behavior 4、导入并使用behavior 5、behavior中所有可用的节点 6、同名字段的覆盖和组合规则总结最后自定义组件-behaviors 1、什么是behaviorsbehaviors是小程序中,用于实现
最近因为项目需要,需要将Android手机系统自带的某个系统软件反编译并更改里面某个资源,并重新打包,签名生成新的自定义的apk,下面我来介绍一下我的实现过程。APK修改,分为以下几步:反编译解包,修改,重打包,修改签名等步骤。安卓apk修改准备工作1.系统配置好JavaJDK环境变量2.需要root权限的手机(针对系统自带apk,其他软件免root)3.Auto-Sign签名工具4.apktool工具安卓apk修改开始反编译本文拿Android系统里面的Settings.apk做demo,具体如何将apk获取出来在此就不过多介绍了,直接进入主题:按键win+R输入cmd,打开命令窗口,并将路
了解Rails缓存如何工作的人可以真正帮助我。这是嵌套在Rails::Initializer.runblock中的代码:config.after_initializedoSomeClass.const_set'SOME_CONST','SOME_VAL'end现在,如果我运行script/server并发出请求,一切都很好。然而,在我的Rails应用程序的第二个请求中,一切都因单元化常量错误而变得糟糕。在生产模式下,我可以成功发出第二个请求,这意味着常量仍然存在。我已通过将以上内容更改为以下内容来解决问题:config.after_initializedorequire'some_cl