TX2刷机后,完成了opencv4.5.1的编译:Ubuntu18.04安装opencv4.5.1+contrib 支持cuda加速(附带编译好的opencv4.5.1及缺失文件)_Barrymaster的博客-CSDN博客
TX2版本及配置环境如下:
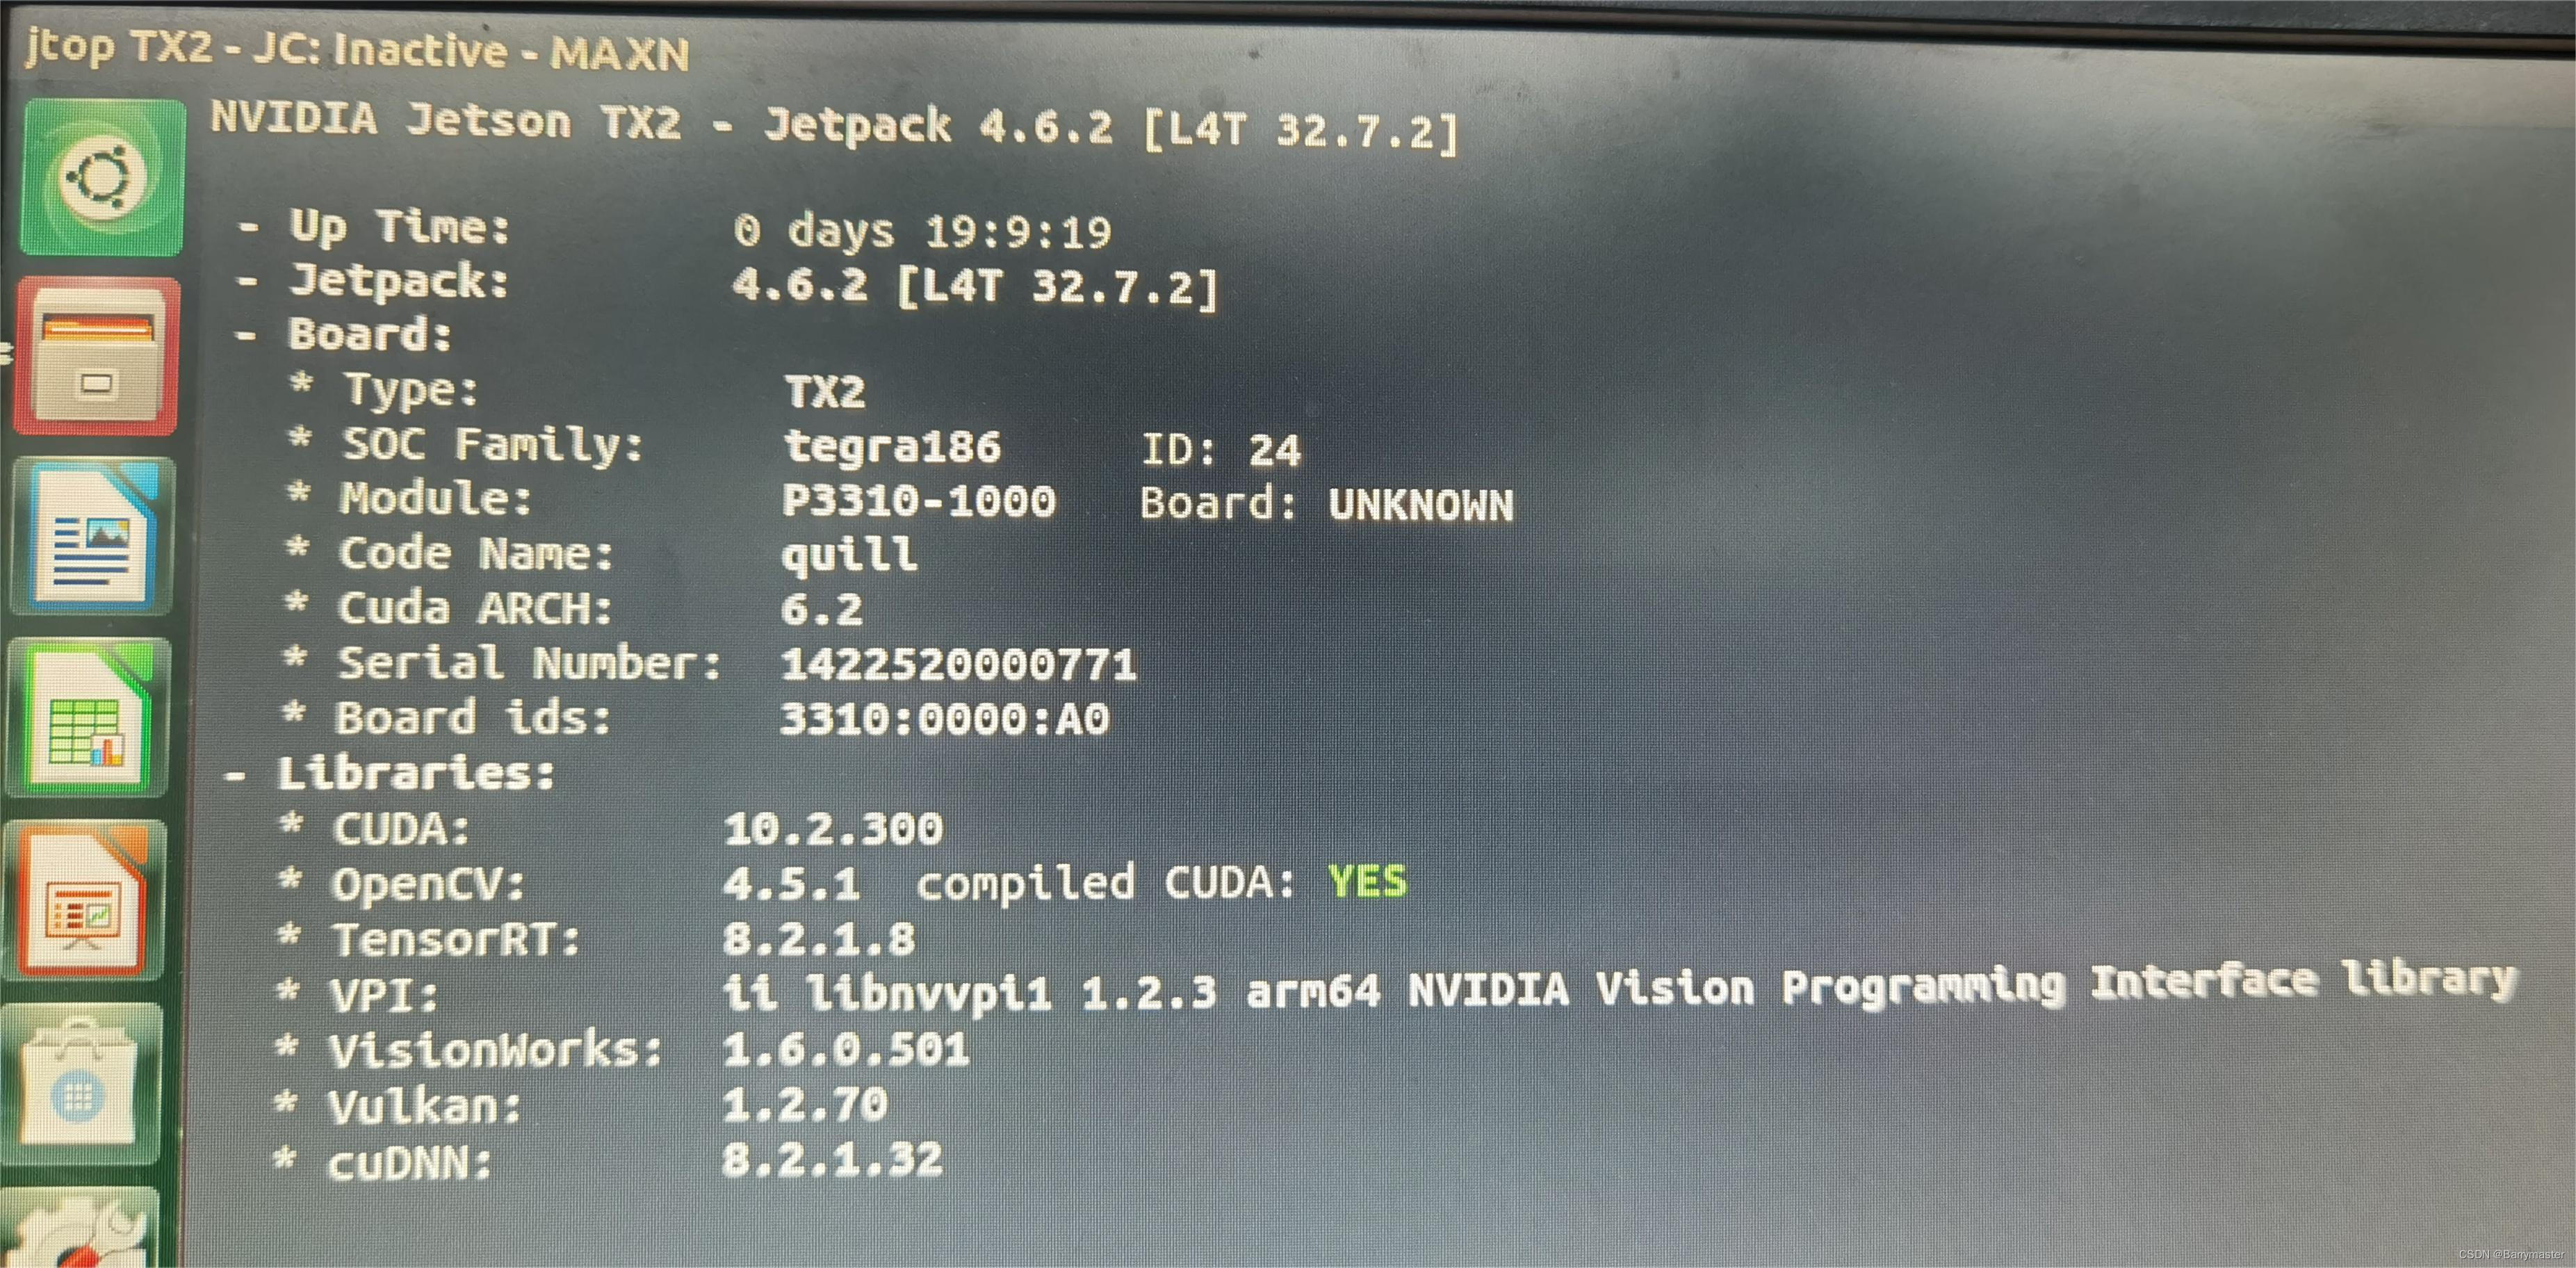
一般刷机的时候应该换过源了,没换过的可以参照下方刷机文章的换源部分
(注意:TX2和ubuntupc源不共用)
Nvidia TX2 刷机全过程_Barrymaster的博客-CSDN博客_tx2刷机
pytorch分架构,所以pc端与TX2的安装方法不同。
这里直接在系统环境下使用python3安装的流程,全程用的python3与pip3。如有多版本共存需求,请先查找archiconda(pc端叫anaconda)在TX2上的使用方法
官方的TX2专用下载地址,一定和jetpack的版本对应好(网址里也有很清晰的安装教程)
首先根据自己TX2的Cuda版本选择合适的Pytorch版本,注意:我使用的yolov5的5.0版本要求pytorch≥1.7,提前查看所需的pytorch版本。对应关系可参照以下两个链接:
PYTORCH和CUDA 版本对应关系_代码帮的博客-CSDN博客_pytorch和cuda对应版本
Previous PyTorch Versions | PyTorch
(但是别按照上面的代码安装pytorch,只是为了看一下cuda与pytorch对应版本)
接下来查看自己的Jetpack版本与python版本是否符合要求。

我的Cuda版本为10.2,python版本为3.6.9,Jetpack版本为4.6,最后选择安装Pytorch v1.10.0。
windows环境里点一下这个whl就可以进行下载了,但是ubuntu环境里点了没反应,我就用windows下载后用U盘拷到TX2里去了。
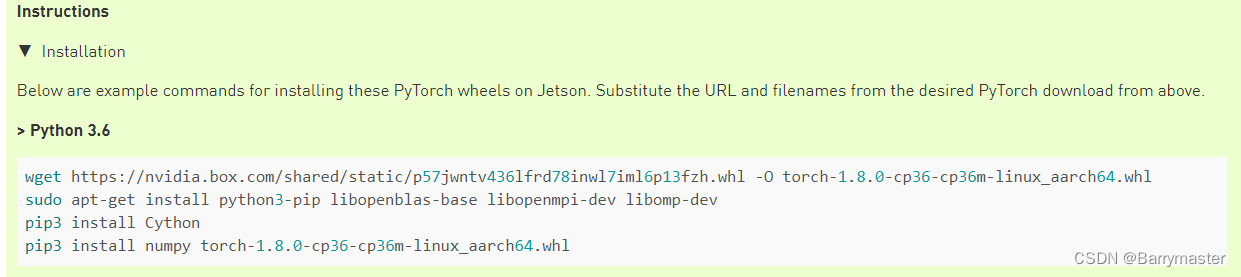
按照官网里installation下的安装步骤即可,第一步的意思是把左侧网址的whl文件下载并重命名为右侧的whl文件。我们在windows里下载后直接重命名为torch-1.10.0-cp36-cp36m-linux_aarch64.whl即可。
(注意:官网给的是v1.8.0的安装例子,左侧的网址是1.8.0的安装包,不要直接用)
#第一步windows下载并且重名为torch-1.10.0-cp36-cp36m-linux_aarch64.whl
sudo apt-get install python3-pip libopenblas-base libopenmpi-dev libomp-dev
pip3 install Cython
pip3 install numpy torch-1.10.0-cp36-cp36m-linux_aarch64.whl #Permission denied就加sudo同样官网给出了安装过程,需要根据pytorch版本选择torchvision版本。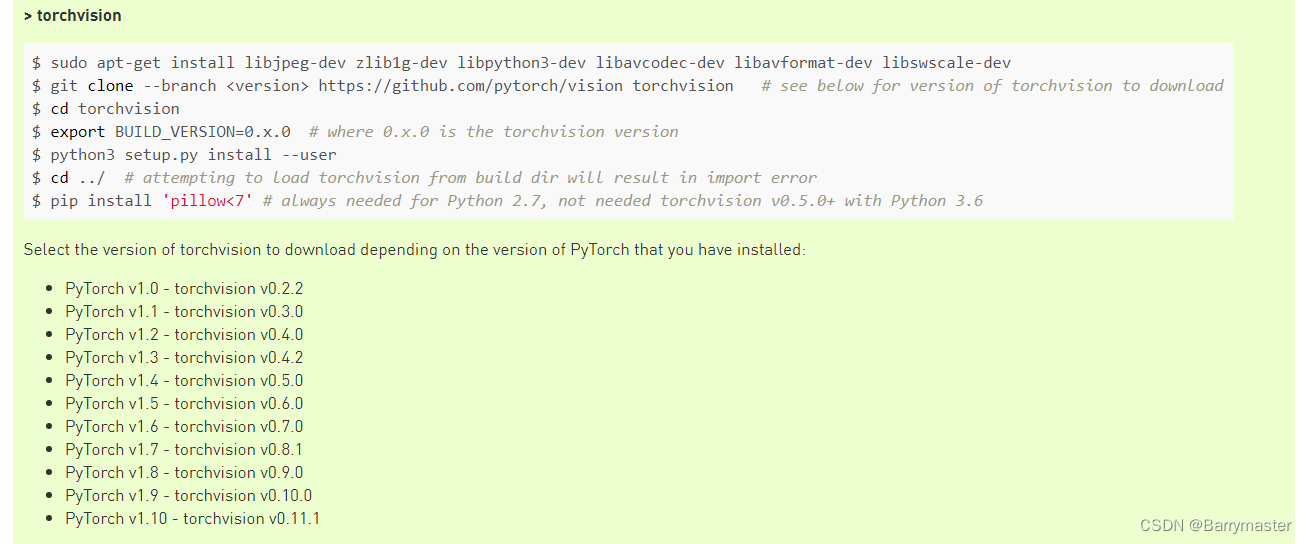
或者也可以在第二步version里直接选择版本:
sudo apt-get install libjpeg-dev zlib1g-dev libpython3-dev libavcodec-dev libavformat-dev libswscale-dev
pip3 install setuptools #这个官方教程没写
git clone --branch v0.11.1 https://github.com/pytorch/vision torchvision
cd torchvision

python3 setup.py install #Permission denied就加sudo

cd ../
pip3 install 'pillow<7'python3
import torch
print(torch.__version__)
print(torchversion.__version__)
print(torch.cuda.is_available())
退出用exit()安装成功的话,前两个print出版本号,第三个print出现true。
一般在TX2上跑yolov5的应该都在pc端运行成功过,所以yolov5下载啥的就不写了。这里我用的是v5的5.0版本。
这里老坑了,tx2刷机的时候预装了好多库,一是版本不对,二是不好卸载。
重要:一般来说是运行 yolov5 的 requirement.txt 文件,按照他里面的要求自动安装库。但是在电脑里这么做的时候他直接重装了我的pytorch等,所以需要在requirement里进行筛选,并且将已安装的库进行注释,所以不如就不运行requirement了。而是直接运行检测命令:
python3 detect.py --source data/images/ --weights yolov5s.pt看报错缺什么库就安装什么库。
thop、seaborn、tqdm、pycocotools 这几个好像是要装的
requirement文件如下:(实在想这么装,就把opencv-python,torch,torchvision注释掉)
# pip install -r requirements.txt

# base ----------------------------------------
Cython
matplotlib>=3.2.2
numpy>=1.18.5
opencv-python>=4.1.2
Pillow
PyYAML>=5.3.1
scipy>=1.4.1
tensorboard>=2.2
torch>=1.7.0
torchvision>=0.8.1
tqdm>=4.41.0

# logging -------------------------------------
# wandb

# plotting ------------------------------------
seaborn>=0.11.0
pandas

# export --------------------------------------
# coremltools>=4.1
# onnx>=1.8.1
# scikit-learn==0.19.2  # for coreml quantization

# extras --------------------------------------
thop  # FLOPS computation
pycocotools>=2.0  # COCO mAP
注意:
运行 yolov5 的 detect.py 时,会有一个检查安装包的版本的函数 check_requirements ,很多安装包需要很新的版本,这里建议把这个函数注释掉,否则要重新装很多东西,着实没必要(能跑通就行)。
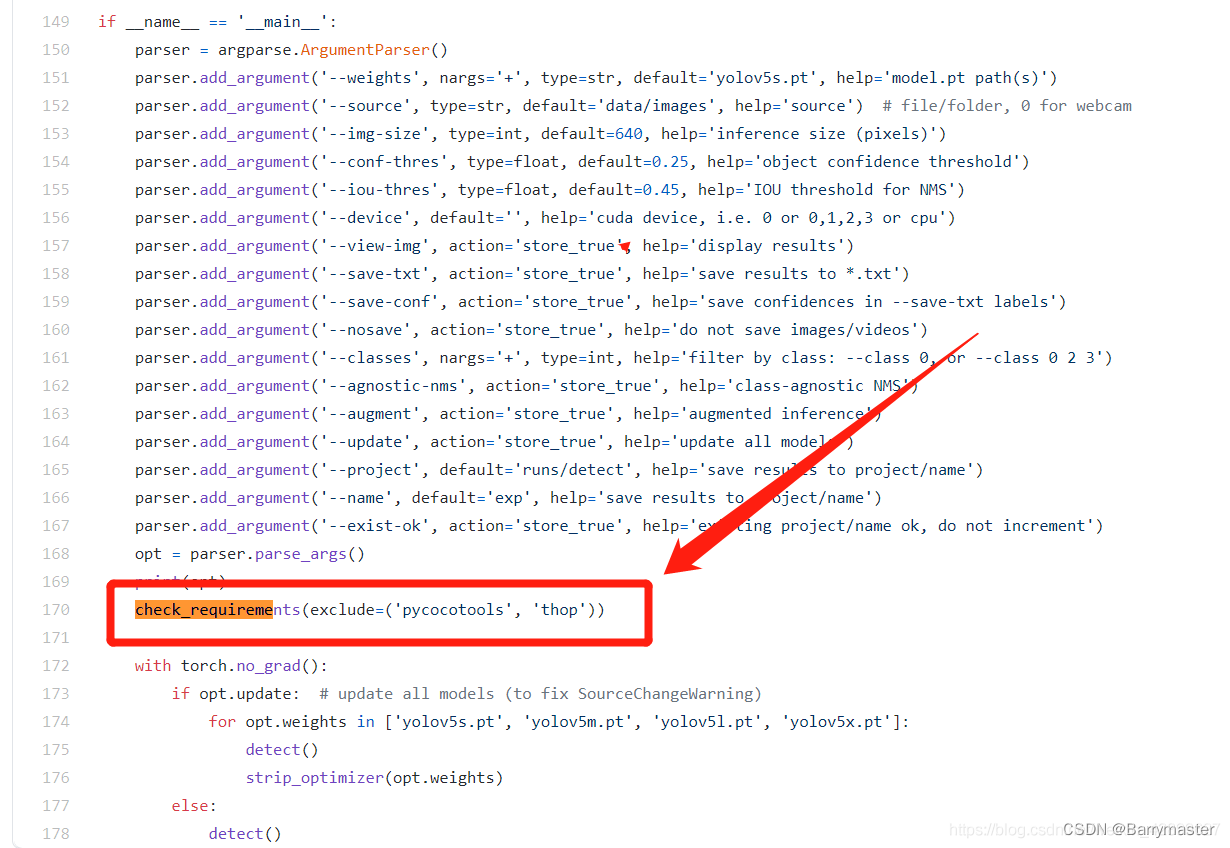
TX2可参照下方代码安装:
sudo apt-get install liblapack-dev
sudo apt-get install libblas-dev
sudo apt-get install gfortran
pip3 install scipy


pip3 install matplotlib pillow pyyaml tensorboard tqdm
#安装seaborn时会自动安装matplotlib和pandas
pip3 install seaborn

python3 detect.py #看看还缺啥
可能会遇到巨多问题
1.安装scipy,matplotlib,numpy等的时候,可能会提示安装失败,提示:pip3 uninstall 失败,outside environment /usr。
原因:刷机后的系统预装了许多的库,但是版本可能过低,无法满足要求。但是预装的库一般在/usr/lib/python3/dist-packages里,pip卸载不掉(pip的库一般在/usr/lib/python3/site-packages里)。
解决办法:以scipy为例子,在/usr/lib/python3/dist-packages/路径下找到一个scipy文件夹以及一个scipy.egg-info文件(具体名称略有不同),将这两个文件全部删掉,然后再进行pip3安装即可。
2.安装scipy的时候出现error: library dfftpack has Fortran sources but no Fortran compiler found
原因:有代码是Fortran写的,因此需要安装gfortran
解决方法:安装Fortran compiler
sudo apt-get install gfortran注意:(同1中的注意一致)
运行 yolov5 的 detect.py 时,会有一个检查安装包的版本的函数 check_requirements ,把这个函数注释掉,没用。
参考文章:
YOLOv5 调用 NVIDIA JetsonTX2 板载摄像头出错_G果的博客-CSDN博客_tx2 yolov5detect.py执行命令$ python3 detect.py --source 0 --exist-ok --weights yolov5s.pt报错:AssertionError: Failed to open 0解决方法注意:cv2.VideoCapture(0)是打不开的!!!需要把括号里面的0替换成 gst_str 这一长串字符串 gst_str = ('nvarguscamerasrc ! ' 'video/x-raw(m.https://blog.csdn.net/weixin_42899627/article/details/115129085?spm=1001.2014.3001.5506注意:该方法对yolov5 utils 文件夹里面的 dataset.py进行修改,可成功调用板载摄像头。在这里我还遇到了其他问题,使用命令python3 detect.py --source 1时,无法调用usb摄像头,但是通过上方文章进行修改后,source 1即可成功调用usb摄像头,没搞明白原因。
我用的是tensorrtx,下载地址(yolov5)如下,需要在Tags里选择相应的v5版本,与自己训练使用的v5版本一定要对应,不然会报错。
https://github.com/wang-xinyu/tensorrtx.git
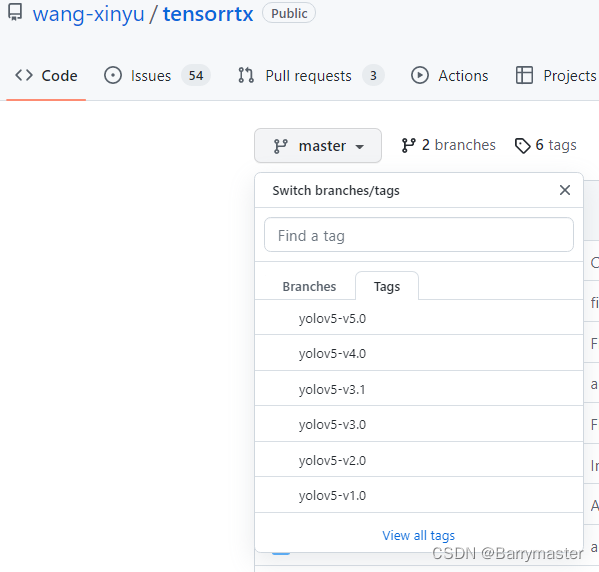
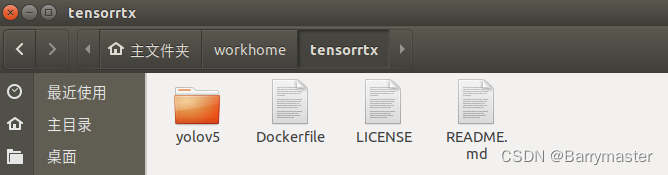
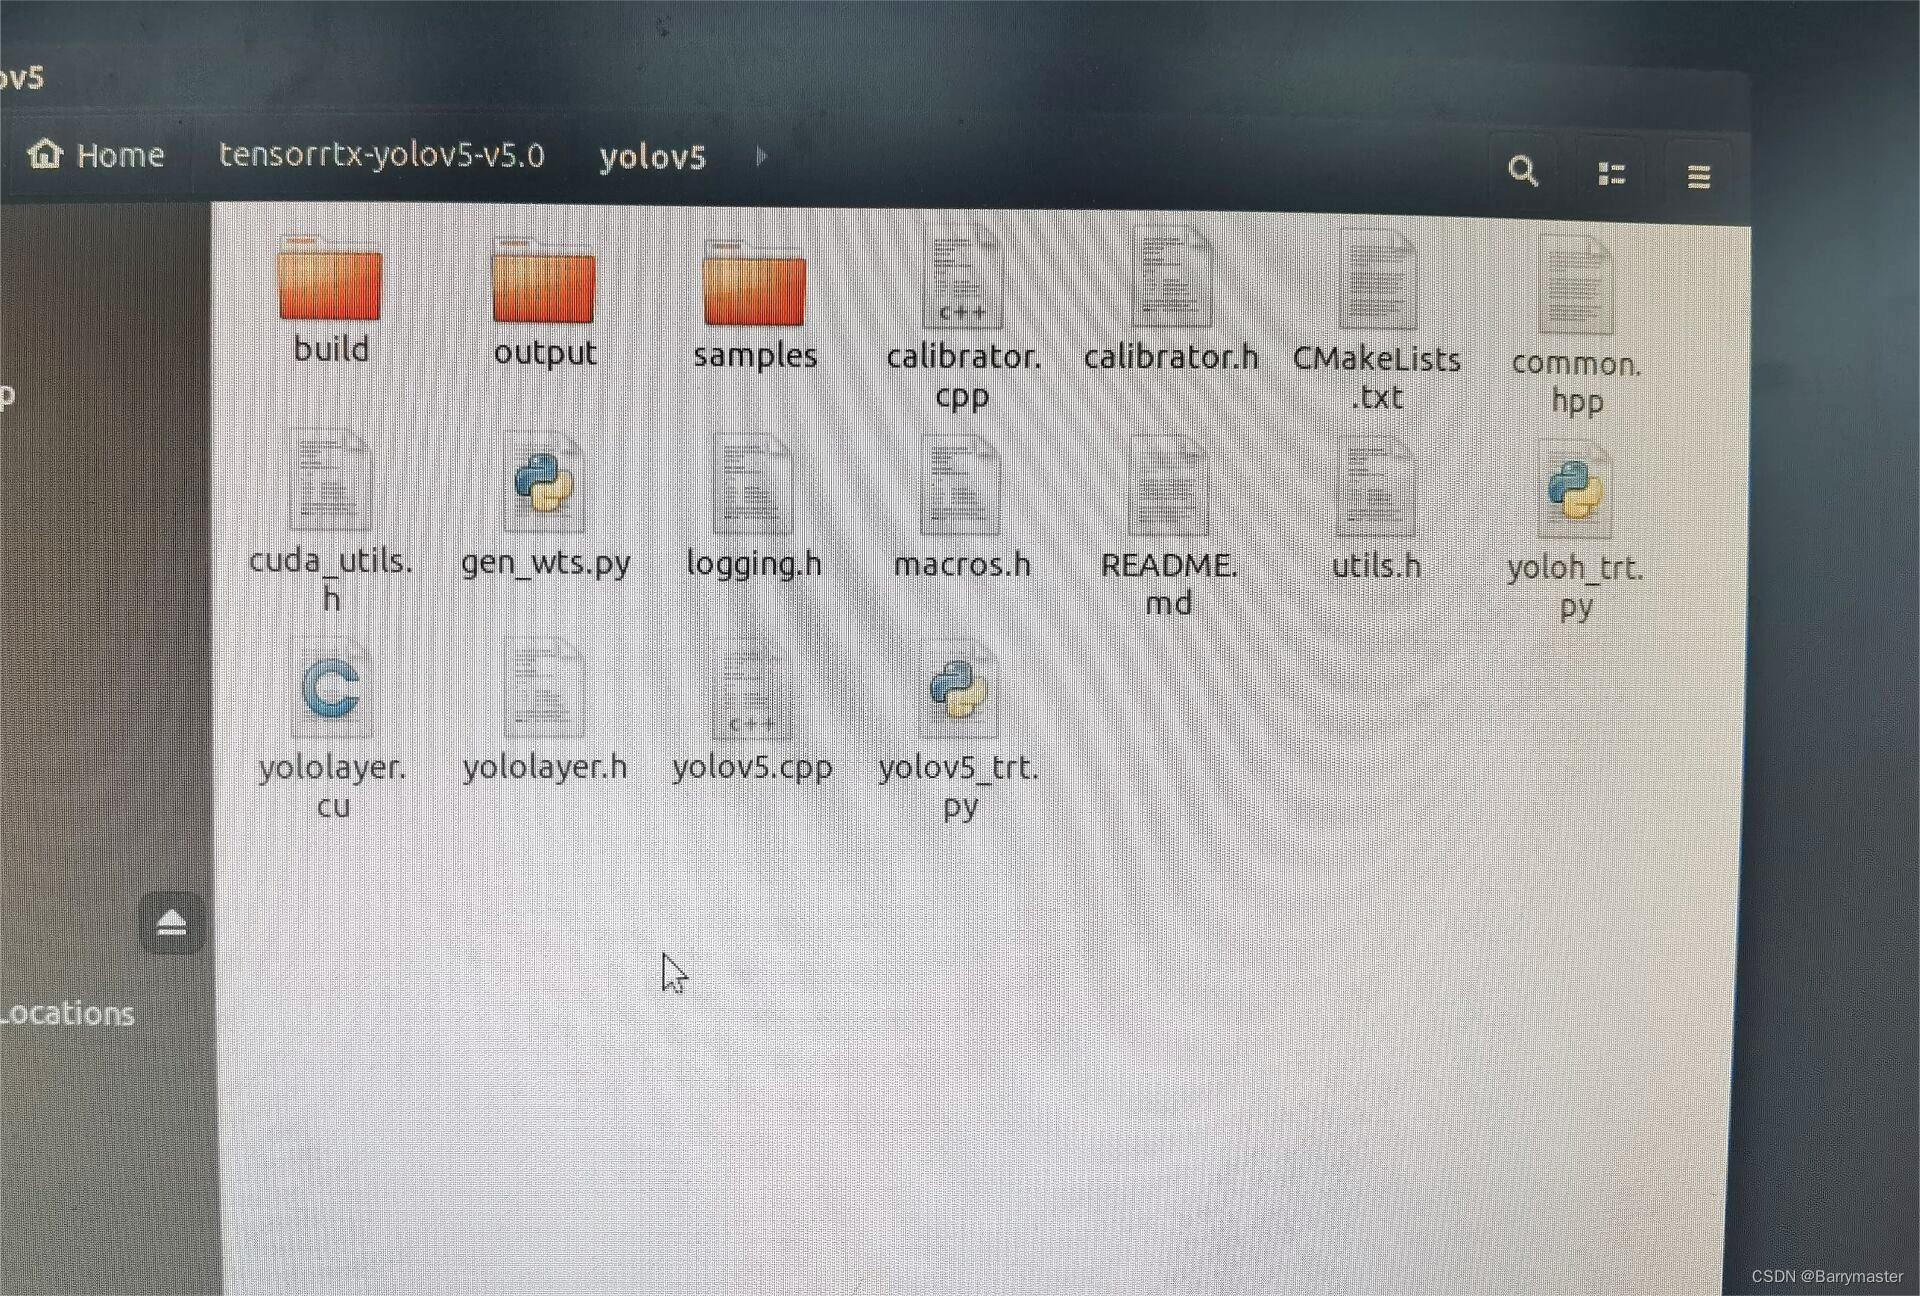
tensorrtx支持许多加速,所以下载的文件中包含许多文件,不用的话可以删除。我只保留了yolov5文件夹,如图:
下载yolov5s.pt(官方提供的,注意对应版本不能错)进行测试,或者自信的话直接用自己训练的也行。
tensorrtx上有他自己官方的教程,这里我搬运过来:
1.安装pycuda
pip3 install pycuda2.将tensorrtx/yolov5/gen_wts.py复制到第三步下载的yolov5检测文件夹中。
3.将官方的权重文件'yolov5s.pt',或自己训练出来的模型,也放在yolov5检测文件夹中。
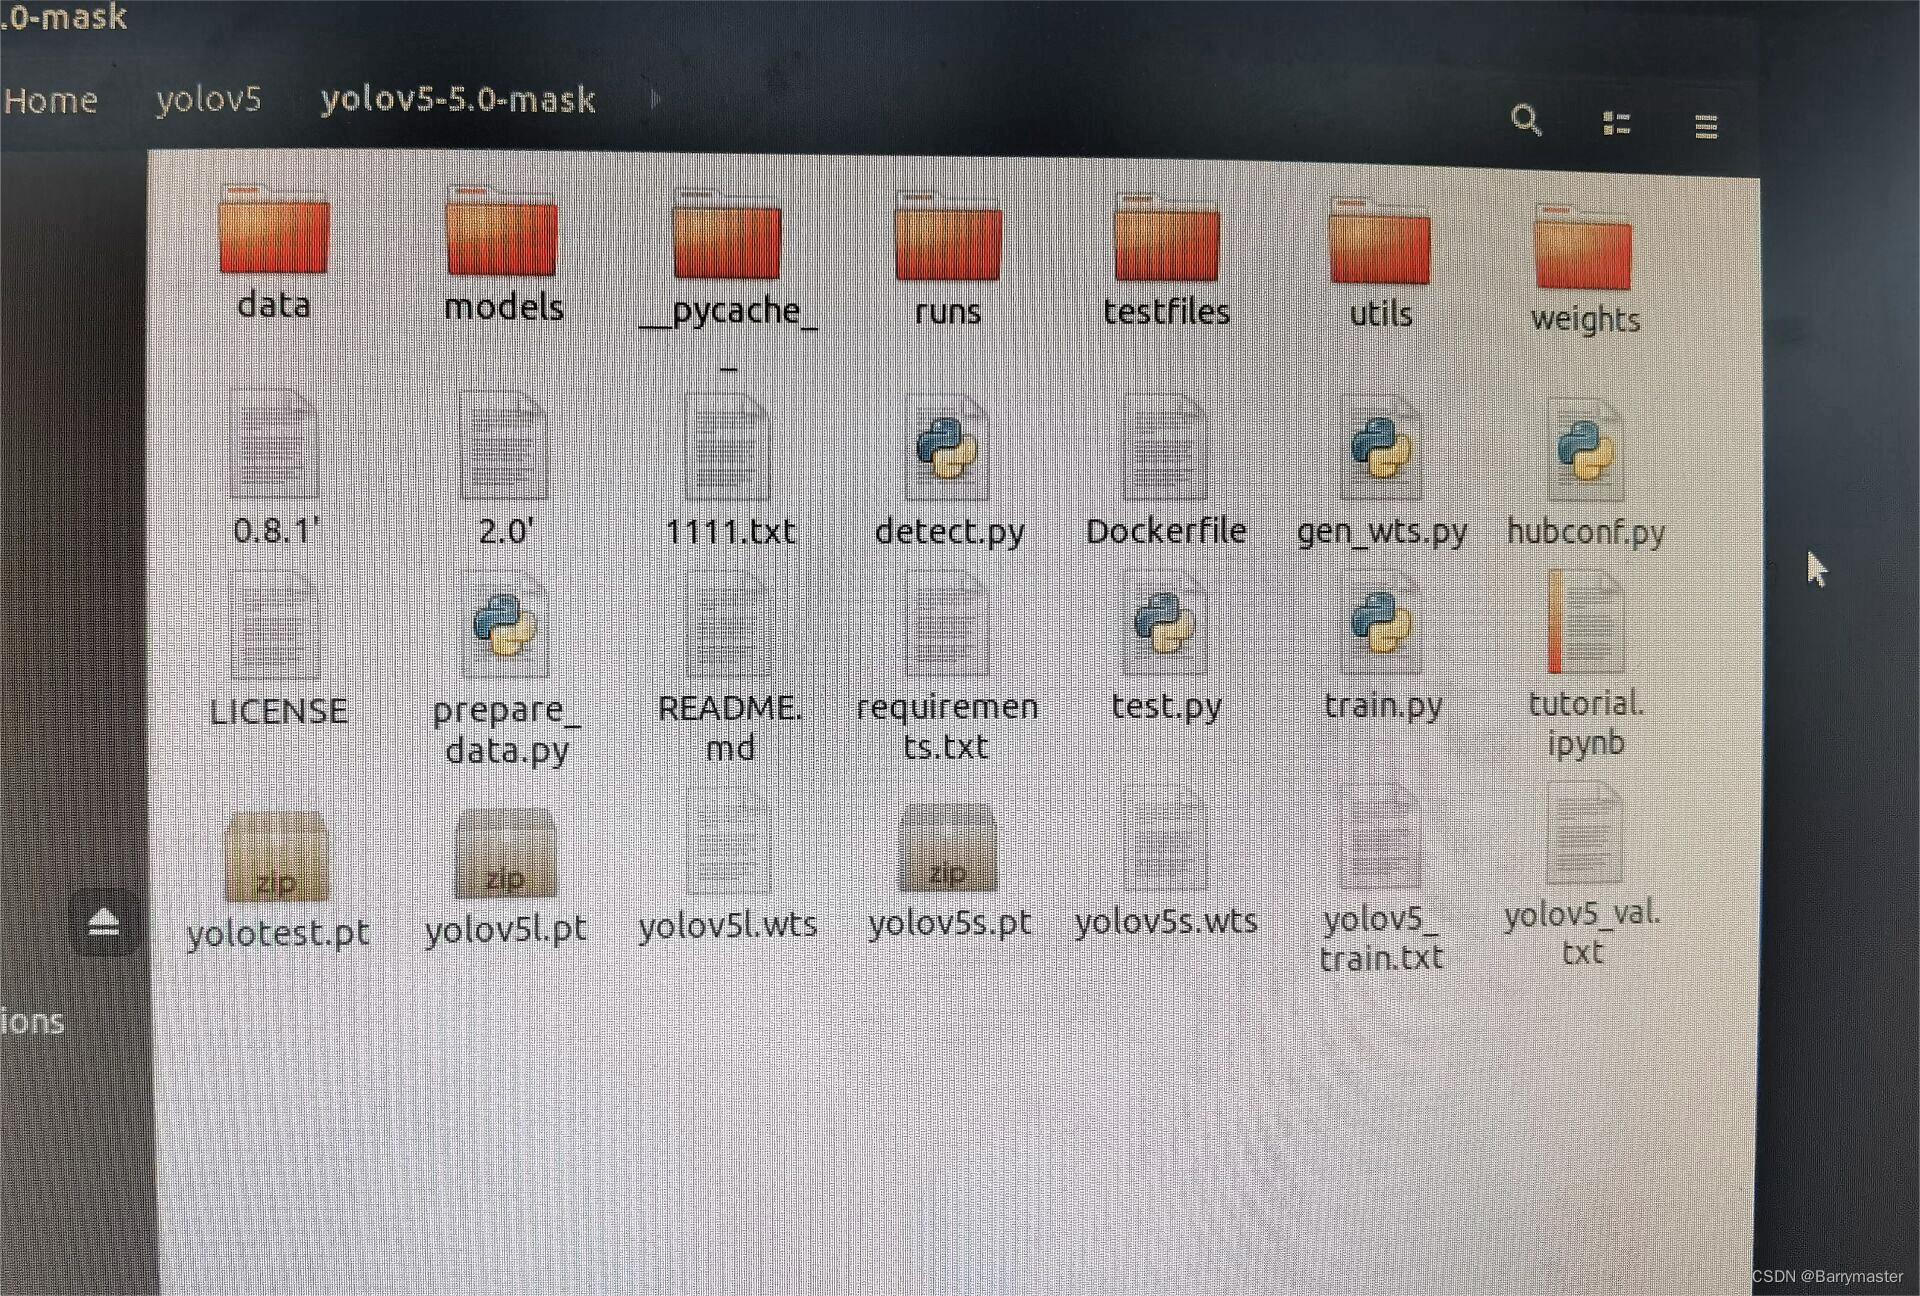
4.执行gen_wts.py生成.wts文件。python3 gen_wts.py -w 自己的权重.pt -o 随便起名.wts
python3 gen_wts.py -w yolov5s.pt -o yolov5s.wts5.接下来去到目录tensorrtx下的yolov5文件夹,创建一个build文件,并生成生成makeFile,如果用的自己的权重文件请看8.
mkdir build
cd build
cmake ..
make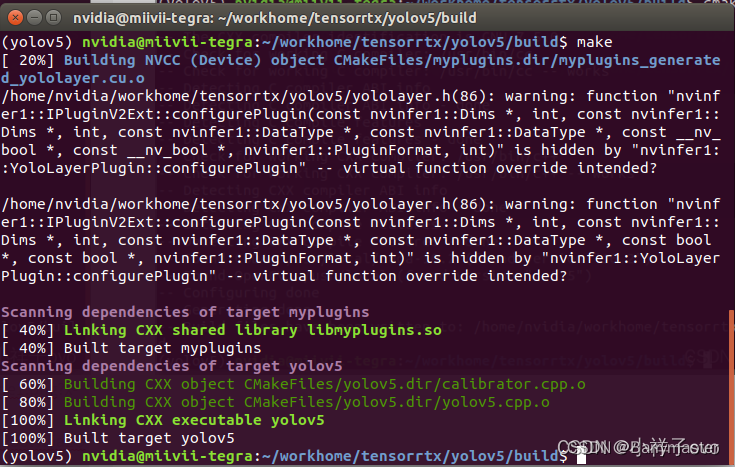
6.将第4步生成的.wts文件复制到tensorrtx/yolov5/build里,运行代码生成.engine文件。
我用的是yolov5s,所以结尾用s,格式是 -s xxxx.wts xxxx.engine s/m/l/x/....(要根据自己的权重类型选择),或者直接不输入最后一个字母,运行 -s xxxx.wts xxxx.engine后会提示有哪些正确的输入格式)(权重类型,置信度等都在yolov5.cpp里)
sudo ./yolov5 -s ../yolov5s.wts yolov5s.engine s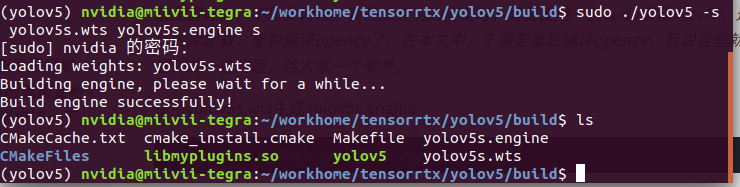
7.测试 用文件自带的图片(在samples里有两张图片)测试一下
sudo ./yolov5 -d yolov5s.engine ../samples也可以用自带的python文件来测试
python yolov5_trt.py8.使用自己训练的权重文件检测
#6、将yololayer.h里的CLASS_NUM修改成你的。因为官方用的是coco数据集,所以默认是80。

#7、执行makeFile。(每次修改为CLASS_NUM都要make一次)
make

#8、将第4步生成的.wts文件复制到tensorrtx/yolov5里。

#9、生成.engine文件(我用的是yolov5s,所以结尾用s)
sudo ./yolov5 -s ../yolov5s.wts yolov5s.engine s
    如果你训练时是自定义depth_multiple 和 width_multiple就这样写:
sudo ./yolov5 -s ../yolov5.wts yolov5.engine c 0.17 0.25
    在tensorrtx 5.0里也更新了yolov5的P6模型:
sudo ./yolov5 -s ../yolov5.wts yolov5.engine s6
也可按照官网原装教程进行配置:
tensorrtx/yolov5 at master · wang-xinyu/tensorrtx · GitHub
搬运自:
【TensorRT】在Jetson设备Xavier(TX2等通用)上使用TensorRT加速yolov5,详细记录过程_小祥子ovo的博客-CSDN博客_jetson xavier 安装tensorrt硬件:Xavierjetpack版本:sudo apt-cache show nvidia-jetpack一、克隆代码:1、第一个代码是yolov5的官方代码:https://github.com/ultralytics/yolov5.git2、第二个代码是TensorRT编译yolov5的代码:git clone https://github.com/wang-xinyu/tensorrtx.git其中tensorrtx文件夹我只保留了yolov5文件夹,如图:下载yolov5shttps://blog.csdn.net/weixin_46716951/article/details/123742902?spm=1001.2014.3001.5506 搜索cap = cv2.VideoCapture 进行摄像头的选择,一般0是板载摄像头,1是usb摄像头。
"""
An example that uses TensorRT's Python api to make inferences.
"""
import ctypes
import os
import shutil
import random
import sys
import threading
import time
import cv2
import numpy as np
import pycuda.autoinit
import pycuda.driver as cuda
import tensorrt as trt
import torch
import torchvision
import argparse

CONF_THRESH = 0.5
IOU_THRESHOLD = 0.4


def get_img_path_batches(batch_size, img_dir):
    ret = []
    batch = []
    for root, dirs, files in os.walk(img_dir):
        for name in files:
            if len(batch) == batch_size:
                ret.append(batch)
                batch = []
            batch.append(os.path.join(root, name))
    if len(batch) > 0:
        ret.append(batch)
    return ret


def plot_one_box(x, img, color=None, label=None, line_thickness=None):
    """
    description: Plots one bounding box on image img,
                 this function comes from YoLov5 project.
    param:
        x:      a box likes [x1,y1,x2,y2]
        img:    a opencv image object
        color:  color to draw rectangle, such as (0,255,0)
        label:  str
        line_thickness: int
    return:
        no return
    """
    tl = (
            line_thickness or round(0.002 * (img.shape[0] + img.shape[1]) / 2) + 1
    )  # line/font thickness
    color = color or [random.randint(0, 255) for _ in range(3)]
    c1, c2 = (int(x[0]), int(x[1])), (int(x[2]), int(x[3]))
    cv2.rectangle(img, c1, c2, color, thickness=tl, lineType=cv2.LINE_AA)
    if label:
        tf = max(tl - 1, 1)  # font thickness
        t_size = cv2.getTextSize(label, 0, fontScale=tl / 3, thickness=tf)[0]
        c2 = c1[0] + t_size[0], c1[1] - t_size[1] - 3
        cv2.rectangle(img, c1, c2, color, -1, cv2.LINE_AA)  # filled
        cv2.putText(
            img,
            label,
            (c1[0], c1[1] - 2),
            0,
            tl / 3,
            [225, 255, 255],
            thickness=tf,
            lineType=cv2.LINE_AA,
        )


class YoLov5TRT(object):
    """
    description: A YOLOv5 class that warps TensorRT ops, preprocess and postprocess ops.
    """

    def __init__(self, engine_file_path):
        # Create a Context on this device,
        self.ctx = cuda.Device(0).make_context()
        stream = cuda.Stream()
        TRT_LOGGER = trt.Logger(trt.Logger.INFO)
        runtime = trt.Runtime(TRT_LOGGER)

        # Deserialize the engine from file
        with open(engine_file_path, "rb") as f:
            engine = runtime.deserialize_cuda_engine(f.read())
        context = engine.create_execution_context()

        host_inputs = []
        cuda_inputs = []
        host_outputs = []
        cuda_outputs = []
        bindings = []

        for binding in engine:
            print('bingding:', binding, engine.get_binding_shape(binding))
            size = trt.volume(engine.get_binding_shape(binding)) * engine.max_batch_size
            dtype = trt.nptype(engine.get_binding_dtype(binding))
            # Allocate host and device buffers
            host_mem = cuda.pagelocked_empty(size, dtype)
            cuda_mem = cuda.mem_alloc(host_mem.nbytes)
            # Append the device buffer to device bindings.
            bindings.append(int(cuda_mem))
            # Append to the appropriate list.
            if engine.binding_is_input(binding):
                self.input_w = engine.get_binding_shape(binding)[-1]
                self.input_h = engine.get_binding_shape(binding)[-2]
                host_inputs.append(host_mem)
                cuda_inputs.append(cuda_mem)
            else:
                host_outputs.append(host_mem)
                cuda_outputs.append(cuda_mem)

        # Store
        self.stream = stream
        self.context = context
        self.engine = engine
        self.host_inputs = host_inputs
        self.cuda_inputs = cuda_inputs
        self.host_outputs = host_outputs
        self.cuda_outputs = cuda_outputs
        self.bindings = bindings
        self.batch_size = engine.max_batch_size

    def infer(self, input_image_path):
        threading.Thread.__init__(self)
        # Make self the active context, pushing it on top of the context stack.
        self.ctx.push()
        self.input_image_path = input_image_path
        # Restore
        stream = self.stream
        context = self.context
        engine = self.engine
        host_inputs = self.host_inputs
        cuda_inputs = self.cuda_inputs
        host_outputs = self.host_outputs
        cuda_outputs = self.cuda_outputs
        bindings = self.bindings
        # Do image preprocess
        batch_image_raw = []
        batch_origin_h = []
        batch_origin_w = []
        batch_input_image = np.empty(shape=[self.batch_size, 3, self.input_h, self.input_w])

        input_image, image_raw, origin_h, origin_w = self.preprocess_image(input_image_path
                                                                           )

        batch_origin_h.append(origin_h)
        batch_origin_w.append(origin_w)
        np.copyto(batch_input_image, input_image)
        batch_input_image = np.ascontiguousarray(batch_input_image)

        # Copy input image to host buffer
        np.copyto(host_inputs[0], batch_input_image.ravel())
        start = time.time()
        # Transfer input data  to the GPU.
        cuda.memcpy_htod_async(cuda_inputs[0], host_inputs[0], stream)
        # Run inference.
        context.execute_async(batch_size=self.batch_size, bindings=bindings, stream_handle=stream.handle)
        # Transfer predictions back from the GPU.
        cuda.memcpy_dtoh_async(host_outputs[0], cuda_outputs[0], stream)
        # Synchronize the stream
        stream.synchronize()
        end = time.time()
        # Remove any context from the top of the context stack, deactivating it.
        self.ctx.pop()
        # Here we use the first row of output in that batch_size = 1
        output = host_outputs[0]
        # Do postprocess
        result_boxes, result_scores, result_classid = self.post_process(
            output, origin_h, origin_w)
        # Draw rectangles and labels on the original image
        for j in range(len(result_boxes)):
            box = result_boxes[j]
            plot_one_box(
                box,
                image_raw,
                label="{}:{:.2f}".format(
                    categories[int(result_classid[j])], result_scores[j]
                ),
            )
        return image_raw, end - start

    def destroy(self):
        # Remove any context from the top of the context stack, deactivating it.
        self.ctx.pop()

    def get_raw_image(self, image_path_batch):
        """
        description: Read an image from image path
        """
        for img_path in image_path_batch:
            yield cv2.imread(img_path)

    def get_raw_image_zeros(self, image_path_batch=None):
        """
        description: Ready data for warmup
        """
        for _ in range(self.batch_size):
            yield np.zeros([self.input_h, self.input_w, 3], dtype=np.uint8)

    def preprocess_image(self, input_image_path):
        """
        description: Convert BGR image to RGB,
                     resize and pad it to target size, normalize to [0,1],
                     transform to NCHW format.
        param:
            input_image_path: str, image path
        return:
            image:  the processed image
            image_raw: the original image
            h: original height
            w: original width
        """
        image_raw = input_image_path
        h, w, c = image_raw.shape
        image = cv2.cvtColor(image_raw, cv2.COLOR_BGR2RGB)
        # Calculate widht and height and paddings
        r_w = self.input_w / w
        r_h = self.input_h / h
        if r_h > r_w:
            tw = self.input_w
            th = int(r_w * h)
            tx1 = tx2 = 0
            ty1 = int((self.input_h - th) / 2)
            ty2 = self.input_h - th - ty1
        else:
            tw = int(r_h * w)
            th = self.input_h
            tx1 = int((self.input_w - tw) / 2)
            tx2 = self.input_w - tw - tx1
            ty1 = ty2 = 0
        # Resize the image with long side while maintaining ratio
        image = cv2.resize(image, (tw, th))
        # Pad the short side with (128,128,128)
        image = cv2.copyMakeBorder(
            image, ty1, ty2, tx1, tx2, cv2.BORDER_CONSTANT, (128, 128, 128)
        )
        image = image.astype(np.float32)
        # Normalize to [0,1]
        image /= 255.0
        # HWC to CHW format:
        image = np.transpose(image, [2, 0, 1])
        # CHW to NCHW format
        image = np.expand_dims(image, axis=0)
        # Convert the image to row-major order, also known as "C order":
        image = np.ascontiguousarray(image)
        return image, image_raw, h, w

    def xywh2xyxy(self, origin_h, origin_w, x):
        """
        description:    Convert nx4 boxes from [x, y, w, h] to [x1, y1, x2, y2] where xy1=top-left, xy2=bottom-right
        param:
            origin_h:   height of original image
            origin_w:   width of original image
            x:          A boxes tensor, each row is a box [center_x, center_y, w, h]
        return:
            y:          A boxes tensor, each row is a box [x1, y1, x2, y2]
        """
        y = torch.zeros_like(x) if isinstance(x, torch.Tensor) else np.zeros_like(x)
        r_w = self.input_w / origin_w
        r_h = self.input_h / origin_h
        if r_h > r_w:
            y[:, 0] = x[:, 0] - x[:, 2] / 2
            y[:, 2] = x[:, 0] + x[:, 2] / 2
            y[:, 1] = x[:, 1] - x[:, 3] / 2 - (self.input_h - r_w * origin_h) / 2
            y[:, 3] = x[:, 1] + x[:, 3] / 2 - (self.input_h - r_w * origin_h) / 2
            y /= r_w
        else:
            y[:, 0] = x[:, 0] - x[:, 2] / 2 - (self.input_w - r_h * origin_w) / 2
            y[:, 2] = x[:, 0] + x[:, 2] / 2 - (self.input_w - r_h * origin_w) / 2
            y[:, 1] = x[:, 1] - x[:, 3] / 2
            y[:, 3] = x[:, 1] + x[:, 3] / 2
            y /= r_h

        return y

    def post_process(self, output, origin_h, origin_w):
        """
        description: postprocess the prediction
        param:
            output:     A tensor likes [num_boxes,cx,cy,w,h,conf,cls_id, cx,cy,w,h,conf,cls_id, ...]
            origin_h:   height of original image
            origin_w:   width of original image
        return:
            result_boxes: finally boxes, a boxes tensor, each row is a box [x1, y1, x2, y2]
            result_scores: finally scores, a tensor, each element is the score correspoing to box
            result_classid: finally classid, a tensor, each element is the classid correspoing to box
        """
        # Get the num of boxes detected
        num = int(output[0])
        # Reshape to a two dimentional ndarray
        pred = np.reshape(output[1:], (-1, 6))[:num, :]
        # to a torch Tensor
        pred = torch.Tensor(pred).cuda()
        # Get the boxes
        boxes = pred[:, :4]
        # Get the scores
        scores = pred[:, 4]
        # Get the classid
        classid = pred[:, 5]
        # Choose those boxes that score > CONF_THRESH
        si = scores > CONF_THRESH
        boxes = boxes[si, :]
        scores = scores[si]
        classid = classid[si]
        # Trandform bbox from [center_x, center_y, w, h] to [x1, y1, x2, y2]
        boxes = self.xywh2xyxy(origin_h, origin_w, boxes)
        # Do nms
        indices = torchvision.ops.nms(boxes, scores, iou_threshold=IOU_THRESHOLD).cpu()
        result_boxes = boxes[indices, :].cpu()
        result_scores = scores[indices].cpu()
        result_classid = classid[indices].cpu()
        return result_boxes, result_scores, result_classid


class inferThread(threading.Thread):
    def __init__(self, yolov5_wrapper):
        threading.Thread.__init__(self)
        self.yolov5_wrapper = yolov5_wrapper

    def infer(self, frame):
        batch_image_raw, use_time = self.yolov5_wrapper.infer(frame)

        # for i, img_path in enumerate(self.image_path_batch):
        #     parent, filename = os.path.split(img_path)
        #     save_name = os.path.join('output', filename)
        #     # Save image
        #     cv2.imwrite(save_name, batch_image_raw[i])
        # print('input->{}, time->{:.2f}ms, saving into output/'.format(self.image_path_batch, use_time * 1000))
        return batch_image_raw, use_time


class warmUpThread(threading.Thread):
    def __init__(self, yolov5_wrapper):
        threading.Thread.__init__(self)
        self.yolov5_wrapper = yolov5_wrapper

    def run(self):
        batch_image_raw, use_time = self.yolov5_wrapper.infer(self.yolov5_wrapper.get_raw_image_zeros())
        print('warm_up->{}, time->{:.2f}ms'.format(batch_image_raw[0].shape, use_time * 1000))


if __name__ == "__main__":
    # load custom plugins
    parser = argparse.ArgumentParser()
    parser.add_argument('--engine', nargs='+', type=str, default="build/yolov5s.engine", help='.engine path(s)')
    parser.add_argument('--save', type=int, default=0, help='save?')
    opt = parser.parse_args()
    PLUGIN_LIBRARY = "build/libmyplugins.so"
    engine_file_path = opt.engine

    ctypes.CDLL(PLUGIN_LIBRARY)

    # load coco labels

    categories = ["person", "bicycle", "car", "motorcycle", "airplane", "bus", "train", "truck", "boat",
                  "traffic light",
                  "fire hydrant", "stop sign", "parking meter", "bench", "bird", "cat", "dog", "horse", "sheep", "cow",
                  "elephant", "bear", "zebra", "giraffe", "backpack", "umbrella", "handbag", "tie", "suitcase",
                  "frisbee",
                  "skis", "snowboard", "sports ball", "kite", "baseball bat", "baseball glove", "skateboard",
                  "surfboard",
                  "tennis racket", "bottle", "wine glass", "cup", "fork", "knife", "spoon", "bowl", "banana", "apple",
                  "sandwich", "orange", "broccoli", "carrot", "hot dog", "pizza", "donut", "cake", "chair", "couch",
                  "potted plant", "bed", "dining table", "toilet", "tv", "laptop", "mouse", "remote", "keyboard",
                  "cell phone",
                  "microwave", "oven", "toaster", "sink", "refrigerator", "book", "clock", "vase", "scissors",
                  "teddy bear",
                  "hair drier", "toothbrush"]
    # a YoLov5TRT instance
    yolov5_wrapper = YoLov5TRT(engine_file_path)
    cap = cv2.VideoCapture(1)   #选择摄像头
    try:
        thread1 = inferThread(yolov5_wrapper)
        thread1.start()
        thread1.join()
        while 1:
            _, frame = cap.read()
            img, t = thread1.infer(frame)
            fps = 1/t
            imgout = cv2.putText(img, "FPS= %.2f" % (fps), (0, 40), cv2.FONT_HERSHEY_SIMPLEX, 1, (0, 255, 0), 2)
            cv2.imshow("result", imgout)
            if cv2.waitKey(1) & 0XFF == ord('q'):  # 1 millisecond
                break


    finally:
        # destroy the instance
        cap.release()
        cv2.destroyAllWindows()
        yolov5_wrapper.destroy()
调用板载摄像头可参考下方文章:
YOLOv5 调用 NVIDIA JetsonTX2 板载摄像头出错_G果的博客-CSDN博客_tx2 yolov5
cv2.VideoCapture(0)是打不开TX2板载摄像头的,所以需要进行一定的修改。
参考文章:
JetsonXavierAGX配置Yolov5环境_航天城拖地的的博客-CSDN博客
Jetson nano + yolov5 + TensorRT加速+调用usb摄像头_無證騎士的博客-CSDN博客_jetson nano调用usb摄像头
Jetson AGX Xavier实现TensorRT加速YOLOv5进行实时检测_围白的尾巴的博客-CSDN博客
yolov5笔记(3)——移动端部署自己的模型(随5.0更新)_Pangaroo的博客-CSDN博客_yolov5移动端部署
我想为Heroku构建一个Rails3应用程序。他们使用Postgres作为他们的数据库,所以我通过MacPorts安装了postgres9.0。现在我需要一个postgresgem并且共识是出于性能原因你想要pggem。但是我对我得到的错误感到非常困惑当我尝试在rvm下通过geminstall安装pg时。我已经非常明确地指定了所有postgres目录的位置可以找到但仍然无法完成安装:$envARCHFLAGS='-archx86_64'geminstallpg--\--with-pg-config=/opt/local/var/db/postgresql90/defaultdb/po
我打算为ruby脚本创建一个安装程序,但我希望能够确保机器安装了RVM。有没有一种方法可以完全离线安装RVM并且不引人注目(通过不引人注目,就像创建一个可以做所有事情的脚本而不是要求用户向他们的bash_profile或bashrc添加一些东西)我不是要脚本本身,只是一个关于如何走这条路的快速指针(如果可能的话)。我们还研究了这个很有帮助的问题:RVM-isthereawayforsimpleofflineinstall?但有点误导,因为答案只向我们展示了如何离线在RVM中安装ruby。我们需要能够离线安装RVM本身,并查看脚本https://raw.github.com/wayn
我有一个奇怪的问题:我在rvm上安装了rubyonrails。一切正常,我可以创建项目。但是在我输入“railsnew”时重新启动后,我有“程序'rails'当前未安装。”。SystemUbuntu12.04ruby-v"1.9.3p194"gemlistactionmailer(3.2.5)actionpack(3.2.5)activemodel(3.2.5)activerecord(3.2.5)activeresource(3.2.5)activesupport(3.2.5)arel(3.0.2)builder(3.0.0)bundler(1.1.4)coffee-rails(
我刚刚为fedora安装了emacs。我想用emacs编写ruby。为ruby提供代码提示、代码完成类型功能所需的工具、扩展是什么? 最佳答案 ruby-mode已经包含在Emacs23之后的版本中。不过,它也可以通过ELPA获得。您可能感兴趣的其他一些事情是集成RVM、feature-mode(Cucumber)、rspec-mode、ruby-electric、inf-ruby、rinari(用于Rails)等。这是我当前用于Ruby开发的Emacs配置:https://github.com/citizen428/emacs
我正在尝试在我的centos服务器上安装therubyracer,但遇到了麻烦。$geminstalltherubyracerBuildingnativeextensions.Thiscouldtakeawhile...ERROR:Errorinstallingtherubyracer:ERROR:Failedtobuildgemnativeextension./usr/local/rvm/rubies/ruby-1.9.3-p125/bin/rubyextconf.rbcheckingformain()in-lpthread...yescheckingforv8.h...no***e
我的最终目标是安装当前版本的RubyonRails。我在OSXMountainLion上运行。到目前为止,这是我的过程:已安装的RVM$\curl-Lhttps://get.rvm.io|bash-sstable检查已知(我假设已批准)安装$rvmlistknown我看到当前的稳定版本可用[ruby-]2.0.0[-p247]输入命令安装$rvminstall2.0.0-p247注意:我也试过这些安装命令$rvminstallruby-2.0.0-p247$rvminstallruby=2.0.0-p247我很快就无处可去了。结果:$rvminstall2.0.0-p247Search
我实际上是在尝试使用RVM在我的OSX10.7.5上更新ruby,并在输入以下命令后:rvminstallruby我得到了以下回复:Searchingforbinaryrubies,thismighttakesometime.Checkingrequirementsforosx.Installingrequirementsforosx.Updatingsystem.......Errorrunning'requirements_osx_brew_update_systemruby-2.0.0-p247',pleaseread/Users/username/.rvm/log/138121
由于fast-stemmer的问题,我很难安装我想要的任何rubygem。我把我得到的错误放在下面。Buildingnativeextensions.Thiscouldtakeawhile...ERROR:Errorinstallingfast-stemmer:ERROR:Failedtobuildgemnativeextension./System/Library/Frameworks/Ruby.framework/Versions/2.0/usr/bin/rubyextconf.rbcreatingMakefilemake"DESTDIR="cleanmake"DESTDIR=
我收到这个错误:RuntimeError(自动加载常量Apps时检测到循环依赖当我使用多线程时。下面是我的代码。为什么会这样?我尝试多线程的原因是因为我正在编写一个HTML抓取应用程序。对Nokogiri::HTML(open())的调用是一个同步阻塞调用,需要1秒才能返回,我有100,000多个页面要访问,所以我试图运行多个线程来解决这个问题。有更好的方法吗?classToolsController0)app.website=array.join(',')putsapp.websiteelseapp.website="NONE"endapp.saveapps=Apps.order("
我有一个用户工厂。我希望默认情况下确认用户。但是鉴于unconfirmed特征,我不希望它们被确认。虽然我有一个基于实现细节而不是抽象的工作实现,但我想知道如何正确地做到这一点。factory:userdoafter(:create)do|user,evaluator|#unwantedimplementationdetailshereunlessFactoryGirl.factories[:user].defined_traits.map(&:name).include?(:unconfirmed)user.confirm!endendtrait:unconfirmeddoenden
