我们在写shader时,经常会出现同一个shader在面对不同的一些需求时,可能需要出现一些局部的变化,比如有些地方需要描边,有些地方不需要描边,由于在shader中不适合使用if,所以最好就是再写一份shader,但我们肯定不想复制一个shader改改,毕竟有很多共用的部分,万一修改了,岂不是两边都要改,而且shader多了也不方便使用。这个时候就需要用到shader变体了,只需要写一个shader,在编译的时候会自动生成多个对应shader使用,这样子就完美的解决了我们的问题。
拥有多种变体的shader一般称为"mega shaders"或者"uber shaders"
在unity里我们可以通过在Shader中(CG代码块或者HLSL代码块中)添加下面的指令来实现
#pragma multi_compile
或者
#pragma shader_feature
在运行时Unity会根据材质中的关键词(通过Material.EnableKeyword和Material.DisableKeyword开关)或者全局的shader关键词(通过Shader.EnableKeyword和Shader.DisableKeyword开关)来选择对应的Shader变体。
如下
SubShader {
        Pass {

            HLSLPROGRAM

            #pragma multi_compile PCF3 PCF5

            ENDHLSL
        }
    }
这里会生成两个shader变体,一个是定义了PCF3的,另外一个定义了PCF5,在运行时,根据材质或者全局的关键词,他们其中一个会被调用到,如果两个关键词都没有开启,则第一个PCF3的版本的shader变体会被使用。
当然我们可以在一个multi_compile中定义更多的关键词,如下会产生4个shader变体
SubShader {
        Pass {

            HLSLPROGRAM

            #pragma multi_compile PCF PCF3 PCF5 PCF7

            ENDHLSL
        }
    }
如果定义的名称都由下划线组成的话,这个名称也会产生一个shader变体,作为类似默认的shader变体,这样子我们可以少定义一个关键词(关键词总数会有限制,下面会讲),比如上面的shader我们可以改为如下,这样子同样会生成4个变体,但是只需要开关3个关键词了
SubShader {
        Pass {

            HLSLPROGRAM

            #pragma multi_compile __ PCF3 PCF5 PCF7

            ENDHLSL
        }
    }
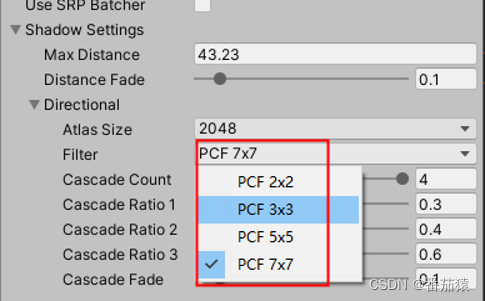
C#中使用如下所示(材质球中设置同理)
    public enum FilterMode
    {
        PCF2x2, PCF3x3, PCF5x5, PCF7x7
    }


    // 定义Shader中FilterMode的关键词
    static string[] directionalFilterKeywords = {
        "PCF3",
        "PCF5",
        "PCF7",
    };


    // 设置Shader中的Keywords,目前主要设置使用的过滤模式(filter mode)
    void SetKeywords()
    {
        // 我们定义shader关键词的时候,不需要定义默认的PCF2x2,默认的只要是没有定义就可以
        int enabledIndex = (int)settings.directional.filter - 1;
        for (int i = 0; i < directionalFilterKeywords.Length; i++)
        {
            if (i == enabledIndex)
            {
                buffer.EnableShaderKeyword(directionalFilterKeywords[i]);
            }
            else
            {
                buffer.DisableShaderKeyword(directionalFilterKeywords[i]);
            }
        }
    }
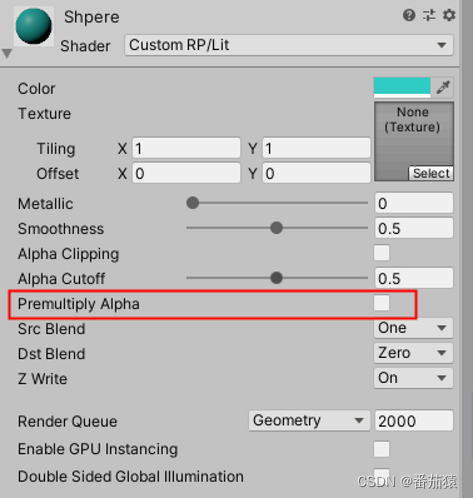
如下所示,这样子会有两个变体,一个是没有开启,另外一个是开启了预乘alpha
Properties {
        [Toggle(_PREMULTIPLY_ALPHA)] _PremulAlpha("Premultiply Alpha", Float) = 0  //控制预乘Alpha
     }


SubShader {
        Pass {

            HLSLPROGRAM

            #pragma shader_feature _PREMULTIPLY_ALPHA  //控制预乘Alpha

            ENDHLSL
        }
    }
multi_compile和shader_feature功能很像,最大的区别是对于shader_feature,没有使用的变体不会在构建时包含进去,所以对于shader_feature最好是直接在材质上设置好关键词(选项选好,开关开好),不然可能在运行时设置可能无效,因为对应的shader变体可能没有包含进来,multi_compile则没有这个问题,全局设置也可以。
Properties {
        [Toggle(_PREMULTIPLY_ALPHA)] _PremulAlpha("Premultiply Alpha", Float) = 0  //控制预乘Alpha
     }


SubShader {
        Pass {

            HLSLPROGRAM

            #pragma shader_feature _PREMULTIPLY_ALPHA  //控制预乘Alpha
            #pragma multi_compile _ _DIRECTIONAL_PCF3 _DIRECTIONAL_PCF5 _DIRECTIONAL_PCF7

            ENDHLSL
        }
    }
#pragma shader_feature _PREMULTIPLY_ALPHA实际上是一种简化写法,和#pragma shader_feature _ _PREMULTIPLY_ALPHA是一样的,都是对应两种变体,一种定义了_PREMULTIPLY_ALPHA,另外一种没有定义
在一个CG或HLSL代码块中可以有多个multi_compile指令,如下
#pragma multi_compile A B C
#pragma multi_compile D E
这样子总共会产生6个变体,AD,AE,BD,BE,CD,CE,就是所有的排列组合,因此要注意不能使用太多的multi_compile不然会产生大量的shader变体,因为这是指数级增长的。
unity中总共能用256个关键词,但是unity内部会大概用掉60个关键词,因此能用的数量就不超过196个,或者更少,所以要注意不要超过这个限制了。
对于灯光、阴影和光照贴图,unity有多种的内置multi_compile指令可以使用来快速生成对应的shader变体
multi_compile_fwdbase
编译ForwardBase pass类型的所有需要的变体,这些变体处理不同的光照贴图和主要的平行光的阴影开关
multi_compile_fwdadd
编译ForwardAdd pass类型的所有需要的变体,这些变体处理平行光、聚光灯、点光源类型和相应的贴图
multi_compile_fwdadd_fullshadows
和上面的multi_compile_fwdadd类似,但是还增加了灯光的实时阴影相关的处理
multi_compile_fog
编译不同类型的雾(off/linear/exp/exp2) 所需要的shader变体
要注意的是,大部分的内置multi_compile会导致产生大量的shader变体,如果有不需要的变体,我们可以使用下面的指令来跳过其中的一些shader变体
#pragma multi_compile_fwdadd
#prama skip_variants POINT POINT_COOKIE
这样子会跳过其中的POINT 或 POINT_COOKIE的变体,不会生成带这两种定义的变体,会减少一些变体的量
Shader Hardware Variants
One common reason for using shader variants is to create fallbacks or simplified shaders that can run efficiently on both high and low end hardware within a single target platform - such as OpenGL ES. To provide a specially optimised set of variants for different levels of hardware capability, you can use shader hardware variants.
To enable the generation of shader hardware variants, add #pragma hardware_tier_variants renderer, where renderer is one of the available renderering platforms for shader program pragmas. With this #pragma 3 shader variants will be generated for each shader, regardless of any other keywords. Each variant will have one of the following defined:
UNITY_HARDWARE_TIER1
UNITY_HARDWARE_TIER2
UNITY_HARDWARE_TIER3
You can use these to write conditional fallbacks or extra features for lower or higher end. In the editor you can test any of the tiers by using the Graphics Emulation menu, which allows you to change between each of the tiers.
To help keep the impact of these variants as small as possible, only one set of shaders is ever loaded in the player. In addition, any shaders which end up identical - for example if you only write a specialised version for TIER1 and all others are the same - will not take up any extra space on disk.
At load time Unity will examine the GPU that it is using and auto-detect a tier value; it will default to the highest tier if the GPU is not auto-detected. You can override this tier value by setting Shader.globalShaderHardwareTier, but this must be done before any shaders you want to vary are loaded. Once the shaders are loaded they will have selected their set of variants and this value will have no effect. A good place to set this would be in a pre-load scene before you load your main scene.
Note that these shader hardware tiers are not related to the Quality settings of the player, they are purely detected from the relative capability of the GPU the player is running on.
来自 https://docs.unity3d.com/2018.4/Documentation/Manual/SL-MultipleProgramVariants.html
Platform Shader Settings
Apart from tweaking your shader code for different hardware tiers, you might want to tweak unity internal defines (e.g. you might want to force cascaded shadowmaps on mobiles). You can find details on this in the UnityEditor.Rendering.PlatformShaderSettings documentation, which provides a list of currently supported features for overriding per-tier. Use UnityEditor.Rendering.EditorGraphicsSettings.SetShaderSettingsForPlatform to tweak Platform Shader Settings per-platform per-tier.
Please note that if PlatformShaderSettings set to different tiers are not identical, then tier variants will be generated for the shader even if #pragma hardware_tier_variants is missing.
来自 https://docs.unity3d.com/2018.4/Documentation/Manual/SL-MultipleProgramVariants.html
https://docs.unity3d.com/2018.4/Documentation/Manual/SL-MultipleProgramVariants.html
我有一个Ruby程序,它使用rubyzip压缩XML文件的目录树。gem。我的问题是文件开始变得很重,我想提高压缩级别,因为压缩时间不是问题。我在rubyzipdocumentation中找不到一种为创建的ZIP文件指定压缩级别的方法。有人知道如何更改此设置吗?是否有另一个允许指定压缩级别的Ruby库? 最佳答案 这是我通过查看rubyzip内部创建的代码。level=Zlib::BEST_COMPRESSIONZip::ZipOutputStream.open(zip_file)do|zip|Dir.glob("**/*")d
我试图在一个项目中使用rake,如果我把所有东西都放到Rakefile中,它会很大并且很难读取/找到东西,所以我试着将每个命名空间放在lib/rake中它自己的文件中,我添加了这个到我的rake文件的顶部:Dir['#{File.dirname(__FILE__)}/lib/rake/*.rake'].map{|f|requiref}它加载文件没问题,但没有任务。我现在只有一个.rake文件作为测试,名为“servers.rake”,它看起来像这样:namespace:serverdotask:testdoputs"test"endend所以当我运行rakeserver:testid时
我的目标是转换表单输入,例如“100兆字节”或“1GB”,并将其转换为我可以存储在数据库中的文件大小(以千字节为单位)。目前,我有这个:defquota_convert@regex=/([0-9]+)(.*)s/@sizes=%w{kilobytemegabytegigabyte}m=self.quota.match(@regex)if@sizes.include?m[2]eval("self.quota=#{m[1]}.#{m[2]}")endend这有效,但前提是输入是倍数(“gigabytes”,而不是“gigabyte”)并且由于使用了eval看起来疯狂不安全。所以,功能正常,
Rails2.3可以选择随时使用RouteSet#add_configuration_file添加更多路由。是否可以在Rails3项目中做同样的事情? 最佳答案 在config/application.rb中:config.paths.config.routes在Rails3.2(也可能是Rails3.1)中,使用:config.paths["config/routes"] 关于ruby-on-rails-Rails3中的多个路由文件,我们在StackOverflow上找到一个类似的问题
对于具有离线功能的智能手机应用程序,我正在为Xml文件创建单向文本同步。我希望我的服务器将增量/差异(例如GNU差异补丁)发送到目标设备。这是计划:Time=0Server:hasversion_1ofXmlfile(~800kiB)Client:hasversion_1ofXmlfile(~800kiB)Time=1Server:hasversion_1andversion_2ofXmlfile(each~800kiB)computesdeltaoftheseversions(=patch)(~10kiB)sendspatchtoClient(~10kiBtransferred)Cl
我有多个ActiveRecord子类Item的实例数组,我需要根据最早的事件循环打印。在这种情况下,我需要打印付款和维护日期,如下所示:ItemAmaintenancerequiredin5daysItemBpaymentrequiredin6daysItemApaymentrequiredin7daysItemBmaintenancerequiredin8days我目前有两个查询,用于查找maintenance和payment项目(非排他性查询),并输出如下内容:paymentrequiredin...maintenancerequiredin...有什么方法可以改善上述(丑陋的)代
我正在寻找执行以下操作的正确语法(在Perl、Shell或Ruby中):#variabletoaccessthedatalinesappendedasafileEND_OF_SCRIPT_MARKERrawdatastartshereanditcontinues. 最佳答案 Perl用__DATA__做这个:#!/usr/bin/perlusestrict;usewarnings;while(){print;}__DATA__Texttoprintgoeshere 关于ruby-如何将脚
使用带有Rails插件的vim,您可以创建一个迁移文件,然后一次性打开该文件吗?textmate也可以这样吗? 最佳答案 你可以使用rails.vim然后做类似的事情::Rgeneratemigratonadd_foo_to_bar插件将打开迁移生成的文件,这正是您想要的。我不能代表textmate。 关于ruby-使用VimRails,您可以创建一个新的迁移文件并一次性打开它吗?,我们在StackOverflow上找到一个类似的问题: https://sta
我需要从一个View访问多个模型。以前,我的links_controller仅用于提供以不同方式排序的链接资源。现在我想包括一个部分(我假设)显示按分数排序的顶级用户(@users=User.all.sort_by(&:score))我知道我可以将此代码插入每个链接操作并从View访问它,但这似乎不是“ruby方式”,我将需要在不久的将来访问更多模型。这可能会变得很脏,是否有针对这种情况的任何技术?注意事项:我认为我的应用程序正朝着单一格式和动态页面内容的方向发展,本质上是一个典型的网络应用程序。我知道before_filter但考虑到我希望应用程序进入的方向,这似乎很麻烦。最终从任何
我想要做的是有2个不同的Controller,client和test_client。客户端Controller已经构建,我想创建一个test_clientController,我可以使用它来玩弄客户端的UI并根据需要进行调整。我主要是想绕过我在客户端中内置的验证及其对加载数据的管理Controller的依赖。所以我希望test_clientController加载示例数据集,然后呈现客户端Controller的索引View,以便我可以调整客户端UI。就是这样。我在test_clients索引方法中试过这个:classTestClientdefindexrender:template=>