在HarmonyOS开发中List下拉刷新是一种很常见的问题,今天描述怎么实现List下拉刷新的功能实现,主要分为“开发准备”,“代码实现”,“运行效果”
1. 开发准备 我们需要学习以下知识点
1.1 【Harmony OS】【ARK UI】【Demo】加载动画实现
1.2 PanGesture
1.4 显隐控制
2. 代码实现
2.1 准备数据源
定义全量数据源:用于加载每次加载部分数据
定义List显示数据源:用于List显示在界面上 代码如下
private arr: string[] = ["A", "B", "C", "D", "E", "F", "G", "H"] //todo 当前list显示数据源
private AllData: string[] = ["A", "B", "C", "D", "E", "F", "G", "H", "I", "J", "K", "L", "M", "N", "O", "P", "Q", "R", "S", "T", "U", "V", "W", "X", "Y", "Z"] //todo 全量数据
2.2 使用 List 和ListItem,【Harmony OS】【ARK UI】【Demo】加载动画实现来 绘画基本界面,代码如
Column() {
      List({ space: 20, initialIndex: 0 }) {
        ListItem() {
          Column() {
            Image($r("app.media.loading"))
              .objectFit(ImageFit.Contain)
              .height(40)
              .aspectRatio(1)
              .width(40)
              .margin({ bottom: 5 })
              .rotate({ x: 0, y: 0, z: 1, angle: this.rotateAngle })
            Text(this.loadingText)
              .fontSize(14)
              .fontColor("#ed6262")
              .backgroundColor(Color.White)
          }
          .alignItems(HorizontalAlign.Center)
          .padding({ top: 10, right: 0, bottom: 10, left: 0 })
          .width("100%")
          .padding({ top: 10, right: 0, bottom: 10, left: 0 })
          .backgroundColor(Color.White)
        }

        ForEach(this.arr, (item) => {
          ListItem() {
            Text('' + item)
              .width('100%')
              .height(100)
              .fontSize(16)
              .textAlign(TextAlign.Center)
              .borderRadius(10)
              .backgroundColor(0xFFFFFF)
          }
        }, item => item)
      }
      .listDirection(Axis.Vertical) // 排列方向
      .onScrollIndex((firstIndex: number, lastIndex: number) => {
        //Todo firstIndex屏幕第一个可见条目索引
        //todo lastIndex屏幕最后可见索引
        this.firstIndex = firstIndex;
      })

}.width('100%')
2.3 控制加载动画显示或者隐藏
我们可以学习显隐控制来控制加载动画显示隐藏,定义一个全局变量来进行控制动画显示隐藏,代码如下
  @State IsShowLoading: boolean= true//动画显示隐藏 默认是显示状态
  .visibility((this.IsShowLoading ? Visibility.Visible : Visibility.None))//Todo 动画显示隐藏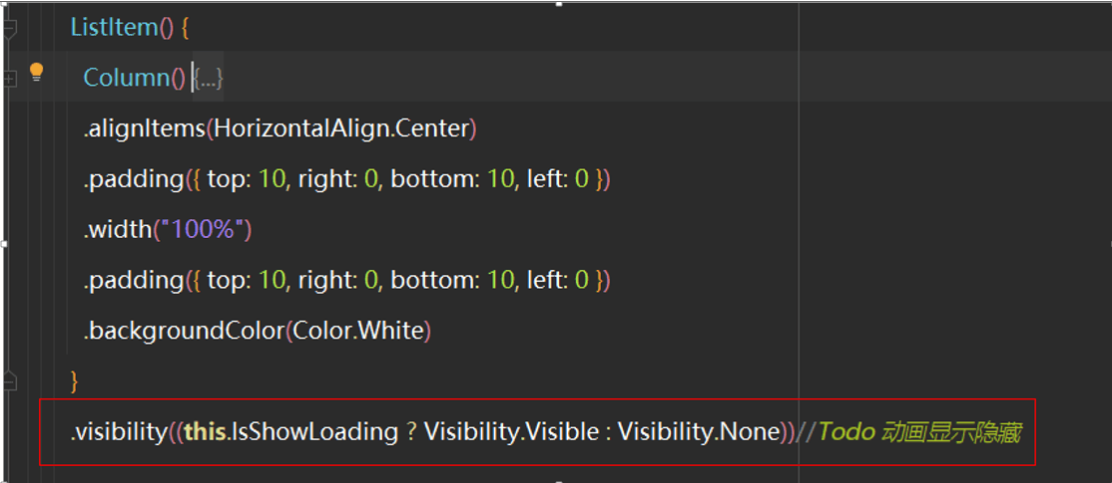
2.4 控件List下拉刷新动画
刷新临界值:只用当List第一条屏幕可见索引为0的时候,并且上下拉松开的时候开始加载数据
List第一条屏幕可见索引获取,我们参List的onScrollIndex的Api,并且定义一个变量进行获取到值 代码如下
.onScrollIndex((firstIndex: number, lastIndex: number) => {
//Todo firstIndex屏幕第一个可见条目索引
//todo lastIndex屏幕最后可见索引
this.firstIndex = firstIndex;
})
2.5 手势判断,我们参考PanGesture文档,代码如下
  .parallelGesture(
      PanGesture({ distance: 150, direction: PanDirection.Down })
        .onActionStart(this.ActionStart.bind(this))
        .onActionUpdate(this.ActionUpdate.bind(this))
        .onActionEnd(this.ActionEnd.bind(this))
        .onActionCancel(this.ActionCancel.bind(this))
      )

   public ActionStart(event) {
    clearInterval(this.rotateTimeOut)
    if (this.firstIndex === 0 && this.arr.length > 0) { //判断是否刷新
      this.IsShowLoading = true;
      this.loadingText = "开始刷新"
    }
  }

  private ActionUpdate() {
    clearInterval(this.rotateTimeOut)//Todo 取消之前动画
    this.loadingText = "正在刷新"
    console.log(this.loadingText)

  }

  private ActionEnd() {
    this.loadingText = "开始刷新数据"
    console.log(this.loadingText)
    //开始刷新数据


    this.loadingRotate();
    this.loadingData(); //加载数据
  }

  private ActionCancel() {
    //取消动画
    this.IsShowLoading = false;
    this.loadingText = "刷新取消"
    console.log(this.loadingText)
    clearInterval(this.rotateTimeOut)
  }
2.6刷新数据代码如下
//网络加载数据
private loadingData() {
console.log("loadingData=====")
var that = this;
//延迟几秒执行这个代码 取消动画
setTimeout(function () {
console.log("loadingData=====开始")
var random=Math.ceil(Math.random()*10);;
that.arr.splice(0,8)
for(var i=random;i<random+8;i++){
that.arr.push(that.AllData[i])
}
console.log("loadingData=====clearInterval")
clearInterval(this.rotateTimeOut)
console.log("loadingData===取消动画")
that.IsShowLoading = false
}, 5000)
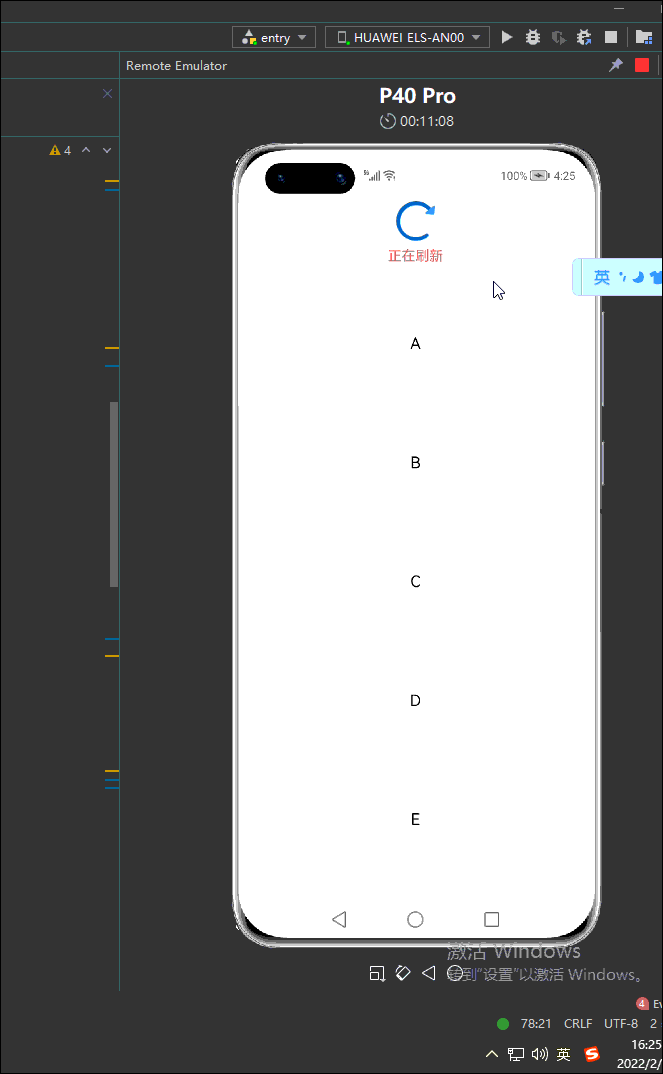
}3.运行效果
3.1全部代码如下
@Entry
@Component
struct MyListView {
  private arr: string[] = ["A", "B", "C", "D", "E", "F", "G", "H"] //todo 当前数据源
  private AllData: string[] = ["A", "B", "C", "D", "E", "F", "G", "H", "I", "J", "K", "L", "M", "N", "O", "P", "Q", "R", "S", "T", "U", "V", "W", "X", "Y", "Z"]
  private firstIndex: number= 0;
//-1 代表正常状态 0代表下拉刷新 1 代表上拉加载
  @State loadingText: string = '正在刷新' //文本
  @State IsShowLoading: boolean= true//动画显示隐藏 默认是显示状态
  private rotateTimeOut: any //计时器
  @State rotateAngle: number= 0;
//加载图标旋转
  loadingRotate() {
    this.rotateTimeOut = setInterval(() => {
      this.rotateAngle = 0
      animateTo({ duration: 800 }, () => {
        this.rotateAngle = 360
      })
    }, 800)
  }

  public ActionStart(event) {
    clearInterval(this.rotateTimeOut)
    if (this.firstIndex === 0 && this.arr.length > 0) { //判断是否刷新
      this.IsShowLoading = true;
      this.loadingText = "开始刷新"
    }
  }

  private ActionUpdate() {
    clearInterval(this.rotateTimeOut)//Todo 取消之前动画
    this.loadingText = "正在刷新"
    console.log(this.loadingText)

  }

  private ActionEnd() {
    this.loadingText = "开始刷新数据"
    console.log(this.loadingText)
    //开始刷新数据


    this.loadingRotate();
    this.loadingData(); //加载数据
  }

  private ActionCancel() {
    //取消动画
    this.IsShowLoading = false;
    this.loadingText = "刷新取消"
    console.log(this.loadingText)
    clearInterval(this.rotateTimeOut)
  }
//网络加载数据
  private loadingData() {
    console.log("loadingData=====")
    var that = this;
    //延迟几秒执行这个代码 取消动画
    setTimeout(function () {
      console.log("loadingData=====开始")
      var random=Math.ceil(Math.random()*10);;
      that.arr.splice(0,8)
      for(var i=random;i<random+8;i++){
        that.arr.push(that.AllData[i])
      }
      console.log("loadingData=====clearInterval")
      clearInterval(this.rotateTimeOut)
      console.log("loadingData===取消动画")
      that.IsShowLoading = false
    }, 5000)
  }

  build() {
    Column() {
      List({ space: 20, initialIndex: 0 }) {
        ListItem() {
          Column() {
            Image($r("app.media.loading"))
              .objectFit(ImageFit.Contain)
              .height(40)
              .aspectRatio(1)
              .width(40)
              .margin({ bottom: 5 })
              .rotate({ x: 0, y: 0, z: 1, angle: this.rotateAngle })
            Text(this.loadingText)
              .fontSize(14)
              .fontColor("#ed6262")
              .backgroundColor(Color.White)
          }
          .alignItems(HorizontalAlign.Center)
          .padding({ top: 10, right: 0, bottom: 10, left: 0 })
          .width("100%")
          .padding({ top: 10, right: 0, bottom: 10, left: 0 })
          .backgroundColor(Color.White)
        }
        .visibility((this.IsShowLoading ? Visibility.Visible : Visibility.None))//Todo 动画显示隐藏

        ForEach(this.arr, (item) => {
          ListItem() {
            Text('' + item)
              .width('100%')
              .height(100)
              .fontSize(16)
              .textAlign(TextAlign.Center)
              .borderRadius(10)
              .backgroundColor(0xFFFFFF)
          }
        }, item => item)
      }
      .listDirection(Axis.Vertical) // 排列方向
      .onScrollIndex((firstIndex: number, lastIndex: number) => {
        //Todo firstIndex屏幕第一个可见条目索引
        //todo lastIndex屏幕最后可见索引
        this.firstIndex = firstIndex;
      })
      .parallelGesture(
      PanGesture({ distance: 150, direction: PanDirection.Down })
        .onActionStart(this.ActionStart.bind(this))
        .onActionUpdate(this.ActionUpdate.bind(this))
        .onActionEnd(this.ActionEnd.bind(this))
        .onActionCancel(this.ActionCancel.bind(this))
      )
    }.width('100%')


  }
}
3.2运行效果图如下
我有一个用户工厂。我希望默认情况下确认用户。但是鉴于unconfirmed特征,我不希望它们被确认。虽然我有一个基于实现细节而不是抽象的工作实现,但我想知道如何正确地做到这一点。factory:userdoafter(:create)do|user,evaluator|#unwantedimplementationdetailshereunlessFactoryGirl.factories[:user].defined_traits.map(&:name).include?(:unconfirmed)user.confirm!endendtrait:unconfirmeddoenden
只是想确保我理解了事情。据我目前收集到的信息,Cucumber只是一个“包装器”,或者是一种通过将事物分类为功能和步骤来组织测试的好方法,其中实际的单元测试处于步骤阶段。它允许您根据事物的工作方式组织您的测试。对吗? 最佳答案 有点。它是一种组织测试的方式,但不仅如此。它的行为就像最初的Rails集成测试一样,但更易于使用。这里最大的好处是您的session在整个Scenario中保持透明。关于Cucumber的另一件事是您(应该)从使用您的代码的浏览器或客户端的角度进行测试。如果您愿意,您可以使用步骤来构建对象和设置状态,但通常您
华为OD机试题本篇题目:明明的随机数题目输入描述输出描述:示例1输入输出说明代码编写思路最近更新的博客华为od2023|什么是华为od,od薪资待遇,od机试题清单华为OD机试真题大全,用Python解华为机试题|机试宝典【华为OD机试】全流程解析+经验分享,题型分享,防作弊指南华为o
C#实现简易绘图工具一.引言实验目的:通过制作窗体应用程序(C#画图软件),熟悉基本的窗体设计过程以及控件设计,事件处理等,熟悉使用C#的winform窗体进行绘图的基本步骤,对于面向对象编程有更加深刻的体会.Tutorial任务设计一个具有基本功能的画图软件**·包括简单的新建文件,保存,重新绘图等功能**·实现一些基本图形的绘制,包括铅笔和基本形状等,学习橡皮工具的创建**·设计一个合理舒适的UI界面**注明:你可能需要先了解一些关于winform窗体应用程序绘图的基本知识,以及关于GDI+类和结构的知识二.实验环境Windows系统下的visualstudio2017C#窗体应用程序三.
MIMO技术的优缺点优点通过下面三个增益来总体概括:阵列增益。阵列增益是指由于接收机通过对接收信号的相干合并而活得的平均SNR的提高。在发射机不知道信道信息的情况下,MIMO系统可以获得的阵列增益与接收天线数成正比复用增益。在采用空间复用方案的MIMO系统中,可以获得复用增益,即信道容量成倍增加。信道容量的增加与min(Nt,Nr)成正比分集增益。在采用空间分集方案的MIMO系统中,可以获得分集增益,即可靠性性能的改善。分集增益用独立衰落支路数来描述,即分集指数。在使用了空时编码的MIMO系统中,由于接收天线或发射天线之间的间距较远,可认为它们各自的大尺度衰落是相互独立的,因此分布式MIMO
遍历文件夹我们通常是使用递归进行操作,这种方式比较简单,也比较容易理解。本文为大家介绍另一种不使用递归的方式,由于没有使用递归,只用到了循环和集合,所以效率更高一些!一、使用递归遍历文件夹整体思路1、使用File封装初始目录,2、打印这个目录3、获取这个目录下所有的子文件和子目录的数组。4、遍历这个数组,取出每个File对象4-1、如果File是否是一个文件,打印4-2、否则就是一个目录,递归调用代码实现publicclassSearchFile{publicstaticvoidmain(String[]args){//初始目录Filedir=newFile("d:/Dev");Datebeg
通常,数组被实现为内存块,集合被实现为HashMap,有序集合被实现为跳跃列表。在Ruby中也是如此吗?我正在尝试从性能和内存占用方面评估Ruby中不同容器的使用情况 最佳答案 数组是Ruby核心库的一部分。每个Ruby实现都有自己的数组实现。Ruby语言规范只规定了Ruby数组的行为,并没有规定任何特定的实现策略。它甚至没有指定任何会强制或至少建议特定实现策略的性能约束。然而,大多数Rubyist对数组的性能特征有一些期望,这会迫使不符合它们的实现变得默默无闻,因为实际上没有人会使用它:插入、前置或追加以及删除元素的最坏情况步骤复
在ruby中,你可以这样做:classThingpublicdeff1puts"f1"endprivatedeff2puts"f2"endpublicdeff3puts"f3"endprivatedeff4puts"f4"endend现在f1和f3是公共(public)的,f2和f4是私有(private)的。内部发生了什么,允许您调用一个类方法,然后更改方法定义?我怎样才能实现相同的功能(表面上是创建我自己的java之类的注释)例如...classThingfundeff1puts"hey"endnotfundeff2puts"hey"endendfun和notfun将更改以下函数定
对于用户模型,我有一个过滤器来检查用户的预订状态,该状态由整数值(0、1或2)表示。UserActiveAdmin索引页上的过滤器是通过以下代码实现的:filter:booking_status,as::select然而,这会导致下拉选项为0、1或2。当管理员用户从下拉列表中选择它们时,我更愿意自己将它们命名为“未完成”、“待定”和“已确认”之类的名称。有没有办法在不改变booking_status在模型中的表示方式的情况下做到这一点? 最佳答案 假设booking_status是模型中的枚举字段,您可以使用:过滤器:booking
在Rails自动生成的功能测试(test/functional/products_controller_test.rb)中,我看到以下代码:classProductsControllerTest我的问题是:方法调用products()在哪里/如何定义?products(:one)到底是什么意思?看代码,大概意思是“创建一个产品”,但是它是如何工作的呢?注意我是Ruby/Rails的新手,如果这些是微不足道的问题,我深表歉意。 最佳答案 如果您查看test/fixtures文件夹,您会看到一个products.yml文件。这是在您创建