/**
 * Requests permissions to be granted to this application. These permissions
 * must be requested in your manifest, they should not be granted to your app,
 * and they should have protection level {@link
 * android.content.pm.PermissionInfo#PROTECTION_DANGEROUS dangerous}, regardless
 * whether they are declared by the platform or a third-party app.
 * <p>
 * Normal permissions {@link android.content.pm.PermissionInfo#PROTECTION_NORMAL}
 * are granted at install time if requested in the manifest. Signature permissions
 * {@link android.content.pm.PermissionInfo#PROTECTION_SIGNATURE} are granted at
 * install time if requested in the manifest and the signature of your app matches
 * the signature of the app declaring the permissions.
 * </p>
 * <p>
 * Call {@link #shouldShowRequestPermissionRationale(String)} before calling this API to
 * check if the system recommends to show a rationale UI before asking for a permission.
 * </p>
 * <p>
 * If your app does not have the requested permissions the user will be presented
 * with UI for accepting them. After the user has accepted or rejected the
 * requested permissions you will receive a callback on {@link
 * #onRequestPermissionsResult(int, String[], int[])} reporting whether the
 * permissions were granted or not.
 * </p>
 * <p>
 * Note that requesting a permission does not guarantee it will be granted and
 * your app should be able to run without having this permission.
 * </p>
 * <p>
 * This method may start an activity allowing the user to choose which permissions
 * to grant and which to reject. Hence, you should be prepared that your activity
 * may be paused and resumed. Further, granting some permissions may require
 * a restart of you application. In such a case, the system will recreate the
 * activity stack before delivering the result to {@link
 * #onRequestPermissionsResult(int, String[], int[])}.
 * </p>
 * <p>
 * When checking whether you have a permission you should use {@link
 * #checkSelfPermission(String)}.
 * </p>
 * <p>
 * You cannot request a permission if your activity sets {@link
 * android.R.styleable#AndroidManifestActivity_noHistory noHistory} to
 * <code>true</code> because in this case the activity would not receive
 * result callbacks including {@link #onRequestPermissionsResult(int, String[], int[])}.
 * </p>
 * <p>
 * The <a href="https://github.com/android/permissions-samples">
 * RuntimePermissions</a> sample apps demonstrate how to use this method to
 * request permissions at run time.
 * </p>
 *
 * @param permissions The requested permissions. Must me non-null and not empty.
 * @param requestCode Application specific request code to match with a result
 *    reported to {@link #onRequestPermissionsResult(int, String[], int[])}.
 *    Should be >= 0.
 *
 * @throws IllegalArgumentException if requestCode is negative.
 *
 * @see #onRequestPermissionsResult(int, String[], int[])
 * @see #checkSelfPermission(String)
 * @see #shouldShowRequestPermissionRationale(String)
 */
public final void requestPermissions(@NonNull String[] permissions, int requestCode) {
    if (requestCode < 0) {
        throw new IllegalArgumentException("requestCode should be >= 0");
    }

    if (mHasCurrentPermissionsRequest) {
        Log.w(TAG, "Can request only one set of permissions at a time");
        // Dispatch the callback with empty arrays which means a cancellation.
        onRequestPermissionsResult(requestCode, new String[0], new int[0]);
        return;
    }

    if (!getAttributionSource().getRenouncedPermissions().isEmpty()) {
        final int permissionCount = permissions.length;
        for (int i = 0; i < permissionCount; i++) {
            if (getAttributionSource().getRenouncedPermissions().contains(permissions[i])) {
                throw new IllegalArgumentException("Cannot request renounced permission: "
                        + permissions[i]);
            }
        }
    }

    final Intent intent = getPackageManager().buildRequestPermissionsIntent(permissions);
    startActivityForResult(REQUEST_PERMISSIONS_WHO_PREFIX, intent, requestCode, null);
    mHasCurrentPermissionsRequest = true;
}
注释翻译如下:
该函数作用是请求授予应用程序权限。不管这些权限是否被平台或三方应用声明过,他们都必须在manifest清单中进行申请,他们应该没有被授予给应用程序,并且这些权限应该具有危险的保护级别。
如果在manifest中声明了普通权限(正常保护级别),则在安装应用的时就会授予这些普通权限给应用。如果签名权限(签名保护级别)在manifest中声明了,并app的签名和app声明权限的签名匹配,则在安装应用程序时会授予签名权限。
在调用requestPermissions()函数之前调用shouldShowRequestPermissionRationale(String)来检查在询问权限前,系统是否推荐展示请求权限原因的UI。
如果你的app没有这些被请求的权限,为了接受这些权限,将会展示UI给用户。在用户接受或拒绝这些请求的权限之后,你将收到一个回调函数onRequestPermissionsResult(int, String[], int[])来报告这些权限是否被授予或没有被授予。
注意,请求一个权限不能保证权限被授予,并且你的应用app应该有能力在不具有这些权限的情况下正常运行。
该函数可能启动一个activity允许用户选择哪个权限被授予,哪个权限被拒绝。因此,您应该预料到您的activity可能会被暂停和resumed。更进一步,授予某些权限可能需要应用程序进行重启。在这种情况下,在把结果交付给onRequestPermissionsResult(int, String[], int[])前,系统将重建activity栈。
当检查是否你具有某个权限,你应该使用checkSelfPermission(String)。
如果你的activity设置了 android.R.styleable#AndroidManifestActivity_noHistory noHistory=true,你将不能请求权限,因为在这种情况下activity将不会接受onRequestPermissionsResult(int, String[], int[])中的回调结果。
链接https://github.com/android/permissions-samples的例子RuntimePermissions演示了在运行时,如何使用该方法请求权限。
demo演示
package com.example.helloworld.activity.camera;

import android.Manifest;
import android.app.Activity;
import android.content.Context;
import android.content.Intent;
import android.content.pm.PackageManager;
import android.os.Bundle;
import android.view.View;

import androidx.annotation.NonNull;
import androidx.appcompat.app.AppCompatActivity;
import androidx.core.app.ActivityCompat;

import com.example.helloworld.R;
import com.google.android.material.snackbar.Snackbar;

/**
 * Launcher Activity that demonstrates the use of runtime permissions for Android M.
 * This Activity requests permissions to access the camera
 * ({@link android.Manifest.permission#CAMERA})
 * when the 'Show Camera Preview' button is clicked to start  {@link CameraPreviewActivity} once
 * the permission has been granted.
 * <p>
 * First, the status of the Camera permission is checked using {@link
 * ActivityCompat#checkSelfPermission(Context, String)}
 * If it has not been granted ({@link PackageManager#PERMISSION_GRANTED}), it is requested by
 * calling
 * {@link ActivityCompat#requestPermissions(Activity, String[], int)}. The result of the request is
 * returned to the
 * {@link androidx.core.app.ActivityCompat.OnRequestPermissionsResultCallback}, which starts
 * {@link
 * CameraPreviewActivity} if the permission has been granted.
 * <p>
 * Note that there is no need to check the API level, the support library
 * already takes care of this. Similar helper methods for permissions are also available in
 * ({@link ActivityCompat},
 * {@link androidx.core.content.ContextCompat} and {@link androidx.fragment.app.Fragment}).
 */
public class MainPermissionActivity extends AppCompatActivity
        implements ActivityCompat.OnRequestPermissionsResultCallback {

    private static final int PERMISSION_REQUEST_CAMERA = 0;

    private View mLayout;

    @Override
    protected void onCreate(Bundle savedInstanceState) {
        super.onCreate(savedInstanceState);
        setContentView(R.layout.activity_main1);
        mLayout = findViewById(R.id.main_layout);

        // Register a listener for the 'Show Camera Preview' button.
        findViewById(R.id.button_open_camera).setOnClickListener(new View.OnClickListener() {
            @Override
            public void onClick(View view) {
                showCameraPreview();
            }
        });
    }

    @Override
    public void onRequestPermissionsResult(int requestCode, @NonNull String[] permissions,
                                           @NonNull int[] grantResults) {
        super.onRequestPermissionsResult(requestCode, permissions, grantResults);
        // BEGIN_INCLUDE(onRequestPermissionsResult)
        if (requestCode == PERMISSION_REQUEST_CAMERA) {
            // Request for camera permission.
            if (grantResults.length == 1 && grantResults[0] == PackageManager.PERMISSION_GRANTED) {
                // Permission has been granted. Start camera preview Activity.
                Snackbar.make(mLayout, R.string.camera_permission_granted,
                        Snackbar.LENGTH_LONG)
                        .show();
                startCamera();
            } else {
                // Permission request was denied.
                Snackbar.make(mLayout, R.string.camera_permission_denied,
                        Snackbar.LENGTH_LONG)
                        .show();
            }
        }
        // END_INCLUDE(onRequestPermissionsResult)
    }

    private void showCameraPreview() {
        // BEGIN_INCLUDE(startCamera)
        // Check if the Camera permission has been granted
        if (ActivityCompat.checkSelfPermission(this, Manifest.permission.CAMERA)
                == PackageManager.PERMISSION_GRANTED) {
            // Permission is already available, start camera preview
            Snackbar.make(mLayout,
                    R.string.camera_permission_available,
                    Snackbar.LENGTH_LONG).show();
            startCamera();
        } else {
            // Permission is missing and must be requested.
            requestCameraPermission();
        }
        // END_INCLUDE(startCamera)
    }

    /**
     * Requests the {@link android.Manifest.permission#CAMERA} permission.
     * If an additional rationale should be displayed, the user has to launch the request from
     * a SnackBar that includes additional information.
     */
    private void requestCameraPermission() {
        // Permission has not been granted and must be requested.
        if (ActivityCompat.shouldShowRequestPermissionRationale(this,
                Manifest.permission.CAMERA)) {
            // Provide an additional rationale to the user if the permission was not granted
            // and the user would benefit from additional context for the use of the permission.
            // Display a SnackBar with cda button to request the missing permission.
            Snackbar.make(mLayout, R.string.camera_access_required,
                    Snackbar.LENGTH_INDEFINITE).setAction(R.string.ok, new View.OnClickListener() {
                @Override
                public void onClick(View view) {
                    // Request the permission
                    ActivityCompat.requestPermissions(MainPermissionActivity.this,
                            new String[]{Manifest.permission.CAMERA},
                            PERMISSION_REQUEST_CAMERA);
                }
            }).show();

        } else {
            Snackbar.make(mLayout, R.string.camera_unavailable, Snackbar.LENGTH_LONG).show();
            // Request the permission. The result will be received in onRequestPermissionResult().
            ActivityCompat.requestPermissions(this,
                    new String[]{Manifest.permission.CAMERA}, PERMISSION_REQUEST_CAMERA);
        }
    }

    private void startCamera() {
        Intent intent = new Intent(this, CameraPreviewActivity.class);
        startActivity(intent);
    }

}
2、shouldShowRequestPermissionRationale
/**
 * Gets whether you should show UI with rationale before requesting a permission.
 *
 * @param permission A permission your app wants to request.
 * @return Whether you should show permission rationale UI.
 *
 * @see #checkSelfPermission(String)
 * @see #requestPermissions(String[], int)
 * @see #onRequestPermissionsResult(int, String[], int[])
 */
public boolean shouldShowRequestPermissionRationale(@NonNull String permission) {
    return getPackageManager().shouldShowRequestPermissionRationale(permission);
}1、应用第一次申请危险权限时,shouldShowRequestPermissionRationale(permission)=false,不会弹出请求权限原因说明弹窗,而是直接弹出请求权限弹窗让用户选择授予或拒绝权限;
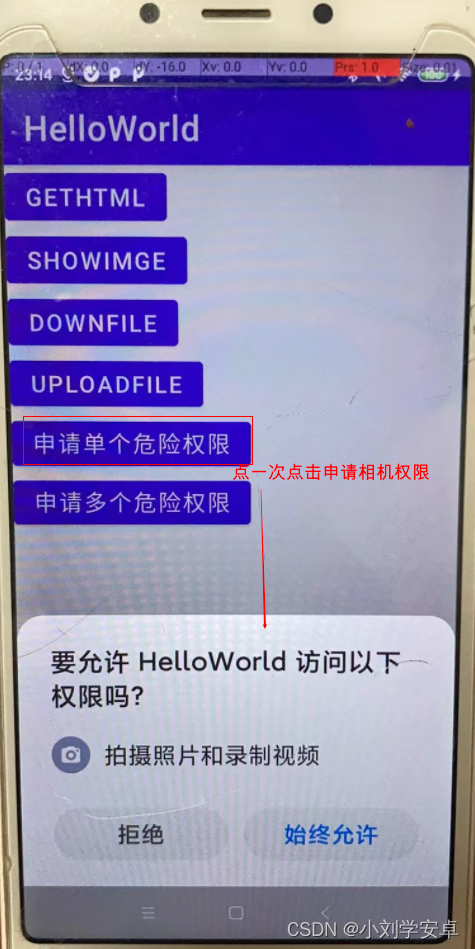
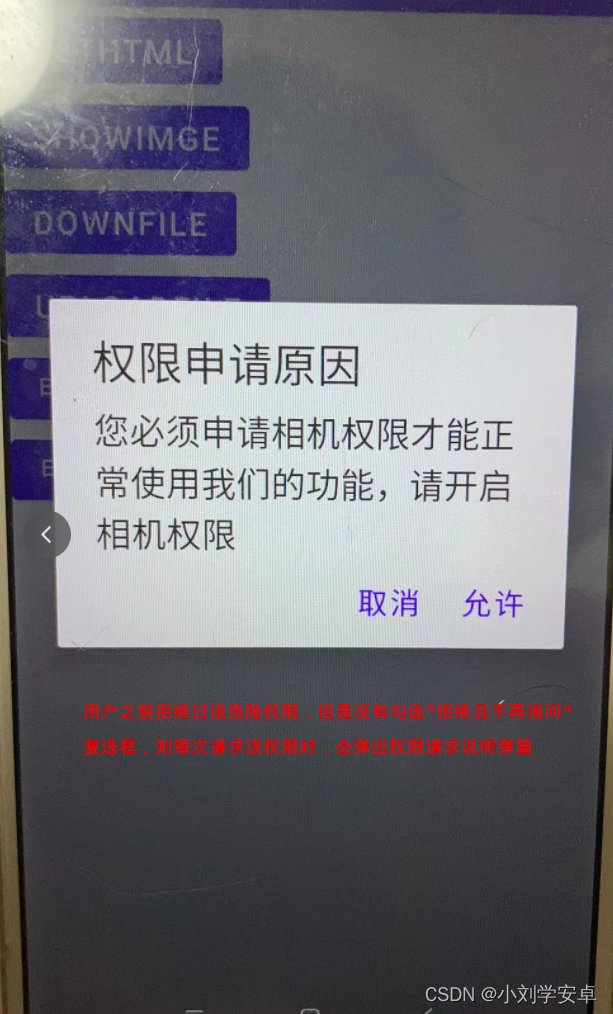
2、当且仅当用户之前有拒绝了危险权限,且没有勾选”拒绝且不再询问“复选框时shouldShowRequestPermissionRationale(permission)=true,则申请危险权限时,会先弹出请求权限原因说明弹窗,在弹窗允许后才会弹出请求权限弹窗让用户选择授予或拒绝权限;
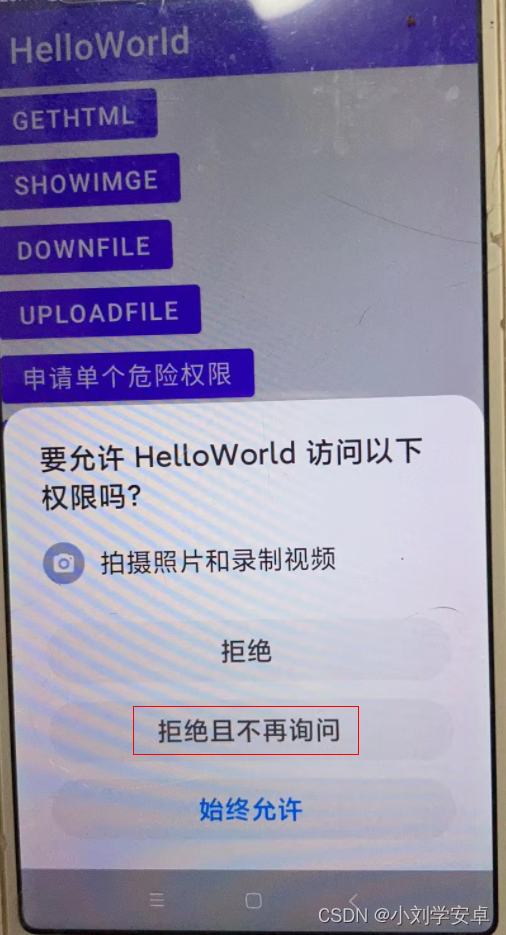
3、如果用户勾选了”拒绝且不再询问“复选框,则shouldShowRequestPermissionRationale(permission)=false,则申请危险权限时,不再弹出权限原因说明弹窗,并且调用requestPermissions()申请危险权限时也不再弹出请求权限弹窗,而是直接走到onRequestPermissionsResult()函数中权限请求失败的逻辑。
疑问:为什么勾选了”拒绝且不再询问“复选框后再请求权限就不会再弹窗请求权限弹窗,我没有从源码中看出是如何实现的。
注意:上面的逻辑我是在android api 28上能够复现的,在api30上好像不行(api 30 没有”拒绝且不再询问“复选框),具体原因不清楚。
相关代码如下:
reqoneper.setOnClickListener {
    if (checkSelfPermission(Manifest.permission.CAMERA) != PackageManager.PERMISSION_GRANTED) {
        //if (ActivityCompat.shouldShowRequestPermissionRationale(this, Manifest.permission.CAMERA)) {
        if (shouldShowRequestPermissionRationale( Manifest.permission.CAMERA)) {
            var dialog = AlertDialog.Builder(this)
                .setTitle("权限申请原因")
                .setMessage("您必须申请相机权限才能正常使用我们的功能,请开启相机权限")
                .setPositiveButton(
                    "允许",
                    DialogInterface.OnClickListener() { dialog, which ->
                        requestPermissions(
                            onePermission,
                            reqonecode
                        )
                    })
                .setNegativeButton(
                    "取消",
                    DialogInterface.OnClickListener() { dialog, which ->
                        dialog.cancel()
                    }).create()
            dialog.setCanceledOnTouchOutside(false)
            dialog.show()
        } else {
            requestPermissions(onePermission, reqonecode)
        }
    } else {
        openCamera()
    }
}
override fun onRequestPermissionsResult(
requestCode: Int,
permissions: Array<out String>,
grantResults: IntArray
) {
super.onRequestPermissionsResult(requestCode, permissions, grantResults)
when (requestCode) {
reqonecode -> {
if (grantResults[0] == PackageManager.PERMISSION_GRANTED) {
openCamera()
} else {
Toast.makeText(this, "申请相机失败", Toast.LENGTH_SHORT).show()
}
}
}
}参考文章:
最近因为项目需要,需要将Android手机系统自带的某个系统软件反编译并更改里面某个资源,并重新打包,签名生成新的自定义的apk,下面我来介绍一下我的实现过程。APK修改,分为以下几步:反编译解包,修改,重打包,修改签名等步骤。安卓apk修改准备工作1.系统配置好JavaJDK环境变量2.需要root权限的手机(针对系统自带apk,其他软件免root)3.Auto-Sign签名工具4.apktool工具安卓apk修改开始反编译本文拿Android系统里面的Settings.apk做demo,具体如何将apk获取出来在此就不过多介绍了,直接进入主题:按键win+R输入cmd,打开命令窗口,并将路
大家好,我正在尝试设置一个开发环境,并且我一直在关注以下教程:Linktotutorial我做得不是很好,除了最基本的版本控制内容外,我对终端命令没有任何实际经验。我点击了第一个链接并尝试运行source~/.bash_profile我得到了错误;mkdir:/usr/local/rbenv/shims:权限被拒绝mkdir:/usr/local/rbenv/versions:权限被拒绝现在每次我加载终端时都会出现错误。bash_profile的内容;exportPATH=/usr/local/rbenv/bin:$PATHexportRBENV_ROOT=/usr/local/rbe
有没有办法在Ruby中动态创建数组?例如,假设我想遍历用户输入的书籍数组:books=gets.chomp用户输入:"TheGreatGatsby,CrimeandPunishment,Dracula,Fahrenheit451,PrideandPrejudice,SenseandSensibility,Slaughterhouse-Five,TheAdventuresofHuckleberryFinn"我把它变成一个数组:books_array=books.split(",")现在,对于用户输入的每一本书,我想用Ruby创建一个数组。伪代码来做到这一点:x=0books_array.
我想在IRB中浏览文件系统并让提示更改以反射(reflect)当前工作目录,但我不知道如何在每个命令后进行提示更新。最终,我想在日常工作中更多地使用IRB,让bash溜走。我在我的.irbrc中试过这个:require'fileutils'includeFileUtilsIRB.conf[:PROMPT][:CUSTOM]={:PROMPT_N=>"\e[1m:\e[m",:PROMPT_I=>"\e[1m#{pwd}>\e[m",:PROMPT_S=>"FOO",:PROMPT_C=>"\e[1m#{pwd}>\e[m",:RETURN=>""}IRB.conf[:PROMPT_MO
首先,我使用的是rails3.1.3和来自master的carrierwavegithub仓库的分支。我使用after_init钩子(Hook)来确定基于属性的字段页面模型实例并为这些字段定义属性访问器将值存储在序列化哈希中(希望它清楚我是什么谈论)。这是我正在做的事情的精简版:classPage省略mount_uploader命令让我可以访问我想要的属性。但是当我安装uploader时出现错误消息说“nil类的未定义新方法”我在源代码中读到有方法read_uploader和扩展模块中的write_uploader。我如何必须覆盖这些来制作mount_uploader命令使用我的“虚拟
我正在尝试动态构建一个多维数组。我想要的基本上是这样的(为简单起见写出来):b=0test=[[]]test[b]这给了我错误:NoMethodError:undefinedmethod`test=[[],[],[]]而且它工作正常,但在我的实际使用中,我不会事先知道需要多少个数组。有一个更好的方法吗?谢谢 最佳答案 不需要像您正在使用的索引变量。只需将每个数组附加到您的test数组:irb>test=[]=>[]irb>test[["a","b","c"]]irb>test[["a","b","c"],["d","e","f"]]
如何只加载map边界内的标记gmaps4rails?当然,在平移和/或缩放后加载新的。与此直接相关的是,如何获取map的当前边界和缩放级别? 最佳答案 我是这样做的,我只在用户完成平移或缩放后替换标记,如果您需要不同的行为,请使用不同的事件监听器:在你看来(index.html.erb):{"zoom"=>15,"auto_adjust"=>false,"detect_location"=>true,"center_on_user"=>true}},false,true)%>在View的底部添加:functiongmaps4rail
如何在对象上调用方法名称的嵌套哈希?例如,给定以下哈希:hash={:a=>{:b=>{:c=>:d}}}我想创建一个方法,给定上面的散列,执行以下操作:object.send(:a).send(:b).send(:c).send(:d)我的想法是我需要从一个未知的关联中获取一个特定的属性(这个方法不知道,但程序员知道)。我希望能够指定一个方法链来以嵌套哈希的形式检索该属性。例如:hash={:manufacturer=>{:addresses=>{:first=>:postal_code}}}car.execute_method_hash(hash)=>90210
我正在为我的用户实现一些rubyonrails代码推特内容。我正在创建正确的oauth链接...类似http://twitter.com/oauth/authorize?oauth_token=y2RkuftYAEkbEuIF7zKMuzWN30O2XxM8U9j0egtzKv但在我的测试帐户授予对twitter的访问权限后,它会弹出一个页面,上面写着“您已成功授予对.我不知道用户应该在哪里输入此PIN以及他们为什么必须这样做。我认为这不是必要的步骤。Twitter应该将用户重定向到我在应用程序设置中提供的回调URL。有谁知道为什么会这样?更新我找到了thisarticle声明我需
我有一个ruby程序,我想接受用户创建的方法,并使用该名称创建一个新方法。我试过这个:defmethod_missing(meth,*args,&block)name=meth.to_sclass我收到以下错误:`define_method':interningemptystring(ArgumentError)in'method_missing'有什么想法吗?谢谢。编辑:我以不同的方式让它工作,但我仍然很好奇如何以这种方式做到这一点。这是我的代码:defmethod_missing(meth,*args,&block)Adder.class_evaldodefine_method