Hudi 源表对应一份 HDFS 数据,通过 Spark,Flink 组件或者 Hudi CLI,可以将 Hudi 表的数据映射为 *Hive 外部表*,基于该外部表, Hive可以方便的进行实时视图,读优化视图以及增量视图的查询。
以 hive3.1.2、hudi 0.12.0为例,其他版本类似。
(1)拷贝编译好的jar包
将 hudi-hadoop-mr-bundle-0.12.0.jar , hudi-hive-sync-bundle-0.12.0.jar 放到 hive 节点的lib目录下;
cp /opt/software/hudi-0.12.0/packaging/hudi-hadoop-mr-bundle/target/hudi-hadoop-mr-bundle-0.12.0.jar /opt/module/hive/lib/

cp /opt/software/hudi-0.12.0/packaging/hudi-hive-sync-bundle/target/hudi-hive-sync-bundle-0.12.0.jar /opt/module/hive/lib/
(2)配置完后重启 hive
// 按照需求选择合适的方式重启
nohup hive --service metastore &
nohup hive --service hiveserver2 &
(1)Flink同步Hive
Flink hive sync 现在支持两种 hive sync mode, 分别是 hms 和 jdbc 模式。 其中 hms 只需要配置 metastore uris;而 jdbc 模式需要同时配置 jdbc 属性 和 metastore uris,具体配置模版如下:
## hms mode 配置
CREATE TABLE t1(
    uuid VARCHAR(20),
    name VARCHAR(10),
    age INT,
    ts TIMESTAMP(3),
    `partition` VARCHAR(20)
)
PARTITIONED BY (`partition`)
with(
    'connector'='hudi',
    'path' = 'hdfs://xxx.xxx.xxx.xxx:9000/t1',
    'table.type'='COPY_ON_WRITE',        -- MERGE_ON_READ方式在没生成 parquet 文件前,hive不会有输出
    'hive_sync.enable'='true',           -- required,开启hive同步功能
    'hive_sync.table'='${hive_table}',              -- required, hive 新建的表名
    'hive_sync.db'='${hive_db}',             -- required, hive 新建的数据库名
    'hive_sync.mode' = 'hms',            -- required, 将hive sync mode设置为hms, 默认jdbc
    'hive_sync.metastore.uris' = 'thrift://ip:9083' -- required, metastore的端口
);
实例:
CREATE TABLE t10(
    id int,
    num int,
    ts int,
    primary key (id) not enforced
)
PARTITIONED BY (num)
with(
    'connector'='hudi',
    'path' = 'hdfs://hadoop1:8020/tmp/hudi_flink/t10',
    'table.type'='COPY_ON_WRITE',
    'hive_sync.enable'='true',
    'hive_sync.table'='h10',
    'hive_sync.db'='default',
    'hive_sync.mode' = 'hms',
    'hive_sync.metastore.uris' = 'thrift://hadoop1:9083'
);

insert into t10 values(1,1,1);
(2)Spark 同步Hive
参数:https://hudi.apache.org/docs/basic_configurations#Write-Options
option("hoodie.datasource.hive_sync.enable","true").                         //设置数据集注册并同步到hive
option("hoodie.datasource.hive_sync.mode","hms").                         //使用hms
option("hoodie.datasource.hive_sync.metastore.uris", "thrift://ip:9083"). //hivemetastore地址
option("hoodie.datasource.hive_sync.username","").                          //登入hiveserver2的用户
option("hoodie.datasource.hive_sync.password","").                      //登入hiveserver2的密码
option("hoodie.datasource.hive_sync.database", "").                   //设置hudi与hive同步的数据库
option("hoodie.datasource.hive_sync.table", "").                        //设置hudi与hive同步的表名
option("hoodie.datasource.hive_sync.partition_fields", "").               //hive表同步的分区列
option("hoodie.datasource.hive_sync.partition_extractor_class", "org.apache.hudi.hive.MultiPartKeysValueExtractor"). // 分区提取器 按/ 提取分区
案例:
import org.apache.hudi.QuickstartUtils._
import scala.collection.JavaConversions._
import org.apache.spark.sql.SaveMode._
import org.apache.hudi.DataSourceReadOptions._
import org.apache.hudi.DataSourceWriteOptions._
import org.apache.hudi.config.HoodieWriteConfig._

val tableName = "hudi_trips_cow"
val basePath = "file:///tmp/hudi_trips_cow"
val dataGen = new DataGenerator

val inserts = convertToStringList(dataGen.generateInserts(10))
val df = spark.read.json(spark.sparkContext.parallelize(inserts, 2))
	.withColumn("a",split(col("partitionpath"),"\\/")(0))
	.withColumn("b",split(col("partitionpath"),"\\/")(1))
	.withColumn("c",split(col("partitionpath"),"\\/")(2))
df.write.format("hudi").
    options(getQuickstartWriteConfigs).
    option(PRECOMBINE_FIELD_OPT_KEY, "ts").
    option(RECORDKEY_FIELD_OPT_KEY, "uuid").
    option("hoodie.table.name", tableName).
    option("hoodie.datasource.hive_sync.enable","true").
    option("hoodie.datasource.hive_sync.mode","hms").
    option("hoodie.datasource.hive_sync.metastore.uris", "thrift://hadoop1:9083").
    option("hoodie.datasource.hive_sync.database", "default").
    option("hoodie.datasource.hive_sync.table", "spark_hudi").
    option("hoodie.datasource.hive_sync.partition_fields", "a,b,c").
    option("hoodie.datasource.hive_sync.partition_extractor_class", "org.apache.hudi.hive.MultiPartKeysValueExtractor").
	mode(Overwrite).
	save(basePath)
(1)直接使用Hive Catalog
上传hive connector到flink的lib中
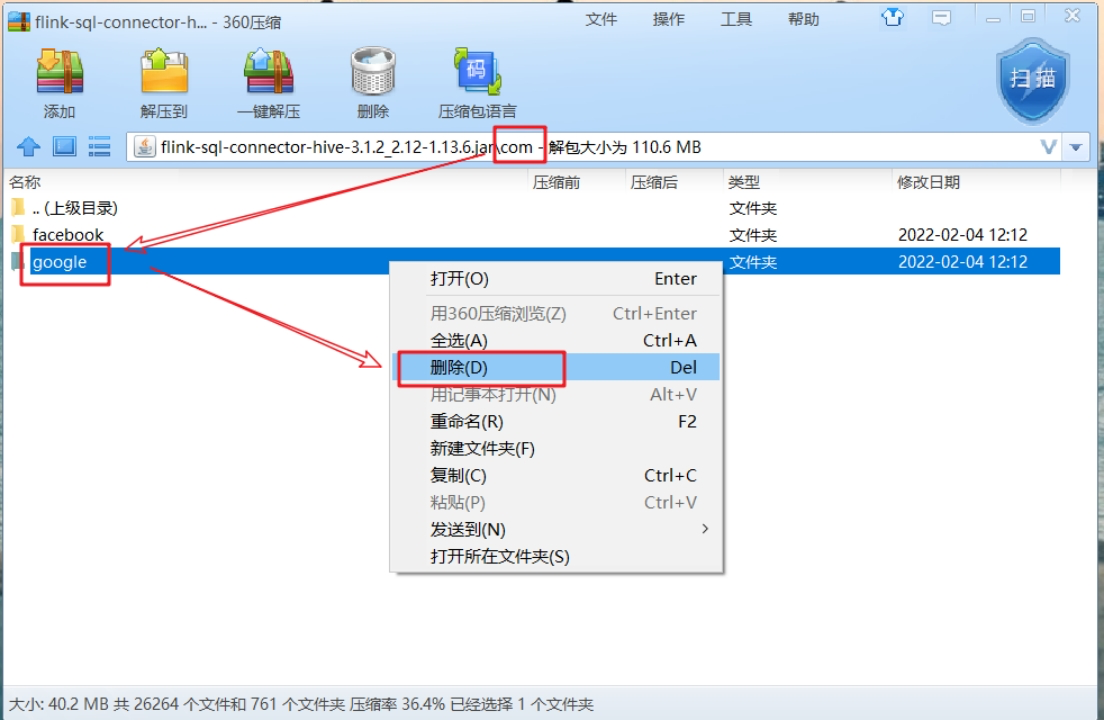
hive3.1.3的connector存在guava版本冲突,需要解决:官网下载connector后,用压缩软件打开jar包,删除/com/google文件夹。处理完后上传flink的lib中。
解决与hadoop的冲突
避免与hadoop的冲突,拷贝hadoop-mapreduce-client-core-3.1.3.jar到flink的lib中(5.2.1已经做过)
创建catalog
CREATE CATALOG hive_catalog
  WITH (
      'type' = 'hive',
      'default-database' = 'default',
      'hive-conf-dir' = '/opt/module/hive/conf',
      'hadoop-conf-dir'='/opt/module/hadoop-3.1.3/etc/hadoop'
  );

use catalog hive_catalog;

-- hive-connector内置了hive module,提供了hive自带的系统函数
load module hive with ('hive-version'='3.1.2');
show modules;
show functions;

-- 可以调用hive的split函数
select split('a,b', ',');
(2)Hudi Catalog使用hms
CREATE CATALOG hoodie_hms_catalog
  WITH (
      'type'='hudi',
      'catalog.path' = '/tmp/hudi_hms_catalog',
      'hive.conf.dir' = '/opt/module/hive/conf',
      'mode'='hms',
      'table.external' = 'true'
  );
一般来说 Hudi 表在用 Spark 或者 Flink 写入数据时会自动同步到 Hive 外部表(同6.2), 此时可以直接通过 beeline 查询同步的外部表,若写入引擎没有开启自动同步,则需要手动利用 hudi 客户端工具 run_hive_sync_tool.sh 进行同步,具体后面介绍。
(1)设置参数
使用 Hive 查询 Hudi 表前,需要通过set命令设置 hive.input.format,否则会出现数据重复,查询异常等错误,如下面这个报错就是典型的没有设置 hive.input.format 导致的:
java.lang.IllegalArgumentException: HoodieRealtimeReader can oly work on RealTimeSplit and not with xxxxxxxxxx
除此之外对于增量查询,还需要 set 命令额外设置3个参数。
set hoodie.mytableName.consume.mode=INCREMENTAL;
set hoodie.mytableName.consume.max.commits=3;
set hoodie.mytableName.consume.start.timestamp=commitTime;
注意这3个参数是表级别参数。
| 参数名 | 描述 |
|---|---|
| hoodie.mytableName.consume.mode | Hudi表的查询模式。增量查询 :INCREMENTAL。非增量查询:不设置或者设为SNAPSHOT |
| hoodie.mytableName.consume.start.timestamp | Hudi表增量查询起始时间。 |
| hoodie. mytableName.consume.max.commits | Hudi表基于 hoodie.mytableName.consume.start.timestamp之后要查询的增量commit次数。例如:设置为3时,增量查询从指定的起始时间之后commit 3次的数据设为-1时,增量查询从指定的起始时间之后提交的所有数据 |
(2)COW 表查询
这里假设同步的 Hive 外表名为 hudi_cow。
实时视图
设置 hive.input.format 为以下两个之一:
像普通的hive表一样查询即可:
set hive.input.format= org.apache.hadoop.hive.ql.io.HiveInputFormat;
select count(*) from hudi_cow;
增量视图
除了要设置 hive.input.format,还需要设置上述的3个增量查询参数,且增量查询语句中的必须添加 where 关键字并将 `_hoodie_commit_time > ‘startCommitTime’ 作为过滤条件(这地方主要是hudi的小文件合并会把新旧commit的数据合并成新数据,hive是没法直接从parquet文件知道哪些是新数据哪些是老数据)
set hive.input.format= org.apache.hadoop.hive.ql.io.HiveInputFormat;
set hoodie.hudicow.consume.mode= INCREMENTAL;
set hoodie.hudicow.consume.max.commits=3;
set hoodie.hudicow.consume.start.timestamp= xxxx;
select count(*) from hudicow where `_hoodie_commit_time`>'xxxx'
-- (这里注意`_hoodie_commit_time` 的引号是反引号(tab键上面那个)不是单引号, 'xxxx'是单引号)
(3)MOR 表查询
这里假设 MOR 类型 Hudi 源表的表名为hudi_mor,映射为两张 Hive 外部表hudi_mor_ro(ro表)和 hudi_mor_rt(rt表)。
实时视图
设置了 hive.input.format 之后,即可查询到Hudi源表的最新数据
set hive.input.format= org.apache.hadoop.hive.ql.io.HiveInputFormat;
select * from hudicow_rt;
读优化视图
ro 表全称 read oprimized table,对于 MOR 表同步的 xxx_ro 表,只暴露压缩后的 parquet。其查询方式和COW表类似。设置完 hiveInputFormat 之后 和普通的 Hive 表一样查询即可。
增量视图
这个增量查询针对的rt表,不是ro表。同 COW 表的增量查询类似:
set hive.input.format=org.apache.hudi.hadoop.hive.HoodieCombineHiveInputFormat; // 这地方指定为HoodieCombineHiveInputFormat
set hoodie.hudimor.consume.mode=INCREMENTAL;
set hoodie.hudimor.consume.max.commits=-1;
set hoodie.hudimor.consume.start.timestamp=xxxx;
select * from hudimor_rt where `_hoodie_commit_time`>'xxxx';// 这个表名要是rt表
索引
说明:
若写入引擎没有开启自动同步,则需要手动利用 Hudi 客户端工具进行同步,Hudi提供Hive sync tool用于同步Hudi最新的元数据(包含自动建表、增加字段、同步分区信息)到hive metastore。
Hive sync tool提供三种同步模式,JDBC,HMS,HIVEQL。这些模式只是针对Hive执行DDL的三种不同方式。在这些模式中,JDBC或HMS优于HIVEQL, HIVEQL主要用于运行DML而不是DDL。
(1)使用语法及参数
脚本位置在hudi源码路径下的hudi-sync/hudi-hive-sync/run_sync_tool.sh
语法
#查看语法帮助
./run_sync_tool.sh --help

#语法:
./run_sync_tool.sh  \
--jdbc-url jdbc:hive2:\/\/hiveserver:10000 \
--user hive \
--pass hive \
--partitioned-by partition \
--base-path <basePath> \
--database default \
--table <tableName>
从Hudi 0.5.1版本开始,读时合并优化版本的表默认带有’_ro’后缀。为了向后兼容旧的Hudi版本,提供了一个可选的配置 --skip-ro-suffix,如果需要,可以关闭’_ro’后缀。
参数说明
| HiveSyncConfig | DataSourceWriteOption | 描述 |
|---|---|---|
| –database | hoodie.datasource.hive_sync.database | 同步到hive的目标库名 |
| –table | hoodie.datasource.hive_sync.table | 同步到hive的目标表名 |
| –user | hoodie.datasource.hive_sync.username | hive metastore 用户名 |
| –pass | hoodie.datasource.hive_sync.password | hive metastore 密码 |
| –use-jdbc | hoodie.datasource.hive_sync.use_jdbc | 使用JDBC连接到hive metastore |
| –jdbc-url | hoodie.datasource.hive_sync.jdbcurl | Hive metastore url |
| –sync-mode | hoodie.datasource.hive_sync.mode | 同步hive元数据的方式. 有效值为 hms, jdbc 和hiveql. |
| –partitioned-by | hoodie.datasource.hive_sync.partition_fields | hive分区字段名,多个字段使用逗号连接. |
| –partition-value-extractor | hoodie.datasource.hive_sync.partition_extractor_class | 解析分区值的类名,默认SlashEncodedDayPartitionValueExtractor |
(2)解决依赖问题
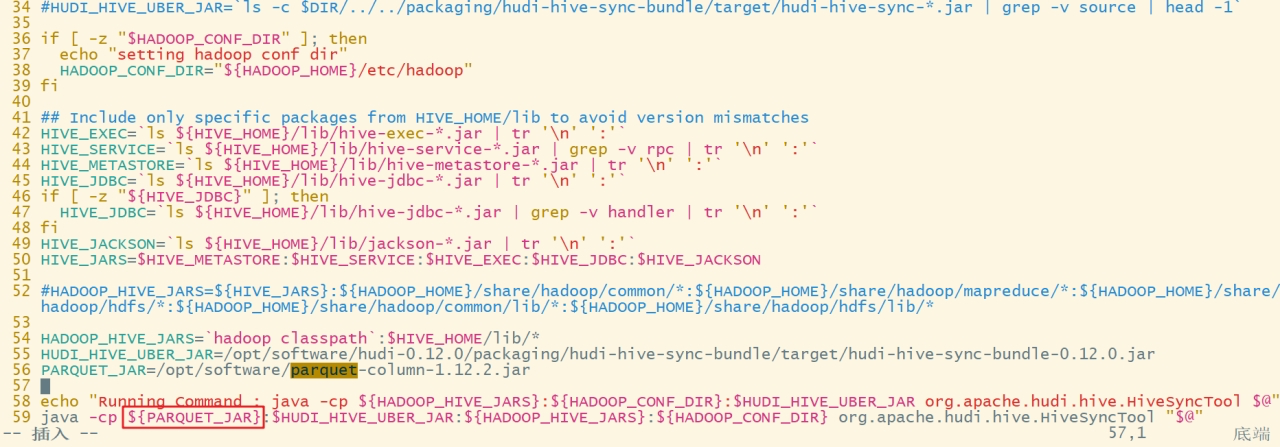
run_sync_tool.sh这个脚本就是查找hadoop、hive和bundle包的依赖,实际上使用的时候会报错各种ClassNotFoundException、NoSuchMethod,所以要动手修改依赖的加载逻辑:
vim /opt/software/hudi-0.12.0/hudi-sync/hudi-hive-sync/run_sync_tool.sh
修改hadoop、hive、hudi-hive-sync-bundle-0.12.0.jar的依赖加载
a. 将34行 HUDI_HIVE_UBER_JAR=xxxx 注释掉
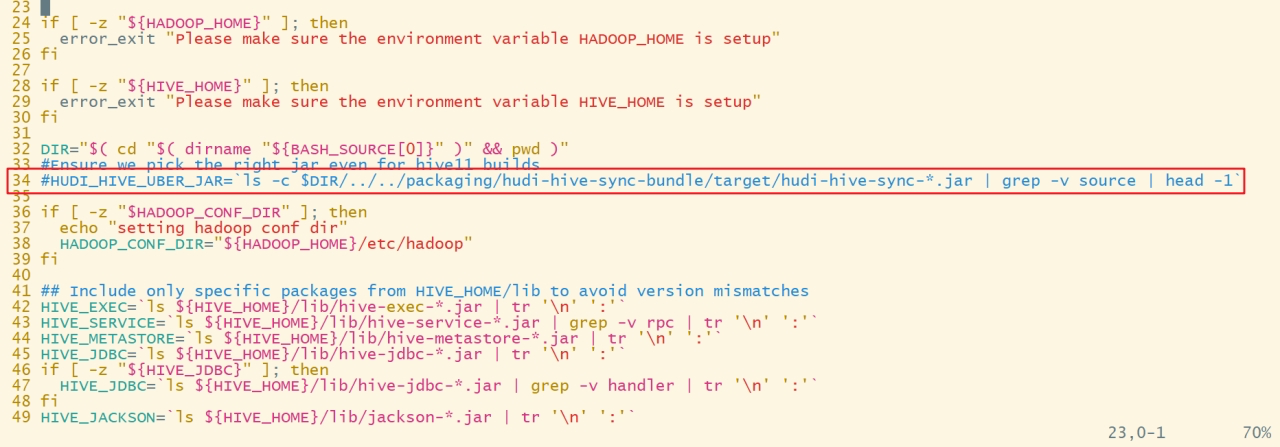
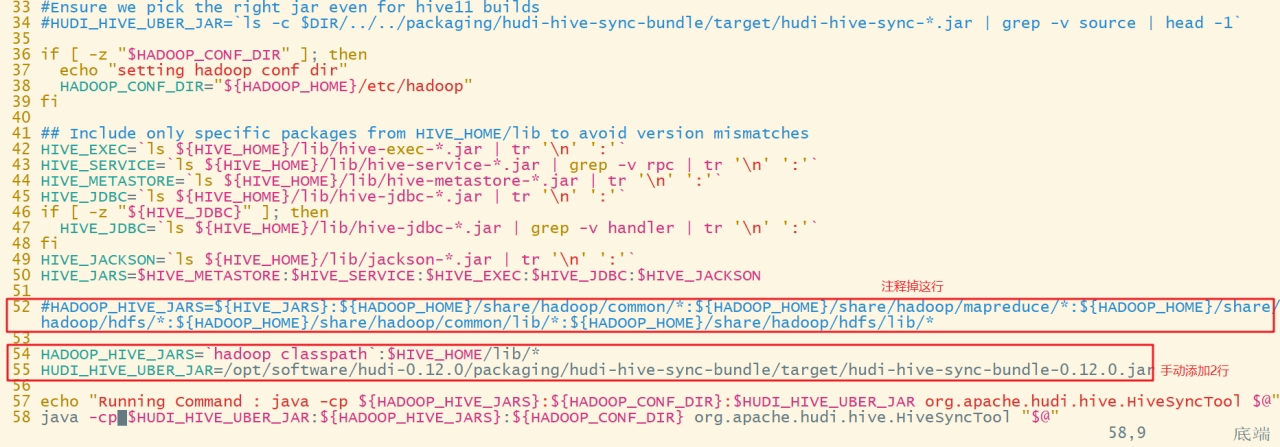
b. 将52行 HADOOP_HIVE_JARS=xxx注释掉
#在 54行 添加如下:
HADOOP_HIVE_JARS=`hadoop classpath`:$HIVE_HOME/lib/*
HUDI_HIVE_UBER_JAR=/opt/software/hudi-0.12.0/packaging/hudi-hive-sync-bundle/target/hudi-hive-sync-bundle-0.12.0.jar
解决parquet-column的版本冲突
a. 上传parquet-column-1.12.2.jar到/opt/software/,脚本中添加如下:
PARQUET_JAR=/opt/software/parquet-column-1.12.2.jar
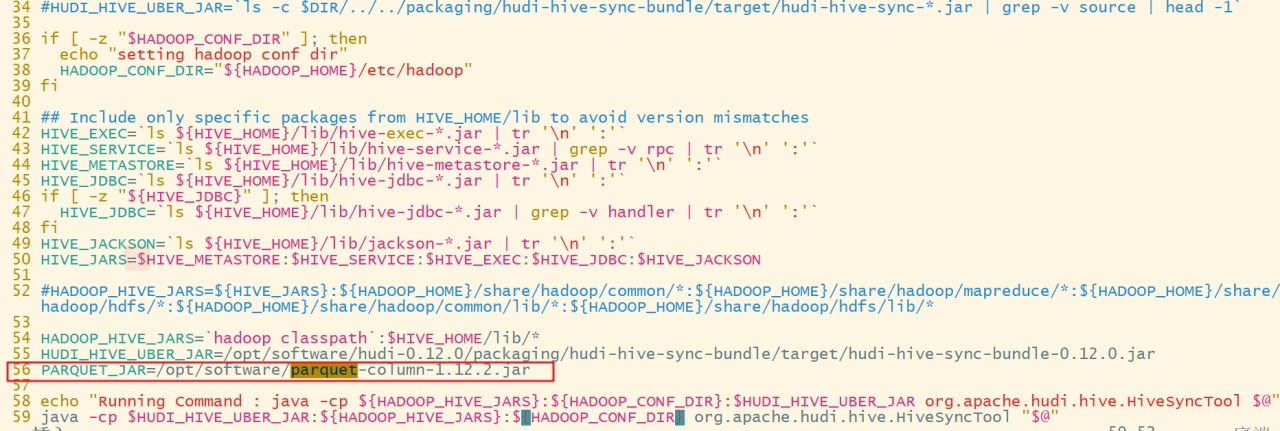
b. 拼接路径到命令最前面(只能最前面!)
c. 保存退出
(3)JDBC模式同步
通过hive2 jdbc协议同步,提供的是hive server2的地址,如jdbc:hive2://hive-server:10000。默认为jdbc。
cd /opt/software/hudi-0.12.0/hudi-sync/hudi-hive-sync

./run_sync_tool.sh \
--base-path hdfs://hadoop1:8020/tmp/hudi_flink/t2/ \
--database default \
--table t2_flink \
--jdbc-url jdbc:hive2://hadoop1:10000 \
--user atguigu \
--pass atguigu \
--partitioned-by num
(4)HMS模式同步
提供hive metastore的地址,如thrift://hms:9083,通过hive metastore的接口完成同步。使用时需要设置 --sync-mode=hms。
如果使用的是远程metastore,那么确保hive-site.xml配置文件中设置hive.metastore.uris。
./run_sync_tool.sh  \
--base-path hdfs://hadoop1:8020/tmp/hudi_flink/t3 \
--database default \
--table t3_flink  \
--user atguigu \
--pass atguigu \
--partitioned-by age \
--sync-mode hms \
--jdbc-url thrift://hadoop1:9083
我在app/helpers/sessions_helper.rb中有一个帮助程序文件,其中包含一个方法my_preference,它返回当前登录用户的首选项。我想在集成测试中访问该方法。例如,这样我就可以在测试中使用getuser_path(my_preference)。在其他帖子中,我读到这可以通过在测试文件中包含requiresessions_helper来实现,但我仍然收到错误NameError:undefinedlocalvariableormethod'my_preference'.我做错了什么?require'test_helper'require'sessions_hel
我一直很高兴地使用DelayedJob习惯用法:foo.send_later(:bar)这会调用DelayedJob进程中对象foo的方法bar。我一直在使用DaemonSpawn在我的服务器上启动DelayedJob进程。但是...如果foo抛出异常,Hoptoad不会捕获它。这是任何这些包中的错误...还是我需要更改某些配置...或者我是否需要在DS或DJ中插入一些异常处理来调用Hoptoad通知程序?回应下面的第一条评论。classDelayedJobWorker 最佳答案 尝试monkeypatchingDelayed::W
前置步骤我们都操作完了,这篇开始介绍jenkins的集成。话不多说,看操作1、登录进入jenkins后会让你选择安装插件,选择第一个默认的就行。安装完成后设置账号密码,重新登录。2、配置JDK和Git都需要执行路径,所以需要先把执行路径找到,先进入服务器的docker容器,2.1JDK的路径root@69eef9ee86cf:/usr/bin#echo$JAVA_HOME/usr/local/openjdk-82.2Git的路径root@69eef9ee86cf:/#whichgit/usr/bin/git3、先配置JDK和Git。点击:ManageJenkins>>GlobalToolCon
目录第1题连续问题分析:解法:第2题分组问题分析:解法:第3题间隔连续问题分析:解法:第4题打折日期交叉问题分析:解法:第5题同时在线问题分析:解法:第1题连续问题如下数据为蚂蚁森林中用户领取的减少碳排放量iddtlowcarbon10012021-12-1212310022021-12-124510012021-12-134310012021-12-134510012021-12-132310022021-12-144510012021-12-1423010022021-12-154510012021-12-1523.......找出连续3天及以上减少碳排放量在100以上的用户分析:遇到这类
三分钟集成Tap防沉迷SDK(Unity版)一、SDK介绍基于国家对上线所有游戏必须增加防沉迷功能的政策下,TapTap推出防沉迷SDK,供游戏开发者进行接入;允许未成年用户在周五、六、日以及法定节假日晚上8:00-9:00进行游戏,防沉谜时间段进入游戏会弹窗进行提示!开发环境要求:Unity2019.4或更高版本iOS10或更高版本Android5.0(APIlevel21)或更高版本🔗Unity集成Demo参考链接🔗UnityTapSDK功能体验APK下载链接二、集成前准备1.创建应用进入开发者后台,按照提示开始创建应用;2.开通服务在使用TDS实名认证和防沉迷服务之前,需要在上面创建的应
我被这个难住了。到目前为止教程中的一切都进行得很顺利,但是当我将这段代码添加到我的/spec/requests/users_spec.rb文件中时,事情开始变得糟糕:describe"success"doit"shouldmakeanewuser"dolambdadovisitsignup_pathfill_in"Name",:with=>"ExampleUser"fill_in"Email",:with=>"ryan@example.com"fill_in"Password",:with=>"foobar"fill_in"Confirmation",:with=>"foobar"cl
我需要一些指导来了解如何将Angular整合到rails中。选择Rails的原因:我喜欢他们偏执的做事方式。还有迁移,gem真的很酷。使用angular的原因:我正在研究和寻找最适合SPA的框架。Backbone似乎太抽象了。我不得不在Angular和Ember之间做出选择。我首先开始阅读Angular,它对我来说很有意义。所以我从来没有去读过关于ember的文章。使用Angular和Rails的原因:我研究并尝试使用小型框架,例如grape、slim(是的,我也使用php)。但我觉得需要坚持项目的长期范围。我个人喜欢用Rails的方式做事。这就是我需要帮助的地方,我在Rails4中有
有没有人有在Maven中运行用Ruby编写的单元测试的经验。任何输入,如要使用的库/maven插件,将不胜感激!我们已经在使用Maven+hudson+Junit。但是我们正在引入Ruby单元测试,找不到任何同样好的组合。 最佳答案 我建议让Maven使用ExecMavenPlugin启动rake测试(exec:exec目标)并使用ci_reportergem生成单元测试结果的XML文件,Hudson、Bamboo等可以读取该文件,以与JUnit测试相同的格式显示测试结果。如果您不需要使用mvntest运行Ruby测试,您也可以只使
目前我有一小套针对我的网络服务器运行的集成测试,它发出请求并断言一些关于响应应该是什么的假设。这些是用Ruby编写的,生成http请求。我一直在看Gatling作为压力测试工具,但我想知道它是否也可以用于集成测试。这样,所有端点请求都可以在压力测试和集成测试中重复使用。我可能在这里失去了一些东西,因为没有RSpec的BDD,但不必两次创建相同的测试。有没有人有这样使用gatling的经验? 最佳答案 您可以使用AssertionAPI并设置验收标准。但是,Gatling不是浏览器,不会运行/测试您的Javascript,因此这种方法
文章目录前言一、Elasticsearch版本介绍二、客户端种类三、客户端与版本兼容性四、引入Elasticsearch依赖包五、客户端配置六、Elasticsearch使用前言ElasticSearch是Elastic公司出品的一款功能强大的搜索引擎,被广泛的应用于各大IT公司,它的代码位于https://github.com/elastic/elasticsearch,目前是一个开源项目。ElasticSearch公司的另外两个开源产品Logstash、Kibana与ElasticSearch构成了著名的ELK技术栈。。他们三个共同形成了一个强大的生态圈。简单地说,Logstash负责数据
