今天聊一下比较重要的torch.fx,也趁着这次机会把之前的torch.fx笔记整理下,笔记大概拆成三份,分别对应三篇:
本文对应第一篇,主要介绍torch.fx和基本使用方法。废话不多说,直接开始吧!
torch.fx是Pytorch 1.8出来的一套工具或者说一个库,是做python-to-python code transformation,大意就是可以把pytorch中的python前向代码转换为你想要的样子,官方介绍如下:
We apply this principle in torch.fx, a program capture and
transformation library for PyTorch written entirely in Python and optimized for high developer productivity by ML practitioners
上述来源于FX的论文,感兴趣的可以看TORCH.FX: PRACTICAL PROGRAM CAPTURE AND TRANSFORMATION FOR DEEP LEARNING IN PYTHON这篇,知乎上也有一篇不错的解读,这里就不复述了。不过本文也会介绍论文中的内容,更多的是以实践的角度。
核心的关键词是program capture和transformation library,这两个概念很重要。
那么FX怎么用呢?直观了解一下,我们定义了一个pytorch.nn.module:
class MyModule(torch.nn.Module):
    def __init__(self):
        super().__init__()
        self.param = torch.nn.Parameter(torch.rand(3, 4))
        self.linear = torch.nn.Linear(4, 5)

    def forward(self, x):
        return self.linear(x + self.param).clamp(min=0.0, max=1.0)
很简单地继承于torch.nn.Module的Module(熟悉pytorch的应该都懂)。其中前向forward函数也记录了这个module的具体操作逻辑。
如果我们想把这个Module中forward中的一部分操作逻辑self.linear(x + self.param).clamp(min=0.0, max=1.0)的clamp部分替换为sigmoid,应该怎么搞呢?
当然可以直接改代码么,但是如果这些操作很多,或者说你写了很多模块,或者说你想要做很多实验(某些模块中改某些模块中不改),再这样就比较烦琐了。
这时候就需要FX,不需要我们手动修改代码(就是自己改这个forward实现),只需要设定好规则,使用torch.fx,带入这个模型实例进去,跑一下代码。然后你的这个MyModule中forward部分就会变为self.linear(x + self.param).sigmoid():
module = MyModule()

from torch.fx import symbolic_trace
# Symbolic tracing frontend - captures the semantics of the module
symbolic_traced : torch.fx.GraphModule = symbolic_trace(module)

# High-level intermediate representation (IR) - Graph representation
# 打印查看FX的IR
print(symbolic_traced.graph)
"""
graph():
    %x : [#users=1] = placeholder[target=x]
    %param : [#users=1] = get_attr[target=param]
    %add : [#users=1] = call_function[target=operator.add](args = (%x, %param), kwargs = {})
    %linear : [#users=1] = call_module[target=linear](args = (%add,), kwargs = {})
    %clamp : [#users=1] = call_method[target=clamp](args = (%linear,), kwargs = {min: 0.0, max: 1.0})
    return clamp
"""

# Code generation - valid Python code
# 通过FX生成的代码,可以视为module中的forward代码
print(symbolic_traced.code)
"""
def forward(self, x):
    param = self.param
    add = x + param;  x = param = None
    linear = self.linear(add);  add = None
    clamp = linear.clamp(min = 0.0, max = 1.0);  linear = None
    return clamp
"""
这样,FX会帮助你修改这个Module,并且修改好的这个model就和平常一样使用就可以,注意这里,FX capture 了你写的forward代码,然后进行了transform,修改了其中的操作。
当然这只是很简单很简单的fx的一个功能,我们还可以通过fx:
等等等等。
可能大家会疑惑,这些操作是不是很像AI编译器中的PASS,而操作对象也是神经网络这种DAG(有向无环图)。其实吧,FX你也可以理解为是一种编译器,不过这个编译器最终产生的可执行文件,而是python->python,最终的产物还是基于Pytorch规则的python代码,也就是为什么FX一直说自己是Python-to-Python (or Module-to-Module) transformation toolkit而不是compiler了。
FX目前大部分API已经稳定(在torch-1.10中正式发布),使用起来历史包袱不大。
fx的官方介绍:
FX的出现第一利好是基于Pytorch的量化工具,这也是我介绍FX的一个原因。借助FX可以很方便地对pytorch模型做量化操作,之前商汤就出了一个基于fx的量化工具MQBench。
对于量化来说,不论是PTQ(需要插入观察op来收集每一层的激活分布以及权重分布)还是QTA(需要插入fake量化节点来模拟量化),都会涉及到fx的功能。所以如果想基于Pytorch框架来做量化,建议直接上手torch.fx。
fx在pytorch-1.10中已经处于stable状态,大部分API已经稳定了,我也拿torch.fx量化了几个模型,最终搞到TensorRT上,涉及到卷积、BN、反卷积、add、concat等基本操作,使用的版本是Pytorch-1.10和TensorRT-8.2。
其中fx部分自己修改了下源码,补充了一些op。这里我是直接把最新release的pytorch中的fx部分摘出来,然后pip安装torch-1.10.0+cu113-cp38-cp38-linux_x86_64.whl,两者搭配食用。
其实一开始torch.fx出现的时候也想过这两个有啥区别,都是先解析模型、然后生成IR、然后基于IR做一些优化,最后生成一个最终版的优化后的模型,难道一个是python版本的一个是C++版?肯定没有这么简单。当你FX用多了,会发现FX和torchscript的定位是不一样的,FX更侧重于对模型进行一些功能性的改变(比如批量增加、修改某个操作,比如增加统计操作,比如量化);而torchscript更侧重于优化当前模型的性能,并且可以脱离python,仅在C++环境运行。
借一句官方大佬的回答:
torch.fx is different from TorchScript in that it is a platform for Python-to-Python transformations of PyTorch code. TorchScript, on the other hand, is more targeted at moving PyTorch programs outside of Python for deployment purposes. In this sense, FX and TorchScript are orthogonal to each other, and can even be composed with each other (e.g. transform PyTorch programs with FX, then subsequently export to TorchScript for deployment).
大意就是,FX仅仅是做Python2Python的转换,不像Torchscript一样是为了做部署(脱离Python这个环境,在C++中运行)而做转换。两者没什么关系,不冲突,用FX转换后的模型也可以用torchscript继续转换,两者是正交的。
不过需要注意的是,FX的代码生成式由Python到Python。也就是说,FX生成的代码,和我们平常使用nn.Module搭建的网络没区别,可以直接使用Pytorch的eager mode跑,不像torchscript一样,是另一套runtime(我们跑torchscript的时候其实调用的是一个VM,也就是虚拟机,通过VM在C++中跑通过torchscript导出的模型)。
因此fx转换后的模型类型和nn.Module一毛一样,所以对nn.Module能做的,对转换后的模型也能做,咱们可以连续套娃:
这俩IR不一样,FX的IR相较Jit的来说,有两个优点:
prograim representations,不像jit.trace有时候会出错。torch.nn.module没啥区别,其IR没有那么底层,所以说用起来更简单,效率也会提升。这里简单列一下FX的IR,很简单,只有六种,大概功能就是调函数、提取attr、获取输入输出等:
placeholder represents a function input. The name attribute specifies the name this value will take on. target is similarly the name of the argument. args holds either: 1) nothing, or 2) a single argument denoting the default parameter of the function input. kwargs is don't-care. Placeholders correspond to the function parameters (e.g. x) in the graph printout.get_attr retrieves a parameter from the module hierarchy. name is similarly the name the result of the fetch is assigned to. target is the fully-qualified name of the parameter's position in the module hierarchy. args and kwargs are don't-carecall_function applies a free function to some values. name is similarly the name of the value to assign to. target is the function to be applied. args and kwargs represent the arguments to the function, following the Python calling conventioncall_module applies a module in the module hierarchy's forward() method to given arguments. name is as previous. target is the fully-qualified name of the module in the module hierarchy to call. args and kwargs represent the arguments to invoke the module on, including the self argument.call_method calls a method on a value. name is as similar. target is the string name of the method to apply to the self argument. args and kwargs represent the arguments to invoke the module on, including the self argumentoutput contains the output of the traced function in its args[0] attribute. This corresponds to the "return" statement in the Graph printout.相比torchscript的IR,FX的可就简单多了,我们理解使用起来也很简单。
回到一开头示例的那段代码,其中有一行是symbolic_traced : torch.fx.GraphModule = symbolic_trace(module),这里核心就是symbolic_trace函数,也就是FX解析、转换模型的起点。这个函数其实内部是这样的:
@compatibility(is_backward_compatible=True)
def symbolic_trace(root : Union[torch.nn.Module, Callable[..., Any]], concrete_args: Optional[Dict[str, Any]] = None,
                   enable_cpatching: bool = False) -> GraphModule:
    """
    Symbolic tracing API

    Given an ``nn.Module`` or function instance ``root``, this function will return a ``GraphModule``
    constructed by recording operations seen while tracing through ``root``.

    ...
    """
    tracer = Tracer(enable_cpatching=enable_cpatching)
    graph = tracer.trace(root, concrete_args)
    name = root.__class__.__name__ if isinstance(root, torch.nn.Module) else root.__name__
    return GraphModule(tracer.root, graph, name)
首先会创建一个Tracer类然后使用成员函数trace我们的torch.nn.Module。我们在trace这个模型之后,就可以对这个模型进行修改了:
def transform(m: nn.Module,
              tracer_class : type = torch.fx.Tracer) -> torch.nn.Module:
    # Step 1: Acquire a Graph representing the code in `m`
    # 使用 Tracer 类对象去trace模型 m
    # 这边是拆开了,这个transform函数就是实现torch.fx.symbolic_trace的功能
    graph : torch.fx.Graph = tracer_class().trace(m)

    # Step 2: 这里就可以任意修改模型了,这也是重点
    graph = ...

    # Step 3: Construct a Module to return
    return torch.fx.GraphModule(m, graph)
修改之后的模型可以直接拿来用,也可以通过graph_module.to_folder,把这个模型摘出来当做单独的模块去使用(这个之后说)。整体的流程大概就是这样:
symbolic tracing -> intermediate representation -> transforms -> Python code generation。
各自的功能为:
The symbolic tracer performs “symbolic execution” of the Python code. It feeds fake values, called Proxies, through the code. Operations on theses Proxies are recorded. More information about symbolic tracing can be found in the symbolic_trace() and Tracer documentation.
The intermediate representation is the container for the operations that were recorded during symbolic tracing. It consists of a list of Nodes that represent function inputs, callsites (to functions, methods, or torch.nn.Module instances), and return values. More information about the IR can be found in the documentation for Graph. The IR is the format on which transformations are applied.
Python code generation is what makes FX a Python-to-Python (or Module-to-Module) transformation toolkit. For each Graph IR, we can create valid Python code matching the Graph’s semantics. This functionality is wrapped up in GraphModule, which is a torch.nn.Module instance that holds a Graph as well as a forward method generated from the Graph.
上述就是FX的三个核心功能。
Proxy/Retracing是symbolic trace的核心。因为我对Proxy/Retracing的理解还不是很深,这里就不擅自描述了,摘一下官方的介绍:
Proxy objects are Node wrappers that flow through the program during symbolic tracing and record all the operations (torch function calls, method calls, operators) that they touch into the growing FX Graph.
If you’re doing graph transforms, you can wrap your own Proxy method around a raw Node so that you can use the overloaded operators to add additional things to a Graph.
FX主要的结构就是Graph和GraphModule了,其中A Graph is a data structure that represents a method on a GraphModule。可以理解为Graph中存放着网络中最关键的Node,这些node就是网络中的一个个节点(比如卷积、relu、add、concat等等),这些node记录了对应的method和输入输出信息,从而可以串起来组成网络的逻辑。
通过print_tabular()可以将graph中的node信息打印出来:
import torch
import torch.fx

class MyModule(torch.nn.Module):
    def __init__(self):
        super().__init__()
        self.param = torch.nn.Parameter(torch.rand(3, 4))
        self.linear = torch.nn.Linear(4, 5)

    def forward(self, x):
        return torch.topk(torch.sum(
            self.linear(x + self.linear.weight).relu(), dim=-1), 3)

m = MyModule()
gm = torch.fx.symbolic_trace(m)
# 这里打印module中的node
gm.graph.print_tabular()
打印信息如下:
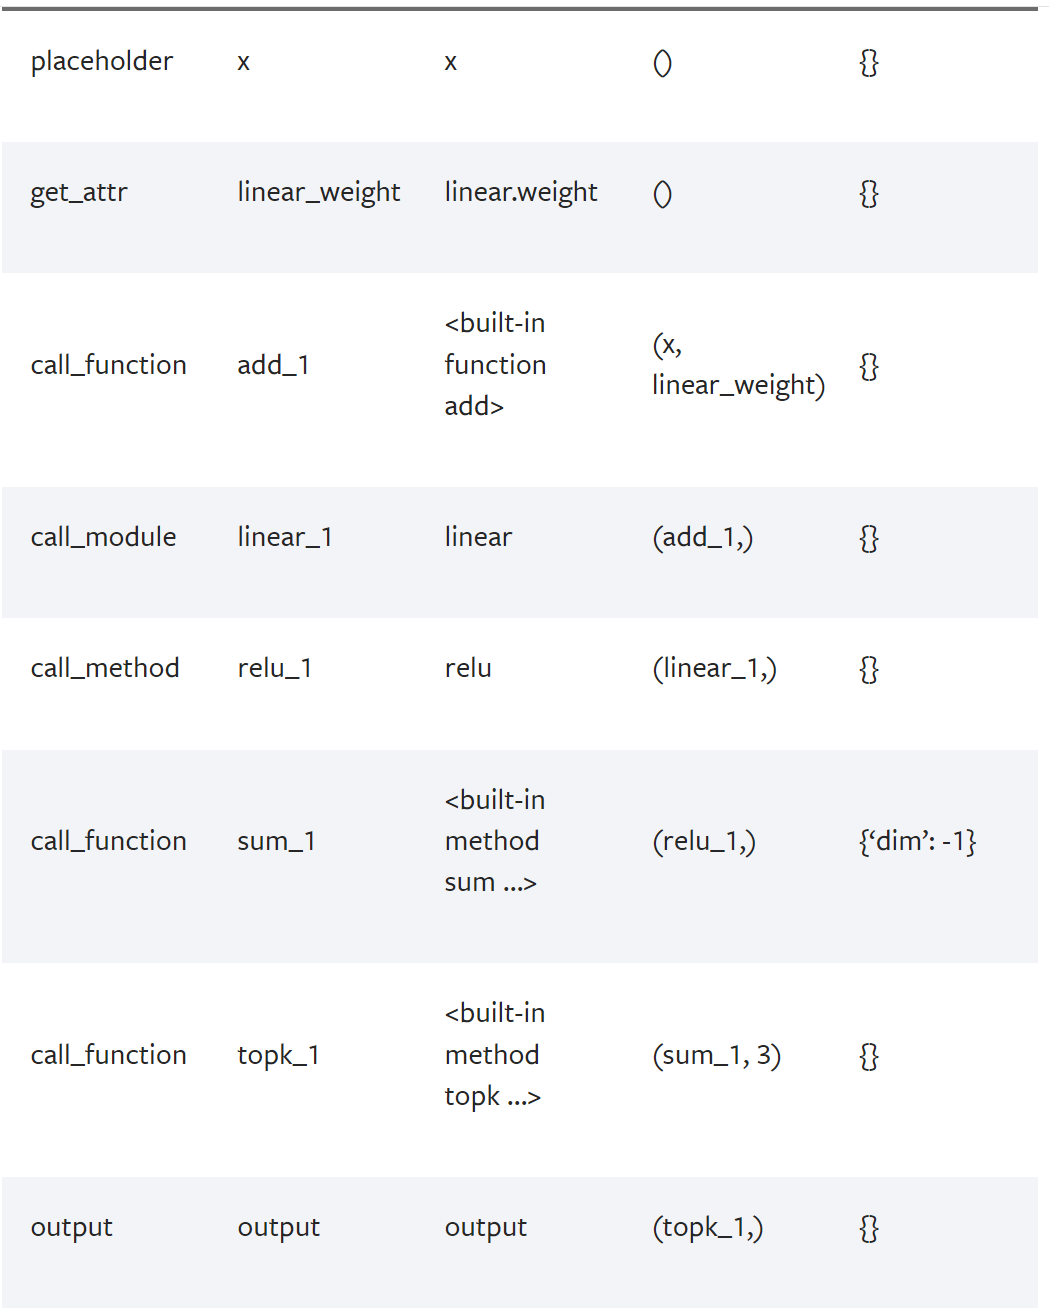
可以看到,对于输入x,对应的IR类型是placeholder;对于权重信息,对应的IR类型是get_attr;对于具体的实际操作(add、linear、sum、relu、topk等),对应着call_function、call_module这俩IR,最后的输出对应着output这个IR。
同时还打印了每个node的输入信息和额外的参数信息,通过这些信息就可以把node连起来。
不过光有graph是不够的,还需要GraphModule。GraphModule继承于torch.nn.Module,包含了前向forward函数和网络中模块需要的参数,这些参数会被graph中的node调用。
总结一下,那就是graph中的node包含了网络的逻辑信息,然后这些node前后调用关系会被FX重新组合为GraphModule中FX生成的前向forward代码(可以通过traced.code打印出来),而这些生成的代码会需要GraphModule中的参数信息来保证顺利执行。
既然知道graph中包含了网络的顺序执行信息,那么想要修改网络,直接修改node就可以:
import torch
import torch.fx

# Sample module
class M(torch.nn.Module):
    def forward(self, x, y):
        return torch.add(x, y)

def transform(m: torch.nn.Module,
              tracer_class : type = fx.Tracer) -> torch.nn.Module:
    graph : fx.Graph = tracer_class().trace(m)
    # 对于graph中的node,FX会以顺序的形式来表示这个网络
    # 所以我们可以直接for循环来遍历:
    for node in graph.nodes:
        # 检测该node的IR类型是否是call_function
        if node.op == 'call_function':
            # 修改node.target为torch.mul,网络也因此变了
            if node.target == torch.add:
                node.target = torch.mul

    graph.lint() # Does some checks to make sure the
                 # Graph is well-formed.

    return fx.GraphModule(m, graph)
简单提一句,node.target代表call_function中call的是哪个target,而torch.add也就是pytorch自带的操作op,调用这个node的时候会实际调用到torch.add。
上述直接修改简单粗暴,FX也贴心地为我们提供了Graph rewrites工具,我们可以借助这些工具方便地增加或者删除某一个node:
# Specifies the insertion point. Any nodes added to the
# Graph within this scope will be inserted after `node`
with traced.graph.inserting_after(node):
    # Insert a new `call_function` node calling `torch.relu`
    new_node = traced.graph.call_function(
        torch.relu, args=(node,))
    # We want all places that used the value of `node` to
    # now use that value after the `relu` call we've added.
    # We use the `replace_all_uses_with` API to do this.
    node.replace_all_uses_with(new_node)
Graph rewrites工具都有了(相关概念是来源于编译器),那么match pattern肯定也有了,我们可以通过 replace_pattern()来对整个graph进行修改。pattern的话可以用fx自带的也可以自己添加自己的规则:
# Sample module
class M(torch.nn.Module):
    def __init__(self):
        super().__init__()

    def forward(self, x, w1, w2):
        val1 = torch.neg(w1)
        m1 = torch.cat([val1, w2]).sum()
        val2 = torch.neg(w1)
        m2 = torch.cat([val2, w2]).sum()
        return x + torch.max(m1) + torch.max(m2)

# Symbolically trace an instance of `M`
traced = symbolic_trace(M())

# Define the pattern.
def pattern(a1, a2):
    val1 = torch.neg(a1)
    return torch.cat([val1, a2]).sum()

# Define the replacement (same rules as the pattern)
def replacement(w1, w2):
    return torch.stack([w1, w2])

# Replace `pattern` with `replacement` in `traced`
replace_pattern(traced, pattern, replacement)

# After calling `replace_pattern`, the generated code is:
'''
def forward(self, x, w1, w2):
    stack = torch.stack([w1, w2])
    max_1 = torch.max(stack);  stack = None
    add = x + max_1;  x = max_1 = None
    stack_1 = torch.stack([w1, w2]);  w1 = w2 = None
    max_2 = torch.max(stack_1);  stack_1 = None
    add_1 = add + max_2;  add = max_2 = None
    return add_1
'''
Interpreter,即解释器,这个名字用的好。其实就是以一个比较优雅的方式循环一个Graph的node并且执行它们,并同时顺带完成一些任务。比如我们想看下模型在运行期间每一层的shape变化:
import torch
import torch.fx
from torch.fx.node import Node

from typing import Dict

class ShapeProp:
    """
    Shape propagation. This class takes a `GraphModule`.
    Then, its `propagate` method executes the `GraphModule`
    node-by-node with the given arguments. As each operation
    executes, the ShapeProp class stores away the shape and
    element type for the output values of each operation on
    the `shape` and `dtype` attributes of the operation's
    `Node`.
    """
    def __init__(self, mod):
        self.mod = mod
        self.graph = mod.graph
        self.modules = dict(self.mod.named_modules())

    def propagate(self, *args):
        args_iter = iter(args)
        env : Dict[str, Node] = {}

        def load_arg(a):
            return torch.fx.graph.map_arg(a, lambda n: env[n.name])

        def fetch_attr(target : str):
            target_atoms = target.split('.')
            attr_itr = self.mod
            for i, atom in enumerate(target_atoms):
                if not hasattr(attr_itr, atom):
                    raise RuntimeError(f"Node referenced nonexistant target {'.'.join(target_atoms[:i])}")
                attr_itr = getattr(attr_itr, atom)
            return attr_itr

        for node in self.graph.nodes:
            if node.op == 'placeholder':
                result = next(args_iter)
            elif node.op == 'get_attr':
                result = fetch_attr(node.target)
            elif node.op == 'call_function':
                result = node.target(*load_arg(node.args), **load_arg(node.kwargs))
            elif node.op == 'call_method':
                self_obj, *args = load_arg(node.args)
                kwargs = load_arg(node.kwargs)
                result = getattr(self_obj, node.target)(*args, **kwargs)
            elif node.op == 'call_module':
                result = self.modules[node.target](*load_arg(node.args), **load_arg(node.kwargs))

            # This is the only code specific to shape propagation.
            # you can delete this `if` branch and this becomes
            # a generic GraphModule interpreter.
            if isinstance(result, torch.Tensor):
                node.shape = result.shape
                node.dtype = result.dtype

            env[node.name] = result

        return load_arg(self.graph.result)
上述的propagate函数很简单,遍历一遍node然后记录信息到node.shape和node.dtype中。FX也提供了interpreter类,存放了一些util的function,我们直接继承就可以使用(类似于上面这个ShapeProp)。
Transformer就是对torch.nn.Module做一些变换,这些变换我们可以封装成一个函数或者写到类里头,其实Transformer也可以叫做PASS,总之就是对网络进行一些修改。比如这样:
import torch
import torch.fx

def transform(m: nn.Module,
              tracer_class : type = torch.fx.Tracer) -> torch.nn.Module:
    # Step 1: Acquire a Graph representing the code in `m`

    # trace nn.Module
    graph : torch.fx.Graph = tracer_class().trace(m)

    # Step 2: 这里对Graph进行修改
    graph = ...

    # Step 3: Construct a Module to return
    return torch.fx.GraphModule(m, graph)
Your transform will take in an torch.nn.Module, acquire a Graph from it, do some modifications, and return a new torch.nn.Module. You should think of the torch.nn.Module that your FX transform returns as identical to a regular torch.nn.Module – you can pass it to another FX transform, you can pass it to TorchScript, or you can run it. Ensuring that the inputs and outputs of your FX transform are a torch.nn.Module will allow for composability.
当然也可以直接修改GraphModule,没必要非要返回一个新的:
import torch
import torch.fx

def transform(m : nn.Module) -> nn.Module:
    gm : torch.fx.GraphModule = torch.fx.symbolic_trace(m)

    # 这里修改 gm.graph
    # <...>

    # Recompile the forward() method of `gm` from its Graph
    gm.recompile()

    return gm
需要注意,gm.recompile()这句必须是要加上的,我们修改graph后,需要recompile来重新生成forward代码。
铺垫了那么多,简单举一个FX的实际例子吧,这里我们用FX去量化一个基于CenterNet框架的目标检测模型,backbone使用的是Resnet50,限于篇幅,本篇只介绍trace完模型和fuse的部分,量化和导出trt之后的文章再说。
首先搭建CenterNet模型,然后进行trace:
model = FXCenterNet()
tracer = Tracer()
graph_module = GraphModule(model, tracer.trace(model))
其中trace的函数如下,大概就是遍历model中的操作,按照规则转换为node存放到graph中,包含attr和op、输入输出等信息,最终返回graph这个IR结构:
@compatibility(is_backward_compatible=True)
def trace(self, root: Union[torch.nn.Module, Callable[..., Any]], concrete_args: Optional[Dict[str, Any]] = None) -> Graph:
    # root FXCenterNet
    if isinstance(root, torch.nn.Module):
        self.root = root
        fn = type(root).forward
        self.submodule_paths = {mod: name for name, mod in root.named_modules()}
    else:
        self.root = torch.nn.Module()
        fn = root

    tracer_cls: Optional[Type['Tracer']] = getattr(self, '__class__', None)
    self.graph = Graph(tracer_cls=tracer_cls)
    # 这里大概就是遍历root中的操作,按照规则转换为node存放到graph中,
    # 包含attr和op、输入输出等信息,最终返回graph这个IR结构
    ...
    return self.graph
生成的self.graph类型是torch.fx.graph.Graph。
self.graph
<torch.fx.graph.Graph object at 0x7f57f59efdf0>
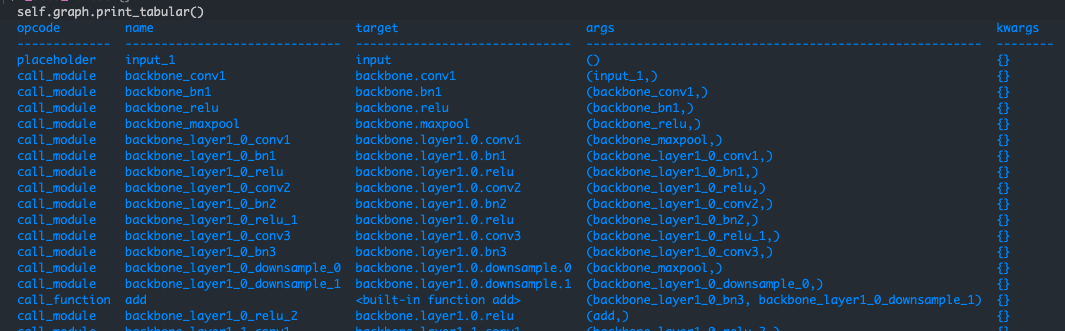
调用self.graph.print_tabular()打印graph的node信息,可以看到熟悉的resnet-50-backbone的结构,以IR的形式组织起来:
生成graph后,开始组装GraphModule,GraphModule是由graph生成的,GraphModule会把graph的node中的参数和模块信息复制一份到自己:
@compatibility(is_backward_compatible=True)
class GraphModule(torch.nn.Module):
    def __new__(cls: 'Type[GraphModule]', *args, **kwargs):
        for t in cls.__mro__:
            c = t.__qualname__.split('.')[-1]
            if c != 'GraphModuleImpl':
                cls = t
                break

        class GraphModuleImpl(cls):  # type: ignore[misc, valid-type]
            pass
        return super().__new__(GraphModuleImpl)

    @compatibility(is_backward_compatible=True)
    def __init__(self,
                 root: Union[torch.nn.Module, Dict[str, Any]],
                 graph: Graph,
                 class_name: str = 'GraphModule'):
        super().__init__()
        self.__class__.__name__ = class_name
        if isinstance(root, torch.nn.Module):
            if hasattr(root, 'training'):
                self.training = root.training
            # 这里拷贝graph中的参数信息和模块信息到self也就是GraphModule中
            for node in graph.nodes:
                if node.op in ['get_attr', 'call_module']:
                    assert isinstance(node.target, str)
                    _copy_attr(root, self, node.target)
        elif isinstance(root, dict):
            targets_to_copy = []
            for node in graph.nodes:
                if node.op in ['get_attr', 'call_module']:
                    assert isinstance(node.target, str)
                    if node.target not in root:
                        raise RuntimeError('Node ' + str(node) + ' referenced target ' + node.target +
                                           ' but that target was not provided in ``root``!')
                    targets_to_copy.append(node.target)
            targets_to_copy.sort(key=lambda t: t.count('.'))
            for target_to_copy in targets_to_copy:
                _assign_attr(root[target_to_copy], self, target_to_copy)
        else:
            raise RuntimeError('Unsupported type ' + str(root) + ' passed for root!')

        self.graph = graph
        self._tracer_cls = None
        if self.graph._tracer_cls and '<locals>' not in self.graph._tracer_cls.__qualname__:
            self._tracer_cls = self.graph._tracer_cls
    __jit_unused_properties__ = ['graph']
最终graph_module中包含了生成的代码,通过print(graph_module.code)打印出来:
def forward(self, input):
    input_1 = input
    upsampler_deconv_layers_0_bias = getattr(self.upsampler.deconv_layers, "0").bias
    ...
    head_angle_0 = getattr(self.head.angle, "0")(upsampler_deconv_layers_11);  upsampler_deconv_layers_11 = None
    head_angle_1 = getattr(self.head.angle, "1")(head_angle_0);  head_angle_0 = None
    head_angle_2 = getattr(self.head.angle, "2")(head_angle_1);  head_angle_1 = None
    return {'hm': head_hm_2, 'wh': head_wh_2, 'reg': head_reg_2, 'angle': head_angle_2}
这个时候我们就有了trace后的Module,这个Module和原始模型并没有区别,forward函数也是按照原始模型的forward生成的。因为我们只是简单地trace了一遍,所以相同输入结果也是一样的:graph_module(input) == original_model(input),毕竟没干啥特殊的。
接下来就是fuse,这里直接调用FX提供的fuse函数,其实里头也就是调用了Fuser:
def _fuse_fx(
    graph_module: GraphModule,
    is_qat: bool,
    fuse_custom_config_dict: Optional[Dict[str, Any]] = None,
    backend_config_dict: Optional[Dict[str, Any]] = None,
) -> GraphModule:
    r""" Internal helper function to fuse modules in preparation for quantization

    Args:
        graph_module: GraphModule object from symbolic tracing (torch.fx.symbolic_trace)
    """
    _check_is_graph_module(graph_module)
    fuser = Fuser()
    return fuser.fuse(
        graph_module, is_qat, fuse_custom_config_dict, backend_config_dict)
来看看Fuser都干了啥,其实很简单,就是遍历一遍input_graph = model.graph中的node,然后根据指定好的fuse规则进行融合,融合会涉及到修改graph结构:
class Fuser:
    def fuse(
        self,
        model: GraphModule,
        is_qat: bool,
        fuse_custom_config_dict: Optional[Dict[str, Any]] = None,
        backend_config_dict: Optional[Dict[str, Any]] = None,
    ) -> GraphModule:
        if fuse_custom_config_dict is None:
            fuse_custom_config_dict = {}

        input_root = model
        input_graph = model.graph
        # 这里首先copy 原始模型中的named_modules中,之后会根据fuse情况进行修改
        self.modules = dict(input_root.named_modules())
        ...
        # 这里查找匹配的fuse pattern
        fusion_pairs = self._find_matches(
            input_root, input_graph, fusion_pattern_to_fuse_handler_cls)
        self.fused_graph = Graph()
        env: Dict[Any, Any] = {}

        def load_arg(a):
            return map_arg(a, lambda node: env[node.name])

        def get_root_node(node_pattern):
            while not isinstance(node_pattern[-1], Node):
                node_pattern = node_pattern[-1]
            return node_pattern[-1]

        for node in input_graph.nodes:
            maybe_last_node, pattern, matched_node_pattern, obj = \
                fusion_pairs.get(node.name, (None, None, None, None))
            if maybe_last_node is node:
                assert obj is not None
                # TODO: currently we hard code the root node, which only works for
                # a sequence of ops and assume the root node is the last node,
                # we want to make this more general to support more complex patterns
                root_node = get_root_node(matched_node_pattern)  # 寻找fuse的根node
                env[node.name] = obj.fuse( # 这里将self传入,对self进行修改
                    self, load_arg, root_node, matched_node_pattern,  # type: ignore[arg-type]
                    fuse_custom_config_dict, fuser_method_mapping, is_qat)
            elif maybe_last_node is None:
                env[node.name] = self.fused_graph.node_copy(node, load_arg)
            # node matched in patterns and is not root is removed here

        preserved_attributes = set(fuse_custom_config_dict.get("preserved_attributes", []))
        model = FusedGraphModule(input_root, self.fused_graph, preserved_attributes)
        return model

    def _find_matches(
            self, root: GraphModule, graph: Graph,
            patterns: Dict[Pattern, Callable]
    ) -> Dict[str, Tuple[Node, Pattern, NodePattern, FuseHandler]]:
        modules = dict(root.named_modules())
        match_map : Dict[str, Tuple[Node, Pattern, NodePattern, FuseHandler]] = {}  # node name -> (root_node, match_value)

        def apply_match(pattern, node, match, matched_node_pattern):
            if isinstance(pattern, tuple):
                s, *args = pattern
                current_node_pattern: List[Node] = []
                apply_match(s, node, match, current_node_pattern)
                for subpattern, arg in zip(args, node.args):
                    apply_match(subpattern, arg, match, current_node_pattern)
                matched_node_pattern.append(tuple(current_node_pattern))
            else:
                # the first pattern matches will take precedence
                if node.name not in match_map:
                    matched_node_pattern.append(node)
                    root_node, pattern, handler = match
                    match_map[node.name] = (root_node, pattern, matched_node_pattern, handler)
        # 这里就是match过程
        for node in reversed(graph.nodes):
            if node.name not in match_map:
                for pattern, value in patterns.items():
                    matched_node_pattern: List[Node] = []
                    if is_match(modules, node, pattern):
                        apply_match(pattern, node, (node, pattern, value(self, node)), matched_node_pattern)

        return match_map
至于定义了哪些fuse的规则,可以在pytorch/torch/ao/quantization/fx/fusion_patterns.py这里头找到:
# /ao/quantization/fx/fusion_patterns.py
@register_fusion_pattern((torch.nn.ReLU, torch.nn.Conv1d))
@register_fusion_pattern((torch.nn.ReLU, torch.nn.Conv2d))
@register_fusion_pattern((torch.nn.ReLU, torch.nn.Conv3d))
@register_fusion_pattern((torch.nn.functional.relu, torch.nn.Conv1d))
@register_fusion_pattern((torch.nn.functional.relu, torch.nn.Conv2d))
@register_fusion_pattern((torch.nn.functional.relu, torch.nn.Conv3d))
@register_fusion_pattern((torch.nn.BatchNorm1d, torch.nn.Conv1d))
@register_fusion_pattern((torch.nn.BatchNorm2d, torch.nn.Conv2d))
@register_fusion_pattern((torch.nn.BatchNorm3d, torch.nn.Conv3d))
@register_fusion_pattern((torch.nn.ReLU, (torch.nn.BatchNorm1d, torch.nn.Conv1d)))
@register_fusion_pattern((torch.nn.ReLU, (torch.nn.BatchNorm2d, torch.nn.Conv2d)))
@register_fusion_pattern((torch.nn.ReLU, (torch.nn.BatchNorm3d, torch.nn.Conv3d)))
@register_fusion_pattern((torch.nn.functional.relu, (torch.nn.BatchNorm1d, torch.nn.Conv1d)))
@register_fusion_pattern((torch.nn.functional.relu, (torch.nn.BatchNorm2d, torch.nn.Conv2d)))
@register_fusion_pattern((torch.nn.functional.relu, (torch.nn.BatchNorm3d, torch.nn.Conv3d)))
@register_fusion_pattern((torch.nn.BatchNorm1d, torch.nn.Linear))
class DefaultFuseHandler(FuseHandler):
    def __init__(
            self,
            quantizer: QuantizerCls,
            node: Node):
        super().__init__(quantizer, node)

    def fuse(...):
        # 这里执行实际的融合操作
具体的融合操作在DefaultFuseHandler类中的fuse方法内执行,找到对应的fuser_method,然后调用,返回融合后的fused_module使用setattr来修改网络的modules,同样也会通过node_copy修改graph中的node:
matched_module_types = get_matched_types(matched_modules)
module_parent_name, module_name = _parent_name(root_node.target)
fuser_method = get_fuser_method_new(matched_module_types, fuser_method_mapping)
# TODO: change the signature for fuser_method to take matched module patterns
# as input
fused_module = fuser_method(is_qat, *matched_modules)
# TODO: maybe add a pass to cleanup bn modules?
setattr(quantizer.modules[module_parent_name], module_name, fused_module) # 往fuse控制的新模型中加入 新的modules
return quantizer.fused_graph.node_copy(root_node, load_arg)                # 往fuse控制的新graph中加入forward参数
其中,Conv+bn+relu的融合细节会调用pytorch/torch/ao/quantization/fuser_method_mappings.py中的fuse_conv_bn_relu函数:
def fuse_conv_bn_relu(is_qat, conv, bn, relu):
    assert(conv.training == bn.training == relu.training),\
        "Conv and BN both must be in the same mode (train or eval)."
    fused_module : Optional[Type[nn.Sequential]] = None
    map_to_fused_module_eval = {
        nn.Conv1d: nni.ConvReLU1d,
        nn.Conv2d: nni.ConvReLU2d,
        nn.Conv3d: nni.ConvReLU3d,
    }
    fused_module = map_to_fused_module_eval.get(type(conv), None)
    if fused_module is not None:
        fused_conv = nn.utils.fusion.fuse_conv_bn_eval(conv, bn)
        return fused_module(fused_conv, relu)
    else:
        raise NotImplementedError("Cannot fuse eval modules: {}".format((conv, bn, relu)))
上述fused_module为torch.nn.intrinsic.modules.fused.ConvReLU2d类,会调用fuse_conv_bn_eval来实际吸bn到conv:
def fuse_conv_bn_eval(conv, bn, transpose=False):
    assert(not (conv.training or bn.training)), "Fusion only for eval!"
    fused_conv = copy.deepcopy(conv)

    fused_conv.weight, fused_conv.bias = \
        fuse_conv_bn_weights(fused_conv.weight, fused_conv.bias,
                             bn.running_mean, bn.running_var, bn.eps, bn.weight, bn.bias, transpose)

    return fused_conv

def fuse_conv_bn_weights(conv_w, conv_b, bn_rm, bn_rv, bn_eps, bn_w, bn_b, transpose=False):
    if conv_b is None:
        conv_b = torch.zeros_like(bn_rm)
    if bn_w is None:
        bn_w = torch.ones_like(bn_rm)
    if bn_b is None:
        bn_b = torch.zeros_like(bn_rm)
    bn_var_rsqrt = torch.rsqrt(bn_rv + bn_eps)

    if transpose:
        shape = [1, -1] + [1] * (len(conv_w.shape) - 2)
    else:
        shape = [-1, 1] + [1] * (len(conv_w.shape) - 2)

    conv_w = conv_w * (bn_w * bn_var_rsqrt).reshape(shape)
    conv_b = (conv_b - bn_rm) * bn_var_rsqrt * bn_w + bn_b

    return torch.nn.Parameter(conv_w), torch.nn.Parameter(conv_b)
吸完后,得到新的conv,然后带入ConvReLU2d类。
class ConvReLU2d(_FusedModule):
    r"""This is a sequential container which calls the Conv2d and ReLU modules.
    During quantization this will be replaced with the corresponding fused module."""
    def __init__(self, conv, relu):
        assert type(conv) == Conv2d and type(relu) == ReLU, \
            'Incorrect types for input modules{}{}'.format(
                type(conv), type(relu))
        super().__init__(conv, relu)
整体流程就是conv + bn->conv然后conv + relu -> ConvReLU2d。
fuse后的code就清爽很多了,bn和relu都被融合进去了(当然还有其他融合):
def forward(self, input):
    input_1 = input
    backbone_conv1 = self.backbone.conv1(input_1)
    backbone_maxpool = self.backbone.maxpool(backbone_relu)
    backbone_layer1_0_conv1 = getattr(self.backbone.layer1, "0").conv1(backbone_maxpool)
    backbone_layer1_0_conv2 = getattr(self.backbone.layer1, "0").conv2(backbone_layer1_0_relu)
    backbone_layer1_0_conv3 = getattr(self.backbone.layer1, "0").conv3(backbone_layer1_0_relu_1)
    ...
    head_reg_0 = getattr(self.head.reg, "0")(upsampler_deconv_layers_11)
    head_reg_2 = getattr(self.head.reg, "2")(head_reg_1)
    head_angle_0 = getattr(self.head.angle, "0")(upsampler_deconv_layers_11)
    head_angle_2 = getattr(self.head.angle, "2")(head_angle_1)
    return {'hm': head_hm_2, 'wh': head_wh_2, 'reg': head_reg_2, 'angle': head_angle_2}
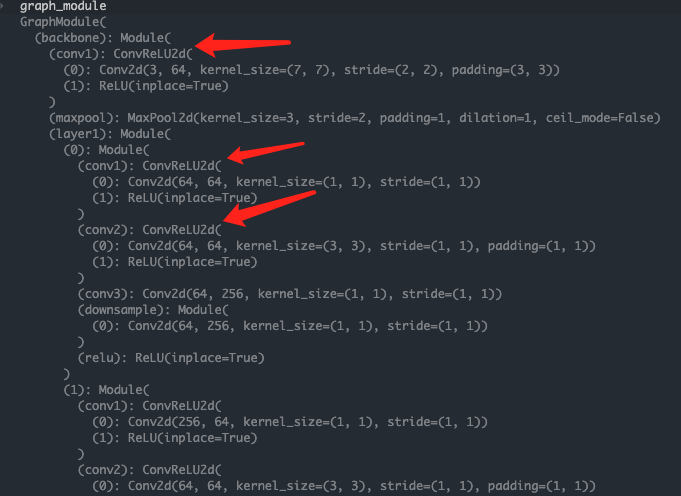
至此,就得到了trace后和fuse后的模型,可以看到融合后的ConvReLU2d模块。
这个GraphModule和torch.nn.module的使用方式一模一样,可以简单输入一个image验证一下。
下一篇中我们会对这个GraphModule进行量化操作。
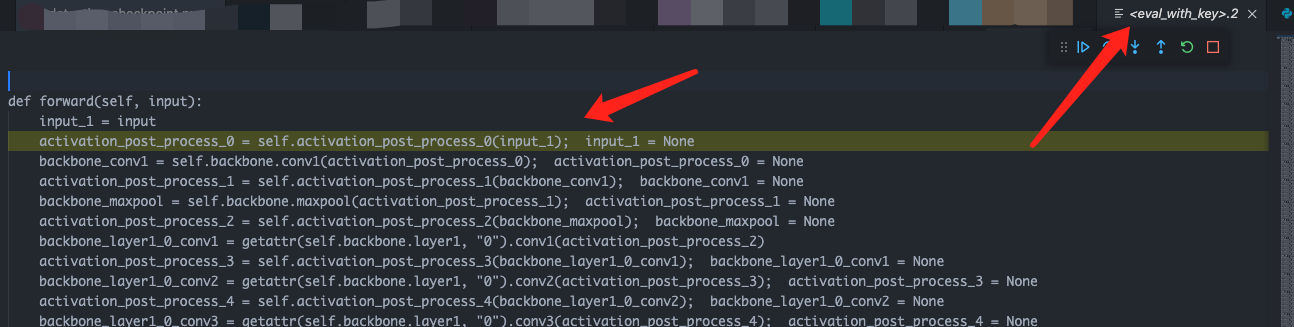
那么我们得到了最终的GraphModule,该如何debug呢,也就是一步一步单独调试。这也是有办法的,调试fx生成model的方式有三种:
我们是可以进入FX的Generated Code中的,也可以设置断点:
因为graph中的node包含了指定逻辑,GraphModule中包含了模型权重等信息,而这些权重信息是通过原始的Module获取的,那么我们可以直接将生成的code放到原始Module子类的forward中,组成一个新的Module来调用。
# Assume that `traced` is a GraphModule that has undergone some
# number of transforms

# Copy this code for later
print(traced)
# Print the code generated from symbolic tracing. This outputs:
"""
def forward(self, y):
    x = self.x
    add_1 = x + y;  x = y = None
    return add_1
"""

# 这里继承原始的Module
class SubclassM(M):
    def __init__(self):
        super().__init__()

    # 把生成的代码粘到这里
    def forward(self, y):
        x = self.x
        add_1 = x + y;  x = y = None
        return add_1

# Create an instance of the original, untraced Module. Then, create an
# instance of the Module with the copied `forward` function. We can
# now compare the output of both the original and the traced version.
pre_trace = M()
post_trace = SubclassM()
是不是很符合常识!
to_folder函数就像之前例子里说到的,GraphModule.to_folder()是一个神奇的函数,可以直接将FX生成的module导出为一个文件夹,文件夹中包含了模型需要的参数(.pt格式)和模型的定义。
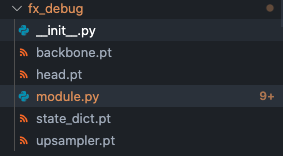
而module.py的代码也帮你生成好了:
# 导出的module.py中
import torch
from torch.nn import *
class FusedModel(torch.nn.Module):
    def __init__(self):
        super().__init__()
        # 这里加载权重参数信息
        self.backbone = torch.load(r'fx_debug/backbone.pt')
        self.load_state_dict(torch.load(r'fx_debug/state_dict.pt'))
        ...

    def forward(self, input):
        # 这里就是生成的code部分,也帮你写到forward中了
        input_1 = input
        backbone_conv1 = self.backbone.conv1(input_1)
        backbone_maxpool = self.backbone.maxpool(backbone_relu)
        backbone_layer1_0_conv1 = getattr(self.backbone.layer1, "0").conv1(backbone_maxpool)
        ...
        head_angle_0 = getattr(self.head.angle, "0")(upsampler_deconv_layers_11)
        head_angle_2 = getattr(self.head.angle, "2")(head_angle_1)
        return {'hm': head_hm_2, 'wh': head_wh_2, 'reg': head_reg_2, 'angle': head_angle_2}
是不是很强大?!
我们也可以修改这个生成的代码来做其他方面的实验(不过这个导出有一些bug,不知道是不是我使用姿势不对)。
torch.fx也是有一些限制的(毕竟不可能十全十美)。
因为Symbolic execution的限制。
Proxy object cannot be iterated. This can be attempted when the Proxy is used in a loop or as a *args or **kwargs function argument. See the torch.fx docs on pytorch.org for a more detailed explanation of what types of control flow can be traced, and check out the Proxy docstring for help troubleshooting Proxy iteration errors
The main limitation of symbolic tracing is it does not currently support dynamic control flow. That is, loops or if statements where the condition may depend on the input values of the program.
更详细的限制可以看官方的介绍:
就先写到这里吧,关于FX的功能使用更多是在量化过程中体现了,下一篇的量化实操中,会结合量化过程来理解FX,同时也会总结下PTQ量化的流程和注意点,我是老潘,我们下一篇再见~
很好奇,就使用rubyonrails自动化单元测试而言,你们正在做什么?您是否创建了一个脚本来在cron中运行rake作业并将结果邮寄给您?git中的预提交Hook?只是手动调用?我完全理解测试,但想知道在错误发生之前捕获错误的最佳实践是什么。让我们理所当然地认为测试本身是完美无缺的,并且可以正常工作。下一步是什么以确保他们在正确的时间将可能有害的结果传达给您? 最佳答案 不确定您到底想听什么,但是有几个级别的自动代码库控制:在处理某项功能时,您可以使用类似autotest的内容获得关于哪些有效,哪些无效的即时反馈。要确保您的提
我有一个模型:classItem项目有一个属性“商店”基于存储的值,我希望Item对象对特定方法具有不同的行为。Rails中是否有针对此的通用设计模式?如果方法中没有大的if-else语句,这是如何干净利落地完成的? 最佳答案 通常通过Single-TableInheritance. 关于ruby-on-rails-Rails-子类化模型的设计模式是什么?,我们在StackOverflow上找到一个类似的问题: https://stackoverflow.co
我正在使用这个:4.times{|i|assert_not_equal("content#{i+2}".constantize,object.first_content)}我之前声明过局部变量content1content2content3content4content5我得到的错误NameError:wrongconstantnamecontent2这个错误是什么意思?我很确定我想要content2=\ 最佳答案 你必须用一个大字母来调用ruby常量:Content2而不是content2。Aconstantnamestart
我需要从一个View访问多个模型。以前,我的links_controller仅用于提供以不同方式排序的链接资源。现在我想包括一个部分(我假设)显示按分数排序的顶级用户(@users=User.all.sort_by(&:score))我知道我可以将此代码插入每个链接操作并从View访问它,但这似乎不是“ruby方式”,我将需要在不久的将来访问更多模型。这可能会变得很脏,是否有针对这种情况的任何技术?注意事项:我认为我的应用程序正朝着单一格式和动态页面内容的方向发展,本质上是一个典型的网络应用程序。我知道before_filter但考虑到我希望应用程序进入的方向,这似乎很麻烦。最终从任何
我有一个包含模块的模型。我想在模块中覆盖模型的访问器方法。例如:classBlah这显然行不通。有什么想法可以实现吗? 最佳答案 您的代码看起来是正确的。我们正在毫无困难地使用这个确切的模式。如果我没记错的话,Rails使用#method_missing作为属性setter,因此您的模块将优先,阻止ActiveRecord的setter。如果您正在使用ActiveSupport::Concern(参见thisblogpost),那么您的实例方法需要进入一个特殊的模块:classBlah
我有一个表单,其中有很多字段取自数组(而不是模型或对象)。我如何验证这些字段的存在?solve_problem_pathdo|f|%>... 最佳答案 创建一个简单的类来包装请求参数并使用ActiveModel::Validations。#definedsomewhere,atthesimplest:require'ostruct'classSolvetrue#youcouldevencheckthesolutionwithavalidatorvalidatedoerrors.add(:base,"WRONG!!!")unlesss
我想向我的Controller传递一个参数,它是一个简单的复选框,但我不知道如何在模型的form_for中引入它,这是我的观点:{:id=>'go_finance'}do|f|%>Transferirde:para:Entrada:"input",:placeholder=>"Quantofoiganho?"%>Saída:"output",:placeholder=>"Quantofoigasto?"%>Nota:我想做一个额外的复选框,但我该怎么做,模型中没有一个对象,而是一个要检查的对象,以便在Controller中创建一个ifelse,如果没有检查,请帮助我,非常感谢,谢谢
我有一些非常大的模型,我必须将它们迁移到最新版本的Rails。这些模型有相当多的验证(User有大约50个验证)。是否可以将所有这些验证移动到另一个文件中?说app/models/validations/user_validations.rb。如果可以,有人可以提供示例吗? 最佳答案 您可以为此使用关注点:#app/models/validations/user_validations.rbrequire'active_support/concern'moduleUserValidationsextendActiveSupport:
对于Rails模型,是否可以/建议让一个类的成员不持久保存到数据库中?我想将用户最后选择的类型存储在session变量中。由于我无法从我的模型中设置session变量,我想将值存储在一个“虚拟”类成员中,该成员只是将值传递回Controller。你能有这样的类(class)成员吗? 最佳答案 将非持久属性添加到Rails模型就像任何其他Ruby类一样:classUser扩展解释:在Ruby中,所有实例变量都是私有(private)的,不需要在赋值前定义。attr_accessor创建一个setter和getter方法:classUs
我有一个正在构建的应用程序,我需要一个模型来创建另一个模型的实例。我希望每辆车都有4个轮胎。汽车模型classCar轮胎模型classTire但是,在make_tires内部有一个错误,如果我为Tire尝试它,则没有用于创建或新建的activerecord方法。当我检查轮胎时,它没有这些方法。我该如何补救?错误是这样的:未定义的方法'create'forActiveRecord::AttributeMethods::Serialization::Tire::Module我测试了两个环境:测试和开发,它们都因相同的错误而失败。 最佳答案