Grad-CAM (Gradient-weighted Class Activation Mapping) 是一种可视化深度神经网络中哪些部分对于预测结果贡献最大的技术。它能够定位到特定的图像区域,从而使得神经网络的决策过程更加可解释和可视化。
Grad-CAM 的基本思想是,在神经网络中,最后一个卷积层的输出特征图对于分类结果的影响最大,因此我们可以通过对最后一个卷积层的梯度进行全局平均池化来计算每个通道的权重。这些权重可以用来加权特征图,生成一个 Class Activation Map (CAM),其中每个像素都代表了该像素区域对于分类结果的重要性。
相比于传统的 CAM 方法,Grad-CAM 能够处理任意种类的神经网络,因为它不需要修改网络结构或使用特定的层结构。此外,Grad-CAM 还可以用于对特征的可视化,以及对网络中的一些特定层或单元进行分析。
在Pytorch中,我们可以使用钩子 (hook) 技术,在网络中注册前向钩子和反向钩子。前向钩子用于记录目标层的输出特征图,反向钩子用于记录目标层的梯度。在本篇文章中,我们将详细介绍如何在Pytorch中实现Grad-CAM。
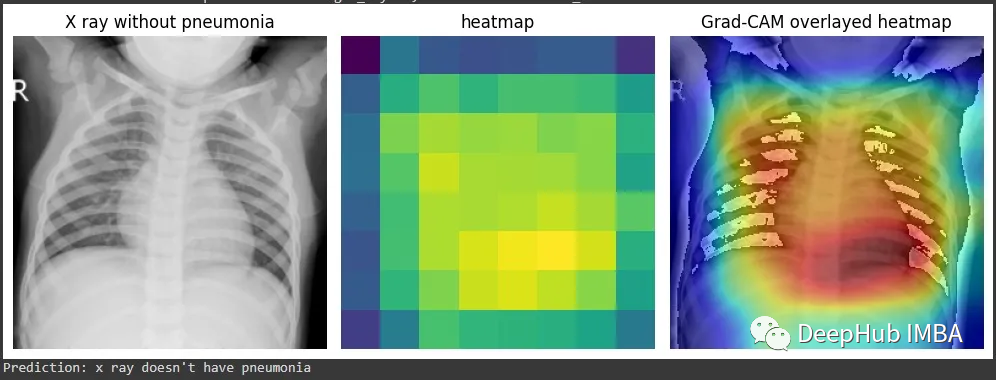
为了演示Grad-CAM的实现,我将使用来自Kaggle的胸部x射线数据集和我制作的一个预训练分类器,该分类器能够将x射线分类为是否患有肺炎。
model_path = "your/model/path/"

 # instantiate your model
 model = XRayClassifier()

 # load your model. Here we're loading on CPU since we're not going to do
 # large amounts of inference
 model.load_state_dict(torch.load(model_path, map_location=torch.device('cpu')))

 # put it in evaluation mode for inference
 model.eval()
首先我们看看这个模型的架构。就像前面提到的,我们需要识别最后一个卷积层,特别是它的激活函数。这一层表示模型学习到的最复杂的特征,它最有能力帮助我们理解模型的行为,下面是我们这个演示模型的代码:
import torch
 import torch.nn as nn
 import torch.nn.functional as F

 # hyperparameters
 nc = 3 # number of channels
 nf = 64 # number of features to begin with
 dropout = 0.2
 device = torch.device('cuda' if torch.cuda.is_available() else 'cpu')

 # setup a resnet block and its forward function
 class ResNetBlock(nn.Module):
     def __init__(self, in_channels, out_channels, stride=1):
         super(ResNetBlock, self).__init__()
         self.conv1 = nn.Conv2d(in_channels, out_channels, kernel_size=3, stride=stride, padding=1, bias=False)
         self.bn1 = nn.BatchNorm2d(out_channels)
         self.conv2 = nn.Conv2d(out_channels, out_channels, kernel_size=3, stride=1, padding=1, bias=False)
         self.bn2 = nn.BatchNorm2d(out_channels)

         self.shortcut = nn.Sequential()
         if stride != 1 or in_channels != out_channels:
             self.shortcut = nn.Sequential(
                 nn.Conv2d(in_channels, out_channels, kernel_size=1, stride=stride, bias=False),
                 nn.BatchNorm2d(out_channels)
            )

     def forward(self, x):
         out = F.relu(self.bn1(self.conv1(x)))
         out = self.bn2(self.conv2(out))
         out += self.shortcut(x)
         out = F.relu(out)
         return out

 # setup the final model structure
 class XRayClassifier(nn.Module):
     def __init__(self, nc=nc, nf=nf, dropout=dropout):
         super(XRayClassifier, self).__init__()

         self.resnet_blocks = nn.Sequential(
             ResNetBlock(nc,   nf,    stride=2), # (B, C, H, W) -> (B, NF, H/2, W/2), i.e., (64,64,128,128)
             ResNetBlock(nf,   nf*2,  stride=2), # (64,128,64,64)
             ResNetBlock(nf*2, nf*4,  stride=2), # (64,256,32,32)
             ResNetBlock(nf*4, nf*8,  stride=2), # (64,512,16,16)
             ResNetBlock(nf*8, nf*16, stride=2), # (64,1024,8,8)
        )

         self.classifier = nn.Sequential(
             nn.Conv2d(nf*16, 1, 8, 1, 0, bias=False),
             nn.Dropout(p=dropout),
             nn.Sigmoid(),
        )

     def forward(self, input):
         output = self.resnet_blocks(input.to(device))
         output = self.classifier(output)
         return output
模型3通道接收256x256的图片。它期望输入为[batch size, 3,256,256]。每个ResNet块以一个ReLU激活函数结束。对于我们的目标,我们需要选择最后一个ResNet块。
XRayClassifier(
  (resnet_blocks): Sequential(
    (0): ResNetBlock(
      (conv1): Conv2d(3, 64, kernel_size=(3, 3), stride=(2, 2), padding=(1, 1), bias=False)
      (bn1): BatchNorm2d(64, eps=1e-05, momentum=0.1, affine=True, track_running_stats=True)
      (conv2): Conv2d(64, 64, kernel_size=(3, 3), stride=(1, 1), padding=(1, 1), bias=False)
      (bn2): BatchNorm2d(64, eps=1e-05, momentum=0.1, affine=True, track_running_stats=True)
      (shortcut): Sequential(
        (0): Conv2d(3, 64, kernel_size=(1, 1), stride=(2, 2), bias=False)
        (1): BatchNorm2d(64, eps=1e-05, momentum=0.1, affine=True, track_running_stats=True)
      )
    )
    (1): ResNetBlock(
      (conv1): Conv2d(64, 128, kernel_size=(3, 3), stride=(2, 2), padding=(1, 1), bias=False)
      (bn1): BatchNorm2d(128, eps=1e-05, momentum=0.1, affine=True, track_running_stats=True)
      (conv2): Conv2d(128, 128, kernel_size=(3, 3), stride=(1, 1), padding=(1, 1), bias=False)
      (bn2): BatchNorm2d(128, eps=1e-05, momentum=0.1, affine=True, track_running_stats=True)
      (shortcut): Sequential(
        (0): Conv2d(64, 128, kernel_size=(1, 1), stride=(2, 2), bias=False)
        (1): BatchNorm2d(128, eps=1e-05, momentum=0.1, affine=True, track_running_stats=True)
      )
    )
    (2): ResNetBlock(
      (conv1): Conv2d(128, 256, kernel_size=(3, 3), stride=(2, 2), padding=(1, 1), bias=False)
      (bn1): BatchNorm2d(256, eps=1e-05, momentum=0.1, affine=True, track_running_stats=True)
      (conv2): Conv2d(256, 256, kernel_size=(3, 3), stride=(1, 1), padding=(1, 1), bias=False)
      (bn2): BatchNorm2d(256, eps=1e-05, momentum=0.1, affine=True, track_running_stats=True)
      (shortcut): Sequential(
        (0): Conv2d(128, 256, kernel_size=(1, 1), stride=(2, 2), bias=False)
        (1): BatchNorm2d(256, eps=1e-05, momentum=0.1, affine=True, track_running_stats=True)
      )
    )
    (3): ResNetBlock(
      (conv1): Conv2d(256, 512, kernel_size=(3, 3), stride=(2, 2), padding=(1, 1), bias=False)
      (bn1): BatchNorm2d(512, eps=1e-05, momentum=0.1, affine=True, track_running_stats=True)
      (conv2): Conv2d(512, 512, kernel_size=(3, 3), stride=(1, 1), padding=(1, 1), bias=False)
      (bn2): BatchNorm2d(512, eps=1e-05, momentum=0.1, affine=True, track_running_stats=True)
      (shortcut): Sequential(
        (0): Conv2d(256, 512, kernel_size=(1, 1), stride=(2, 2), bias=False)
        (1): BatchNorm2d(512, eps=1e-05, momentum=0.1, affine=True, track_running_stats=True)
      )
    )
    (4): ResNetBlock(
      (conv1): Conv2d(512, 1024, kernel_size=(3, 3), stride=(2, 2), padding=(1, 1), bias=False)
      (bn1): BatchNorm2d(1024, eps=1e-05, momentum=0.1, affine=True, track_running_stats=True)
      (conv2): Conv2d(1024, 1024, kernel_size=(3, 3), stride=(1, 1), padding=(1, 1), bias=False)
      (bn2): BatchNorm2d(1024, eps=1e-05, momentum=0.1, affine=True, track_running_stats=True)
      (shortcut): Sequential(
        (0): Conv2d(512, 1024, kernel_size=(1, 1), stride=(2, 2), bias=False)
        (1): BatchNorm2d(1024, eps=1e-05, momentum=0.1, affine=True, track_running_stats=True)
      )
    )
  )
  (classifier): Sequential(
    (0): Conv2d(1024, 1, kernel_size=(8, 8), stride=(1, 1), bias=False)
    (1): Dropout(p=0.2, inplace=False)
    (2): Sigmoid()
  )
 )
在Pytorch中,我们可以很容易地使用模型的属性进行选择。
model.resnet_blocks[-1]
 #ResNetBlock(
 # (conv1): Conv2d(512, 1024, kernel_size=(3, 3), stride=(2, 2), padding=(1, 1), bias=False)
 # (bn1): BatchNorm2d(1024, eps=1e-05, momentum=0.1, affine=True, track_running_stats=True)
 # (conv2): Conv2d(1024, 1024, kernel_size=(3, 3), stride=(1, 1), padding=(1, 1), bias=False)
 # (bn2): BatchNorm2d(1024, eps=1e-05, momentum=0.1, affine=True, track_running_stats=True)
 # (shortcut): Sequential(
 #   (0): Conv2d(512, 1024, kernel_size=(1, 1), stride=(2, 2), bias=False)
 #   (1): BatchNorm2d(1024, eps=1e-05, momentum=0.1, affine=True, track_running_stats=True)
 # )
#)Pytorch有许多钩子函数,这些函数可以处理在向前或后向传播期间流经模型的信息。我们可以使用它来检查中间梯度值,更改特定层的输出。
在这里,我们这里将关注两个方法:
register_full_backward_hook(hook, prepend=False)该方法在模块上注册了一个后向传播的钩子,当调用backward()方法时,钩子函数将会运行。后向钩子函数接收模块本身的输入、相对于层的输入的梯度和相对于层的输出的梯度
hook(module, grad_input, grad_output) -> tuple(Tensor) or None它返回一个torch.utils.hooks.RemovableHandle,可以使用这个返回值来删除钩子。我们在后面会讨论这个问题。
register_forward_hook(hook, *, prepend=False, with_kwargs=False)这与前一个非常相似,它在前向传播中后运行,这个函数的参数略有不同。它可以让你访问层的输出:
hook(module, args, output) -> None or modified output它的返回也是torch.utils.hooks.RemovableHandle
为了计算Grad-CAM,我们需要定义后向和前向钩子函数。这里的目标是关于最后一个卷积层的输出的梯度,需要它的激活,即层的激活函数的输出。钩子函数会在推理和向后传播期间为我们提取这些值。
# defines two global scope variables to store our gradients and activations
 gradients = None
 activations = None

 def backward_hook(module, grad_input, grad_output):
   global gradients # refers to the variable in the global scope
   print('Backward hook running...')
   gradients = grad_output
   # In this case, we expect it to be torch.Size([batch size, 1024, 8, 8])
   print(f'Gradients size: {gradients[0].size()}')
   # We need the 0 index because the tensor containing the gradients comes
   # inside a one element tuple.

 def forward_hook(module, args, output):
   global activations # refers to the variable in the global scope
   print('Forward hook running...')
   activations = output
   # In this case, we expect it to be torch.Size([batch size, 1024, 8, 8])
   print(f'Activations size: {activations.size()}')
在定义了钩子函数和存储激活和梯度的变量之后,就可以在感兴趣的层中注册钩子,注册的代码如下:
backward_hook = model.resnet_blocks[-1].register_full_backward_hook(backward_hook, prepend=False)
forward_hook = model.resnet_blocks[-1].register_forward_hook(forward_hook, prepend=False)现在已经为模型设置了钩子函数,让我们加载一个图像,计算gradcam。
from PIL import Image

 img_path = "/your/image/path/"
 image = Image.open(img_path).convert('RGB')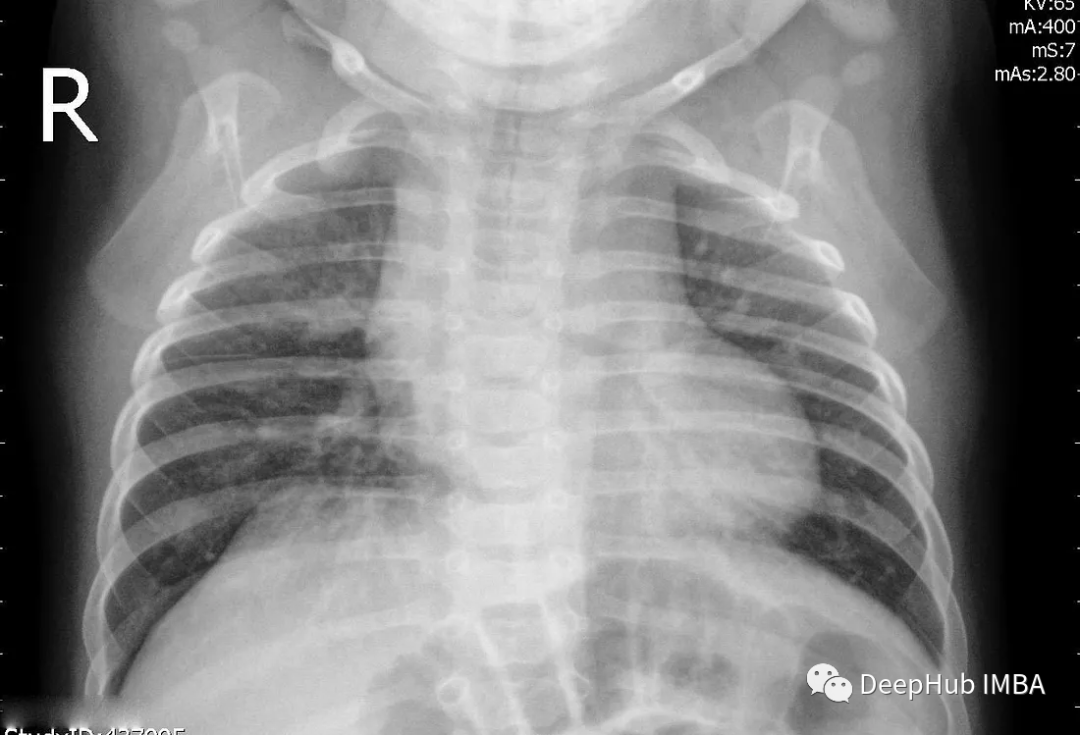
为了进行推理,我们还需要对其进行预处理:
from torchvision import transforms
 from torchvision.transforms import ToTensor

 image_size = 256
 transform = transforms.Compose([
                                transforms.Resize(image_size, antialias=True),
                                transforms.CenterCrop(image_size),
                                transforms.ToTensor(),
                                transforms.Normalize((0.5, 0.5, 0.5), (0.5, 0.5, 0.5)),
                            ])

 img_tensor = transform(image) # stores the tensor that represents the image
现在就可以进行前向传播了:
model(img_tensor.unsqueeze(0)).backward()钩子函数的返回如下:
Forward hook running...
 Activations size: torch.Size([1, 1024, 8, 8])
 Backward hook running...
 Gradients size: torch.Size([1, 1024, 8, 8])
得到了梯度和激活变量后就可以生成热图:
为了计算Grad-CAM,我们将原始论文公式进行一些简单的修改:
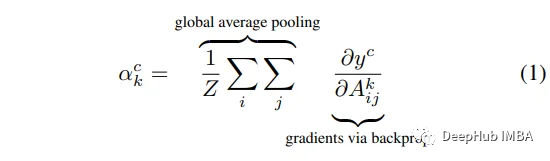
pooled_gradients = torch.mean(gradients[0], dim=[0, 2, 3])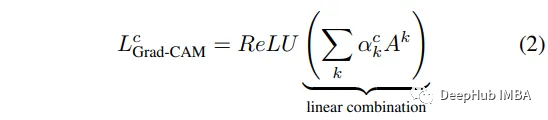
import torch.nn.functional as F
 import matplotlib.pyplot as plt

 # weight the channels by corresponding gradients
 for i in range(activations.size()[1]):
     activations[:, i, :, :] *= pooled_gradients[i]

 # average the channels of the activations
 heatmap = torch.mean(activations, dim=1).squeeze()

 # relu on top of the heatmap
 heatmap = F.relu(heatmap)

 # normalize the heatmap
 heatmap /= torch.max(heatmap)

 # draw the heatmap
 plt.matshow(heatmap.detach())
结果如下:
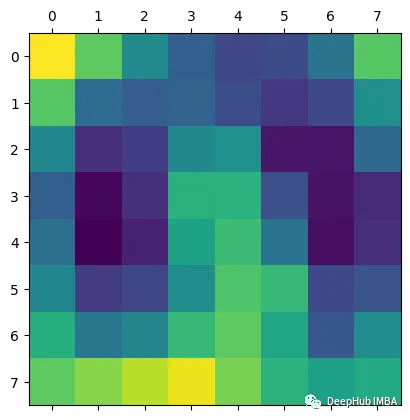
得到的激活包含1024个特征映射,这些特征映射捕获输入图像的不同方面,每个方面的空间分辨率为8x8。通过钩子获得的梯度表示每个特征映射对最终预测的重要性。通过计算梯度和激活的元素积可以获得突出显示图像最相关部分的特征映射的加权和。通过计算加权特征图的全局平均值,可以得到一个单一的热图,该热图表明图像中对模型预测最重要的区域。这就是Grad-CAM,它提供了模型决策过程的可视化解释,可以帮助我们解释和调试模型的行为。
但是这个图能代表什么呢?我们将他与图片进行整合就能更加清晰的可视化了。
下面的代码将原始图像和我们生成的热图进行整合显示:
from torchvision.transforms.functional import to_pil_image
 from matplotlib import colormaps
 import numpy as np
 import PIL

 # Create a figure and plot the first image
 fig, ax = plt.subplots()
 ax.axis('off') # removes the axis markers

 # First plot the original image
 ax.imshow(to_pil_image(img_tensor, mode='RGB'))

 # Resize the heatmap to the same size as the input image and defines
 # a resample algorithm for increasing image resolution
 # we need heatmap.detach() because it can't be converted to numpy array while
 # requiring gradients
 overlay = to_pil_image(heatmap.detach(), mode='F')
                      .resize((256,256), resample=PIL.Image.BICUBIC)

 # Apply any colormap you want
 cmap = colormaps['jet']
 overlay = (255 * cmap(np.asarray(overlay) ** 2)[:, :, :3]).astype(np.uint8)

 # Plot the heatmap on the same axes,
 # but with alpha < 1 (this defines the transparency of the heatmap)
 ax.imshow(overlay, alpha=0.4, interpolation='nearest', extent=extent)

 # Show the plot
 plt.show()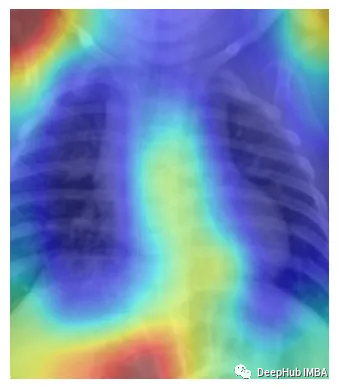
这样看是不是就理解多了。由于它是一个正常的x射线结果,所以并没有什么需要特殊说明的。
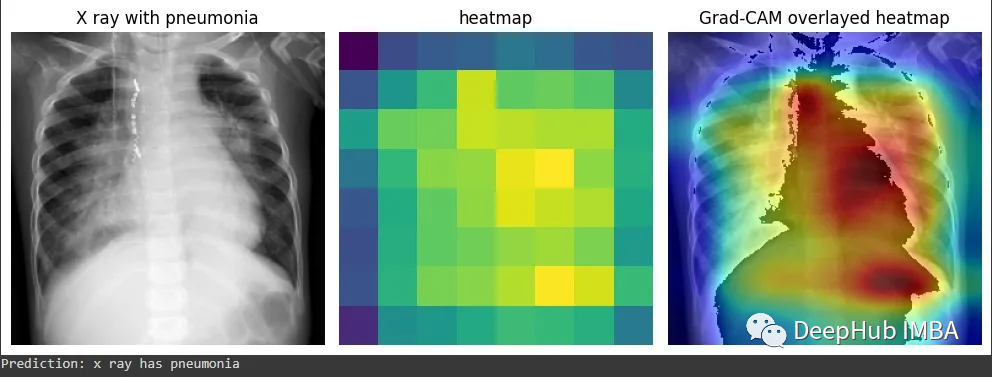
再看这个例子,这个结果中被标注的是肺炎。Grad-CAM能准确显示出医生为确定是否患有肺炎而必须检查的胸部x光片区域。也就是说我们的模型的确学到了一些东西(红色区域再肺部附近)
要从模型中删除钩子,只需要在返回句柄中调用remove()方法。
backward_hook.remove()
forward_hook.remove()这篇文章可以帮助你理清Grad-CAM 是如何工作的,以及如何用Pytorch实现它。因为Pytorch包含了强大的钩子函数,所以我们可以在任何模型中使用本文的代码。
如何在buildr项目中使用Ruby?我在很多不同的项目中使用过Ruby、JRuby、Java和Clojure。我目前正在使用我的标准Ruby开发一个模拟应用程序,我想尝试使用Clojure后端(我确实喜欢功能代码)以及JRubygui和测试套件。我还可以看到在未来的不同项目中使用Scala作为后端。我想我要为我的项目尝试一下buildr(http://buildr.apache.org/),但我注意到buildr似乎没有设置为在项目中使用JRuby代码本身!这看起来有点傻,因为该工具旨在统一通用的JVM语言并且是在ruby中构建的。除了将输出的jar包含在一个独特的、仅限ruby
在rails源中:https://github.com/rails/rails/blob/master/activesupport/lib/active_support/lazy_load_hooks.rb可以看到以下内容@load_hooks=Hash.new{|h,k|h[k]=[]}在IRB中,它只是初始化一个空哈希。和做有什么区别@load_hooks=Hash.new 最佳答案 查看rubydocumentationforHashnew→new_hashclicktotogglesourcenew(obj)→new_has
我有一个用户工厂。我希望默认情况下确认用户。但是鉴于unconfirmed特征,我不希望它们被确认。虽然我有一个基于实现细节而不是抽象的工作实现,但我想知道如何正确地做到这一点。factory:userdoafter(:create)do|user,evaluator|#unwantedimplementationdetailshereunlessFactoryGirl.factories[:user].defined_traits.map(&:name).include?(:unconfirmed)user.confirm!endendtrait:unconfirmeddoenden
我的主要目标是能够完全理解我正在使用的库/gem。我尝试在Github上从头到尾阅读源代码,但这真的很难。我认为更有趣、更温和的踏脚石就是在使用时阅读每个库/gem方法的源代码。例如,我想知道RubyonRails中的redirect_to方法是如何工作的:如何查找redirect_to方法的源代码?我知道在pry中我可以执行类似show-methodmethod的操作,但我如何才能对Rails框架中的方法执行此操作?您对我如何更好地理解Gem及其API有什么建议吗?仅仅阅读源代码似乎真的很难,尤其是对于框架。谢谢! 最佳答案 Ru
我的假设是moduleAmoduleBendend和moduleA::Bend是一样的。我能够从thisblog找到解决方案,thisSOthread和andthisSOthread.为什么以及什么时候应该更喜欢紧凑语法A::B而不是另一个,因为它显然有一个缺点?我有一种直觉,它可能与性能有关,因为在更多命名空间中查找常量需要更多计算。但是我无法通过对普通类进行基准测试来验证这一点。 最佳答案 这两种写作方法经常被混淆。首先要说的是,据我所知,没有可衡量的性能差异。(在下面的书面示例中不断查找)最明显的区别,可能也是最著名的,是你的
几个月前,我读了一篇关于rubygem的博客文章,它可以通过阅读代码本身来确定编程语言。对于我的生活,我不记得博客或gem的名称。谷歌搜索“ruby编程语言猜测”及其变体也无济于事。有人碰巧知道相关gem的名称吗? 最佳答案 是这个吗:http://github.com/chrislo/sourceclassifier/tree/master 关于ruby-寻找通过阅读代码确定编程语言的rubygem?,我们在StackOverflow上找到一个类似的问题:
我目前正在使用以下方法获取页面的源代码:Net::HTTP.get(URI.parse(page.url))我还想获取HTTP状态,而无需发出第二个请求。有没有办法用另一种方法做到这一点?我一直在查看文档,但似乎找不到我要找的东西。 最佳答案 在我看来,除非您需要一些真正的低级访问或控制,否则最好使用Ruby的内置Open::URI模块:require'open-uri'io=open('http://www.example.org/')#=>#body=io.read[0,50]#=>"["200","OK"]io.base_ur
前言作为一名程序员,自己的本质工作就是做程序开发,那么程序开发的时候最直接的体现就是代码,检验一个程序员技术水平的一个核心环节就是开发时候的代码能力。众所周知,程序开发的水平提升是一个循序渐进的过程,每一位程序员都是从“菜鸟”变成“大神”的,所以程序员在程序开发过程中的代码能力也是根据平时开发中的业务实践来积累和提升的。提高代码能力核心要素程序员要想提高自身代码能力,尤其是新晋程序员的代码能力有很大的提升空间的时候,需要针对性的去提高自己的代码能力。提高代码能力其实有几个比较关键的点,只要把握住这些方面,就能很好的、快速的提高自己的一部分代码能力。1、多去阅读开源项目,如有机会可以亲自参与开源
华为OD机试题本篇题目:明明的随机数题目输入描述输出描述:示例1输入输出说明代码编写思路最近更新的博客华为od2023|什么是华为od,od薪资待遇,od机试题清单华为OD机试真题大全,用Python解华为机试题|机试宝典【华为OD机试】全流程解析+经验分享,题型分享,防作弊指南华为o
?博客主页:https://xiaoy.blog.csdn.net?本文由呆呆敲代码的小Y原创,首发于CSDN??学习专栏推荐:Unity系统学习专栏?游戏制作专栏推荐:游戏制作?Unity实战100例专栏推荐:Unity实战100例教程?欢迎点赞?收藏⭐留言?如有错误敬请指正!?未来很长,值得我们全力奔赴更美好的生活✨------------------❤️分割线❤️-------------------------
