基本说明:基于注解的方式配置bean,主要是项目开发中的组件,比如Controller,Service和Dao
组件的注解形式有:
@Component 表示当前注解标识的是一个组件@Controller 表示当前注解标识的是一个控制器,通常用于Servlet@Service 表示当前注解标识的是一个处理业务逻辑的类,通常用于Service类@Repository 表示当前注解标识的是一个持久化层的类,通常用于Dao类应用案例:使用注解的方式来配置Controller /Service/ Repository/ Component
代码实现:
1.使用注解方式,需要引入spring-aop.jar包,该jar包位于spring/lib下
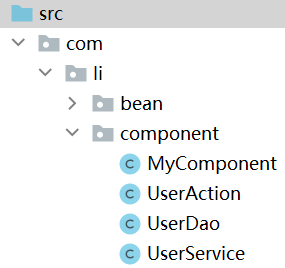
2.创建 UserAction.java、UserService.java、UserDao.java、MyComponent.java
UserDao:
package com.li.component;

import org.springframework.stereotype.Repository;

/**
 * @author 李
 * @version 1.0
 * 使用 @Repository 表示该类是一个Repository,一个持久化层的类/对象
 */
@Repository
public class UserDao {
}
UserService:
package com.li.component;

import org.springframework.stereotype.Service;

/**
 * @author 李
 * @version 1.0
 * @Service 标识该类是一个Service类/对象
 */
@Service
public class UserService {
}
UserAction:
package com.li.component;

import org.springframework.stereotype.Controller;

/**
 * @author 李
 * @version 1.0
 * @Controller 标识该类是一个控制器Controller,通常该类是一个Servlet
 */
@Controller
public class UserAction {
}
MyComponent:
package com.li.component;

import org.springframework.stereotype.Component;

/**
 * @author 李
 * @version 1.0
 * @Component 用于标识该类是一个组件,是一个通用的注解
 */

@Component
public class MyComponent {
}
上面我们在类中添加了注解,但是还没有在配置文件中指定容器要扫描哪个包下的注解类
3.配置beans04.xml:
<!--配置容器要扫描的包:
    1.component-scan 表示对指定的包下的类进行扫描,并创建对象到容器
    2.base-package 指定要扫描的包
    3.下面整个配置的含义是:当spring容器创建/初始化时,会扫描 com.li.component 包下
      的所有含有四种注解(Controller/Service/Repository/Component)的类,
      并将其实例化,生成对象,放入到ioc容器
-->
<context:component-scan base-package="com.li.component"/>
注意引入context命名空间
4.测试
//通过注解来配置Bean
@Test
public void setBeanByAnnotation() {
    ApplicationContext ioc = new ClassPathXmlApplicationContext("beans04.xml");
    System.out.println("ok");
}
在 System.out.println("ok");旁打上断点,点击debug。
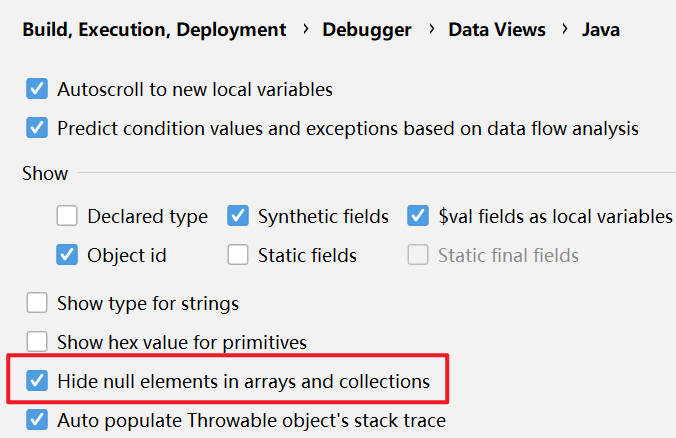
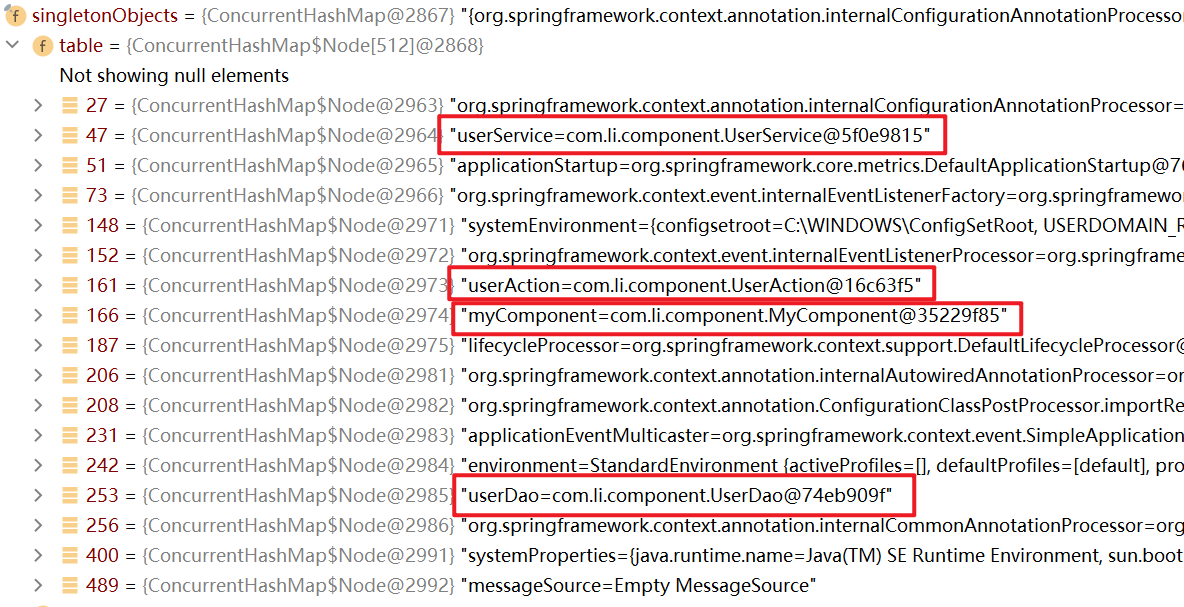
查看ioc对象-->beanFactory-->singletoObjects-->table的属性。因为table属性有很多null值,为了显示方便,这里配置了IDEA不显示null值
如下,spring容器中成功创建了四个对象,并且在默认情况下,按照注解方式进行扫描创建的对象,它对应的id就是它的类名(首字母小写)
其他的对象是系统自带的
查看类型id(key)

因为配置的这四个对象是单例对象,因此可以直接通过类的类型来获取:
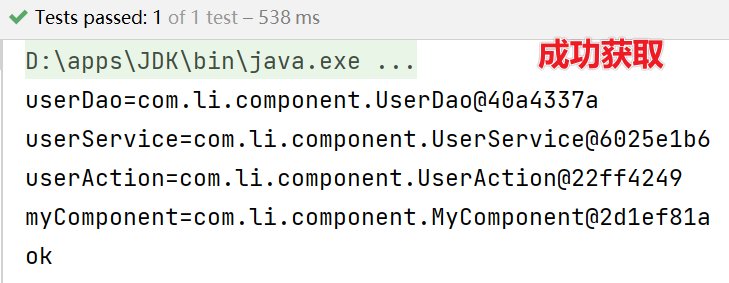
因为spring在创建时赋予了默认id,也可以通过id来获取
//通过注解来配置Bean
@Test
public void setBeanByAnnotation() {
    ApplicationContext ioc = new ClassPathXmlApplicationContext("beans04.xml");
    UserDao userDao = ioc.getBean(UserDao.class);
    UserService userService = ioc.getBean(UserService.class);
    UserAction userAction = ioc.getBean(UserAction.class);
    MyComponent myComponent = ioc.getBean(MyComponent.class);
    System.out.println("userDao=" + userDao);
    System.out.println("userService=" + userService);
    System.out.println("userAction=" + userAction);
    System.out.println("myComponent=" + myComponent);
    System.out.println("ok");
}
基于注解配置bean,需要导入spring-aop.jar包
必须在Spring配置文件中指定“自动扫描的包”,IOC容器才能够检测到当前项目中哪些类被标识了注解
(1)在配置时注意导入context名称空间
(2)指定扫描的包时,可以使用通配符,如:com.li.component.*表示扫描com.li.component包下的类, 包括com.li.component包下的子包(递归扫描)
Spring的IOC容器不能检测一个使用了@Controller注解的类到底是不是一个真正的控制器。注解的名称只是用于程序员自己识别当前标识的是什么组件。其他的注解@Service、@Reposity 也是一样。
也就是说,Spring的容器只要检测到注解就会生成对象,但是这个注解的含义spring不会识别,只是给程序员方便区分的
如果你只在spring容器上用,@Controller、@Service、@Reposity基本是等价的;如果你用在springmvc上面,它们是有区别的:彻底弄懂@Controller 、@Service、@Component
配置只扫描满足要求的类:
如下面的resource-pattern="User*.class",表示扫描指定包下以User开头的类
<context:component-scan base-package="com.li.component"
                        resource-pattern="User*.class" />
一般来说,想要扫描某个类只需要写上注解,不想扫描的类就不会写注解,因此上面这种写法不常使用
配置排除扫描的类:
如果我们希望排除某个包/子包下的某种类型的注解,可以通过exclude-filter来指定
(1)context:exclude-filter 指定要排除哪些类
(2)type 指定排除方式(annotation 表示通过注解来排除)
(3)expression 指定要排除的注解的全路径
下面的配置表示,在扫描com.li.component包下注解的类时,排除以@Service注解的类
<context:component-scan base-package="com.li.component" >
<!-- 排除哪些类, 以 annotaion注解为例(通过注解来排除) -->
<context:exclude-filter type="annotation" expression="org.springframework.stereotype.Service"/>
</context>
自定义规则指定扫描哪些注解类:
<!--如果我们希望通过自己的规则,来扫描包/子包下的某些注解类,可以通过include-filter
    1. use-default-filters="false": 表示不使用默认的过滤/扫描机制
    2. context:include-filter: 表示只是扫描指定的注解的类
    3. type="annotation" 表示按照注解方式来扫描
    4. expression="org.springframework.stereotype.Controller" 指定要扫描的注解的全类路径
 -->
<context:component-scan base-package="com.li.component" use-default-filters="false">
    <context:include-filter type="annotation" expression="org.springframework.stereotype.Service"/>
    <context:include-filter type="annotation" expression="org.springframework.stereotype.Controller"/>
</context:component-scan>
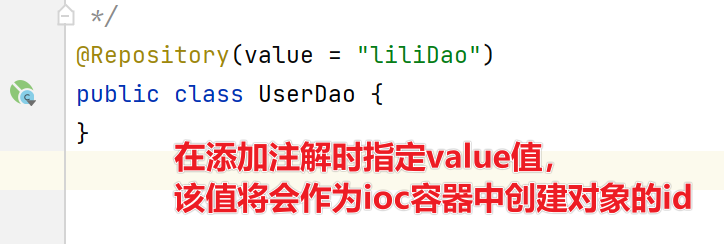
在默认情况下,注解标识的类创建对象后,在容器中它默认对应的id就是它的类名(首字母小写)
也可以使用注解的value属性指定 id 值,并且 value 可以省略:

自己写一个简单的Spring容器,通过读取类的注解(@Component、@Controller、@Service、@Repository),将对象注入到IOC容器。即不使用Spring原生框架,我们自己使用IO+Annotation+反射+集合实现,加深对Spring注解方式开发的理解。
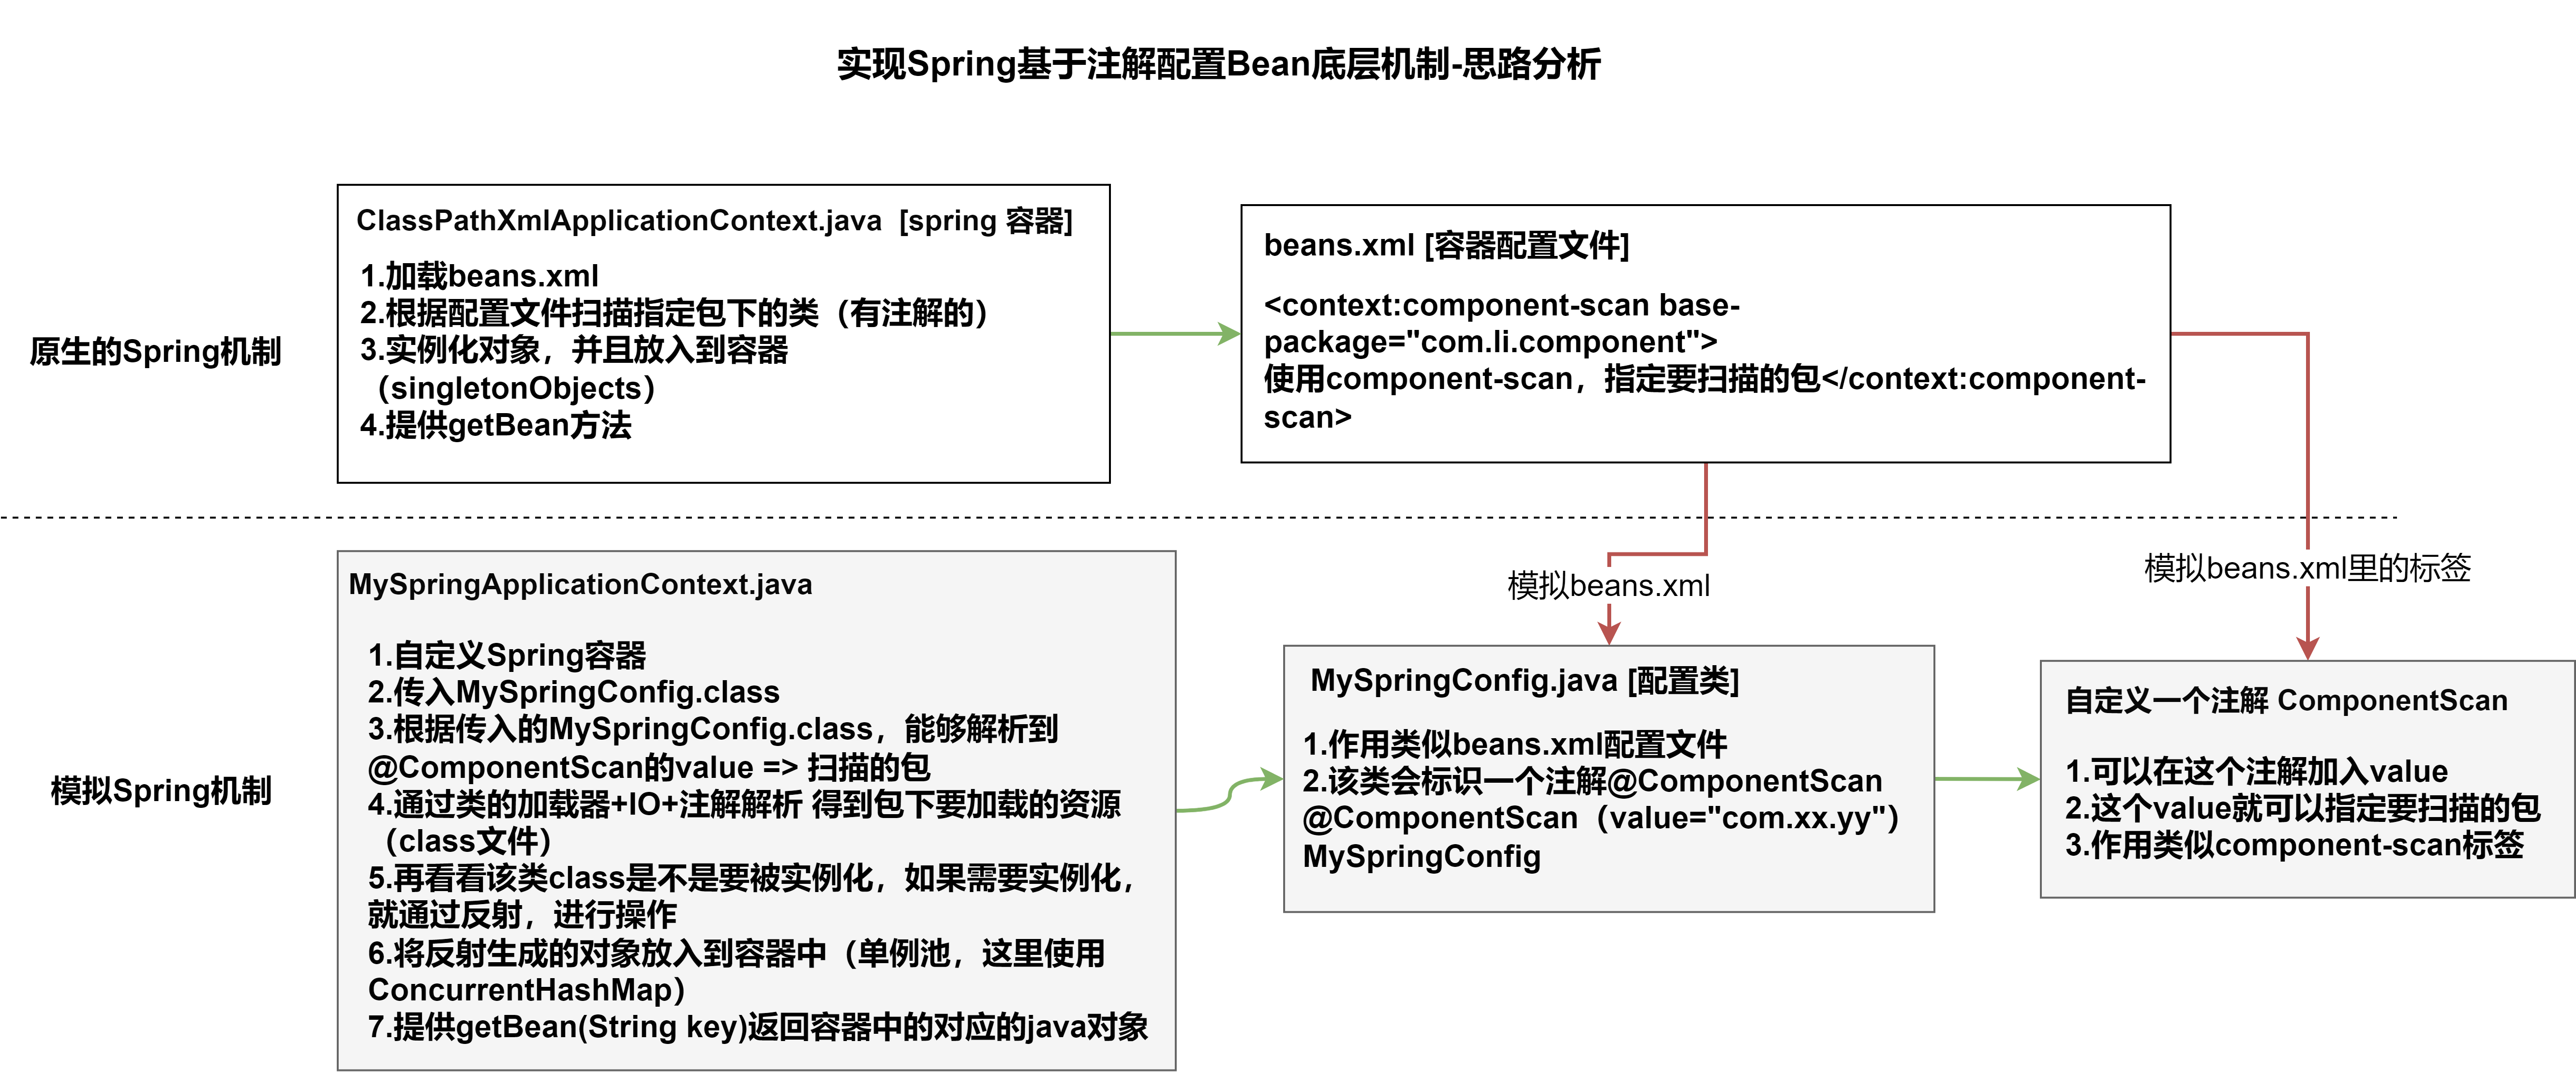
步骤一:搭建基本结构并获取扫描包
1.ComponentScan注解(模拟原生的spring注解)
package com.li.annotation;

import java.lang.annotation.ElementType;
import java.lang.annotation.Retention;
import java.lang.annotation.RetentionPolicy;
import java.lang.annotation.Target;

/**
 * @author 李
 * @version 1.0
 * 模仿spring原生注解,自定义一个注解
 * 1. @Target(ElementType.TYPE) 指定ComponentScan注解可以修饰TYPE元素
 * 2. @Retention(RetentionPolicy.RUNTIME) 指定ComponentScan注解 的保留范围
 * 3. String value() default "";  表示 ComponentScan 可以传入一个value值
 */
@Target(ElementType.TYPE)
@Retention(RetentionPolicy.RUNTIME)
public @interface ComponentScan {
    String value() default "";
}
2.MySpringConfig配置类(模拟Spring的xml配置文件)
package com.li.annotation;

/**
 * @author 李
 * @version 1.0
 * 这是一个配置类,作用类似我们原生spring的容器配置文件beans.xml
 */
@ComponentScan(value = "com.li.component")
public class MySpringConfig {
}
3.MySpringApplicationContext(模拟原生的ioc容器)
package com.li.annotation;

import java.lang.annotation.Annotation;
import java.util.concurrent.ConcurrentHashMap;

/**
 * @author 李
 * @version 1.0
 * MySpringApplicationContext 类的作用类似Spring原生的ioc容器
 */
public class MySpringApplicationContext {
    private Class configClass;
    //ioc中存放的就是通过反射创建的对象(基于注解方式)
    private final ConcurrentHashMap<String, Object> ioc = new ConcurrentHashMap<>();

    //构造器
    public MySpringApplicationContext(Class configClass) {
        this.configClass = configClass;
        //获取要扫描的包
        //1.先得到MySpringConfig配置类的注解 @ComponentScan(value = "com.li.component")
        ComponentScan componentScan = (ComponentScan) this.configClass.getDeclaredAnnotation(ComponentScan.class);
        //2.通过 componentScan的 value=>得到要扫描的包路径
        String path = componentScan.value();
        System.out.println(path);
    }
}
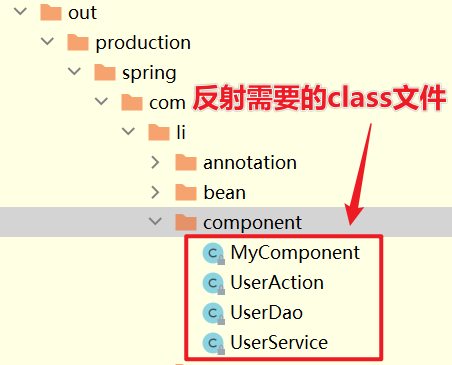
步骤二:获取扫描包下所有.class文件
4.如下,我们现在已经获取了要扫描的包路径,接下来就是通过反射创建对象。但是反射需要的是class文件,因此我们真正需要读取的是out目录下,编译过的类.class文件
步骤三:获取全类名反射对象,并放入容器中
MySpringApplicationContext完整代码:
package com.li.annotation;

import org.springframework.stereotype.Component;
import org.springframework.stereotype.Controller;
import org.springframework.stereotype.Repository;
import org.springframework.stereotype.Service;
import org.springframework.util.StringUtils;

import java.io.File;
import java.net.URL;
import java.util.concurrent.ConcurrentHashMap;

/**
 * @author 李
 * @version 1.0
 * MySpringApplicationContext 类的作用类似Spring原生的ioc容器
 */
public class MySpringApplicationContext {
    private Class configClass;
    //ioc中存放的就是通过反射创建的对象(基于注解方式)
    private final ConcurrentHashMap<String, Object> ioc = new ConcurrentHashMap<>();

    //构造器
    public MySpringApplicationContext(Class configClass) {
        this.configClass = configClass;
        //##步骤一:获取要扫描的包

        //1.先得到MySpringConfig配置类的注解 @ComponentScan(value = "com.li.component")
        ComponentScan componentScan = (ComponentScan) this.configClass.getDeclaredAnnotation(ComponentScan.class);

        //2.通过 componentScan的 value=>得到要扫描的包路径
        String path = componentScan.value();
        System.out.println(path);//com.li.component

        //##步骤二:得到要扫描的包下的所有资源(类.class)

        //1.得到类的加载器
        ClassLoader classLoader = MySpringApplicationContext.class.getClassLoader();

        //2.通过类的加载器获取到要扫描的包的资源 url=>类似一个路径
        path = path.replace(".", "/");//将原先路径的.替换成/ ==> com/li/component
        URL resource = classLoader.getResource(path);
        //resource=file:/D:/IDEA-workspace/spring/out/production/spring/com/li/component
        System.out.println("resource=" + resource);

        //3.将要加载的资源(.class)路径下的文件进行遍历
        File file = new File(resource.getFile());
        if (file.isDirectory()) {

            File[] files = file.listFiles();//将当前目录下的所有文件放到files数组中(这里没有实现递归)

            for (File f : files) {
                System.out.println("-----------");
                System.out.println("AbsolutePath=" + f.getAbsolutePath());
                //获取文件的绝对路径 fileAbsolutePath
                //如:D:\IDEA-workspace\spring\out\production\spring\com\li\component\MyComponent.class
                String fileAbsolutePath = f.getAbsolutePath();

                //这里我们只处理.class文件
                if (fileAbsolutePath.endsWith(".class")) {

                    //##步骤三:获取全类名反射对象,并放入容器中

                    //将其转变为 com.li.component.MyComponent.class 形式
                    //1.先获取到类名
                    String className = fileAbsolutePath.substring(
                            fileAbsolutePath.lastIndexOf("\\") + 1,
                            fileAbsolutePath.indexOf(".class"));
                    //System.out.println("className=" + className);

                    //2.获取类的完整路径(全类名)
                    // path.replace("/", ".") => com.li.component
                    String classFullName = path.replace("/", ".") + "." + className;
                    System.out.println("classFullName=" + classFullName);

                    //3.判断该class文件是否要注入到容器中(该类是不是有注解)
                    try {
                        /*
                        得到该类的Class对象:
                        (1)Class.forName(className) 可以反射加载类
                        (2)classLoader.loadClass(className)也可以反射类的Class
                        主要区别是:(1)的方式会调用该类的静态方法,(2)的方法不会
                         */
                        //因为这里只是要判断该类有没有注解,因此使用比较轻量级的方式
                        Class<?> aClass = classLoader.loadClass(classFullName);
                        //判断该类是否有特定注解
                        if (aClass.isAnnotationPresent(Component.class) ||
                                aClass.isAnnotationPresent(Controller.class) ||
                                aClass.isAnnotationPresent(Service.class) ||
                                aClass.isAnnotationPresent(Repository.class)) {
                            //反射对象并放入到容器中
                            //使用完整反射方法Class.forName
                            Class<?> clazz = Class.forName(classFullName);
                            Object instance = clazz.newInstance();
                            //放入到容器中
                            //默认情况下key为类名(首字符小写)
                            //StringUtils.uncapitalize():将字符串首字母小写
                            ioc.put(StringUtils.uncapitalize(className), instance);
                        }

                    } catch (Exception e) {
                        e.printStackTrace();
                    }

                }
            }
        }
    }

    //编写方法,返回容器对象
    public Object getBean(String name) {
        return ioc.get(name);
    }
}
5.进行测试:
package com.li.annotation;

import com.li.component.MyComponent;
import com.li.component.UserAction;
import com.li.component.UserDao;
import com.li.component.UserService;

/**
 * @author 李
 * @version 1.0
 */
public class MySpringApplicationContextTest {
    public static void main(String[] args) {
        MySpringApplicationContext ioc = new MySpringApplicationContext(MySpringConfig.class);

        UserAction userAction = (UserAction) ioc.getBean("userAction");
        System.out.println("userAction=" + userAction);

        MyComponent myComponent = (MyComponent) ioc.getBean("myComponent");
        System.out.println("myComponent=" + myComponent);

        UserDao userDao = (UserDao) ioc.getBean("userDao");
        System.out.println("userDao=" + userDao);

        UserService userService = (UserService) ioc.getBean("userService");
        System.out.println("userService=" + userService);

        System.out.println("ok");

    }
}
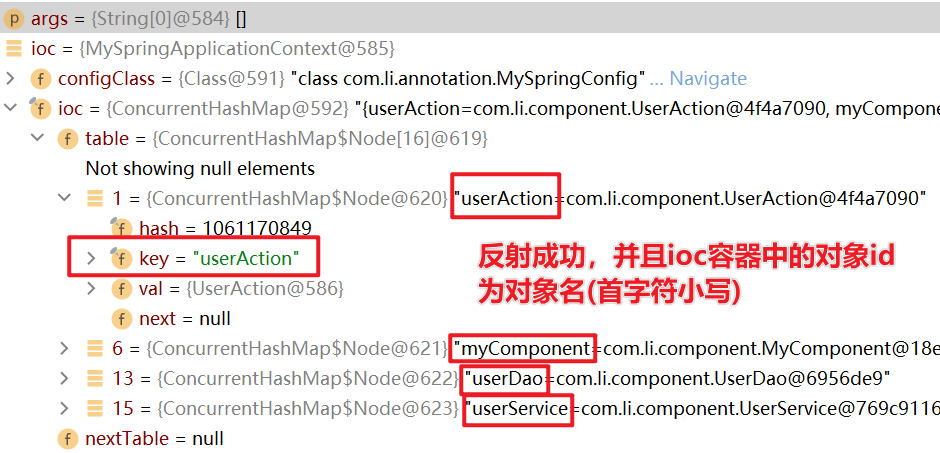
上述代码默认将反射类的类名首字符小写后,放入到ioc容器中。但是在原生spring中我们可以在注解的value中指定对象key值。
因此上述代码的逻辑可以优化为:进行反射之前,先判断注解有没有指定value值,如果有,将其作为反射的对象的key,放入到ioc容器中。
//这里以Component注解为例,其他注解的逻辑一致
if (aClass.isAnnotationPresent(Component.class)) {
    //获取该注解
    Component component = aClass.getDeclaredAnnotation(Component.class);
    //获取该注解的value值
    String id = component.value();
    if (!"".endsWith(id)) {
        className = id;
    }
}
我正在使用Ruby2.1.1和Rails4.1.0.rc1。当执行railsc时,它被锁定了。使用Ctrl-C停止,我得到以下错误日志:~/.rvm/gems/ruby-2.1.1/gems/spring-1.1.2/lib/spring/client/run.rb:47:in`gets':Interruptfrom~/.rvm/gems/ruby-2.1.1/gems/spring-1.1.2/lib/spring/client/run.rb:47:in`verify_server_version'from~/.rvm/gems/ruby-2.1.1/gems/spring-1.1.
需求:要创建虚拟机,就需要给他提供一个虚拟的磁盘,我们就在/opt目录下创建一个10G大小的raw格式的虚拟磁盘CentOS-7-x86_64.raw命令格式:qemu-imgcreate-f磁盘格式磁盘名称磁盘大小qemu-imgcreate-f磁盘格式-o?1.创建磁盘qemu-imgcreate-fraw/opt/CentOS-7-x86_64.raw10G执行效果#ls/opt/CentOS-7-x86_64.raw2.安装虚拟机使用virt-install命令,基于我们提供的系统镜像和虚拟磁盘来创建一个虚拟机,另外在创建虚拟机之前,提前打开vnc客户端,在创建虚拟机的时候,通过vnc
转自:spring.profiles.active和spring.profiles.include的使用及区别说明下文笔者讲述spring.profiles.active和spring.profiles.include的区别简介说明,如下所示我们都知道,在日常开发中,开发|测试|生产环境都拥有不同的配置信息如:jdbc地址、ip、端口等此时为了避免每次都修改全部信息,我们则可以采用以上的属性处理此类异常spring.profiles.active属性例:配置文件,可使用以下方式定义application-${profile}.properties开发环境配置文件:application-dev
我试图在Ubuntu14.04中使用Curl安装RVM。我运行了以下命令:\curl-sSLhttps://get.rvm.io|bash-sstable出现如下错误:curl:(7)Failedtoconnecttoget.rvm.ioport80:Networkisunreachable非常感谢解决此问题的任何帮助。谢谢 最佳答案 在执行curl之前尝试这个:echoipv4>>~/.curlrc 关于ruby-在Ubuntu14.04中使用Curl安装RVM时出错,我们在Stack
我无法运行Spring。这是错误日志。myid-no-MacBook-Pro:myid$spring/Users/myid/.rbenv/versions/1.9.3-p484/lib/ruby/gems/1.9.1/gems/spring-0.0.10/lib/spring/sid.rb:17:in`fiddle_func':uninitializedconstantSpring::SID::DL(NameError)from/Users/myid/.rbenv/versions/1.9.3-p484/lib/ruby/gems/1.9.1/gems/spring-0.0.10/li
我有一个任务列表(名称、starts_at),我试图在每日View中显示它们(就像iCal)。deftodays_tasks(day)Task.find(:all,:conditions=>["starts_atbetween?and?",day.beginning,day.ending]end我不知道如何将Time.now(例如“2009-04-1210:00:00”)动态转换为一天的开始(和结束),以便进行比较。 最佳答案 deftodays_tasks(now=Time.now)Task.find(:all,:conditio
安装Rails时,一切都很好,但后来,我写道:rails-v和输出:/home/toshiba/.rvm/rubies/ruby-2.2.1/lib/ruby/site_ruby/2.2.0/rubygems/core_ext/kernel_require.rb:54:in`require':cannotloadsuchfile--rails/cli(LoadError)from/home/toshiba/.rvm/rubies/ruby-2.2.1/lib/ruby/site_ruby/2.2.0/rubygems/core_ext/kernel_require.rb:54:in`r
什么是0day漏洞?0day漏洞,是指已经被发现,但是还未被公开,同时官方还没有相关补丁的漏洞;通俗的讲,就是除了黑客,没人知道他的存在,其往往具有很大的突发性、破坏性、致命性。0day漏洞之所以称为0day,正是因为其补丁永远晚于攻击。所以攻击者利用0day漏洞攻击的成功率极高,往往可以达到目的并全身而退,而防守方却一无所知,只有在漏洞公布之后,才后知后觉,却为时已晚。“后知后觉、反应迟钝”就是当前安全防护面对0day攻击的真实写照!为了方便大家理解,中科三方为大家梳理当前安全防护模式下,一个漏洞从发现到解决的三个时间节点:T0:此时漏洞即0day漏洞,是已经被发现,还未被公开,官方还没有相
提供3种Ubuntu系统安装微信的方法,在Ubuntu20.04上验证都ok。1.WineHQ7.0安装微信:ubuntu20.04安装最新版微信--可以支持微信最新版,但是适配的不是特别好;比如WeChartOCR.exe报错。2.原生微信安装:linux系统下的微信安装(ubuntu20.04)--微信适配的最好,反应最快,但是微信版本只到2.1.1,版本太老,很多功能都没有。3.深度deepin-wine6安装微信:ubuntu20.04+系统deepin-wine6安装新版微信--综合比较好,当前个人使用此种方法1个月,微信版本3.4;没什么大问题,尚可。一、WineHQ7.0安装微信
目录SpringBootStarter是什么?以前传统的做法使用SpringBootStarter之后starter的理念:starter的实现: 创建SpringBootStarter步骤在idea新建一个starter项目、直接执行下一步即可生成项目。 在xml中加入如下配置文件:创建proterties类来保存配置信息创建业务类:创建AutoConfiguration测试如下:SpringBootStarter是什么? SpringBootStarter是在SpringBoot组件中被提出来的一种概念、简化了很多烦琐的配置、通过引入各种SpringBootStarter包可以快速搭建出一