这段时间在开发一个微信小程序,有个需求是,小程序底部的tabBar导航实现动态化。就是根据用户角色不同,显示不同的导航。要实现动态导航首先要考虑的是如何把小程序中的原生导航更改为自定义导航。
一、根据官方文档所说,实现自定义导航首先要在app.js中配置好tabBar项;
"tabBar": {
    "custom": true,
    "color": "#7A7E83",
    "selectedColor": "#2a83f7",
    "backgroundColor": "#ffffff",
    "list": [{
      "iconPath": "images/icon/home.png",
      "selectedIconPath": "images/icon/home-a.png",
      "pagePath": "pages/index/index",
      "text": "首页"
    }, {
      "iconPath": "images/icon/classify.png",
      "selectedIconPath": "images/icon/classify-a.png",
      "pagePath": "pages/picSort/index",
      "text": "全部分类"
    }, {
      "iconPath": "images/icon/chat.png",
      "selectedIconPath": "images/icon/chat-a.png",
      "pagePath": "pages/chat/index",
      "text": "聊一聊"
    }, {
      "iconPath": "images/icon/user.png",
      "selectedIconPath": "images/icon/user-a.png",
      "pagePath": "pages/myCentre/index",
      "text": "我的"
    }]
  }
注意:"custom": true是重点,默认是没有这个字段的,在配置项中新增即可;
二、在项目的根目录创建“custom-tab-bar”组件;
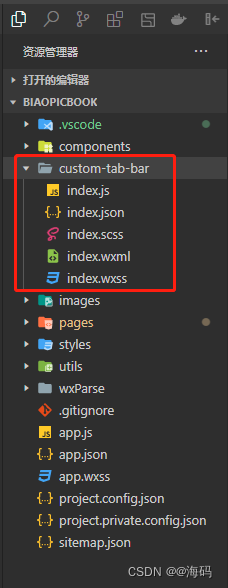
三、编写custom-tab-bar组件的导航页面布局、样式表及JS;
index.wxml
<view class="tab-bar">
  <view class="tab-bar-item"
    wx:for="{{list}}"
    wx:key="index"
    data-path="{{item.pagePath}}"
    data-index="{{index}}"
    bindtap="switchTab"
  >
    <view class="tab-bar-item-img">
      <image class="itemImage" src="{{tabIndex === index ? item.selectedIconPath : item.iconPath}}"></image>
    </view>
    <view class="tab-bar-item-title">
      <view class="itemTitle" style="color: {{tabIndex === index ? selectedColor : color}}">{{item.text}}</view>
    </view>
  </view>
</view>
说明:以上代码中
index.wxss
.tab-bar {
  position: fixed;
  bottom: 0;
  left: 0;
  right: 0;
  height: 96rpx;
  background: white;
  display: flex;
  padding-bottom: env(safe-area-inset-bottom);
  border-top: 2rpx solid #dddddd;
}

.tab-bar .tab-bar-item {
  flex: 1;
  text-align: center;
  display: flex;
  justify-content: center;
  align-items: center;
  flex-direction: column;
  height: 100%;
}

.tab-bar .tab-bar-item .tab-bar-item-img .itemImage {
  width: 54rpx;
  height: 54rpx;
}

.tab-bar .tab-bar-item .tab-bar-item-title .itemTitle {
  font-size: 20rpx;
}
index.js
Component({
  data: {
    tabIndex: 0
    custom: true,
    color: "#7A7E83",
    selectedColor: "#2a83f7",
    backgroundColor: "#ffffff",
    list: [{
      iconPath: "images/icon/home.png",
      selectedIconPath: "images/icon/home-a.png",
      pagePath: "pages/index/index",
      text: "首页"
    }, {
      iconPath: "images/icon/classify.png",
      selectedIconPath: "images/icon/classify-a.png",
      pagePath: "pages/picSort/index",
      text: "全部分类"
    }, {
      iconPath: "images/icon/chat.png",
      selectedIconPath: "images/icon/chat-a.png",
      pagePath: "pages/chat/index",
      text: "聊一聊"
    }, {
      iconPath: "images/icon/user.png",
      selectedIconPath: "images/icon/user-a.png",
      pagePath: "pages/myCentre/index",
      text: "我的"
    }]
  },
  methods: {
    switchTab(e) {
      const data = e.currentTarget.dataset
      // console.log('currentTarget:', data.index)
      const url = data.path
      wx.switchTab({url})
      this.setData({
        selected: data.index
      })
    }
  }
})
重点:在实现自定义tabbar的时候,会出现点击导航,高亮状态及跳转链接出现混乱的现象, 这是因为使用Component组件是不允许设置动态数据的。下面会一并解决如何解决这些问题。
四、上面部分不是重点,在任何地方都能搜索。而实现动态 tabbar是写这边文章的重点
1、我们先在utils目录中创建tab-service.js文件,写上全局的数据及方法;
// Tab页的data
let tabData = {
  tabIndex: 0,
  tabBar: {
      showplate: '',
      custom: true,
      color: "#7A7E83",
      selectedColor: "#2a83f7",
      backgroundColor: "#ffffff",
      list: [{
        iconPath: "/images/icon/home.png",
        selectedIconPath: "/images/icon/home-a.png",
        pagePath: "/pages/index/index",
        text: "首页"
      }, {
        iconPath: "/images/icon/classify.png",
        selectedIconPath: "/images/icon/classify-a.png",
        pagePath: "/pages/picSort/index",
        text: "全部分类"
      }, {
        iconPath: "/images/icon/chat.png",
        selectedIconPath: "/images/icon/chat-a.png",
        pagePath: "/pages/chat/index",
        text: "聊一聊"
      }, {
        iconPath: "/images/icon/user.png",
        selectedIconPath: "/images/icon/user-a.png",
        pagePath: "/pages/myCentre/index",
        text: "我的"
      }]
  }
}

// 更新菜单
const updateRole = (that, type) => {
  if (type === '0') {
    tabData.tabBar.list.forEach((item, i) => {
      if (item.text === '我的') {
        tabData.tabBar.list.splice(i, 1)
      }
    })
  } else if (type === '1') {
    const num = tabData.tabBar.list.length
    if (num === 3) {
      tabData.tabBar.list.push({
        iconPath: "/images/icon/user.png",
        selectedIconPath: "/images/icon/user-a.png",
        pagePath: "/pages/myCentre/index",
        text: "我的"
      })
    }
  }
  // console.log('tabData:', tabData)
  updateTab(that);
}

// 更新底部高亮
const updateIndex = (that, index) => {
  tabData.tabIndex = index;
  updateTab(that);
}

// 更新Tab状态
const updateTab = (that) => {
  if (typeof that.getTabBar === 'function' && that.getTabBar()) {
      that.getTabBar().setData(tabData);
  }
}

// 将可调用的方法抛出让外面调用
module.exports = {
  updateRole, updateTab, updateIndex
}
2、把custom-tab-bar目录中的index.wxml修改为下面这段
<view class="tab-bar">
  <view class="tab-bar-item"
    wx:for="{{tabBar.list}}"
    wx:key="index"
    data-path="{{item.pagePath}}"
    data-index="{{index}}"
    bindtap="switchTab"
  >
    <view class="tab-bar-item-img">
      <image class="itemImage" src="{{tabIndex === index ? item.selectedIconPath : item.iconPath}}"></image>
    </view>
    <view class="tab-bar-item-title">
      <view class="itemTitle" style="color: {{tabIndex === index ? tabBar.selectedColor : tabBar.color}}">{{item.text}}</view>
    </view>
  </view>
</view>
其中tabBar就是在tab-service.js文件中写的公共数据。
2、把index.js修改为下面这段
Component({
  data: {

  },
  methods: {
    switchTab(e) {
      const data = e.currentTarget.dataset
      // console.log('currentTarget:', data.index)
      const url = data.path
      wx.switchTab({url})
      this.setData({
        selected: data.index
      })
    }
  }
})
3、重点是在对应导航的JS文件中找到onShow方法,写上tabService.updateIndex(this, 0),其中tabService就是我们写的全局tab-service.js,引入一下
const tabService = require("../../utils/tab-service")在js,onShow方法写上tabService.updateIndex(this, 0),这是因为需要调用一次刷新事件。如果导航有4个,每个导航对一个页面,0,1,2,3以此类推即可;
onShow: function () {
    tabService.updateIndex(this, 0)
}
4、 因为我要实现页面加载时判断用户,根据用户的不同改变导航的。所以我在onLand方法中去判断调用tabService.updateRole(this, res.data.showplate)这个公共的方法;
这样就完全解决了动态tabbar的效果;
我怎样才能完成http://php.net/manual/en/function.call-user-func-array.php在ruby中?所以我可以这样做:classAppdeffoo(a,b)putsa+benddefbarargs=[1,2]App.send(:foo,args)#doesn'tworkApp.send(:foo,args[0],args[1])#doeswork,butdoesnotscaleendend 最佳答案 尝试分解数组App.send(:foo,*args)
我主要使用Ruby来执行此操作,但到目前为止我的攻击计划如下:使用gemsrdf、rdf-rdfa和rdf-microdata或mida来解析给定任何URI的数据。我认为最好映射到像schema.org这样的统一模式,例如使用这个yaml文件,它试图描述数据词汇表和opengraph到schema.org之间的转换:#SchemaXtoschema.orgconversion#data-vocabularyDV:name:namestreet-address:streetAddressregion:addressRegionlocality:addressLocalityphoto:i
我有一个用户工厂。我希望默认情况下确认用户。但是鉴于unconfirmed特征,我不希望它们被确认。虽然我有一个基于实现细节而不是抽象的工作实现,但我想知道如何正确地做到这一点。factory:userdoafter(:create)do|user,evaluator|#unwantedimplementationdetailshereunlessFactoryGirl.factories[:user].defined_traits.map(&:name).include?(:unconfirmed)user.confirm!endendtrait:unconfirmeddoenden
有时我需要处理键/值数据。我不喜欢使用数组,因为它们在大小上没有限制(很容易不小心添加超过2个项目,而且您最终需要稍后验证大小)。此外,0和1的索引变成了魔数(MagicNumber),并且在传达含义方面做得很差(“当我说0时,我的意思是head...”)。散列也不合适,因为可能会不小心添加额外的条目。我写了下面的类来解决这个问题:classPairattr_accessor:head,:taildefinitialize(h,t)@head,@tail=h,tendend它工作得很好并且解决了问题,但我很想知道:Ruby标准库是否已经带有这样一个类? 最佳
我需要在RubyonRails中实现无向图G=(V,E)并考虑构建一个Vertex和一个Edge模型,其中Vertex有_多条边。由于边恰好连接两个顶点,您将如何在Rails中执行此操作?您是否知道任何有助于实现此类图表的gem或库(对重新发明轮子不感兴趣;-))? 最佳答案 不知道有任何现有库在ActiveRecord之上提供图形逻辑。您可能必须实现自己的Vertex、EdgeActiveRecord支持的模型(请参阅Rails安装的rails/activerecord中的vertex.rb和edge.rb/test/fixtur
按照目前的情况,这个问题不适合我们的问答形式。我们希望答案得到事实、引用或专业知识的支持,但这个问题可能会引发辩论、争论、投票或扩展讨论。如果您觉得这个问题可以改进并可能重新打开,visitthehelpcenter指导。关闭10年前。问题1)我想知道rubyonrails是否有功能类似于primefaces的gem。我问的原因是如果您使用primefaces(http://www.primefaces.org/showcase-labs/ui/home.jsf),开发人员无需担心javascript或jquery的东西。据我所知,JSF是一个规范,基于规范的各种可用实现,prim
我正在尝试使用Curbgem执行以下POST以解析云curl-XPOST\-H"X-Parse-Application-Id:PARSE_APP_ID"\-H"X-Parse-REST-API-Key:PARSE_API_KEY"\-H"Content-Type:image/jpeg"\--data-binary'@myPicture.jpg'\https://api.parse.com/1/files/pic.jpg用这个:curl=Curl::Easy.new("https://api.parse.com/1/files/lion.jpg")curl.multipart_form_
无论您是想搭建桌面端、WEB端或者移动端APP应用,HOOPSPlatform组件都可以为您提供弹性的3D集成架构,同时,由工业领域3D技术专家组成的HOOPS技术团队也能为您提供技术支持服务。如果您的客户期望有一种在多个平台(桌面/WEB/APP,而且某些客户端是“瘦”客户端)快速、方便地将数据接入到3D应用系统的解决方案,并且当访问数据时,在各个平台上的性能和用户体验保持一致,HOOPSPlatform将帮助您完成。利用HOOPSPlatform,您可以开发在任何环境下的3D基础应用架构。HOOPSPlatform可以帮您打造3D创新型产品,HOOPSSDK包含的技术有:快速且准确的CAD
华为OD机试题本篇题目:明明的随机数题目输入描述输出描述:示例1输入输出说明代码编写思路最近更新的博客华为od2023|什么是华为od,od薪资待遇,od机试题清单华为OD机试真题大全,用Python解华为机试题|机试宝典【华为OD机试】全流程解析+经验分享,题型分享,防作弊指南华为o
本教程将在Unity3D中混合Optitrack与数据手套的数据流,在人体运动的基础上,添加双手手指部分的运动。双手手背的角度仍由Optitrack提供,数据手套提供双手手指的角度。 01 客户端软件分别安装MotiveBody与MotionVenus并校准人体与数据手套。MotiveBodyMotionVenus数据手套使用、校准流程参照:https://gitee.com/foheart_1/foheart-h1-data-summary.git02 数据转发打开MotiveBody软件的Streaming,开始向Unity3D广播数据;MotionVenus中设置->选项选择Unit