CSDN话题挑战赛第2期
参赛话题:万家争鸣的云计算修罗场
在这个专属于“云”的时代,各位云端弄潮儿们,请分享出你的云计算学习历程吧!
你可以从以下几个方面着手(不强制),或者根据自己对话题主题的理解创作,参考如下:
首先我们要直到什么是微信小程序的云开发
微信小程序云开发是2018年9月腾讯上线的集云函数、云数据库、云储存和云调用等功能于一身的开放服务。云开发为开发者提供了完整的原生云端支持和微信服务支持,弱化后端和运维概念,无需搭建服务器,适用平台提供的API进行核心业务开发,即可实现快速上线的迭代,同时这一功能同开发者使用云服务相互兼容,并不互斥!
作用:原生微信服务集成
详情:基于云函数免鉴权使用小程序开放接口的能力,包括服务端调用、获取开放数据库能力
作用:无需搭建数据库
详情:一个既可以在小程序前端操作,也能在云函数中读写的json数据库
作用:无需搭建数据库
详情:一个既可以在小程序前端操作,也能在云函数中读写的json数据库
作用:无需自建储存和CDN
详情:在小程序前端直接上传/下载云端文件,在云开发控制台可视化管理
总结:云开发为微信小程序开辟了一条新的道路,能让开发者更方便的编写自己的代码,简化了后端程序语言编写并部署在服务器上的后端功能函数中,可以通过JavaScript脚本语言与微信原生脚本语言完成编写!
先展示一下效果:
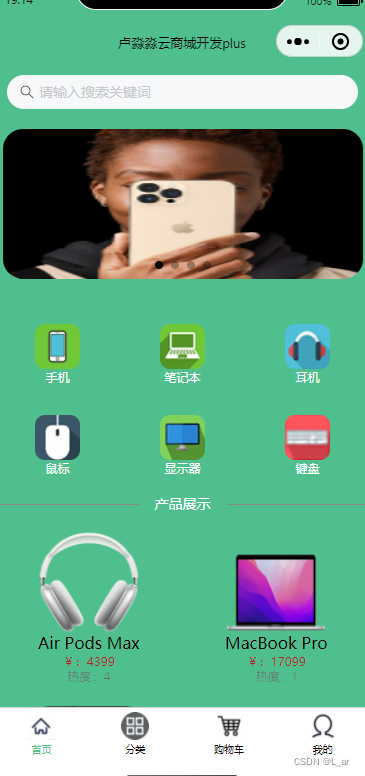
这是我以前学习微信小程序的时候发现的宝藏网站!!!
1.首页:
搜索框一个(搜索框中我的们输入在数据库中的产品名字,点击某个产品时,通过wxml的<navigator/>标签跳转也可以,通过js中编写跳转命令也可以。实现搜索框可以参考上方的网址!)
轮播图一个(轮播图我们可以在js中写一个如下:)
<!-- 轮播图开始 -->
<view>
    <swiper indicator-dots="{{indicatorDots}}" autoplay="{{autoplay}}" interval="{{interval}}" duration="{{duration}}">
    <block wx:for="{{imgUrls}}" wx:key="index">
      <swiper-item class="LB_a">
        <image class="LB_b"  src="{{item}}" />
      </swiper-item>
    </block>
  </swiper>
</view>
<!-- 轮播图结束 -->
在page里面的data中:
imgUrls: [
            'cloud://shangcheng-1gv76n6pf3af957d.7368-shangcheng-1gv76n6pf3af957d-1312670923/轮播图/7.jpg',
            'cloud://shangcheng-1gv76n6pf3af957d.7368-shangcheng-1gv76n6pf3af957d-1312670923/轮播图/1.jpg',
            'cloud://shangcheng-1gv76n6pf3af957d.7368-shangcheng-1gv76n6pf3af957d-1312670923/轮播图/5.jpg',
            'cloud://shangcheng-1gv76n6pf3af957d.7368-shangcheng-1gv76n6pf3af957d-1312670923/轮播图/22.jpg'
          ],
          indicatorDots: true,  //是否显示面板指示点
          autoplay: true,      //是否自动切换
          interval: 2000,       //自动切换时间间隔
          duration: 300,       //滑动动画时长
          inputShowed: false,
          inputVal: "",
分类区(如下:)
<view class="fenlei" >
    <view class="fenlei_1" wx:for="{{fenlei}}" wx:key="index">
    <navigator class="fenlei_1" url="../product_fenlei/product_fenlei?name={{item.name}}">
        <image  src="{{item.src}}" style="height: 90rpx;width: 90rpx;border-radius: 20rpx;"></image>
        <text style="font-size: 25rpx; color: #fff;">{{item.name}}</text>
    </navigator>
    </view>
</view>
其中{{itme.name}}及{{itme.src}}等写法时动态从wx:for获取到的{{fenlei}}云数据库中的数据,如果wx:for获取指定的云数据库后,后面的动态加载可使用itme.***来实现!
        let that = this
        db.collection('fenlei').get({
            success:function(res){
                console.log('分类获取成功',res)
                that.setData({
                    fenlei:res.data
                })
            },
            fail:function(res){
                console.log('分类获取失败',res)
            }
        })
注意:微信小程序中要尽量用ES6的语句!
产品展示区(如下):
<view class="product">
    <navigator class="product_1" wx:for="{{product}}" wx:key="index"url="../product_datail/product_datail?id={{item._id}}">
        <image style="width: 200rpx;height: 200rpx;" src="{{item.src[0]}}" class="img"></image>
        <view class="product_2">
            <text>{{item.name}}</text>
            <text style="color: brown;font-size: 25rpx;">¥:{{item.price}}</text>
            <text style="font-size:25rpx;font-weight: 300;color: #6d6b6b;">热度:{{item.num}}</text>
        </view>
    </navigator>
</view>{{itme***}}运用的与上面的原理相同!
        db.collection('product').get({
            success:function(res){
                console.log('商品获取成功',res)
                that.setData({
                    product:res.data
                })
            },
            fail:function(rex){
                console.log('商品获取失败',res)
            }
})通过db.collection('product').get来获取到云数据库product中的数据,从而显示在wxml页面上
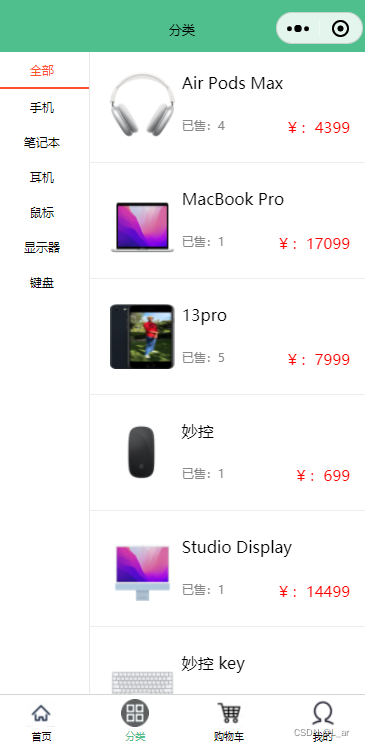
2.分类(类似前端中的选显卡):
需要创建一个传统的小程序竖状分类样式
分类左右两边(左边是用来用户选择点击事件,右侧则是根据用户的点击从而携带的某个页面的参数显示数据内容)
如下:
<!-- 左边 -->
    <scroll-view style="width:25%;height:100%;border-right: 2rpx solid #e9e9e9;font-size: 25rpx;" scroll-y="true">
        <block wx:for="{{fenlei}}" wx:key="index">
            <view class="lay_row_cen {{select_classify==item.name?'select_classify':'classify_def'}}" data-name="{{item.name}}"
            bindtap="select_classify">
                <text>{{item.name}}</text>
            </view>
        </block>
    </scroll-view>
<!-- 右边 -->
<scroll-view style="width:75%;height:100%;" scroll-y="true">
<block wx:for="{{goods}}" wx:key="index">
<navigator class="lay_row_spa pad_20" url="../product_datail/product_datail?id={{item._id}}">
<view class="lay_row_spa pad_20">
<image src="{{item.src[0]}}" class="goods_img"></image>
<view class="lay_col_spa" style="height:130rpx;width: 70%;">
<view class="lay_row_sta">
<text>{{item.name}}</text>
</view>
<view class="lay_row_spa">
<text style="font-size: 25rpx;color: #888888;">已售:{{item.num}}</text>
<text style="font-size: 30rpx;color: #ff0101;">¥:{{item.price}}</text>
</view>
</view>
</view>
</navigator>
<van-divider style="width:100%" custom-style="margin-top:10rpx;margin-bottom:10rpx"></van-divider>
</block>
</scroll-view>在编写右侧的同时我们也要添加每个分类中商品的跳转代码,用于用户点击分类中的商品时随时可跳转到商品详情界面。
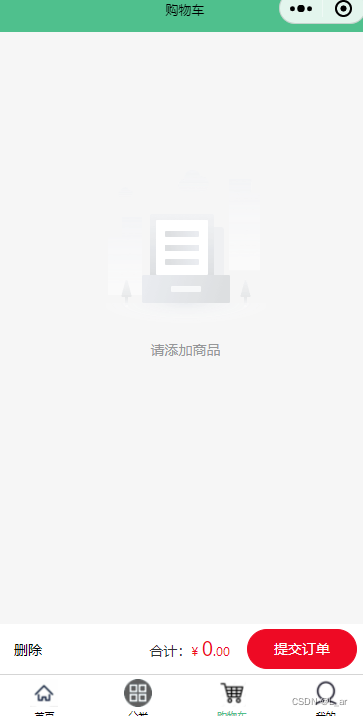
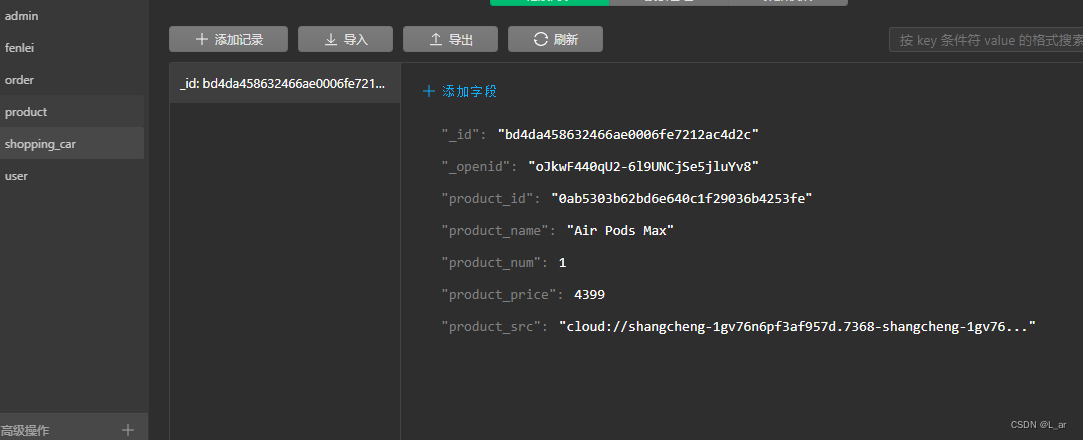
3.购物车:
需要创建一个背景图及下面的动态合计金额数的js代码块区域
首先我们需要创建一个云数据库用来存放用户添加商品到购物车时的商品数据存放(如下:)
const db = cloud.database()
const _ = db.command
// 云函数入口函数
exports.main = async (event, context) => {
const ap = cloud.getWXContext()
try{
return await db.collection('shopping_car').where({
_openid:ap.OPENID,
product_checked:"true"
}).remove()
}catch(e){
console.error(e)
}
}然后我们再通过云函数代码来实现 product云数据库的商品的_id与shopping_car中的product_id的相等的判断条件。
<block wx:for="{{product}}" wx:key="_id">最后从购物车.wxml用微信原生的wx:for来将product云数据库中的数据循环动态显示出来。
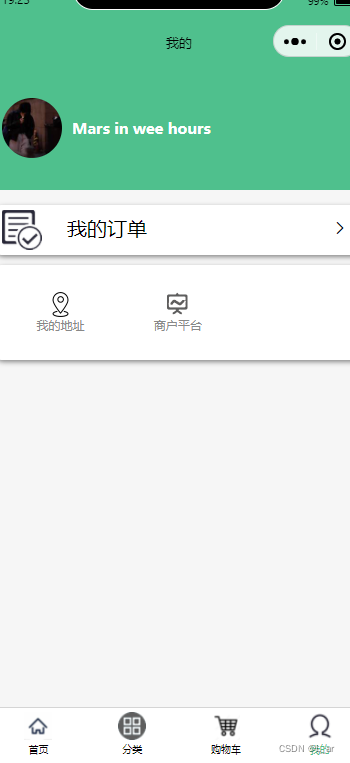
4.我的:
需要创建一个获取用户信息的区域来获取并显示我们获取到的用户信息。同时需要创建三个区域分别为:我的订单,我的地址,商户平台!
获取用户信息(可以使用微信原生代码实现,如下:)
wx.getUserProfile({
desc: '用于完善会员资料', // 声明获取用户个人信息后的用途,后续会展示在弹窗中,请谨慎填写
success: (userInfo) => {
console.log(userInfo)
wx.showLoading({
title: '注册中',
})
db.collection('user').add({
data:{
userInfo:userInfo.userInfo
}
}).then(user=>{
wx.hideLoading()
wx.showToast({
title: '注册成功!',
})
that.login()
})
}
})我的订单、我的地址、商户平台(可以分别编写三个隐藏页面当用户点击时跳转) 再根据用户所需来创建对应的云数据库用来完成用户一系列的个人操作!
5.隐藏页面:
(商品详情页面,通过点击商品列表或者在搜索框中点击某一个商品的区域跳转过去,并加以显示的页面)
<!-- 跳转到真的搜索界面 -->
<navigator url="../sousuo/sousuo">
<van-search
value="{{ value }}"
shape="round"
background="#4fc08d"
placeholder="请输入搜索关键词"
/>
</navigator>
<view style="height: 20rpx;"></view>
<!-- 轮播图开始 -->
<view>
<swiper indicator-dots="{{indicatorDots}}" autoplay="{{autoplay}}" interval="{{interval}}" duration="{{duration}}">
<block wx:for="{{imgUrls}}" wx:key="index">
<swiper-item class="LB_a">
<image class="LB_b" src="{{item}}" />
</swiper-item>
</block>
</swiper>
</view>
<!-- 轮播图结束 -->
<!-- 分类开始 -->
<view class="fenlei" >
<view class="fenlei_1" wx:for="{{fenlei}}" wx:key="index">
<navigator class="fenlei_1" url="../product_fenlei/product_fenlei?name={{item.name}}">
<image src="{{item.src}}" style="height: 90rpx;width: 90rpx;border-radius: 20rpx;"></image>
<text style="font-size: 25rpx; color: #fff;">{{item.name}}</text>
</navigator>
</view>
</view>
<!-- 分类结束 -->
<van-divider contentPosition="center"customStyle="color: white; border-color: #888888; font-size: 18rrpx;">产品展示</van-divider>
<!-- 产品列表开始 -->
<view class="product">
<navigator class="product_1" wx:for="{{product}}" wx:key="index"url="../product_datail/product_datail?id={{item._id}}">
<image style="width: 200rpx;height: 200rpx;" src="{{item.src[0]}}" class="img"></image>
<view class="product_2">
<text>{{item.name}}</text>
<text style="color: brown;font-size: 25rpx;">¥:{{item.price}}</text>
<text style="font-size:25rpx;font-weight: 300;color: #6d6b6b;">热度:{{item.num}}</text>
</view>
</navigator>
</view>
<!-- 产品列表结束 -->
// pages/index/index.js
const db = wx.cloud.database()
Page({
/**
* 页面的初始数据
*/
data: {
product:[],
fenlei:[],
// 轮播图开始
imgUrls: [
'cloud://shangcheng-1gv76n6pf3af957d.7368-shangcheng-1gv76n6pf3af957d-1312670923/轮播图/7.jpg',
'cloud://shangcheng-1gv76n6pf3af957d.7368-shangcheng-1gv76n6pf3af957d-1312670923/轮播图/1.jpg',
'cloud://shangcheng-1gv76n6pf3af957d.7368-shangcheng-1gv76n6pf3af957d-1312670923/轮播图/5.jpg',
'cloud://shangcheng-1gv76n6pf3af957d.7368-shangcheng-1gv76n6pf3af957d-1312670923/轮播图/22.jpg'
],
indicatorDots: true, //是否显示面板指示点
autoplay: true, //是否自动切换
interval: 2000, //自动切换时间间隔
duration: 300, //滑动动画时长
inputShowed: false,
inputVal: "",
// 轮播图结束
//商品列表开始
pro_list:[],
//商品列表结束
search_list:[],
search_case:false,
num:20
},
search_case_close(){
this.setData({
search_case:false
})
},
//页面上拉触底事件
onReachBottom:function(){
let that = this
wx.showLoading({
title: '刷新中!',
duration:1000
})
let old_data = that.data.product
const db = wx.cloud.database()
db.collection('product').skip(that.data.num)
.get()
.then(res =>{
this.setData({
product:old_data.concat(res.data),
num:that.data.num+20
})
if(res,data==""){
wx.showToast({
title: '加载完毕',
icon:'none'
})
}
})
.catch(err =>{
console.error(err)
})
console.log('circle 下一页');
},
/**
* 生命周期函数--监听页面加载
*/
onLoad:function() {
// 分类开始
let that = this
db.collection('fenlei').get({
success:function(res){
console.log('分类获取成功',res)
that.setData({
fenlei:res.data
})
},
fail:function(res){
console.log('分类获取失败',res)
}
})
// 分类结束
// 产品展示开始
db.collection('product').get({
success:function(res){
console.log('商品获取成功',res)
that.setData({
product:res.data
})
},
fail:function(rex){
console.log('商品获取失败',res)
}
})
// 产品展示结束
},
/**
* 生命周期函数--监听页面初次渲染完成
*/
onReady() {
},
/**
* 生命周期函数--监听页面显示
*/
onShow() {
},
/**
* 生命周期函数--监听页面隐藏
*/
onHide() {
},
/**
* 生命周期函数--监听页面卸载
*/
onUnload() {
},
/**
* 页面相关事件处理函数--监听用户下拉动作
*/
onPullDownRefresh() {
},
/**
* 页面上拉触底事件的处理函数
*/
onReachBottom() {
},
/**
* 用户点击右上角分享
*/
onShareAppMessage() {
}
})<view class="lay_row_cen" style="height:100vh">
<!-- 左边 -->
<scroll-view style="width:25%;height:100%;border-right: 2rpx solid #e9e9e9;font-size: 25rpx;" scroll-y="true">
<block wx:for="{{fenlei}}" wx:key="index">
<view class="lay_row_cen {{select_classify==item.name?'select_classify':'classify_def'}}" data-name="{{item.name}}"
bindtap="select_classify">
<text>{{item.name}}</text>
</view>
</block>
</scroll-view>
<!-- 右边 -->
    <scroll-view style="width:75%;height:100%;" scroll-y="true">
        <block wx:for="{{goods}}" wx:key="index">
        <navigator class="lay_row_spa pad_20" url="../product_datail/product_datail?id={{item._id}}">
            <view class="lay_row_spa pad_20">
                <image src="{{item.src[0]}}" class="goods_img"></image>
                <view class="lay_col_spa" style="height:130rpx;width: 70%;">
                    <view class="lay_row_sta">
                        <text>{{item.name}}</text>
                    </view>
                    <view class="lay_row_spa">
                        <text style="font-size: 25rpx;color: #888888;">已售:{{item.num}}</text>
                        <text style="font-size: 30rpx;color: #ff0101;">¥:{{item.price}}</text>
                    </view>
                </view>
            </view>
        </navigator>
            <van-divider style="width:100%" custom-style="margin-top:10rpx;margin-bottom:10rpx"></van-divider>
        </block>
    </scroll-view>
</view>// pages/classify/classify.js
const db = wx.cloud.database()
Page({
/**
* 页面的初始数据
*/
data: {
select_classify:"全部",
fenlei:[{name:"全部"}],
goods:[]
},
// 获取商品
get_goods(fenlei){
let that = this
if(fenlei == '全部'){
db.collection('product').get().then(res=>{
console.log("获取商品",res.data)
that.setData({
goods:res.data
})
})
}else{
db.collection('product').where({
select_classify:fenlei,
})
.get()
.then(res=>{
console.log("获取商品",res.data)
that.setData({
goods:res.data
})
})
}
},
// 选择分类
select_classify(e){
let that = this
let name = e.currentTarget.dataset.name
that.setData({
select_classify:name
})
that.get_goods(name)
},
// 获取分类
get_classify(){
let that = this
let fenlei = that.data.fenlei
console.log(fenlei)
db.collection('fenlei').orderBy('num','asc').get().then(res=>{
console.log("获取分类",res.data)
that.setData({
fenlei:fenlei.concat(res.data),
})
})
},
/**
* 生命周期函数--监听页面加载
*/
onLoad:function(options) {
let that = this
that.get_classify()
that.get_goods("全部")
},
/**
* 生命周期函数--监听页面初次渲染完成
*/
onReady() {
},
/**
* 生命周期函数--监听页面显示
*/
onShow() {
},
/**
* 生命周期函数--监听页面隐藏
*/
onHide() {
},
/**
* 生命周期函数--监听页面卸载
*/
onUnload() {
},
/**
* 页面相关事件处理函数--监听用户下拉动作
*/
onPullDownRefresh() {
},
/**
* 页面上拉触底事件的处理函数
*/
onReachBottom() {
},
/**
* 用户点击右上角分享
*/
onShareAppMessage() {
}
})
<view style="margin-bottom: 200rpx;">
<block wx:for="{{product}}" wx:key="_id">
<!-- 商品信息模块 -->
<view class="product_list">
<view class="product_list_1">
<view class="product_list_11" bindlongpress="delete_product">
<checkbox-group bindchange="xuanze" data-id="{{item._id}}">
<checkbox value="{{item._id}}"checked="{{item.product_checked}}"></checkbox>
</checkbox-group>
<view class="product_list_3">
<image src="{{item.product_src}}" style="width: 100rpx;height: 100rpx;"></image>
<view class="product_list_2">
<view style="font-size:20px">{{item.product_name}}</view>
<view style="color: red;">¥:{{item.product_price}}</view>
</view>
<view class="jiajian">
<van-icon name="plus" data-id="{{item._id}}" bindtap="product_jia" />
<view >
<view>{{item.product_num}}</view>
</view>
<van-icon name="minus"data-id="{{item._id}}" bindtap="product_jian" data-product_num="{{item.product_num}}" />
</view>
</view>
</view>
</view>
</view>
</block>
</view>
<van-empty description="请添加商品" />
<view class="bottom">
<van-submit-bar
price="{{money}}"
button-text="提交订单"
bind:submit="pay"
safe-area-inset-bottom=""
tip="{{ true }}"
>
<van-tag type="primary"data-name="删除" bindtap="delete">删除</van-tag>
</van-submit-bar>
</view>// pages/shopping_car/shopping_car.js
const db = wx.cloud.database()
const _ = db.command
Page({
/**
* 页面的初始数据
*/
data: {
product:[],
money:0,
product_now:[],
product_id:[],
delet_id:[]
},
//支付事件
pay:function(e){
let that = this
db.collection('shopping_car').where({
product_checked:"true"
}).get({
success:function(res){
console.log('获取商品成功',res)
if(res.data.length == 0){
wx.showToast({
title: '您还未选择商品',
icon:"none"
})
}else{
wx.redirectTo({
url: '../tijiaodingdan/tijiaodingdan',
})
}
},fail:function(res){
console.log('获取商品失败',res)
}
})
},
//计算金额
get_money_sum(){
let that = this
let money_sum = 0
for(var x = 0;x<that.data.product.length;x++){
if(that.data.product[x].product_checked == "true"){
money_sum=money_sum+(that.data.product[x].product_num*that.data.product[x].product_price)
}
}
that.setData({
money:money_sum*100
})
},
//选择事件
xuanze:function(e){
let that = this
console.log(e)
that.setData({
delet_id:that.data.delet_id.concat(e.detail.value[0])
})
if(e.detail.value.length !== 0){
db.collection('shopping_car').doc(e.target.dataset.id).update({
data:{
product_checked:"true"
},success:function(res){
db.collection('shopping_car').get({
success:function(res){
console.log('获取购物车商品成功',res)
that.setData({
product:res.data,
})
that.get_money_sum()
},fail:function(res){
console.log('获取购物车商品失败',res)
}
})
}
})
}else{
db.collection('shopping_car').doc(e.target.dataset.id).update({
data:{
product_checked:""
},success:function(){
db.collection('shopping_car').get({
success:function(res){
console.log('获取购物车商品成功',res)
that.setData({
product:res.data,
})
that.get_money_sum()
},fail:function(res){
console.log('获取购物车商品失败',res)
}
})
}
})
}
},
//商品删除
delete:function(){
let that = this
wx.cloud.callFunction({
name:"product_delet",
success:function(res){
console.log('删除商品成功',res)
db.collection('shopping_car').get({
success:function(res){
console.log('获取购物车商品成功',res)
that.setData({
product:res.data,
})
that.get_money_sum()
},fail:function(res){
console.log('获取购物车商品失败',res)
}
})
},fail:function(res){
console.log('删除商品失败',res)
}
})
},
//商品数量增加事件
product_jia:function(e){
let that = this
console.log(e)
db.collection('shopping_car').doc(e.target.dataset.id).update({
data:{
product_num: _.inc(1)
},success:function(res){
console.log('商品数量加一',res)
db.collection('shopping_car').get({
success:function(res){
console.log('获取购物车商品成功',res)
that.setData({
product:res.data
})
that.get_money_sum()
},fail:function(res){
console.log('获取购物车商品失败',res)
}
})
},fail:function(res){
console.log('获取商品价格失败',res)
}
})
},
//商品数量减少事件
product_jian:function(e){
let that = this
console.log(e)
if(e.target.dataset.product_num<2){
wx.showToast({
title: '客观不能再少了',
icon:"none"
})
}else{
db.collection('shopping_car').doc(e.target.dataset.id).update({
data:{
product_num: _.inc(-1)
} ,success:function(res){
console.log('商品数量加一',res)
db.collection('shopping_car').get({
success:function(res){
console.log('获取购物车商品成功',res)
that.setData({
product:res.data
})
that.get_money_sum()
},fail:function(res){
console.log('获取购物车商品失败',res)
}
})
},fail:function(res){
console.log('获取商品价格失败',res)
}
})
}
},
/**
* 生命周期函数--监听页面加载
*/
onLoad:function(options) {
let that = this
db.collection('shopping_car').get({
success:function(res){
console.log('获取购物车商品成功',res)
that.setData({
product:res.data
})
that.get_money_sum()
},fail:function(res){
console.log('获取购物车商品失败',res)
}
})
},
/**
* 生命周期函数--监听页面初次渲染完成
*/
onReady() {
},
/**
* 生命周期函数--监听页面显示
*/
onShow() {
let that = this
db.collection('shopping_car').get({
success:function(res){
console.log('获取购物车商品成功',res)
that.setData({
product:res.data
})
that.get_money_sum()
},fail:function(res){
console.log('获取购物车商品失败',res)
}
})
},
/**
* 生命周期函数--监听页面隐藏
*/
onHide() {
},
/**
* 生命周期函数--监听页面卸载
*/
onUnload() {
},
/**
* 页面相关事件处理函数--监听用户下拉动作
*/
onPullDownRefresh() {
},
/**
* 页面上拉触底事件的处理函数
*/
onReachBottom() {
},
/**
* 用户点击右上角分享
*/
onShareAppMessage() {
}
})<!-- 个人信息开始 -->
<view class="lay_row_spa pad_20 user_msg lay_row_sta">
<view class="lay_row_sta " style="width:60%;">
<image class="avg" src="{{user.userInfo.avatarUrl}}" class="avg"></image>
<text style="font-size: 30rpx;font-weight: bolder;color: #FFFF;">{{user.userInfo.nickName}}</text>
</view>
<!-- <text style="font-size: 25rpx;font-weight: bolder; color: #FFFF;">个人信息</text> -->
</view>
<!-- 个人信息结束 -->
<!-- 内容总模块开始 -->
<view >
<!-- 订单管理开始 -->
<view class=" order_case" style="margin-top: 30rpx;height: 100rpx;">
<navigator url="../DDguanli/DDguanli" class="WDDD">
<image style="width: 80rpx;height: 80rpx;margin-left: 20rpx;margin-top: 10rpx;" src="cloud://shangcheng-1gv76n6pf3af957d.7368-shangcheng-1gv76n6pf3af957d-1312670923/我的img/222.png"></image>
<view class="WDDD1" style="margin-left: 50rpx;">
<text style="font-size: 40rpx;">我的订单</text>
</view>
<van-icon style="margin-left: 370rpx;" name="arrow" />
</navigator>
</view>
<!-- 订单管理结束 -->
<!-- 功能模块开始 -->
<view class="lay_col_cen pad_20 fun_case">
<!-- 第一行开始 -->
<view class="lay_row_sta fun_row">
<view class="lay_col_cen fun_item" bindtap="my_address">
<image src="cloud://shangcheng-1gv76n6pf3af957d.7368-shangcheng-1gv76n6pf3af957d-1312670923/我的img/dizhi.png" class="fun_img"></image>
<text>我的地址</text>
</view>
<view class="lay_col_cen fun_item" bindtap="show_login_case">
<image src="cloud://shangcheng-1gv76n6pf3af957d.7368-shangcheng-1gv76n6pf3af957d-1312670923/我的img/houtaiyunying.png" class="fun_img"></image>
<text>商户平台</text>
</view>
</view>
<!-- 第一行结束 -->
<!-- 第三行结束 -->
</view>
<!-- 功能模块结束 -->
</view>
<!-- 内容总模块结束 -->
<!-- 登录弹窗开始 -->
<van-popup show="{{ show_login }}" round position="bottom"custom-style="height: 60%" closeable bind:close="close_login_case">
<view class="lay_col_sta pad_20">
<view class="lay_row_cen"style="height:100rpx">
<text>登录</text>
</view>
<view class="lay_row_sta" style="width:80%;margin-top: 80rpx;">
<van-icon name="friends-o" />
<input type="text" placeholder="账号" style="margin-left:20rpx" data-name="username" bindinput="input_msg"/>
</view>
<van-divider style="width:80%" custom-style="margin-top:10rpx;margin-bottom:10rpx"></van-divider>
<view class="lay_row_sta" style="width:80%;margin-top: 40rpx;">
<van-icon name="goods-collect-o" />
<input type="password" placeholder="密码" style="margin-left:20rpx" data-name="password" bindinput="input_msg"/>
</view>
<van-divider style="width:80%" custom-style="margin-top:10rpx;margin-bottom:10rpx"></van-divider>
<button style="background-color:#4fc08d;color:#FFFF;width:70%;margin-top:100rpx"disabled="{{is_login?'true':''}}" bindtap="login_admin">登录</button>
</view>
</van-popup>
<!-- 登录弹窗结束 -->
// pages/wode/wode.js
const db = wx.cloud.database()
const app = getApp()
Page({
/**
* 页面的初始数据
*/
data: {
user:{},
show_login:false,
username:"",
password:"",
is_login:false
},
login_admin(){
let that = this
wx.showLoading({
title: '登陆中',
})
if(that.data.username == '' || that.data.password == ''){
wx.showToast({
title: '请输入账号密码',
icon:"none"
})
}else{
that.setData({
is_login:true
})
db.collection('admin').where({
username:that.data.username,
password:that.data.password,
}).get().then(res=>{
console.log('登录',res)
that.setData({
is_login:false
})
wx.hideLoading()
if(res.data.length == 0){
wx.showToast({
title: '账号或密码错误',
})
}else{
app.globalData.admin = res.data[0]
wx.navigateTo({
url: '../admin_index/admin_index',
})
}
})
}
},
//输入信息开始
input_msg(e){
let that =this
let name = e.currentTarget.dataset.name
that.setData({
[name]:e.detail.value
})
},
// 输入信息结束
// 后台运营关闭登录框开始
close_login_case(){
this.setData({
show_login:false
})
wx.showTabBar()
},
// 后台运营关闭登录框结束
// 后台运营显示登录框开始
show_login_case(){
this.setData({
show_login:true
})
wx.hideTabBar()
},
// 后台运营显示登录框结束
//我的地址开始
my_address:function(e){
wx.getSetting({
success(res){
console.log(res)
if(res.authSetting['scope.address']){
wx.authorize({
scope: 'scope.address',
success(){
wx.chooseAddress({
success(res){
console.log(res)
},
})
}
})
}else{
wx.openSetting({
success(res){
console.log(res.authSetting)
}
})
}
}
})
},
//我的地址结束
// 用户注册开始
register(){
let that = this
wx.showModal({
title: '提示',
content: '您还未注册,是否注册',
success (res) {
if (res.confirm) {
console.log('用户点击确定')
               wx.getUserProfile({
                    desc: '用于完善会员资料', // 声明获取用户个人信息后的用途,后续会展示在弹窗中,请谨慎填写
                    success: (userInfo) => {
                        console.log(userInfo)
                        wx.showLoading({
                          title: '注册中',
                        })
                        db.collection('user').add({
                            data:{
                                userInfo:userInfo.userInfo
                            }
                        }).then(user=>{
                            wx.hideLoading()
                            wx.showToast({
                              title: '注册成功!',
                            })
                            that.login()

                        })

                    }
                  })
} else if (res.cancel) {
console.log('用户点击取消')
}
}
})
},
// 用户注册结束
// 用户登录开始
login(){
let that = this
db.collection('user').get().then(res=>{
if(res.data.length > 0){
that.setData({
user:res.data[0]
})
}else{
that.register()
}
})
},
// 用户登录结束
/**
* 生命周期函数--监听页面加载
*/
onLoad(options) {
let that = this
that.login()
},
/**
* 生命周期函数--监听页面初次渲染完成
*/
onReady() {
},
/**
* 生命周期函数--监听页面显示
*/
onShow() {
},
/**
* 生命周期函数--监听页面隐藏
*/
onHide() {
},
/**
* 生命周期函数--监听页面卸载
*/
onUnload() {
},
/**
* 页面相关事件处理函数--监听用户下拉动作
*/
onPullDownRefresh() {
},
/**
* 页面上拉触底事件的处理函数
*/
onReachBottom() {
},
/**
* 用户点击右上角分享
*/
onShareAppMessage() {
}
})
出于纯粹的兴趣,我很好奇如何按顺序创建PI,而不是在过程结果之后生成数字,而是让数字在过程本身生成时显示。如果是这种情况,那么数字可以自行产生,我可以对以前看到的数字实现垃圾收集,从而创建一个无限系列。结果只是在Pi系列之后每秒生成一个数字。这是我通过互联网筛选的结果:这是流行的计算机友好算法,类机器算法:defarccot(x,unity)xpow=unity/xn=1sign=1sum=0loopdoterm=xpow/nbreakifterm==0sum+=sign*(xpow/n)xpow/=x*xn+=2sign=-signendsumenddefcalc_pi(digits
关闭。这个问题是opinion-based.它目前不接受答案。想要改进这个问题?更新问题,以便editingthispost可以用事实和引用来回答它.关闭4年前。Improvethisquestion我想在固定时间创建一系列低音和高音调的哔哔声。例如:在150毫秒时发出高音调的蜂鸣声在151毫秒时发出低音调的蜂鸣声200毫秒时发出低音调的蜂鸣声250毫秒的高音调蜂鸣声有没有办法在Ruby或Python中做到这一点?我真的不在乎输出编码是什么(.wav、.mp3、.ogg等等),但我确实想创建一个输出文件。
如何在buildr项目中使用Ruby?我在很多不同的项目中使用过Ruby、JRuby、Java和Clojure。我目前正在使用我的标准Ruby开发一个模拟应用程序,我想尝试使用Clojure后端(我确实喜欢功能代码)以及JRubygui和测试套件。我还可以看到在未来的不同项目中使用Scala作为后端。我想我要为我的项目尝试一下buildr(http://buildr.apache.org/),但我注意到buildr似乎没有设置为在项目中使用JRuby代码本身!这看起来有点傻,因为该工具旨在统一通用的JVM语言并且是在ruby中构建的。除了将输出的jar包含在一个独特的、仅限ruby
使用带有Rails插件的vim,您可以创建一个迁移文件,然后一次性打开该文件吗?textmate也可以这样吗? 最佳答案 你可以使用rails.vim然后做类似的事情::Rgeneratemigratonadd_foo_to_bar插件将打开迁移生成的文件,这正是您想要的。我不能代表textmate。 关于ruby-使用VimRails,您可以创建一个新的迁移文件并一次性打开它吗?,我们在StackOverflow上找到一个类似的问题: https://sta
在rails源中:https://github.com/rails/rails/blob/master/activesupport/lib/active_support/lazy_load_hooks.rb可以看到以下内容@load_hooks=Hash.new{|h,k|h[k]=[]}在IRB中,它只是初始化一个空哈希。和做有什么区别@load_hooks=Hash.new 最佳答案 查看rubydocumentationforHashnew→new_hashclicktotogglesourcenew(obj)→new_has
我想用ruby编写一个小的命令行实用程序并将其作为gem分发。我知道安装后,Guard、Sass和Thor等某些gem可以从命令行自行运行。为了让gem像二进制文件一样可用,我需要在我的gemspec中指定什么。 最佳答案 Gem::Specification.newdo|s|...s.executable='name_of_executable'...endhttp://docs.rubygems.org/read/chapter/20 关于ruby-在Ruby中编写命令行实用程序
我对最新版本的Rails有疑问。我创建了一个新应用程序(railsnewMyProject),但我没有脚本/生成,只有脚本/rails,当我输入ruby./script/railsgeneratepluginmy_plugin"Couldnotfindgeneratorplugin.".你知道如何生成插件模板吗?没有这个命令可以创建插件吗?PS:我正在使用Rails3.2.1和ruby1.8.7[universal-darwin11.0] 最佳答案 随着Rails3.2.0的发布,插件生成器已经被移除。查看变更日志here.现在
如何使用RSpec::Core::RakeTask初始化RSpecRake任务?require'rspec/core/rake_task'RSpec::Core::RakeTask.newdo|t|#whatdoIputinhere?endInitialize函数记录在http://rubydoc.info/github/rspec/rspec-core/RSpec/Core/RakeTask#initialize-instance_method没有很好的记录;它只是说:-(RakeTask)initialize(*args,&task_block)AnewinstanceofRake
关闭。这个问题需要detailsorclarity.它目前不接受答案。想改进这个问题吗?通过editingthispost添加细节并澄清问题.关闭8年前。Improvethisquestion为什么SecureRandom.uuid创建一个唯一的字符串?SecureRandom.uuid#=>"35cb4e30-54e1-49f9-b5ce-4134799eb2c0"SecureRandom.uuid方法创建的字符串从不重复?
我的主要目标是能够完全理解我正在使用的库/gem。我尝试在Github上从头到尾阅读源代码,但这真的很难。我认为更有趣、更温和的踏脚石就是在使用时阅读每个库/gem方法的源代码。例如,我想知道RubyonRails中的redirect_to方法是如何工作的:如何查找redirect_to方法的源代码?我知道在pry中我可以执行类似show-methodmethod的操作,但我如何才能对Rails框架中的方法执行此操作?您对我如何更好地理解Gem及其API有什么建议吗?仅仅阅读源代码似乎真的很难,尤其是对于框架。谢谢! 最佳答案 Ru