这是一篇关于android开发的UI部分的笔记,其中包括布局,布局中常用的单位以及一个计算器UI的小例子。这里所用到的开发工具是Android4.1。
目录
<?xml version="1.0" encoding="utf-8"?>
<androidx.constraintlayout.widget.ConstraintLayout xmlns:android="http://schemas.android.com/apk/res/android"
xmlns:app="http://schemas.android.com/apk/res-auto"
xmlns:tools="http://schemas.android.com/tools"
android:layout_width="match_parent"
android:layout_height="match_parent"
tools:context=".MainActivity">
<LinearLayout
android:layout_width="match_parent"
android:layout_height="match_parent">
</LinearLayout>
</androidx.constraintlayout.widget.ConstraintLayout>我们可以通过orientation这个属性来修改LinearLayout.布局的孩子摆放方向,它的值有两个:一个是vertical(水平线性布局),另一个是horizontal(垂直线性布局).
当有些时候我们需要平均的给孩子高度或宽度,这个时候我们就可以用权重。有时候不平均,但点的宽/高成比例,我们也可以用权重解决。
这个是平均分配宽度的方法,每个占宽度为0,权重占的都是1,也就是占1/N代码如下:
<LinearLayout
android:layout_width="match_parent"
android:layout_height="match_parent"
android:orientation="horizontal"
tools:layout_editor_absoluteX="61dp"
tools:layout_editor_absoluteY="0dp">
<Button
android:id="@+id/button14"
android:layout_width="0dp"
android:layout_height="wrap_content"
android:layout_weight="1"
android:text="Button" />
<Button
android:id="@+id/button15"
android:layout_width="0dp"
android:layout_height="wrap_content"
android:layout_weight="1"
android:text="Button" />
<Button
android:id="@+id/button16"
android:layout_width="0dp"
android:layout_height="wrap_content"
android:layout_weight="1"
android:text="Button" />
<Button
android:id="@+id/button17"
android:layout_width="0dp"
android:layout_height="wrap_content"
android:layout_weight="1"
android:text="Button" />
</LinearLayout>第二种情况,也不平局,但是成比列,这样的话,我们也可以通过权重来实现:
<LinearLayout
android:layout_width="match_parent"
android:layout_height="match_parent"
android:orientation="horizontal"
tools:layout_editor_absoluteX="61dp"
tools:layout_editor_absoluteY="0dp">
<Button
android:id="@+id/button14"
android:layout_width="0dp"
android:layout_height="wrap_content"
android:layout_weight="2"
android:text="Button" />
<Button
android:id="@+id/button15"
android:layout_width="0dp"
android:layout_height="wrap_content"
android:layout_weight="1"
android:text="Button" />
<Button
android:id="@+id/button16"
android:layout_width="0dp"
android:layout_height="wrap_content"
android:layout_weight="1"
android:text="Button" />
<Button
android:id="@+id/button17"
android:layout_width="0dp"
android:layout_height="wrap_content"
android:layout_weight="1"
android:text="Button" />
</LinearLayout>权重的计算:我们把所有的数字加起来,占的份儿就是该控件占总的部分。
相对的意思就是根据一个参照进行组件的排序。
<?xml version="1.0" encoding="utf-8"?>
<RelativeLayout xmlns:android="http://schemas.android.com/apk/res/android"
xmlns:app="http://schemas.android.com/apk/res-auto"
xmlns:tools="http://schemas.android.com/tools"
android:layout_width="match_parent"
android:layout_height="match_parent"
tools:context=".MainActivity">
<Button
android:layout_width="wrap_content"
android:text="中间"
android:layout_centerInParent="true"
android:layout_height="wrap_content"/>
<Button
android:layout_width="wrap_content"
android:text="右上角"
android:layout_alignParentRight="true"
android:layout_height="wrap_content"/>
<Button
android:layout_width="wrap_content"
android:text="右下角"
android:layout_alignParentRight="true"
android:layout_alignParentBottom="true"
android:layout_height="wrap_content"/>
<Button
android:layout_width="wrap_content"
android:text="左下角"
android:layout_alignParentLeft="true"
android:layout_alignParentBottom="true"
android:layout_height="wrap_content"/>
</RelativeLayout><?xml version="1.0" encoding="utf-8"?>
<RelativeLayout xmlns:android="http://schemas.android.com/apk/res/android"
xmlns:app="http://schemas.android.com/apk/res-auto"
xmlns:tools="http://schemas.android.com/tools"
android:layout_width="match_parent"
android:layout_height="match_parent"
tools:context=".MainActivity">
<Button
android:id="@+id/center_button"
android:layout_width="wrap_content"
android:text="中间"
android:layout_centerInParent="true"
android:layout_height="wrap_content"/>
<Button
android:layout_width="wrap_content"
android:text="中间的右边"
android:layout_centerVertical="true"
android:layout_toLeftOf="@id/center_button"
android:layout_height="wrap_content"/>
<Button
android:layout_width="wrap_content"
android:text="中间的左边"
android:layout_centerVertical="true"
android:layout_toRightOf="@id/center_button"
android:layout_height="wrap_content"/>
<Button
android:layout_width="wrap_content"
android:text="中间的上面"
android:layout_centerHorizontal="true"
android:layout_above="@id/center_button"
android:layout_height="wrap_content"/>
<Button
android:layout_width="wrap_content"
android:text="中间的底部"
android:layout_centerHorizontal="true"
android:layout_below="@id/center_button"
android:layout_height="wrap_content"/>
</RelativeLayout>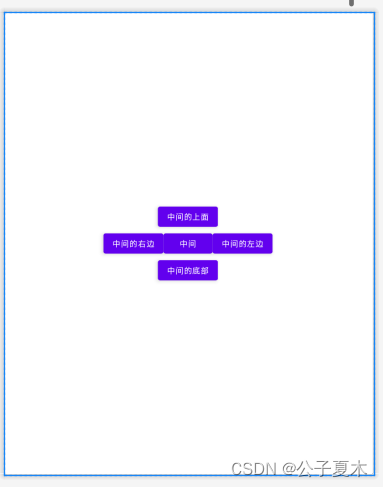
注意:margin是空格,即留白,align是对齐。
Absolutelayout是靠xy来控制自己的位置的(标签上有删除线是因为它已经过时了)
<?xml version="1.0" encoding="utf-8"?>
<AbsoluteLayout xmlns:android="http://schemas.android.com/apk/res/android"
xmlns:app="http://schemas.android.com/apk/res-auto"
xmlns:tools="http://schemas.android.com/tools"
android:layout_width="match_parent"
android:layout_height="match_parent"
tools:context=".MainActivity">
<Button
android:id="@+id/button1"
android:layout_width="wrap_content"
android:text="new button"
android:layout_x="90dp"
android:layout_y="112dp"
android:layout_height="wrap_content"/>
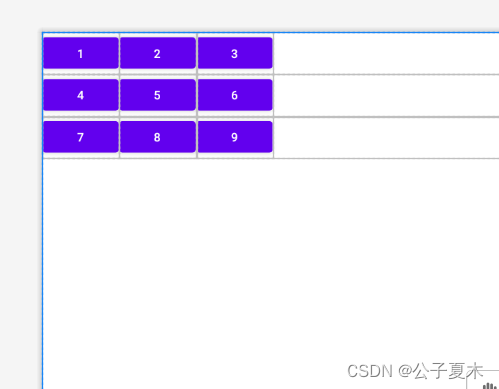
</AbsoluteLayout><?xml version="1.0" encoding="utf-8"?>
<TableLayout xmlns:android="http://schemas.android.com/apk/res/android"
xmlns:app="http://schemas.android.com/apk/res-auto"
xmlns:tools="http://schemas.android.com/tools"
android:layout_width="match_parent"
android:layout_height="match_parent"
tools:context=".MainActivity">
<TableRow>
<Button
android:layout_width="wrap_content"
android:layout_height="wrap_content"
android:text="1"/>
<Button
android:layout_width="wrap_content"
android:layout_height="wrap_content"
android:text="2"/>
<Button
android:layout_width="wrap_content"
android:layout_height="wrap_content"
android:text="3"/>
</TableRow>
<TableRow>
<Button
android:layout_width="wrap_content"
android:layout_height="wrap_content"
android:text="4"/>
<Button
android:layout_width="wrap_content"
android:layout_height="wrap_content"
android:text="5"/>
<Button
android:layout_width="wrap_content"
android:layout_height="wrap_content"
android:text="6"/>
</TableRow>
<TableRow>
<Button
android:layout_width="wrap_content"
android:layout_height="wrap_content"
android:text="7"/>
<Button
android:layout_width="wrap_content"
android:layout_height="wrap_content"
android:text="8"/>
<Button
android:layout_width="wrap_content"
android:layout_height="wrap_content"
android:text="9"/>
</TableRow>
</TableLayout>
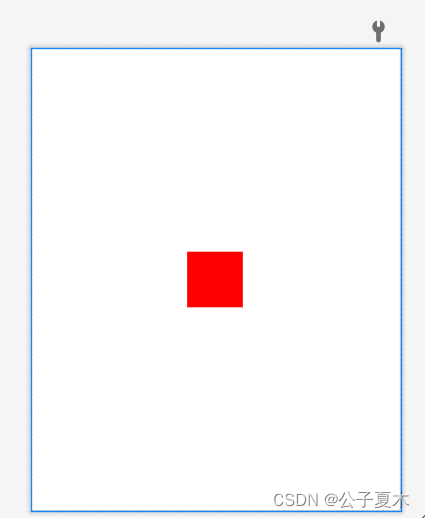
<?xml version="1.0" encoding="utf-8"?>
<FrameLayout xmlns:android="http://schemas.android.com/apk/res/android"
    xmlns:app="http://schemas.android.com/apk/res-auto"
    xmlns:tools="http://schemas.android.com/tools"
    android:layout_width="match_parent"
    android:layout_height="match_parent"
    tools:context=".MainActivity">

    <View
        android:layout_width="100dp"
        android:layout_height="100dp"
        android:background="#ff00"
        android:layout_gravity="center"/>
</FrameLayout>
像素单位不建议使用,除非是手表,或者机顶盒。图片的最小单位就是像素。
这适配屏幕的单位,推荐使用,在实际开发中,UI设计师会给你标好的。
dp | dip 其实这两个是一样的。 dip--缩写->dp—>Density Independent Pixels(密度独立像素)的缩写。也就是独立密度的意思,与像素没有关系,它的标准是︰以160dip为基准,在这个dip的条件下:1dp = 1px;其便屏幕大小进行比例变化即可,这个单位是屏幕适配的。为什么呢?请看下面的文字理解一下吧:
假设标准的屏幕是160dpi,小米2s的屏幕dpi = 342、然后的话,假设在标准屏幕的图片宽度为1dip.也就是1像素。也就是说,在标准屏幕上显示1dip的大小为1像素。而在小米2s上像是是多少呢?我们掐指一算∶得出342/160 = 2.1375.也就是在小米2s上1dip表示的大小为2.375像素。
sp:全名 scaled pixels-best for text size,放大像素(比例像素),与刻度无关,可以根据用户的字体大小首选项进行缩放,主要用来处理字体的大小;
sp它和dp一样,都是谷歌公司的工程师们进行换算过的单位,它使用在字体大小上。sp: scale-Independent Pixels.这个scale貌似是拉伸的意思。
1、wrap是扩展空间,并且强制性占用整个空间,不给其他控件留地方。
2、match的话是指“填充满”父容器。但是他跟fill_parent是不一样的,fill是真的填满,没有条件。而match的话有自动调整的功能。
区别:
1、wrap_content
设置一个视图的尺寸为wrap_content将强制性地使视图扩展以显示全部内容。以TextView和ImageView控件为例,设置为wrap_content将完整显示其内部的文本和图像。布局元素将根据内容更改大小。设置一个视图的尺寸为wrap_content大体等同于设置Windows控件的Autosize属性为True。
2、match_parent
Android2.2中match_parent和fill_parent是一个意思 .两个参数意思一样,match_parent更贴切,于是从2.2开始两个词都可以用。那么如果考虑低版本的使用情况你就需要用fill_parent了
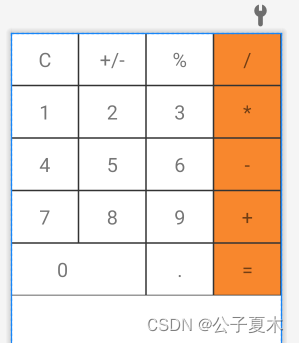
给整体一个垂直线性布局,然后用LinearLayout标签来写每一行,给一个水平线性布局。在LinearLayout放上四个TextView,width为0dp,宽用权重来决定。文字大小用textSize,内容位置用android:gravity。
注:
android:gravity 属性是对该view中内容的限定.比如一个button 上面的text. 你可以设置该text 相对于view的靠左,靠右等位置.

android:layout_gravity是用来设置该view相对与父view 的位置.比如一个button 在linearlayout里,你想把该button放在linearlayout里靠左、靠右等位置就可以通过该属性设置.

即android:gravity用于设置View中内容相对于View组件的对齐方式,而android:layout_gravity用于设置View组件相对于Container的对齐方式。
在drawable里新建一个sahpe_rectangle.xml,

代码如下:
<?xml version="1.0" encoding="utf-8"?>
<shape xmlns:android="http://schemas.android.com/apk/res/android"
    android:shape="rectangle">
    <solid android:color="#ffffff"/>
    <stroke
        android:color="#333333"
        android:width="1dp"/>

</shape>
注:solid:边缘线;stroke:外边框。
给它设置背景色和外边框,在layout里用android:background="@drawable/shape_rectangle"来使用这个背景设置。
我正在使用i18n从头开始构建一个多语言网络应用程序,虽然我自己可以处理一大堆yml文件,但我说的语言(非常)有限,最终我想寻求外部帮助帮助。我想知道这里是否有人在使用UI插件/gem(与django上的django-rosetta不同)来处理多个翻译器,其中一些翻译器不愿意或无法处理存储库中的100多个文件,处理语言数据。谢谢&问候,安德拉斯(如果您已经在rubyonrails-talk上遇到了这个问题,我们深表歉意) 最佳答案 有一个rails3branchofthetolkgem在github上。您可以通过在Gemfi
我正在编写一个包含C扩展的gem。通常当我写一个gem时,我会遵循TDD的过程,我会写一个失败的规范,然后处理代码直到它通过,等等......在“ext/mygem/mygem.c”中我的C扩展和在gemspec的“扩展”中配置的有效extconf.rb,如何运行我的规范并仍然加载我的C扩展?当我更改C代码时,我需要采取哪些步骤来重新编译代码?这可能是个愚蠢的问题,但是从我的gem的开发源代码树中输入“bundleinstall”不会构建任何native扩展。当我手动运行rubyext/mygem/extconf.rb时,我确实得到了一个Makefile(在整个项目的根目录中),然后当
我已经在Sinatra上创建了应用程序,它代表了一个简单的API。我想在生产和开发上进行部署。我想在部署时选择,是开发还是生产,一些方法的逻辑应该改变,这取决于部署类型。是否有任何想法,如何完成以及解决此问题的一些示例。例子:我有代码get'/api/test'doreturn"Itisdev"end但是在部署到生产环境之后我想在运行/api/test之后看到ItisPROD如何实现? 最佳答案 根据SinatraDocumentation:EnvironmentscanbesetthroughtheRACK_ENVenvironm
我们的git存储库中目前有一个Gemfile。但是,有一个gem我只在我的环境中本地使用(我的团队不使用它)。为了使用它,我必须将它添加到我们的Gemfile中,但每次我checkout到我们的master/dev主分支时,由于与跟踪的gemfile冲突,我必须删除它。我想要的是类似Gemfile.local的东西,它将继承从Gemfile导入的gems,但也允许在那里导入新的gems以供使用只有我的机器。此文件将在.gitignore中被忽略。这可能吗? 最佳答案 设置BUNDLE_GEMFILE环境变量:BUNDLE_GEMFI
这似乎非常适得其反,因为太多的gem会在window上破裂。我一直在处理很多mysql和ruby-mysqlgem问题(gem本身发生段错误,一个名为UnixSocket的类显然在Windows机器上不能正常工作,等等)。我只是在浪费时间吗?我应该转向不同的脚本语言吗? 最佳答案 我在Windows上使用Ruby的经验很少,但是当我开始使用Ruby时,我是在Windows上,我的总体印象是它不是Windows原生系统。因此,在主要使用Windows多年之后,开始使用Ruby促使我切换回原来的系统Unix,这次是Linux。Rub
我正在玩HTML5视频并且在ERB中有以下片段:mp4视频从在我的开发环境中运行的服务器很好地流式传输到chrome。然而firefox显示带有海报图像的视频播放器,但带有一个大X。问题似乎是mongrel不确定ogv扩展的mime类型,并且只返回text/plain,如curl所示:$curl-Ihttp://0.0.0.0:3000/pr6.ogvHTTP/1.1200OKConnection:closeDate:Mon,19Apr201012:33:50GMTLast-Modified:Sun,18Apr201012:46:07GMTContent-Type:text/plain
按照目前的情况,这个问题不适合我们的问答形式。我们希望答案得到事实、引用或专业知识的支持,但这个问题可能会引发辩论、争论、投票或扩展讨论。如果您觉得这个问题可以改进并可能重新打开,visitthehelpcenter指导。关闭10年前。问题1)我想知道rubyonrails是否有功能类似于primefaces的gem。我问的原因是如果您使用primefaces(http://www.primefaces.org/showcase-labs/ui/home.jsf),开发人员无需担心javascript或jquery的东西。据我所知,JSF是一个规范,基于规范的各种可用实现,prim
无论您是想搭建桌面端、WEB端或者移动端APP应用,HOOPSPlatform组件都可以为您提供弹性的3D集成架构,同时,由工业领域3D技术专家组成的HOOPS技术团队也能为您提供技术支持服务。如果您的客户期望有一种在多个平台(桌面/WEB/APP,而且某些客户端是“瘦”客户端)快速、方便地将数据接入到3D应用系统的解决方案,并且当访问数据时,在各个平台上的性能和用户体验保持一致,HOOPSPlatform将帮助您完成。利用HOOPSPlatform,您可以开发在任何环境下的3D基础应用架构。HOOPSPlatform可以帮您打造3D创新型产品,HOOPSSDK包含的技术有:快速且准确的CAD
在应用开发中,有时候我们需要获取系统的设备信息,用于数据上报和行为分析。那在鸿蒙系统中,我们应该怎么去获取设备的系统信息呢,比如说获取手机的系统版本号、手机的制造商、手机型号等数据。1、获取方式这里分为两种情况,一种是设备信息的获取,一种是系统信息的获取。1.1、获取设备信息获取设备信息,鸿蒙的SDK包为我们提供了DeviceInfo类,通过该类的一些静态方法,可以获取设备信息,DeviceInfo类的包路径为:ohos.system.DeviceInfo.具体的方法如下:ModifierandTypeMethodDescriptionstatic StringgetAbiList()Obt
@作者:SYFStrive @博客首页:HomePage📜:微信小程序📌:个人社区(欢迎大佬们加入)👉:社区链接🔗📌:觉得文章不错可以点点关注👉:专栏连接🔗💃:感谢支持,学累了可以先看小段由小胖给大家带来的街舞👉微信小程序(🔥)目录自定义组件-behaviors 1、什么是behaviors 2、behaviors的工作方式 3、创建behavior 4、导入并使用behavior 5、behavior中所有可用的节点 6、同名字段的覆盖和组合规则总结最后自定义组件-behaviors 1、什么是behaviorsbehaviors是小程序中,用于实现