效果预览图:
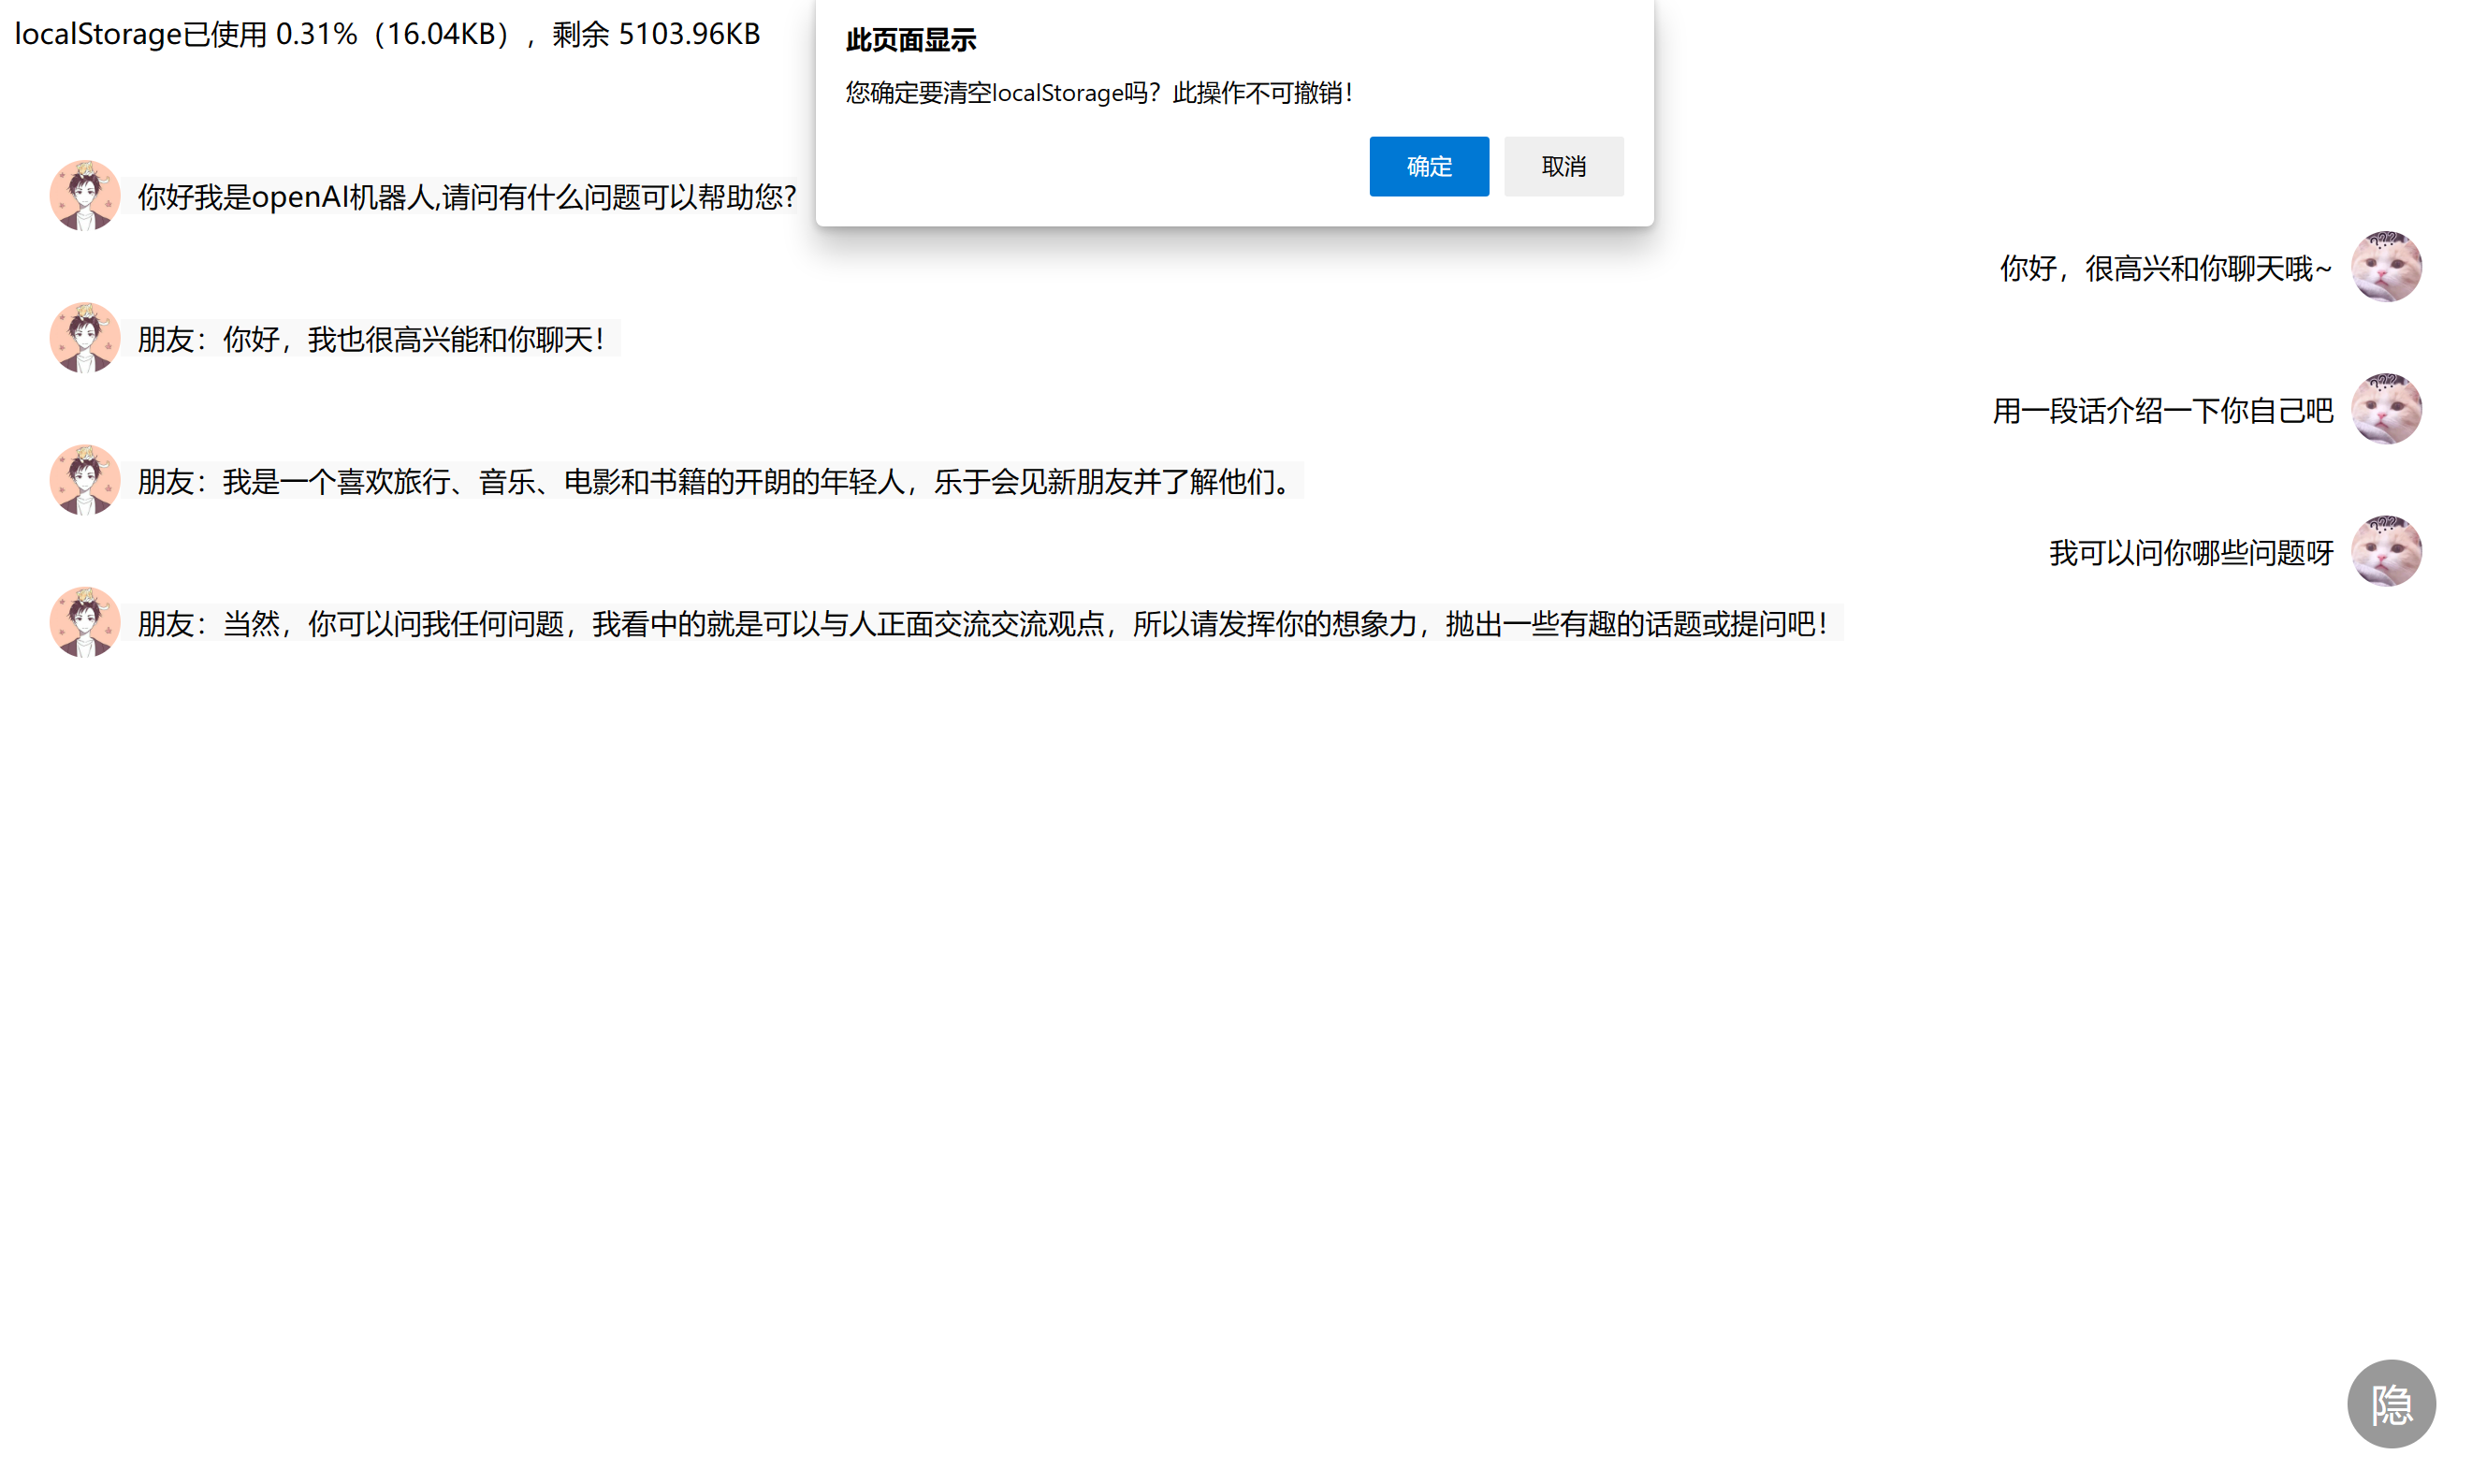
① 在原有的基础上加入了本地实时存档的功能,按照下面的步骤便可以随时在本地查看以往和智能AI所有的聊天记录哦!再也不用担心关闭网页后先前的聊天内容全部消失啦!
PS:最新的谷歌和Edge浏览器都有本地存档这个功能哦~
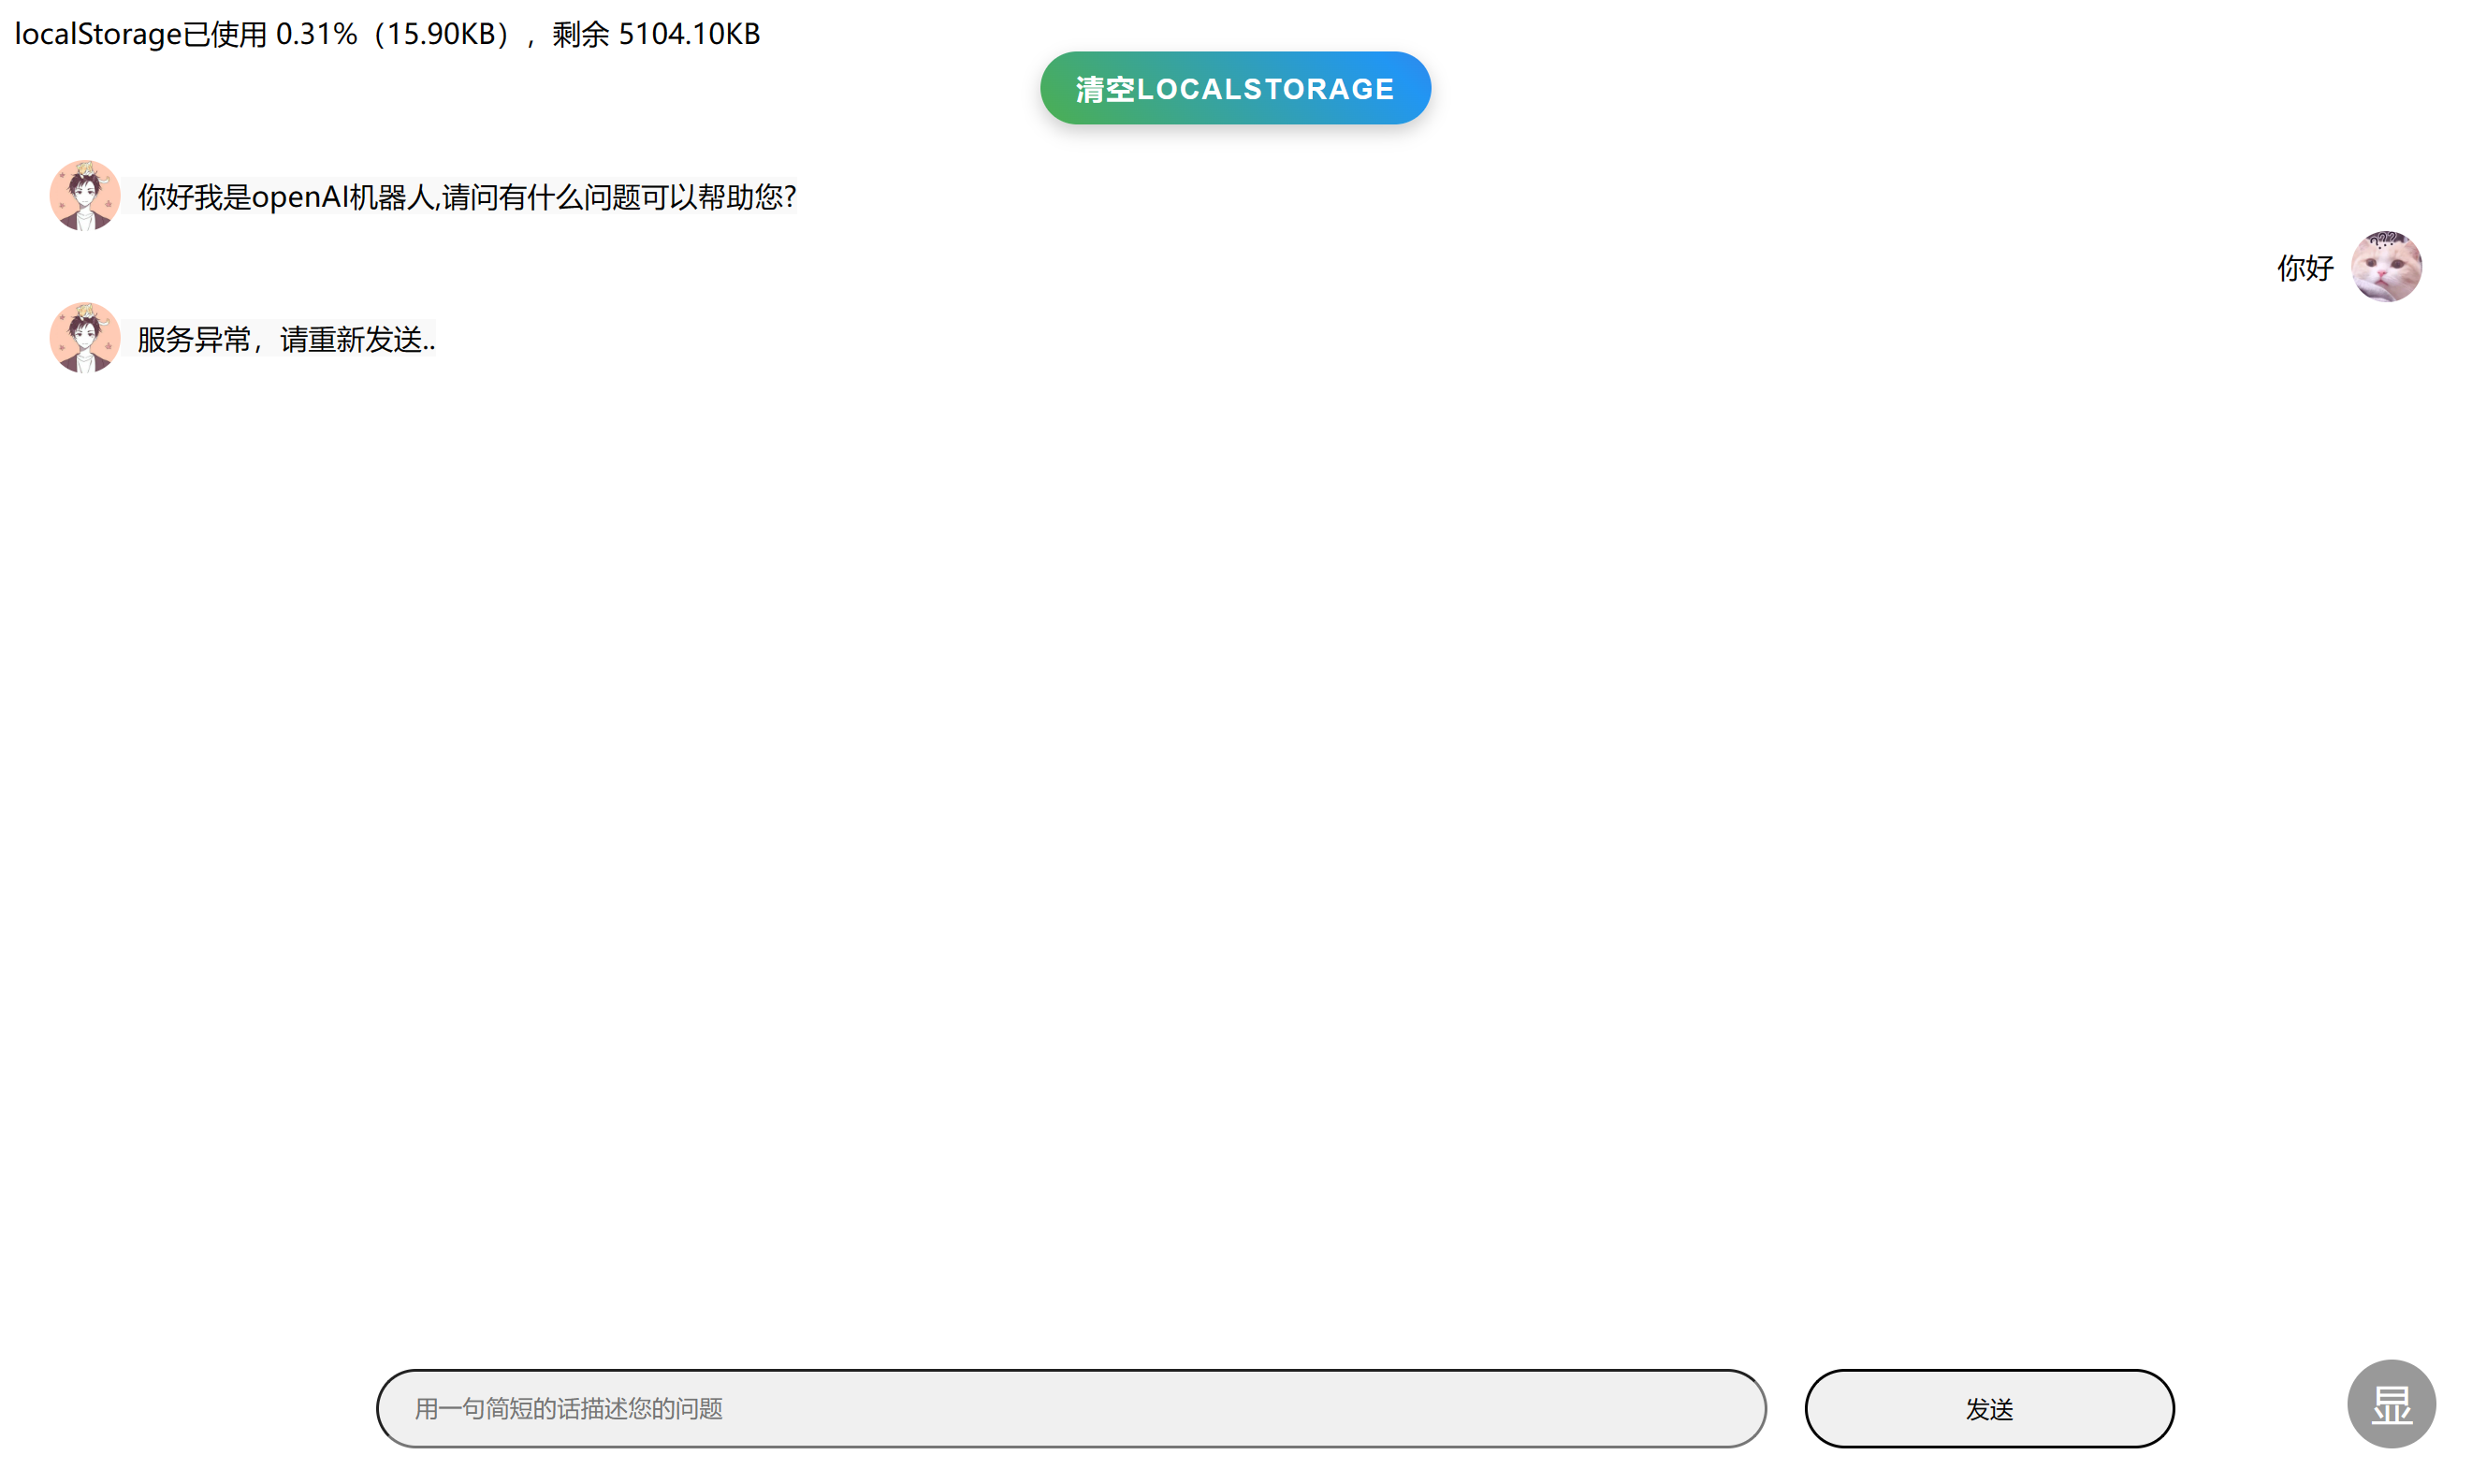
②实时监控本地储存空间余量(5MB)
③还有炫酷彩虹按钮,可以一键清空自己的本地存档,这样就不会被其他人不小心看到自己的聊天记录了!
④在使用的时候发现最下方的输入框容易遮挡文字影响截图与使用,所以便加入了隐藏按钮,点击便隐藏对话框,方便查看与截图~
⑤加入了可自定的头像哦!按照下方步骤便可以更换自己与智能AI的头像哦,聊天更有代入感~
⑥当遇见服务器无法回复的情况时,会自主提出异常,不用重启网页便可以直接在发送一次哦!
原版参考:(53条消息) 网页版chatGPT,国内直接打开就用的chatgpt_小袁同学.的博客-CSDN博客
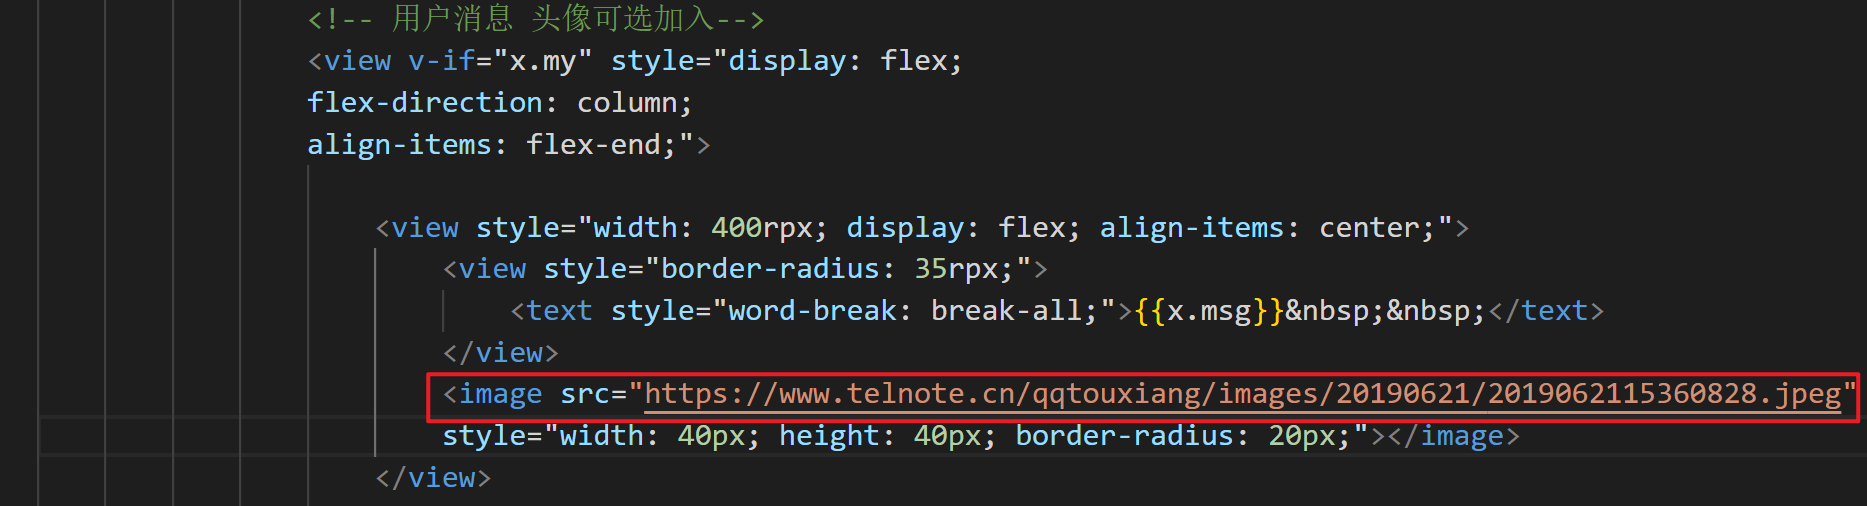
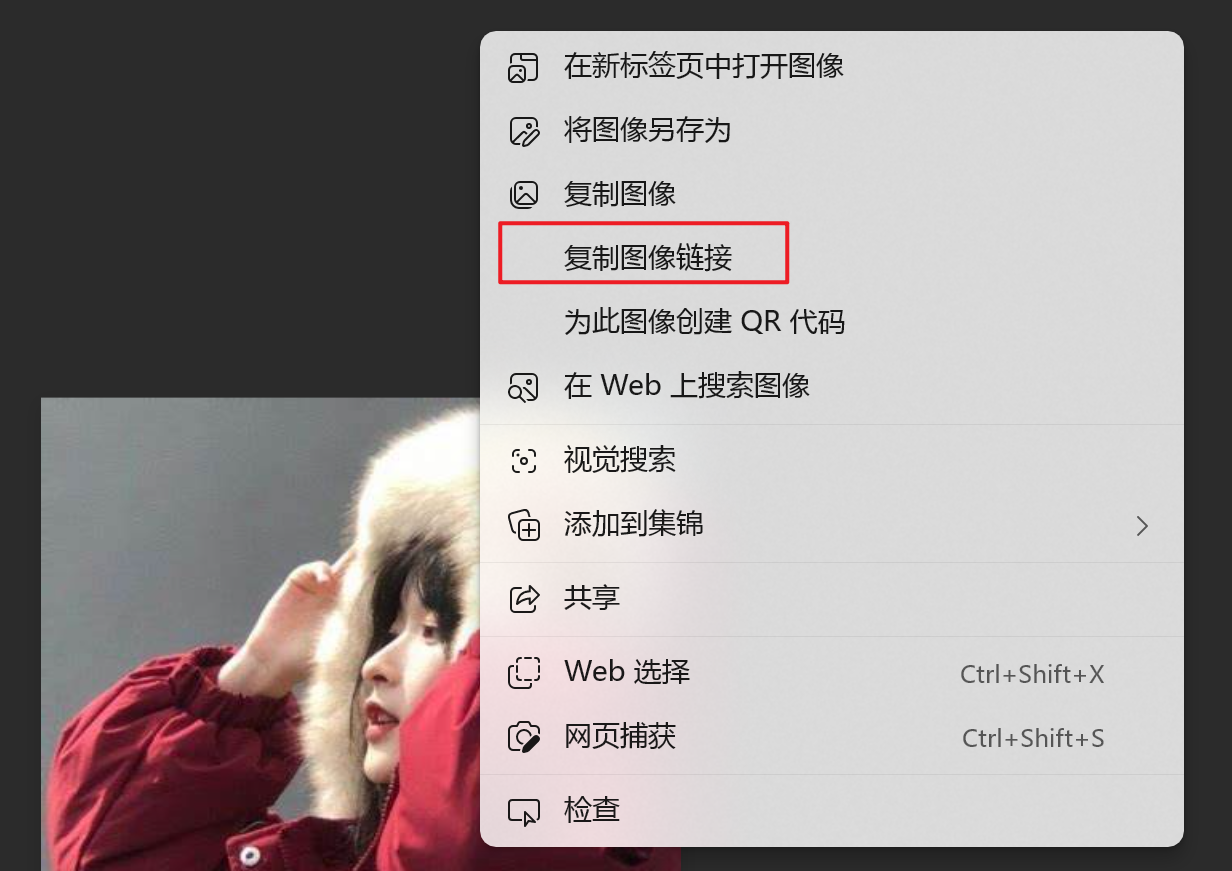
修改自己头像的位置,修改src地址就可以哦,可以使用网络上和本地的图。(网络上的图片就自己用用哦,有版权风险)
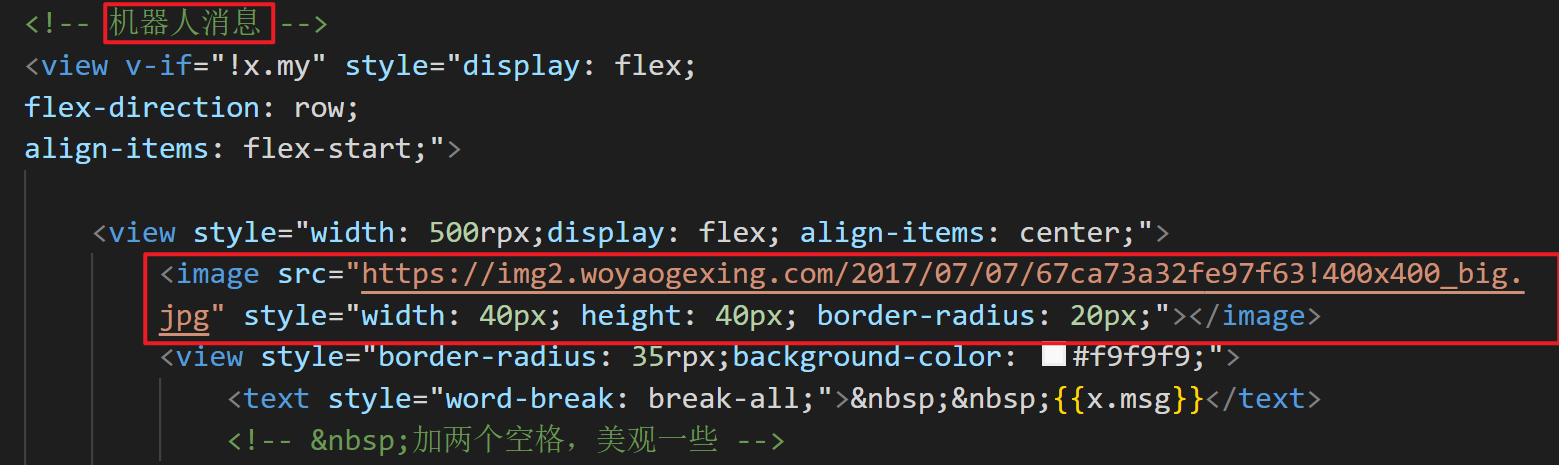
智能机器人头像修改同理哦
如果是本地图片粘帖上图片在电脑中的绝对路劲就可以哦!
但如果需要放网图的话要复制图像链接哦~
以Edge浏览器为例:右键打开菜单点击检查,将会有如右侧的控制台弹出
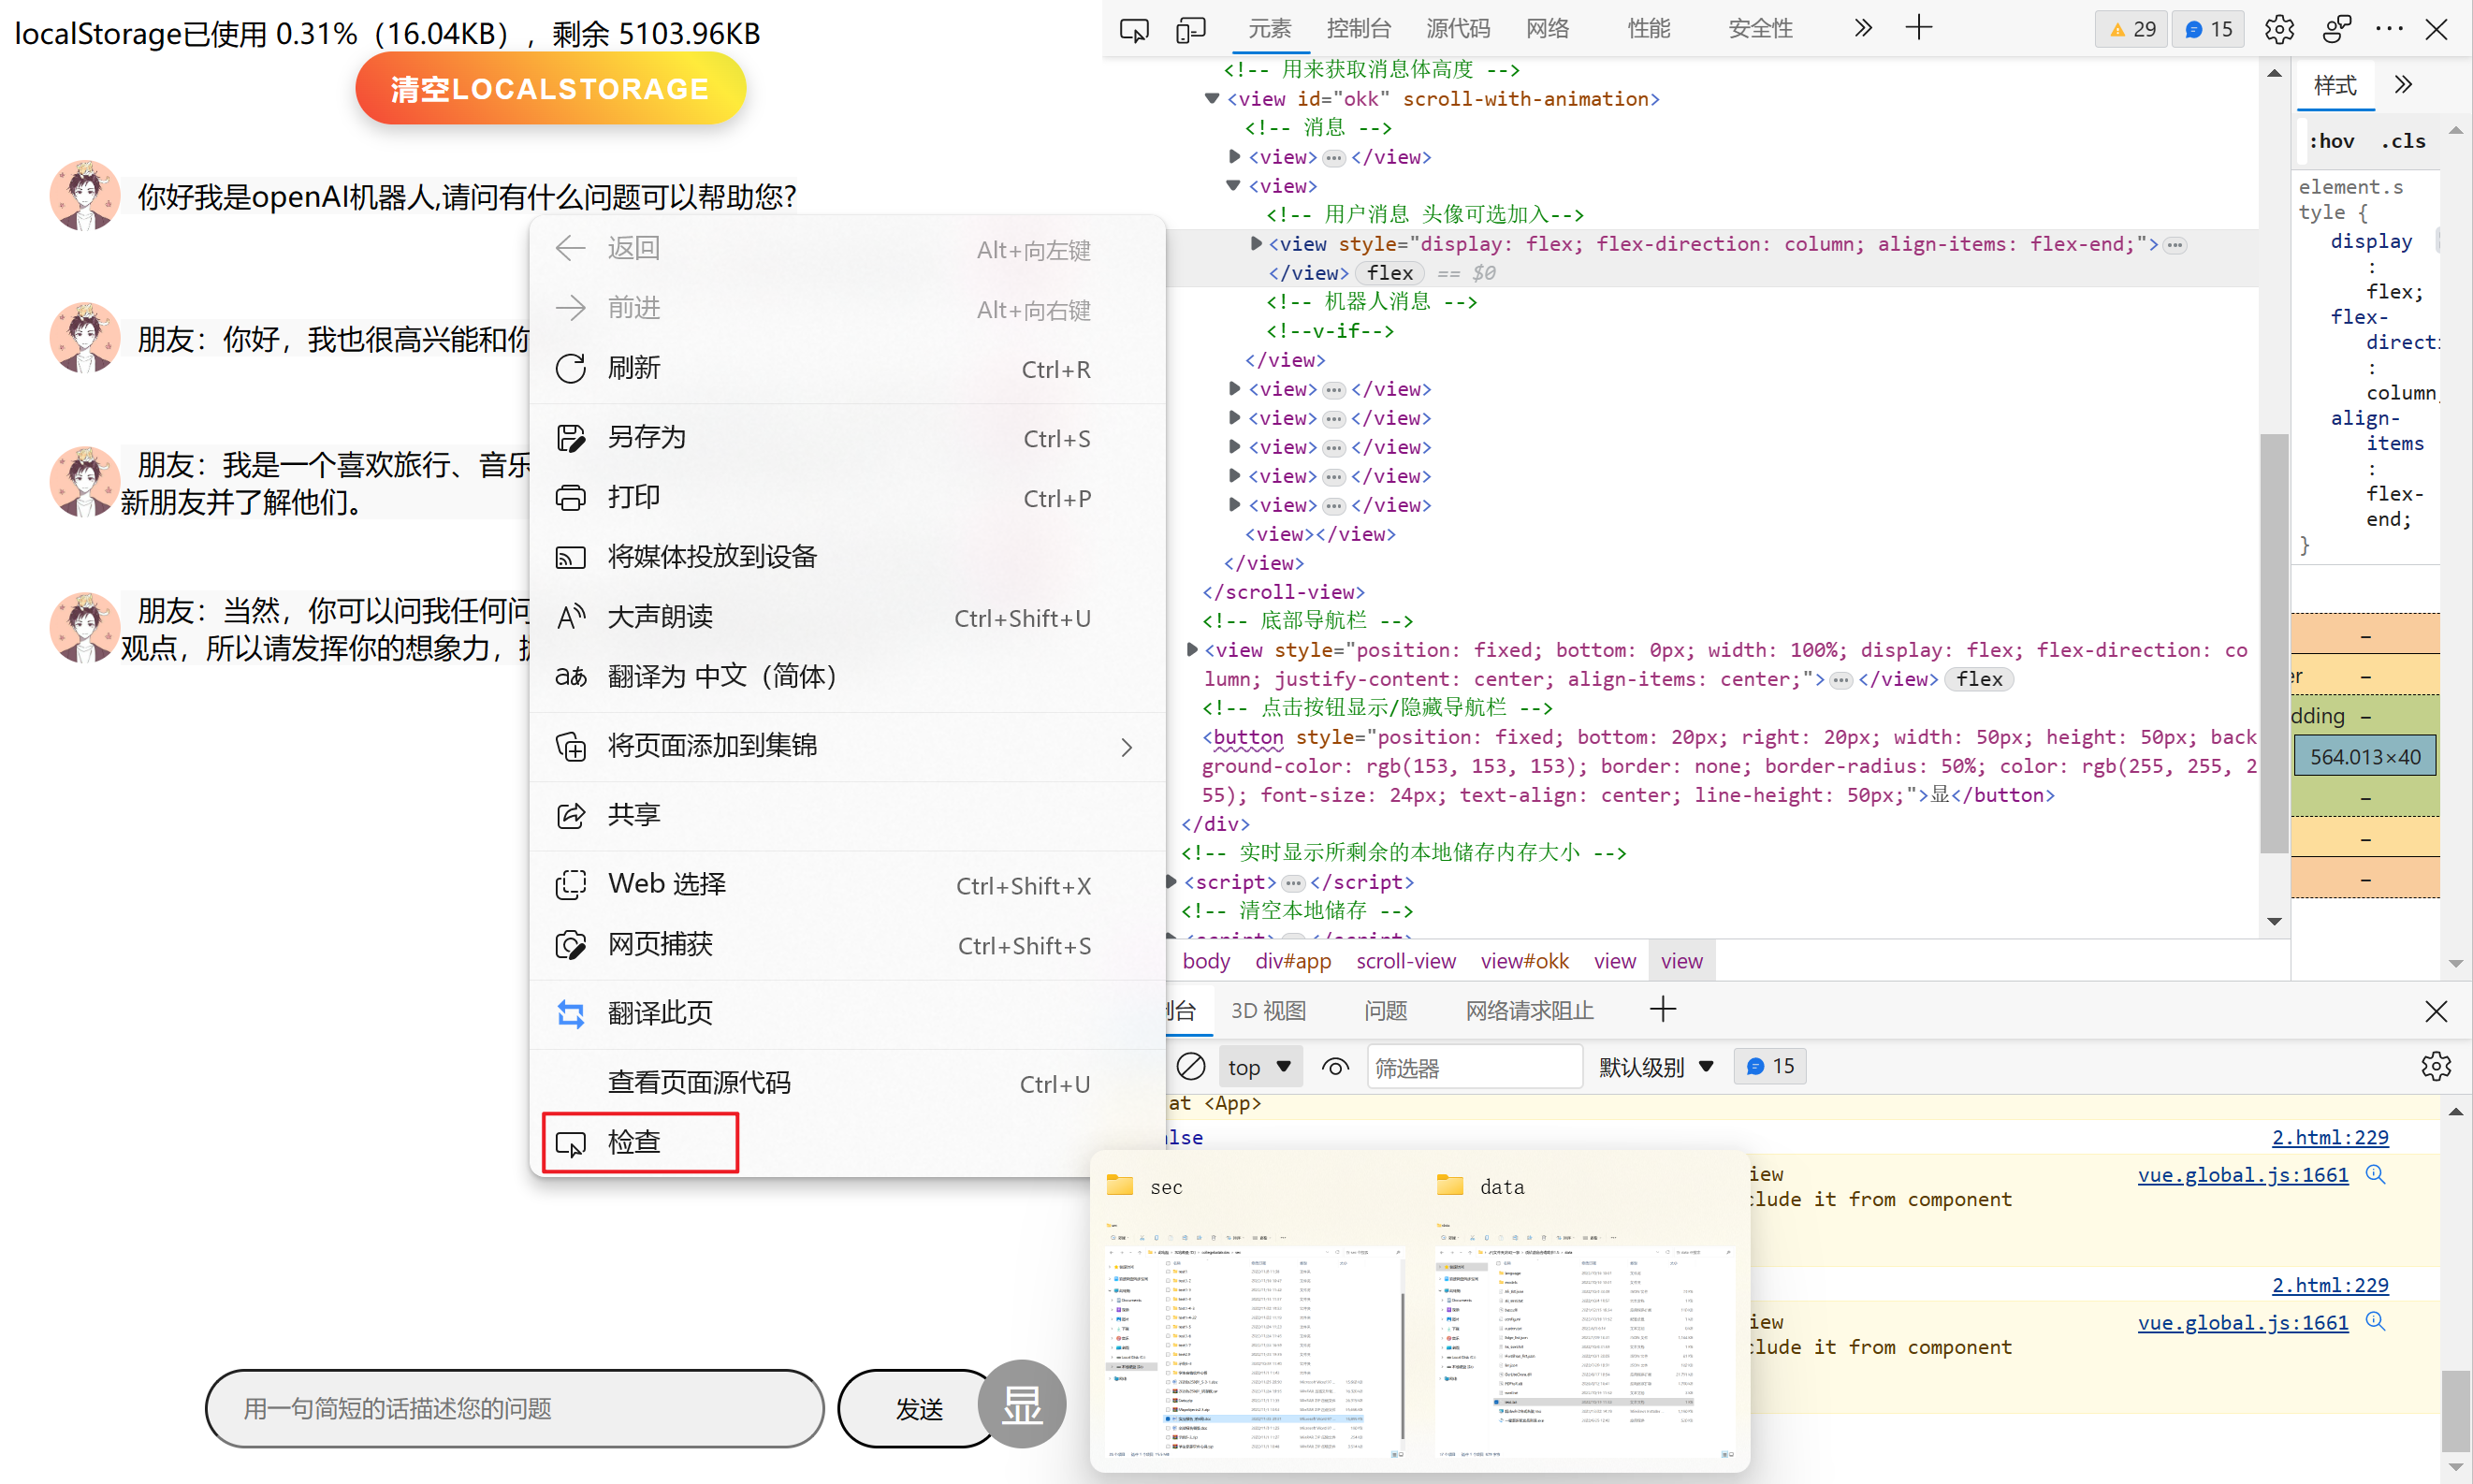
找到应用程序,点进去

就可以在本地储存中看到你和AI的聊天记录啦!

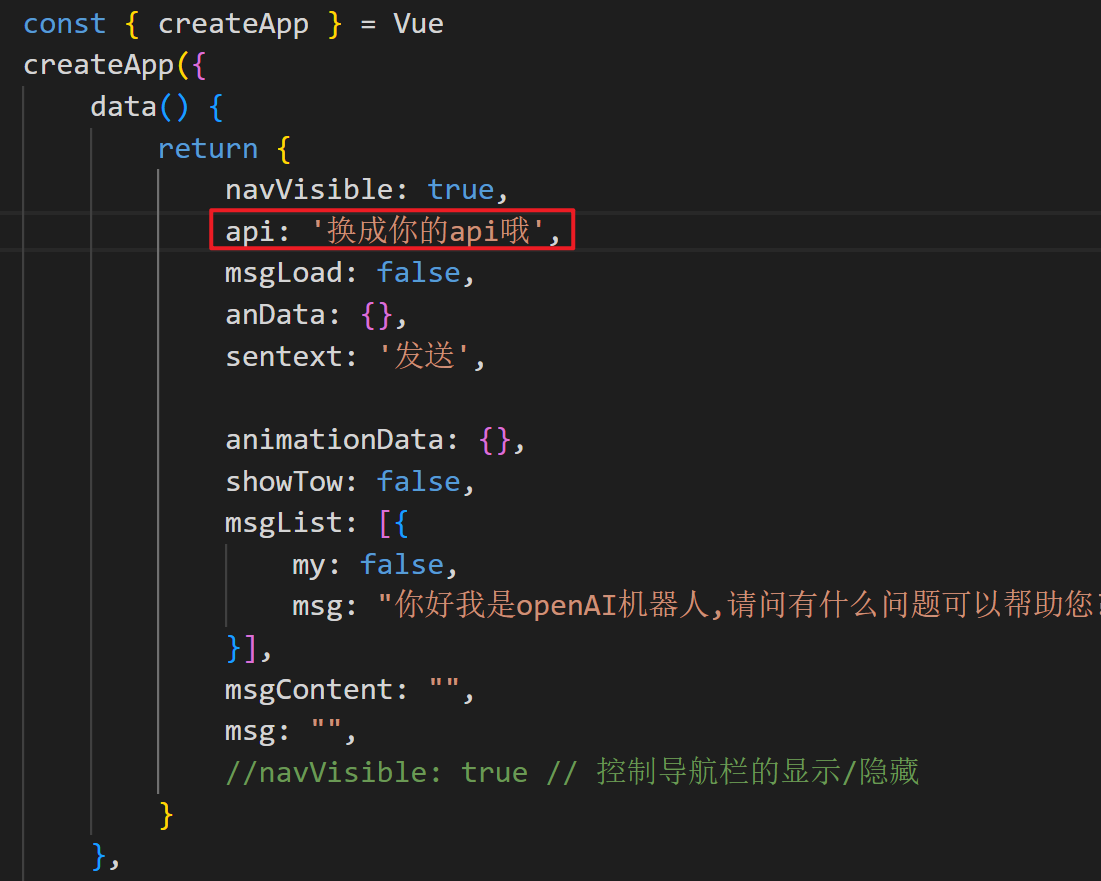
使用的前提是需要有chatGPT的账号去获取apikey,然后把拿到的apikey放在下面代码中,
可以先创建txt文本将内容粘贴进去并且填写api后,将文件后缀名改为.html哦~
<script src="https://unpkg.com/vue@3/dist/vue.global.js"></script>
<script src="https://unpkg.com/axios/dist/axios.min.js"></script>
<!-- 用来显示本地存储还有多少空间 -->
<div id="storageInfo"></div>
<!-- 清空本地储存可以写在标签内的炫酷一点的按钮 -->
<button style="
align-items: center;
background: linear-gradient(45deg, #F44336, #FFEB3B, #4CAF50, #2196F3, #9C27B0);
background-size: 400%;
animation: rainbow 10s ease infinite;
color: white;
padding: 10px 20px;
border: none;
border-radius: 30px;
box-shadow: 0px 4px 10px rgba(0, 0, 0, 0.2);
cursor: pointer;
font-size: 16px;
font-weight: bold;
letter-spacing: 1px;
outline: none;
text-transform: uppercase;"
onclick="confirmClearLocalStorage()">
清空localStorage
</button>
<style>
button {
display: block;
margin: 0 auto;
}
@keyframes rainbow {
0% {
background-position: 0%;
}
50% {
background-position: 100%;
}
100% {
background-position: 0%;
}
}
#chat-container {
position: relative;
width: 500px;
height: 500px;
}
#chat-window {
position: absolute;
top: 50px;
left: 50px;
width: 400px;
height: 400px;
background-color: #fff;
overflow-y: scroll;
}
/* 使view标签隐藏 */
/* .show {
display: flex;
}
.hide {
display: none;
} */
/* .nav-visible .toggle-view {
display: flex;
}
.nav-hidden .toggle-view {
display: none;
} */
</style>
<div id="app" style="display: flex;flex-flow: column;margin: 20 ">
<scroll-view scroll-with-animation scroll-y="true" style="width: 100%;">
<!-- 用来获取消息体高度 -->
<view id="okk" scroll-with-animation>
<!-- 消息 -->
<view v-for="(x,i) in msgList" :key="i">
<!-- 用户消息 头像可选加入-->
<view v-if="x.my" style="display: flex;
flex-direction: column;
align-items: flex-end;">
<view style="width: 400rpx; display: flex; align-items: center;">
<view style="border-radius: 35rpx;">
<text style="word-break: break-all;">{{x.msg}} </text>
</view>
<image src="您的头像地址哦" style="width: 40px; height: 40px; border-radius: 20px;"></image>
<!-- <image src="https://img2.woyaogexing.com/2017/07/07/67ca73a32fe97f63!400x400_big.jpg" style="width: 40px; height: 40px; border-radius: 80rpx;"></image> -->
</view>
</view>
<!-- 机器人消息 -->
<view v-if="!x.my" style="display: flex;
flex-direction: row;
align-items: flex-start;">
<view style="width: 500rpx;display: flex; align-items: center;">
<image src="机器人的头像地址哦" style="width: 40px; height: 40px; border-radius: 20px;"></image>
<view style="border-radius: 35rpx;background-color: #f9f9f9;">
<text style="word-break: break-all;"> {{x.msg}}</text>
<!-- 加两个空格,美观一些 -->
</view>
</view>
</view>
</view>
<view style="height: 130rpx;">
</view>
</view>
</scroll-view>
<!-- 底部导航栏 -->
<view ref="toggleView" style="position: fixed;bottom:0px;width: 100%;display: flex;
flex-direction: column;
justify-content: center;
align-items: center;">
<view style="font-size: 55rpx;display: flex;
flex-direction: row;
justify-content: space-around;
align-items: center;width: 75%;
margin: 20;">
<input v-model="msg" type="text" style="width: 75%;
height: 45px;
border-radius: 50px;
padding-left: 20px;
margin-left: 10px;background-color: #f0f0f0;" @confirm="sendMsg" confirm-type="search"
placeholder-class="my-neirong-sm" placeholder="用一句简短的话描述您的问题" />
<button @click="sendMsg" :disabled="msgLoad" style="height: 45px;
width: 20%;;
color: #030303; border-radius: 2500px;">{{sentext}}</button>
</view>
</view>
</view>
<!-- 点击按钮显示/隐藏导航栏 -->
<button v-on:click="toggleNav" style="position: fixed; bottom: 20px; right: 20px; width: 50px; height: 50px; background-color: #999; border: none; border-radius: 50%; color: #fff; font-size: 24px; text-align: center; line-height: 50px;"> {{ navVisible ? '显':'隐'}}</button>
</div>
<!-- 实时显示所剩余的本地储存内存大小 -->
<script>
function updateStorageInfo() {
const usedSpace = JSON.stringify(localStorage).length;
const totalSpace = 5 * 1024 * 1024; // 5MB
const freeSpace = totalSpace - usedSpace;
const usedPercentage = (usedSpace / totalSpace) * 100;
const storageInfoDiv = document.getElementById("storageInfo");
storageInfoDiv.innerHTML = `localStorage已使用 ${usedPercentage.toFixed(2)}%(${(usedSpace / 1024).toFixed(2)}KB),剩余 ${(freeSpace / 1024).toFixed(2)}KB`;
}
// 在页面加载时更新一次localStorage的使用情况
updateStorageInfo();
// 监听localStorage的变化,当有新的数据添加到localStorage中时更新使用情况
window.addEventListener("storage", function() {
updateStorageInfo();
});
// 在以上代码中,updateStorageInfo()函数会根据localStorage的占用大小和总大小计算出剩余大小和使用百分比,然后将这些信息显示在id为storageInfo的div元素中。
// 为了保证在页面加载时就能显示localStorage的使用情况,我们在代码中首先调用了updateStorageInfo()函数。
// 此外,为了实现实时更新localStorage使用情况的功能,我们还添加了一个storage事件监听器。当页面中有其他代码向localStorage中写入数据时,该事件监听器会自动被调用,从而更新localStorage的使用情况。
</script>
<!-- 清空本地储存 -->
<script>
function confirmClearLocalStorage() {
if (confirm("您确定要清空localStorage吗?此操作不可撤销!")) {
localStorage.clear();
alert("localStorage已清空");
}
}
// 当点击按钮后,会调用clearLocalStorage函数,该函数会调用localStorage.clear()方法来清空所有的localStorage数据。最后弹出一个提示框,告诉用户localStorage已经被清空了。
//改进后↓
// 当用户点击按钮后,会调用confirmClearLocalStorage函数,该函数会弹出一个确认框,询问用户是否确定要清空localStorage。如果用户点击确认,函数会调用localStorage.clear()方法来清空localStorage中的所有数据,并弹出提示框告诉用户localStorage已经被清空了。如果用户点击取消,则不会执行清空localStorage的操作。
</script>
<script>
const { createApp } = Vue
createApp({
data() {
return {
navVisible: true,
api: '换成你的api哦,使用上有疑问可以联系我企鹅756639910,记得备注来意哈',
msgLoad: false,
anData: {},
sentext: '发送',
animationData: {},
showTow: false,
msgList: [{
my: false,
msg: "你好我是openAI机器人,请问有什么问题可以帮助您?"
}],
msgContent: "",
msg: "",
//navVisible: true // 控制导航栏的显示/隐藏
}
},
methods: {
toggleNav() {
//const toggleBtn = document.getElementById('toggleBtn');
//const toggleView = document.getElementById('toggleView');
const toggleView = this.$refs.toggleView; // 通过 ref 获取元素
//toggleView.classList.toggle('hide');
this.navVisible = !this.navVisible;
console.log(this.navVisible);
if(this.navVisible){
toggleView.style.display = 'flex';
}
else{
toggleView.style.display = 'none';
}
},
sendMsg() {
// 消息为空不做任何操作
if (this.msg == "") {
return 0;
}
this.sentext = '请求中'
this.msgList.push({
"msg": this.msg,
"my": true
})
console.log(this.msg);
this.msgContent += ('YOU:' + this.msg + "\n")
// 添加聊天记录到localStorage中
let chatHistory = localStorage.getItem('chatHistory') || '[]';
chatHistory = JSON.parse(chatHistory);
chatHistory.push({
"msg": this.msg,
"my": true
});
localStorage.setItem('chatHistory', JSON.stringify(chatHistory));
this.msgLoad = true
// 清除消息
this.msg = ""
axios.post('https://api.openai.com/v1/completions', {
prompt: this.msgContent, max_tokens: 2048, model: "text-davinci-003"
}, {
headers: { 'content-type': 'application/json', 'Authorization': 'Bearer ' + this.api }
}).then(res => {
console.log(res);
let text = res.data.choices[0].text.replace("openai:", "").replace("openai:", "").replace(/^\n|\n$/g, "")
console.log(text);
this.msgList.push({
"msg": text,
"my": false
})
this.msgContent += (text + "\n")
// 添加聊天记录到localStorage中
let chatHistory = localStorage.getItem('chatHistory') || '[]';
chatHistory = JSON.parse(chatHistory);
chatHistory.push({
"msg": text,
"my": false
});
localStorage.setItem('chatHistory', JSON.stringify(chatHistory));
this.msgLoad = false
this.sentext = '发送'
}).catch(error => {
alert(error);//弹出异常
let text = "" //重置text
this.msgList.push({
"msg": "服务异常,请重新发送..",
"my": false
})
this.msgContent += (text + "\n")
this.msgLoad = false
this.sentext = '发送'//再次点击发送
});
},
}
}).mount('#app')
//这段代码的作用是将当前对话中的一条消息添加到聊天记录中,并将聊天记录存储在本地的localStorage中。
// 首先,代码通过localStorage.getItem('chatHistory')获取了本地存储的聊天记录,如果没有聊天记录则初始化为空数组'[]'。接着,代码使用JSON.parse将获取到的聊天记录字符串解析为数组类型。此时,chatHistory变量中保存的就是之前存储在本地的聊天记录。
// 然后,代码向chatHistory数组中添加了一条消息对象。该对象有两个属性,"msg"表示消息内容,"my"表示消息是否是自己发送的(即是否是用户自己发出的消息,true表示是,false表示否)。
// 最后,代码使用localStorage.setItem将更新后的chatHistory数组再次存储到本地。这里需要使用JSON.stringify将数组转换为字符串格式,才能存储到localStorage中。
// 这样一来,每次用户发送一条消息时,代码都会将该消息添加到聊天记录中,并将聊天记录保存到本地。下次用户再次访问页面时,就可以从localStorage中加载之前的聊天记录。
</script>
对您有帮助的话请关注我哦~关注后小作者会受到莫大的鼓励,回复您的问题也会更加积极哦!
我想将html转换为纯文本。不过,我不想只删除标签,我想智能地保留尽可能多的格式。为插入换行符标签,检测段落并格式化它们等。输入非常简单,通常是格式良好的html(不是整个文档,只是一堆内容,通常没有anchor或图像)。我可以将几个正则表达式放在一起,让我达到80%,但我认为可能有一些现有的解决方案更智能。 最佳答案 首先,不要尝试为此使用正则表达式。很有可能你会想出一个脆弱/脆弱的解决方案,它会随着HTML的变化而崩溃,或者很难管理和维护。您可以使用Nokogiri快速解析HTML并提取文本:require'nokogiri'h
我想向我的Controller传递一个参数,它是一个简单的复选框,但我不知道如何在模型的form_for中引入它,这是我的观点:{:id=>'go_finance'}do|f|%>Transferirde:para:Entrada:"input",:placeholder=>"Quantofoiganho?"%>Saída:"output",:placeholder=>"Quantofoigasto?"%>Nota:我想做一个额外的复选框,但我该怎么做,模型中没有一个对象,而是一个要检查的对象,以便在Controller中创建一个ifelse,如果没有检查,请帮助我,非常感谢,谢谢
在我的Controller中,我通过以下方式在我的index方法中支持HTML和JSON:respond_todo|format|format.htmlformat.json{renderjson:@user}end在浏览器中拉起它时,它会自然地以HTML呈现。但是,当我对/user资源进行内容类型为application/json的curl调用时(因为它是索引方法),我仍然将HTML作为响应。如何获取JSON作为响应?我还需要说明什么? 最佳答案 您应该将.json附加到请求的url,提供的格式在routes.rb的路径中定义。这
所以我在关注Railscast,我注意到在html.erb文件中,ruby代码有一个微弱的背景高亮效果,以区别于其他代码HTML文档。我知道Ryan使用TextMate。我正在使用SublimeText3。我怎样才能达到同样的效果?谢谢! 最佳答案 为SublimeText安装ERB包。假设您安装了SublimeText包管理器*,只需点击cmd+shift+P即可获得命令菜单,然后键入installpackage并选择PackageControl:InstallPackage获取包管理器菜单。在该菜单中,键入ERB并在看到包时选择
我正在使用Rails构建一个简单的聊天应用程序。当用户输入url时,我希望将其输出为html链接(即“url”)。我想知道在Ruby中是否有任何库或众所周知的方法可以做到这一点。如果没有,我有一些不错的正则表达式示例代码可以使用... 最佳答案 查看auto_linkRails提供的辅助方法。这会将所有URL和电子邮件地址变成可点击的链接(htmlanchor标记)。这是文档中的代码示例。auto_link("Gotohttp://www.rubyonrails.organdsayhellotodavid@loudthinking.
我正在使用RubyonRails3.0.9,我想生成一个传递一些自定义参数的link_toURL。也就是说,有一个articles_path(www.my_web_site_name.com/articles)我想生成如下内容:link_to'Samplelinktitle',...#HereIshouldimplementthecode#=>'http://www.my_web_site_name.com/articles?param1=value1¶m2=value2&...我如何编写link_to语句“alàRubyonRailsWay”以实现该目的?如果我想通过传递一些
有这些railscast。http://railscasts.com/episodes/218-making-generators-in-rails-3有了这个,你就会知道如何创建样式表和脚手架生成器。http://railscasts.com/episodes/216-generators-in-rails-3通过这个,您可以了解如何添加一些文件来修改脚手架View。我想把两者结合起来。我想创建一个生成器,它也可以创建脚手架View。有点像RyanBates漂亮的生成器或web_app_themegem(https://github.com/pilu/web-app-theme)。我
我正在学习http://ruby.railstutorial.org/chapters/static-pages上的RubyonRails教程并遇到以下错误StaticPagesHomepageshouldhavethecontent'SampleApp'Failure/Error:page.shouldhave_content('SampleApp')Capybara::ElementNotFound:Unabletofindxpath"/html"#(eval):2:in`text'#./spec/requests/static_pages_spec.rb:7:in`(root)'
是否有简单的方法来更改默认ISO格式(yyyy-mm-dd)的ActiveAdmin日期过滤器显示格式? 最佳答案 您可以像这样为日期选择器提供额外的选项,而不是覆盖js:=f.input:my_date,as::datepicker,datepicker_options:{dateFormat:"mm/dd/yy"} 关于ruby-on-rails-事件管理员日期过滤器日期格式自定义,我们在StackOverflow上找到一个类似的问题: https://s
我们目前正在为ROR3.2开发自定义cms引擎。在这个过程中,我们希望成为我们的rails应用程序中的一等公民的几个类类型起源,这意味着它们应该驻留在应用程序的app文件夹下,它是插件。目前我们有以下类型:数据源数据类型查看我在app文件夹下创建了多个目录来保存这些:应用/数据源应用/数据类型应用/View更多类型将随之而来,我有点担心应用程序文件夹被这么多目录污染。因此,我想将它们移动到一个子目录/模块中,该子目录/模块包含cms定义的所有类型。所有类都应位于MyCms命名空间内,目录布局应如下所示:应用程序/my_cms/data_source应用程序/my_cms/data_ty