摘要:本文将通过实践案例带大家掌握CutMix&Mixup。
本文分享自华为云社区《CutMix&Mixup详解与代码实战》,作者:李长安。
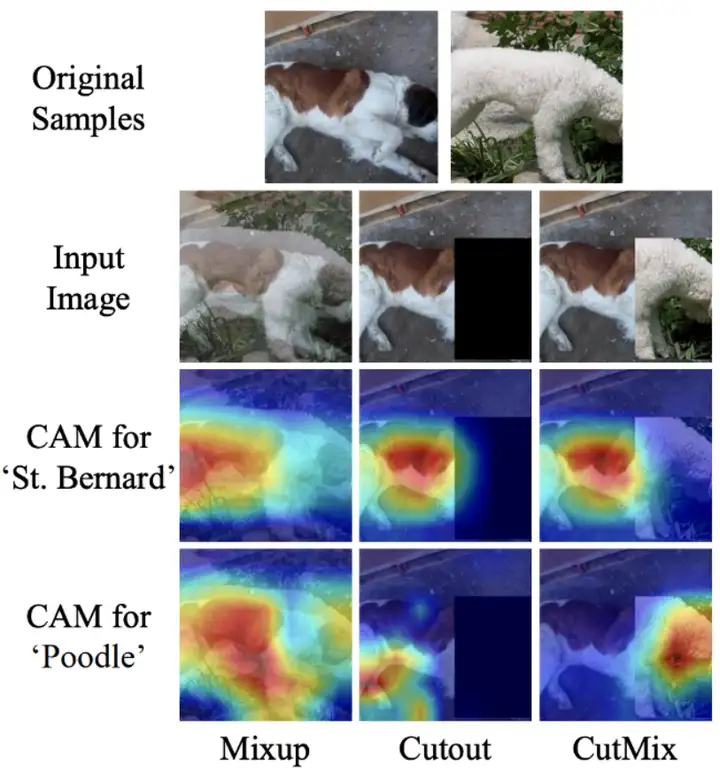
最近在回顾之前学到的知识,看到了数据增强部分,对于CutMix以及Mixup这两种数据增强方式发现理解不是很到位,所以这里写了一个项目再去好好看这两种数据增强方式。最开始在目标检测中,未对数据的标签部分进行思考,对于图像的处理,大家是可以很好理解的,因为非常直观,但是通过阅读相关论文,查看一些相关的资料发现一些新的有趣的东西。接下来为大家讲解一下这两种数据增强方式。下图从左至右分别为原图、mixup、cutout、cutmix。

Mixup相信大家有了很多了解,并且大家也能发现网络上有很多大神的解答,所以我这里就不在进行详细讲解了。

下面的Cell为Mixup的图像效果展示,具体实现请参考下面的在线实现。
%matplotlib inline
import matplotlib.pyplot as plt
import matplotlib.image as Image
import numpy as np
im1 = Image.imread("work/data/10img11.jpg")
im1 = im1/255.
im2 = Image.imread("work/data/14img01.jpg")
im2 = im2/255.
for i in range(1,10):
    lam= i*0.1
 im_mixup = (im1*lam+im2*(1-lam))
 plt.subplot(3,3,i)
 plt.imshow(im_mixup)
plt.show()简单来说cutmix相当于cutout+mixup的结合,可以应用于各种任务中。
mixup相当于是全图融合,cutout仅仅对图片进行增强,不改变label,而cutmix则是采用了cutout的局部融合思想,并且采用了mixup的混合label策略,看起来比较make sense。
下面的代码为了消除随机性,对cut的位置进行了固定,主要是为了展示效果。代码更改位置如下所示,注释的部分为大家通用的实现。
# bbx1 = np.clip(cx - cut_w // 2, 0, W)
# bby1 = np.clip(cy - cut_h // 2, 0, H)
# bbx2 = np.clip(cx + cut_w // 2, 0, W)
# bby2 = np.clip(cy + cut_h // 2, 0, H)
bbx1 = 10
bby1 = 600
bbx2 = 10
bby2 = 600
%matplotlib inline
import glob
import numpy as np
import matplotlib.pyplot as plt
plt.rcParams['figure.figsize'] = [10,10]
import cv2
# Path to data
data_folder = f"/home/aistudio/work/data/"
# Read filenames in the data folder
filenames = glob.glob(f"{data_folder}*.jpg")
# Read first 10 filenames
image_paths = filenames[:4]
image_batch = []
image_batch_labels = []
n_images = 4
print(image_paths)
for i in range(4):
image = cv2.cvtColor(cv2.imread(image_paths[i]), cv2.COLOR_BGR2RGB)
image_batch.append(image)
image_batch_labels=np.array([[1,0,0,0],[0,1,0,0],[0,0,1,0],[0,0,0,1]])
def rand_bbox(size, lamb):
W = size[0]
H = size[1]
cut_rat = np.sqrt(1. - lamb)
cut_w = np.int(W * cut_rat)
cut_h = np.int(H * cut_rat)
# uniform
cx = np.random.randint(W)
cy = np.random.randint(H)
# bbx1 = np.clip(cx - cut_w // 2, 0, W)
# bby1 = np.clip(cy - cut_h // 2, 0, H)
# bbx2 = np.clip(cx + cut_w // 2, 0, W)
# bby2 = np.clip(cy + cut_h // 2, 0, H)
bbx1 = 10
bby1 = 600
bbx2 = 10
bby2 = 600
return bbx1, bby1, bbx2, bby2
image = cv2.cvtColor(cv2.imread(image_paths[0]), cv2.COLOR_BGR2RGB)
# Crop a random bounding box
lamb = 0.3
size = image.shape
print('size',size)
def generate_cutmix_image(image_batch, image_batch_labels, beta):
c=[1,0,3,2]
# generate mixed sample
lam = np.random.beta(beta, beta)
rand_index = np.random.permutation(len(image_batch))
print(f'iamhere{rand_index}')
target_a = image_batch_labels
target_b = np.array(image_batch_labels)[c]
print('img.shape',image_batch[0].shape)
bbx1, bby1, bbx2, bby2 = rand_bbox(image_batch[0].shape, lam)
print('bbx1',bbx1)
print('bby1',bby1)
print('bbx2',bbx2)
print('bby2',bby2)
image_batch_updated = image_batch.copy()
image_batch_updated=np.array(image_batch_updated)
image_batch=np.array(image_batch)
image_batch_updated[:, bbx1:bby1, bbx2:bby2, :] = image_batch[[c], bbx1:bby1, bbx2:bby2, :]
# adjust lambda to exactly match pixel ratio
lam = 1 - ((bbx2 - bbx1) * (bby2 - bby1) / (image_batch.shape[1] * image_batch.shape[2]))
print(f'lam is {lam}')
label = target_a * lam + target_b * (1. - lam)
return image_batch_updated, label
# Generate CutMix image
input_image = image_batch[0]
image_batch_updated, image_batch_labels_updated = generate_cutmix_image(image_batch, image_batch_labels, 1.0)
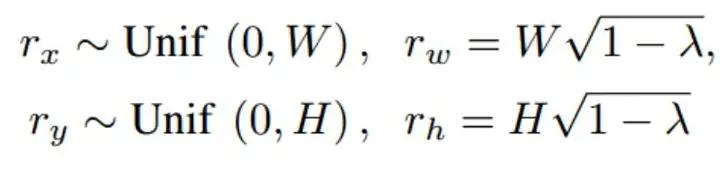
# Show original images
print("Original Images")
for i in range(2):
for j in range(2):
plt.subplot(2,2,2*i+j+1)
plt.imshow(image_batch[2*i+j])
plt.show()
# Show CutMix images
print("CutMix Images")
for i in range(2):
for j in range(2):
plt.subplot(2,2,2*i+j+1)
plt.imshow(image_batch_updated[2*i+j])
plt.show()
# Print labels
print('Original labels:')
print(image_batch_labels)
print('Updated labels')
print(image_batch_labels_updated)
['/home/aistudio/work/data/11img01.jpg', '/home/aistudio/work/data/10img11.jpg', '/home/aistudio/work/data/14img01.jpg', '/home/aistudio/work/data/12img11.jpg']
size (2016, 1512, 3)
iamhere[2 1 0 3]
img.shape (2016, 1512, 3)
bbx1 10
bby1 600
bbx2 10
bby2 600
lam is 1.0
Original Images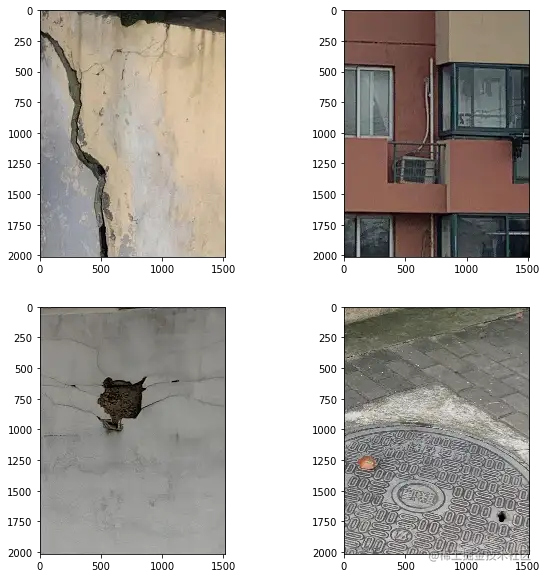
CutMix Images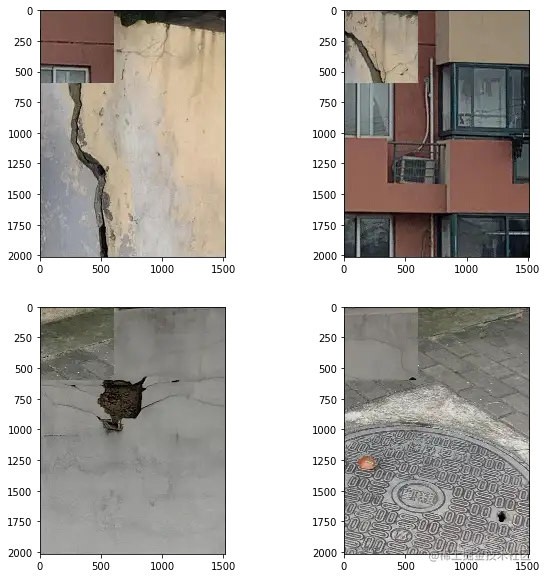
Original labels:
[[1 0 0 0]
 [0 1 0 0]
 [0 0 1 0]
 [0 0 0 1]]
Updated labels
[[1. 0. 0. 0.]
 [0. 1. 0. 0.]
 [0. 0. 1. 0.]
[0. 0. 0. 1.]]大家需要注意的是,通常我们在实际的使用中都是使用在线的方式进行数据增强,也就是本小节所讲的方法,所以大家在实际的使用中可以使用下面的代码。mixup实现原理同cutmix相差不多,大家可以根据我下面的的代码更改一下即可。
!cd 'data/data97595' && unzip -q nongzuowu.zip
from paddle.io import Dataset
import cv2
import paddle
import random
# 导入所需要的库
from sklearn.utils import shuffle
import os
import pandas as pd
import numpy as np
from PIL import Image
import paddle
import paddle.nn as nn
from paddle.io import Dataset
import paddle.vision.transforms as T
import paddle.nn.functional as F
from paddle.metric import Accuracy
import warnings
warnings.filterwarnings("ignore")
# 读取数据
train_images = pd.read_csv('data/data97595/nongzuowu/train.csv')
# 划分训练集和校验集
all_size = len(train_images)
# print(all_size)
train_size = int(all_size * 0.8)
train_df = train_images[:train_size]
val_df = train_images[train_size:]
#  CutMix 的切块功能
def rand_bbox(size, lam):
 if len(size) == 4:
        W = size[2]
        H = size[3]
 elif len(size) == 3:
        W = size[0]
        H = size[1]
 else:
 raise Exception
 cut_rat = np.sqrt(1. - lam)
 cut_w = np.int(W * cut_rat)
 cut_h = np.int(H * cut_rat)
 # uniform
    cx = np.random.randint(W)
    cy = np.random.randint(H)
    bbx1 = np.clip(cx - cut_w // 2, 0, W)
    bby1 = np.clip(cy - cut_h // 2, 0, H)
    bbx2 = np.clip(cx + cut_w // 2, 0, W)
    bby2 = np.clip(cy + cut_h // 2, 0, H)
 return bbx1, bby1, bbx2, bby2
# 定义数据预处理
data_transforms = T.Compose([
 T.Resize(size=(256, 256)),
 T.Transpose(), # HWC -> CHW
 T.Normalize(
        mean=[0, 0, 0], # 归一化
        std=[255, 255, 255],
 to_rgb=True)
])
class JSHDataset(Dataset):
 def __init__(self, df, transforms, train=False):
 self.df = df
 self.transfoms = transforms
 self.train = train
 def __getitem__(self, idx):
        row = self.df.iloc[idx]
 fn = row.image
 # 读取图片数据
        image = cv2.imread(os.path.join('data/data97595/nongzuowu/train', fn))
        image = cv2.cvtColor(image, cv2.COLOR_BGR2RGB)
        image = cv2.resize(image, (256, 256), interpolation=cv2.INTER_LINEAR)
 # 读取 mask 数据
 # masks = cv2.imread(os.path.join(row['mask_path'], fn), cv2.IMREAD_GRAYSCALE)/255
 # masks = cv2.resize(masks, (1024, 1024), interpolation=cv2.INTER_LINEAR)
 # 读取 label
        label = paddle.zeros([4])
        label[row.label] = 1
 # ------------------------------  CutMix  ------------------------------------------
        prob = 20 # 将 prob 设置为 0 即可关闭 CutMix
 if random.randint(0, 99) < prob and self.train:
 rand_index = random.randint(0, len(self.df) - 1)
 rand_row = self.df.iloc[rand_index]
 rand_fn = rand_row.image
 rand_image = cv2.imread(os.path.join('data/data97595/nongzuowu/train', rand_fn))
 rand_image = cv2.cvtColor(rand_image, cv2.COLOR_BGR2RGB)
 rand_image = cv2.resize(rand_image, (256, 256), interpolation=cv2.INTER_LINEAR)
 # rand_masks = cv2.imread(os.path.join(rand_row['mask_path'], rand_fn), cv2.IMREAD_GRAYSCALE)/255
 # rand_masks = cv2.resize(rand_masks, (1024, 1024), interpolation=cv2.INTER_LINEAR)
            lam = np.random.beta(1,1)
            bbx1, bby1, bbx2, bby2 = rand_bbox(image.shape, lam)
 image[bbx1:bbx2, bby1:bby2, :] = rand_image[bbx1:bbx2, bby1:bby2, :]
 # masks[bbx1:bbx2, bby1:bby2] = rand_masks[bbx1:bbx2, bby1:bby2]
            lam = 1 - ((bbx2 - bbx1) * (bby2 - bby1) / (image.shape[1] * image.shape[0]))
 rand_label = paddle.zeros([4])
 rand_label[rand_row.label] = 1
            label = label * lam + rand_label * (1. - lam)
 # ---------------------------------  CutMix  ---------------------------------------
 # 应用之前我们定义的各种数据增广
 # augmented = self.transforms(image=image, mask=masks)
 # img, mask = augmented['image'], augmented['mask']
 img = image
 return self.transfoms(img), label
 def __len__(self):
 return len(self.df)
train_dataset = JSHDataset(train_df, data_transforms, train=True)
val_dataset = JSHDataset(val_df, data_transforms)
#train_loader
train_loader = paddle.io.DataLoader(train_dataset, places=paddle.CPUPlace(), batch_size=8, shuffle=True, num_workers=0)
#val_loader
val_loader = paddle.io.DataLoader(val_dataset, places=paddle.CPUPlace(), batch_size=8, shuffle=True, num_workers=0)
for batch_id, data in enumerate(train_loader()):
 x_data = data[0]
 y_data = data[1]
 print(x_data.dtype)
 print(y_data)
 break
paddle.float32
Tensor(shape=[8, 4], dtype=float32, place=CUDAPlace(0), stop_gradient=True,
 [[0. , 0. , 1. , 0. ],
 [0.54284668, 0.45715332, 0. , 0. ],
 [0. , 1. , 0. , 0. ],
 [0. , 0. , 1. , 0. ],
 [0.32958984, 0. , 0.67041016, 0. ],
 [0. , 0. , 0. , 1. ],
 [0. , 0. , 0. , 1. ],
 [0. , 0. , 0. , 1. ]])
from paddle.vision.models import resnet18
model = resnet18(num_classes=4)
# 模型封装
model = paddle.Model(model)
# 定义优化器
optim = paddle.optimizer.Adam(learning_rate=3e-4, parameters=model.parameters())
# 配置模型
model.prepare(
 optim,
 paddle.nn.CrossEntropyLoss(soft_label=True),
 Accuracy()
 )
# 模型训练与评估
model.fit(train_loader,
 val_loader,
 log_freq=1,
        epochs=2,
        verbose=1,
 )
The loss value printed in the log is the current step, and the metric is the average value of previous steps.
Epoch 1/2
step 56/56 [==============================] - loss: 1.2033 - acc: 0.5843 - 96ms/step
Eval begin...
step 14/14 [==============================] - loss: 1.6905 - acc: 0.5625 - 73ms/step
Eval samples: 112
Epoch 2/2
step 56/56 [==============================] - loss: 0.5297 - acc: 0.7708 - 82ms/step
Eval begin...
step 14/14 [==============================] - loss: 0.5764 - acc: 0.7857 - 67ms/step
Eval samples: 112在CutMix中,用另一幅图像的一部分以及第二幅图像的ground truth标记替换该切块。在图像生成过程中设置每个图像的比例(例如0.4/0.6)。在下面的图片中,你可以看到CutMix的作者是如何演示这种技术比简单的MixUp和Cutout效果更好。
ps:神经网络热力图生成可以参考我另一个项目。
这两种数据增强方式能够很好地代表了目前数据增强的一些方法,比如cutout、mosaic等方法,掌握了这两种方法,大家也就理解了另外的cutout以及mosaic增强方法。
我正在尝试测试是否存在表单。我是Rails新手。我的new.html.erb_spec.rb文件的内容是:require'spec_helper'describe"messages/new.html.erb"doit"shouldrendertheform"dorender'/messages/new.html.erb'reponse.shouldhave_form_putting_to(@message)with_submit_buttonendendView本身,new.html.erb,有代码:当我运行rspec时,它失败了:1)messages/new.html.erbshou
我在从html页面生成PDF时遇到问题。我正在使用PDFkit。在安装它的过程中,我注意到我需要wkhtmltopdf。所以我也安装了它。我做了PDFkit的文档所说的一切......现在我在尝试加载PDF时遇到了这个错误。这里是错误:commandfailed:"/usr/local/bin/wkhtmltopdf""--margin-right""0.75in""--page-size""Letter""--margin-top""0.75in""--margin-bottom""0.75in""--encoding""UTF-8""--margin-left""0.75in""-
我在我的项目目录中完成了compasscreate.和compassinitrails。几个问题:我已将我的.sass文件放在public/stylesheets中。这是放置它们的正确位置吗?当我运行compasswatch时,它不会自动编译这些.sass文件。我必须手动指定文件:compasswatchpublic/stylesheets/myfile.sass等。如何让它自动运行?文件ie.css、print.css和screen.css已放在stylesheets/compiled。如何在编译后不让它们重新出现的情况下删除它们?我自己编译的.sass文件编译成compiled/t
如何在buildr项目中使用Ruby?我在很多不同的项目中使用过Ruby、JRuby、Java和Clojure。我目前正在使用我的标准Ruby开发一个模拟应用程序,我想尝试使用Clojure后端(我确实喜欢功能代码)以及JRubygui和测试套件。我还可以看到在未来的不同项目中使用Scala作为后端。我想我要为我的项目尝试一下buildr(http://buildr.apache.org/),但我注意到buildr似乎没有设置为在项目中使用JRuby代码本身!这看起来有点傻,因为该工具旨在统一通用的JVM语言并且是在ruby中构建的。除了将输出的jar包含在一个独特的、仅限ruby
在rails源中:https://github.com/rails/rails/blob/master/activesupport/lib/active_support/lazy_load_hooks.rb可以看到以下内容@load_hooks=Hash.new{|h,k|h[k]=[]}在IRB中,它只是初始化一个空哈希。和做有什么区别@load_hooks=Hash.new 最佳答案 查看rubydocumentationforHashnew→new_hashclicktotogglesourcenew(obj)→new_has
我有一个对象has_many应呈现为xml的子对象。这不是问题。我的问题是我创建了一个Hash包含此数据,就像解析器需要它一样。但是rails自动将整个文件包含在.........我需要摆脱type="array"和我该如何处理?我没有在文档中找到任何内容。 最佳答案 我遇到了同样的问题;这是我的XML:我在用这个:entries.to_xml将散列数据转换为XML,但这会将条目的数据包装到中所以我修改了:entries.to_xml(root:"Contacts")但这仍然将转换后的XML包装在“联系人”中,将我的XML代码修改为
为了将Cucumber用于命令行脚本,我按照提供的说明安装了arubagem。它在我的Gemfile中,我可以验证是否安装了正确的版本并且我已经包含了require'aruba/cucumber'在'features/env.rb'中为了确保它能正常工作,我写了以下场景:@announceScenario:Testingcucumber/arubaGivenablankslateThentheoutputfrom"ls-la"shouldcontain"drw"假设事情应该失败。它确实失败了,但失败的原因是错误的:@announceScenario:Testingcucumber/ar
我在我的项目中添加了一个系统来重置用户密码并通过电子邮件将密码发送给他,以防他忘记密码。昨天它运行良好(当我实现它时)。当我今天尝试启动服务器时,出现以下错误。=>BootingWEBrick=>Rails3.2.1applicationstartingindevelopmentonhttp://0.0.0.0:3000=>Callwith-dtodetach=>Ctrl-CtoshutdownserverExiting/Users/vinayshenoy/.rvm/gems/ruby-1.9.3-p0/gems/actionmailer-3.2.1/lib/action_mailer
我的瘦服务器配置了nginx,我的ROR应用程序正在它们上运行。在我发布代码更新时运行thinrestart会给我的应用程序带来一些停机时间。我试图弄清楚如何优雅地重启正在运行的Thin实例,但找不到好的解决方案。有没有人能做到这一点? 最佳答案 #Restartjustthethinserverdescribedbythatconfigsudothin-C/etc/thin/mysite.ymlrestartNginx将继续运行并代理请求。如果您将Nginx设置为使用多个上游服务器,例如server{listen80;server
在MRIRuby中我可以这样做:deftransferinternal_server=self.init_serverpid=forkdointernal_server.runend#Maketheserverprocessrunindependently.Process.detach(pid)internal_client=self.init_client#Dootherstuffwithconnectingtointernal_server...internal_client.post('somedata')ensure#KillserverProcess.kill('KILL',