文章目录
前言
最近在学习ROS的navigation部分,写些东西作为笔记,方便理解与日后查看。本文从Astar算法入手,对navigation源码进行解析。
PS:ros navigation源码版本https://gitcode.net/mirrors/ros-planning/navigation/-/tree/noetic-devel
对于Astar算法,想必大家都非常熟悉了。具体算法原理就不在本文详细介绍了,不太熟悉的话,可以参考下面这篇博客:
自动驾驶路径规划——A*(Astar)算法
<launch>
    <!-- 将 Urdf 文件的内容加载到参数服务器 -->
    <param name="robot_description" command="$(find xacro)/xacro $(find urdf02_gazebo)/urdf/xacro/car.urdf.xacro" />
    <!-- 启动 gazebo -->
    <include file="$(find gazebo_ros)/launch/empty_world.launch" >
        <arg name="world_name" value="$(find urdf02_gazebo)/worlds/test.world"/>
    </include>
    <!-- 在 gazebo 中显示机器人模型 -->
    <node pkg="gazebo_ros" type="spawn_model" name="model" args="-urdf -model mycar -param robot_description  -x -3.182779  -y 0.866966 -Y -1.57"  />
    <!-- <node pkg="gazebo_ros" type="spawn_model" name="model" args="-urdf -model mycar -param robot_description "  /> -->
</launch>
首先该launch文件启动,将机器人模型的xacro文件加载到参数服务器;再启动gazebo,加载出预设的地图以及加载机器人的初始位置.
<launch>
    <!-- 设置地图的配置文件 -->
    <arg name="map" default="test01.yaml" />
    <!-- 运行地图服务器,并且加载设置的地图-->
    <node name="map_server" pkg="map_server" type="map_server" args="$(find nav_demo)/map/$(arg map)"/>

    <!-- 启动AMCL节点 -->
    <include file="$(find nav_demo)/launch/nav04_amcl.launch" />

    <!-- 启动move_base节点 -->
    <include file="$(find nav_demo)/launch/nav05_path.launch" />

    <!-- 运行rviz -->
    <node pkg="rviz" type="rviz" name="rviz" args="-d $(find nav_demo)/config/test02.rviz" />
    <!-- 添加关节状态发布节点 -->
    <node pkg="joint_state_publisher" type="joint_state_publisher" name="joint_state_publisher" />
    <!-- 添加机器人状态发布节点 -->
    <node pkg="robot_state_publisher" type="robot_state_publisher" name="robot_state_publisher" />
</launch>
启动这个launch文件后,将会运行地图服务器,加载设置的地图;启动AMCL节点,实现机器人的定位功能;启动move_base节点,加载move_base相关的参数;运行rviz,显示机器人在rviz中的图像.
这部分就不细讲了,具体可以参考【ROS】—— 机器人导航(仿真)—导航实现(十八)中的amcl部分.
<launch>
    <node pkg="move_base" type="move_base" respawn="false" name="move_base" output="screen" clear_params="true">
        <rosparam file="$(find nav_demo)/param/costmap_common_params.yaml" command="load" ns="global_costmap" />
        <rosparam file="$(find nav_demo)/param/costmap_common_params.yaml" command="load" ns="local_costmap" />
        <rosparam file="$(find nav_demo)/param/local_costmap_params.yaml" command="load" />
        <rosparam file="$(find nav_demo)/param/global_costmap_params.yaml" command="load" />
        <!-- <rosparam file="$(find nav_demo)/param/base_local_planner_params.yaml" command="load" /> -->
        <rosparam file="$(find nav_demo)/param/move_base_params.yaml" command="load" />
        <rosparam file="$(find nav_demo)/param/global_planner_params.yaml" command="load" />
        <rosparam file="$(find nav_demo)/param/dwa_local_planner_params.yaml" command="load" />

    </node>
</launch>
这部分是move_base的核心,主要目的是加载代价图的相关参数,包括全局代价地图和局部代价地图的参数;加载move_base的参数以及全局规划器和局部规划器(这里选用的是dwa_local_planner)的相关参数.部分参数文件在【ROS】—— 机器人导航(仿真)—导航实现(十八)中已有讲述,这里就不重复了.本文主要对move_base_params.yaml global_planner_params.yaml进行介绍.
参数配置的说明可以参考注释
shutdown_costmaps: false  #当move_base在不活动状态时,是否关掉costmap.

controller_frequency: 15.0  #向底盘控制移动话题cmd_vel发送命令的频率.
controller_patience: 3.0 #在空间清理操作执行前,控制器花多长时间等有效控制下发

planner_frequency: 5.0  #全局规划操作的执行频率.如果设置为0.0,则全局规划器仅
                        #在接收到新的目标点或者局部规划器报告路径堵塞时才会重新执行规划操作.
planner_patience: 5.0  #在空间清理操作执行前,留给规划器多长时间来找出一条有效规划.

oscillation_timeout: 10.0  #执行修复机制前,允许振荡的时长.
oscillation_distance: 0.02  #来回运动在多大距离以上不会被认为是振荡.

#全局路径规划器
# base_global_planner: "global_planner/GlobalPlanner" #指定用于move_base的全局规划器插件名称.
# base_global_planner: "navfn/NavfnROS" #指定用于move_base的局部规划器插件名称.
base_global_planner: "global_planner/GlobalPlanner"
# base_global_planner: "carrot_planner/CarrotPlanner"

#局部路径规划器的调用在文件【teb_local_planner.launch】、【dwa_local_planner.launch】对应文件内自动调用,该部分可以忽略
# base_local_planner: "teb_local_planner/TebLocalPlannerROS" #指定用于move_base的局部规划器插件名称.
base_local_planner: "dwa_local_planner/DWAPlannerROS" #指定用于move_base的全局规划器插件名称.


max_planning_retries: 1  #最大规划路径的重复次数,-1表示无限次

recovery_behavior_enabled: true  #是否启动恢复机制
clearing_rotation_allowed: true  #是否启动旋转的恢复,必须是recovery_behavior_enabled在使能的基础上才能生效


recovery_behaviors:  # 自恢复行为
  - name: 'conservative_reset'
    type: 'clear_costmap_recovery/ClearCostmapRecovery'
  #- name: 'aggressive_reset'
  #  type: 'clear_costmap_recovery/ClearCostmapRecovery'
  #- name: 'super_reset'
  #  type: 'clear_costmap_recovery/ClearCostmapRecovery'
  - name: 'clearing_rotation'
    type: 'rotate_recovery/RotateRecovery'
  # - name: 'move_slow_and_clear'
  #   type: 'move_slow_and_clear/MoveSlowAndClear'

#保守清除,用户指定区域之外的障碍物将从机器人地图中清除
conservative_reset:
  reset_distance: 1.0
  #layer_names: [static_layer, obstacle_layer, inflation_layer]
  layer_names: [obstacle_layer]
#保守清除后,如果周围障碍物允许,机器人将进行原地旋转以清理空间

#保守清除失败,积极清除,清除指定区域之外的所有障碍物,然后进行旋转
aggressive_reset:
  reset_distance: 3.0
  #layer_names: [static_layer, obstacle_layer, inflation_layer]
  layer_names: [obstacle_layer]
#积极清除也失败后,放弃规划路径

#可能是更进一步的清除,wiki未找到相关资料
super_reset:
  reset_distance: 5.0
  #layer_names: [static_layer, obstacle_layer, inflation_layer]
  layer_names: [obstacle_layer]

#另一种恢复行为,需要注意该行为只能与具有动态设置速度限制功能的局部路径规划器适配,例如dwa
move_slow_and_clear:
  clearing_distance: 0.5  #与小车距离0.5内的障碍物会被清除
  limited_trans_speed: 0.1
  limited_rot_speed: 0.4
  limited_distance: 0.3
 base_global_planner: "navfn/NavfnROS"
 base_global_planner: "global_planner/GlobalPlanner"
 base_global_planner: "carrot_planner/CarrotPlanner"
此部分指定用于move_base的全局规划器插件名称.这里选择global_planner/GlobalPlanner,当然也可以选择navfn/NavfnROS,只不过后者版本较老,而carrot_planner/CarrotPlanner适合目标点距离障碍物比较近的规划场景,对于大部分导航场景来说,可能并非那么实用.
recovery_behavior_enabled: true
clearing_rotation_allowed: true
此部分来决定是否启动恢复机制与旋转机制(可以减少小车规划路径失败导致的卡死现象)
GlobalPlanner:
  allow_unknown: false  #默认true,是否允许路径穿过未知区域
  default_tolerance: 0.2  #默认0.0,目标容差
  visualize_potential: false #默认false,是否显示从PointCloud2计算得到的势区域
  use_dijkstra: false #默认true,true表示使用dijkstra's否则使用A*
  use_quadratic: true #默认true,true表示使用二次函数近似函数
  use_grid_path: false #默认false,true表示使路径沿栅格边界生成,否则使用梯度下降算法
  old_navfn_behavior:  true #默认false,是否复制navfn规划器的结果
  lethal_cost: 253 #默认253,致命代价值
  neutral_cost: 50 #默认50,中等代价值
  cost_factor: 3.0 #默认3.0,代价因子
  publish_potential: true #默认true,是否发布costmap的势函数
  orientation_mode: 0 #默认0,设置点的方向
  orientation_window_size: 1 #默认1,根据orientation_mode指定的位置积分确定窗口方向
在修改这部分参数的时候遇到了一些问题:
若要启动Astar算法,需将use_dijkstra:置为false,此时运行遇到以下问题
[ERROR] [1674480358.446397317, 514.551000000]: NO PATH!
[ERROR] [1674480358.446429697, 514.551000000]: Failed to get a plan from potential when a legal potential was found. This shouldn't happen.
参考Navigation中全局路径规划效果对比和Some errors when using GlobalPlanner,得出以下可能的原因:
在ROS navigation包中A*算法是基于梯度势场实现的,而并非我们所熟知的栅格地图,这种方式可能是非最优的,但其规划出的路径平滑度更高.但这种方法在"precise start(精确启动?)"机制上可能存在着一些BUG,所以经常会启动失败.
解决方法:
use_grid_path置为true.即将其转化为基于栅格地图的Astar算法.实现效果如下图所示(规划出的路线不光滑,折线明显).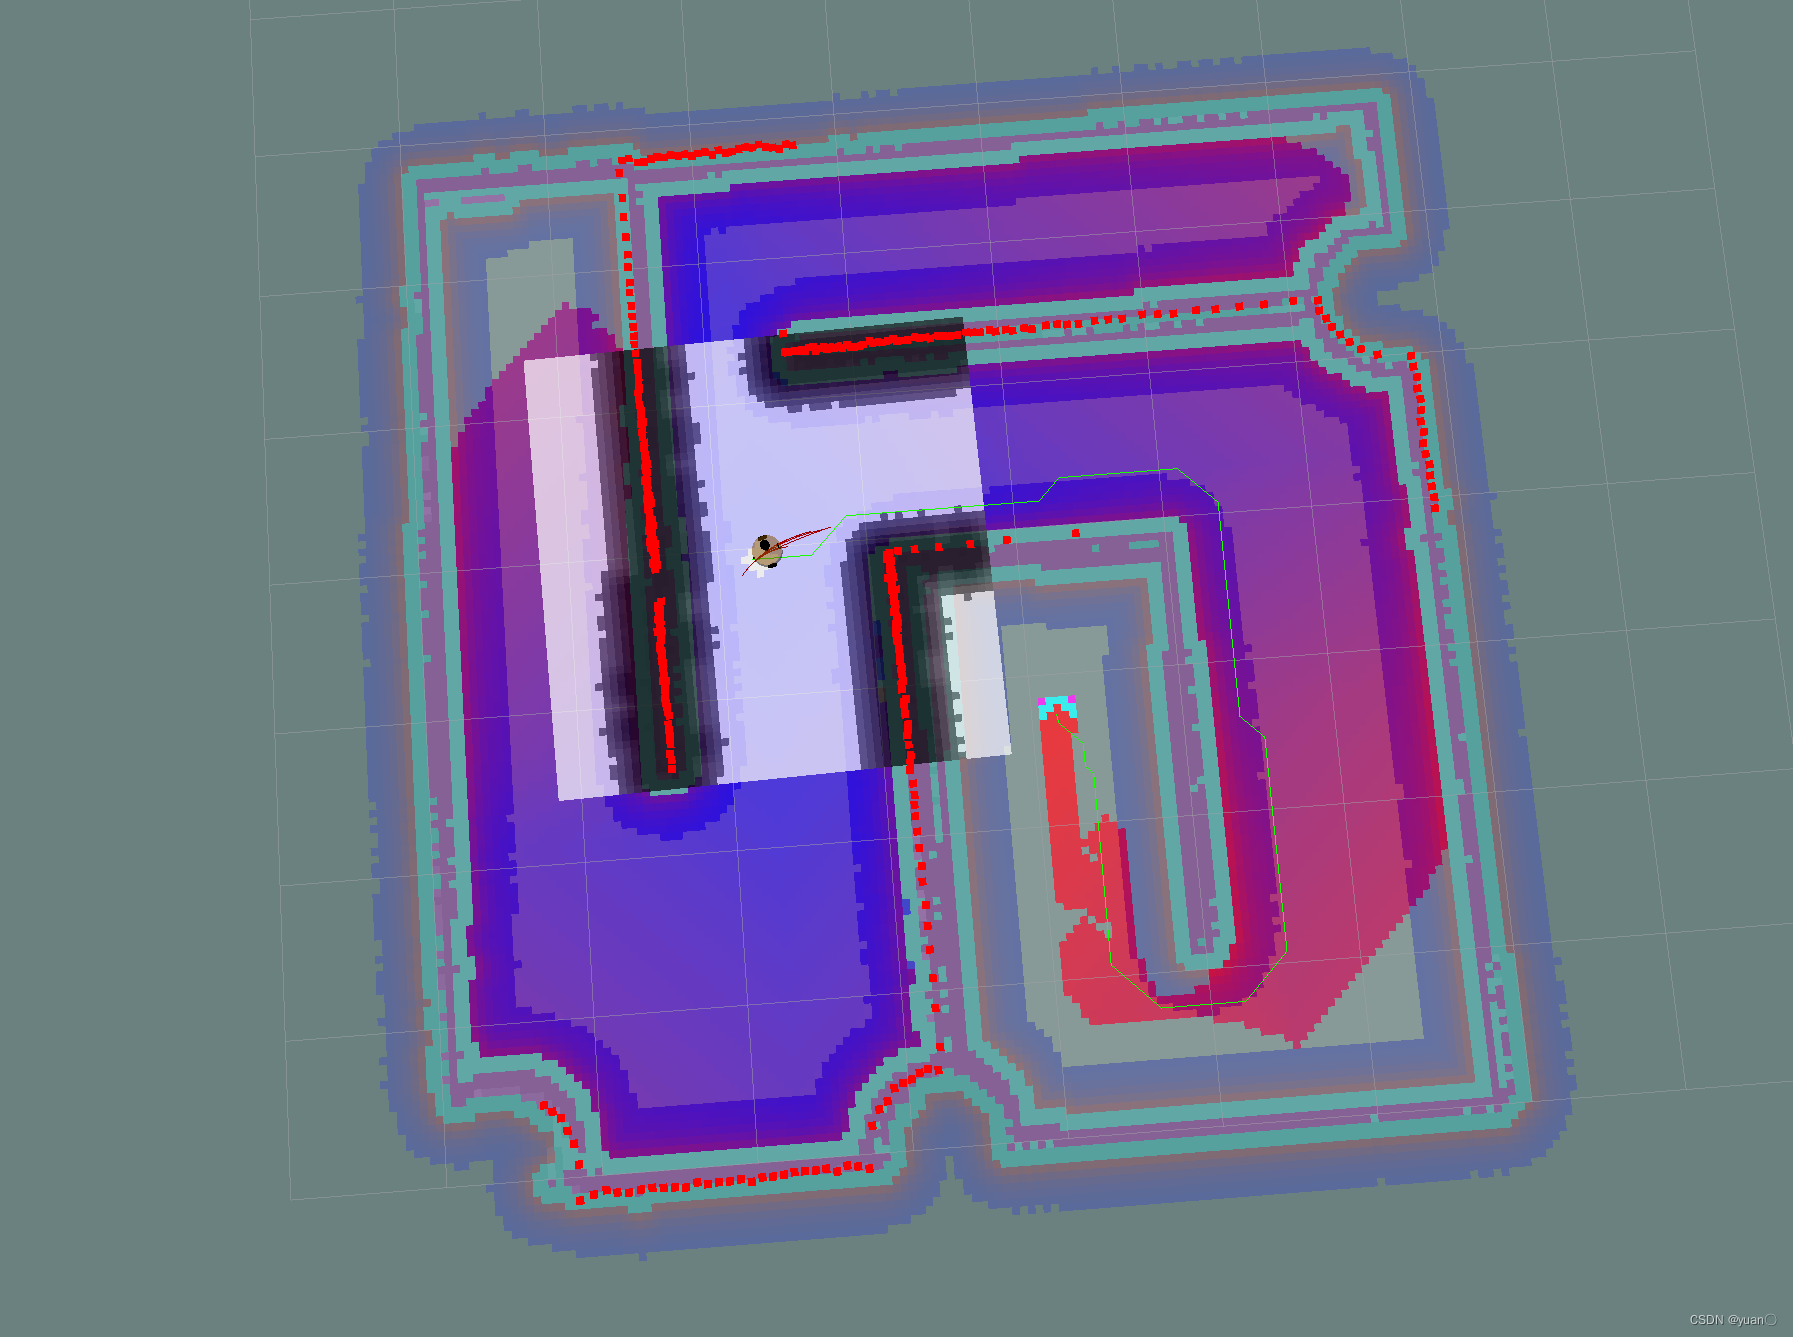
old_navfn_behavior置为true.使用旧版本的规划器.实现效果如下图所示
也有人通过减小inflation radius 并增大 cost scaling factor,从而使得全局代价地图在障碍物周围膨胀得并不多,从而不至于规划失败.这种方法可以参考,但我没有细调过参数所以没有实现.
附上Astar的源码
#ifndef _ASTAR_H
#define _ASTAR_H

#include <global_planner/planner_core.h>
#include <global_planner/expander.h>
#include <vector>
#include <algorithm>

namespace global_planner {
class Index {
    public:
        Index(int a, float b) {
            i = a;
            cost = b;
        }
        int i;
        float cost;
};

struct greater1 {
        bool operator()(const Index& a, const Index& b) const {
            return a.cost > b.cost;
        }
};

class AStarExpansion : public Expander {
    public:
        AStarExpansion(PotentialCalculator* p_calc, int nx, int ny);
        bool calculatePotentials(unsigned char* costs, double start_x, double start_y, double end_x, double end_y, int cycles,
                                float* potential);
    private:
        void add(unsigned char* costs, float* potential, float prev_potential, int next_i, int end_x, int end_y);
        std::vector<Index> queue_;
};

} //end namespace global_planner
#endif
#include<global_planner/astar.h>
#include<costmap_2d/cost_values.h>

namespace global_planner {

AStarExpansion::AStarExpansion(PotentialCalculator* p_calc, int xs, int ys) :
        Expander(p_calc, xs, ys) {
}

/*	function:计算规划代价的函数
	potential: 代价数组,
	costs: 地图指针,
	cycles:循环次数;
*/
bool AStarExpansion::calculatePotentials(unsigned char* costs, double start_x, double start_y, double end_x, double end_y,  int cycles, float* potential) {
	//queue_为启发式搜索到的向量队列:<i , cost>,每次规划前清空队列里所有的元素
    queue_.clear();
	//起点对应的序号
    int start_i = toIndex(start_x, start_y);
	//1 将起点放入队列
    queue_.push_back(Index(start_i, 0));
	//2 将所有点的potential都设为一个极大值1e10
	//potential就是估计值g, f=g+h
	//std::fill函数的作用是:将一个区间的元素都赋予指定的值,即在[first, last)范围内填充指定值
    std::fill(potential, potential + ns_, POT_HIGH);
	//3 起点的potential设为0;
    potential[start_i] = 0;

	//终点对应的序号
    int goal_i = toIndex(end_x, end_y);
    int cycle = 0;

	//4 进入循环,继续循环的判断条件为只要队列大小大于0且循环次数小于cycles
	//代码中cycles = 2 *nx * ny, 即为所有格子数的2倍
	///目的:得到最小cost的索引,并删除它,如果索引指向goal(目的地)则退出算法,返回true
    while (queue_.size() > 0 && cycle < cycles) {
		//最小代价点
        Index top = queue_[0];
		///将首元素放到最后,其他元素按照Cost值从小到大排列
		//pop_heap() 是将堆顶元素与最后一个元素交换位置,之后用pop_back将最后一个元素删除
		//greater1()是按小顶堆
        std::pop_heap(queue_.begin(), queue_.end(), greater1());
		//删除最后一个元素,即删除最小代价的点
        queue_.pop_back();

        int i = top.i;
		//如果到了目标点,就结束了
        if (i == goal_i)
            return true;

		//6. 对前后左右四个点执行add函数,将代价最小点i周围点加入搜索队里并更新代价值
        add(costs, potential, potential[i], i + 1, end_x, end_y);
        add(costs, potential, potential[i], i - 1, end_x, end_y);
        add(costs, potential, potential[i], i + nx_, end_x, end_y);
        add(costs, potential, potential[i], i - nx_, end_x, end_y);

        cycle++;
    }

    return false;
}

/*add函数:添加点并更新代价函数;
如果是已经添加的的点则忽略,根据costmap的值如果是障碍物的点也忽略。
potential[next_i]是起点到当前点的cost即g(n),
distance * neutral_cost_是当前点到目的点的cost即h(n)。
f(n) = g(n) + h(n)
*/
void AStarExpansion::add(unsigned char* costs, float* potential, float prev_potential, int next_i, int end_x, int end_y) {
	//next_i 点不在网格内 忽略
    if (next_i < 0 || next_i >= ns_)
        return;

	//未搜索的点cost为POT_HIGH,如小于该值,则为已搜索点,跳过;
    if (potential[next_i] < POT_HIGH)
        return;

	//障碍物点 忽略
    if(costs[next_i]>=lethal_cost_ && !(unknown_ && costs[next_i]==costmap_2d::NO_INFORMATION))
        return;


	/*
	  potential 存储所有点的g(n),即从初始点到节点n的实际代价
	  costs[next_i] + neutral_cost_
	  potential[next_i]   是起点到当前点的cost即g(n)
	  neutral_cost_ 设定的一个默认值,为50
	  prev_potentia   当前点的f

	  calculatePotential()计算根据use_quadratic的值有下面两个选择
	        若为TRUE, 则使用二次曲线计算
			若为False, 则采用简单方法计算, return prev_potential + cost
						即:costs[next_i] + neutral_cost_+ prev_potential
					 地图代价+单格距离代价(初始化为50)+之前路径代价 为G
	*/
    potential[next_i] = p_calc_->calculatePotential(potential, costs[next_i] + neutral_cost_, next_i, prev_potential);
    int x = next_i % nx_, y = next_i / nx_;
	//启发式函数:即h(n) 从节点n到目标点最佳路径的估计代价,这里选用了曼哈顿距离
    float distance = abs(end_x - x) + abs(end_y - y);

	//两个cost后,加起来即为f(n),代价 f = g +h;,将其存入队列中
	// f = potential[next_i] + distance * neutral_cost_ 为总
    queue_.push_back(Index(next_i, potential[next_i] + distance * neutral_cost_));

	//对加入的再进行堆排序, 把最小代价点放到front队头queue_[0]
    std::push_heap(queue_.begin(), queue_.end(), greater1());
}

}
首先来看一下AStarExpansion::calculatePotentials这个函数,这个函数的传参为地图指针costs,起点和终点的位置信息,循环次数cycles以及代价数组potential.
程序开始,先对启发式搜索得到的向量队列进行初始化
queue_.clear();
再将起始点的位置信息转化为序列号
int start_i = toIndex(start_x, start_y);
toIndex()具体定义如下:
        inline int toIndex(int x, int y) {
            return x + nx_ * y;
        }//nx_为栅格地图中x方向的像素数目
index()定义如下
// 第一项为序列号值,第二项为代价值
class Index {
    public:
        Index(int a, float b) {
            i = a;
            cost = b;
        }
        int i;
        float cost;
};
#define POT_HIGH 1.0e10
std::fill函数的作用是:将一个区间的元素都赋予指定的值,即在[first, last)范围内填充指定值
potential[start_i] = 0;
再将终点的位置信息转化为序列号
int goal_i = toIndex(end_x, end_y);
top为最小代价点
Index top = queue_[0];
将首元素放到最后,其他元素按照Cost值从小到大排列
pop_heap() 是将堆顶元素与最后一个元素交换位置,之后用pop_back将最后一个元素删除,greater1()是按小顶堆的方式
std::pop_heap(queue_.begin(), queue_.end(), greater1());
删除最后一个元素,即删除最小代价的点
queue_.pop_back();
当找到目标点时,规划结束
int i = top.i;
if (i == goal_i)
    return true;
最后对前后左右四个点执行add函数,将代价最小点i周围点加入搜索队里并更新代价值(和grid算法不同,这里的Astar是四邻域的)
        add(costs, potential, potential[i], i + 1, end_x, end_y);
        add(costs, potential, potential[i], i - 1, end_x, end_y);
        add(costs, potential, potential[i], i + nx_, end_x, end_y);
        add(costs, potential, potential[i], i - nx_, end_x, end_y);
再来看看AStarExpansion::add函数
add函数的作用:添加点并更新代价
首先判断新的点是否在地图内;是否被访问过;是否是障碍物.是的话,跳过这个点.
    if (next_i < 0 || next_i >= ns_)
        return;

    if (potential[next_i] < POT_HIGH)
        return;

    if(costs[next_i]>=lethal_cost_ && !(unknown_ && costs[next_i]==costmap_2d::NO_INFORMATION))
        return;
计算start_i到 邻点(i+1,i-1,i+nx,i-nx) 的最小代价g(n),
potential[next_i] = p_calc_->calculatePotential(potential, costs[next_i] + neutral_cost_, next_i, prev_potential);
potential 存储所有点的g(n),即从初始点到节点n的实际代价costs[next_i] + neutral_cost_
potential[next_i] 是起点到当前点的cost即g(n)
neutral_cost_ 设定的一个默认值,为50
prev_potentia 当前点的f
        virtual float calculatePotential(float* potential, unsigned char cost, int n, float prev_potential=-1){
            if(prev_potential < 0){
                // get min of neighbors
                float min_h = std::min( potential[n - 1], potential[n + 1] ),
                      min_v = std::min( potential[n - nx_], potential[n + nx_]);
                prev_potential = std::min(min_h, min_v);
            }

            return prev_potential + cost;
        }
启发式函数:即h(n) 从节点n到目标点最佳路径的估计代价,这里选用了曼哈顿距离
float distance = abs(end_x - x) + abs(end_y - y);
两个cost后,加起来即为f(n),代价 f = g +h;,将其存入队列中
queue_.push_back(Index(next_i, potential[next_i] + distance * neutral_cost_));
对加入的再进行堆排序, 把最小代价点放到front队头queue_[0]
std::push_heap(queue_.begin(), queue_.end(), greater1());
[1] ros navigation 解析之A*路径规划
[2] Navigation中全局路径规划效果对比
[3] ROS - move_base全局路径规划之A*程序分析
[4] 移动机器人gazebo仿真(5)—规划算法A*
我有一个字符串input="maybe(thisis|thatwas)some((nice|ugly)(day|night)|(strange(weather|time)))"Ruby中解析该字符串的最佳方法是什么?我的意思是脚本应该能够像这样构建句子:maybethisissomeuglynightmaybethatwassomenicenightmaybethiswassomestrangetime等等,你明白了......我应该一个字符一个字符地读取字符串并构建一个带有堆栈的状态机来存储括号值以供以后计算,还是有更好的方法?也许为此目的准备了一个开箱即用的库?
我主要使用Ruby来执行此操作,但到目前为止我的攻击计划如下:使用gemsrdf、rdf-rdfa和rdf-microdata或mida来解析给定任何URI的数据。我认为最好映射到像schema.org这样的统一模式,例如使用这个yaml文件,它试图描述数据词汇表和opengraph到schema.org之间的转换:#SchemaXtoschema.orgconversion#data-vocabularyDV:name:namestreet-address:streetAddressregion:addressRegionlocality:addressLocalityphoto:i
我正在使用ruby1.9解析以下带有MacRoman字符的csv文件#encoding:ISO-8859-1#csv_parse.csvName,main-dialogue"Marceu","Giveittohimóhe,hiswife."我做了以下解析。require'csv'input_string=File.read("../csv_parse.rb").force_encoding("ISO-8859-1").encode("UTF-8")#=>"Name,main-dialogue\r\n\"Marceu\",\"Giveittohim\x97he,hiswife.\"\
简而言之错误:NOTE:Gem::SourceIndex#add_specisdeprecated,useSpecification.add_spec.Itwillberemovedonorafter2011-11-01.Gem::SourceIndex#add_speccalledfrom/opt/local/lib/ruby/site_ruby/1.8/rubygems/source_index.rb:91./opt/local/lib/ruby/gems/1.8/gems/rails-2.3.8/lib/rails/gem_dependency.rb:275:in`==':und
目录一.加解密算法数字签名对称加密DES(DataEncryptionStandard)3DES(TripleDES)AES(AdvancedEncryptionStandard)RSA加密法DSA(DigitalSignatureAlgorithm)ECC(EllipticCurvesCryptography)非对称加密签名与加密过程非对称加密的应用对称加密与非对称加密的结合二.数字证书图解一.加解密算法加密简单而言就是通过一种算法将明文信息转换成密文信息,信息的的接收方能够通过密钥对密文信息进行解密获得明文信息的过程。根据加解密的密钥是否相同,算法可以分为对称加密、非对称加密、对称加密和非
如何使此根路径转到:“/dashboard”而不仅仅是http://example.com?root:to=>'dashboard#index',:constraints=>lambda{|req|!req.session[:user_id].blank?} 最佳答案 您可以通过以下方式实现:root:to=>redirect('/dashboard')match'/dashboard',:to=>"dashboard#index",:constraints=>lambda{|req|!req.session[:user_id].b
我正在使用ruby2.1.0我有一个json文件。例如:test.json{"item":[{"apple":1},{"banana":2}]}用YAML.load加载这个文件安全吗?YAML.load(File.read('test.json'))我正在尝试加载一个json或yaml格式的文件。 最佳答案 YAML可以加载JSONYAML.load('{"something":"test","other":4}')=>{"something"=>"test","other"=>4}JSON将无法加载YAML。JSON.load("
我需要根据字符串路径的长度将字符串路径数组转换为符号、哈希和数组的数组给定以下数组:array=["info","services","about/company","about/history/part1","about/history/part2"]我想生成以下输出,对不同级别进行分组,根据级别的结构混合使用符号和对象。产生以下输出:[:info,:services,about:[:company,history:[:part1,:part2]]]#altsyntax[:info,:services,{:about=>[:company,{:history=>[:part1,:pa
我想用Nokogiri解析HTML页面。页面的一部分有一个表,它没有使用任何特定的ID。是否可以提取如下内容:Today,3,455,34Today,1,1300,3664Today,10,100000,3444,Yesterday,3454,5656,3Yesterday,3545,1000,10Yesterday,3411,36223,15来自这个HTML:TodayYesterdayQntySizeLengthLengthSizeQnty345534345456563113003664354510001010100000344434113622315
Organization和Image具有一对一的关系。Image有一个名为filename的列,它存储文件的路径。我在Assets管道中包含这样一个文件:app/assets/other/image.jpg。播种时如何包含此文件的路径?我已经在我的种子文件中尝试过:@organization=...@organization.image.create!(filename:File.open('app/assets/other/image.jpg'))#Ialsotried:#@organization.image.create!(filename:'app/assets/other/i