这种KVM只能安装windows无法安装安卓
(From https://phoenixnap.com/kb/ubuntu-install-kvm)
A type 2 hypervisor enables users to run isolated instances of other operating systems inside a host system. As a Linux based OS, Ubuntu supports a wide range of virtualization solutions.
Aside from popular third-party apps, such as VirtualBox and VMWare, the Linux kernel has its own virtualization module called KVM (Kernel-based Virtual Machine).
In this tutorial you will learn how to install and set up KVM on Ubuntu 20.04.
Prerequisites
A system running Ubuntu 20.04
An account with sudo privileges
Access to the command line/terminal
1. Before you begin with installing KVM, check if your CPU supports hardware virtualization via egrep command:
egrep -c '(vmx|svm)' /proc/cpuinfoCheck the number in the output:

If the command returns a value of 0, your processor is not capable of running KVM. On the other hand, any other number means you can proceed with the installation.
2. Now, check if your system can use KVM acceleration by typing:
sudo kvm-okThe output should look like this:

If kvm-ok returns an error stating KVM acceleration cannot be used, try solving the problem by installing cpu-checker.
3. To install cpu-checker, run the following command:
sudo apt install cpu-checker4. When the installation completes, restart the terminal.
You are now ready to start installing KVM.
Note: When it is performed for servers, hardware virtualization is referred to as server virtualization.
To enable KVM virtualization on Ubuntu 20.04:
Install related packages using apt
Authorize users to run VMs
Verify that the installation was successful
1. First, update the repositories:
sudo apt update2. Then, install essential KVM packages with the following command:
sudo apt install qemu-kvm libvirt-daemon-system libvirt-clients bridge-utilsThis will start the installation of four KVM packages:

3. When prompted, type Y, press ENTER, and wait for the installation to finish.
1. Only members of the libvirt and kvm user groups can run virtual machines. Add a user to the libvirt group by typing:
sudo adduser ‘username’ libvirtReplace username with the actual username.

2. Now do the same for the kvm group:
sudo adduser ‘[username]’ kvm
Note: If you need to remove a user from the libvirt or kvm group, just replace adduser with deluser in the command above.
1. Confirm the installation was successful by using the virsh command:
virsh list --allYou can expect an output as seen below:

2. Or use the systemctl command to check the status of libvirtd:
sudo systemctl status libvirtdIf everything is functioning properly, the output returns an active (running) status.
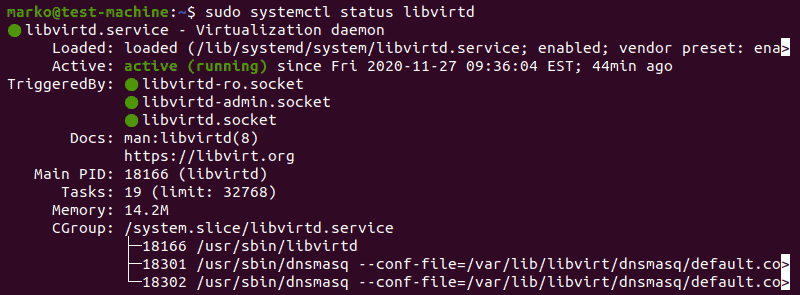
3. Press Q to quit the status screen.
4. If the virtualization daemon is not active, activate it with the following command:
sudo systemctl enable --now libvirtd1. Before you choose one of the two methods listed below, install virt-manager, a tool for creating and managing VMs:
sudo apt install virt-manager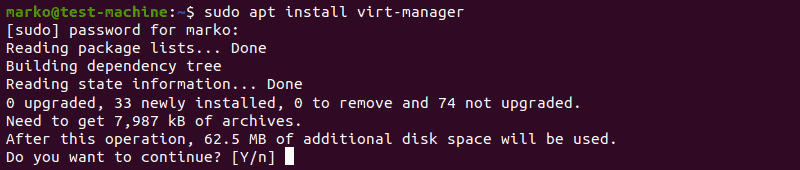
2. Type Y and press ENTER. Wait for the installation to finish.
Make sure you download an ISO containing the OS you wish to install on a VM and proceed to pick an installation method.
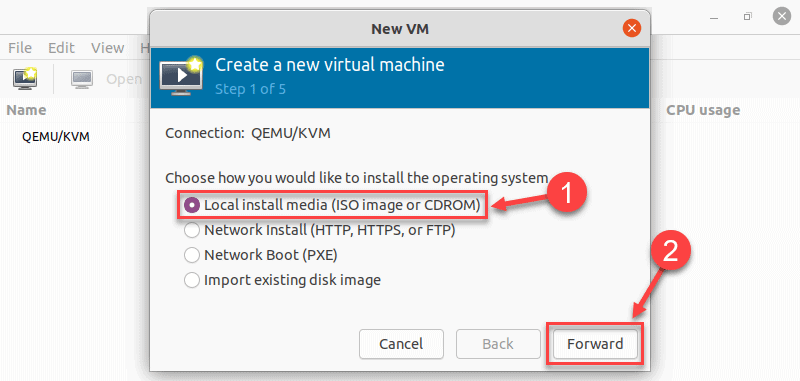
1. Start virt-manager with:
sudo virt-manager2. In the first window, click the computer icon in the upper-left corner.

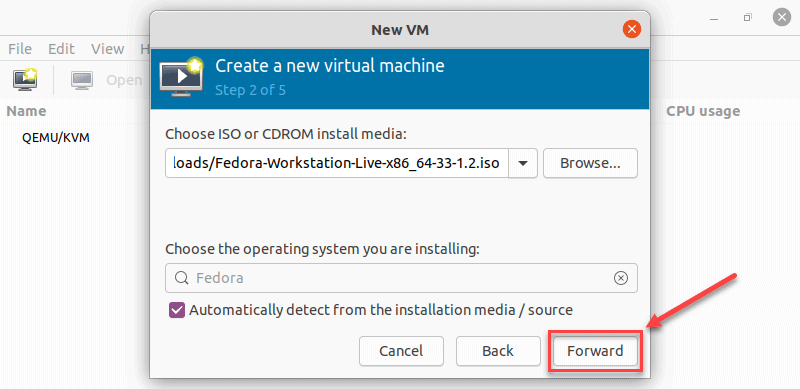
3. In the dialogue box that opens, select the option to install the VM using an ISO image. Then click Forward.
4. In the next dialogue, click Browse Local and navigate to the path where you stored the ISO you wish to install.

5. The ISO you chose in the previous window populates the field in Step 2. Proceed to Step 3 by clicking Forward.
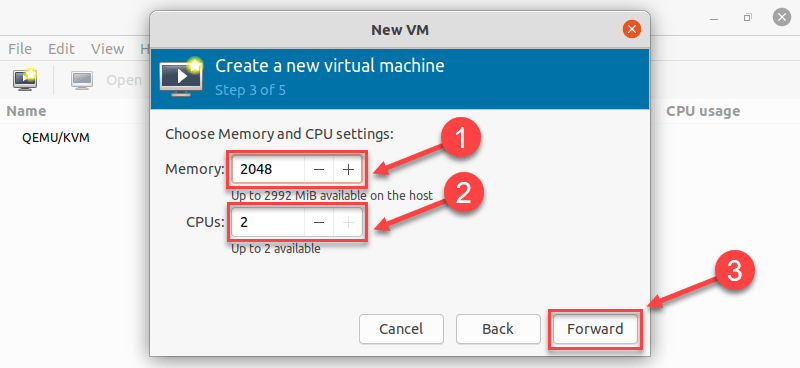
6. Enter the amount of RAM and the number of CPUs you wish to allocate to the VM and proceed to the next step.
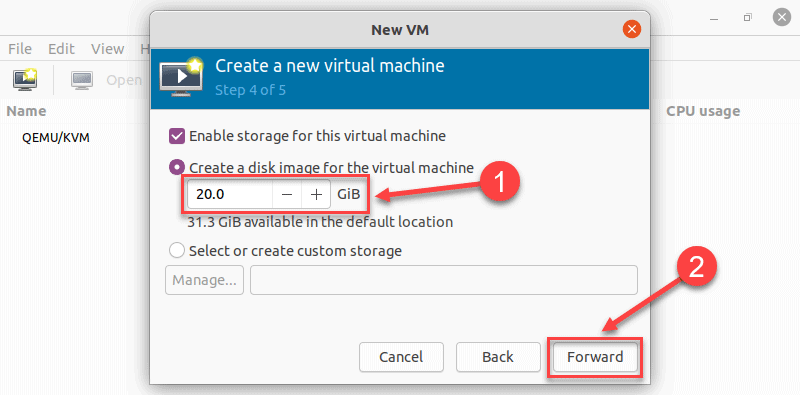
7. Allocate hard disk space to the VM. Click Forward to go to the last step.
8. Specify the name for your VM and click Finish to complete the setup.
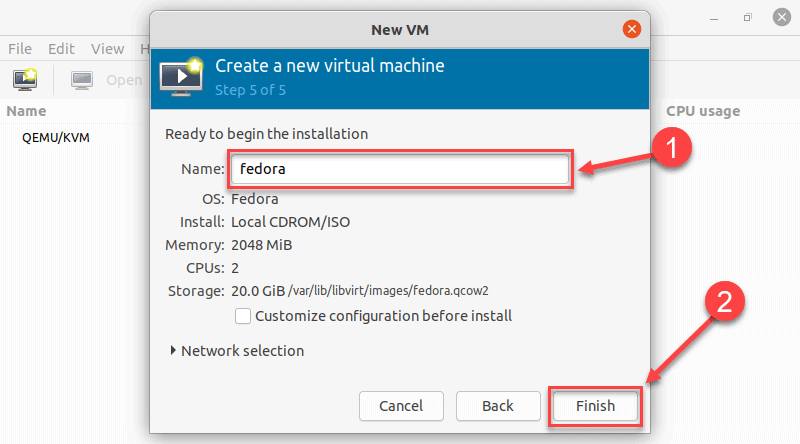
9. The VM starts automatically, prompting you to start installing the OS that’s on the ISO file.
Use the virt-install command to create a VM via Linux terminal. The syntax is:
virt-install --option1=value --option2=value ...In the following example, virt-install is used to install Fedora 33 Workstation.
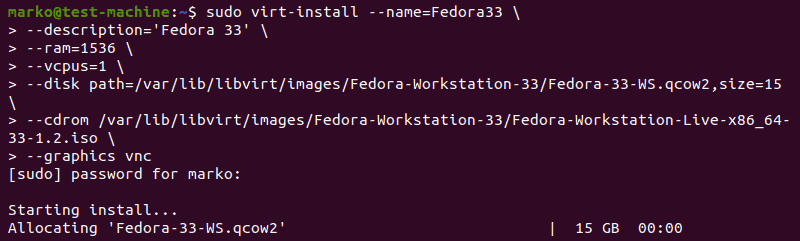
Tip: For tidier appearance of commands with many options, type a back-slash after each option. That way, when you press Enter, the command will not execute, and the cursor will go to the next line.
Options behind the command serve to define the parameters of the installation.
Here is what each of them means:
Option | Description |
--name | The name you give to the VM |
--description | A short description of the VM |
--ram | The amount of RAM you wish to allocate to the VM |
--vcpus | The number of virtual CPUs you wish to allocate to the VM |
--disk | The location of the VM on your disk (if you specify a qcow2 disk file that does not exist, it will be automatically created) |
--cdrom | The location of the ISO file you downloaded |
--graphics | Specifies the display type |
Conclusion
After reading this article, you should know how to install KVM on Ubuntu 20.04. Additionally, the article describes two methods of setting up virtual machines, using the virt-manager GUI and the virt-install command.
(From https://beebom.com/run-android-on-linux-using-virtual-machine/)
Recently, we curated a list of top Android emulators for Linux systems and were disappointed to find that there is no proper application that can mimic Android on a Linux distro. That said, we did find a cool way to run Android on Linux using a virtual machine with Play Store support. And in fact, it works better than emulators due to better binary translation and desktop-like features. So in this article, we are going to show you how to run Android on Linux using a virtual machine. On that note, let’s go ahead and learn about the steps without any delay.
Before we go ahead, let me briefly explain how we are going to run Android on Linux. We are going to use an open-source project called Android-x86 that ports ARM-based Android OS to x86 based systems. Basically, with Android-x86’s ISO image, you can boot Android on any desktop platform, be it Windows or Linux.
You can also install and run the best of Android games and apps on your Linux machine. So here are the instructions that you have to go through to install Android on Linux as a virtual machine. You can click on the link below to seamlessly move between various sections.
Table Of Contents
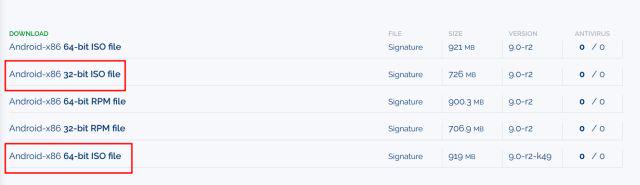
1. First of all, download the ISO image of Android 9 from here. Depending on your computer architecture, choose either a 64-bit or 32-bit ISO image. By the way, currently, Android 9 is the latest OS ported for desktop computers.
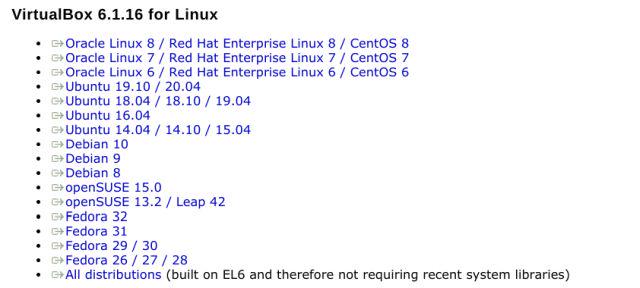
2. Once you have downloaded the Android ISO image, go ahead and download VirtualBox. You can find the setup file for all Linux distributions from here. After the download is complete, install VirtualBox on your system.
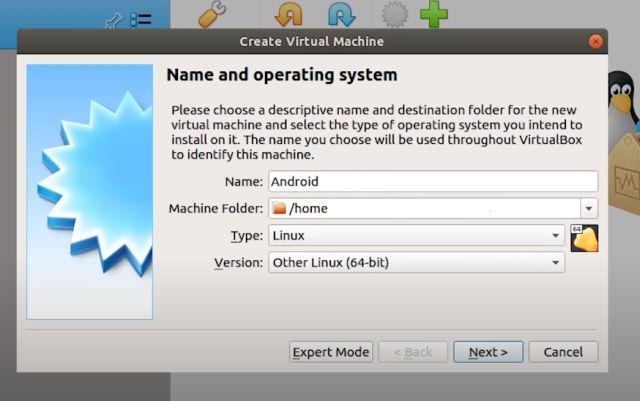
3. Here, I am running VirtualBox on Ubuntu. Now, click on “New” on the menubar and give a name to your virtual machine. For example, I have entered “Android”. Further, select the Type as “Linux” and choose “Other Linux (64-bit)” under Version. If you have a 32-bit machine then select “Other Linux (32-bit)”. Finally, click on “Next”.
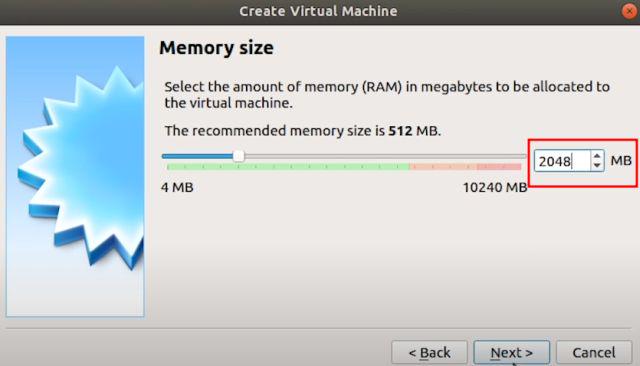
4. On the next window, allot at least 2GB of RAM. If you have extra RAM available, increase it to 4GB for better performance while using Android.
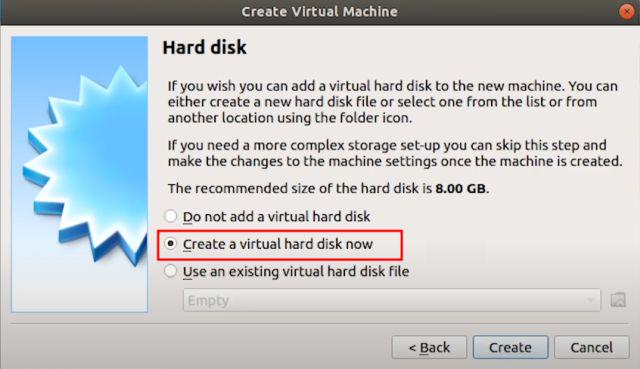
5. Next, select “Create a virtual hard disk now” and click on “Create”.
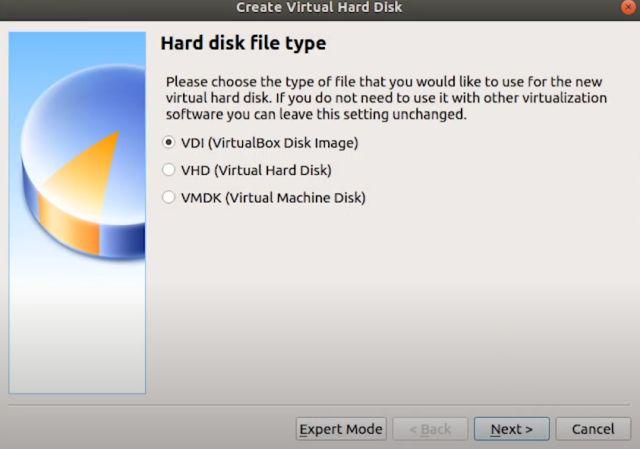
6. Further, select “VDI” and click on “Next”.
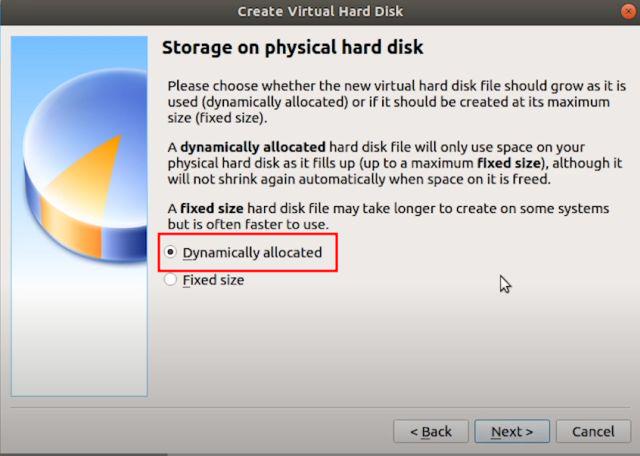
7. Select “Dynamically allocated” and click on “Next”.
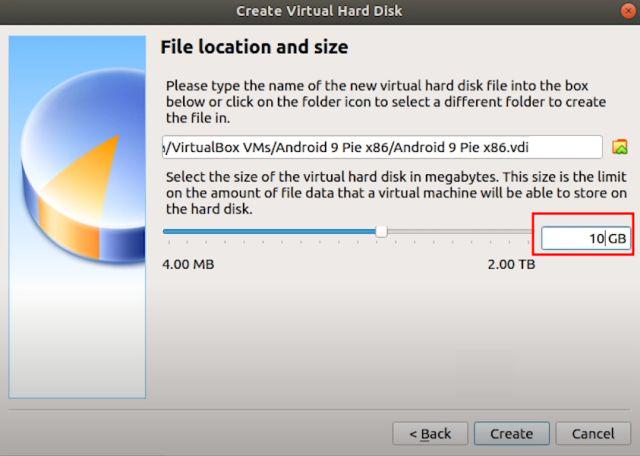
8. Here, enter the amount of storage that you want to allot to Android. The default is 8GB, but you can increase the storage to 16GB or more depending on your usage. Finally, click on “Create”.
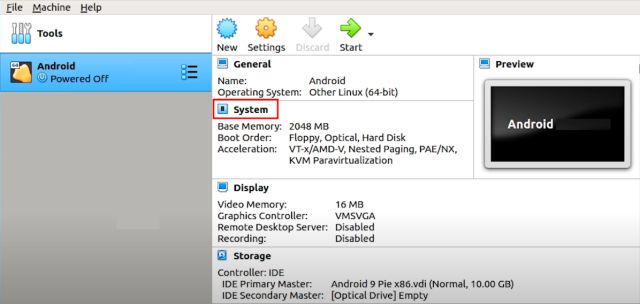
1. Now that you have created the VM, it’s time to configure a few things so that you get the best performance while running Android on Linux. On the VirtualBox, click on “System“.
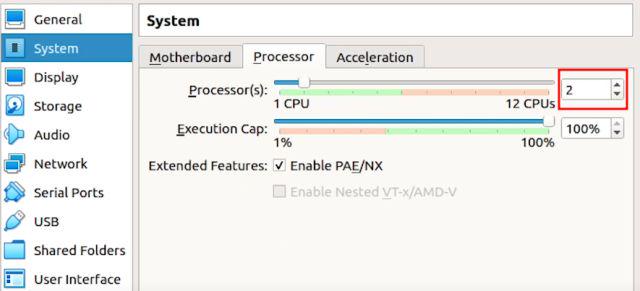
2. Move to the “Processor” tab and allot at least 2 CPU cores. You can also increase it to 4 for better gaming performance.
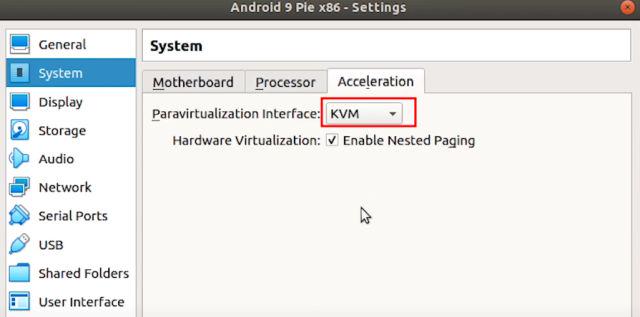
3. Next, switch to the “Acceleration” tab and choose “KVM” from the drop-down menu.
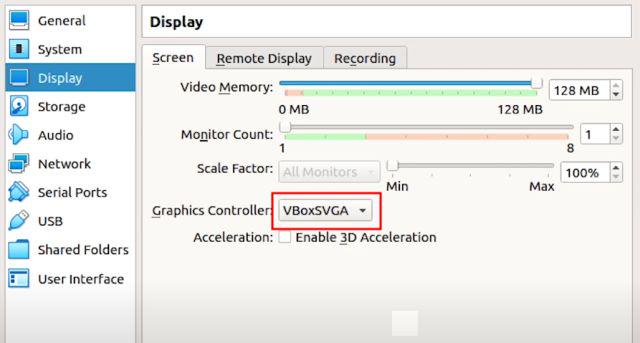
4. Once you have done that, move to the “Display” section and change the “Graphics controller” to “VBoxSVGA“. This is the most important step otherwise you will be stuck on a blank screen. Besides that, increase the Video Memory to at least 64-128MB.
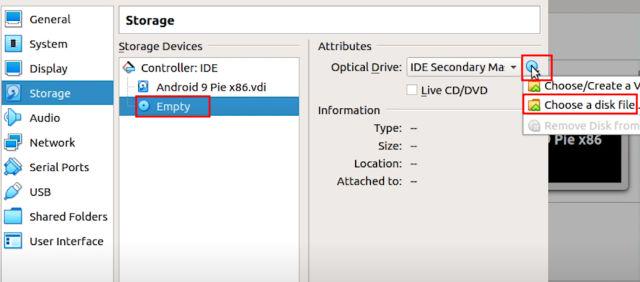
5. Finally, go to “Storage” and select the “Empty” sub-menu. Here, click on the disc icon and select “Choose a disk file”.
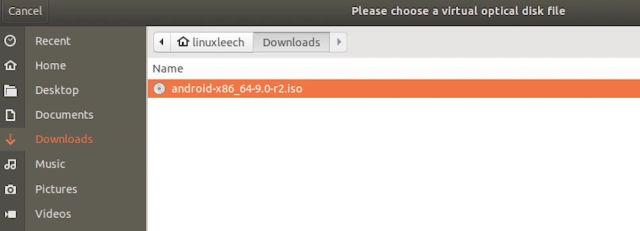
6. Now, select the Android ISO image that you downloaded in the first step. You are basically done. Simply, click on the “OK” button.
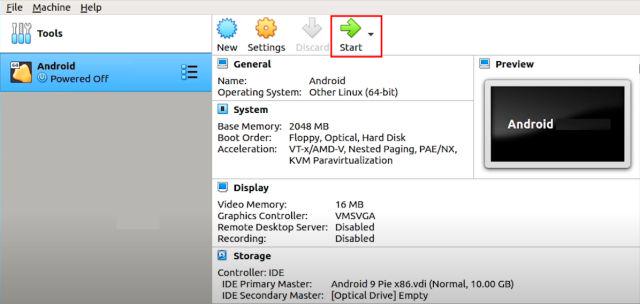
1. After the basic setup and configuration, you are now ready to boot Android on Linux. Simply, select “Android” on the left pane and then click on “Start“.
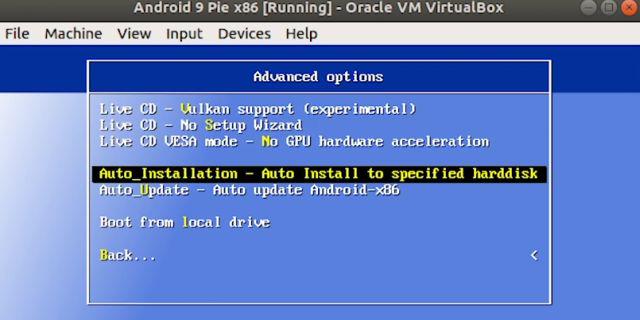
2. Here, move to the “Advanced options“.
3. Now, select “Auto_Installation…” and hit enter.
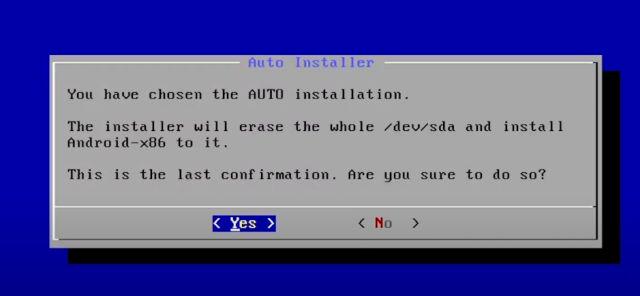
4. On the next screen, select “Yes” and hit enter.
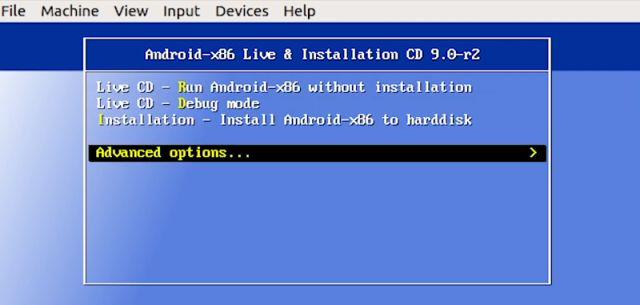
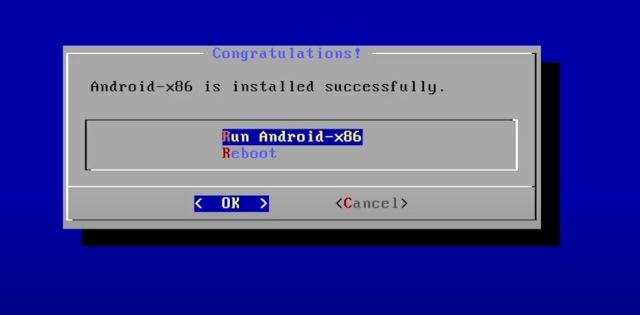
5. Finally, you will get the option to “Run Android-x86” on your Linux machine. Press enter and Android will starting booting on your Linux machine then and there.
6. You can go through the initial setup screen just like Android smartphones.
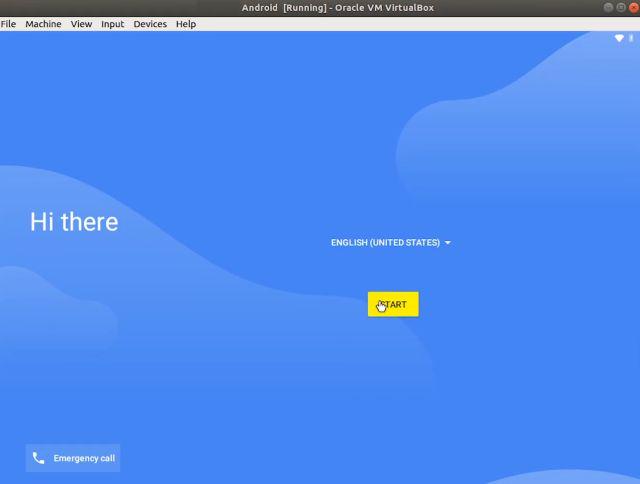
7. Finally, there you have it. Android 9 running on Linux with near-native performance. How great is that? Now onwards, you just need to press the “Start” button in VirtualBox and Android will be ready for you.

9. In case, you want to delete Android from Linux then simply right-click on the Android VM that you have created and choose “Remove”.
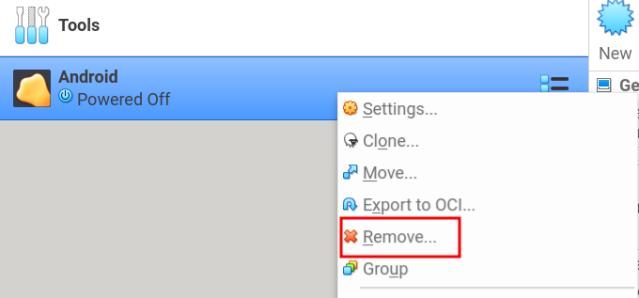
10. Next, click on “Delete all files”. It will remove the virtual hard drive and all associated files freeing up all the space on your computer. That’s it.

So that is how you can install and run Android on Linux without using an emulator. One of the added benefits of this setup is that it makes things possible that you cannot do on your Android smartphone like taking screenshots on Snapchat without notifying sender, screen recording of protected content, playing games like PUBG, and much more.
You can even use Android as a desktop with the Taskbar launcher that ships with Android-x86 ISO image. Anyway, that is all from us. If you are facing any issue then do comment down below and let us know. We will surely try to help you out.
125
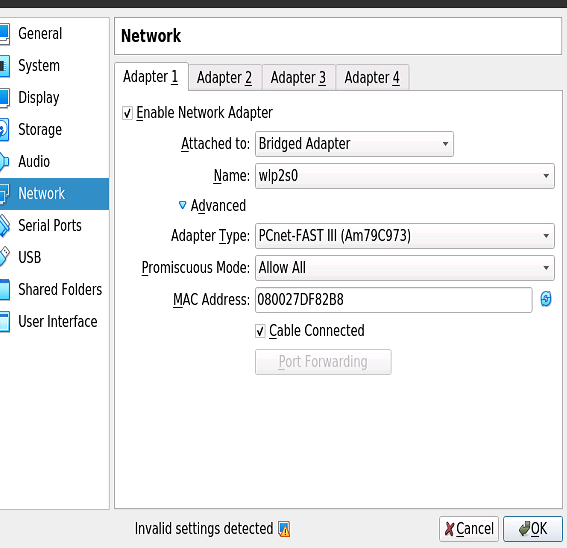
I was having the same problem on Ubuntu 12.10 64bit using Virtualbox 4.2.22. Here are the steps I took to solve my problem:
Open Virtualbox Manager
Select the machine you cannot get internet on in the left pane
Click the Settings button in the top menu
Click Network in the left pane in the settings window
Switched to Bridged Adapter in the Attached to drop-down menu
Select the name of the network adapter you are currently using on your host machine. I am using wireless so I chose eth0 which is my wireless network adapter. You can check which adapter you are currently using by opening the terminal (CTRL+ALT+T by default) and running ifconfig. It will probably be the eth adapter that shows an inet addr and shows data transfer next to RX bytes.
Under Advanced, make sure the machine is using the Desktop Adapter Type
Under Advanced, make sure Promiscuous Mode is set to Allow All
Under Advanced, make sure Cable connected is checked on
Hit OK to save your changes
Start your VM
At that point you should be able to start a web browser in your VM and get a connection. This video provided the information I listed above, even though they are using a Windows 7 host with a Windows Server guest.
This is an image showing an example of the settings you need (taken from this answer).
我正在学习如何使用Nokogiri,根据这段代码我遇到了一些问题:require'rubygems'require'mechanize'post_agent=WWW::Mechanize.newpost_page=post_agent.get('http://www.vbulletin.org/forum/showthread.php?t=230708')puts"\nabsolutepathwithtbodygivesnil"putspost_page.parser.xpath('/html/body/div/div/div/div/div/table/tbody/tr/td/div
总的来说,我对ruby还比较陌生,我正在为我正在创建的对象编写一些rspec测试用例。许多测试用例都非常基础,我只是想确保正确填充和返回值。我想知道是否有办法使用循环结构来执行此操作。不必为我要测试的每个方法都设置一个assertEquals。例如:describeitem,"TestingtheItem"doit"willhaveanullvaluetostart"doitem=Item.new#HereIcoulddotheitem.name.shouldbe_nil#thenIcoulddoitem.category.shouldbe_nilendend但我想要一些方法来使用
关闭。这个问题是opinion-based.它目前不接受答案。想要改进这个问题?更新问题,以便editingthispost可以用事实和引用来回答它.关闭4年前。Improvethisquestion我想在固定时间创建一系列低音和高音调的哔哔声。例如:在150毫秒时发出高音调的蜂鸣声在151毫秒时发出低音调的蜂鸣声200毫秒时发出低音调的蜂鸣声250毫秒的高音调蜂鸣声有没有办法在Ruby或Python中做到这一点?我真的不在乎输出编码是什么(.wav、.mp3、.ogg等等),但我确实想创建一个输出文件。
给定这段代码defcreate@upgrades=User.update_all(["role=?","upgraded"],:id=>params[:upgrade])redirect_toadmin_upgrades_path,:notice=>"Successfullyupgradeduser."end我如何在该操作中实际验证它们是否已保存或未重定向到适当的页面和消息? 最佳答案 在Rails3中,update_all不返回任何有意义的信息,除了已更新的记录数(这可能取决于您的DBMS是否返回该信息)。http://ar.ru
我在我的项目目录中完成了compasscreate.和compassinitrails。几个问题:我已将我的.sass文件放在public/stylesheets中。这是放置它们的正确位置吗?当我运行compasswatch时,它不会自动编译这些.sass文件。我必须手动指定文件:compasswatchpublic/stylesheets/myfile.sass等。如何让它自动运行?文件ie.css、print.css和screen.css已放在stylesheets/compiled。如何在编译后不让它们重新出现的情况下删除它们?我自己编译的.sass文件编译成compiled/t
我想为Heroku构建一个Rails3应用程序。他们使用Postgres作为他们的数据库,所以我通过MacPorts安装了postgres9.0。现在我需要一个postgresgem并且共识是出于性能原因你想要pggem。但是我对我得到的错误感到非常困惑当我尝试在rvm下通过geminstall安装pg时。我已经非常明确地指定了所有postgres目录的位置可以找到但仍然无法完成安装:$envARCHFLAGS='-archx86_64'geminstallpg--\--with-pg-config=/opt/local/var/db/postgresql90/defaultdb/po
我正在寻找执行以下操作的正确语法(在Perl、Shell或Ruby中):#variabletoaccessthedatalinesappendedasafileEND_OF_SCRIPT_MARKERrawdatastartshereanditcontinues. 最佳答案 Perl用__DATA__做这个:#!/usr/bin/perlusestrict;usewarnings;while(){print;}__DATA__Texttoprintgoeshere 关于ruby-如何将脚
Rackup通过Rack的默认处理程序成功运行任何Rack应用程序。例如:classRackAppdefcall(environment)['200',{'Content-Type'=>'text/html'},["Helloworld"]]endendrunRackApp.new但是当最后一行更改为使用Rack的内置CGI处理程序时,rackup给出“NoMethodErrorat/undefinedmethod`call'fornil:NilClass”:Rack::Handler::CGI.runRackApp.newRack的其他内置处理程序也提出了同样的反对意见。例如Rack
在选择我想要运行操作的频率时,唯一的选项是“每天”、“每小时”和“每10分钟”。谢谢!我想为我的Rails3.1应用程序运行调度程序。 最佳答案 这不是一个优雅的解决方案,但您可以安排它每天运行,并在实际开始工作之前检查日期是否为当月的第一天。 关于ruby-如何每月在Heroku运行一次Scheduler插件?,我们在StackOverflow上找到一个类似的问题: https://stackoverflow.com/questions/8692687/
我有一个对象has_many应呈现为xml的子对象。这不是问题。我的问题是我创建了一个Hash包含此数据,就像解析器需要它一样。但是rails自动将整个文件包含在.........我需要摆脱type="array"和我该如何处理?我没有在文档中找到任何内容。 最佳答案 我遇到了同样的问题;这是我的XML:我在用这个:entries.to_xml将散列数据转换为XML,但这会将条目的数据包装到中所以我修改了:entries.to_xml(root:"Contacts")但这仍然将转换后的XML包装在“联系人”中,将我的XML代码修改为