这篇文章,主要介绍如何使用Spring Cloud微服务组件从0到1搭建一个微服务工程。
目录
这里主要是使用的Spring Cloud Netflix微服务组件搭建工程,其中需要搭建下面这些组件工程:
大致如下所示:
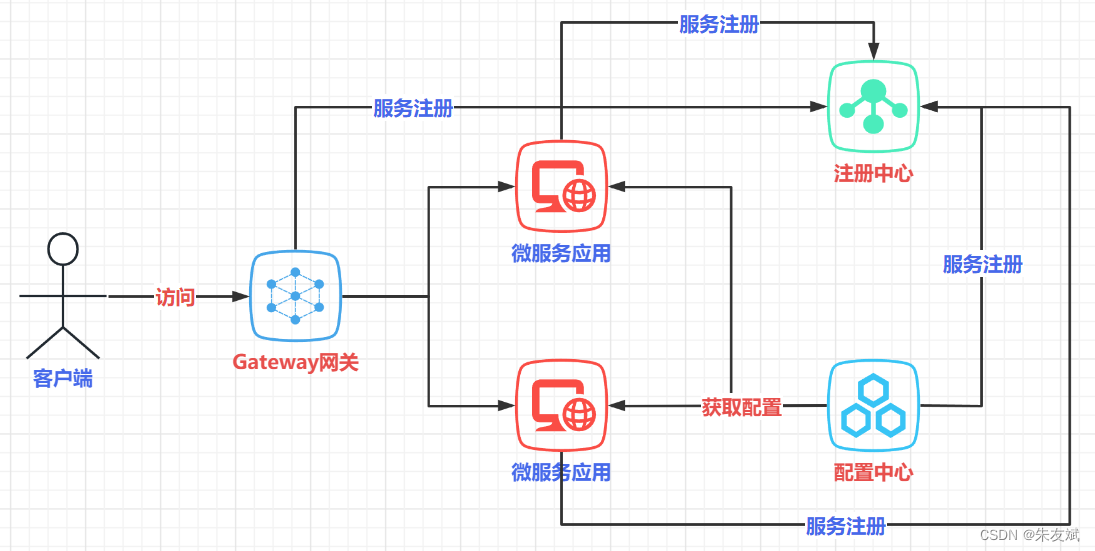
工程代码结构:

<!-- 引入SpringBoot依赖 -->
<parent>
    <groupId>org.springframework.boot</groupId>
    <artifactId>spring-boot-starter-parent</artifactId>
    <version>2.3.12.RELEASE</version>
    <relativePath/> <!-- lookup parent from repository -->
</parent>

<dependencyManagement>
    <!-- 使用 dependencyManagement 依赖管理,统一管理组件的版本 -->
    <dependencies>
        <!-- 引入 SpringCloud 微服务依赖 -->
        <dependency>
            <groupId>org.springframework.cloud</groupId>
            <artifactId>spring-cloud-dependencies</artifactId>
            <version>Hoxton.SR12</version>
            <type>pom</type>
            <scope>import</scope>
        </dependency>
    </dependencies>
</dependencyManagement>

<build>
    <plugins>
        <plugin>
            <groupId>org.springframework.boot</groupId>
            <artifactId>spring-boot-maven-plugin</artifactId>
        </plugin>
    </plugins>
</build>这里采用单机的Eureka注册中心,当然也可以使用集群的Eureka注册中心。
<!-- 引入 eureka 服务端依赖 -->
<dependency>
    <groupId>org.springframework.cloud</groupId>
    <artifactId>spring-cloud-starter-netflix-eureka-server</artifactId>
</dependency>server:
port: 8761
spring:
application:
name: cloud-eureka-server
# 配置 eureka 服务端
eureka:
client:
register-with-eureka: false # 是否将自己注册到eureka注册中心
fetch-registry: false # 是否从eureka注册中心获取注册信息package com.gitcode.demo;
import org.springframework.boot.SpringApplication;
import org.springframework.boot.autoconfigure.SpringBootApplication;
import org.springframework.cloud.netflix.eureka.server.EnableEurekaServer;
/**
* @version 1.0.0
* @Date: 2023/4/26 20:27
* @Copyright (C) ZhuYouBin
* @Description: Eureka 注册中心服务端启动类
*/
@EnableEurekaServer
@SpringBootApplication
public class EurekaApp {
public static void main(String[] args) {
SpringApplication.run(EurekaApp.class, args);
}
}
采用Spring Cloud Config组件实现配置中心的功能。
<!-- 引入 eureka 客户端依赖 -->
<dependency>
    <groupId>org.springframework.cloud</groupId>
    <artifactId>spring-cloud-starter-netflix-eureka-client</artifactId>
</dependency>
<!-- 引入 config-server 服务端依赖 -->
<dependency>
    <groupId>org.springframework.cloud</groupId>
    <artifactId>spring-cloud-config-server</artifactId>
</dependency>server:
port: 8888
spring:
application:
name: cloud-config-server
cloud:
config:
server:
git:
uri: https://gitcode.net/qq_39826207/config-demo.git # Git仓库的地址
# username: # Git仓库的登录用户名称
# password: # Git仓库的登录密码
# default-label: # 默认访问的分支名称
# search-paths: # 搜索的根目录,从仓库中的哪个目录中开始查找配置文件
# eureka 配置
eureka:
instance:
hostname: ${spring.application.name}
prefer-ip-address: true # 开启采用 IP 注册形式
# ${spring.cloud.client.ip-address} 这个属性可以获取到当前机器的 IP 地址
instance-id: ${spring.cloud.client.ip-address}:${server.port} # 设置当前服务的实例ID,采用:IP+端口形式
client:
register-with-eureka: true # 是否将自己注册到eureka注册中心
fetch-registry: true # 是否从eureka注册中心获取注册信息
service-url:
defaultZone: http://localhost:8761/eureka/ # eureka服务端的地址package com.gitcode.demo;
import org.springframework.boot.SpringApplication;
import org.springframework.boot.autoconfigure.SpringBootApplication;
import org.springframework.cloud.config.server.EnableConfigServer;
import org.springframework.cloud.netflix.eureka.EnableEurekaClient;
/**
* @version 1.0.0
* @Date: 2023/4/26 20:37
* @Copyright (C) ZhuYouBin
* @Description: Config 配置中心服务端启动类
*/
@EnableConfigServer
@EnableEurekaClient
@SpringBootApplication
public class ConfigApp {
public static void main(String[] args) {
SpringApplication.run(ConfigApp.class, args);
}
}
采用Spring Cloud Gateway实现API网关的功能。
<!-- 引入 eureka 客户端依赖 -->
<dependency>
    <groupId>org.springframework.cloud</groupId>
    <artifactId>spring-cloud-starter-netflix-eureka-client</artifactId>
</dependency>
<!-- 引入 Gateway 依赖 -->
<dependency>
    <groupId>org.springframework.cloud</groupId>
    <artifactId>spring-cloud-starter-gateway</artifactId>
</dependency>server:
port: 8080
spring:
application:
name: cloud-api-gateway
cloud:
gateway:
# 动态服务转发
discovery:
locator:
enabled: true # 启用动态路由服务名称转发功能
lower-case-service-id: true # 开启服务名称小写
# eureka 配置
eureka:
instance:
hostname: ${spring.application.name}
prefer-ip-address: true # 开启采用 IP 注册形式
# ${spring.cloud.client.ip-address} 这个属性可以获取到当前机器的 IP 地址
instance-id: ${spring.cloud.client.ip-address}:${server.port} # 设置当前服务的实例ID,采用:IP+端口形式
client:
register-with-eureka: true # 是否将自己注册到eureka注册中心
fetch-registry: true # 是否从eureka注册中心获取注册信息
service-url:
defaultZone: http://localhost:8761/eureka/ # eureka服务端的地址package com.gitcode.demo;
import org.springframework.boot.SpringApplication;
import org.springframework.boot.autoconfigure.SpringBootApplication;
import org.springframework.cloud.netflix.eureka.EnableEurekaClient;
/**
* @version 1.0.0
* @Date: 2023/4/26 20:49
* @Copyright (C) ZhuYouBin
* @Description: Gateway 网关启动类
*/
@EnableEurekaClient
@SpringBootApplication
public class GatewayApp {
public static void main(String[] args) {
SpringApplication.run(GatewayApp.class, args);
}
}
<!-- 引入 web 依赖 -->
<dependency>
    <groupId>org.springframework.boot</groupId>
    <artifactId>spring-boot-starter-web</artifactId>
</dependency>
<!-- 引入 eureka 客户端依赖 -->
<dependency>
    <groupId>org.springframework.cloud</groupId>
    <artifactId>spring-cloud-starter-netflix-eureka-client</artifactId>
</dependency>
<!-- 引入 config-client 客户端依赖 -->
<dependency>
    <groupId>org.springframework.cloud</groupId>
    <artifactId>spring-cloud-config-client</artifactId>
</dependency>server:
port: 6250
spring:
application:
name: biz-provider
cloud:
config:
name: biz-provider # 从 Git 仓库获取的配置文件名称
label: master # 从哪个分支获取
profile: dev # 获取哪个环境下的配置文件
# 从注册中心获取配置信息
discovery:
enabled: true # 开启服务发现的功能,这里也就是支持eureka的功能
service-id: cloud-config-server # config server服务端的微服务应用名称package com.gitcode.demo;
import org.springframework.boot.SpringApplication;
import org.springframework.boot.autoconfigure.SpringBootApplication;
import org.springframework.cloud.netflix.eureka.EnableEurekaClient;
/**
* @version 1.0.0
* @Date: 2023/4/26 20:57
* @Copyright (C) ZhuYouBin
* @Description: 服务提供者启动类
*/
@EnableEurekaClient
@SpringBootApplication
public class ProviderApp {
public static void main(String[] args) {
SpringApplication.run(ProviderApp.class, args);
}
}
服务消费者需要调用服务提供者的接口,所以这里需要引入OpenFeign组件。
<!-- 引入 web 依赖 -->
<dependency>
    <groupId>org.springframework.boot</groupId>
    <artifactId>spring-boot-starter-web</artifactId>
</dependency>
<!-- 引入 eureka 客户端依赖 -->
<dependency>
    <groupId>org.springframework.cloud</groupId>
    <artifactId>spring-cloud-starter-netflix-eureka-client</artifactId>
</dependency>
<!-- 引入 config-client 客户端依赖 -->
<dependency>
    <groupId>org.springframework.cloud</groupId>
    <artifactId>spring-cloud-config-client</artifactId>
</dependency>
<!-- 引入 OpenFeign 依赖 -->
<dependency>
    <groupId>org.springframework.cloud</groupId>
    <artifactId>spring-cloud-starter-openfeign</artifactId>
</dependency>server:
port: 9527
spring:
application:
name: biz-consumer
cloud:
config:
name: biz-consumer # 从 Git 仓库获取的配置文件名称
label: master # 从哪个分支获取
profile: dev # 获取哪个环境下的配置文件
# 从注册中心获取配置信息
discovery:
enabled: true # 开启服务发现的功能,这里也就是支持eureka的功能
service-id: cloud-config-server # config server服务端的微服务应用名称package com.gitcode.demo;
import org.springframework.boot.SpringApplication;
import org.springframework.boot.autoconfigure.SpringBootApplication;
import org.springframework.cloud.netflix.eureka.EnableEurekaClient;
import org.springframework.cloud.openfeign.EnableFeignClients;
/**
* @version 1.0.0
* @Date: 2023/4/26 21:11
* @Copyright (C) ZhuYouBin
* @Description: 服务消费者启动类
*/
@EnableFeignClients
@EnableEurekaClient
@SpringBootApplication
public class ConsumerApp {
public static void main(String[] args) {
SpringApplication.run(ConsumerApp.class, args);
}
}
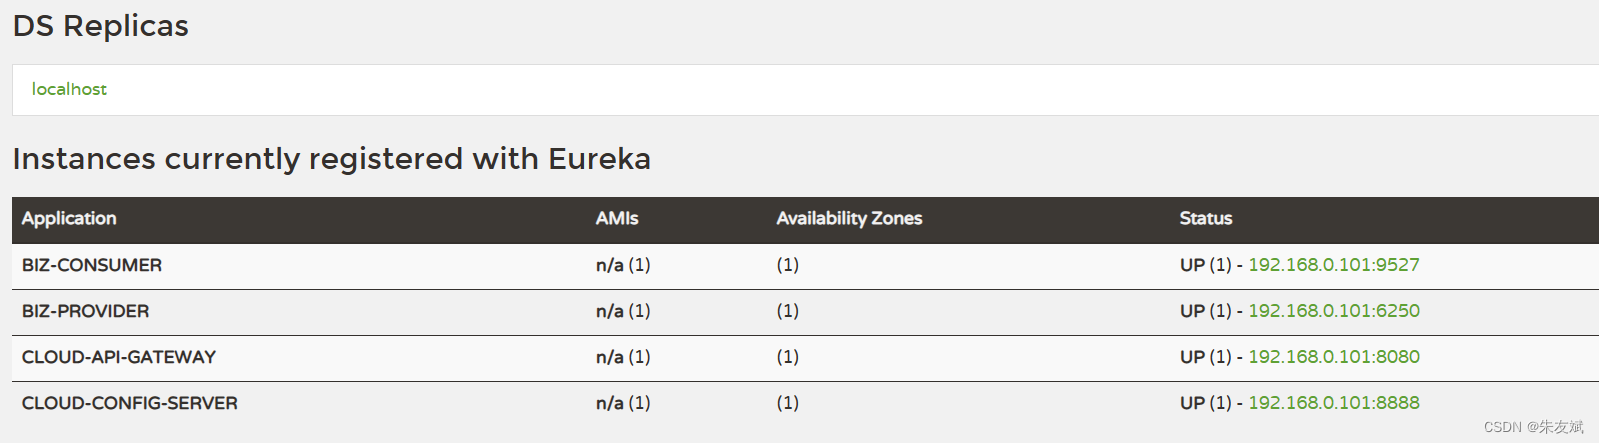
依次启动Eureka注册中心、Config配置中心、Gateway网关、Consumer服务消费者、Provider服务提供者,查看注册中心是否正常。
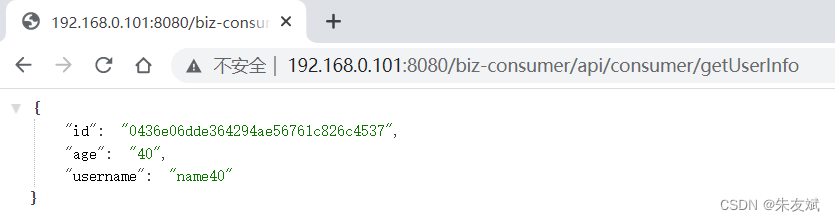
浏览器,通过Gateway访问Consumer消费者工程中的接口【http://localhost:8080/biz-consumer/api/consumer/getUserInfo】,注意:测试接口的代码没有贴出来,可以到我的代码仓库里面查看。
到此,从0到1的微服务工程搭建完成。
综上,这篇文章结束了,主要介绍如何使用Spring Cloud微服务组件从0到1搭建一个微服务工程【源代码】。
我正在学习如何使用Nokogiri,根据这段代码我遇到了一些问题:require'rubygems'require'mechanize'post_agent=WWW::Mechanize.newpost_page=post_agent.get('http://www.vbulletin.org/forum/showthread.php?t=230708')puts"\nabsolutepathwithtbodygivesnil"putspost_page.parser.xpath('/html/body/div/div/div/div/div/table/tbody/tr/td/div
我有一个Ruby程序,它使用rubyzip压缩XML文件的目录树。gem。我的问题是文件开始变得很重,我想提高压缩级别,因为压缩时间不是问题。我在rubyzipdocumentation中找不到一种为创建的ZIP文件指定压缩级别的方法。有人知道如何更改此设置吗?是否有另一个允许指定压缩级别的Ruby库? 最佳答案 这是我通过查看rubyzip内部创建的代码。level=Zlib::BEST_COMPRESSIONZip::ZipOutputStream.open(zip_file)do|zip|Dir.glob("**/*")d
类classAprivatedeffooputs:fooendpublicdefbarputs:barendprivatedefzimputs:zimendprotecteddefdibputs:dibendendA的实例a=A.new测试a.foorescueputs:faila.barrescueputs:faila.zimrescueputs:faila.dibrescueputs:faila.gazrescueputs:fail测试输出failbarfailfailfail.发送测试[:foo,:bar,:zim,:dib,:gaz].each{|m|a.send(m)resc
很好奇,就使用rubyonrails自动化单元测试而言,你们正在做什么?您是否创建了一个脚本来在cron中运行rake作业并将结果邮寄给您?git中的预提交Hook?只是手动调用?我完全理解测试,但想知道在错误发生之前捕获错误的最佳实践是什么。让我们理所当然地认为测试本身是完美无缺的,并且可以正常工作。下一步是什么以确保他们在正确的时间将可能有害的结果传达给您? 最佳答案 不确定您到底想听什么,但是有几个级别的自动代码库控制:在处理某项功能时,您可以使用类似autotest的内容获得关于哪些有效,哪些无效的即时反馈。要确保您的提
假设我做了一个模块如下:m=Module.newdoclassCendend三个问题:除了对m的引用之外,还有什么方法可以访问C和m中的其他内容?我可以在创建匿名模块后为其命名吗(就像我输入“module...”一样)?如何在使用完匿名模块后将其删除,使其定义的常量不再存在? 最佳答案 三个答案:是的,使用ObjectSpace.此代码使c引用你的类(class)C不引用m:c=nilObjectSpace.each_object{|obj|c=objif(Class===objandobj.name=~/::C$/)}当然这取决于
我正在尝试使用ruby和Savon来使用网络服务。测试服务为http://www.webservicex.net/WS/WSDetails.aspx?WSID=9&CATID=2require'rubygems'require'savon'client=Savon::Client.new"http://www.webservicex.net/stockquote.asmx?WSDL"client.get_quotedo|soap|soap.body={:symbol=>"AAPL"}end返回SOAP异常。检查soap信封,在我看来soap请求没有正确的命名空间。任何人都可以建议我
关闭。这个问题是opinion-based.它目前不接受答案。想要改进这个问题?更新问题,以便editingthispost可以用事实和引用来回答它.关闭4年前。Improvethisquestion我想在固定时间创建一系列低音和高音调的哔哔声。例如:在150毫秒时发出高音调的蜂鸣声在151毫秒时发出低音调的蜂鸣声200毫秒时发出低音调的蜂鸣声250毫秒的高音调蜂鸣声有没有办法在Ruby或Python中做到这一点?我真的不在乎输出编码是什么(.wav、.mp3、.ogg等等),但我确实想创建一个输出文件。
我在我的项目目录中完成了compasscreate.和compassinitrails。几个问题:我已将我的.sass文件放在public/stylesheets中。这是放置它们的正确位置吗?当我运行compasswatch时,它不会自动编译这些.sass文件。我必须手动指定文件:compasswatchpublic/stylesheets/myfile.sass等。如何让它自动运行?文件ie.css、print.css和screen.css已放在stylesheets/compiled。如何在编译后不让它们重新出现的情况下删除它们?我自己编译的.sass文件编译成compiled/t
我想将html转换为纯文本。不过,我不想只删除标签,我想智能地保留尽可能多的格式。为插入换行符标签,检测段落并格式化它们等。输入非常简单,通常是格式良好的html(不是整个文档,只是一堆内容,通常没有anchor或图像)。我可以将几个正则表达式放在一起,让我达到80%,但我认为可能有一些现有的解决方案更智能。 最佳答案 首先,不要尝试为此使用正则表达式。很有可能你会想出一个脆弱/脆弱的解决方案,它会随着HTML的变化而崩溃,或者很难管理和维护。您可以使用Nokogiri快速解析HTML并提取文本:require'nokogiri'h
我想为Heroku构建一个Rails3应用程序。他们使用Postgres作为他们的数据库,所以我通过MacPorts安装了postgres9.0。现在我需要一个postgresgem并且共识是出于性能原因你想要pggem。但是我对我得到的错误感到非常困惑当我尝试在rvm下通过geminstall安装pg时。我已经非常明确地指定了所有postgres目录的位置可以找到但仍然无法完成安装:$envARCHFLAGS='-archx86_64'geminstallpg--\--with-pg-config=/opt/local/var/db/postgresql90/defaultdb/po