您启用 Elasticsearch 安全功能,然后为内置用户创建密码。您可以稍后添加更多用户,但使用内置用户可以简化为集群启用安全性的过程。
最小安全场景对于 生产模式集群是不够的。如果您的集群有多个节点,您必须启用最低安全性,然后 在节点之间配置传输层安全性 (TLS)。
本文档是测试案例。配置为开发模式,如果一个 Elasticsearch 节点不能通过非环回地址与另一台机器形成集群,我们认为它处于开发模式,如果它可以通过非环回地址加入集群,则认为它处于生产模式。
请注意!!!!!!!
如果 Elasticsearch 处于开发模式,任何失败的引导程序检查都会在 Elasticsearch 日志中显示为警告。如果 Elasticsearch 处于生产模式,任何失败的引导程序检查都会导致 Elasticsearch 拒绝启动。
当您使用基本许可证时,Elasticsearch 安全功能默认处于禁用状态。启用 Elasticsearch 安全功能会启用基本身份验证,以便您可以使用用户名和密码身份验证运行本地集群。
root@ubuntu-x64_02:/opt# systemctl stop kibana

root@ubuntu-x64_02:/opt# systemctl stop elasticsearch9201

root@ubuntu-x64_02:/opt# systemctl stop elasticsearch9202

root@ubuntu-x64_02:/opt# systemctl stop elasticsearch9203
# 9201
root@ubuntu-x64_02:/usr/local/elasticsearch9201/config# cp elasticsearch.yml elasticsearch.yml.bak
root@ubuntu-x64_02:/usr/local/elasticsearch9201/config# sed -i 's/xpack.security.enabled: false/xpack.security.enabled: true/g' elasticsearch.yml


# 9202
root@ubuntu-x64_02:/usr/local/elasticsearch9202/config# cp elasticsearch.yml elasticsearch.yml.bak
root@ubuntu-x64_02:/usr/local/elasticsearch9202/config# sed -i 's/xpack.security.enabled: false/xpack.security.enabled: true/g' elasticsearch.yml


# 9203
root@ubuntu-x64_02:/usr/local/elasticsearch9203/config# cp elasticsearch.yml elasticsearch.yml.bak
root@ubuntu-x64_02:/usr/local/elasticsearch9203/config# sed -i 's/xpack.security.enabled: false/xpack.security.enabled: true/g' elasticsearch.yml
discovery.type: single-node
要与集群通信,您必须为内置用户配置用户名。除非您启用匿名访问,否则所有不包含用户名和密码的请求都会被拒绝。
在启用最低或基本安全性时,您只需要为elastic和kibana_system用户设置密码。
在集群中的每个节点上,启动 Elasticsearch。
请注意,你要使用开发模式的集群,如果你使用生产环境模式,又不启用TLS,你的集群将不会启动,报错:
bootstrap check failure [1] of [1]: Transport SSL must be enabled if security is enabled on a [basic] license. Please set [xpack.security.transport.ssl.enabled] to [true] or disable security by setting [xpack.security.enabled] to [false]
如果你使用开发模式,则上面的报错会显示为“警告”
# 启动-->  9201
root@ubuntu-x64_02:/opt# systemctl start elasticsearch9201
root@ubuntu-x64_02:/opt# ps -ef | grep elasticsearch9201
elk       3513     1 99 14:11 ?        00:00:22 /usr/local/elasticsearch9201/jdk/bin/java -Xshare:auto -Des.networkaddress.cache.ttl=60 -Des.networkaddress.cache.negative.ttl=10 -XX:+AlwaysPreTouch -Xss1m -Djava.awt.headless=true -Dfile.encoding=UTF-8 -Djna.nosys=true -XX:-OmitStackTraceInFastThrow -XX:+ShowCodeDetailsInExceptionMessages -Dio.netty.noUnsafe=true -Dio.netty.noKeySetOptimization=true -Dio.netty.recycler.maxCapacityPerThread=0 -Dio.netty.allocator.numDirectArenas=0 -Dlog4j.shutdownHookEnabled=false -Dlog4j2.disable.jmx=true -Djava.locale.providers=SPI,COMPAT --add-opens=java.base/java.io=ALL-UNNAMED -Xms1g -Xmx1g -XX:+UseG1GC -Djava.io.tmpdir=/tmp/elasticsearch-4767306356958695874 -XX:+HeapDumpOnOutOfMemoryError -XX:HeapDumpPath=data -XX:ErrorFile=logs/hs_err_pid%p.log -Xlog:gc*,gc+age=trace,safepoint:file=logs/gc.log:utctime,pid,tags:filecount=32,filesize=64m -XX:MaxDirectMemorySize=536870912 -XX:G1HeapRegionSize=4m -XX:InitiatingHeapOccupancyPercent=30 -XX:G1ReservePercent=15 -Des.path.home=/usr/local/elasticsearch9201 -Des.path.conf=/usr/local/elasticsearch9201/config -Des.distribution.flavor=default -Des.distribution.type=tar -Des.bundled_jdk=true -cp /usr/local/elasticsearch9201/lib/* org.elasticsearch.bootstrap.Elasticsearch -d
elk       3534  3513  0 14:11 ?        00:00:00 /usr/local/elasticsearch9201/modules/x-pack-ml/platform/linux-x86_64/bin/controller


# 启动-->  9202
root@ubuntu-x64_02:/opt# systemctl start elasticsearch9202
root@ubuntu-x64_02:/opt# ps -ef | grep elasticsearch9202
elk       3743     1 99 14:13 ?        00:00:04 /usr/local/elasticsearch9202/jdk/bin/java -Xshare:auto -Des.networkaddress.cache.ttl=60 -Des.networkaddress.cache.negative.ttl=10 -XX:+AlwaysPreTouch -Xss1m -Djava.awt.headless=true -Dfile.encoding=UTF-8 -Djna.nosys=true -XX:-OmitStackTraceInFastThrow -XX:+ShowCodeDetailsInExceptionMessages -Dio.netty.noUnsafe=true -Dio.netty.noKeySetOptimization=true -Dio.netty.recycler.maxCapacityPerThread=0 -Dio.netty.allocator.numDirectArenas=0 -Dlog4j.shutdownHookEnabled=false -Dlog4j2.disable.jmx=true -Djava.locale.providers=SPI,COMPAT --add-opens=java.base/java.io=ALL-UNNAMED -Xms1g -Xmx1g -XX:+UseG1GC -Djava.io.tmpdir=/tmp/elasticsearch-12089215587958578062 -XX:+HeapDumpOnOutOfMemoryError -XX:HeapDumpPath=data -XX:ErrorFile=logs/hs_err_pid%p.log -Xlog:gc*,gc+age=trace,safepoint:file=logs/gc.log:utctime,pid,tags:filecount=32,filesize=64m -XX:MaxDirectMemorySize=536870912 -XX:G1HeapRegionSize=4m -XX:InitiatingHeapOccupancyPercent=30 -XX:G1ReservePercent=15 -Des.path.home=/usr/local/elasticsearch9202 -Des.path.conf=/usr/local/elasticsearch9202/config -Des.distribution.flavor=default -Des.distribution.type=tar -Des.bundled_jdk=true -cp /usr/local/elasticsearch9202/lib/* org.elasticsearch.bootstrap.Elasticsearch -d
elk       3764  3743  0 14:13 ?        00:00:00 /usr/local/elasticsearch9202/modules/x-pack-ml/platform/linux-x86_64/bin/controller


# 启动--> 9203
root@ubuntu-x64_02:/opt# systemctl start elasticsearch9203
root@ubuntu-x64_02:/opt# ps -ef | grep elasticsearch9203
elk       3974     1 99 14:13 ?        00:00:05 /usr/local/elasticsearch9203/jdk/bin/java -Xshare:auto -Des.networkaddress.cache.ttl=60 -Des.networkaddress.cache.negative.ttl=10 -XX:+AlwaysPreTouch -Xss1m -Djava.awt.headless=true -Dfile.encoding=UTF-8 -Djna.nosys=true -XX:-OmitStackTraceInFastThrow -XX:+ShowCodeDetailsInExceptionMessages -Dio.netty.noUnsafe=true -Dio.netty.noKeySetOptimization=true -Dio.netty.recycler.maxCapacityPerThread=0 -Dio.netty.allocator.numDirectArenas=0 -Dlog4j.shutdownHookEnabled=false -Dlog4j2.disable.jmx=true -Djava.locale.providers=SPI,COMPAT --add-opens=java.base/java.io=ALL-UNNAMED -Xms1g -Xmx1g -XX:+UseG1GC -Djava.io.tmpdir=/tmp/elasticsearch-1626046538224446804 -XX:+HeapDumpOnOutOfMemoryError -XX:HeapDumpPath=data -XX:ErrorFile=logs/hs_err_pid%p.log -Xlog:gc*,gc+age=trace,safepoint:file=logs/gc.log:utctime,pid,tags:filecount=32,filesize=64m -XX:MaxDirectMemorySize=536870912 -XX:G1HeapRegionSize=4m -XX:InitiatingHeapOccupancyPercent=30 -XX:G1ReservePercent=15 -Des.path.home=/usr/local/elasticsearch9203 -Des.path.conf=/usr/local/elasticsearch9203/config -Des.distribution.flavor=default -Des.distribution.type=tar -Des.bundled_jdk=true -cp /usr/local/elasticsearch9203/lib/* org.elasticsearch.bootstrap.Elasticsearch -d
elk       3995  3974  1 14:13 ?        00:00:00 /usr/local/elasticsearch9203/modules/x-pack-ml/platform/linux-x86_64/bin/controller
root@ubuntu-x64_02:/opt# curl "http://127.0.0.1:9201/_cat/health/?v"
{"error":{"root_cause":[{"type":"security_exception","reason":"missing authentication credentials for REST request [/_cat/health/?v]","header":{"WWW-Authenticate":"Basic realm=\"security\" charset=\"UTF-8\""}}],"type":"security_exception","reason":"missing authentication credentials for REST request [/_cat/health/?v]","header":{"WWW-Authenticate":"Basic realm=\"security\" charset=\"UTF-8\""}},"status":401}
在另一个终端窗口中,通过运行实用程序为内置用户设置密码 elasticsearch-setup-passwords, 您可以elasticsearch-setup-passwords针对集群中的任何节点运行该实用程序。但是,您应该只为整个集群运行一次该实用程序。
cd /usr/local/elasticsearch9201/
root@ubuntu-x64_02:/usr/local/elasticsearch9201# ./bin/elasticsearch-setup-passwords auto
Initiating the setup of passwords for reserved users elastic,apm_system,kibana,kibana_system,logstash_system,beats_system,remote_monitoring_user.
The passwords will be randomly generated and printed to the console.
Please confirm that you would like to continue [y/N]y


Changed password for user apm_system
PASSWORD apm_system = G5e******qb

Changed password for user kibana_system
PASSWORD kibana_system = Z4i******Wy7

Changed password for user kibana
PASSWORD kibana = Z4i******y7

Changed password for user logstash_system
PASSWORD logstash_system = sdR******BY

Changed password for user beats_system
PASSWORD beats_system = rIF******BA

Changed password for user remote_monitoring_user
PASSWORD remote_monitoring_user = dt5******gD

Changed password for user elastic
PASSWORD elastic = G9e******nG
cd /usr/local/elasticsearch9201/
root@ubuntu-x64_02:/usr/local/elasticsearch9201# ./bin/elasticsearch-setup-passwords interactive
启用 Elasticsearch 安全功能后,用户必须使用有效的用户名和密码登录 Kibana。
您将配置 Kibana 以使用您之前创建的内置 kibana_system 用户和密码。Kibana 执行一些需要 kibana_system 用户使用的后台任务。
此帐户不适用于个人用户,无权从浏览器登录 Kibana。相反,您将以超级用户身份登录 Kibana elastic。
将设置添加elasticsearch.username到KIB_PATH_CONF/kibana.yml 文件并将值设置为kibana_system用户:
root@ubuntu-x64_02:/usr/local/kibana/config# echo 'elasticsearch.username: "kibana_system"' >> kibana.yml
root@ubuntu-x64_02:/usr/local/kibana/config# egrep "^[a-Z]" kibana.yml
server.port: 5601
server.host: 192.168.88.12
server.publicBaseUrl: "http://192.168.88.12:5601"
elasticsearch.hosts: ["http://127.0.0.1:9201" ,"http://127.0.0.1:9202" ,"http://127.0.0.1:9203"]
kibana.index: ".kibana"
kibana.defaultAppId: "home"
elasticsearch.pingTimeout: 1500
elasticsearch.requestTimeout: 30000
elasticsearch.shardTimeout: 30000
elasticsearch.username: "kibana_system"
创建 Kibana 密钥库:
root@ubuntu-x64_02:/usr/local/kibana# ./bin/kibana-keystore create
Created Kibana keystore in /usr/local/kibana/config/kibana.keystore
将用户 kibana_system 的密码添加到 Kibana 密钥库:
出现提示时,输入用户kibana_system的密码
root@ubuntu-x64_02:/usr/local/kibana# ./bin/kibana-keystore add elasticsearch.password
Setting elasticsearch.password already exists. Overwrite? [y/N] y
Enter value for elasticsearch.password: ********************
重启 kibana 服务
root@ubuntu-x64_02:/usr/local/kibana# systemctl restart kibana.service

root@ubuntu-x64_02:/usr/local/kibana# ps -ef | grep kibana
elk       2370     1 11 19:22 ?        00:00:00 /usr/local/kibana/bin/../node/bin/node /usr/local/kibana/bin/../src/cli/dist
elk       2385  2370 99 19:22 ?        00:00:06 /usr/local/kibana/node/bin/node --preserve-symlinks-main --preserve-symlinks /usr/local/kibana/src/cli/dist
以用户 elastic 身份登录 Kibana 。使用此超级用户帐户来管理空间、创建新用户和分配角色。
如果您在本地运行 Kibana,请转至http://localhost:5601 查看登录页面。
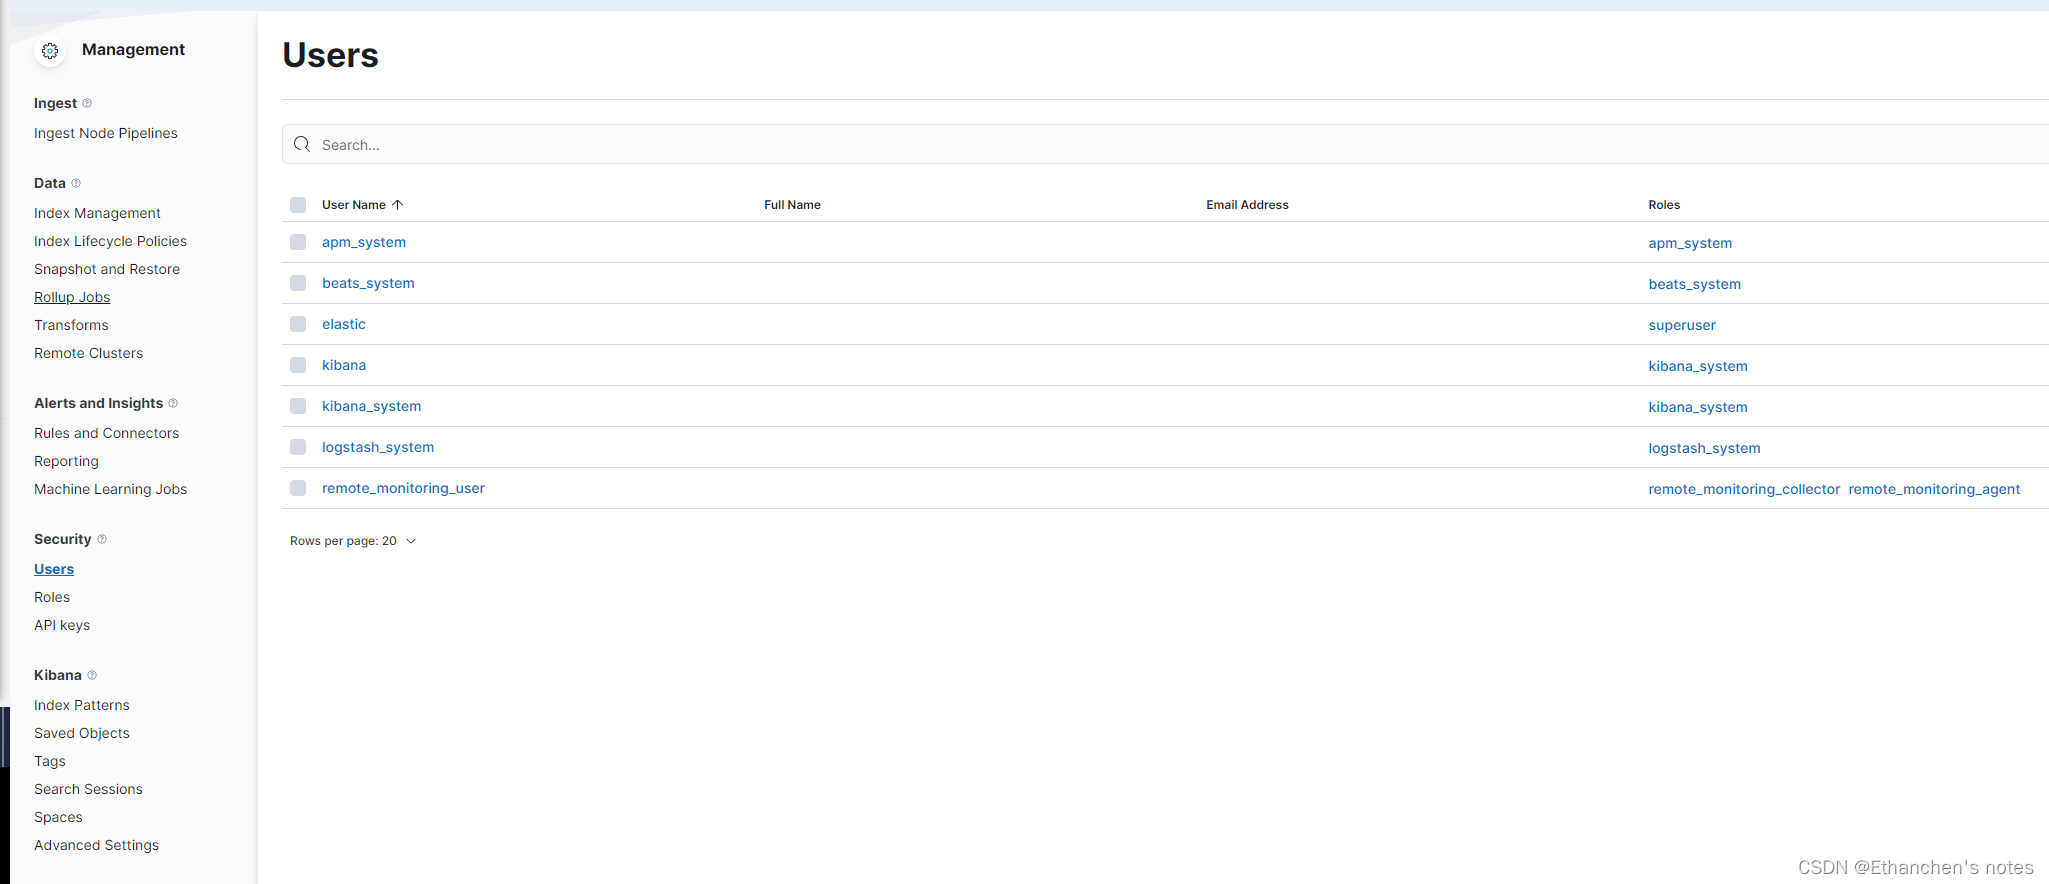
登录后,可以看到 Management 下面security可以对用户和角色权设置限管理~
以上是最低安全性配置, 如果您想在笔记本电脑上设置 Elasticsearch 并开始开发,这个场景适合您。此配置通过为内置用户设置密码来防止未经授权访问您的本地集群。您还可以为 Kibana 配置密码身份验证。
最小安全场景对于 生产模式集群是不够的。如果您的集群有多个节点,您必须启用最低安全性,然后 在节点之间配置传输层安全性 (TLS)。
请参考 “Elasticsearch 设置基本安全性”,以保护集群中节点之间的所有内部通信
我有一个Ruby程序,它使用rubyzip压缩XML文件的目录树。gem。我的问题是文件开始变得很重,我想提高压缩级别,因为压缩时间不是问题。我在rubyzipdocumentation中找不到一种为创建的ZIP文件指定压缩级别的方法。有人知道如何更改此设置吗?是否有另一个允许指定压缩级别的Ruby库? 最佳答案 这是我通过查看rubyzip内部创建的代码。level=Zlib::BEST_COMPRESSIONZip::ZipOutputStream.open(zip_file)do|zip|Dir.glob("**/*")d
我在使用omniauth/openid时遇到了一些麻烦。在尝试进行身份验证时,我在日志中发现了这一点:OpenID::FetchingError:Errorfetchinghttps://www.google.com/accounts/o8/.well-known/host-meta?hd=profiles.google.com%2Fmy_username:undefinedmethod`io'fornil:NilClass重要的是undefinedmethodio'fornil:NilClass来自openid/fetchers.rb,在下面的代码片段中:moduleNetclass
我正在查看instance_variable_set的文档并看到给出的示例代码是这样做的:obj.instance_variable_set(:@instnc_var,"valuefortheinstancevariable")然后允许您在类的任何实例方法中以@instnc_var的形式访问该变量。我想知道为什么在@instnc_var之前需要一个冒号:。冒号有什么作用? 最佳答案 我的第一直觉是告诉你不要使用instance_variable_set除非你真的知道你用它做什么。它本质上是一种元编程工具或绕过实例变量可见性的黑客攻击
我正在编写一个小脚本来定位aws存储桶中的特定文件,并创建一个临时验证的url以发送给同事。(理想情况下,这将创建类似于在控制台上右键单击存储桶中的文件并复制链接地址的结果)。我研究过回形针,它似乎不符合这个标准,但我可能只是不知道它的全部功能。我尝试了以下方法:defauthenticated_url(file_name,bucket)AWS::S3::S3Object.url_for(file_name,bucket,:secure=>true,:expires=>20*60)end产生这种类型的结果:...-1.amazonaws.com/file_path/file.zip.A
我想设置一个默认日期,例如实际日期,我该如何设置?还有如何在组合框中设置默认值顺便问一下,date_field_tag和date_field之间有什么区别? 最佳答案 试试这个:将默认日期作为第二个参数传递。youcorrectlysetthedefaultvalueofcomboboxasshowninyourquestion. 关于ruby-on-rails-date_field_tag,如何设置默认日期?[rails上的ruby],我们在StackOverflow上找到一个类似的问
我正在玩HTML5视频并且在ERB中有以下片段:mp4视频从在我的开发环境中运行的服务器很好地流式传输到chrome。然而firefox显示带有海报图像的视频播放器,但带有一个大X。问题似乎是mongrel不确定ogv扩展的mime类型,并且只返回text/plain,如curl所示:$curl-Ihttp://0.0.0.0:3000/pr6.ogvHTTP/1.1200OKConnection:closeDate:Mon,19Apr201012:33:50GMTLast-Modified:Sun,18Apr201012:46:07GMTContent-Type:text/plain
在Ruby中是否有Gem或安全删除文件的方法?我想避免系统上可能不存在的外部程序。“安全删除”指的是覆盖文件内容。 最佳答案 如果您使用的是*nix,一个很好的方法是使用exec/open3/open4调用shred:`shred-fxuz#{filename}`http://www.gnu.org/s/coreutils/manual/html_node/shred-invocation.html检查这个类似的帖子:Writingafileshredderinpythonorruby?
我在Rails应用程序中使用CarrierWave/Fog将视频上传到AmazonS3。有没有办法判断上传的进度,让我可以显示上传进度如何? 最佳答案 CarrierWave和Fog本身没有这种功能;你需要一个前端uploader来显示进度。当我不得不解决这个问题时,我使用了jQueryfileupload因为我的堆栈中已经有jQuery。甚至还有apostonCarrierWaveintegration因此您只需按照那里的说明操作即可获得适用于您的应用的进度条。 关于ruby-on-r
我正在使用ruby2.1.0我有一个json文件。例如:test.json{"item":[{"apple":1},{"banana":2}]}用YAML.load加载这个文件安全吗?YAML.load(File.read('test.json'))我正在尝试加载一个json或yaml格式的文件。 最佳答案 YAML可以加载JSONYAML.load('{"something":"test","other":4}')=>{"something"=>"test","other"=>4}JSON将无法加载YAML。JSON.load("
我正在尝试为我的iOS应用程序设置cocoapods但是当我执行命令时:sudogemupdate--system我收到错误消息:当前已安装最新版本。中止。当我进入cocoapods的下一步时:sudogeminstallcocoapods我在MacOS10.8.5上遇到错误:ERROR:Errorinstallingcocoapods:cocoapods-trunkrequiresRubyversion>=2.0.0.我在MacOS10.9.4上尝试了同样的操作,但出现错误:ERROR:Couldnotfindavalidgem'cocoapods'(>=0),hereiswhy:U