目录
Unity Android 之 读取下载获取移动端 sdcard 路径下的指定文件夹的所有图片的几种方式的简单整理
三、Unity3D各平台路径(包括手机内置存储路径、SD卡等等)
Unity中的一些基础知识点,便于后期查看学习。
本节介绍,加载Android手机移动端sdcard 上指定文件上的图片文件的简单方式整理,方法不唯一,仅供参考。
1、首先 使用 DirectoryInfo 获取该文件夹下的所有文件信息
        DirectoryInfo direction = new DirectoryInfo(SD_URL2);
        //返回的指定数组 = 返回当前目录的所有文件列表的名字加格式数组
        FileInfo[] files = direction.GetFiles("*");
2、然后,根据文件后缀,判断是否是图片,然后进行对应图片的加载
         string ext = files[i].Extension;
         Debug.Log("  ext  " + ext);
         if (ext.EndsWith("jpg") || ext.EndsWith("png") || ext.EndsWith("jpeg"))
3、然后使用三种方式进行加载
1、Android 移动端获取文件夹下的文件信息时,不用添加 "jar:file://" 前缀
2、Android 移动端使用 WWW 或者 UnityWebRequest 加载图片文件时,注意添加 "jar:file://" 前缀
3、Android 移动端使用文件IO读取文件时,不用添加 "jar:file://" 前缀
4、读取 sdcard 文件的时候,注意添加对应权限
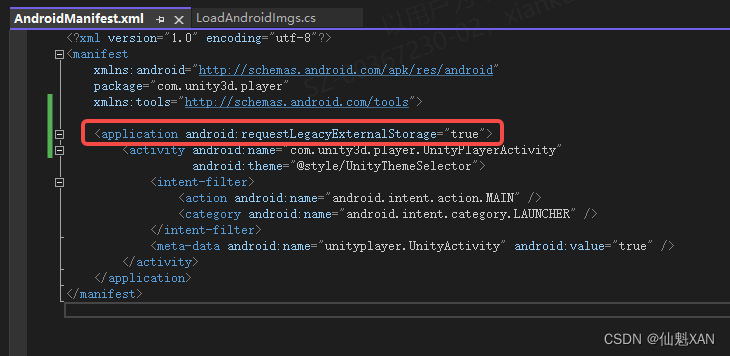
5、不同Android手机版本问题,虽然添加了 读取 sdcard 权限,依然没有权限读取,在 AndroidManifest.xml 添加如下进行处理
<application android:requestLegacyExternalStorage="true">权限报错:Unity: IOException: Permission denied
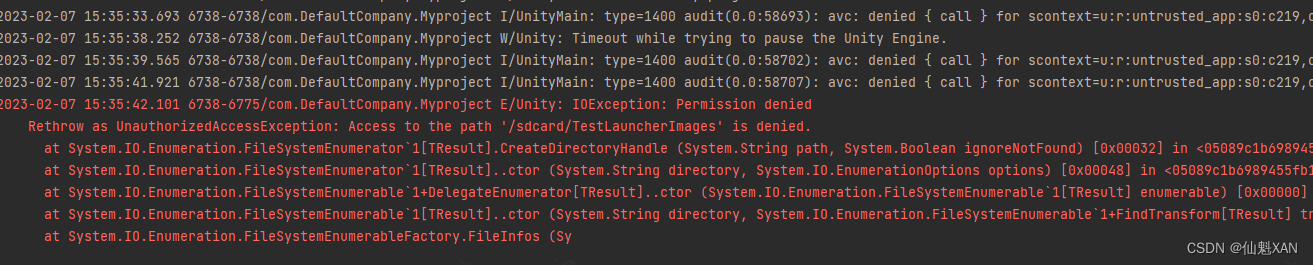
6、发现 sdcard 或者 storage/ 或者 storage/emulated/0/ 好似都可以加载根目录文件
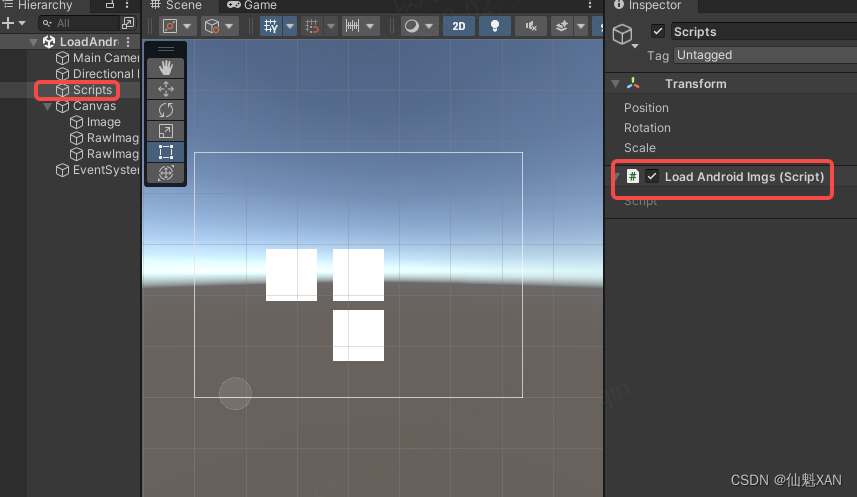
1、新建Unity 工程,简单搭建场景

2、创建脚本,获取sdcard 对应文件夹下的文件信息,并简单使用三种方式加载对应图片

3、把脚本添加到场景中
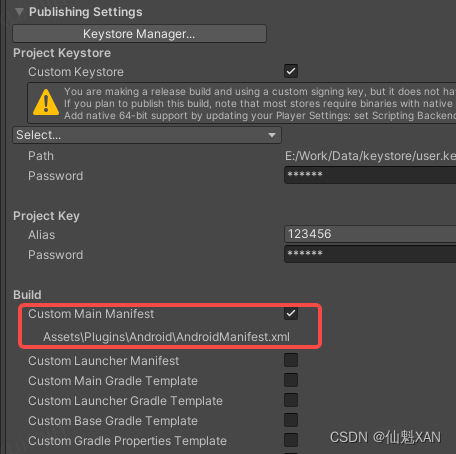
4、在 PlayerSettings 添加对应sdcard 读写权限,Write Permission 设置为 External(SDCard)

5、为了避免可能由于不同 Android 手机版本,可能出现给了权限依旧无法读取的报错
Publishing Setting 勾选 Custom Main Mainifest ,在工程中显示 AndroidManifest.xml,并添加android:requestLegacyExternalStorage="true"

6、打包运行到Android手机,效果如下

1、LoadAndroidImgs.cs
using System;
using System.Collections;
using System.Collections.Generic;
using System.IO;
using UnityEngine;
using UnityEngine.Networking;
using UnityEngine.UI;

public class LoadAndroidImgs : MonoBehaviour
{
    string URL = "file://" + "/storage/emulated/0/TestLauncherImages/";
    string SD_URL =  "/storage/emulated/0/TestLauncherImages/";
    string SD_URL2 = "/sdcard/TestLauncherImages/";

    // Start is called before the first frame update
    void Start()
    {
        Load();
        GetTexture("https://scpic.chinaz.net/files/pic/pic9/201706/zzpic4354.jpg", (t) => {
            GameObject.Find("Canvas/RawImage (1)").GetComponent<RawImage>().texture = t;
        });
    }

    // Update is called once per frame
    void Update()
    {

    }

    void Load(){

        DirectoryInfo direction = new DirectoryInfo(SD_URL2);
        //返回的指定数组 = 返回当前目录的所有文件列表的名字加格式数组
        FileInfo[] files = direction.GetFiles("*");
        //存储读取图片的名字字符串
        List<string> imageNames = new List<string>();
        for (int i = 0; i < files.Length; i++)
        {
            //判断图片的格式字符串是否与指定的字符串不匹配。
            if (!files[i].Name.EndsWith(".meta"))
            {
                //Debug.LogFormat("图片{0}的名字:{1}", i, files[i].FullName);
                //添加图片路径和名字字符串到泛型数组
                imageNames.Add(files[i].FullName);
                Debug.Log(files[i].FullName);
                string ext = files[i].Extension;
                Debug.Log("  ext  " + ext);
                if (ext.EndsWith("jpg") || ext.EndsWith("png") || ext.EndsWith("jpeg"))
                {
                    //StartCoroutine(doLoadByWWW("jar:file://" + files[i].FullName));

                    GetTexture("jar:file://"+files[i].FullName, (t) => {
                        GameObject.Find("Canvas/RawImage").GetComponent<RawImage>().texture = t;
                    });

                     //Texture2D tx = new Texture2D(100, 100);
                     //tx.LoadImage(getImageByte(files[i].FullName));
                     //GameObject.Find("Canvas/RawImage").GetComponent<RawImage>().texture = (tx);
                }
            }


        }

    }

    IEnumerator doLoadByWWW(String path)
    {

        WWW w = new WWW(path);

        yield return w;

        if (w.isDone)
        {
            Sprite sprite = Sprite.Create(w.texture, new Rect(0, 0, w.texture.width, w.texture.height), new Vector2(0.5f, 0.5f));

            GameObject.Find("Canvas/Image").GetComponent<Image>().sprite = sprite;

        }
    }

    /// <summary>
    /// 请求图片
    /// </summary>
    /// <param name="url">图片地址,like 'http://www.my-server.com/image.png '</param>
    /// <param name="action">请求发起后处理回调结果的委托,处理请求结果的图片</param>
    /// <returns></returns>
    public void GetTexture(string url, Action<Texture2D> actionResult)
    {
        StartCoroutine(_GetTexture(url, actionResult));
    }

    /// <summary>
    /// 请求图片
    /// </summary>
    /// <param name="url">图片地址,like 'http://www.my-server.com/image.png '</param>
    /// <param name="action">请求发起后处理回调结果的委托,处理请求结果的图片</param>
    /// <returns></returns>
    IEnumerator _GetTexture(string url, Action<Texture2D> actionResult)
    {
        UnityWebRequest uwr = new UnityWebRequest(url);
        DownloadHandlerTexture downloadTexture = new DownloadHandlerTexture(true);
        uwr.downloadHandler = downloadTexture;
        yield return uwr.SendWebRequest();
        Texture2D t = null;
        if (!(uwr.isNetworkError || uwr.isHttpError))
        {
            t = downloadTexture.texture;
        }
        else
        {
            Debug.Log("下载失败,请检查网络,或者下载地址是否正确: "+ uwr.error);
        }

        if (actionResult != null)
        {
            actionResult(t);
        }
    }

    /// <summary>
    /// 根据图片路径返回图片的字节流byte[]
    /// </summary>
    /// <param name="imagePath">图片路径</param>
    /// <returns>返回的字节流</returns>
    private static byte[] getImageByte(string imagePath)
    {
        FileStream files = new FileStream(imagePath, FileMode.Open);
        byte[] imgByte = new byte[files.Length];
        files.Read(imgByte, 0, imgByte.Length);
        files.Close();
        return imgByte;
    }

}
2、AndroidManifest.xml
<?xml version="1.0" encoding="utf-8"?>
<manifest
    xmlns:android="http://schemas.android.com/apk/res/android"
    package="com.unity3d.player"
    xmlns:tools="http://schemas.android.com/tools">

	<application android:requestLegacyExternalStorage="true">
        <activity android:name="com.unity3d.player.UnityPlayerActivity"
                  android:theme="@style/UnityThemeSelector">
            <intent-filter>
                <action android:name="android.intent.action.MAIN" />
                <category android:name="android.intent.category.LAUNCHER" />
            </intent-filter>
            <meta-data android:name="unityplayer.UnityActivity" android:value="true" />
        </activity>
    </application>
</manifest>
#if UNITY_EDITOR
        filepath = Application.dataPath + "/StreamingAssets";
#elif UNITY_IOS || UNITY_IPHONE
        filepath = "file://" + Application.streamingAssetsPath;
#elif UNITY_ANDROID
        filepath = "jar:file://"  + Application.dataPath + "!/assets";
#endif关于Unity3D在各平台上的路径问题,网上有好多的资料,如下是比较好的参考资料:
1、http://www.manew.com/thread-23491-1-1.html
2、#你好Unity3D#手机上的路径(来自我的长微博) | 雨松MOMO程序研究院
这里我不详细解释和路径的用法,只把各个路径对应的位置和访问方式总结一下。
1、Resources路径
Resources文件夹是Unity里自动识别的一种文件夹,可在Unity编辑器的Project窗口里创建,并将资源放置在里面。Resources文件夹下的资源不管是否有用,全部会打包进.apk或者.ipa,并且打包时会将里面的资源压缩处理。加载方法是Resources.Load<T>(文件名),需要注意:文件名不包括扩展名,打包后不能更改Resources下的资源内容,但是从Resources文件夹中加载出来的资源可以更改。
2、Application.dataPath路径
这个属性返回的是程序的数据文件所在文件夹的路径,例如在Editor中就是项目的Assets文件夹的路径,通过这个路径可以访问项目中任何文件夹中的资源,但是在移动端它是完全没用。
3、Application.streamingAssetsPath路径
这个属性用于返回流数据的缓存目录,返回路径为相对路径,适合设置一些外部数据文件的路径。在Unity工程的Assets目录下起一个名为“StreamingAssets”的文件夹即可,然后用Application.streamingAssetsPath访问,这个文件夹中的资源在打包时会原封不动的打包进去,不会压缩,一般放置一些资源数据。在PC/MAC中可实现对文件的“增删改查”等操作,但在移动端是一个只读路径。
4、Application.persistentDataPath路径(推荐使用)
此属性返回一个持久化数据存储目录的路径,可以在此路径下存储一些持久化的数据文件。这个路径可读、可写,但是只能在程序运行时才能读写操作,不能提前将数据放入这个路径。在IOS上是应用程序的沙盒,可以被iCloud自动备份,可以通过同步推送一类的助手直接取出文件;在Android上的位置是根据Project Setting里设置的Write Access路径,可以设置是程序沙盒还是sdcard,注意:如果在Android设置保存在沙盒中,那么就必须root以后才能用电脑取出文件,因此建议写入sdcard里。一般情况下,建议将获得的文件保存在这个路径下,例如可以从StreamingAsset中读取的二进制文件或者从AssetBundle读取的文件写入PersistentDatapath。
5、Application.temporaryCachePath路径
此属性返回一个临时数据的缓存目录,跟Application.persistentDataPath类似,但是在IOS上不能被自动备份。
6、/sdcard/..路径
表示Android手机的SD卡根目录。
7、/storage/emulated/0/..路径(这个路径我查找了好久……)
表示Android手机的内置存储根目录。
以上各路径中的资源加载方式都可以用WWW类加载,但要注意各个平台路径需要加的访问名称,例如Android平台的路径前要加"jar:file://",其他平台使用"file://"。以下是各路径在各平台中的具体位置信息:
Android平台
Application.dataPath : /data/app/xxx.xxx.xxx.apk
Application.streamingAssetsPath : jar:file:///data/app/xxx.xxx.xxx.apk/!/assets
Application.persistentDataPath : /data/data/xxx.xxx.xxx/files
Application.temporaryCachePath : /data/data/xxx.xxx.xxx/cache
IOS平台
Application.dataPath : Application/xxxxxxxx-xxxx-xxxx-xxxx-xxxxxxxxxxxx/xxx.app/Data
Application.streamingAssetsPath : Application/xxxxxxxx-xxxx-xxxx-xxxx-xxxxxxxxxxxx/xxx.app/Data/Raw
Application.persistentDataPath : Application/xxxxxxxx-xxxx-xxxx-xxxx-xxxxxxxxxxxx/Documents
Application.temporaryCachePath : Application/xxxxxxxx-xxxx-xxxx-xxxx-xxxxxxxxxxxx/Library/Caches
Windows Web Player
Application.dataPath : file:///D:/MyGame/WebPlayer (即导包后保存的文件夹,html文件所在文件夹)
Application.streamingAssetsPath :
Application.persistentDataPath :
Application.temporaryCachePath :
我有一个Ruby程序,它使用rubyzip压缩XML文件的目录树。gem。我的问题是文件开始变得很重,我想提高压缩级别,因为压缩时间不是问题。我在rubyzipdocumentation中找不到一种为创建的ZIP文件指定压缩级别的方法。有人知道如何更改此设置吗?是否有另一个允许指定压缩级别的Ruby库? 最佳答案 这是我通过查看rubyzip内部创建的代码。level=Zlib::BEST_COMPRESSIONZip::ZipOutputStream.open(zip_file)do|zip|Dir.glob("**/*")d
我试图在一个项目中使用rake,如果我把所有东西都放到Rakefile中,它会很大并且很难读取/找到东西,所以我试着将每个命名空间放在lib/rake中它自己的文件中,我添加了这个到我的rake文件的顶部:Dir['#{File.dirname(__FILE__)}/lib/rake/*.rake'].map{|f|requiref}它加载文件没问题,但没有任务。我现在只有一个.rake文件作为测试,名为“servers.rake”,它看起来像这样:namespace:serverdotask:testdoputs"test"endend所以当我运行rakeserver:testid时
我的目标是转换表单输入,例如“100兆字节”或“1GB”,并将其转换为我可以存储在数据库中的文件大小(以千字节为单位)。目前,我有这个:defquota_convert@regex=/([0-9]+)(.*)s/@sizes=%w{kilobytemegabytegigabyte}m=self.quota.match(@regex)if@sizes.include?m[2]eval("self.quota=#{m[1]}.#{m[2]}")endend这有效,但前提是输入是倍数(“gigabytes”,而不是“gigabyte”)并且由于使用了eval看起来疯狂不安全。所以,功能正常,
Rails2.3可以选择随时使用RouteSet#add_configuration_file添加更多路由。是否可以在Rails3项目中做同样的事情? 最佳答案 在config/application.rb中:config.paths.config.routes在Rails3.2(也可能是Rails3.1)中,使用:config.paths["config/routes"] 关于ruby-on-rails-Rails3中的多个路由文件,我们在StackOverflow上找到一个类似的问题
对于具有离线功能的智能手机应用程序,我正在为Xml文件创建单向文本同步。我希望我的服务器将增量/差异(例如GNU差异补丁)发送到目标设备。这是计划:Time=0Server:hasversion_1ofXmlfile(~800kiB)Client:hasversion_1ofXmlfile(~800kiB)Time=1Server:hasversion_1andversion_2ofXmlfile(each~800kiB)computesdeltaoftheseversions(=patch)(~10kiB)sendspatchtoClient(~10kiBtransferred)Cl
我正在寻找执行以下操作的正确语法(在Perl、Shell或Ruby中):#variabletoaccessthedatalinesappendedasafileEND_OF_SCRIPT_MARKERrawdatastartshereanditcontinues. 最佳答案 Perl用__DATA__做这个:#!/usr/bin/perlusestrict;usewarnings;while(){print;}__DATA__Texttoprintgoeshere 关于ruby-如何将脚
使用带有Rails插件的vim,您可以创建一个迁移文件,然后一次性打开该文件吗?textmate也可以这样吗? 最佳答案 你可以使用rails.vim然后做类似的事情::Rgeneratemigratonadd_foo_to_bar插件将打开迁移生成的文件,这正是您想要的。我不能代表textmate。 关于ruby-使用VimRails,您可以创建一个新的迁移文件并一次性打开它吗?,我们在StackOverflow上找到一个类似的问题: https://sta
好的,所以我的目标是轻松地将一些数据保存到磁盘以备后用。您如何简单地写入然后读取一个对象?所以如果我有一个简单的类classCattr_accessor:a,:bdefinitialize(a,b)@a,@b=a,bendend所以如果我从中非常快地制作一个objobj=C.new("foo","bar")#justgaveitsomerandomvalues然后我可以把它变成一个kindaidstring=obj.to_s#whichreturns""我终于可以将此字符串打印到文件或其他内容中。我的问题是,我该如何再次将这个id变回一个对象?我知道我可以自己挑选信息并制作一个接受该信
我正在编写一个小脚本来定位aws存储桶中的特定文件,并创建一个临时验证的url以发送给同事。(理想情况下,这将创建类似于在控制台上右键单击存储桶中的文件并复制链接地址的结果)。我研究过回形针,它似乎不符合这个标准,但我可能只是不知道它的全部功能。我尝试了以下方法:defauthenticated_url(file_name,bucket)AWS::S3::S3Object.url_for(file_name,bucket,:secure=>true,:expires=>20*60)end产生这种类型的结果:...-1.amazonaws.com/file_path/file.zip.A
我注意到像bundler这样的项目在每个specfile中执行requirespec_helper我还注意到rspec使用选项--require,它允许您在引导rspec时要求一个文件。您还可以将其添加到.rspec文件中,因此只要您运行不带参数的rspec就会添加它。使用上述方法有什么缺点可以解释为什么像bundler这样的项目选择在每个规范文件中都需要spec_helper吗? 最佳答案 我不在Bundler上工作,所以我不能直接谈论他们的做法。并非所有项目都checkin.rspec文件。原因是这个文件,通常按照当前的惯例,只