对于大多数 maven 多模块化工程,可以使用 Jacoco 这款工具,关于 Jacoco 这款工具,ChatGPT 对它的描述是这样的:
JaCoCo(Java Code Coverage)是一个开源的测试覆盖率工具,它可以用于帮助开发人员衡量其软件测试的有效性。它支持多种语言,包括 Java 和 Kotlin 等,并且可以与多个构建工具和集成开发环境(IDE)一起使用。
JaCoCo 可以收集测试覆盖率数据,并生成可视化的测试覆盖率报告,帮助开发人员更好地理解其代码的测试覆盖率情况。它提供了多种测试覆盖率指标,例如行覆盖率、分支覆盖率、方法覆盖率、类覆盖率等,可以帮助开发人员了解其测试覆盖率情况的具体细节。
JaCoCo 还可以与多种构建工具集成,例如 Maven、Gradle 等。它可以通过 Maven 或 Gradle 的插件来收集测试覆盖率数据,并在构建过程中生成测试覆盖率报告
Jacoco 可以很好的支持对 Maven 多模块进行聚合分析测试覆盖率,可以从项目整体输出覆盖率报告非常方便。
下面展示一下具体的使用方法
先创建一个多模块的 Maven 项目,大致的结构如下:
├── parent-project
├── pom.xml
├── business-module1
│   ├── pom.xml
│   └── src
│       ├── main
│       └── test
├── business-module2
│   ├── pom.xml
│   └── src
│       ├── main
│       └── test
└── test-module
    ├── pom.xml
    └── src
        ├── main
        └── test
在一个空白的目录,一个的 Maven 的根项目:
mvn archetype:generate \
-DgroupId=org.example \
-DartifactId=jacoco-multi-module-example \
-DarchetypeArtifactId=maven-archetype-quickstart \
-DinteractiveMode=false
然后进入目录:
cd jacoco-multi-module-example
把根目录 pom.xml 的 packaging 属性改为 pom,从而将根目录设置为一个聚合模块,用来管理多个子模块的依赖关系
<packaging>pom</packaging>
根据上面的结构,在根目录下,分别创建:
在根目录的路径下,输入以下命令,创建 business-module1 模块:
mvn archetype:generate \
-DgroupId=org.example \
-DartifactId=business-module1 \
-DarchetypeArtifactId=maven-archetype-quickstart  \
-DinteractiveMode=false
创建 business-module2 模块:
mvn archetype:generate \
-DgroupId=org.example \
-DartifactId=business-module2 \
-DarchetypeArtifactId=maven-archetype-quickstart \
-DinteractiveMode=false
创建 test-module 单元测试模块:
mvn archetype:generate \
-DgroupId=org.example \
-DartifactId=test-module \
-DarchetypeArtifactId=maven-archetype-quickstart \
-DinteractiveMode=false
然后模拟实际的开发,分别在模块1,模块2中添加一些业务代码,
在 business-module1 中我添加一个简单的数学运算 IntegerSimpleCompute 类:
// business-module1\src\main\java\org\example\IntegerSimpleCompute.java
package org.example;

public class IntegerSimpleCompute {

    public int add(int i, int j) {
        return i + j;
    }

    public int subtract(int i, int j) {
        return i - j;
    }

    public int multiply(int i, int j) {
        return i * j;
    }

    public int divide(int i, int j) {
        return i / j;
    }
}
在 business-module2 中我添加一个简单的逻辑运算 IntegerLogicCompute 类:
// business-module2\src\main\java\org\example\IntegerLogicCompute.java
package org.example;

public class IntegerLogicCompute {

    public int increment(Integer i) {
        return i + 1;
    }

    public int decrement(Integer i) {
        return i- 1;
    }

    // 存在条件分支的语句,需要满足所有条件分支判断才能达到 100% 的覆盖率
    public boolean equals(Integer i, Integer j) {
        if (i < 127 && j < 127) {
            return i == j;
        }
        return i.equals(j);
    }
}
我们将 test-module 作为测试模块,在该模块的 pom.xml 文件中,我们引入上面的测试模块,方便对他们进行集成测试
<dependencies>
    <dependency>
        <groupId>org.example</groupId>
        <artifactId>business-module1</artifactId>
        <version>1.0-SNAPSHOT</version>
    </dependency>

    <dependency>
        <groupId>org.example</groupId>
        <artifactId>business-module2</artifactId>
        <version>1.0-SNAPSHOT</version>
    </dependency>

    <dependency>
        <groupId>junit</groupId>
        <artifactId>junit</artifactId>
        <version>4.12</version>
        <scope>test</scope>
    </dependency>
</dependencies>
然后在 src/test/java 目录下创建测试类:
// test-module\src\test\java\org\example\IntegrationTest.java
package org.example;

import org.junit.Before;
import org.junit.Test;

import static org.junit.Assert.assertEquals;

public class IntegrationTest {

    private IntegerSimpleCompute simpleCompute;
    private IntegerLogicCompute logicCompute;

    @Before
    public void init() {
        simpleCompute = new IntegerSimpleCompute();
        logicCompute = new IntegerLogicCompute();
    }

    @Test
    public void simpleComputeTest() throws Throwable {
        assertEquals(7, simpleCompute.add(3, 4));
        assertEquals(4, simpleCompute.subtract(7, 3));
        assertEquals(12, simpleCompute.multiply(3, 4));
        assertEquals(3, simpleCompute.divide(12, 4));
    }

    @Test
    public void logicComputeTest() throws Throwable {
        assertEquals(8, logicCompute.increment(7));
        assertEquals(6, logicCompute.decrement(7));
        assertEquals(true, logicCompute.equals(125, 125));
        assertEquals(false, logicCompute.equals(123, 125));
        assertEquals(false, logicCompute.equals(123, 130));
        assertEquals(false, logicCompute.equals(133, 125));
        assertEquals(true, logicCompute.equals(140, 140));
        assertEquals(false, logicCompute.equals(140, 141));
    }
}
到可以,你可以通过:
mvn test
执行单元测试,maven 的 maven-surefire-plugin 插件也会简单的输出如下测试报告:
Tests run: 2, Failures: 0, Errors: 0, Skipped: 0
首先在根目录的 pom.xml 引入 jacoco 插件并且启动代理:
<build>
    <plugins>
        <!-- 指定 Java 编译版本 -->
        <plugin>
            <groupId>org.apache.maven.plugins</groupId>
            <artifactId>maven-compiler-plugin</artifactId>
            <version>3.8.1</version>
            <configuration>
                <source>11</source>
                <target>11</target>
            </configuration>
        </plugin>

        <!-- jacoco 插件 -->
        <plugin>
            <groupId>org.jacoco</groupId>
            <artifactId>jacoco-maven-plugin</artifactId>
            <version>0.8.8</version>
            <executions>
                <!--  执行 prepare-agent 目标,它会启动 JaCoCo 代理 -->
                <execution>
                    <id>default-prepare-agent</id>
                    <goals>
                        <goal>prepare-agent</goal>
                    </goals>
                </execution>

                <!-- 执行 mvn verify 时,生成测试覆盖率报告 -->
                <execution>
                    <id>report</id>
                    <phase>verify</phase>
                    <goals>
                        <goal>report</goal>
                    </goals>
                </execution>
            </executions>
        </plugin>
    </plugins>
</build>
然后在 test-module 模块中引入 jacoco 插件,声明一个聚合分析任务:
<build>
    <plugins>
        <plugin>
            <groupId>org.jacoco</groupId>
            <artifactId>jacoco-maven-plugin</artifactId>
            <version>0.8.8</version>
            <executions>
                <!--  在执行 mvn verify 时,生成聚合测试覆盖率报告,所有 Maven 子模块的测试覆盖率数据 -->
                <execution>
                    <id>report-aggregate</id>
                    <phase>verify</phase>
                    <goals>
                        <goal>report-aggregate</goal>
                    </goals>
                </execution>
            </executions>
        </plugin>
    </plugins>
</build>
最后在根目录执行指令,运行所有测试:
$ mvn clean verify
构建成功后可以在 test-module 模块下的 target/site/jacoco-aggregate/index.html 查看覆盖率报告:
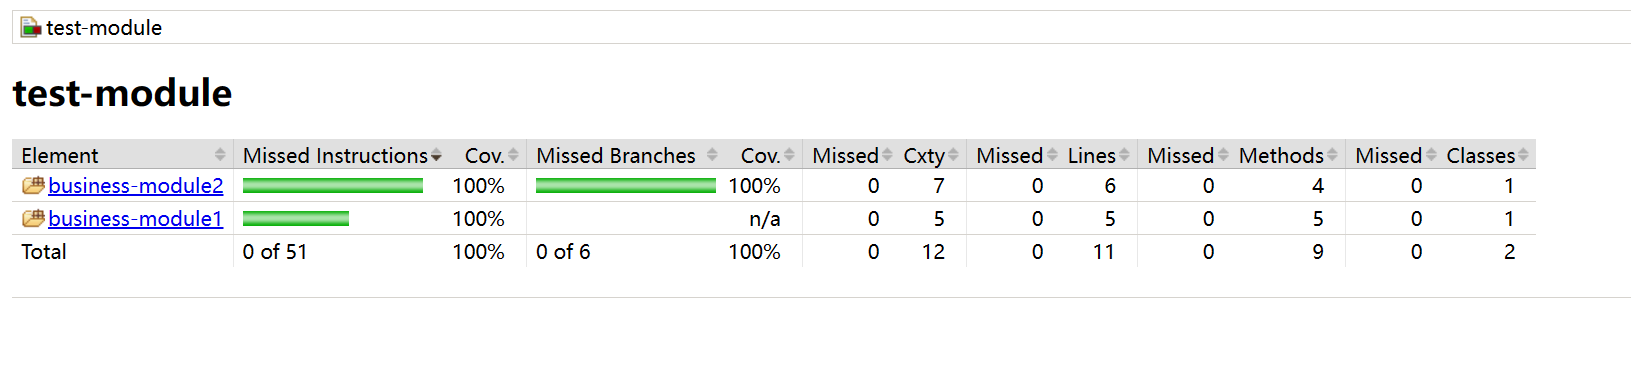
点击对应模块可以看到包内部所有类,方法还有每一行的测试覆盖率情况,这里具体不再展开,自己可以尝试以下
示例代码:jacoco-module-sample
参考资料:
很好奇,就使用rubyonrails自动化单元测试而言,你们正在做什么?您是否创建了一个脚本来在cron中运行rake作业并将结果邮寄给您?git中的预提交Hook?只是手动调用?我完全理解测试,但想知道在错误发生之前捕获错误的最佳实践是什么。让我们理所当然地认为测试本身是完美无缺的,并且可以正常工作。下一步是什么以确保他们在正确的时间将可能有害的结果传达给您? 最佳答案 不确定您到底想听什么,但是有几个级别的自动代码库控制:在处理某项功能时,您可以使用类似autotest的内容获得关于哪些有效,哪些无效的即时反馈。要确保您的提
假设我做了一个模块如下:m=Module.newdoclassCendend三个问题:除了对m的引用之外,还有什么方法可以访问C和m中的其他内容?我可以在创建匿名模块后为其命名吗(就像我输入“module...”一样)?如何在使用完匿名模块后将其删除,使其定义的常量不再存在? 最佳答案 三个答案:是的,使用ObjectSpace.此代码使c引用你的类(class)C不引用m:c=nilObjectSpace.each_object{|obj|c=objif(Class===objandobj.name=~/::C$/)}当然这取决于
作为我的Rails应用程序的一部分,我编写了一个小导入程序,它从我们的LDAP系统中吸取数据并将其塞入一个用户表中。不幸的是,与LDAP相关的代码在遍历我们的32K用户时泄漏了大量内存,我一直无法弄清楚如何解决这个问题。这个问题似乎在某种程度上与LDAP库有关,因为当我删除对LDAP内容的调用时,内存使用情况会很好地稳定下来。此外,不断增加的对象是Net::BER::BerIdentifiedString和Net::BER::BerIdentifiedArray,它们都是LDAP库的一部分。当我运行导入时,内存使用量最终达到超过1GB的峰值。如果问题存在,我需要找到一些方法来更正我的代
如何在buildr项目中使用Ruby?我在很多不同的项目中使用过Ruby、JRuby、Java和Clojure。我目前正在使用我的标准Ruby开发一个模拟应用程序,我想尝试使用Clojure后端(我确实喜欢功能代码)以及JRubygui和测试套件。我还可以看到在未来的不同项目中使用Scala作为后端。我想我要为我的项目尝试一下buildr(http://buildr.apache.org/),但我注意到buildr似乎没有设置为在项目中使用JRuby代码本身!这看起来有点傻,因为该工具旨在统一通用的JVM语言并且是在ruby中构建的。除了将输出的jar包含在一个独特的、仅限ruby
我正在编写一个包含C扩展的gem。通常当我写一个gem时,我会遵循TDD的过程,我会写一个失败的规范,然后处理代码直到它通过,等等......在“ext/mygem/mygem.c”中我的C扩展和在gemspec的“扩展”中配置的有效extconf.rb,如何运行我的规范并仍然加载我的C扩展?当我更改C代码时,我需要采取哪些步骤来重新编译代码?这可能是个愚蠢的问题,但是从我的gem的开发源代码树中输入“bundleinstall”不会构建任何native扩展。当我手动运行rubyext/mygem/extconf.rb时,我确实得到了一个Makefile(在整个项目的根目录中),然后当
我有一个包含模块的模型。我想在模块中覆盖模型的访问器方法。例如:classBlah这显然行不通。有什么想法可以实现吗? 最佳答案 您的代码看起来是正确的。我们正在毫无困难地使用这个确切的模式。如果我没记错的话,Rails使用#method_missing作为属性setter,因此您的模块将优先,阻止ActiveRecord的setter。如果您正在使用ActiveSupport::Concern(参见thisblogpost),那么您的实例方法需要进入一个特殊的模块:classBlah
我有一个围绕一些对象的包装类,我想将这些对象用作散列中的键。包装对象和解包装对象应映射到相同的键。一个简单的例子是这样的:classAattr_reader:xdefinitialize(inner)@inner=innerenddefx;@inner.x;enddef==(other)@inner.x==other.xendenda=A.new(o)#oisjustanyobjectthatallowso.xb=A.new(o)h={a=>5}ph[a]#5ph[b]#nil,shouldbe5ph[o]#nil,shouldbe5我试过==、===、eq?并散列所有无济于事。
我有一些Ruby代码,如下所示:Something.createdo|x|x.foo=barend我想编写一个测试,它使用double代替block参数x,这样我就可以调用:x_double.should_receive(:foo).with("whatever").这可能吗? 最佳答案 specify'something'dox=doublex.should_receive(:foo=).with("whatever")Something.should_receive(:create).and_yield(x)#callthere
我在我的Rails项目中使用Pow和powifygem。现在我尝试升级我的ruby版本(从1.9.3到2.0.0,我使用RVM)当我切换ruby版本、安装所有gem依赖项时,我通过运行railss并访问localhost:3000确保该应用程序正常运行以前,我通过使用pow访问http://my_app.dev来浏览我的应用程序。升级后,由于错误Bundler::RubyVersionMismatch:YourRubyversionis1.9.3,butyourGemfilespecified2.0.0,此url不起作用我尝试过的:重新创建pow应用程序重启pow服务器更新战俘
Sinatra新手;我正在运行一些rspec测试,但在日志中收到了一堆不需要的噪音。如何消除日志中过多的噪音?我仔细检查了环境是否设置为:test,这意味着记录器级别应设置为WARN而不是DEBUG。spec_helper:require"./app"require"sinatra"require"rspec"require"rack/test"require"database_cleaner"require"factory_girl"set:environment,:testFactoryGirl.definition_file_paths=%w{./factories./test/