

👏作者简介:大家好,我是小童,Java开发工程师,CSDN博客博主,Java领域新星创作者
📕系列专栏:前端、Java、Java中间件大全、微信小程序、微信支付、若依框架、Spring全家桶
📧如果文章知识点有错误的地方,请指正!和大家一起学习,一起进步👀
🔥如果感觉博主的文章还不错的话,请👍三连支持👍一下博主哦
🍂博主正在努力完成2023计划中:以梦为马,扬帆起航,2023追梦人

Vue支持两种代码风格,选项式API和组合式API,当然两种代码风格都可以完成一样的功能,不同的是书写风格上的差异
选项式 API (Options API)
使用选项式 API,我们可以用包含多个选项的对象来描述组件的逻辑,例如 data 、 methods 和 mounted 。选项所定义的属性都会暴露在函数内部的 this 上,它会指向当前的组件实例
<script>
 export default {
  data() {
    return {
      count: 0
   }
 },
  methods: {
    increment() {
       this.count++
   }
 },
  mounted() {
    console.log(`The initial count is ${this.count}.`)
 }
}
</script>
<template>
  <button @click="increment">Count is: {{ count }}</button>
</template>
组合式 API (Composition API)
通过组合式 API,我们可以使用导入的 API 函数来描述组件逻辑。
<script setup>
import { ref, onMounted } from 'vue'
const count = ref(0)
function increment() {
  count.value++
}
onMounted(() => {
  console.log(`The initial count is ${count.value}.`)
})
</script>
<template>
  <button @click="increment">Count is: {{ count }}</button>
</template>
两种风格区别
选项式API
1 在 vue2.x 项目中使用的就是 选项式API 写法
2 优点:易于学习和使用,写代码的位置已经约定好了
3 缺点:代码组织性差,相似的逻辑代码不便于复用,逻辑复杂代码多了不好阅读
组合式API
1 在 vue3 中使用的就是 组合API 写法
2 优点:功能逻辑复杂繁多情况下,各个功能逻辑代码组织再一起,便于阅读和维护
3 缺点:需要有良好的代码组织能力和拆分逻辑能力

为了让大家上手组合式API更轻松,我们对比这选项式API来写,不 同的编码风格完成相同的功能
选项式API_响应式
<template>
    <h3>选项式API</h3>
    <p>{{ message }}</p>
</template>
<script>
 export default {
    data(){
        return{
            message:"选项式API 绑定数据"
       }
   }
}
</script>
组合式API_响应式
<template>
    <h3>组合式API</h3>
    <p>{{ message }}</p>
    <p>{{ userInfo.name }}</p>
</template>
<script>
import { ref,reactive } from "vue"
  export default {
    setup(){
        const message = ref("组合式API 绑定数据")
        const userInfo = reactive({
            name:"iwen"
       })
      return{
            message,
            userInfo
       }
   }
}

</script>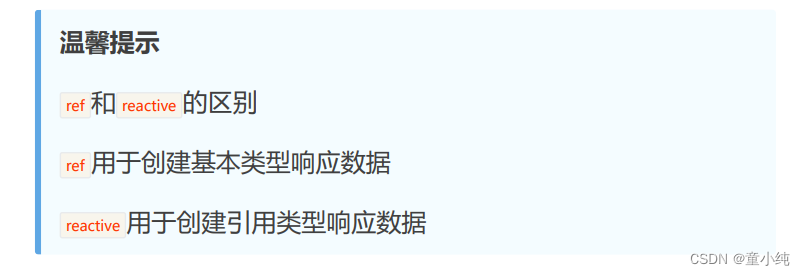
简约组合式API
<template>
    <h3>组合式API</h3>
    <p>{{ message }}</p>
    <p>{{ userInfo.name }}</p>
</template>
<script setup>
import { ref,reactive } from "vue"
const message = ref("组合式API 绑定数据")
const userInfo = reactive({
    name:"iwen"
})

</script>
实时效果反馈
1. 在Vue中,下列那个选项可以实现组合式API:
A data
B methods
C setup
D computed

使用选项式API的时候,所有的计算属性都必须放在 computed 中,这 样如果有很多计算属性就显得很臃肿,但如何使用组合式API,这个问题就迎刃而解了
选项式API_计算属性
<template>
    <h3>选项式API</h3>
    <p>{{ reverse }}</p>
</template>
<script>
export default {
    data(){
        return{
            message:"选项式API 绑定数据"
       }
   },
    computed:{
        reverse(){
            return this.message.split("").reverse().join("")
       }
   }
}
</script>
组合式API_计算属性
<template>
    <h3>组合式API-简约写法</h3>
    <p>{{ message }}</p>
    <p>{{ userInfo.name }}</p>
    <p>{{ reverse }}</p>
    <p>{{ demo }}</p>
</template>
<script setup>
import { ref,reactive,computed } from "vue"
import { myDemo } from "../utils/computedUtils"
const message = ref("组合式API 简约 绑定数据")
const userInfo = reactive({
    name:"iwen"
})
const reverse = computed(() =>{
    return message.value.split("").reverse().join("")
})
const demo = myDemo(message)
</script>
import { computed } from "vue"
export function myDemo(message){
const demo = computed(() =>{
return message.value + "hahah"
})
return demo
}实时效果反馈
1. 下列代码中,画横线的地方应该填写的是:
<template>
    <h3>组合式API</h3>
    <p>{{ reverse }}</p>
</template>
<script setup>
import { ref,computed } from "vue"
const message = ref("组合式API 绑定数据")
const reverse = computed(() =>{
    return message.___.split("").reverse().join("")
})
</script>
A value
B null
C message
D 空

在组合式API中,事件的实现相对比较为简单,与在原生 JavaScript 中有些相似
选项式API_事件处理
<template>
    <h3>选项式API</h3>
    <p>{{ count }}</p>
    <button @click="addCountHandle">增加</button>
</template>
<script>
 export default {
    data(){
        return{
            count:0
       }
   },
    methods:{
        addCountHandle(){
            this.count++
       }
   }
}
</script>
组合式API_事件处理
<template>
    <h3>组合式API</h3>
    <p>{{ count }}</p>
    <button @click="addCountHandle">增加</button>
</template>
<script setup>
import { ref } from "vue"
const count = ref(0)
function addCountHandle(){
    count.value++
}
</script>
实时效果反馈
1. 下列代码中,画横线的地方应该填写的是:
<template>
    <h3>组合式API</h3>
    <p>{{ count }}</p>
    <button @click="addCountHandle">增加
</button>
</template>
<script setup>
import { ref } from "vue"
const count = ___
function addCountHandle(){
    count.value++
}
</script>
A ref()
B ref(0)
C reative()
D reative(0)

使用选项式API的时候,所有的侦听器都必须放在 watch 中,这样如果有很多侦听器就显得很臃肿,但如何使用组合式API,这个问题就迎刃而解了
选项式API_侦听器
<template>
    <h3>选项式API</h3>
    <p>{{ count }}</p>
    <button @click="addCountHandle">增加</button>
</template>
<script>
  export default {
    data(){
        return{
            count:0
       }
   },
    methods:{
        addCountHandle(){
            this.count++
         }
   },
    watch:{
        count(newValue,oldValue){
            console.log(newValue,oldValue);
       }
   }
}
</script>
组合式API_侦听器
<template>
    <h3>组合式API</h3>
    <p>{{ count }}</p>
    <button @click="addCountHandle">增加</button>
</template>
<script setup>
import { ref,watch } from "vue"
const count = ref(0)
function addCountHandle(){
    count.value++
}
watch(count,async(newValue,oldValue) =>{
    console.log(newValue,oldValue);
})
</script>
提取到独立文件
import { watch } from "vue"
export function countUtil(count){
    watch(count,async(newValue,oldValue) =>{
        console.log(newValue,oldValue);
   })
}
实时效果反馈
1. 下列代码中,画横线的地方应该填写的是:
<template>
    <h3>组合式API</h3>
    <p>{{ count }}</p>
    <button @click="addCountHandle">增加</button>
</template>
<script setup>
import { ref,watch } from "vue"
const count = ref(0)
function addCountHandle(){
    count.value++
}
watch(___,async(newValue,oldValue) =>{
    console.log(newValue,oldValue);
})
</script>
A watch
B count
C count.value
D 空
生命周期函数在组合式API中,写法是发生了变化的
选项式API_生命周期
<template>
    <h3>选项式API</h3>
    <p>{{ message }}</p>
</template>
<script>
  export default {
    data(){
        return{
            message:""
       }
   },
    mounted(){
        this.message = "选项式API生命周期函数"
   }
}
</script>
组合式API_生命周期
<template>
    <h3>组合式API</h3>
    <p>{{ message }}</p>
</template>
<script setup>
import { ref,onMounted } from "vue"
const message = ref("")
onMounted(() =>{
    message.value = "选项式API生命周期函数"
})
</script>
虽然 Vue 的声明性渲染模型为你抽象了大部分对 DOM 的直接操作,但在某些情况下,我们仍然需要直接访问底层 DOM 元素。要实现这一点,我们可以使用特殊的 ref attribute,组合式API的实现更为简洁
选项式API_模板引用
<template>
    <h3>选项式API</h3>
    <p ref="message">选项式API-模板引用</p>
</template>
<script>
export default {
    mounted(){
        this.$refs.message.innerHTML = "选项式API-模板引用-修改"
   }
}
</script>
组合式API_模板应用
<template>
    <h3>组合式API</h3>
    <p ref="message">组合式API-模板引用</p>
</template>
<script setup>
import { ref,onMounted } from "vue"
// 声明一个 ref 来存放该元素的引用,必须和模板里的ref 同名
const message = ref(null)
onMounted(() =>{
    message.value.innerHTML = "组合式API-模板引用-修改"
})
</script>
实时效果反馈
1. 下列代码中,画横线的地方应该填写的是:
<template>
    <h3>组合式API</h3>
    <p ref="message">组合式API-模板引用</p>
</template>
<script setup>
import { ref,onMounted } from "vue"
const message = ref(null)
onMounted(() =>{
    message._1_._2_ = "组合式API-模板引用-修改"
})
</script>
A value html
B value innerHTML
C 空 html
D 空 innerHTML

在Vue中,组件之间传递数据是必不可少的,在组合式API中,通过 Props 依然可以传递数据
选项式API_Props
<template>
    <h3>选项式API-Parent</h3>
    <Child title="传递数据"/>
</template>
<script>
import Child from "./Child.vue"
export default {
    components:{
        Child
   }
}
</script>
<template>
<h3>选项式API-Child</h3>
<p>{{ title }}</p>
</template>
<script>
export default {
props:{
title:{
type:String,
default:""
}
}
}
</script>组合式API_Props
<template>
    <h3>组合式API-Parent</h3>
    <Child title="传递数据"/>
</template>
<script setup>
import Child from "./Child.vue"
</script>
<template>
<h3>组合式API-Child</h3>
<p>{{ title }}</p>
</template>
<script setup>
const props = defineProps({
title:{
type:String,
default:""
}
})
</script>实时效果反馈
1. 下列代码中,画横线的地方应该填写的是:
<template>
    <h3>组合式API-Child</h3>
    <p>{{ title }}</p>
</template>
<script setup>
  const props = ___({
    title:{
        type:String,
        default:""
   }
})
</script>
A methods
B props
C data
D defineProps
组件之间传递数据,除了 props 可以做到,还可以使用自定义事件 $emit
选项式API_事件
<template>
    <h3>选项式API-Parent</h3>
    <Child @onSomeEvent="getMessageHandler"/>
    <p>{{ message }}</p>
</template>
<script>
import Child from "./Child.vue"
export default {
    data(){
        return{
            message:""
       }
   },
    components:{
        Child
   },
    methods:{
        getMessageHandler(data){
           this.message = data
       }
   }
}
</script>
<template>
<h3>选项式API-Child</h3>
<button @click="sendMessageHandler">传递数据</button>
</template>
<script>
export default {
data(){
return{
message:"自定义事件"
}
},
methods:{
sendMessageHandler(){
this.$emit("onSomeEvent",this.message)
}
}
}
</script>组合式API_事件
<template>
    <div>
        <h3>组合式API-Parent</h3>
        <Child @onSomeEvent="getMessageHandler"/>
        <p>{{ message }}</p>
    </div>
</template>
<script setup>
import { ref } from "vue"
import Child from "./Child.vue"
const message = ref("")
function getMessageHandler(data){
    message.value = data.value
}
</script>
<template>
<div>
<h3>组合式API-Child</h3>
<button @click="sendMessageHandler">传递数据</button>
</div>
</template>
<script setup>
import {ref} from "vue"
const emit = defineEmits(["onSomeEvent"])
const message = ref("自定义事件")
function sendMessageHandler(){
emit("onSomeEvent",message)
}
</script>实时效果反馈
1. 下列代码中,画横线的地方应该填写的是:
<template>
    <div>
        <h3>组合式API-Child</h3>
        <button @click="sendMessageHandler">传递数据</button>
    </div>
</template>
<script setup>
import {ref} from "vue"
const emit = ___(["onSomeEvent"])
const message = ref("自定义事件")
function sendMessageHandler(){
    emit("onSomeEvent",message)
}
</script>
A data
B props
C defineEmits
D defineProps

除了 Vue 内置的一系列指令 (比如 v-model 或 v-show ) 之外,Vue 还允许你注册自定义的指令 (Custom Directives)
选项式API_自定义指令
<template>
    <h3>自定义指令</h3>
    <p v-author>文本信息</p>
</template>
<script>
 export default {
   directives:{
        author:{
            mounted(element){
                element.innerHTML = element.innerHTML + "-itbaizhan"
           }
       }
   }
}
</script>
组合式API_自定义指令
<template>
    <h3>自定义指令</h3>
    <p v-author>文本信息</p>
</template>
<script setup>
 const vAuthor = {
    mounted:(element) =>{
        element.innerHTML = element.innerHTML + "-itbaizhan"
   }
}
</script>
实时效果反馈
1. 下列代码中,画横线的地方应该填写的是:
<template>
    <h3>自定义指令</h3>
    <p v-author>文本信息</p>
</template>
<script setup>
 const vAuthor = {
    ___:(element) =>{
        element.innerHTML = element.innerHTML + "-itbaizhan"
   }
}
</script>
A mounted
B element
C data
D directives
 自定义指令是区分全局和局部注册,在全局注册,可以在任意组件中使用,局部注册,只在当前组件中使用
局部自定义指令
<template>
    <h3>自定义指令</h3>
    <p v-blue>蓝色效果</p>
</template>
<script>
  export default {
    directives:{
        blue:{
            mounted(element){
                element.style.color = "blue"
           }
       }
   }
}
</script>
全局自定义指令
import { createApp } from 'vue'
import App from './App.vue'
const app = createApp(App)
app.directive("red",{
    mounted(element){
        element.style.color = 'red'
   }
})
app.mount('#app')
<template>
<h3>自定义指令</h3>
<p v-red>红色效果</p>
</template>
自定义指令有很多钩子函数,我们可以理解为是自定义指令的生命周期函数,在不同的情况下会自动调用
钩子函数
<template>
    <h3>自定义指令</h3>
    <p v-red v-if="flag">{{ message }}</p>
    <button @click="updateHandler">修改数据</button>
    <button @click="delHandler">删除元素</button>
</template>
<script setup>
import { ref } from "vue"
const message = ref("红色效果")
const flag = ref(true)
function updateHandler(){
    message.value = "修改的红色效果"
}
function delHandler(){
    flag.value = false
}
const vRed = {
    // 在绑定元素的 attribute 前
    // 或事件监听器应用前调用
    created(el, binding, vnode, prevVnode) {
        console.log("created");
   },
    // 在元素被插入到 DOM 前调用
    beforeMount(el, binding, vnode,prevVnode) {
        console.log("beforeMount");
   },
    // 在绑定元素的父组件
    // 及他自己的所有子节点都挂载完成后调用
    mounted(el, binding, vnode, prevVnode) {
        console.log("mounted");
   },
    // 绑定元素的父组件更新前调用
    beforeUpdate(el, binding, vnode,prevVnode) {
        console.log("beforeUpdate");
   },
    // 在绑定元素的父组件
    // 及他自己的所有子节点都更新后调用
    updated(el, binding, vnode, prevVnode) {
        console.log("updated");
   },
    // 绑定元素的父组件卸载前调用
    beforeUnmount(el, binding, vnode,prevVnode) {
        console.log("beforeUnmount");
   },
    // 绑定元素的父组件卸载后调用
     unmounted(el, binding, vnode, prevVnode)
   {
        console.log("unmounted");
   }
}
</script>
实时效果反馈
1. 下列那个是自定义指令在绑定元素的父组件之后执行:
A created
B beforeMount
C mounted
D beforeUpdate

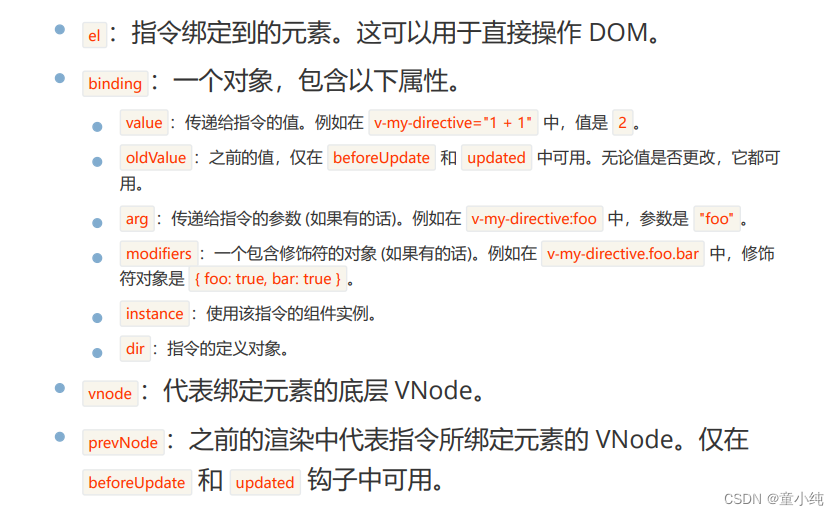
指令的钩子会传递以下几种参数
模拟 v-show 指令
<template>
    <h3>自定义指令</h3>
    <p v-myShow="flag">{{ message }}</p>
    <button @click="updateHandler">显隐Toggle</button>
</template>
<script setup>
import { ref } from "vue"
const message = ref("模拟v-show指令")
const flag = ref(true)
function updateHandler(){
    flag.value = flag.value === true ? flag.value=false : flag.value = true
}
const vMyShow = {
    updated(el, binding) {
        binding.value === true ? el.style.display='block' : el.style.display='none'
   }
}
</script>
实时效果反馈
1. 下列代码中,画横线的地方应该填写的是:
<template>
    <h3>自定义指令</h3>
    <p v-myShow="flag">{{ message }}</p>
    <button @click="updateHandler">显隐Toggle</button>
</template>
<script setup>
import { ref } from "vue"
const message = ref("模拟v-show指令")
const flag = ref(true)
function updateHandler(){
   flag.value = flag.value === true ? flag.value=false : flag.value = true
}
const vMyShow = {
    ___(el, binding) {
        binding.value === true ? el.style.display='block' : el.style.display='none'
   }
}
</script>
A created
B mounted
C updated
D unmounted
Rackup通过Rack的默认处理程序成功运行任何Rack应用程序。例如:classRackAppdefcall(environment)['200',{'Content-Type'=>'text/html'},["Helloworld"]]endendrunRackApp.new但是当最后一行更改为使用Rack的内置CGI处理程序时,rackup给出“NoMethodErrorat/undefinedmethod`call'fornil:NilClass”:Rack::Handler::CGI.runRackApp.newRack的其他内置处理程序也提出了同样的反对意见。例如Rack
我希望我的UserPrice模型的属性在它们为空或不验证数值时默认为0。这些属性是tax_rate、shipping_cost和price。classCreateUserPrices8,:scale=>2t.decimal:tax_rate,:precision=>8,:scale=>2t.decimal:shipping_cost,:precision=>8,:scale=>2endendend起初,我将所有3列的:default=>0放在表格中,但我不想要这样,因为它已经填充了字段,我想使用占位符。这是我的UserPrice模型:classUserPrice回答before_val
我有一个包含模块的模型。我想在模块中覆盖模型的访问器方法。例如:classBlah这显然行不通。有什么想法可以实现吗? 最佳答案 您的代码看起来是正确的。我们正在毫无困难地使用这个确切的模式。如果我没记错的话,Rails使用#method_missing作为属性setter,因此您的模块将优先,阻止ActiveRecord的setter。如果您正在使用ActiveSupport::Concern(参见thisblogpost),那么您的实例方法需要进入一个特殊的模块:classBlah
我正在使用puppet为ruby程序提供一组常量。我需要提供一组主机名,我的程序将对其进行迭代。在我之前使用的bash脚本中,我只是将它作为一个puppet变量hosts=>"host1,host2"我将其提供给bash脚本作为HOSTS=显然这对ruby不太适用——我需要它的格式hosts=["host1","host2"]自从phosts和putsmy_array.inspect提供输出["host1","host2"]我希望使用其中之一。不幸的是,我终其一生都无法弄清楚如何让它发挥作用。我尝试了以下各项:我发现某处他们指出我需要在函数调用前放置“function_”……这
这里是Ruby新手。完成一些练习后碰壁了。练习:计算一系列成绩的字母等级创建一个方法get_grade来接受测试分数数组。数组中的每个分数应介于0和100之间,其中100是最大分数。计算平均分并将字母等级作为字符串返回,即“A”、“B”、“C”、“D”、“E”或“F”。我一直返回错误:avg.rb:1:syntaxerror,unexpectedtLBRACK,expecting')'defget_grade([100,90,80])^avg.rb:1:syntaxerror,unexpected')',expecting$end这是我目前所拥有的。我想坚持使用下面的方法或.join,
我有一个具有一些属性的模型:attr1、attr2和attr3。我需要在不执行回调和验证的情况下更新此属性。我找到了update_column方法,但我想同时更新三个属性。我需要这样的东西:update_columns({attr1:val1,attr2:val2,attr3:val3})代替update_column(attr1,val1)update_column(attr2,val2)update_column(attr3,val3) 最佳答案 您可以使用update_columns(attr1:val1,attr2:val2
我有这个html标记:我想得到这个:我如何使用Nokogiri做到这一点? 最佳答案 require'nokogiri'doc=Nokogiri::HTML('')您可以通过xpath删除所有属性:doc.xpath('//@*').remove或者,如果您需要做一些更复杂的事情,有时使用以下方法遍历所有元素会更容易:doc.traversedo|node|node.keys.eachdo|attribute|node.deleteattributeendend 关于ruby-Nokog
对于Rails模型,是否可以/建议让一个类的成员不持久保存到数据库中?我想将用户最后选择的类型存储在session变量中。由于我无法从我的模型中设置session变量,我想将值存储在一个“虚拟”类成员中,该成员只是将值传递回Controller。你能有这样的类(class)成员吗? 最佳答案 将非持久属性添加到Rails模型就像任何其他Ruby类一样:classUser扩展解释:在Ruby中,所有实例变量都是私有(private)的,不需要在赋值前定义。attr_accessor创建一个setter和getter方法:classUs
我是Google云的新手,我正在尝试对其进行首次部署。我的第一个部署是RubyonRails项目。我基本上是在关注thisguideinthegoogleclouddocumentation.唯一的区别是我使用的是我自己的项目,而不是他们提供的“helloworld”项目。这是我的app.yaml文件runtime:customvm:trueentrypoint:bundleexecrackup-p8080-Eproductionconfig.ruresources:cpu:0.5memory_gb:1.3disk_size_gb:10当我转到我的项目目录并运行gcloudprevie
是否有简单的方法来更改默认ISO格式(yyyy-mm-dd)的ActiveAdmin日期过滤器显示格式? 最佳答案 您可以像这样为日期选择器提供额外的选项,而不是覆盖js:=f.input:my_date,as::datepicker,datepicker_options:{dateFormat:"mm/dd/yy"} 关于ruby-on-rails-事件管理员日期过滤器日期格式自定义,我们在StackOverflow上找到一个类似的问题: https://s
