yum install -y yum-utils device-mapper-persistent-data lvm2
yum-config-manager --add-repo http://mirrors.aliyun.com/docker-ce/linux/centos/docker-ce.repo
yum install -y docker-ce docker-ce-cli containerd.io
mkdir -p /opt/docker
#docker 19.xx 之后
sed -i 's/-H/ \-\-data\-root \/opt\/docker &/' /usr/lib/systemd/system/docker.service
#docker 19.xx及之前
sed -i 's/-H/ \-\-graph \/opt\/docker &/' /usr/lib/systemd/system/docker.service
systemctl daemon-reload
systemctl restart docker
systemctl enable docker

#可选 portainer (docker可视化管理平台)
docker pull 6053537/portainer-ce
docker volume create portainer_data
docker run \
-d \
--name portainer \
-p 9000:9000 \
--restart=always \
-v /var/run/docker.sock:/var/run/docker.sock \
-v portainer_data:/data \
6053537/portainer-ce
Centos仅发行版本中的内核支持 Docker;
Docker 运行在 CentOS 7 上时,要求系统为64位、系统内核版本为 3.10 以上;
Docker 运行在 CentOS-6.5 或更高的版本的 CentOS 上,要求系统为64位、系统内核版本为 2.6.32-431 或者更高版本。
安装docker时要先卸载掉旧的docker。
首先确认Centos的系统是否为64位,内核版本是否满足上述条件,使用 uname -r 查看当前系统内核版本。
[root@localhost /]# uname -r
3.10.0-693.el7.x86_64
1. 删除Docker所在目录
rm -rf /etc/docker
rm -rf /run/docker
rm -rf /var/lib/dockershim
rm -rf /var/lib/docker
2. 干掉Docker进程
使用 ps -ef|grep docker 查询docker进程的PID
然后使用 kill -9 pid kill掉docker进程
[root@localhost ~]# ps -ef|grep docker
root      98147      1  0 17:20 ?        00:00:00 /usr/bin/dockerd --data-root /opt/docker -H fd:// --containerd=/run/containerd/containerd.sock
root     103785 102158  0 17:24 pts/0    00:00:00 grep --color=auto docker
[root@localhost ~]# kill -9 98147
[root@localhost ~]#
3. 卸载Docker相关的包
使用命令 yum list installed | grep docker 查看相关的包
[root@localhost ~]# yum list installed | grep docker
containerd.io.x86_64                  1.6.18-3.1.el7                   @docker-ce-stable
docker-buildx-plugin.x86_64           0.10.2-1.el7                     @docker-ce-stable
docker-ce.x86_64                      3:23.0.1-1.el7                   @docker-ce-stable
docker-ce-cli.x86_64                  1:23.0.1-1.el7                   @docker-ce-stable
docker-ce-rootless-extras.x86_64      23.0.1-1.el7                     @docker-ce-stable
docker-compose-plugin.x86_64          2.16.0-1.el7                     @docker-ce-stable
docker-scan-plugin.x86_64             0.23.0-3.el7                     @docker-ce-stable
[root@localhost ~]#
把匹配到的包用 yum remove 卸载掉
yum remove \
containerd.io.x86_64 \
docker-buildx-plugin.x86_64 \
docker-ce.x86_64 \
docker-ce-cli.x86_64 \
docker-ce-rootless-extras.x86_64 \
docker-compose-plugin.x86_64 \
docker-scan-plugin.x86_64
#安装命令
curl -fsSL https://get.docker.com | bash -s docker --mirror Aliyun
#或使用国内 daocloud 一键安装命令
curl -sSL https://get.daocloud.io/docker | sh
Docker安装好后默认路径为 /var/lib/docker ,其下的containers文件夹为容器文件夹,image为镜像文件夹
1. 安装依赖软件包
yum install -y yum-utils device-mapper-persistent-data lvm2
yum-util 提供yum-config-manager
devicemapper 存储驱动程序需要依赖 device-mapper-persistent-data 和 lvm2
2. 设置yum源
#官方源(慢)
yum-config-manager --add-repo http://download.docker.com/linux/centos/docker-ce.repo
#阿里源
yum-config-manager --add-repo http://mirrors.aliyun.com/docker-ce/linux/centos/docker-ce.repo
#清华大学源
yum-config-manager --add-repo https://mirrors.tuna.tsinghua.edu.cn/docker-ce/linux/centos/docker-ce.repo
[root@localhost ~]# yum-config-manager --add-repo http://mirrors.aliyun.com/docker-ce/linux/centos/docker-ce.repo
已加载插件:fastestmirror, langpacks
adding repo from: http://mirrors.aliyun.com/docker-ce/linux/centos/docker-ce.repo
grabbing file http://mirrors.aliyun.com/docker-ce/linux/centos/docker-ce.repo to /etc/yum.repos.d/docker-ce.repo
repo saved to /etc/yum.repos.d/docker-ce.repo
[root@localhost ~]#
3. 安装最新版本的 Docker 和 containerd(想安装指定版本看第四步)
#最新的docker社区版
yum install -y docker-ce docker-ce-cli containerd.io
4. 安装指定版本
要安装特定版本的 Docker ,先使用 yum list docker-ce --showduplicates | sort -r 在存储库中列出可用版本,然后选择并安装
[root@localhost ~]# yum list docker-ce --showduplicates | sort -r
已加载插件:fastestmirror, langpacks
已安装的软件包
可安装的软件包
 * updates: mirrors.ustc.edu.cn
Loading mirror speeds from cached hostfile
 * extras: mirrors.ustc.edu.cn
docker-ce.x86_64            3:23.0.1-1.el7                     docker-ce-stable
docker-ce.x86_64            3:23.0.1-1.el7                     @docker-ce-stable
docker-ce.x86_64            3:23.0.0-1.el7                     docker-ce-stable
docker-ce.x86_64            3:20.10.9-3.el7                    docker-ce-stable
docker-ce.x86_64            3:20.10.8-3.el7                    docker-ce-stable
docker-ce.x86_64            3:20.10.7-3.el7                    docker-ce-stable
docker-ce.x86_64            3:20.10.6-3.el7                    docker-ce-stable
docker-ce.x86_64            3:20.10.5-3.el7                    docker-ce-stable
docker-ce.x86_64            3:20.10.4-3.el7                    docker-ce-stable
docker-ce.x86_64            3:20.10.3-3.el7                    docker-ce-stable
docker-ce.x86_64            3:20.10.2-3.el7                    docker-ce-stable
docker-ce.x86_64            3:20.10.23-3.el7                   docker-ce-stable
docker-ce.x86_64            3:20.10.22-3.el7                   docker-ce-stable
docker-ce.x86_64            3:20.10.21-3.el7                   docker-ce-stable
docker-ce.x86_64            3:20.10.20-3.el7                   docker-ce-stable
docker-ce.x86_64            3:20.10.19-3.el7                   docker-ce-stable
docker-ce.x86_64            3:20.10.18-3.el7                   docker-ce-stable
docker-ce.x86_64            3:20.10.17-3.el7                   docker-ce-stable
docker-ce.x86_64            3:20.10.16-3.el7                   docker-ce-stable
docker-ce.x86_64            3:20.10.15-3.el7                   docker-ce-stable
docker-ce.x86_64            3:20.10.14-3.el7                   docker-ce-stable
docker-ce.x86_64            3:20.10.1-3.el7                    docker-ce-stable
docker-ce.x86_64            3:20.10.13-3.el7                   docker-ce-stable
docker-ce.x86_64            3:20.10.12-3.el7                   docker-ce-stable
docker-ce.x86_64            3:20.10.11-3.el7                   docker-ce-stable
docker-ce.x86_64            3:20.10.10-3.el7                   docker-ce-stable
docker-ce.x86_64            3:20.10.0-3.el7                    docker-ce-stable
docker-ce.x86_64            3:19.03.9-3.el7                    docker-ce-stable
docker-ce.x86_64            3:19.03.8-3.el7                    docker-ce-stable
docker-ce.x86_64            3:19.03.7-3.el7                    docker-ce-stable
docker-ce.x86_64            3:19.03.6-3.el7                    docker-ce-stable
docker-ce.x86_64            3:19.03.5-3.el7                    docker-ce-stable
docker-ce.x86_64            3:19.03.4-3.el7                    docker-ce-stable
docker-ce.x86_64            3:19.03.3-3.el7                    docker-ce-stable
docker-ce.x86_64            3:19.03.2-3.el7                    docker-ce-stable
docker-ce.x86_64            3:19.03.15-3.el7                   docker-ce-stable
docker-ce.x86_64            3:19.03.14-3.el7                   docker-ce-stable
docker-ce.x86_64            3:19.03.1-3.el7                    docker-ce-stable
docker-ce.x86_64            3:19.03.13-3.el7                   docker-ce-stable
docker-ce.x86_64            3:19.03.12-3.el7                   docker-ce-stable
docker-ce.x86_64            3:19.03.11-3.el7                   docker-ce-stable
docker-ce.x86_64            3:19.03.10-3.el7                   docker-ce-stable
docker-ce.x86_64            3:19.03.0-3.el7                    docker-ce-stable
docker-ce.x86_64            3:18.09.9-3.el7                    docker-ce-stable
docker-ce.x86_64            3:18.09.8-3.el7                    docker-ce-stable
docker-ce.x86_64            3:18.09.7-3.el7                    docker-ce-stable
docker-ce.x86_64            3:18.09.6-3.el7                    docker-ce-stable
docker-ce.x86_64            3:18.09.5-3.el7                    docker-ce-stable
docker-ce.x86_64            3:18.09.4-3.el7                    docker-ce-stable
docker-ce.x86_64            3:18.09.3-3.el7                    docker-ce-stable
docker-ce.x86_64            3:18.09.2-3.el7                    docker-ce-stable
docker-ce.x86_64            3:18.09.1-3.el7                    docker-ce-stable
docker-ce.x86_64            3:18.09.0-3.el7                    docker-ce-stable
docker-ce.x86_64            18.06.3.ce-3.el7                   docker-ce-stable
docker-ce.x86_64            18.06.2.ce-3.el7                   docker-ce-stable
docker-ce.x86_64            18.06.1.ce-3.el7                   docker-ce-stable
docker-ce.x86_64            18.06.0.ce-3.el7                   docker-ce-stable
docker-ce.x86_64            18.03.1.ce-1.el7.centos            docker-ce-stable
docker-ce.x86_64            18.03.0.ce-1.el7.centos            docker-ce-stable
docker-ce.x86_64            17.12.1.ce-1.el7.centos            docker-ce-stable
docker-ce.x86_64            17.12.0.ce-1.el7.centos            docker-ce-stable
docker-ce.x86_64            17.09.1.ce-1.el7.centos            docker-ce-stable
docker-ce.x86_64            17.09.0.ce-1.el7.centos            docker-ce-stable
docker-ce.x86_64            17.06.2.ce-1.el7.centos            docker-ce-stable
docker-ce.x86_64            17.06.1.ce-1.el7.centos            docker-ce-stable
docker-ce.x86_64            17.06.0.ce-1.el7.centos            docker-ce-stable
docker-ce.x86_64            17.03.3.ce-1.el7                   docker-ce-stable
docker-ce.x86_64            17.03.2.ce-1.el7.centos            docker-ce-stable
docker-ce.x86_64            17.03.1.ce-1.el7.centos            docker-ce-stable
docker-ce.x86_64            17.03.0.ce-1.el7.centos            docker-ce-stable
 * base: mirrors.ustc.edu.cn
[root@localhost ~]#
软件包名称是docker-ce加上第二列版本字符串,从第一个冒号(:)到第一个连字符(-)之间的就是版本号,例:**docker-ce-20.10.9 docker-ce-cli-20.10.9**
#安装指定版本
yum install -y docker-ce-20.10.9 docker-ce-cli-20.10.9 containerd.io
5. 指定docker最终竞选和容器路径(可跳过)
需要注意的时docker在19.xx及之前版本指定路径使用的是 --graph ;而在docker 19.xx之后指定路径时使用的是 data-root(实测docker 20.10.21中也可以使用–graph)。
docker指定路径需要修改 /usr/lib/systemd/system/docker.service,
直接使用代码修改(点一次,不小心加多了就去 /usr/lib/systemd/system/docker.service删)
#docker 19.xx 之后
sed -i 's/-H/ \-\-data\-root \/opt\/docker &/' /usr/lib/systemd/system/docker.service
#docker 19.xx及之前
sed -i 's/-H/ \-\-graph \/opt\/docker &/' /usr/lib/systemd/system/docker.service
或者 vi /usr/lib/systemd/system/docker.service
找到 [Service],在 ExecStart中加入 --graph /opt/docker 或 --data-root /opt/docker
[Service]
Type=notify
# the default is not to use systemd for cgroups because the delegate issues still
# exists and systemd currently does not support the cgroup feature set required
# for containers run by docker
ExecStart=/usr/bin/dockerd  --graph /opt/docker -H fd:// --containerd=/run/containerd/containerd.sock
ExecReload=/bin/kill -s HUP $MAINPID
TimeoutSec=0
RestartSec=2
Restart=always
或者修改docker的配置文件/etc/docker/daemon.json,效果一样。
#在其中添加
"graph":"/opt/docker"
#或
"data-root":"/opt/docker"
修改完了之后使用 systemctl daemon-reload 重新加载服务
[root@localhost ~]# systemctl daemon-reload
[root@localhost ~]#
6. 启动dokcer
#重启docker
systemctl restart docker
#设置开机启动
systemctl enable docker
portainer就是一个docker的可视化管理平台,这里的是中文版的
docker pull 6053537/portainer-ce
docker volume create portainer_data
docker run \
-d \
--name portainer \
-p 9000:9000 \
--restart=always \
-v /var/run/docker.sock:/var/run/docker.sock \
-v portainer_data:/data \
6053537/portainer-ce
[root@localhost /]# yum install -y yum-utils device-mapper-persistent-data lvm2
已加载插件:fastestmirror
base                                                                                     | 3.6 kB  00:00:00


 One of the configured repositories failed (未知),
 and yum doesn't have enough cached data to continue. At this point the only
 safe thing yum can do is fail. There are a few ways to work "fix" this:

     1. Contact the upstream for the repository and get them to fix the problem.

     2. Reconfigure the baseurl/etc. for the repository, to point to a working
        upstream. This is most often useful if you are using a newer
        distribution release than is supported by the repository (and the
        packages for the previous distribution release still work).

     3. Disable the repository, so yum won't use it by default. Yum will then
        just ignore the repository until you permanently enable it again or use
        --enablerepo for temporary usage:

            yum-config-manager --disable <repoid>

     4. Configure the failing repository to be skipped, if it is unavailable.
        Note that yum will try to contact the repo. when it runs most commands,
        so will have to try and fail each time (and thus. yum will be be much
        slower). If it is a very temporary problem though, this is often a nice
        compromise:

            yum-config-manager --save --setopt=<repoid>.skip_if_unavailable=true

Cannot retrieve metalink for repository: epel/x86_64. Please verify its path and try again
解决办法
修改 /etc/yum.repos.d/epel.repo 文件
vi /etc/yum.repos.d/epel.repo
注释metalink,放开baseurl注释,保存
[epel]
name=Extra Packages for Enterprise Linux 7 - $basearch
baseurl=https://repo.huaweicloud.com/epel/7/$basearch
#metalink=https://mirrors.fedoraproject.org/#metalink?repo=epel-7&arch=$basearch
failovermethod=priority
enabled=1
gpgcheck=1
gpgkey=file:///etc/pki/rpm-gpg/RPM-GPG-KEY-EPEL-7
之后重建yum缓存
yum clean all
yum makecache
#update可选
yum update
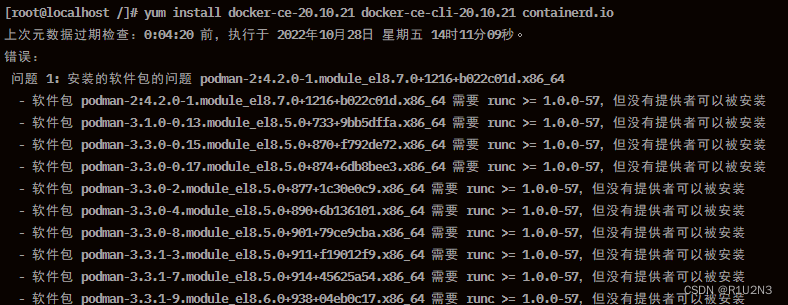
解决办法
yum erase podman buildah
我想为Heroku构建一个Rails3应用程序。他们使用Postgres作为他们的数据库,所以我通过MacPorts安装了postgres9.0。现在我需要一个postgresgem并且共识是出于性能原因你想要pggem。但是我对我得到的错误感到非常困惑当我尝试在rvm下通过geminstall安装pg时。我已经非常明确地指定了所有postgres目录的位置可以找到但仍然无法完成安装:$envARCHFLAGS='-archx86_64'geminstallpg--\--with-pg-config=/opt/local/var/db/postgresql90/defaultdb/po
我打算为ruby脚本创建一个安装程序,但我希望能够确保机器安装了RVM。有没有一种方法可以完全离线安装RVM并且不引人注目(通过不引人注目,就像创建一个可以做所有事情的脚本而不是要求用户向他们的bash_profile或bashrc添加一些东西)我不是要脚本本身,只是一个关于如何走这条路的快速指针(如果可能的话)。我们还研究了这个很有帮助的问题:RVM-isthereawayforsimpleofflineinstall?但有点误导,因为答案只向我们展示了如何离线在RVM中安装ruby。我们需要能够离线安装RVM本身,并查看脚本https://raw.github.com/wayn
我有一个奇怪的问题:我在rvm上安装了rubyonrails。一切正常,我可以创建项目。但是在我输入“railsnew”时重新启动后,我有“程序'rails'当前未安装。”。SystemUbuntu12.04ruby-v"1.9.3p194"gemlistactionmailer(3.2.5)actionpack(3.2.5)activemodel(3.2.5)activerecord(3.2.5)activeresource(3.2.5)activesupport(3.2.5)arel(3.0.2)builder(3.0.0)bundler(1.1.4)coffee-rails(
我刚刚为fedora安装了emacs。我想用emacs编写ruby。为ruby提供代码提示、代码完成类型功能所需的工具、扩展是什么? 最佳答案 ruby-mode已经包含在Emacs23之后的版本中。不过,它也可以通过ELPA获得。您可能感兴趣的其他一些事情是集成RVM、feature-mode(Cucumber)、rspec-mode、ruby-electric、inf-ruby、rinari(用于Rails)等。这是我当前用于Ruby开发的Emacs配置:https://github.com/citizen428/emacs
我正在尝试在我的centos服务器上安装therubyracer,但遇到了麻烦。$geminstalltherubyracerBuildingnativeextensions.Thiscouldtakeawhile...ERROR:Errorinstallingtherubyracer:ERROR:Failedtobuildgemnativeextension./usr/local/rvm/rubies/ruby-1.9.3-p125/bin/rubyextconf.rbcheckingformain()in-lpthread...yescheckingforv8.h...no***e
我的最终目标是安装当前版本的RubyonRails。我在OSXMountainLion上运行。到目前为止,这是我的过程:已安装的RVM$\curl-Lhttps://get.rvm.io|bash-sstable检查已知(我假设已批准)安装$rvmlistknown我看到当前的稳定版本可用[ruby-]2.0.0[-p247]输入命令安装$rvminstall2.0.0-p247注意:我也试过这些安装命令$rvminstallruby-2.0.0-p247$rvminstallruby=2.0.0-p247我很快就无处可去了。结果:$rvminstall2.0.0-p247Search
我实际上是在尝试使用RVM在我的OSX10.7.5上更新ruby,并在输入以下命令后:rvminstallruby我得到了以下回复:Searchingforbinaryrubies,thismighttakesometime.Checkingrequirementsforosx.Installingrequirementsforosx.Updatingsystem.......Errorrunning'requirements_osx_brew_update_systemruby-2.0.0-p247',pleaseread/Users/username/.rvm/log/138121
由于fast-stemmer的问题,我很难安装我想要的任何rubygem。我把我得到的错误放在下面。Buildingnativeextensions.Thiscouldtakeawhile...ERROR:Errorinstallingfast-stemmer:ERROR:Failedtobuildgemnativeextension./System/Library/Frameworks/Ruby.framework/Versions/2.0/usr/bin/rubyextconf.rbcreatingMakefilemake"DESTDIR="cleanmake"DESTDIR=
当我尝试安装Ruby时遇到此错误。我试过查看this和this但无济于事➜~brewinstallrubyWarning:YouareusingOSX10.12.Wedonotprovidesupportforthispre-releaseversion.Youmayencounterbuildfailuresorotherbreakages.Pleasecreatepull-requestsinsteadoffilingissues.==>Installingdependenciesforruby:readline,libyaml,makedepend==>Installingrub
当我执行>rvminstall1.9.2时一切顺利。然后我做>rvmuse1.9.2也很顺利。但是当涉及到ruby-v时..sam@sjones:~$rvminstall1.9.2/home/sam/.rvm/rubies/ruby-1.9.2-p136,thismaytakeawhiledependingonyourcpu(s)...ruby-1.9.2-p136-#fetchingruby-1.9.2-p136-#downloadingruby-1.9.2-p136,thismaytakeawhiledependingonyourconnection...%Total%Rece
