文章目录
WebGL(全写Web Graphics Library)是一种3D绘图协议,这种绘图技术标准允许把JavaScript和OpenGL ES 2.0结合在一起,通过增加OpenGL ES 2.0的一个JavaScript绑定,WebGL可以为HTML5 Canvas提供硬件3D加速渲染,这样Web开发人员就可以借助系统显卡来在浏览器里更流畅地展示3D场景和模型了,还能创建复杂的导航和数据视觉化。显然,WebGL技术标准免去了开发网页专用渲染插件的麻烦,可被用于创建具有复杂3D结构的网站页面,甚至可以用来设计3D网页游戏等等。–百度百科
在现实中webgl的用途很多,比如医院运维网站,地铁运维网站,海绵城市,可以以三维网页形式展示出现实状态。
WebGL相关文档:http://doc.yonyoucloud.com/doc/wiki/project/webgl/webgL-fundamentals.html

安装第三方包:npm i --save threejs-miniprogram
import drawAnimationRectangle from './drawAnimationRectangle'


Page({

  /**
   * 页面的初始数据
   */
  data: {

  },

  /**
   * 生命周期函数--监听页面加载
   */
  onLoad: function (options) {

  },

  /**
   * 生命周期函数--监听页面初次渲染完成
   */
  onReady: function () {
    wx.createSelectorQuery()
      .select('#myCanvas1')
      .node()
      .exec((res) => {
        const canvas = res[0].node
        const gl = canvas.getContext('webgl')
        if (!gl) {
          console.log('webgl未受支持');
          return
        }
        // 检查所有支持的扩展
        var available_extensions = gl.getSupportedExtensions();
        console.log(available_extensions);

        // 清除画布
        // 使用完全不透明的黑色清除所有图像,我们将清除色设为黑色,此时并没有开始清除
        gl.clearColor(0.0, 0.0, 0.0, 1.0);
        // 用上面指定的颜色清除缓冲区
        gl.clear(gl.COLOR_BUFFER_BIT);

        // 画的是一个正方形
        drawAnimationRectangle(gl,canvas)
})
import {
  mat4
} from '../../lib/gl-matrix'


var squareRotation = 0.0;

//
// Start here
//
function drawAnimationRectangle(gl,canvas) {

  // Vertex shader program

  const vsSource = `
    attribute vec4 aVertexPosition;
    attribute vec4 aVertexColor;
    uniform mat4 uModelViewMatrix;
    uniform mat4 uProjectionMatrix;
    varying lowp vec4 vColor;
    void main(void) {
      gl_Position = uProjectionMatrix * uModelViewMatrix * aVertexPosition;
      vColor = aVertexColor;
    }
  `;

  // Fragment shader program

  const fsSource = `
    varying lowp vec4 vColor;
    void main(void) {
      gl_FragColor = vColor;
    }
  `;

  // Initialize a shader program; this is where all the lighting
  // for the vertices and so forth is established.
  const shaderProgram = initShaderProgram(gl, vsSource, fsSource);

  // Collect all the info needed to use the shader program.
  // Look up which attributes our shader program is using
  // for aVertexPosition, aVevrtexColor and also
  // look up uniform locations.

  const programInfo = {
    program: shaderProgram,
    attribLocations: {
      vertexPosition: gl.getAttribLocation(shaderProgram, 'aVertexPosition'),
      vertexColor: gl.getAttribLocation(shaderProgram, 'aVertexColor'),
    },
    uniformLocations: {
      projectionMatrix: gl.getUniformLocation(shaderProgram, 'uProjectionMatrix'),
      modelViewMatrix: gl.getUniformLocation(shaderProgram, 'uModelViewMatrix'),
    },
  };

  // Here's where we call the routine that builds all the
  // objects we'll be drawing.
  const buffers = initBuffers(gl);

  var then = 0;

  // Draw the scene repeatedly
function render(now) {
  console.log('now',now);

  now *= 0.001;  // convert to seconds
  console.log('now',now);
  const deltaTime = now - then;
  then = now;

  drawScene(gl, programInfo, buffers, deltaTime);

  canvas.requestAnimationFrame(render);
}
canvas.requestAnimationFrame(render);

}

//
// initBuffers
//
// Initialize the buffers we'll need. For this demo, we just
// have one object -- a simple two-dimensional square.
//
function initBuffers(gl) {

  // Create a buffer for the square's positions.

  const positionBuffer = gl.createBuffer();

  // Select the positionBuffer as the one to apply buffer
  // operations to from here out.

  gl.bindBuffer(gl.ARRAY_BUFFER, positionBuffer);

  // Now create an array of positions for the square.

  const positions = [
     1.0,  1.0,
    -1.0,  1.0,
     1.0, -1.0,
    -1.0, -1.0,
  ];

  // Now pass the list of positions into WebGL to build the
  // shape. We do this by creating a Float32Array from the
  // JavaScript array, then use it to fill the current buffer.

  gl.bufferData(gl.ARRAY_BUFFER, new Float32Array(positions), gl.STATIC_DRAW);

  // Now set up the colors for the vertices

  const colors = [
    1.0,  1.0,  1.0,  1.0,    // white
    1.0,  0.0,  0.0,  1.0,    // red
    0.0,  1.0,  0.0,  1.0,    // green
    0.0,  0.0,  1.0,  1.0,    // blue
  ];

  const colorBuffer = gl.createBuffer();
  gl.bindBuffer(gl.ARRAY_BUFFER, colorBuffer);
  gl.bufferData(gl.ARRAY_BUFFER, new Float32Array(colors), gl.STATIC_DRAW);

  return {
    position: positionBuffer,
    color: colorBuffer,
  };
}

//
// Draw the scene.
//
function drawScene(gl, programInfo, buffers, deltaTime) {
  gl.clearColor(0.0, 0.0, 0.0, 1.0);  // Clear to black, fully opaque
  gl.clearDepth(1.0);                 // Clear everything
  gl.enable(gl.DEPTH_TEST);           // Enable depth testing
  gl.depthFunc(gl.LEQUAL);            // Near things obscure far things

  // Clear the canvas before we start drawing on it.

  gl.clear(gl.COLOR_BUFFER_BIT | gl.DEPTH_BUFFER_BIT);

  // Create a perspective matrix, a special matrix that is
  // used to simulate the distortion of perspective in a camera.
  // Our field of view is 45 degrees, with a width/height
  // ratio that matches the display size of the canvas
  // and we only want to see objects between 0.1 units
  // and 100 units away from the camera.

  const fieldOfView = 45 * Math.PI / 180;   // in radians
  const aspect = gl.canvas.clientWidth / gl.canvas.clientHeight;
  const zNear = 0.1;
  const zFar = 100.0;
  const projectionMatrix = mat4.create();

  // note: glmatrix.js always has the first argument
  // as the destination to receive the result.
  mat4.perspective(projectionMatrix,
                   fieldOfView,
                   aspect,
                   zNear,
                   zFar);

  // Set the drawing position to the "identity" point, which is
  // the center of the scene.
  const modelViewMatrix = mat4.create();

  // Now move the drawing position a bit to where we want to
  // start drawing the square.

// let xStep = squareRotation % 2-1


mat4.translate(modelViewMatrix,     // destination matrix
                modelViewMatrix,     // matrix to translate
                [-0.0, 0, -6.0]);  // amount to translate

// 旋转是在这里产生的
// mat4.rotate(modelViewMatrix,  // destination matrix
//   modelViewMatrix,  // matrix to rotate
//   squareRotation,   // amount to rotate in radians
//   [0, 1, 1]);       // axis to rotate around

mat4.rotate(modelViewMatrix,  // destination matrix
            modelViewMatrix,  // matrix to rotate
            squareRotation,   // amount to rotate in radians
            [0, 0, 1]);       // axis to rotate around

  // Tell WebGL how to pull out the positions from the position
  // buffer into the vertexPosition attribute
  {
    const numComponents = 2;
    const type = gl.FLOAT;
    const normalize = false;
    const stride = 0;
    const offset = 0;
    gl.bindBuffer(gl.ARRAY_BUFFER, buffers.position);
    gl.vertexAttribPointer(
        programInfo.attribLocations.vertexPosition,
        numComponents,
        type,
        normalize,
        stride,
        offset);
    gl.enableVertexAttribArray(
        programInfo.attribLocations.vertexPosition);
  }

  // Tell WebGL how to pull out the colors from the color buffer
  // into the vertexColor attribute.
  {
    const numComponents = 4;
    const type = gl.FLOAT;
    const normalize = false;
    const stride = 0;
    const offset = 0;
    gl.bindBuffer(gl.ARRAY_BUFFER, buffers.color);
    gl.vertexAttribPointer(
        programInfo.attribLocations.vertexColor,
        numComponents,
        type,
        normalize,
        stride,
        offset);
    gl.enableVertexAttribArray(
        programInfo.attribLocations.vertexColor);
  }

  // Tell WebGL to use our program when drawing

  gl.useProgram(programInfo.program);

  // Set the shader uniforms

  gl.uniformMatrix4fv(
      programInfo.uniformLocations.projectionMatrix,
      false,
      projectionMatrix);

  gl.uniformMatrix4fv(
      programInfo.uniformLocations.modelViewMatrix,
      false,
      modelViewMatrix);

  {
    const offset = 0;
    const vertexCount = 4;
    gl.drawArrays(gl.TRIANGLE_STRIP, offset, vertexCount);
  }

  // Update the rotation for the next draw

  squareRotation += deltaTime;
}

//
// Initialize a shader program, so WebGL knows how to draw our data
//
function initShaderProgram(gl, vsSource, fsSource) {
  const vertexShader = loadShader(gl, gl.VERTEX_SHADER, vsSource);
  const fragmentShader = loadShader(gl, gl.FRAGMENT_SHADER, fsSource);

  // Create the shader program

  const shaderProgram = gl.createProgram();
  gl.attachShader(shaderProgram, vertexShader);
  gl.attachShader(shaderProgram, fragmentShader);
  gl.linkProgram(shaderProgram);

  // If creating the shader program failed, alert

  if (!gl.getProgramParameter(shaderProgram, gl.LINK_STATUS)) {
    alert('Unable to initialize the shader program: ' + gl.getProgramInfoLog(shaderProgram));
    return null;
  }

  return shaderProgram;
}

//
// creates a shader of the given type, uploads the source and
// compiles it.
//
function loadShader(gl, type, source) {
  const shader = gl.createShader(type);

  // Send the source to the shader object

  gl.shaderSource(shader, source);

  // Compile the shader program

  gl.compileShader(shader);

  // See if it compiled successfully

  if (!gl.getShaderParameter(shader, gl.COMPILE_STATUS)) {
    alert('An error occurred compiling the shaders: ' + gl.getShaderInfoLog(shader));
    gl.deleteShader(shader);
    return null;
  }

  return shader;
}

export default drawAnimationRectangle
实际效果
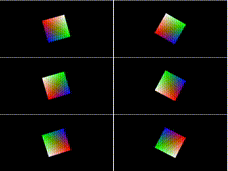
gl-matrix相关包源码链接如下:
https://download.csdn.net/download/aa2528877987/86513333
画一个图形主要经历如下四个步骤:
我正在学习如何使用Nokogiri,根据这段代码我遇到了一些问题:require'rubygems'require'mechanize'post_agent=WWW::Mechanize.newpost_page=post_agent.get('http://www.vbulletin.org/forum/showthread.php?t=230708')puts"\nabsolutepathwithtbodygivesnil"putspost_page.parser.xpath('/html/body/div/div/div/div/div/table/tbody/tr/td/div
我有一个Ruby程序,它使用rubyzip压缩XML文件的目录树。gem。我的问题是文件开始变得很重,我想提高压缩级别,因为压缩时间不是问题。我在rubyzipdocumentation中找不到一种为创建的ZIP文件指定压缩级别的方法。有人知道如何更改此设置吗?是否有另一个允许指定压缩级别的Ruby库? 最佳答案 这是我通过查看rubyzip内部创建的代码。level=Zlib::BEST_COMPRESSIONZip::ZipOutputStream.open(zip_file)do|zip|Dir.glob("**/*")d
类classAprivatedeffooputs:fooendpublicdefbarputs:barendprivatedefzimputs:zimendprotecteddefdibputs:dibendendA的实例a=A.new测试a.foorescueputs:faila.barrescueputs:faila.zimrescueputs:faila.dibrescueputs:faila.gazrescueputs:fail测试输出failbarfailfailfail.发送测试[:foo,:bar,:zim,:dib,:gaz].each{|m|a.send(m)resc
很好奇,就使用rubyonrails自动化单元测试而言,你们正在做什么?您是否创建了一个脚本来在cron中运行rake作业并将结果邮寄给您?git中的预提交Hook?只是手动调用?我完全理解测试,但想知道在错误发生之前捕获错误的最佳实践是什么。让我们理所当然地认为测试本身是完美无缺的,并且可以正常工作。下一步是什么以确保他们在正确的时间将可能有害的结果传达给您? 最佳答案 不确定您到底想听什么,但是有几个级别的自动代码库控制:在处理某项功能时,您可以使用类似autotest的内容获得关于哪些有效,哪些无效的即时反馈。要确保您的提
假设我做了一个模块如下:m=Module.newdoclassCendend三个问题:除了对m的引用之外,还有什么方法可以访问C和m中的其他内容?我可以在创建匿名模块后为其命名吗(就像我输入“module...”一样)?如何在使用完匿名模块后将其删除,使其定义的常量不再存在? 最佳答案 三个答案:是的,使用ObjectSpace.此代码使c引用你的类(class)C不引用m:c=nilObjectSpace.each_object{|obj|c=objif(Class===objandobj.name=~/::C$/)}当然这取决于
我正在尝试使用ruby和Savon来使用网络服务。测试服务为http://www.webservicex.net/WS/WSDetails.aspx?WSID=9&CATID=2require'rubygems'require'savon'client=Savon::Client.new"http://www.webservicex.net/stockquote.asmx?WSDL"client.get_quotedo|soap|soap.body={:symbol=>"AAPL"}end返回SOAP异常。检查soap信封,在我看来soap请求没有正确的命名空间。任何人都可以建议我
关闭。这个问题是opinion-based.它目前不接受答案。想要改进这个问题?更新问题,以便editingthispost可以用事实和引用来回答它.关闭4年前。Improvethisquestion我想在固定时间创建一系列低音和高音调的哔哔声。例如:在150毫秒时发出高音调的蜂鸣声在151毫秒时发出低音调的蜂鸣声200毫秒时发出低音调的蜂鸣声250毫秒的高音调蜂鸣声有没有办法在Ruby或Python中做到这一点?我真的不在乎输出编码是什么(.wav、.mp3、.ogg等等),但我确实想创建一个输出文件。
我在我的项目目录中完成了compasscreate.和compassinitrails。几个问题:我已将我的.sass文件放在public/stylesheets中。这是放置它们的正确位置吗?当我运行compasswatch时,它不会自动编译这些.sass文件。我必须手动指定文件:compasswatchpublic/stylesheets/myfile.sass等。如何让它自动运行?文件ie.css、print.css和screen.css已放在stylesheets/compiled。如何在编译后不让它们重新出现的情况下删除它们?我自己编译的.sass文件编译成compiled/t
我想将html转换为纯文本。不过,我不想只删除标签,我想智能地保留尽可能多的格式。为插入换行符标签,检测段落并格式化它们等。输入非常简单,通常是格式良好的html(不是整个文档,只是一堆内容,通常没有anchor或图像)。我可以将几个正则表达式放在一起,让我达到80%,但我认为可能有一些现有的解决方案更智能。 最佳答案 首先,不要尝试为此使用正则表达式。很有可能你会想出一个脆弱/脆弱的解决方案,它会随着HTML的变化而崩溃,或者很难管理和维护。您可以使用Nokogiri快速解析HTML并提取文本:require'nokogiri'h
我想为Heroku构建一个Rails3应用程序。他们使用Postgres作为他们的数据库,所以我通过MacPorts安装了postgres9.0。现在我需要一个postgresgem并且共识是出于性能原因你想要pggem。但是我对我得到的错误感到非常困惑当我尝试在rvm下通过geminstall安装pg时。我已经非常明确地指定了所有postgres目录的位置可以找到但仍然无法完成安装:$envARCHFLAGS='-archx86_64'geminstallpg--\--with-pg-config=/opt/local/var/db/postgresql90/defaultdb/po
