models.py:
class User(models.Model):
    username = models.CharField(max_length=32)
    password = models.CharField(max_length=32)


class UserToken(models.Model):
    user = models.OneToOneField(to='User', on_delete=models.CASCADE)
    token = models.CharField(max_length=64)
views.py:
from rest_framework.response import Response
from rest_framework.viewsets import ModelViewSet
import uuid

class BookViewSet(ModelViewSet):
    queryset = Book.objects
    serializer_class = BookModelSerializer

    @action(methods=['GET', 'POST'], detail=False)
    def login(self, request):
        username = request.data.get('username')
        password = request.data.get('password')
        user = models.User.objects.filter(username=username, password=password).first()
        if user:
            token = str(uuid.uuid4())
            models.UserToken.objects.update_or_create(user=user, defaults={'token': token})
            return Response({'code': 100, 'msg': '登录成功', 'token': token})
        return Response({'code': 101, 'msg': '用户名或密码错误'})
urls.py:
from rest_framework.routers import DefaultRouter, SimpleRouter

router = DefaultRouter()
router.register('books4', views.BookViewSet)

urlpatterns = [
    path('admin/', admin.site.urls),
]
urlpatterns += router.urls
drf 认证、权限、频率三大功能是在哪里实现的?在 APIView 源码中实现,所有继承 APIView 的类都可以实现三大认证
APIView 的类的 as_view 返回 view 函数的内存地址,view运行后调用了 APIView中的 dispatch方法,三大认证在 self.initial(request, *args, **kwargs) 函数中调用
    def dispatch(self, request, *args, **kwargs):
        request = self.initialize_request(request, *args, **kwargs)
        try:
            self.initial(request, *args, **kwargs)
        except Exception as exc:
            response = self.handle_exception(exc)
APIView --> initial
    def initial(self, request, *args, **kwargs):
        self.perform_authentication(request)  # 认证
        self.check_permissions(request)  # 权限
        self.check_throttles(request)  # 频率
APIView-->perform_authentication(request)
源码中只返回了登录用户或者匿名用户对象
该方法调用了 request.user ,也就是重写后的 request 属性中的 user,我们知道那里的 user有被调用触发的方法 和 被赋值触发的方法
    def perform_authentication(self, request):
        """
        `request.user` or `request.auth` is accessed.
        """
        request.user
转到重写 request 对象的Request类中:
Request-->user(property)
可以看到调用的是 Request类中的 _authenticate()
    @property
    def user(self):
        if not hasattr(self, '_user'):
            with wrap_attributeerrors():
                self._authenticate()
        return self._user
Request-->_authenticate核心代码
该方法循环 Request类中的 authenticators列表(认证类列表)
调用认证类 authenticator 中的 authenticate(self) 方法,并放回元组user_auth_tuple,包含登录用户对象(user)和 auth
如果 user_auth_tuple 不为 None,则 request 对象便获取了user对象和 auth对象
authenticate(self) 方法,并放回 user对象和 auth对象 def _authenticate(self):
for authenticator in self.authenticators:
try:
user_auth_tuple = authenticator.authenticate(self) # 调用类中的authenticate方法
except exceptions.APIException:
self._not_authenticated()
raise
if user_auth_tuple is not None:
self._authenticator = authenticator
self.user, self.auth = user_auth_tuple
return
self._not_authenticated()
authenticators 怎么来的?
可以看出,authenticators 是 Request类实例化时传进来的参数,那么我们就得回到APIView类中的 initialize_request(self, request, *args, **kwargs) 方法,因为是在那里实例化了 Request类
class Request:
    def __init__(self, request, parsers=None, authenticators=None,
                 negotiator=None, parser_context=None):
        self.authenticators = authenticators or ()
APIView-->initialize_request
可以看到调用了自己的 get_authenticators() 方法
    def initialize_request(self, request, *args, **kwargs):
        return Request(
            request,
            parsers=self.get_parsers(),
            authenticators=self.get_authenticators(),
            negotiator=self.get_content_negotiator(),
            parser_context=parser_context
        )
APIView-->get_authenticators()
这是个列表生成式,从视图函数类中的认证类列表 authentication_classes 中取出一个个认证类加括号实例化为对象,并存在类表中放回,那么get_authenticators() 方法放回的是一个认证类对象的列表
    def get_authenticators(self):
        """
        Instantiates and returns the list of authenticators that this view can use.
        """
        return [auth() for auth in self.authentication_classes]
绕来绕去,最终明白,我们可以在视图类中定义 authentication_classes 列表,存放认证类,在触发视图函数类时就会执行列表中认证类重写的 authenticate(self)方法,并放回登录的用户对象和auth
APIView-->check_permissions(request)
get_permissions()是获取认证类对象列表
has_permission(request, self) 是我们自定义权限类时要改写的方法,返回True或False
    def check_permissions(self, request):
        for permission in self.get_permissions():
            if not permission.has_permission(request, self):
                self.permission_denied(
                    request,
                    message=getattr(permission, 'message', None),
                    code=getattr(permission, 'code', None)
                )
APIView-->check_throttles(request)
    def check_throttles(self, request):
        throttle_durations = []
        for throttle in self.get_throttles():
            if not throttle.allow_request(request, self):
                throttle_durations.append(throttle.wait())
        if throttle_durations:
            durations = [
                duration for duration in throttle_durations
                if duration is not None
            ]
            duration = max(durations, default=None)
            self.throttled(request, duration)
class APIView(View):

    # The following policies may be set at either globally, or per-view.
    renderer_classes = api_settings.DEFAULT_RENDERER_CLASSES
    parser_classes = api_settings.DEFAULT_PARSER_CLASSES
    authentication_classes = api_settings.DEFAULT_AUTHENTICATION_CLASSES  # 认证类列表
    throttle_classes = api_settings.DEFAULT_THROTTLE_CLASSES              # 频率限制类
    permission_classes = api_settings.DEFAULT_PERMISSION_CLASSES          # 权限类
    content_negotiation_class = api_settings.DEFAULT_CONTENT_NEGOTIATION_CLASS
    metadata_class = api_settings.DEFAULT_METADATA_CLASS
    versioning_class = api_settings.DEFAULT_VERSIONING_CLASS
三个认证类在 drf 配置文件中的配置
DEFAULTS = {
    'DEFAULT_AUTHENTICATION_CLASSES': [
        'rest_framework.authentication.SessionAuthentication',
        'rest_framework.authentication.BasicAuthentication'
    ],
    'DEFAULT_PERMISSION_CLASSES': [
        'rest_framework.permissions.AllowAny',
    ],
    'DEFAULT_THROTTLE_CLASSES': [],
}
校验过登录用户数据之后把token信息存到usertoken表中
class LoginViewSet(ModelViewSet):
    queryset = models.User.objects
    serializer_class = UserSerializer

    @action(methods=['POST'], detail=False)  # api 要多写一个 login/
    def login(self, request):
        username = request.data.get('username')
        password = request.data.get('password')
        user_obj = models.User.objects.filter(username=username, password=password).first()
        if not user_obj:
            return Response({'code': 1001, 'msg': '该用户不存在'})
        uuid_str = str(uuid.uuid4())
        # 过滤条件中user=user的对象,而不是pk
        models.UserToken.objects.update_or_create(user=user_obj, defaults={'token': uuid_str})  # 别漏写default后的字典
        return Response({'code': 1000, 'msg': '登录成功', 'token': uuid_str})
1、新建一个认证模块,写一个认证类继承 BaseAuthentication(多态),重写authenticate方法,在方法中校验是否登录,是则返回两个值(request.user 和 request.auth)
from rest_framework.authentication import BaseAuthentication


# 登录认证
class LoginAuth(BaseAuthentication):
    def authenticate(self, request):
        token = request.data.get('token')
        is_login = models.UserToken.objects.filter(token=token).first()
        if not is_login:
            raise AuthenticationFailed('您没有登录')
        return is_login.user, token
2、在视图类中书写 authentication_classes,存放导入进来的认证类
from app01.authentications import LoginAuth, ChangePermission

class BookViewSet(ViewSetMixin, ListAPIView):
    queryset = models.Book.objects
    serializer_class = BookModelSerializer
    authentication_classes = [LoginAuth, ]
class BookViewSet(ViewSetMixin, ListAPIView):
    queryset = models.Book.objects
    serializer_class = BookModelSerializer
    authentication_classes = []
3、全局配置(在项目文件夹下的 settings.py 文件中配置)
REST_FRAMEWORK = {
    'DEFAULT_AUTHENTICATION_CLASSES': [
        'app01.authentications.LoginAuth',
    ],
}

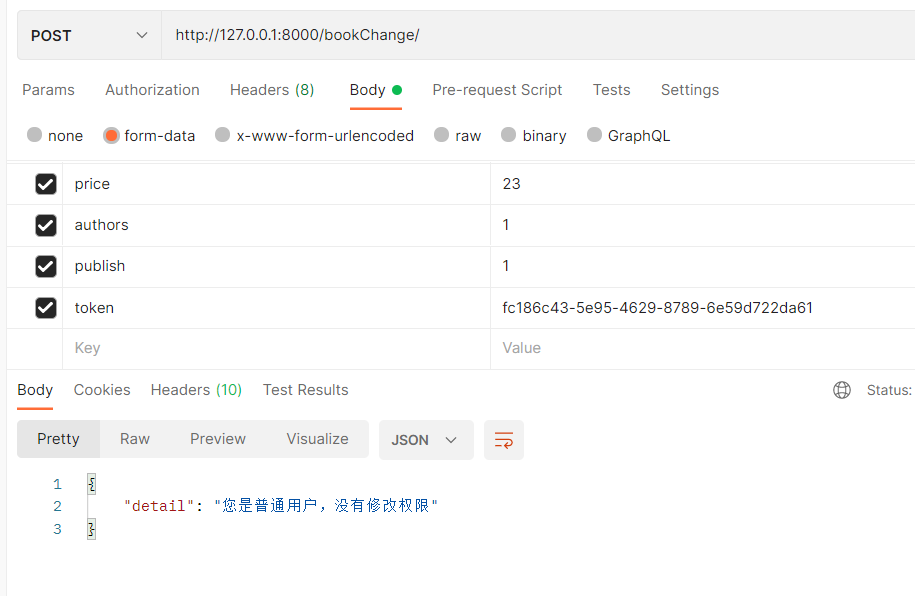
1、在认证模块中,写一个权限类继承 BasePermission(多态),重写has_permission方法,在方法中校验该用户的用户类型,是否有权限执行该视图类,返回 True 或者 False, 还可以自定义报错信息 self.message
from rest_framework.permissions import BasePermission

class ChangePermission(BasePermission):
    def has_permission(self, request, view):
        self.message = '您是%s,没有修改权限' % request.user.get_user_type_display()  # 根据源码,可以修改权限的提示信息
        user_type = request.user.user_type
        if user_type != 1:
            return False
        return True
2、在视图类中书写 permission_classes,存放导入进来的权限类
注意:在定义权限认证类前需要先定义登录认证类,否则没有用户对象 requset.user 来做权限认证
from app01.authentications import LoginAuth, ChangePermission

class BookViewChange(ViewSetMixin, CreateAPIView, RetrieveUpdateDestroyAPIView):
    queryset = models.Book.objects
    serializer_class = BookModelSerializer
    authentication_classes = [LoginAuth, ]
    permission_classes = [ChangePermission, ]
class BookViewChange(ViewSetMixin, CreateAPIView, RetrieveUpdateDestroyAPIView):
    queryset = models.Book.objects
    serializer_class = BookModelSerializer
    authentication_classes = [LoginAuth, ]
    permission_classes = []
3、全局配置(在项目文件夹下的 settings.py 文件中配置)
REST_FRAMEWORK = {
    'DEFAULT_PERMISSION_CLASSES': [
        'app01.authentications.ChangePermission',
    ],
}
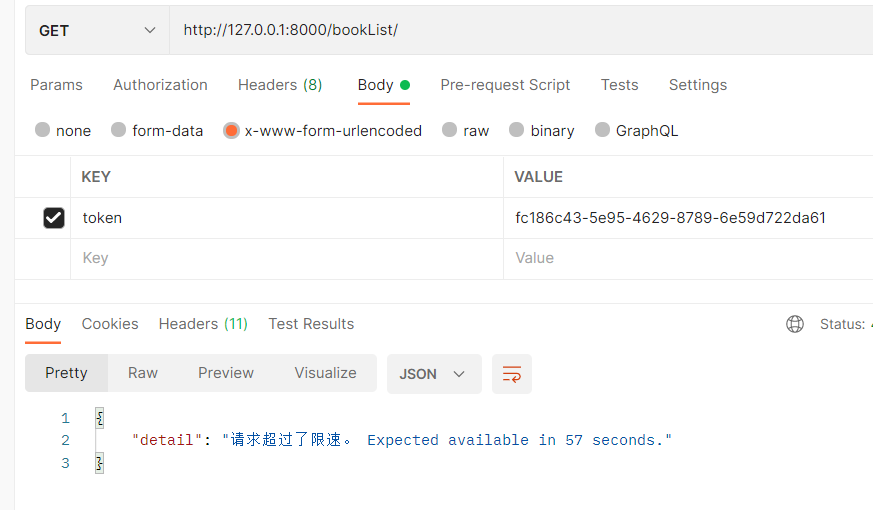
1、在认证模块中,写一个频率限制类继承 SimpleRateThrottle(多态),重写类属性 scope 和 get_cache_key方法,该方法返回什么,就以什么为限制,scope配置文件中要用
from rest_framework.throttling import SimpleRateThrottle

# 频率限制
class IPThrottling(SimpleRateThrottle):
    scope = 'minute_3'

    # 返回什么就以什么做限制
    def get_cache_key(self, request, view):
        # return request.META.get('REMOTE_ADDR')  # 客户端ip地址
        return request.user.id  # 用户id
2、与其它两个认证不同,他需要在项目配置文件中配置:
REST_FRAMEWORK = [
    'DEFAULT_THROTTLE_RATES': {
        'minute_3': '3/m'  # minute_3是scope的字符串,一分钟访问3次
        'minute_5':'5/m'
    }
]
2、在视图类中书写 throttle_classes,存放导入进来的权限类
class BookViewSet(ViewSetMixin, ListAPIView):
    queryset = models.Book.objects
    serializer_class = BookModelSerializer
    authentication_classes = [LoginAuth, ]
    throttle_classes = [IPThrottling, ]
class BookViewSet(ViewSetMixin, ListAPIView):
    queryset = models.Book.objects
    serializer_class = BookModelSerializer
    authentication_classes = [LoginAuth, ]
    throttle_classes = []
3、全局配置(在项目文件夹下的 settings.py 文件中配置)
REST_FRAMEWORK = {
    'DEFAULT_THROTTLE_CLASSES': [
        'app01.authentications.IPThrottling'
    ],
    'DEFAULT_THROTTLE_RATES': {
        'minute_3': '3/m',  # minute_3是scope的字符串,一分钟访问3次
        # 'minute_5': '5/m'
    }
}
一、引擎主循环UE版本:4.27一、引擎主循环的位置:Launch.cpp:GuardedMain函数二、、GuardedMain函数执行逻辑:1、EnginePreInit:加载大多数模块int32ErrorLevel=EnginePreInit(CmdLine);PreInit模块加载顺序:模块加载过程:(1)注册模块中定义的UObject,同时为每个类构造一个类默认对象(CDO,记录类的默认状态,作为模板用于子类实例创建)(2)调用模块的StartUpModule方法2、FEngineLoop::Init()1、检查Engine的配置文件找出使用了哪一个GameEngine类(UGame
大家好,我正在尝试设置一个开发环境,并且我一直在关注以下教程:Linktotutorial我做得不是很好,除了最基本的版本控制内容外,我对终端命令没有任何实际经验。我点击了第一个链接并尝试运行source~/.bash_profile我得到了错误;mkdir:/usr/local/rbenv/shims:权限被拒绝mkdir:/usr/local/rbenv/versions:权限被拒绝现在每次我加载终端时都会出现错误。bash_profile的内容;exportPATH=/usr/local/rbenv/bin:$PATHexportRBENV_ROOT=/usr/local/rbe
简单代码require'net/http'url=URI.parse('getjson/otherdatahere[link]')req=Net::HTTP::Get.new(url.to_s)res=Net::HTTP.start(url.host,url.port){|http|http.request(req)}putsres.body只是想知道如何在phpcURL中放置身份验证token,我是这样做的 curl_setopt($ch,CURLOPT_HTTPHEADER,array('Authorization:Bearerxxx'));//Bearertokenfora
我正在为我的用户实现一些rubyonrails代码推特内容。我正在创建正确的oauth链接...类似http://twitter.com/oauth/authorize?oauth_token=y2RkuftYAEkbEuIF7zKMuzWN30O2XxM8U9j0egtzKv但在我的测试帐户授予对twitter的访问权限后,它会弹出一个页面,上面写着“您已成功授予对.我不知道用户应该在哪里输入此PIN以及他们为什么必须这样做。我认为这不是必要的步骤。Twitter应该将用户重定向到我在应用程序设置中提供的回调URL。有谁知道为什么会这样?更新我找到了thisarticle声明我需
谁能提供一个使用HTTParty和digestauth的例子?我在网上找不到例子,希望有人能提供一些帮助。谢谢。 最佳答案 您可以在定义类时使用digest_auth方法设置用户名和密码classFooincludeHTTPartydigest_auth'username','password'end 关于ruby-HTTParty摘要认证,我们在StackOverflow上找到一个类似的问题: https://stackoverflow.com/questi
我正在关注Ryan的RailsCast第339集。我已经安装了rbenv并且可以运行ruby-v。我退出了我的session,当我试图返回时(通过root的sudeployer,我得到了这个错误/home/deployer/.rbenv/bin/rbenv:line20:cd:/root:Permissiondenied这是rbenv文件:#!/usr/bin/envbashset-e[-n"$RBENV_DEBUG"]&&set-xresolve_link(){$(type-pgreadlinkreadlink|head-1)"$1"}abs_dirname(){localcwd="
因此,在使用Sphinx时,搜索限制为1000个结果。但是,如果will_paginate生成的结果分页链接超过1000个,请不要考虑这一点,并提供指向超过1000/per_page的页面的链接。设置最大页数或类似内容的明显方法是什么?干杯。 最佳答案 我认为最好将参数:total_entries提交给方法paginate:@posts=Post.paginate(:page=>params[:page],:per_page=>30,:total_entries=>1000)will_paginate将仅为显示1000个结果所需的页
1.回顾.TransportServicepublicclassTransportServiceextendsAbstractLifecycleComponentTransportService:方法:1publicfinalTextendsTransportResponse>voidsendRequest(finalTransport.Connectionconnection,finalStringaction,finalTransportRequestrequest,finalTransportRequestOptionsoptions,TransportResponseHandlerT>
参考文章搭建文章gitte源码在线体验可以注册两个号来测试演示图:一.整体介绍 介绍SignalR一种通讯模型Hub(中心模型,或者叫集线器模型),调用这个模型写好的方法,去发送消息。 内容有: ①:Hub模型的方法介绍 ②:服务器端代码介绍 ③:前端vue3安装并调用后端方法 ④:聊天室样例整体流程:1、进入网站->调用连接SignalR的方法2、与好友发送消息->调用SignalR的自定义方法 前端通过,signalR内置方法.invoke() 去请求接口3、监听接受方法(渲染消息)通过new signalR.HubConnectionBuilder().on
有没有一种有效的方法来做到这一点。我有一个数组a=[1,2,2,3,1,2]我想按升序输出出现的频率。示例[[3,1],[1,2],[2,3]]这是我的ruby代码。b=a.group_by{|x|x}out={}b.eachdo|k,v|out[k]=v.sizeendout.sort_by{|k,v|v} 最佳答案 a=[1,2,2,3,1,2]a.each_with_object(Hash.new(0)){|m,h|h[m]+=1}.sort_by{|k,v|v}#=>[[3,1],[1,2],[2,3]]