做为一名前端开发人员,掌握vue/react/angular等框架已经是必不可少的技能了,我们都知道,vue或react等MVVM框架提倡组件化开发,这样一方面可以提高组件复用性和可扩展性,另一方面也带来了项目开发的灵活性和可维护,方便多人开发协作.接下来文章将介绍如何使用react,开发一个自定义json编辑器组件.我们这里使用了jsoneditor这个第三方库,官方地址: jsoneditor 通过实现一个json在线编辑器,来学习如何一步步封装自己的组件(不限于react,vue,原理类似).
你将学到:
在介绍组件设计思路之前,有必要介绍一下著名的SOLID原则.
SOLID(单一功能、开闭原则、里氏替换、接口隔离以及依赖反转)是由罗伯特·C·马丁提出的面向对象编程和面向对象设计的五个基本原则。利用这些原则,程序员能更容易和高效的开发一个可维护和扩展的系统。 SOLID被典型的应用在测试驱动开发上,并且是敏捷开发以及自适应软件开发的基本原则的重要组成部分。
掌握好这5个原则将有利于我们开发出更优秀的组件,请默默记住.接下来我们来看看json编辑器的设计思路.
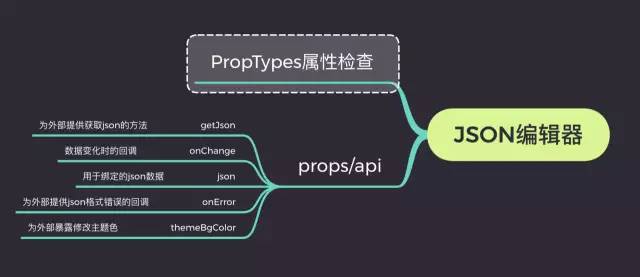
如上所示, 和任何一个输入框一样, 参考antd组件设计方式并兼容antd的form表单, 我们提供了onChange方法.(具体细节下文会详细介绍)
首先利用jsoneditor渲染的基本样式以及API,我们能实现一个基本可用的json编辑器,然后通过对外暴露的json和onChange属性进行数据双向绑定, 通过onError来监控异常或者输入的错误, 通过themeBgColor来修改默认的主题色,通过这几个接口,我们便能完全掌握一个组件的运行情况.
接下来我们就正式开始我们的正文.由于本文的组件是基于react实现的,但是用在vue,angular上,基本模式同样适用.关键就是掌握好不同框架的生命周期.
在学习实现json编辑器组件之前,我们有必要了解一下jsoneditor这个第三方组件的用法与api.
我们先执行npm install安装我们的组件
npm install jsoneditor
其次手动引入样式文件
<link href="jsoneditor/dist/jsoneditor.min.css" rel="stylesheet" type="text/css">
这样,我们就能使用它的api了:
<div id="jsoneditor" style="width: 400px; height: 400px;"></div>
<script>
    // 创建编辑器
    var container = document.getElementById("jsoneditor");
    var editor = new JSONEditor(container);

    // 设置json数据
    function setJSON () {
        var json = {
            "Array": [1, 2, 3],
            "Boolean": true,
            "Null": null,
            "Number": 123,
            "Object": {"a": "b", "c": "d"},
            "String": "Hello World"
        };
        editor.set(json);
    }

    // 获取json数据
    function getJSON() {
        var json = editor.get();
        alert(JSON.stringify(json, null, 2));
    }
</script>
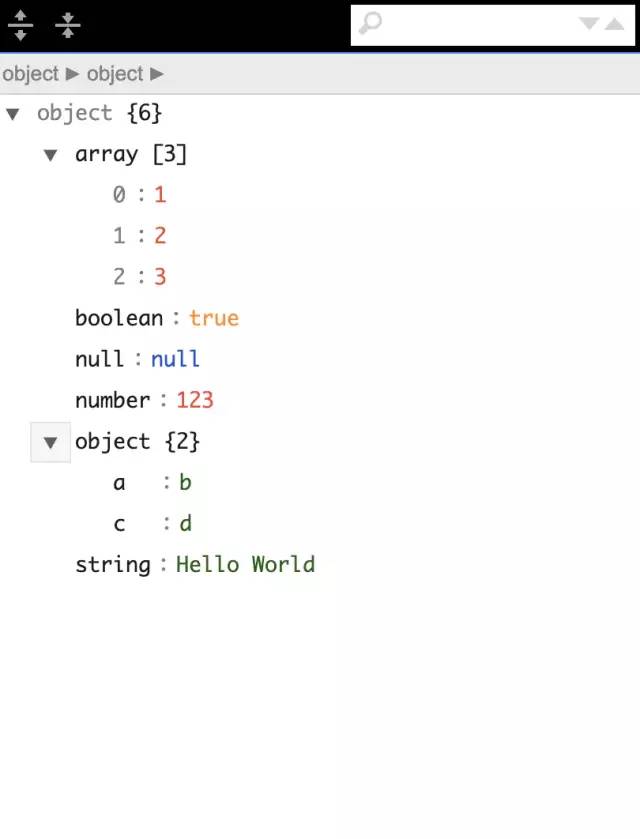
所以你可能看到如下界面:
为了能实现实时预览和编辑,光这样还远远不够,我们还需要进行额外的处理.我们需要用到jsoneditor其他的api和技巧.
基于以上谈论,我们很容易将编辑器封装成react组件, 我们只需要在componentDidMount生命周期里初始化实例即可.react代码可能是这样的:
import React, { PureComponent } from 'react'
import JSONEditor from 'jsoneditor'

import 'jsoneditor/dist/jsoneditor.css'

class JsonEditor extends PureComponent {
  initJsonEditor = () => {
    const options = {
      mode: 'code',
      history: true,
      onChange: this.onChange,
      onValidationError: this.onError
    };

    this.jsoneditor = new JSONEditor(this.container, options)
    this.jsoneditor.set(this.props.value)
  }

  componentDidMount () {
    this.initJsonEditor()
  }

  componentWillUnmount () {
    if (this.jsoneditor) {
      this.jsoneditor.destroy()
    }
  }

  render() {
    return <div className="jsoneditor-react-container" ref={elem => this.container = elem} />
  }
}
export default JsonEditor
至于options里的选项, 我们可以参考jsoneditor的API文档,里面写的很详细, 通过以上代码,我们便可以实现一个基本的react版的json编辑器组件.接下来我们来按照设计思路一步步实现可实时预览的json编辑器组件.
其实这一点很好实现,我们只需要实例化2个编辑器实例,一个用于预览,一个用于编辑就好了.
import React, { PureComponent } from 'react'
import JSONEditor from 'jsoneditor'
import 'jsoneditor/dist/jsoneditor.css'

class JsonEditor extends PureComponent {
  onChange = () => {
    let value = this.jsoneditor.get()
    this.viewJsoneditor.set(value)
  }

  initJsonEditor = () => {
    const options = {
      mode: 'code',
      history: true
    };

    this.jsoneditor = new JSONEditor(this.container, options)
    this.jsoneditor.set(this.props.value)
  }

  initViewJsonEditor = () => {
    const options = {
      mode: 'view'
    };

    this.viewJsoneditor = new JSONEditor(this.viewContainer, options)
    this.viewJsoneditor.set(this.props.value)
  }

  componentDidMount () {
    this.initJsonEditor()
    this.initViewJsonEditor()
  }

  componentDidUpdate() {
    if(this.jsoneditor) {
      this.jsoneditor.update(this.props.value)
      this.viewJsoneditor.update(this.props.value)
    }
  }

  render() {
    return (
      <div className="jsonEditWrap">
        <div className="jsoneditor-react-container" ref={elem => this.container = elem} />
        <div className="jsoneditor-react-container" ref={elem => this.viewContainer = elem} />
      </div>
    );
  }
}

export default JsonEditor
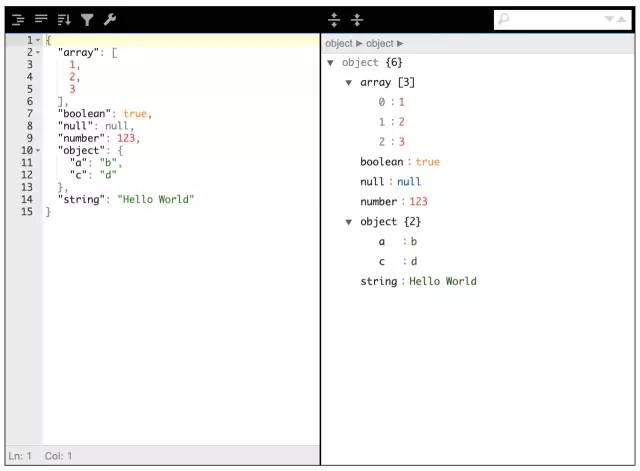
这样,我们便能实现一个初步的可实时预览的编辑器.可能效果长这样:
接近于成熟版,但是还有很多细节要处理.
import React, { PureComponent } from 'react'
import JSONEditor from 'jsoneditor'

import 'jsoneditor/dist/jsoneditor.css'

class JsonEditor extends PureComponent {
  // 监听输入值的变化
  onChange = () => {
    let value = this.jsoneditor.get()
    this.props.onChange && this.props.onChange(value)
    this.viewJsoneditor.set(value)
  }
  // 对外暴露获取编辑器的json数据
  getJson = () => {
    this.props.getJson && this.props.getJson(this.jsoneditor.get())
  }
  // 对外提交错误信息
  onError = (errArr) => {
    this.props.onError && this.props.onError(errArr)
  }

  initJsonEditor = () => {
    const options = {
      mode: 'code',
      history: true,
      onChange: this.onChange,
      onValidationError: this.onError
    };

    this.jsoneditor = new JSONEditor(this.container, options)
    this.jsoneditor.set(this.props.value)
  }

  initViewJsonEditor = () => {
    const options = {
      mode: 'view'
    };

    this.viewJsoneditor = new JSONEditor(this.viewContainer, options)
    this.viewJsoneditor.set(this.props.value)
  }

  componentDidMount () {
    this.initJsonEditor()
    this.initViewJsonEditor()
    // 设置主题色
    this.container.querySelector('.jsoneditor-menu').style.backgroundColor = this.props.themeBgColor
    this.container.querySelector('.jsoneditor').style.border = `thin solid ${this.props.themeBgColor}`
    this.viewContainer.querySelector('.jsoneditor-menu').style.backgroundColor = this.props.themeBgColor
    this.viewContainer.querySelector('.jsoneditor').style.border = `thin solid ${this.props.themeBgColor}`
  }

  componentDidUpdate() {
    if(this.jsoneditor) {
      this.jsoneditor.update(this.props.value)
      this.viewJsoneditor.update(this.props.value)
    }
  }

  render() {
    return (
      <div className="jsonEditWrap">
        <div className="jsoneditor-react-container" ref={elem => this.container = elem} />
        <div className="jsoneditor-react-container" ref={elem => this.viewContainer = elem} />
      </div>
    );
  }
}

export default JsonEditor
通过以上的过程,我们已经完成一大半工作了,剩下的细节和优化工作,比如组件卸载时如何卸载实例, 对组件进行类型检测等,我们继续完成以上问题.
类型检测时react内部支持的,安装react的时候会自动帮我们安装PropTypes,具体用法可参考官网地址propTypes文档,其次我们会在react的componentWillUnmount生命周期中清除编辑器的实例以释放内存.完整代码如下:
import React, { PureComponent } from 'react'
import JSONEditor from 'jsoneditor'
import PropTypes from 'prop-types'
import 'jsoneditor/dist/jsoneditor.css'

/**
 * JsonEditor
 * @param {object} json 用于绑定的json数据
 * @param {func} onChange 变化时的回调
 * @param {func} getJson 为外部提供回去json的方法
 * @param {func} onError 为外部提供json格式错误的回调
 * @param {string} themeBgColor 为外部暴露修改主题色
 */
class JsonEditor extends PureComponent {
  onChange = () => {
    let value = this.jsoneditor.get()
    this.props.onChange && this.props.onChange(value)
    this.viewJsoneditor.set(value)
  }

  getJson = () => {
    this.props.getJson && this.props.getJson(this.jsoneditor.get())
  }

  onError = (errArr) => {
    this.props.onError && this.props.onError(errArr)
  }

  initJsonEditor = () => {
    const options = {
      mode: 'code',
      history: true,
      onChange: this.onChange,
      onValidationError: this.onError
    };

    this.jsoneditor = new JSONEditor(this.container, options)
    this.jsoneditor.set(this.props.value)
  }

  initViewJsonEditor = () => {
    const options = {
      mode: 'view'
    };

    this.viewJsoneditor = new JSONEditor(this.viewContainer, options)
    this.viewJsoneditor.set(this.props.value)
  }

  componentDidMount () {
    this.initJsonEditor()
    this.initViewJsonEditor()
    // 设置主题色
    this.container.querySelector('.jsoneditor-menu').style.backgroundColor = this.props.themeBgColor
    this.container.querySelector('.jsoneditor').style.border = `thin solid ${this.props.themeBgColor}`
    this.viewContainer.querySelector('.jsoneditor-menu').style.backgroundColor = this.props.themeBgColor
    this.viewContainer.querySelector('.jsoneditor').style.border = `thin solid ${this.props.themeBgColor}`
  }

  componentWillUnmount () {
    if (this.jsoneditor) {
      this.jsoneditor.destroy()
      this.viewJsoneditor.destroy()
    }
  }

  componentDidUpdate() {
    if(this.jsoneditor) {
      this.jsoneditor.update(this.props.value)
      this.viewJsoneditor.update(this.props.value)
    }
  }

  render() {
    return (
      <div className="jsonEditWrap">
        <div className="jsoneditor-react-container" ref={elem => this.container = elem} />
        <div className="jsoneditor-react-container" ref={elem => this.viewContainer = elem} />
      </div>
    );
  }
}

JsonEditor.propTypes = {
  json: PropTypes.object,
  onChange: PropTypes.func,
  getJson: PropTypes.func,
  onError: PropTypes.func,
  themeBgColor: PropTypes.string
}

export default JsonEditor
由于组件严格遵守开闭原则,所以我们可以提供更加定制的功能在我们的json编辑器中,已实现不同项目的需求.对于组件开发的健壮性探讨,除了使用propTypes外还可以基于typescript开发,这样适合团队开发组件库或者复杂项目组件的追溯和查错.
使用带有Rails插件的vim,您可以创建一个迁移文件,然后一次性打开该文件吗?textmate也可以这样吗? 最佳答案 你可以使用rails.vim然后做类似的事情::Rgeneratemigratonadd_foo_to_bar插件将打开迁移生成的文件,这正是您想要的。我不能代表textmate。 关于ruby-使用VimRails,您可以创建一个新的迁移文件并一次性打开它吗?,我们在StackOverflow上找到一个类似的问题: https://sta
我需要从一个View访问多个模型。以前,我的links_controller仅用于提供以不同方式排序的链接资源。现在我想包括一个部分(我假设)显示按分数排序的顶级用户(@users=User.all.sort_by(&:score))我知道我可以将此代码插入每个链接操作并从View访问它,但这似乎不是“ruby方式”,我将需要在不久的将来访问更多模型。这可能会变得很脏,是否有针对这种情况的任何技术?注意事项:我认为我的应用程序正朝着单一格式和动态页面内容的方向发展,本质上是一个典型的网络应用程序。我知道before_filter但考虑到我希望应用程序进入的方向,这似乎很麻烦。最终从任何
我想要做的是有2个不同的Controller,client和test_client。客户端Controller已经构建,我想创建一个test_clientController,我可以使用它来玩弄客户端的UI并根据需要进行调整。我主要是想绕过我在客户端中内置的验证及其对加载数据的管理Controller的依赖。所以我希望test_clientController加载示例数据集,然后呈现客户端Controller的索引View,以便我可以调整客户端UI。就是这样。我在test_clients索引方法中试过这个:classTestClientdefindexrender:template=>
在我的Controller中,我通过以下方式在我的index方法中支持HTML和JSON:respond_todo|format|format.htmlformat.json{renderjson:@user}end在浏览器中拉起它时,它会自然地以HTML呈现。但是,当我对/user资源进行内容类型为application/json的curl调用时(因为它是索引方法),我仍然将HTML作为响应。如何获取JSON作为响应?我还需要说明什么? 最佳答案 您应该将.json附加到请求的url,提供的格式在routes.rb的路径中定义。这
如果您尝试在Ruby中的nil对象上调用方法,则会出现NoMethodError异常并显示消息:"undefinedmethod‘...’fornil:NilClass"然而,有一个tryRails中的方法,如果它被发送到一个nil对象,它只返回nil:require'rubygems'require'active_support/all'nil.try(:nonexisting_method)#noNoMethodErrorexceptionanymore那么try如何在内部工作以防止该异常? 最佳答案 像Ruby中的所有其他对象
关闭。这个问题需要detailsorclarity.它目前不接受答案。想改进这个问题吗?通过editingthispost添加细节并澄清问题.关闭8年前。Improvethisquestion为什么SecureRandom.uuid创建一个唯一的字符串?SecureRandom.uuid#=>"35cb4e30-54e1-49f9-b5ce-4134799eb2c0"SecureRandom.uuid方法创建的字符串从不重复?
我有一个正在构建的应用程序,我需要一个模型来创建另一个模型的实例。我希望每辆车都有4个轮胎。汽车模型classCar轮胎模型classTire但是,在make_tires内部有一个错误,如果我为Tire尝试它,则没有用于创建或新建的activerecord方法。当我检查轮胎时,它没有这些方法。我该如何补救?错误是这样的:未定义的方法'create'forActiveRecord::AttributeMethods::Serialization::Tire::Module我测试了两个环境:测试和开发,它们都因相同的错误而失败。 最佳答案
我想在Ruby中创建一个用于开发目的的极其简单的Web服务器(不,不想使用现成的解决方案)。代码如下:#!/usr/bin/rubyrequire'socket'server=TCPServer.new('127.0.0.1',8080)whileconnection=server.acceptheaders=[]length=0whileline=connection.getsheaders想法是从命令行运行这个脚本,提供另一个脚本,它将在其标准输入上获取请求,并在其标准输出上返回完整的响应。到目前为止一切顺利,但事实证明这真的很脆弱,因为它在第二个请求上中断并出现错误:/usr/b
我想让一个yaml对象引用另一个,如下所示:intro:"Hello,dearuser."registration:$introThanksforregistering!new_message:$introYouhaveanewmessage!上面的语法只是它如何工作的一个例子(这也是它在thiscpanmodule中的工作方式。)我正在使用标准的rubyyaml解析器。这可能吗? 最佳答案 一些yaml对象确实引用了其他对象:irb>require'yaml'#=>trueirb>str="hello"#=>"hello"ir
我的问题的一个例子是体育游戏。一场体育比赛有两支球队,一支主队和一支客队。我的事件记录模型如下:classTeam"Team"has_one:away_team,:class_name=>"Team"end我希望能够通过游戏访问一个团队,例如:Game.find(1).home_team但我收到一个单元化常量错误:Game::team。谁能告诉我我做错了什么?谢谢, 最佳答案 如果Gamehas_one:team那么Rails假设您的teams表有一个game_id列。不过,您想要的是games表有一个team_id列,在这种情况下