目录
三、SpringBoot整合微服务&gateway&nginx
1.基于maven方式创建子模块zmall-generator,用于结合mybatis-plus生成代码。

1.在公共模块zmall-common中注释掉mybatis的依赖引入,改换成mybatis-plus依赖引入
<!-- mybatis plus依赖 -->
<dependency>
    <groupId>com.baomidou</groupId>
    <artifactId>mybatis-plus-boot-starter</artifactId>
    <version>3.4.0</version>
</dependency>
2.在zmall-generator中引入mybatis-plus-generator依赖。该模块专用于mybatis-plus的代码生成,所以单独在此引入该依赖即可。
<!-- mybatis-plus-generator依赖 -->
<dependency>
    <groupId>com.baomidou</groupId>
    <artifactId>mybatis-plus-generator</artifactId>
    <version>3.4.0</version>
</dependency>
3. 在src/main/resources下创建templates目录,并导入mybatis-generator生成代码模板页
4.在src/main/java下创建包com.zking.zmall,并导入generator下的CodeGenerator类用于代码生成
5.修改CodeGenerator类基本生成参数,并生成代码
//数据库连接参数
public static String driver = "com.mysql.jdbc.Driver";
public static String url = "jdbc:mysql://localhost:3306/zmall?characterEncoding=utf8&useSSL=false&serverTimezone=Asia/Shanghai&rewriteBatchedStatements=true";
public static String username="****";
public static String password="****";
//父级别包名称
public static String parentPackage = "com.zking.zmall";
//项目名设置(如果是SpringCloud项目则需要设置,其他为""即可)
public static String projectName="/zmall-generator";
//代码生成的目标路径
public static String generateTo = "/src/main/java";
//mapper.xml的生成路径
public static String mapperXmlPath = "/src/main/resources/mapper";
//控制器的公共基类,用于抽象控制器的公共方法,null值表示没有父类
public static String baseControllerClassName ;
//业务层的公共基类,用于抽象公共方法
public static String baseServiceClassName ;
//作者名
public static String author = "zking";
//模块名称,用于组成包名
public static String modelName = "model";
注意:
修改数据库连接URL中的数据库名、数据库账号和密码;
修改父级别包名称
修改项目名,如果是SpringCloud项目则修改,不是则默认“”
1.基于Spring Initializr方式创建商品服务模块zmall-product
2.在主模块pom.xml中加入商品服务子模块zmall-product
<modules>
    <module>zmall-common</module>
    <module>zmall-user</module>
    <module>zmall-generator</module>
    <module>zmall-product</module>
</modules>
3.配置商品服务子模块zmall-product的application.yml配置文件
server:
  port: 8020
spring:
  application:
    name: zmall-product
  datasource:
    #type连接池类型 DBCP,C3P0,Hikari,Druid,默认为Hikari
    type: com.zaxxer.hikari.HikariDataSource
    driver-class-name: com.mysql.jdbc.Driver
    url: jdbc:mysql://localhost:3306/zmall?characterEncoding=utf8&useSSL=false&serverTimezone=Asia/Shanghai&rewriteBatchedStatements=true
    username: ****
    password: ****
  freemarker:
    suffix: .html
    template-loader-path: classpath:/templates/
#mybatis-plus配置
mybatis-plus:
  #所对应的 XML 文件位置
  mapper-locations: classpath*:/mapper/*Mapper.xml
  #别名包扫描路径
  type-aliases-package: com.zking.zmall.model
  configuration:
    #驼峰命名规则
    map-underscore-to-camel-case: true
#日志配置
logging:
  level:
    com.zking.zmall.mapper: debug
4.在商品服务子模块中启动类上添加
@SpringBootApplication
@MapperScan({"com.zking.zmall.mapper"})
public class ZmallProductApplication {
    public static void main(String[] args) {
        SpringApplication.run(ZmallProductApplication.class, args);
    }
}
5.将公共子模块中生成的service层代码复制到商品服务子模块zmall-product中,并删除掉非商品相关的service接口及实现类

6.创建junit实现接口测试
@RunWith(SpringJUnit4ClassRunner.class)
@SpringBootTest
public class ProductServiceImplTest {
@Autowired
private IProductService productService;
@Before
public void setUp() throws Exception {
}
@After
public void tearDown() throws Exception {
}
@Test
public void queryProduct() {
List<Product> list = productService.list();
list.forEach(System.out::println);
}
}1.在公共模块zmall-common中引入freemarker依赖
<dependency>
    <groupId>org.springframework.boot</groupId>
    <artifactId>spring-boot-starter-freemarker</artifactId>
</dependency>
2.在商品子模块zmall-product中添加首页和商品详情页面及公共资源(js/css/images)
将资料目录中的《易买网网页素材.rar》解压后,将其中Index.html、Product.html和js/css/images等等添加到项目的templates和static目录下,最好请将Index.html、Product.html页面首字母改成小写
导入资料目录中的common目录到项目的templates目录下
将页面中的头部申明<!DOCTYPE html ....>修改成<!DOCTYPE html>(支持H5风格)
在页面中通过<#include>指令引入common目录中的head.html
3.创建ProductController定义请求方法
@Controller
public class ProductController {

    @Autowired
    private IProductService productService;

    @RequestMapping("/index.html")
    public String index(Model model){
        //按照商品的销量降序排序获取销量排名Top5的商品
        List<Product> products = productService.list(new QueryWrapper<Product>()
                .orderByDesc("hot")
                .last("limit 5"));
        model.addAttribute("top5",products);
        return "index";
    }

    @RequestMapping("/product.html")
    public String detail(Model model,Integer id){
        //根据商品ID查询商品详情信息
        Product product = productService.getById(id);
        model.addAttribute("product",product);
        return "product";
    }
}
4.在index.html中绑定热门数据和product.html中绑定商品详情数据
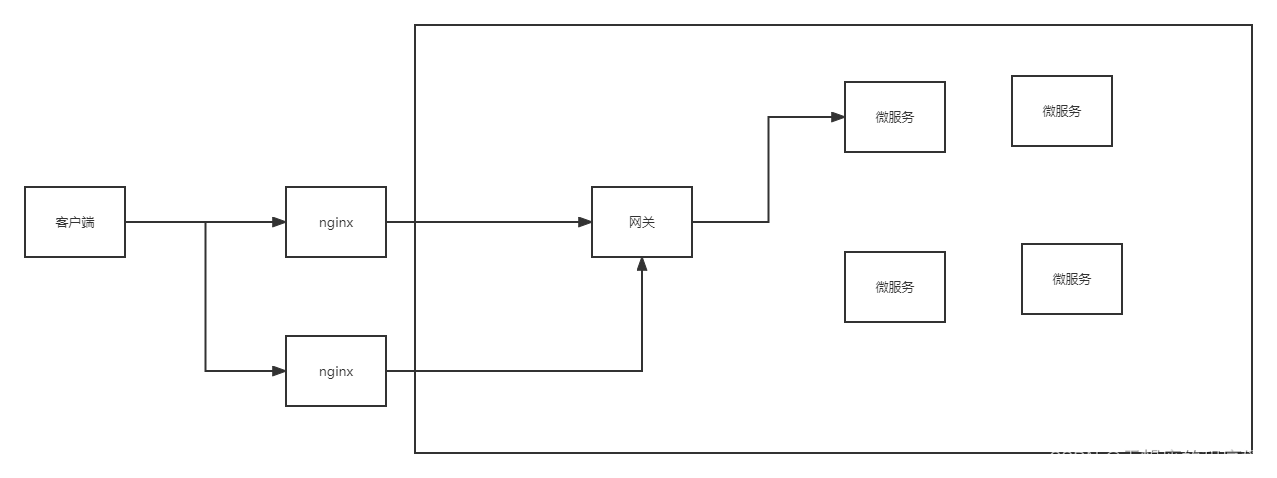
请求链路要求:客户端发送请求先经过nginx,再用nginx转至内部访问网关gateway,最后由网关服务的路由规则转发到微服务的内部服务。
在公共模块zmall-common中导入微服务相关依赖
<!--nacos客户端-->
<dependency>
    <groupId>com.alibaba.cloud</groupId>
    <artifactId>spring-cloud-starter-alibaba-nacos-discovery</artifactId>
</dependency>

<!--fegin组件-->
<dependency>
    <groupId>org.springframework.cloud</groupId>
    <artifactId>spring-cloud-starter-openfeign</artifactId>
</dependency>

<!--nacos配置中心-->
<dependency>
    <groupId>com.alibaba.cloud</groupId>
    <artifactId>spring-cloud-starter-alibaba-nacos-config</artifactId>
</dependency>
配置商品服务模块zmall-product的application.yml文件
spring:
  application:
    name: zmall-product
  cloud:
    nacos:
      discovery:
        server-addr: localhost:8848
修改启动类,向nacos进行注册
@EnableDiscoveryClient
@SpringBootApplication
@MapperScan({"com.zking.zmall.mapper"})
public class ZmallProductApplication {

    public static void main(String[] args) {
        SpringApplication.run(ZmallProductApplication.class, args);
    }
}1.基于Spring initializr方式创建网关模块gateway
2.配置pom.xml添加nacos和gateway的依赖
<modelVersion>4.0.0</modelVersion>
<parent>
    <groupId>com.zking</groupId>
    <artifactId>zmall</artifactId>
    <version>1.0-SNAPSHOT</version>
</parent>
<artifactId>zmall-gateway</artifactId>
<dependencies>
    <!--gateway 注意 此模式不能引入starter-web -->
    <dependency>
        <groupId>org.springframework.cloud</groupId>
        <artifactId>spring-cloud-starter-gateway</artifactId>
    </dependency>

    <!--nacos客户端-->
    <dependency>
        <groupId>com.alibaba.cloud</groupId>
        <artifactId>spring-cloud-starter-alibaba-nacos-discovery</artifactId>
    </dependency>

    <dependency>
        <groupId>org.projectlombok</groupId>
        <artifactId>lombok</artifactId>
    </dependency>

    <dependency>
        <groupId>org.apache.commons</groupId>
        <artifactId>commons-lang3</artifactId>
    </dependency>
</dependencies>
3.修改启动类,向nacos进行注册
@EnableDiscoveryClient
@SpringBootApplication
public class ZmallGatewayApplication {
    public static void main(String[] args) {
        SpringApplication.run(ZmallGatewayApplication.class, args);
    }
}
4.配置application.yml设置gateway路由转发规则
server:
  port: 8000
spring:
  application:
    name: zmall-gateway
  cloud:
    nacos:
      discovery:
        server-addr: localhost:8848
    gateway:
      routes:
        - id: product_route
          uri: lb://zmall-product # lb指的是从nacos中按照名称获取微服务,并遵循负载均衡策略
          predicates:
            - Path=/product-serv/**
          filters:
            - StripPrefix=1
5.将易买网网页素材中的公共静态资源js/css/images复制到gateway网关服务中
这里请注意了,之前在商品服务模块zmall-product中已经配置了易买网的静态资源,为什么还要在gateway网关服务中再配置一次呢?这是因为当请求经过gateway网关服务后会进行断言条件匹配和条件路径截取等操作,从而导致gateway网关路由转发后静态资源失效404的问题,所以特此在gateway网关服务中也配置一次易买网网页素材中的公共静态资源js/css/images,确保能正常访问。
解决方案:(此处将在第三次课解决,使用nginx动静分离方式实现) 配置静态资源访问服务器,将各个微服务模块中的静态访问资源迁移到静态资源访问服务器中,然后通过http方式访问即可。
1.直接双击exe文件即可安装SwitchHosts
2.进入C:\Windows\System32\drivers\etc目录,设置hosts文件访问权限并取消只读模式
3.打开SwitchHosts设置一级域名

1.解压nginx-1.18.0.zip至任意目录
2.进入conf目录,并修改nginx.conf配置文件
server
{
    listen 80;
    server_name zmall.com;
    proxy_redirect off;
    proxy_set_header Host $host;
    proxy_set_header X-Real-IP $remote_addr;
    proxy_set_header X-Forwarded-For $proxy_add_x_forwarded_for;

    location / {
    	proxy_pass http://127.0.0.1:8000/;
    }
}
3.最后运行nginx根目录下的nginx.exe启动nginx
单独访问商品服务:http://localhost:8020/index.html
通过gateway访问:http://localhost:8000/product-serv/index.html
通过nginx访问:http://zmall.com/product-serv/index.html
这篇文章是继上一篇文章“Observability:从零开始创建Java微服务并监控它(一)”的续篇。在上一篇文章中,我们讲述了如何创建一个Javaweb应用,并使用Filebeat来收集应用所生成的日志。在今天的文章中,我来详述如何收集应用的指标,使用APM来监控应用并监督web服务的在线情况。源码可以在地址 https://github.com/liu-xiao-guo/java_observability 进行下载。摄入指标指标被视为可以随时更改的时间点值。当前请求的数量可以改变任何毫秒。你可能有1000个请求的峰值,然后一切都回到一个请求。这也意味着这些指标可能不准确,你还想提取最小/
作为新的阿里云用户,您可以50免费试用多种优惠,价值高达1,700美元(或8,500美元)。这将让您了解和体验阿里云平台上提供的一系列产品和服务。如果您以个人身份注册免费试用,您将获得价值1,700美元的优惠。但是,如果您是注册公司,您可以选择企业免费试用,提交基本信息通过企业实名注册验证,即可开始价值$8,500的免费试用!本教程介绍了如何设置您的帐户并使用您的免费试用版。关于免费试用在我们开始此试用之前,您还必须遵守以下条款和条件才能访问您的免费试用:只有在一年内创建的账户才有资格获得阿里云免费试用。通过此免费试用优惠,用户可以免费试用免费试用活动页面上列出的每种产品一次。如果您有多个帐
我在我的项目中有一个用户和一个管理员角色。我使用Devise创建了身份验证。在我的管理员角色中,我没有任何确认。在我的用户模型中,我有以下内容:devise:database_authenticatable,:confirmable,:recoverable,:rememberable,:trackable,:validatable,:timeoutable,:registerable#Setupaccessible(orprotected)attributesforyourmodelattr_accessible:email,:username,:prename,:surname,:
我的Rails应用程序中安装了carrierwave。但是,当用户上传多页pdf时,我只希望应用程序获取文档中的第一页并将其转换为jpeg。这可能吗?用什么命令?这是我的uploader。#encoding:utf-8classImageUploader[200,300]##defscale(width,height)##dosomething#end#Createdifferentversionsofyouruploadedfiles:version:thumbdoprocess:resize_to_fill=>[150,210]process:convert=>:jpgdefful
有没有办法跳过CSV文件的第一行,让第二行作为标题?我有一个CSV文件,第一行是日期,第二行是标题,所以我需要能够在遍历它时跳过第一行。我尝试使用slice但它会将CSV转换为数组,我真的很想将其读取为CSV,以便我可以利用header。 最佳答案 根据您的数据,您可以使用另一种方法和skip_lines-option此示例跳过所有以#开头的行require'csv'CSV.parse(DATA.read,:col_sep=>';',:headers=>true,:skip_lines=>/^#/#Markcomments!)do|
我的任务是从数组中选择最高和最低的数字。我想我很清楚我想做什么,但只是努力以正确的格式访问信息以满足通过标准。defhigh_and_low(numbers)array=numbers.split("").map!{|x|x.to_i}array.sort!{|a,b|ba}putsarray[0,-1]end数字可能看起来像"80917234100",要通过,我需要输出"9234"。我正在尝试putsarray.first.last,但一直无法弄明白。 最佳答案 有Array#minmax完全满足您需要的方法:array=[80,
或者好像我必须自己写方法?(保持DHA不变):ruby-1.9.2-p180:001>s='omega-3(DHA)'=>"omega-3(DHA)"ruby-1.9.2-p180:002>s.capitalize=>"Omega-3(dha)"ruby-1.9.2-p180:003>s.titleize=>"Omega3(Dha)"ruby-1.9.2-p180:005>s[0].upcase+s[1..-1]=>"Omega-3(DHA)" 最佳答案 如果我的回答只是垃圾,我深表歉意(我不做ruby)。但我相信我已经为您找到了答
完成这个有困难。我正在使用seed.rb+factory_girl来使用rakedb:seed填充数据库。(我知道固定装置存在,但我想以这种方式完成,这只是一个示例,数据库将填充复杂的关联对象。)我的种子.rb:require'factory_girl_rails'["QM","CDC","SI","QS"].eachdo|n|FactoryGirl.create(:grau,nome:n)end还有我的/factories/graus.rbFactoryGirl.definedofactory:graudonomeendend但是当我运行时:rakedb:seed我得到:rakeab
我有这个字符串:auteur="comtedeFlandreetHainaut,Baudouin,Jacques,Thierry"我想删除第一个逗号之前的所有内容,即在这种情况下保留“Baudouin,Jacques,Thierry”试过这个:nom=auteur.gsub(/.*,/,'')但这会删除最后一个逗号之前的每个逗号,只保留“Thierry”。 最佳答案 auteur.partition(",").last#=>"Baudouin,Jacques,Thierry" 关于rub
我有一个以时间戳为键的哈希。hash={"2016-05-31T22:30:58+02:00"=>{"path"=>"/","method"=>"GET"},"2016-05-31T22:31:23+02:00"=>{"path"=>"/tour","method"=>"GET"},"2016-05-31T22:31:05+02:00"=>{"path"=>"/contact_us","method"=>"GET"}}我订购了这个系列并得到了第一双这样的:hash.sort_by{|k,_|k}.first.first但是我该如何删除它呢?删除方法requiresyou知道key的准确