
哈喽~大家好,这篇看看Springboot 整合与文件配置。
🥇个人主页:个人主页
🥈 系列专栏:【Java框架】
🥉与这篇相关的文章:
【JAVAEE框架】MyBatis与Spring的整合(上) 【JAVAEE框架】MyBatis与Spring的整合(上)_程序猿追的博客-CSDN博客 【JAVAEE框架】浅谈 AOP 及代码实现 【JAVAEE框架】浅谈 AOP 及代码实现_程序猿追的博客-CSDN博客 【JAVAEE框架】浅谈 Spring 框架的两大核心思想 AOP 与 IOP 【JAVAEE框架】浅谈 Spring 框架的两大核心思想 AOP 与 IOP_程序猿追的博客-CSDN博客
目录
前篇文字大家已经感受了
SpringBoot起步项目,回过头看看SpringBoot主要作用是什么,就是简化Spring的搭建过程和开发过程。原始
Spring环境搭建和开发存在以下问题
配置繁琐
依赖设置繁琐
SpringBoot程序优点恰巧就是针对Spring的缺点
自动配置。这个是用来解决
Spring程序配置繁琐的问题起步依赖。这个是用来解决
Spring程序依赖设置繁琐的问题辅助功能(内置服务器,...)。我们在启动
SpringBoot程序时既没有使用本地的tomcat也没有使用tomcat插件,而是使用SpringBoot内置的服务器。
接下来我们来说一下 SpringBoot 的起步依赖
<?xml version="1.0" encoding="UTF-8"?>
<project xmlns="http://maven.apache.org/POM/4.0.0" xmlns:xsi="http://www.w3.org/2001/XMLSchema-instance"
xsi:schemaLocation="http://maven.apache.org/POM/4.0.0 https://maven.apache.org/xsd/maven-4.0.0.xsd">
<modelVersion>4.0.0</modelVersion>
<parent>
<groupId>org.springframework.boot</groupId>
<artifactId>spring-boot-starter-parent</artifactId>
<version>2.7.4</version>
<relativePath/> <!-- lookup parent from repository -->
</parent>
<groupId>com.itxzw</groupId>
<artifactId>day03_SpringBoot01</artifactId>
<version>0.0.1-SNAPSHOT</version>
<name>day03_SpringBoot01</name>
<description>day03_SpringBoot01</description>
<properties>
<java.version>1.8</java.version>
</properties>
<dependencies>
<dependency>
<groupId>org.springframework.boot</groupId>
<artifactId>spring-boot-starter-web</artifactId>
</dependency>
<dependency>
<groupId>mysql</groupId>
<artifactId>mysql-connector-java</artifactId>
<scope>runtime</scope>
</dependency>
<dependency>
<groupId>org.projectlombok</groupId>
<artifactId>lombok</artifactId>
<optional>true</optional>
</dependency>
<dependency>
<groupId>org.springframework.boot</groupId>
<artifactId>spring-boot-starter-test</artifactId>
<scope>test</scope>
</dependency>
<dependency>
<groupId>com.alibaba</groupId>
<artifactId>druid-spring-boot-starter</artifactId>
<version>1.2.11</version>
</dependency>
<dependency>
<groupId>org.mybatis.spring.boot</groupId>
<artifactId>mybatis-spring-boot-starter</artifactId>
<version>2.2.2</version>
</dependency>
<dependency>
<groupId>com.baomidou</groupId>
<artifactId>mybatis-plus-boot-starter</artifactId>
<version>3.5.0</version>
</dependency>
</dependencies>
<build>
<plugins>
<plugin>
<groupId>org.springframework.boot</groupId>
<artifactId>spring-boot-maven-plugin</artifactId>
<configuration>
<excludes>
<exclude>
<groupId>org.projectlombok</groupId>
<artifactId>lombok</artifactId>
</exclude>
</excludes>
</configuration>
</plugin>
</plugins>
</build>
</project>parent 作用 定义了一个父标签spring-boot-dependencies,这个里边定义了依赖的版本,也正是因为继承了这个依赖,所以我们在写依赖时才不需要写版本号 使用默认编码格式为 UTF-8 定义了 Java 编译版本为 1.8 定义了针对 application.properties 和 application.yml 的资源过滤,包括通过 profile 定义的不同环境的配置文件,例如 application-dev.properties 和 application-dev.yml 执行打包操作的配置 自动化的资源过滤 自动化的插件配置
spring-boot-starter-web是一个依赖库,Spring Boot 是在 Spring 的基础上创建的一个开原框架,它提供了 spring-boot-starter-web (web场景启动器)来为web开发予以支持。spring-boot-starter-web 为什么提供了嵌入的Servlet容器以及SpringMVC提供了大量自动配置,可以适用于大多数web开发场景。
只要我们在Spring Boot 项目中的 pom.xml 中引入了spring-boot-starter-web依赖,即使不进行任何配置,也可以使用Spring MVC 进行 Web 开发。
支持常规的测试依赖,包括JUnit、Hamcrest、Mockito以及spring-test模块。
更详细的可以看看这位大佬的,[SpringBoot 之Spring Boot Starter依赖包及作用 - 方东信 - 博客园]
在dependencies里面发现了有的依赖有版本号,有些却没有,这是为什么呢?
在 Spring提供的场景启动器是以 spring-boot-starter-** 这样的形式(xx就是要引入的依赖名,不需要版本号(自动装配))
eg:
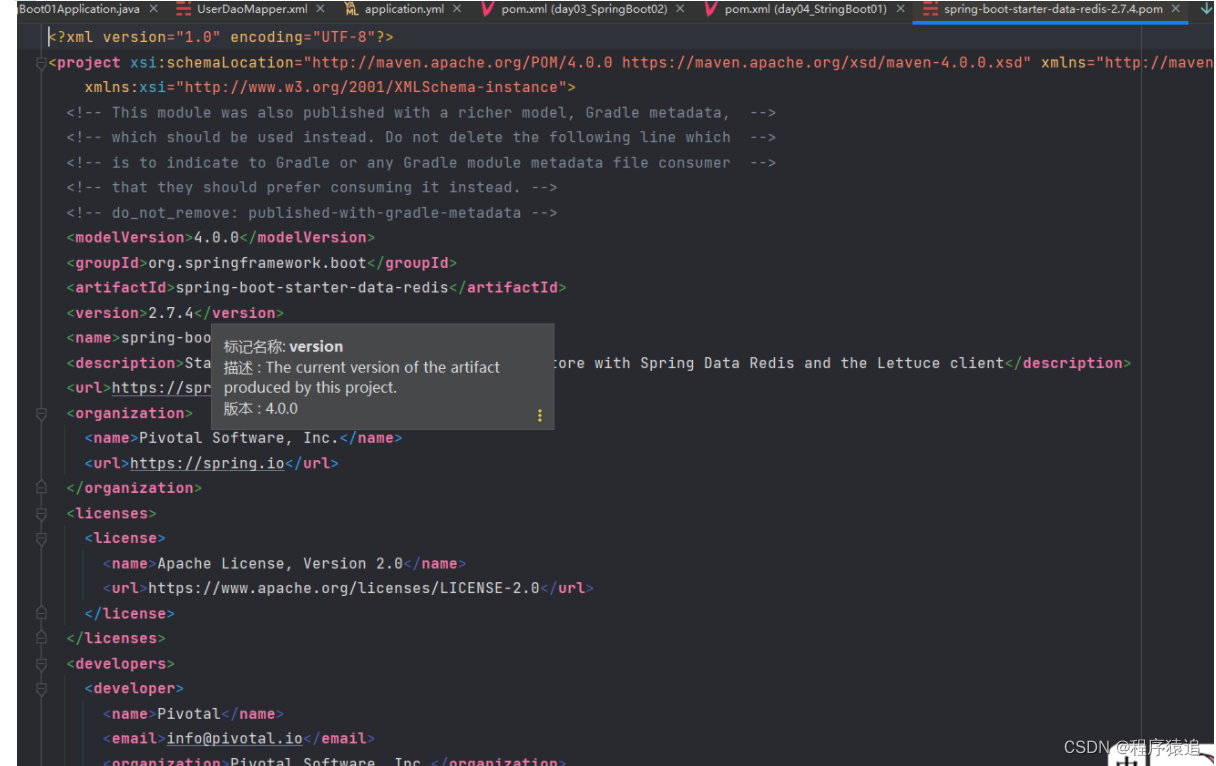
这个redis的依赖
<dependency>
    <groupId>org.springframework.boot</groupId>
    <artifactId>spring-boot-starter-data-redis</artifactId>
</dependency>
按ctrl点击 spring-boot-starter-data-redis 进去,发现里面有<version>2.7.4</version>,真相大白
而第三方框架场景启动器是以 **-spring-boot-starter 这样的形式
eg:
<dependency>
    <groupId>com.alibaba</groupId>
    <artifactId>druid-spring-boot-starter</artifactId>
    <version>1.2.11</version>
</dependency>
application文件配置我们现在启动服务器默认的端口号是 8080,访问路径可以书写为
http://localhost:8080/books/1
在线上环境我们还是希望将端口号改为 80,这样在访问的时候就可以不写端口号了,如下
http://localhost/books/1
而 SpringBoot 程序如何修改呢?SpringBoot 提供了多种属性配置方式
application.properties
server.port=80
而 SpringBoot 程序如何修改呢?SpringBoot 提供了多种属性配置方式
application.properties
server.port=80
application.yml
server:
    port: 81
application.yaml
server:
    port: 82
注意:SpringBoot 程序的配置文件名必须是 application ,只是后缀名不同而已。
static目录 static目录是用来保存静态文件的目录, 比如HTML, JS, CSS, 图片等, 是不需要服务器进行数据绑定的页面. static目录下的文件, SpringBoot帮我们做了静态路径自动解析. 比如: 我写了一个/static/hello.html 在浏览器上访问: localhost/hello.html 即可访问到。
template目录 template目录是用来保存动态模版文件的目录, 比如Freemarker, JSP, Thymeleaf等需要服务器动态渲染数据的文件. 由于页面渲染需要服务器中的数据, 所以该文件必须经过Controller控制器进行Model数据绑定后, 由服务器进行跳转. 所以直接访问是无意义的, 也访问不到.
比如: 我写了一个/templates/hello.ftl 在浏览器上访问: localhost/hello.ftl是访问不到的, 需要访问Controller的路径, 才能访问到页面 (由Controller进行跳转, 也就说明数据已经绑定成功)
server:
  port: 8080

spring:
  datasource:
    driver-class-name: com.mysql.cj.jdbc.Driver
    url: jdbc:mysql://localhost:3306/db1?useUnicode=true&characterEncoding=utf8&useSSL=true&serverTimezone=Asia/Shanghai
    username: root
    password: 123456
    type: com.alibaba.druid.pool.DruidDataSource

mybatis-plus:
  configuration:
    cache-enabled: true
    jdbc-type-for-null: null
    auto-mapping-behavior: full
  type-aliases-package: com.itxzw.*.model
  mapper-locations: classpath:mapper/*.xml
SmbmsUser 与 UserCondition
package com.itxzw.user.model;

import lombok.AllArgsConstructor;
import lombok.Data;
import lombok.NoArgsConstructor;
import lombok.ToString;
import org.springframework.format.annotation.DateTimeFormat;

import java.util.Date;

@Data
@ToString
@AllArgsConstructor
@NoArgsConstructor

// 用户实体类
public class SmbmsUser {

    private String id;
    private String usercode;
    private String username;
    private String userpassword;
    private long gender;
//    @JSONField(format = "yyyy-MM-dd")
//    @DateTimeFormat(pattern = "yyyy-MM-dd")
    private Date birthday;
    private String phone;
    private String address;
    private String userrole;
    private String createdby;
    private Date creationdate;
    private String modifyby;
    private Date modifydate;


}
package com.itxzw.user.model;
import lombok.AllArgsConstructor;
import lombok.Data;
import lombok.NoArgsConstructor;
import lombok.ToString;
@Data
@ToString
@AllArgsConstructor
@NoArgsConstructor
// 对用户操作的实体类
public class UserCondition {
private String id;
private String usercode;
private String username;
private String userpassword;
private String un;
private String gender;
private String userrole;
private String createdby;
}
@Controller
@RequestMapping("/user")
public class UserAction{
@Autowired
private IUserService userService;
public IUserService getUserService() {
return userService;
}
public void setUserService(IUserService userService) {
this.userService = userService;
}
// 查看所有用户信息
@RequestMapping("/userList")
@ResponseBody
public List<SmbmsUser> userList(){
UserCondition coon = new UserCondition();
List<SmbmsUser> userListByCondition = userService.userListCondition(coon);
return userListByCondition;
}
// 查看所有用户信息,做跳转
@RequestMapping("/userView")
public String userView(Model model){
return "userlist";
}
}
这里的 访问 /userView 请求,return 跳转到 template 目录下的 名叫 userlist 这个的文件
@Service
public class UserService implements IUserService {
@Autowired
private IUserDao userDao;
public IUserDao getUserDao() {
return userDao;
}
public void setUserDao(IUserDao userDao) {
this.userDao = userDao;
}
public List<SmbmsUser> userListCondition(UserCondition conn) {
return userDao.userListCondition(conn);
}
}
@Mapper
public interface IUserDao {
// 查询所有用户信息
public List<SmbmsUser> userListCondition(UserCondition conn);
}
<?xml version="1.0" encoding="UTF-8" ?>
<!DOCTYPE mapper
PUBLIC "-//mybatis.org//DTD Mapper 3.0//EN"
"http://mybatis.org/dtd/mybatis-3-mapper.dtd">
<mapper namespace="com.itxzw.user.dao.IUserDao">
<select id="userListCondition" parameterType="userCondition" resultType="smbmsUser">
<![CDATA[
select
u.ID,
u.USERCODE,
u.USERNAME,
u.USERPASSWORD,
u.GENDER,
u.BIRTHDAY,
u.PHONE,
u.ADDRESS,
u.userrole,
u.CREATEDBY,
u.CREATIONDATE,
u.MODIFYBY,
u.MODIFYDATE
from SMBMS_USER u
]]>
</select>
</mapper>
或者这里可以不用 xml,直接用mybatis plus (mybatis plus 篇下篇更新)。
访问地址 : http://localhost:8080/user/userList

扩:前几天有小伙伴问浏览器是什么插件?
答:csdn 官方的浏览器助手
不积跬步无以至千里,趁年轻,使劲拼,给未来的自己一个交代!向着明天更好的自己前进吧!
我有一个Ruby程序,它使用rubyzip压缩XML文件的目录树。gem。我的问题是文件开始变得很重,我想提高压缩级别,因为压缩时间不是问题。我在rubyzipdocumentation中找不到一种为创建的ZIP文件指定压缩级别的方法。有人知道如何更改此设置吗?是否有另一个允许指定压缩级别的Ruby库? 最佳答案 这是我通过查看rubyzip内部创建的代码。level=Zlib::BEST_COMPRESSIONZip::ZipOutputStream.open(zip_file)do|zip|Dir.glob("**/*")d
我试图在一个项目中使用rake,如果我把所有东西都放到Rakefile中,它会很大并且很难读取/找到东西,所以我试着将每个命名空间放在lib/rake中它自己的文件中,我添加了这个到我的rake文件的顶部:Dir['#{File.dirname(__FILE__)}/lib/rake/*.rake'].map{|f|requiref}它加载文件没问题,但没有任务。我现在只有一个.rake文件作为测试,名为“servers.rake”,它看起来像这样:namespace:serverdotask:testdoputs"test"endend所以当我运行rakeserver:testid时
我的目标是转换表单输入,例如“100兆字节”或“1GB”,并将其转换为我可以存储在数据库中的文件大小(以千字节为单位)。目前,我有这个:defquota_convert@regex=/([0-9]+)(.*)s/@sizes=%w{kilobytemegabytegigabyte}m=self.quota.match(@regex)if@sizes.include?m[2]eval("self.quota=#{m[1]}.#{m[2]}")endend这有效,但前提是输入是倍数(“gigabytes”,而不是“gigabyte”)并且由于使用了eval看起来疯狂不安全。所以,功能正常,
Rails2.3可以选择随时使用RouteSet#add_configuration_file添加更多路由。是否可以在Rails3项目中做同样的事情? 最佳答案 在config/application.rb中:config.paths.config.routes在Rails3.2(也可能是Rails3.1)中,使用:config.paths["config/routes"] 关于ruby-on-rails-Rails3中的多个路由文件,我们在StackOverflow上找到一个类似的问题
对于具有离线功能的智能手机应用程序,我正在为Xml文件创建单向文本同步。我希望我的服务器将增量/差异(例如GNU差异补丁)发送到目标设备。这是计划:Time=0Server:hasversion_1ofXmlfile(~800kiB)Client:hasversion_1ofXmlfile(~800kiB)Time=1Server:hasversion_1andversion_2ofXmlfile(each~800kiB)computesdeltaoftheseversions(=patch)(~10kiB)sendspatchtoClient(~10kiBtransferred)Cl
我正在寻找执行以下操作的正确语法(在Perl、Shell或Ruby中):#variabletoaccessthedatalinesappendedasafileEND_OF_SCRIPT_MARKERrawdatastartshereanditcontinues. 最佳答案 Perl用__DATA__做这个:#!/usr/bin/perlusestrict;usewarnings;while(){print;}__DATA__Texttoprintgoeshere 关于ruby-如何将脚
使用带有Rails插件的vim,您可以创建一个迁移文件,然后一次性打开该文件吗?textmate也可以这样吗? 最佳答案 你可以使用rails.vim然后做类似的事情::Rgeneratemigratonadd_foo_to_bar插件将打开迁移生成的文件,这正是您想要的。我不能代表textmate。 关于ruby-使用VimRails,您可以创建一个新的迁移文件并一次性打开它吗?,我们在StackOverflow上找到一个类似的问题: https://sta
好的,所以我的目标是轻松地将一些数据保存到磁盘以备后用。您如何简单地写入然后读取一个对象?所以如果我有一个简单的类classCattr_accessor:a,:bdefinitialize(a,b)@a,@b=a,bendend所以如果我从中非常快地制作一个objobj=C.new("foo","bar")#justgaveitsomerandomvalues然后我可以把它变成一个kindaidstring=obj.to_s#whichreturns""我终于可以将此字符串打印到文件或其他内容中。我的问题是,我该如何再次将这个id变回一个对象?我知道我可以自己挑选信息并制作一个接受该信
我正在编写一个小脚本来定位aws存储桶中的特定文件,并创建一个临时验证的url以发送给同事。(理想情况下,这将创建类似于在控制台上右键单击存储桶中的文件并复制链接地址的结果)。我研究过回形针,它似乎不符合这个标准,但我可能只是不知道它的全部功能。我尝试了以下方法:defauthenticated_url(file_name,bucket)AWS::S3::S3Object.url_for(file_name,bucket,:secure=>true,:expires=>20*60)end产生这种类型的结果:...-1.amazonaws.com/file_path/file.zip.A
我注意到像bundler这样的项目在每个specfile中执行requirespec_helper我还注意到rspec使用选项--require,它允许您在引导rspec时要求一个文件。您还可以将其添加到.rspec文件中,因此只要您运行不带参数的rspec就会添加它。使用上述方法有什么缺点可以解释为什么像bundler这样的项目选择在每个规范文件中都需要spec_helper吗? 最佳答案 我不在Bundler上工作,所以我不能直接谈论他们的做法。并非所有项目都checkin.rspec文件。原因是这个文件,通常按照当前的惯例,只
