1.重点内容
1.引入
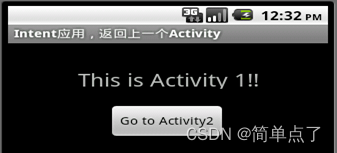
比如下面的图,当我点击”Go to Activity2“的时候就会从第一个Activity跳转到下一个Activity。再点击”Go to Activity1“就会跳转到第一个Aactivity。

2.多个Activity之间的关系
在android开发中,经常会从一个页面调转到另一个页面,在android中从一个activity启动另一个activity可以使用startActivity方法或者startActivityForResult方法(能返回值)。这里的两个方法要传递参数时需要使用到对象Intent,intent是信使,完成组件之间的通信功能。

3.Intent简介
白话:Intent起到了不同Activity之间组件传值的作用。就是传值。传数据。
简介:
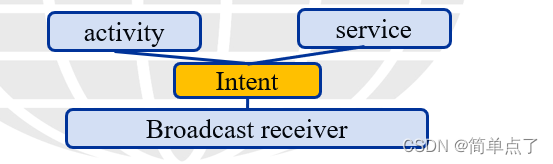
4.Intent简介图示:
可参考文档:https://www.cnblogs.com/mengdd/archive/2013/03/18/2965839.html
5.Intent的两种调用方式?
显示调用需要明确的指定需要启动的Activity所在位置,隐式调用不需要指定组件的名称,但需要一定的条件进行过滤。
1.显式调用步骤?
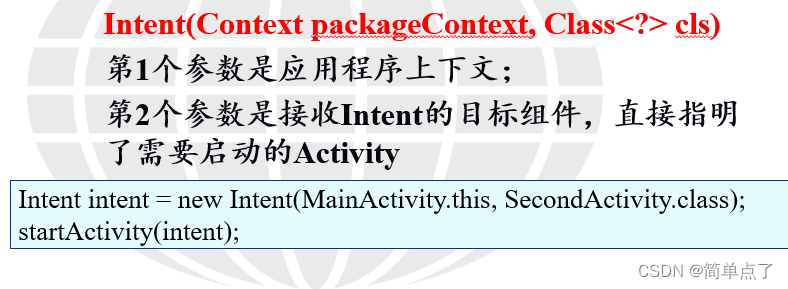
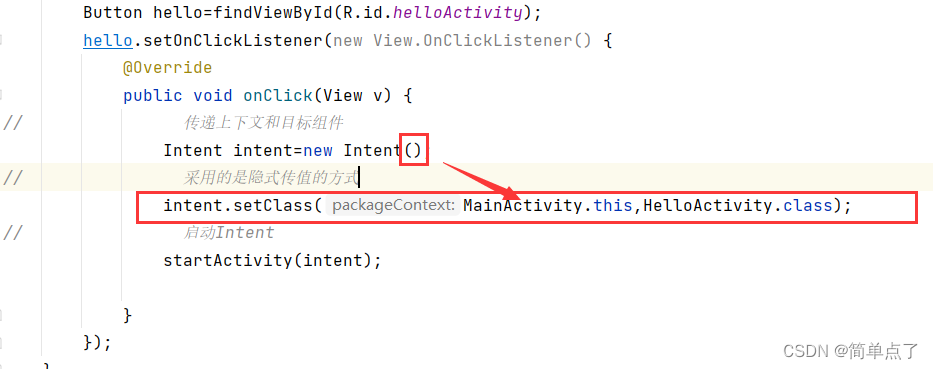
2.2.1采用Intent有参构造函数
1.语法:
第一个参数传入的就是this,第二个需要指定是目标组件的类
2.案例1:
主布局文件的代码:
<?xml version="1.0" encoding="utf-8"?>
<LinearLayout xmlns:android="http://schemas.android.com/apk/res/android"
    xmlns:app="http://schemas.android.com/apk/res-auto"
    xmlns:tools="http://schemas.android.com/tools"
    android:layout_width="match_parent"
    android:layout_height="match_parent"
    android:orientation="vertical"
    tools:context=".MainActivity">

<TextView
    android:layout_width="wrap_content"
    android:layout_height="wrap_content"
    android:text="点击按钮跳转到不同的activity"
    />
    <Button
        android:id="@+id/helloActivity"
        android:layout_width="wrap_content"
        android:layout_height="wrap_content"
        android:text="helloActivity"
        />


</LinearLayout>
主布局文件的java文件代码:
package com.example.activity_study;

import androidx.appcompat.app.AppCompatActivity;

import android.content.Intent;
import android.os.Bundle;
import android.view.View;
import android.widget.Button;

//显式的调用activity
public class MainActivity extends AppCompatActivity {

    @Override
    protected void onCreate(Bundle savedInstanceState) {
        super.onCreate(savedInstanceState);
        setContentView(R.layout.activity_main);

//        helloActivity
        Button hello=findViewById(R.id.helloActivity);
        hello.setOnClickListener(new View.OnClickListener() {
            @Override
            public void onClick(View v) {
//                传递上下文和目标组件
                Intent intent=new Intent(MainActivity.this,HelloActivity.class);
//                启动Intent
                startActivity(intent);

            }
        });
    }
}

要跳转的布局文件

<?xml version="1.0" encoding="utf-8"?>
<LinearLayout xmlns:android="http://schemas.android.com/apk/res/android"
    xmlns:app="http://schemas.android.com/apk/res-auto"
    xmlns:tools="http://schemas.android.com/tools"
    android:layout_width="match_parent"
    android:layout_height="match_parent"
    tools:context=".HelloActivity">

    <TextView
        android:layout_width="wrap_content"
        android:layout_height="wrap_content"
        android:text="我是HelloActivity"
        android:textSize="30dp"
        android:layout_gravity="center"
        />
</LinearLayout>
效果图如下:

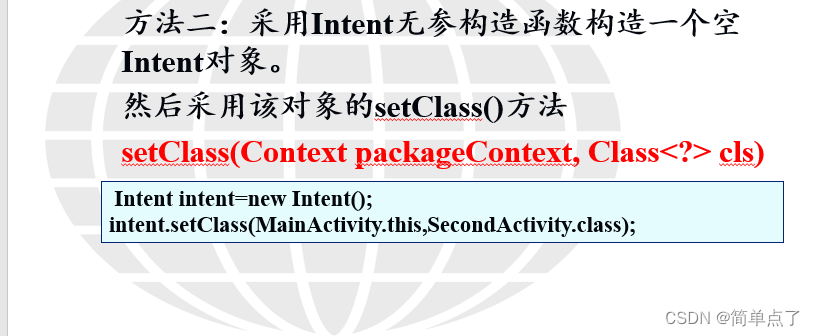
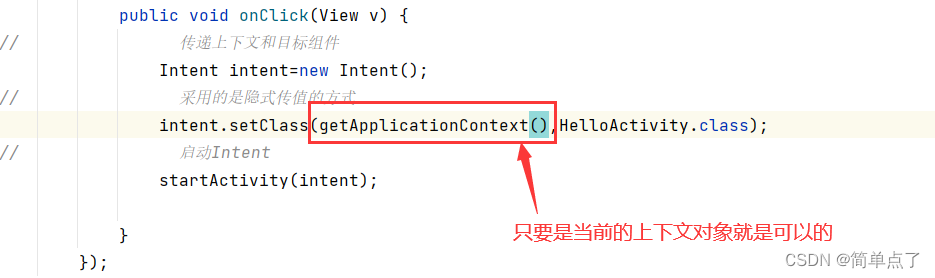
2.2.2采用Intent无参构造函数构造一个空Intent对象
1.创建的步骤
2.案例2:
扩展:关于上下文对象的多种书写的方式
2.3.1传值的简介
1.简介:当一个Activity启动另一个Activity时,常常会有一些数据要传递过去,在Android中,需要传递的数据放在对象Intent中。
比如说:提交一个表单的时候,需要往下一个activity传递数据。

获取前一个activity传递过来的数据。
所以本小节,主要学习的是如何获取前一个activity传递的数据。
2.常见的传递数据的方法:

2.3.2使用Intent+putExtra的单向简单传值
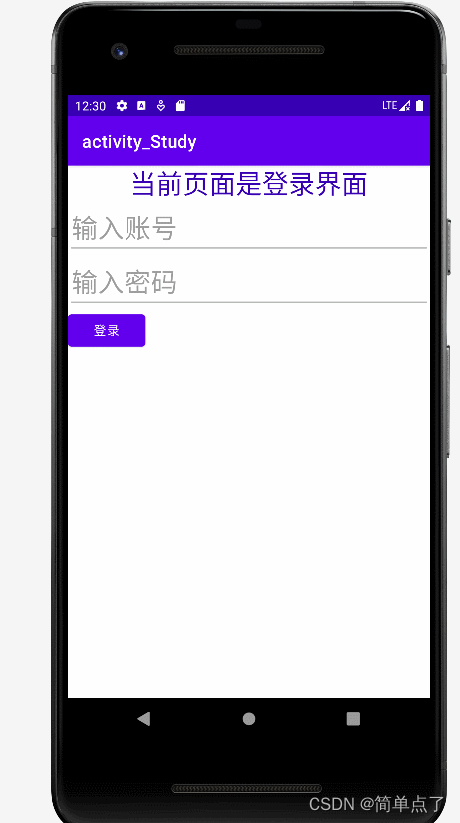
第一步:创建登录的界面
第二步:编写登录界面的布局文件,代码如下。
<?xml version="1.0" encoding="utf-8"?>
<LinearLayout xmlns:android="http://schemas.android.com/apk/res/android"
    xmlns:app="http://schemas.android.com/apk/res-auto"
    xmlns:tools="http://schemas.android.com/tools"
    android:layout_width="match_parent"
    android:layout_height="match_parent"
    android:orientation="vertical"
    tools:context=".LoginActivity">

    <TextView
        android:textSize="30dp"
        android:layout_gravity="center"
        android:textColor="@color/purple_700"
        android:layout_width="wrap_content"
        android:layout_height="wrap_content"
        android:text="当前页面是登录界面"
        />
<!--账号和密码的输入框-->
<EditText
    android:id="@+id/account"
    android:layout_width="match_parent"
    android:layout_height="wrap_content"
    android:textSize="30dp"
    android:inputType="text"
    android:hint="输入账号"
    />
    <EditText
        android:id="@+id/password"
        android:layout_width="match_parent"
        android:layout_height="wrap_content"
        android:textSize="30dp"
        android:inputType="textPassword"
        android:hint="输入密码"
        />

<!--    登录按钮-->
    <Button
        android:id="@+id/login"
        android:layout_width="wrap_content"
        android:layout_height="wrap_content"
        android:text="登录"
        />

</LinearLayout>
第三步:编写登录界面的activity,代码如下。
package com.example.activity_study;

import androidx.appcompat.app.AppCompatActivity;

import android.content.Intent;
import android.os.Bundle;
import android.view.View;
import android.widget.Button;
import android.widget.EditText;

//登录界面
public class LoginActivity extends AppCompatActivity {

    @Override
    protected void onCreate(Bundle savedInstanceState) {
        super.onCreate(savedInstanceState);
        setContentView(R.layout.activity_login);
//        获取控件
        Button login=findViewById(R.id.login);
        EditText account=findViewById(R.id.account);
        EditText password=findViewById(R.id.password);
        login.setOnClickListener(new View.OnClickListener() {
            @Override
            public void onClick(View v) {
//                获取登录的账号和密码
               String acc= account.getText().toString();
                String pswd=password.getText().toString();
//                创建Intent对象传递数据

                Intent intent=new Intent();
                intent.setClass(getBaseContext(),LoginHandleActivity.class);
//                设置需要传递的数据
                intent.putExtra("account",acc);
                intent.putExtra("password",pswd);
                startActivity(intent);
            }
        });


    }
}
第三步:创建接收数据的activity和布局文件。
第四步:显示数据的布局文件代码如下。
<?xml version="1.0" encoding="utf-8"?>
<LinearLayout xmlns:android="http://schemas.android.com/apk/res/android"
xmlns:app="http://schemas.android.com/apk/res-auto"
xmlns:tools="http://schemas.android.com/tools"
android:layout_width="match_parent"
android:layout_height="match_parent"
android:orientation="vertical"
tools:context=".LoginHandleActivity">
<TextView
android:id="@+id/loginsuccess"
android:layout_width="wrap_content"
android:layout_height="wrap_content"
android:layout_gravity="center"
android:textSize="30dp"
/>
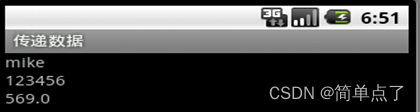
</LinearLayout>第五步:接收数据的activity代码如下。
package com.example.activity_study;

import androidx.appcompat.app.AppCompatActivity;

import android.content.Intent;
import android.os.Bundle;
import android.widget.TextView;
import android.widget.Toast;

public class LoginHandleActivity extends AppCompatActivity {

    @Override
    protected void onCreate(Bundle savedInstanceState) {
        super.onCreate(savedInstanceState);
        setContentView(R.layout.activity_login_handle);
//        登录成功的提示
        TextView loginsuccess=findViewById(R.id.loginsuccess);
//        获取传递的数值
        Intent intent=getIntent();
        String account=intent.getStringExtra("account");
        String password=intent.getStringExtra("password");
//      设置提示内容
        loginsuccess.setText("恭喜 用户:"+account+"  密码为:"+password+"  登录成功!");
//      打印提示消息
        Toast.makeText(this, ""+loginsuccess.getText(), Toast.LENGTH_SHORT).show();

    }
}
效果图:
2.3.3使用Intent+Bundle的复杂传值
1.简介:使用Bundle实现数据传递。Bundle是数据携带包,提供了多个方法存入数据。
需要先创建一个Bundle对象
往bundle中传递数据
获取Bundle中的数据:
2.案例3:-注册界面
第一步:创建一个User,包含id和name以及age属性。
package com.example.activity_study;

import java.io.Serializable;

//创建一个可序列化的对象
public class User implements Serializable {

    private String id;
    private String password;
    private int age;

    @Override
    public String toString() {
        return "User{" +
                "id='" + id + '\'' +
                ", password='" + password + '\'' +
                ", age=" + age +
                '}';
    }

    public User(String id, String password, int age) {
        this.id = id;
        this.password = password;
        this.age = age;
    }

    public User() {
    }

    public String getId() {
        return id;
    }

    public void setId(String id) {
        this.id = id;
    }

    public String getPassword() {
        return password;
    }

    public void setPassword(String password) {
        this.password = password;
    }

    public int getAge() {
        return age;
    }

    public void setAge(int age) {
        this.age = age;
    }
}
第二步:创建注册的布局文件。
<?xml version="1.0" encoding="utf-8"?>
<LinearLayout xmlns:android="http://schemas.android.com/apk/res/android"
    xmlns:app="http://schemas.android.com/apk/res-auto"
    xmlns:tools="http://schemas.android.com/tools"
    android:layout_width="match_parent"
    android:layout_height="match_parent"
    android:orientation="vertical"
    tools:context=".RegisterActivity">

<!--    创建的是一个注册的界面-->
    <TextView
        android:textSize="30dp"
        android:layout_gravity="center"
        android:textColor="@color/purple_700"
        android:layout_width="wrap_content"
        android:layout_height="wrap_content"
        android:text="当前页面是登注册界面"
        />
    <!--账号和密码的输入框-->
    <EditText
        android:id="@+id/regid"
        android:layout_width="match_parent"
        android:layout_height="wrap_content"
        android:textSize="30dp"
        android:inputType="text"
        android:hint="输入账号"
        />
    <EditText
        android:id="@+id/regpassword"
        android:layout_width="match_parent"
        android:layout_height="wrap_content"
        android:textSize="30dp"
        android:inputType="textPassword"
        android:hint="输入密码"
        />
    <EditText
        android:id="@+id/regage"
        android:layout_width="match_parent"
        android:layout_height="wrap_content"
        android:textSize="30dp"
        android:inputType="textPassword"
        android:hint="输入年龄"
        />


    <!--    注册按钮-->
    <Button
        android:id="@+id/reg"
        android:layout_width="wrap_content"
        android:layout_height="wrap_content"
        android:text="登录"
        />

</LinearLayout>
第三步:编写注册的activity。
package com.example.activity_study;

import androidx.appcompat.app.AppCompatActivity;

import android.content.Intent;
import android.os.Bundle;
import android.view.View;
import android.widget.Button;
import android.widget.EditText;

public class RegisterActivity extends AppCompatActivity {

    @Override
    protected void onCreate(Bundle savedInstanceState) {
        super.onCreate(savedInstanceState);
        setContentView(R.layout.activity_register);

        //        获取控件
        Button login=findViewById(R.id.reg);
        EditText account=findViewById(R.id.regid);
        EditText password=findViewById(R.id.regpassword);
        EditText regage=findViewById(R.id.regage);
        login.setOnClickListener(new View.OnClickListener() {
            @Override
            public void onClick(View v) {
//                获取登录的账号和密码
                String acc= account.getText().toString();
                String pswd=password.getText().toString();
               int age=Integer.parseInt(regage.getText().toString());
//               创建可序列化对象
                User user=new User(acc,pswd,age);
                String desc="当前传入的对象是一个可序列化的对象";
//              创建Bundle
                Bundle bundle=new Bundle();
                bundle.putString("desc",desc);
                bundle.putSerializable("user",user);

//                创建Intent对象传递数据
                Intent intent=new Intent();
                intent.setClass(getBaseContext(),RegisterHandleActivity.class);
//                设置需要传递的数据(直接传递bundle数据包就可以)
                intent.putExtras(bundle);
                startActivity(intent);
            }
        });

    }
}
第四步:编写接收信息的布局文件。
<?xml version="1.0" encoding="utf-8"?>
<LinearLayout xmlns:android="http://schemas.android.com/apk/res/android"
    xmlns:app="http://schemas.android.com/apk/res-auto"
    xmlns:tools="http://schemas.android.com/tools"
    android:layout_width="match_parent"
    android:layout_height="match_parent"
    android:orientation="horizontal"
    tools:context=".RegisterHandleActivity">


    <TextView
        android:id="@+id/regsuccess"
        android:layout_width="wrap_content"
        android:layout_height="wrap_content"
        android:layout_gravity="center"
        android:textSize="30dp"
        />
</LinearLayout>
第五步:编写接收信息的activity文件。
package com.example.activity_study;

import androidx.appcompat.app.AppCompatActivity;

import android.content.Intent;
import android.os.Bundle;
import android.widget.TextView;
import android.widget.Toast;

public class RegisterHandleActivity extends AppCompatActivity {

    @Override
    protected void onCreate(Bundle savedInstanceState) {
        super.onCreate(savedInstanceState);
        setContentView(R.layout.activity_register_handle);

        //        登录成功的提示
        TextView loginsuccess=findViewById(R.id.regsuccess);
//        获取传递的数值
        Intent intent=getIntent();
        Bundle bundle=intent.getExtras();
        String desc=bundle.getString("desc");
//        获取可序列化的对象
        User user=(User) bundle.getSerializable("user");

//      设置提示内容
        loginsuccess.setText(desc+"  恭喜 用户"+user.toString());
//      打印提示消息
        Toast.makeText(this, ""+loginsuccess.getText(), Toast.LENGTH_SHORT).show();

    }
}
效果图:

1.简介:
第一个页面需要设置传递的数据+请求码。第二个页面需要设置结果码。第一个页面接收数据+请求码+结果码。
2.回传数据的步骤
注意:注意:
在一个Activity中可能会调用startActivityForResult()方法启动多个Activity,每一个Activity返回的数据都会回调到onActivityResult()这个方法中,所以需要通过检查requestCode的值来判断数据来源,确定数据是从正确的Activity返回,然后再通过resultCode的值来判断数据处理结果是否成功,最后从data中取出数据并打印。
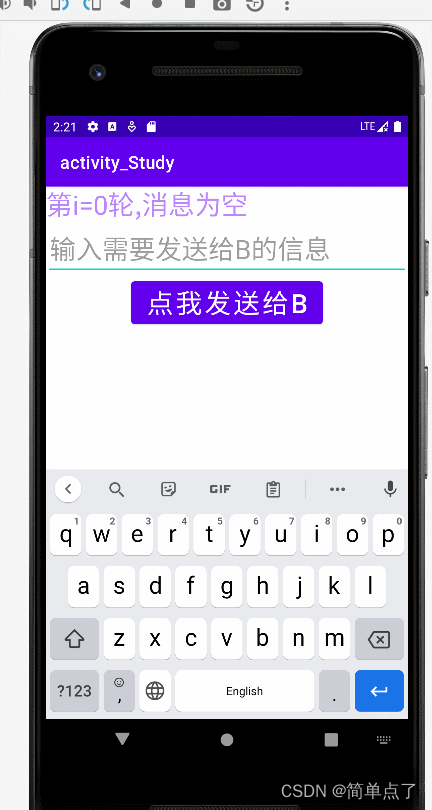
2.4.1双向传递数据(聊天)
第一步:创建A的布局文件
<?xml version="1.0" encoding="utf-8"?>
<LinearLayout xmlns:android="http://schemas.android.com/apk/res/android"
    xmlns:app="http://schemas.android.com/apk/res-auto"
    xmlns:tools="http://schemas.android.com/tools"
    android:layout_width="match_parent"
    android:layout_height="match_parent"
    android:orientation="vertical"
    tools:context=".personOne">

<!--  TextView显示当前的聊天的信息-->
    <TextView
        android:id="@+id/Artext"
        android:textSize="30dp"
        android:textColor="@color/purple_200"
        android:layout_width="wrap_content"
        android:layout_height="wrap_content"
        android:text="第i=0轮,消息为空"
        />
<!--   输入需要传递的数据-->
<EditText
    android:textSize="30dp"
    android:id="@+id/Astext"
    android:layout_width="match_parent"
    android:layout_height="wrap_content"
    android:hint="输入需要发送给B的信息"
    />
<Button
    android:id="@+id/AtoB"
    android:textSize="30dp"
    android:layout_gravity="center"
    android:layout_width="wrap_content"
    android:layout_height="wrap_content"
        android:text="点我发送给B"
    />

</LinearLayout>
第二步:创建A的activity代码
package com.example.activity_study;

import androidx.annotation.Nullable;
import androidx.appcompat.app.AppCompatActivity;

import android.content.Intent;
import android.os.Bundle;
import android.view.View;
import android.widget.Button;
import android.widget.EditText;
import android.widget.TextView;

//A用户
public class personOne extends AppCompatActivity {
static int i=0;
    @Override
    protected void onCreate(Bundle savedInstanceState) {
        super.onCreate(savedInstanceState);
        setContentView(R.layout.activity_person_one);

        EditText Astext=findViewById(R.id.Astext);
        Button AtoB=findViewById(R.id.AtoB);
//        接收数据


        AtoB.setOnClickListener(new View.OnClickListener() {
            @Override
            public void onClick(View v) {
//                传递A发送给B的数据
                String textA=Astext.getText().toString();
                Astext.setText("");
                Intent intent=new Intent();
                intent.setClass(getBaseContext(),personTwo.class);
                intent.putExtra("msg",textA);
                startActivityForResult(intent,0);

            }
        });


    }

//    接收数据
    @Override
    protected void onActivityResult(int requestCode, int resultCode, @Nullable Intent data) {
        super.onActivityResult(requestCode, resultCode, data);
        System.out.println(requestCode+"=======");
        if (requestCode==0&&resultCode==1){
//        获取控件
            TextView Artext=findViewById(R.id.Artext);

            if (!data.getStringExtra("msg").toString().equals(""))
            {
                i++;
                Artext.setText(data.getStringExtra("第i="+i+"轮,"+"msg"));
            }
            else{
                Artext.setText("消息为空");
            }
        }


    }
}
第三步:创建B的布局文件。
<?xml version="1.0" encoding="utf-8"?>
<LinearLayout xmlns:android="http://schemas.android.com/apk/res/android"
    xmlns:app="http://schemas.android.com/apk/res-auto"
    xmlns:tools="http://schemas.android.com/tools"
    android:layout_width="match_parent"
    android:layout_height="match_parent"
    android:orientation="vertical"
    tools:context=".personTwo">

    <!--  TextView显示当前的聊天的信息-->
    <TextView
        android:id="@+id/Brtext"
        android:textSize="30dp"
        android:textColor="@color/purple_200"
        android:layout_width="wrap_content"
        android:layout_height="wrap_content"
        android:text="消息为空"
        />
    <!--   输入需要传递的数据-->
    <EditText
        android:id="@+id/Bstext"
        android:textSize="30dp"
        android:layout_width="match_parent"
        android:layout_height="wrap_content"
        android:hint="输入需要发送给A的信息"
        />
    <Button
        android:id="@+id/BtoA"
        android:textSize="30dp"
        android:layout_gravity="center"
        android:layout_width="wrap_content"
        android:layout_height="wrap_content"
        android:text="点我发送给A"
        />
</LinearLayout>
第四步:创建B的activity代码。
package com.example.activity_study;

import androidx.appcompat.app.AppCompatActivity;

import android.content.Intent;
import android.os.Bundle;
import android.view.View;
import android.widget.Button;
import android.widget.EditText;
import android.widget.TextView;

public class personTwo extends AppCompatActivity {
static int i=0;
    @Override
    protected void onCreate(Bundle savedInstanceState) {
        super.onCreate(savedInstanceState);
        setContentView(R.layout.activity_person_two2);
//      B发送给A的数据
        EditText Bstext=findViewById(R.id.Bstext);
//        B接收A的消息
        TextView Brtext=findViewById(R.id.Brtext);
//        传递数据的按钮
        Button BtoA=findViewById(R.id.BtoA);
//        接收数据
        i++;
        String msg=getIntent().getStringExtra("msg");
        if (!msg.toString().equals("")){
                Brtext.setText("第i="+i+"轮消息,"+msg);
        }
        else
        {
            Brtext.setText("第i="+i+"轮,消息为空");
        }

        BtoA.setOnClickListener(new View.OnClickListener() {
            @Override
            public void onClick(View v) {
//                B发送给A的数据
                String textB=Bstext.getText().toString();
                Bstext.setText("");
                Intent intent=new Intent();
//                回传数据不用设置class
                intent.putExtra("msg",textB);
//                回传数据
                setResult(1,intent);
               finish();
            }
        });

    }
}
效果图:
1.隐式传递的优点:
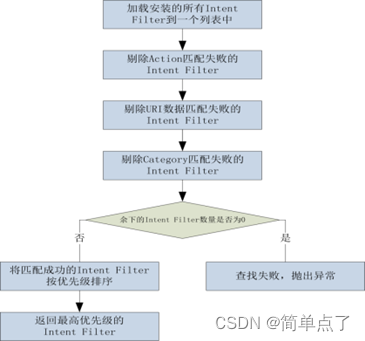
1.简介:
2.常见的属性
3.属性列表
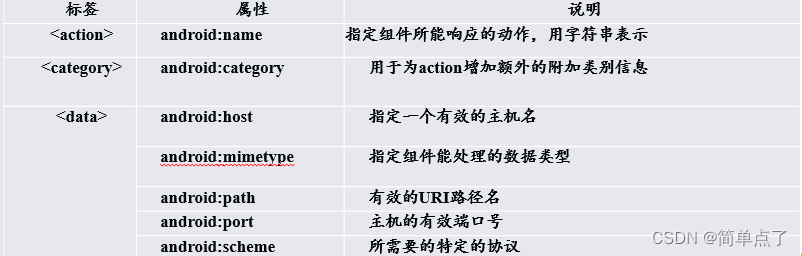
4.隐式启动设置的步骤
注意事项:
如果自己定义的某个Activity要通过隐式启动,在AndroidManifast.xm那么必须加上android.intent.category.DEFAULT,否则不起作用.
在activity中
Intent newIntent=new Intent();
newIntent.setAction(“www.yzh.cn”); newIntent.addCategory(“www”);//category不匹配,则无法启动secondactivity。如果不加这条语句,也就是说不用匹配category,只要有程序也可以运行。但是如果要加addCategory(),则一定要准确。

3.2.1隐式跳转的案例
第一步:创建主布局文件
<?xml version="1.0" encoding="utf-8"?>
<LinearLayout xmlns:android="http://schemas.android.com/apk/res/android"
xmlns:app="http://schemas.android.com/apk/res-auto"
xmlns:tools="http://schemas.android.com/tools"
android:layout_width="match_parent"
android:layout_height="match_parent"
android:orientation="vertical"
tools:context=".MorningActivity">
<!-- 隐式跳转-->
<Button
android:id="@+id/btnmorning"
android:layout_gravity="center"
android:textSize="30dp"
android:layout_width="wrap_content"
android:layout_height="wrap_content"
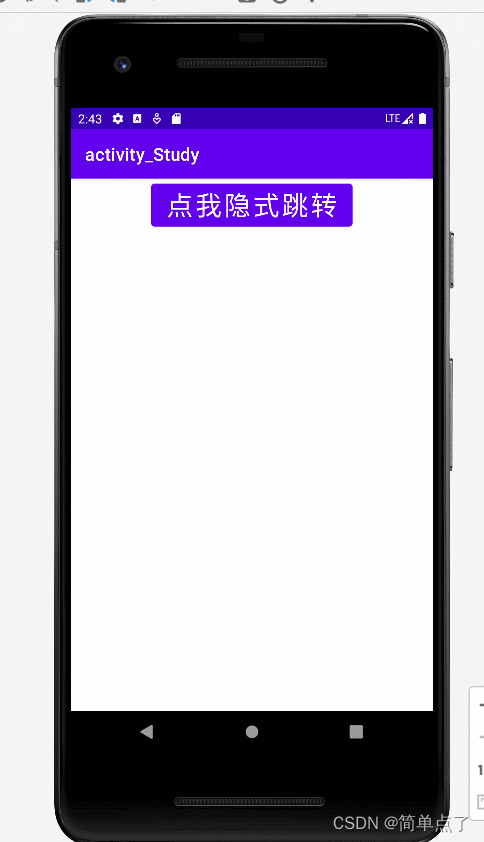
android:text="点我隐式跳转"
/>
</LinearLayout>第二步:创建隐式启动的activity。

隐式启动的代码如下:
package com.example.activity_study;

import androidx.appcompat.app.AppCompatActivity;

import android.content.Intent;
import android.os.Bundle;
import android.view.View;
import android.widget.Button;

//设置隐式启动的activity
public class MorningActivity extends AppCompatActivity {

    @Override
    protected void onCreate(Bundle savedInstanceState) {
        super.onCreate(savedInstanceState);
        setContentView(R.layout.activity_morning);
        Button btnmorning=findViewById(R.id.btnmorning);
        btnmorning.setOnClickListener(new View.OnClickListener() {
            @Override
            public void onClick(View v) {
//                设置隐式跳转
                Intent intent=new Intent();
                intent.setAction("www.morning.action");
//                设置Deault的就不用设置这一条语句了
//                intent.addCategory("www.morning.categoory");
//                启动
                startActivity(intent);
            }
        });

    }
}
第三步:创建接收隐式启动的布局文件
<?xml version="1.0" encoding="utf-8"?>
<LinearLayout xmlns:android="http://schemas.android.com/apk/res/android"
xmlns:app="http://schemas.android.com/apk/res-auto"
xmlns:tools="http://schemas.android.com/tools"
android:layout_width="match_parent"
android:layout_height="match_parent"
android:orientation="vertical"
tools:context=".goodMorningActivity">
<!-- 你好-->
<TextView
android:textSize="30dp"
android:textColor="@color/purple_700"
android:layout_width="wrap_content"
android:layout_height="wrap_content"
android:text="你好!隐式跳转!"
/>
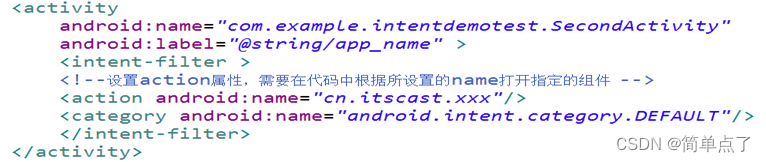
</LinearLayout>第四步:AndroidManifest.xml文件的设置。设置隐式启动的组件的名称。主要包括的是action和category。

代码如下:
<!-- 测试隐式启动的案例 -->
<activity
    android:name=".goodMorningActivity"
    android:exported="true">
    <intent-filter>
        <!-- 设置自定义的名称 -->
        <action android:name="www.morning.action" />
        <!-- 必须设置成defaulte -->
        <category android:name="android.intent.category.DEFAULT" />
        <!-- 可以精确匹配的activity -->
        <category android:name="www.morning.categoory" />
    </intent-filter>
</activity>
效果图:
1.简介
2.启动系统中的组件
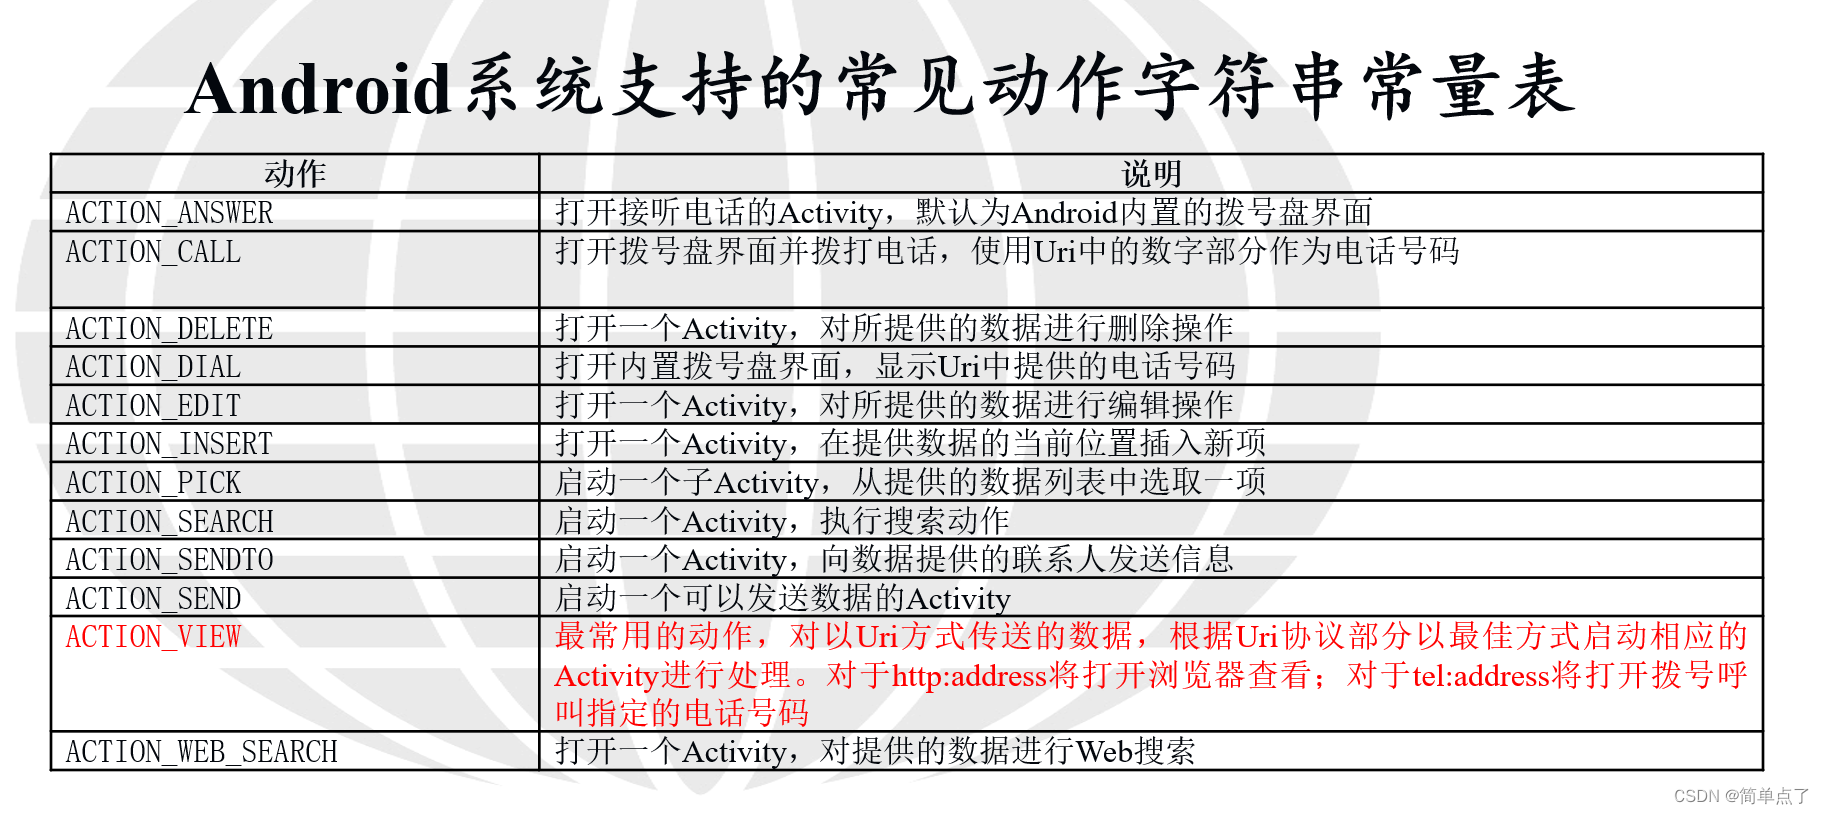
Intent intent = new Intent(Intent.ACTION_VIEW, Uri.parse("http://www.google.com"));
startActivity(intent);
3.Android系统支持的常见动作字符串常量表
3.3.1隐式跳转到百度-内置组件的使用
第一步:创建主布局文件的代码
<?xml version="1.0" encoding="utf-8"?>
<LinearLayout xmlns:android="http://schemas.android.com/apk/res/android"
    xmlns:app="http://schemas.android.com/apk/res-auto"
    xmlns:tools="http://schemas.android.com/tools"
    android:layout_width="match_parent"
    android:layout_height="match_parent"
    tools:context=".BaiduActivity">

    <Button
        android:id="@+id/btnbaidu"
        android:layout_width="wrap_content"
        android:layout_height="wrap_content"
        android:text="点我进入百度"
        android:textSize="30dp"
        android:textColor="@color/purple_700"
        />
</LinearLayout>
第二步:创建activity
注意点:Intent(Intent.ACTION_VIEW, Uri.parse("http://www.baidu.com"));
第一个参数设置是调用系统的组件。第二个是创建一个要跳转的Uri地址,调用parse方法将字符串转化成指定的Uri地址。
package com.example.activity_study;

import androidx.appcompat.app.AppCompatActivity;

import android.content.Intent;
import android.net.Uri;
import android.os.Bundle;
import android.view.View;
import android.widget.Button;

//设置隐式启动打开百度
public class BaiduActivity extends AppCompatActivity {

    @Override
    protected void onCreate(Bundle savedInstanceState) {
        super.onCreate(savedInstanceState);
        setContentView(R.layout.activity_baidu);
//        跳转到百度
        Button btnwaidu=findViewById(R.id.btnbaidu);
        btnwaidu.setOnClickListener(new View.OnClickListener() {
            @Override
            public void onClick(View v) {
//                跳转到百度
                Intent intent=new Intent(Intent.ACTION_VIEW, Uri.parse("http://www.baidu.com"));
                startActivity(intent);
            }
        });

    }
}
效果图:

3.3.2隐式跳转到拨号-内置组件的使用
第一步:创建布局文件
<?xml version="1.0" encoding="utf-8"?>
<LinearLayout xmlns:android="http://schemas.android.com/apk/res/android"
    xmlns:app="http://schemas.android.com/apk/res-auto"
    xmlns:tools="http://schemas.android.com/tools"
    android:layout_width="match_parent"
    android:layout_height="match_parent"
    android:orientation="vertical"
    tools:context=".PhoneCallActivity">
    <EditText
        android:id="@+id/phonenum"
        android:maxLength="11"
        android:layout_width="match_parent"
        android:layout_height="wrap_content"
        android:inputType="phone"
        android:textSize="30dp"
        android:hint="输入要拨打的电话号码"
        />
    <Button
        android:gravity="center_horizontal"
        android:id="@+id/btnphone"
        android:layout_width="wrap_content"
        android:layout_height="wrap_content"
        android:text="点我拨打电话"
        android:textSize="30dp"
        />
</LinearLayout>
第二步:编写activity。
package com.example.activity_study;

import androidx.appcompat.app.AppCompatActivity;

import android.content.Intent;
import android.net.Uri;
import android.os.Bundle;
import android.view.View;
import android.widget.Button;
import android.widget.EditText;

//跳转到打电话的界面
public class PhoneCallActivity extends AppCompatActivity {

    @Override
    protected void onCreate(Bundle savedInstanceState) {
        super.onCreate(savedInstanceState);
        setContentView(R.layout.activity_phone_call2);
        //        跳转到百度
        Button btnphone=findViewById(R.id.btnphone);
        btnphone.setOnClickListener(new View.OnClickListener() {
            @Override
            public void onClick(View v) {
//                跳转到百度
                EditText editText=findViewById(R.id.phonenum);
//                获取要拨打的电话号码,跳转到拨号的界面

                Intent intent=new Intent(Intent.ACTION_DIAL, Uri.parse("tel:"+editText.getText()));
                startActivity(intent);
            }
        });

    }
}
对于调用Action_CALL的话需要调用系统的拨号的权限,不然是不允许使用的。
效果图:

我在使用ExhuberantCtags跳转到Rubybang方法时遇到问题。我已经搜索过其他有类似问题的人,但找不到任何东西。可以使用以下小型Ruby类显示该问题的示例:classHellodefstartmethod!enddefmethod#Blahenddefmethod!#Blahendend当ctags-R.在此文件上运行时,生成的tags文件包含以下两行,表明这两种方法都是在生成时发现的:methodtest.rb/^defmethod$/;"fclass:Hellomethod!test.rb/^defmethod!$/;"fclass:Hello但是,如果我将光标放
更新:我想通了。Ctrl-F仅在未选择我正在搜索的方法时有效。游标只需要在方法名中。我刚升级到TextMate2。当我选择一个方法并使用Ctrl+F转到它的定义时,我得到:>FailurerunningJumptoMethodDefinition这是痕迹:/Users/ilikepie/Library/ApplicationSupport/TextMate/Managed/Bundles/RubyonRails.tmbundle/Support/lib/rails/text_mate.rb:54:in`method_missing':undefinedmethod`current_li
目录1.首先,需要一个副屏1.1可以通过代码的形式自己创建VirtualDispaly,创建副屏。1.2或者,在手机的开发者模式中直接开启模拟副屏,也是可以的。2.0怎么利用这个副屏幕?2.1 用作presentation演示ppt:2.2克隆主屏幕的内容,就是主屏幕显示什么,副屏显示同样的内容,镜像模式。2.3 将一个activity从第二个屏幕上启动,作为一个独立的屏幕首先说明一下这个多屏幕的概念,这里不是指分屏显示。分屏显示:是一个屏幕分出多个窗口,分别显示不同app.多屏支持:是一个设备有多个屏幕,怎么让不同的屏幕显示不同的app,或者是一个app同时用两个屏幕来显示不同的页面内容。多
我正在使用vim进行ruby、php和perl开发。有快捷方式%可以从block(子例程/函数/方法/if)的开头跳转到结尾,反之亦然。对我来说,ruby中的do/end标记上的%不起作用。我如何用vim做到这一点? 最佳答案 matchitplugin允许匹配的不仅仅是括号和注释。可以找到ruby版本here. 关于ruby-如何使用Vim从do跳转到Rubyblock的末尾?,我们在StackOverflow上找到一个类似的问题: https://
在我的HTML页面中,我需要检查是否安装了AdobeFlash播放器。如果没有,我想自动跳转到另一个HTML页面,告诉用户需要Flash播放器。我正在使用JavaScript检查Flash播放器是否可用,使用'JavaScriptFlashdetectionlibrary'.我的HTML页面的主体如下所示:if(!FlashDetect.installed){alert("Flash9.0.115isrequiredtoenjoythissite.");}......检测有效:我可以看到警报,但我没有找到跳转到另一个HTML页面的方法。有什么提示吗?编辑:有一些我没有提到但似乎有所
我一直在尝试让回调在用户完成一条推文后起作用。除InternetExplorer(11、10、9或8)外,所有浏览器都运行良好。IE在控制台中不显示任何内容,回调也不会触发。谁有解决办法?这是一个简单的例子来说明问题(jsfiddle):Testingtwttr.ready(function(twttr){twttr.events.bind('tweet',function(event){alert('twitterclick');});}); 最佳答案 这是由于在IE中的窗口之间发送数据时postMessage功能损坏所致。自IE
我正在尝试开发一个API以将意图上传到DialogflowV2。我已经尝试了下面的代码片段,但它不起作用,但是如果尝试与Dialogflow进行通信,它确实有效(检测意图)并且确实从Dialogflow获得了查询回复。权限我是管理员>服务帐户>DIALOGFLOW管理员错误Error:7PERMISSION_DENIED:IAMpermission'dialogflow.entityTypes.create'on'projects/dexter-47332/agent'denied.博客/引用资料Dialogfloweasywayforauthorizationhttps://gith
我在我的html中使用了一个jQuery多日期选择器。当我在日期选择器中选择第一个日期时它工作正常但是当我选择第二个日期时它跳转到当前月份但是日期选择器值被附加到输入框。我不知道我在这段代码中做错了什么:$('#datePick').multiDatesPicker({beforeShowDay:my_array,//Fordisablingall"Sundays"dateFormat:"d/m/yy",maxDate:"+3m",minDate:"-1m",multidate:true,addDisabledDates:My_array,onSelect:functionload()
我将jQueryDataTables与ajax来源的数据一起使用。我必须每30秒更新一次数据而不刷新页面,而ajax.reload()就是我需要的函数。我将ajax.reload()放在setInterval函数中。一切正常(如果您停留在第1页)。但是当您浏览第2页或第3页的表格时,当setInterval被触发时,它会让您回到第1页。所以...在此网址上查看文档:http://datatables.net/reference/api/ajax.reload()如果我将“false”作为第二个参数传递,它会保存当前分页位置,并且分页不会在重新加载时重置。宾果游戏!有效!但是......
我已经使用Eclipse几个星期了,我开始习惯它了。但是,有一件事真的让我很恼火:在编辑JavaScript时(我还没有尝试过任何其他语言),编辑器窗口一直跳到我正在编辑的文档的开头。这主要发生在代码当前包含语法错误时,并且主要是在删除行时/之后。特别是像{=和有时未终止的字符串/注释这样的结构似乎会导致这个问题。当它发生时,只有View滚动到文档的顶部-光标停留在“跳转”发生之前的位置。有人知道如何解决这个问题吗? 最佳答案 我认为上述问题与此错误有关:https://bugs.eclipse.org/bugs/show_bug.