本次配置基于DR负载均衡模式,设置一个VIP(Virtual IP)为19.50.67.173,用户只需要访问这个IP地址即可获得后端服务
其中,负载均衡主机为19.50.67.165(LVS1),备机为 19.50.67.169(LVS2)。Web服务器A为19.50.67.171(WEB1),Web服务器B为19.50.67.172(WEB2)。四台CentOS的防火墙都需要关闭。
由于LVS基于4层转发,所以LVS到NGINX的过程中,其实并没有什么性能损失,实现了两组NGINX同时在线,提供了更好的性能。
目前此架构已经在公司商用运行,未出现过故障,转发非常稳定。
由于网上此类教程较多,故不进行太详细描述过程。
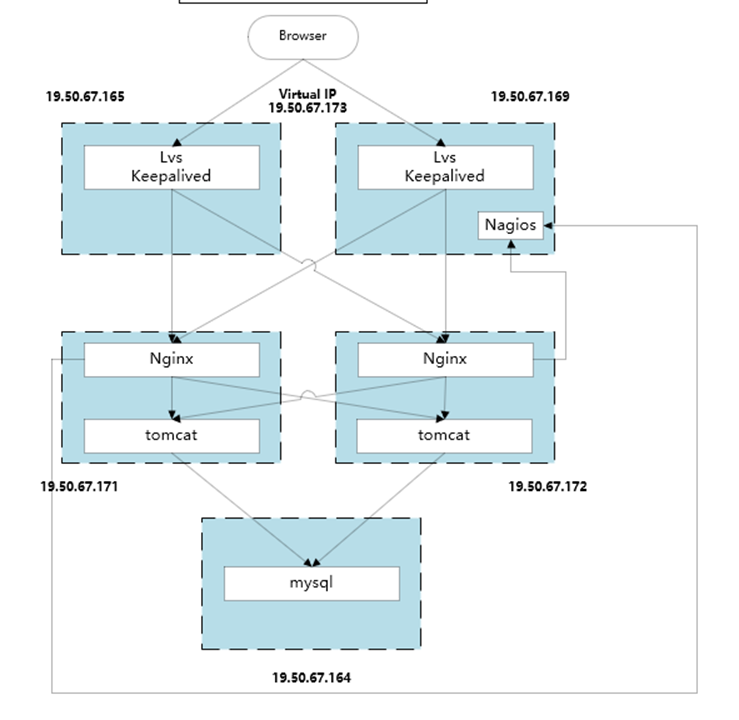
服务器配置不多做介绍,用APACHE或者NGINX即可;如果用NGINX,后端则还可以做反向代理,提供更好的自定义转发。
yum install httpd
systemctl start httpd
systemctl enable httpd
然后修改配置文件即可。
#!/bin/bash
SNS_VIP=19.50.67.173 #虚拟IP地址
. /etc/rc.d/init.d/functions #.后边有空格,或者source /etc/rc.d/init.d/functions
case "$1" in
start)
ifconfig lo:0 $SNS_VIP netmask 255.255.255.255 broadcast $SNS_VIP
/sbin/route add -host $SNS_VIP dev lo:0
echo "1" >/proc/sys/net/ipv4/conf/lo/arp_ignore
echo "2" >/proc/sys/net/ipv4/conf/lo/arp_announce
echo "1" >/proc/sys/net/ipv4/conf/all/arp_ignore
echo "2" >/proc/sys/net/ipv4/conf/all/arp_announce
sysctl -p >/dev/null 2>&1
echo "RealServer Start OK"
;;
stop)
ifconfig lo:0 down
route del $SNS_VIP >/dev/null 2>&1
echo "0" >/proc/sys/net/ipv4/conf/lo/arp_ignore
echo "0" >/proc/sys/net/ipv4/conf/lo/arp_announce
echo "0" >/proc/sys/net/ipv4/conf/all/arp_ignore
echo "0" >/proc/sys/net/ipv4/conf/all/arp_announce
echo "RealServer Stoped"
;;
*)
echo "Usage: $0 {start|stop}"
exit 1
esac
exit 0
保存脚本文件后更改该文件权限:chmod 755 realserver,开启realserver服务:service realserver start(systemctl start realserver)。
下图所示表示配置正确

每一台WEB服务器都要配置此脚本文件 #keepalived服务器不需要配置。
这里只展示了80端口的配置,如果需要其他端口,可以继续配置。
global_defs {
notification_email {
acassen@firewall.loc
failover@firewall.loc
sysadmin@firewall.loc
}
#notification_email_from Alexandre.Cassen@firewall.loc
smtp_server 192.168.200.1
smtp_connect_timeout 30
router_id LVS_DEVEL
vrrp_skip_check_adv_addr
#vrrp_strict
vrrp_garp_interval 0
vrrp_gna_interval 0
}
vrrp_instance VI_1 {
state MASTER
interface eth0
virtual_router_id 51
priority 100
advert_int 1
authentication {
auth_type PASS
auth_pass 1111
}
virtual_ipaddress {
19.50.67.173
}
}
virtual_server 19.50.67.173 80 {
delay_loop 5
lb_algo wrr
lb_kind DR
persistence_timeout 30
protocol TCP
real_server 19.50.67.171 80 {
weight 2
TCP_CHECK {
connect_timeout 10
nb_get_retry 3 #新版本已经改为retry
delay_before_retry 3
#connect_port 80 加了此项会报错
}
# HTTP_GET {
# url {
# path /
# status_code 200
# }
# connect_timeout 3
# nb_get_retry 3
# delay_before_retry 3
# }
}
real_server 19.50.67.172 80 {
weight 2
TCP_CHECK {
connect_timeout 10
nb_get_retry 3
delay_before_retry 3
#connect_port 80 加了此项会报错
}
# HTTP_GET {
# url {
# path /
# status_code 200
# }
# connect_timeout 3
# nb_get_retry 3
# delay_before_retry 3
# }
}
}
将state由MASTER改为BACKUP将priority由100改为99,其他的保持和master不变。
vrrp_instance VI_1 {
state BACKUP # 这里改为BACKUP
interface eth1
virtual_router_id 51
priority 99 # 这里改为99,master优先级是100
advert_int 1
authentication {
auth_type PASS
auth_pass 1111
}
virtual_ipaddress {
192.168.80.200
}
}
因为两台真实服务器的取值一致,所以会依次交替将请求转发给两台服务器,以此实现负载均衡。
Master和backup的priority不一样,所以同一时间只会有一台keepalived工作,以此实现主从热备。
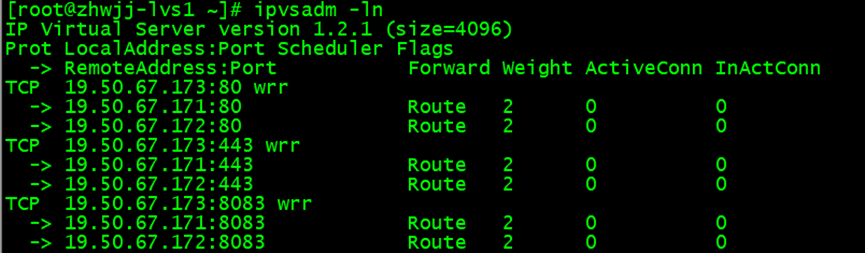
ipvsadm -ln可以查看keepalived转发明细(三个端口均转发到了后端NGINX)
ipvsadm -L -n -c查看链接状态
我的瘦服务器配置了nginx,我的ROR应用程序正在它们上运行。在我发布代码更新时运行thinrestart会给我的应用程序带来一些停机时间。我试图弄清楚如何优雅地重启正在运行的Thin实例,但找不到好的解决方案。有没有人能做到这一点? 最佳答案 #Restartjustthethinserverdescribedbythatconfigsudothin-C/etc/thin/mysite.ymlrestartNginx将继续运行并代理请求。如果您将Nginx设置为使用多个上游服务器,例如server{listen80;server
目录1.漏洞简介2、AJP13协议介绍Tomcat主要有两大功能:3.Tomcat远程文件包含漏洞分析4.漏洞复现 5、漏洞分析6.RCE实现的原理1.漏洞简介2020年2月20日,公开CNVD的漏洞公告中发现ApacheTomcat文件包含漏洞(CVE-2020-1938)。ApacheTomcat是Apache开源组织开发的用于处理HTTP服务的项目。ApacheTomcat服务器中被发现存在文件包含漏洞,攻击者可利用该漏洞读取或包含Tomcat上所有webapp目录下的任意文件。该漏洞是一个单独的文件包含漏洞,依赖于Tomcat的AJP(定向包协议)。AJP自身存在一定缺陷,导致存在可控
A/ctohttp://wiki.nginx.org/CoreModule#usermaster进程曾经以root用户运行,是否可以以不同的用户运行nginxmaster进程? 最佳答案 只需以非root身份运行init脚本(即/etc/init.d/nginxstart),就可以用不同的用户运行nginxmaster进程。如果这真的是你想要做的,你将需要确保日志和pid目录(通常是/var/log/nginx&/var/run/nginx.pid)对该用户是可写的,并且您所有的listen调用都是针对大于1024的端口(因为绑定(
我有带有gemwebsocket-rails0.7的Rails3.2应用程序。在开发机上,一切正常在生产环境中,我使用Nginx/1.6作为代理服务器,Unicorn作为http服务器。Thin用于独立模式(在https://github.com/websocket-rails/websocket-rails/wiki/Standalone-Server-Mode之后)。nginx配置:location/websocket{proxy_passhttp://localhost:3001/websocket;proxy_http_version1.1;proxy_set_headerUp
Nginx在生产中的重要性通常基于它为慢速客户端提供服务的能力;在RESTfulAPI的设置中,它似乎是生产堆栈的一个不必要的层,尤其是Puma(不像广泛使用的unicorn可以处理nginx工作)。Pumacanallowmultipleslowclientstoconnectwithoutrequiringaworkertobeblockedontherequesttransaction.Becauseofthis,Pumahandlesslowclientsgracefully.HerokurecommendsPumaforuseinscenarioswhereyouexpect
我目前正在运行Foreman在暂存(Ubuntu)上,一旦我开始工作,就会切换到使用upstart。我的Procfile.staging看起来像这样:nginx:sudoservicenginxstartunicorn:bundleexecunicorn-c./config/unicorn.rbredis:bundleexecredis-serversidekiq:bundleexecsidekiq-v-C./config/sidekiq.yml我可以使用以下方法成功启动nginx:$sudoservicenginxstart然而,当我运行$foremanstart时,当其他三个进程成
Nginx安装1.官网下载Nginx2.使用XShell和Xftp将压缩包上传到Linux虚拟机中3.解压文件nginx-1.20.2.tar.gz4.配置nginx5.启动nginx6.拓展(修改端口和常用命令)(一)修改nginx端口(二)常用命令1.官网下载Nginxhttp://nginx.org/en/download.html这里我下载的是1.20.2版本,大家按需下载对应稳定版即可2.使用XShell和Xftp将压缩包上传到Linux虚拟机中没有XShell可以参考《Linux操作系统CentOS7连接XShell》3.解压文件nginx-1.20.2.tar.gz1)检查是否存
我正在ubuntu14.04和ruby2.2.4上安装passenger+nginx。passenger-install-nginx-module有bundler错误$passenger-install-nginx-module/home/ubuntu/.rvm/gems/ruby-2.2.4/gems/bundler-1.13.1/lib/bundler/rubygems_ext.rb:45:in`full_gem_path':uninitializedconstantBundler::Plugin::API::Source(NameError)from/home/ubuntu/.r
一、前言最近,在测试环境的nginx里增加了一个https配置:location/api-meeting-qq/{proxy_passhttps://api.meeting.qq.com/;}然后,执行命令://这个是nginx启动文件的路径,根据实际情况自行更改sudo/home/useradmin/nginx/sbin/nginx-sreload结果,nginx就报错了:nginx:[emerg]httpsprotocolrequiresSSLsupportin/home/useradmin/nginx/conf.d/trainNginx.conf:9二、解决方法百度发现,是之前安装ngi
我已经按照Railscasts第293集中的描述设置了在nginx和unicorn上运行。当我尝试重定向时,例如classPostsController"Testredirect"endend我被重定向到http://unicorn/posts而不是http://mydomain.com/posts这是我的应用程序的nginx.confupstreamunicorn{serverunix:/tmp/unicorn.scvrush.sockfail_timeout=0;}server{listen80defaultdeferred;#server_nameexample.com;root