上来先贴onnx优化后的效果:
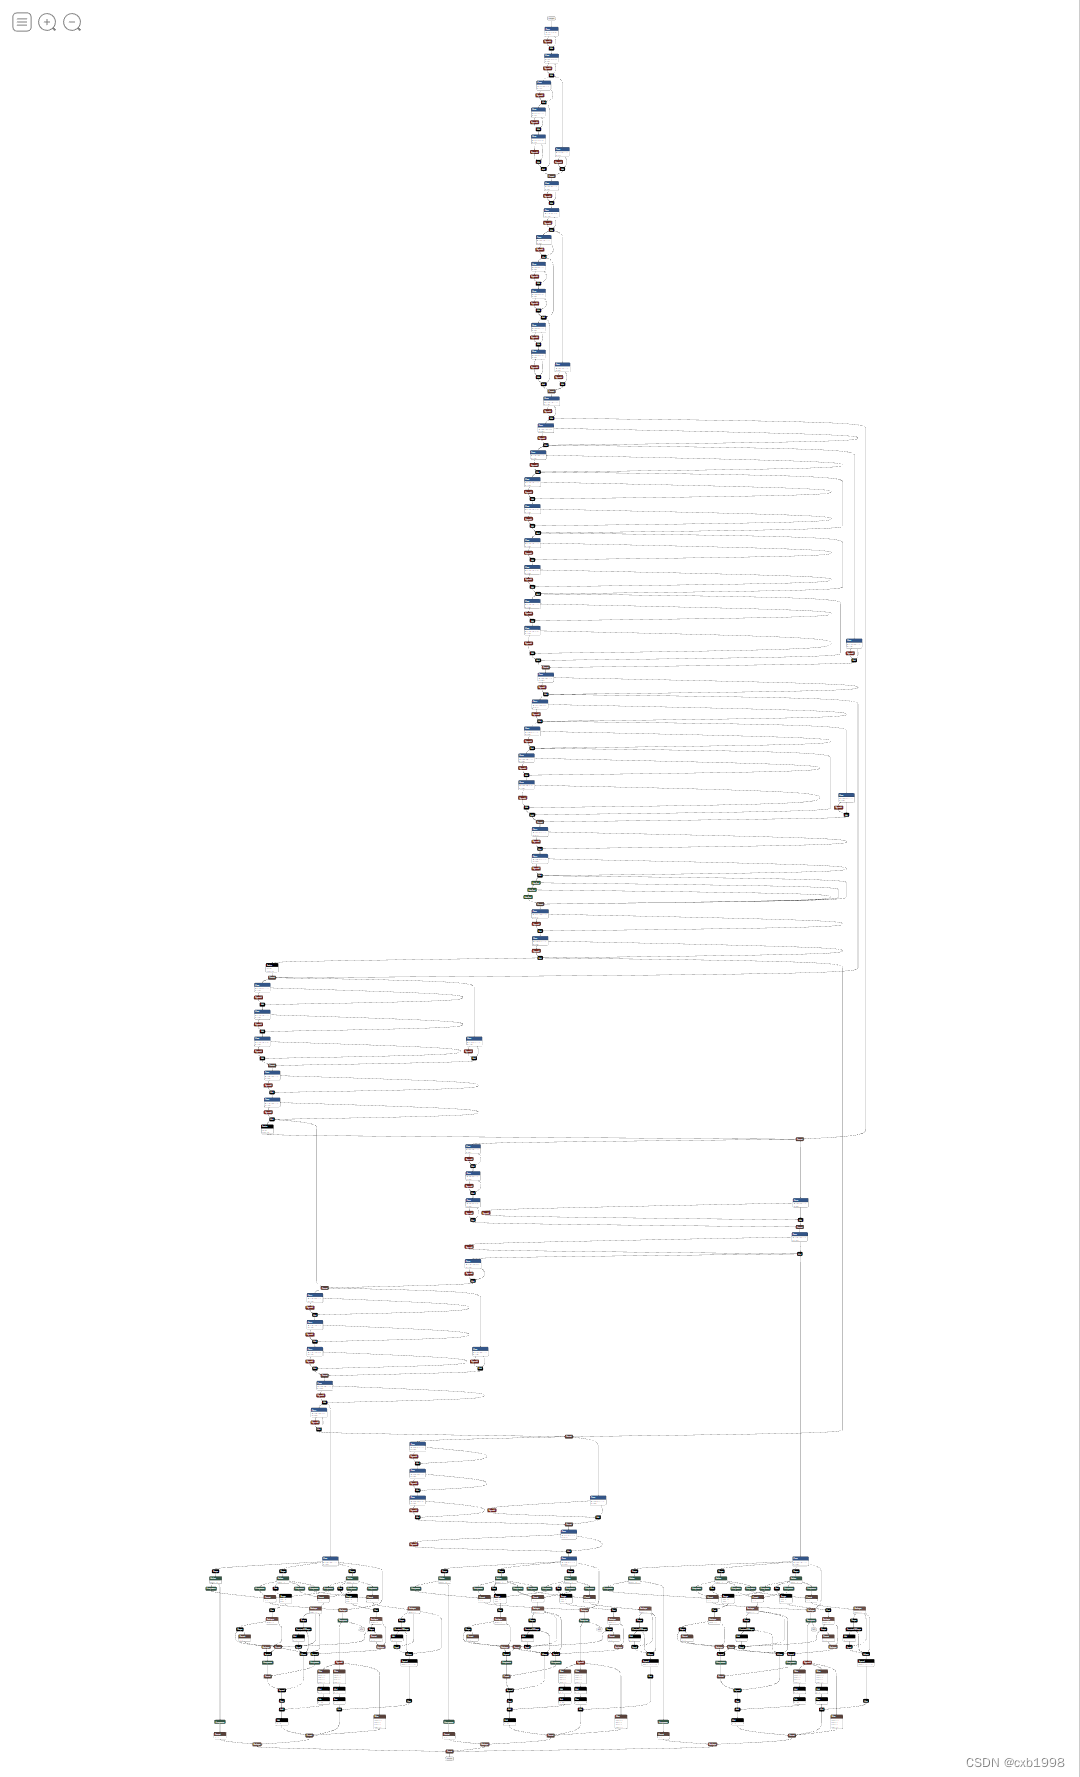
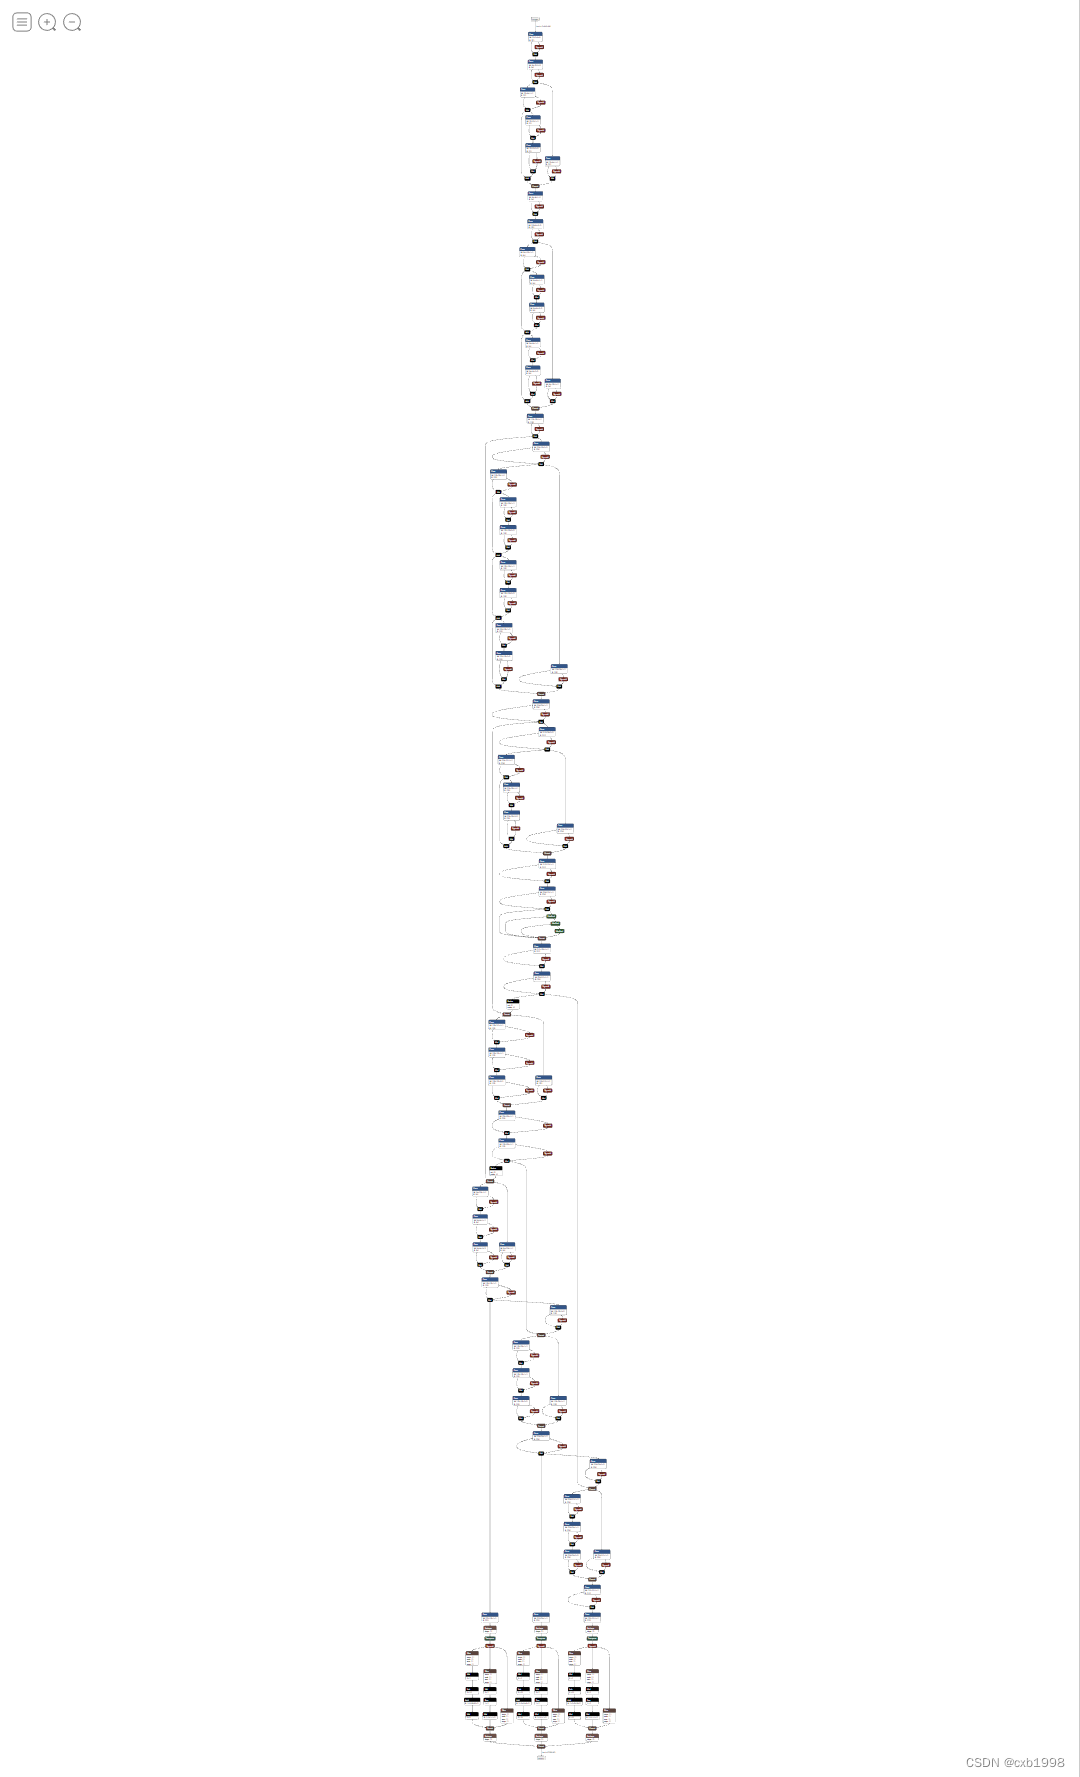
左图是yolov5s原模型导出的onnx,右图是经过优化后的onnx,效果是一致的,可以看到优化后简洁了 不少,最主要的是模型简化后,可以排除很多不必要的麻烦。
1. 首先是动态维度,前面说过通常只设定batch为动态维度,因此找到yolov5官方的onnx转化代码export.py,找到torch.onnx.export函数,进行修改。
        torch.onnx.export(model, im, f, verbose=False, opset_version=opset,
                          training=torch.onnx.TrainingMode.TRAINING if train else torch.onnx.TrainingMode.EVAL,
                          do_constant_folding=not train,
                          input_names=['images'],
                          output_names=['output'],
                          dynamic_axes={'images': {0: 'batch', 2: 'height', 3: 'width'},  # shape(1,3,640,640)
                                        'output': {0: 'batch', 1: 'anchors'}  # shape(1,25200,85)
                                        } if dynamic else None)
dynamic_axes中image的height和width以及output的anchors都不设置动态,可以省去很多麻烦。
        torch.onnx.export(model, im, f, verbose=False, opset_version=opset,
                          training=torch.onnx.TrainingMode.TRAINING if train else torch.onnx.TrainingMode.EVAL,
                          do_constant_folding=not train,
                          input_names=['images'],
                          output_names=['output'],
                          dynamic_axes={'images': {0: 'batch'},  # shape(1,3,640,640)
                                        'output': {0: 'batch'}  # shape(1,25200,85)
                                        } if dynamic else None)
这时候再导出,可以看到images的输入动态维度只有batch,但output仍然不对劲,因为output节点前还是引用了其他的shape关系,导致其输出是计算得到的,需要继续修改。
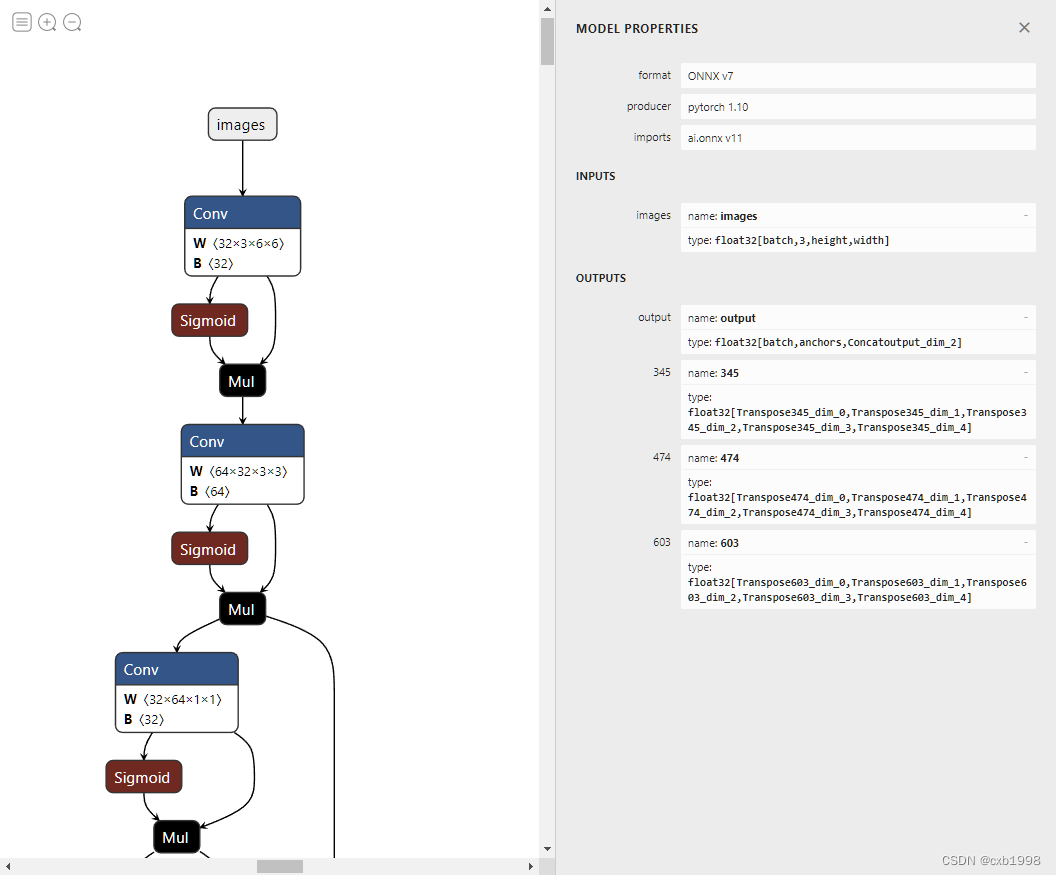
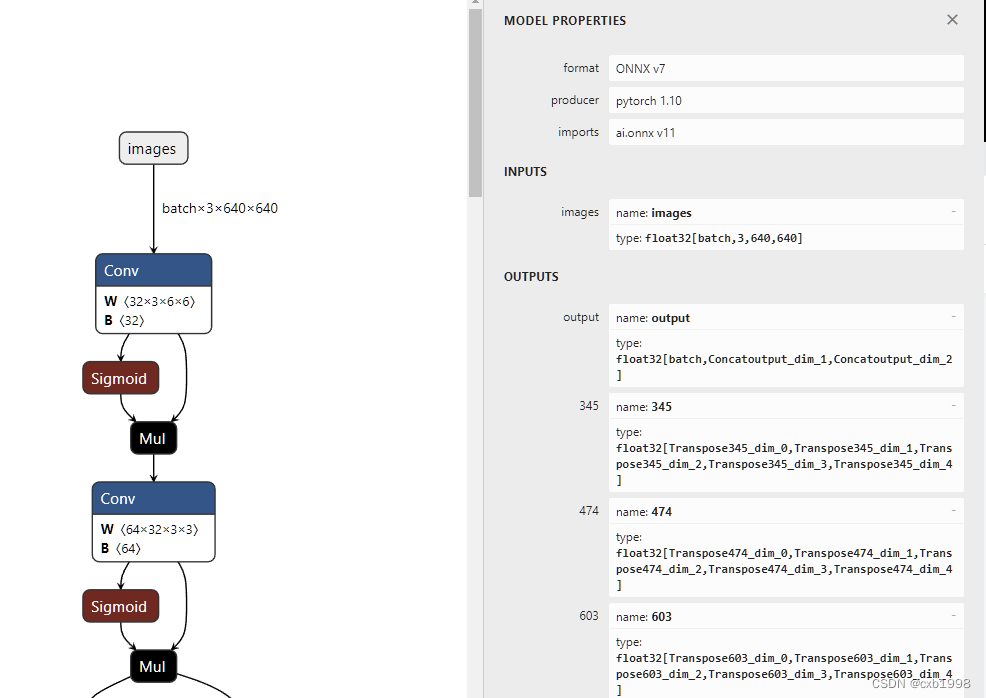
上图未修改,下图修改后。
2. output输出只需要一项即可,多余的三项可以省去。之所以多出来三项,是与yolo的训练代码有关,yolo为了适应不同尺度的目标检测,采用了FPN结构(特征金字塔结构),其返回了三个尺度的预测结果,在测试时不需要些单独层的预测,找到yolo.py中Detect类的forward函数,将输出曾进行修改。
return x if self.training else (torch.cat(z, 1), x)改为:
return torch.cat(z,1)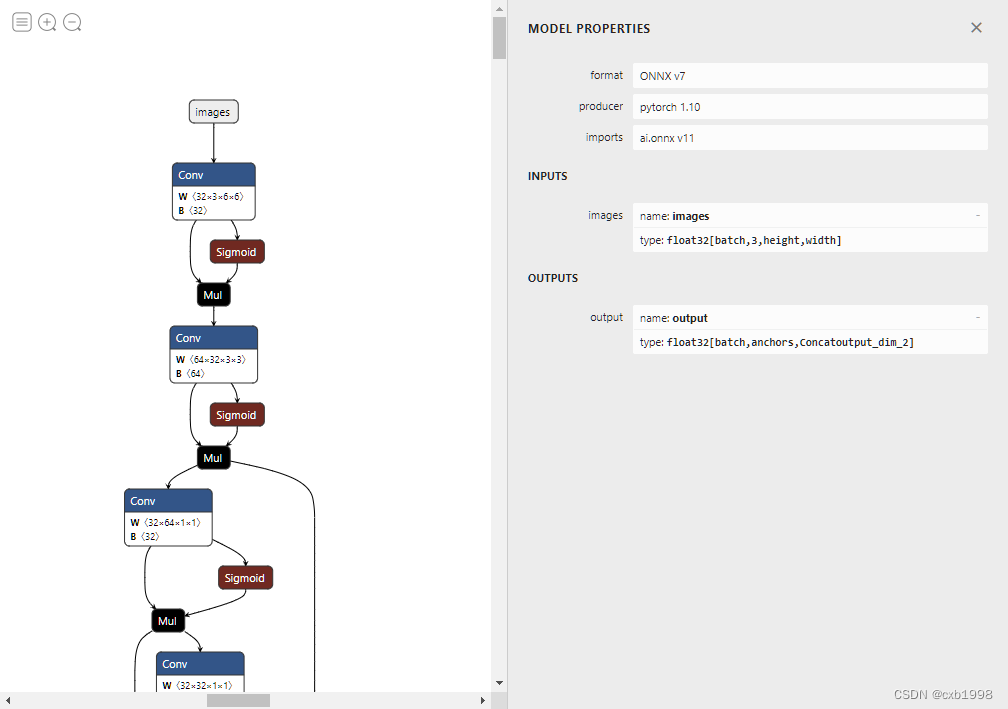
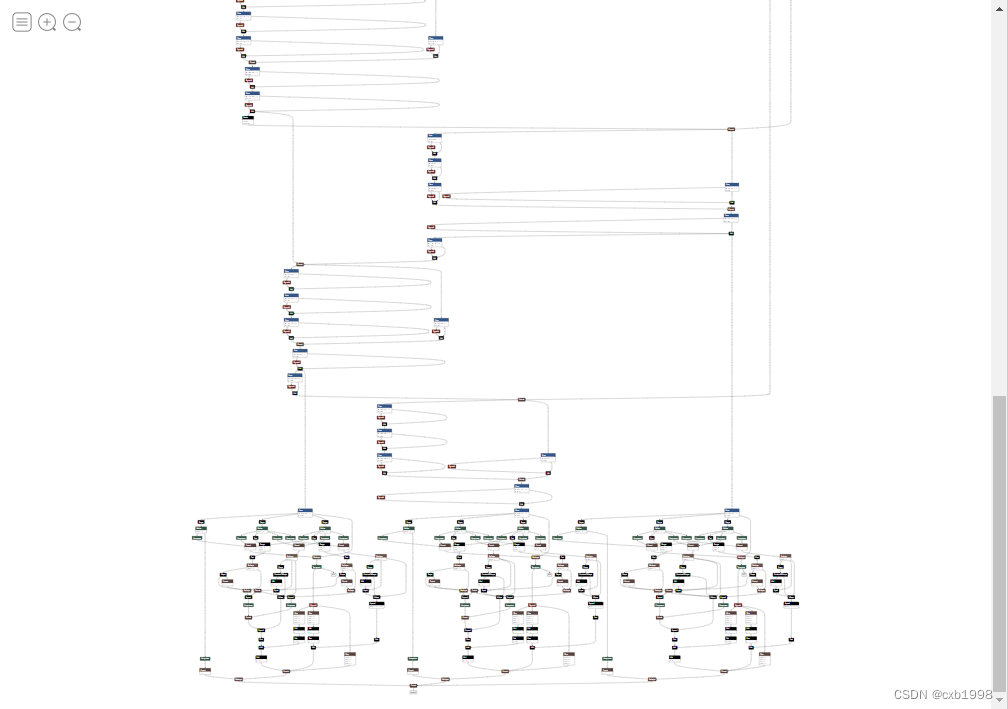
可以看到输出只剩下了一个,但此时onnx的整体仍然看起来很不简洁,是因为直接使用了.shape或者.size返回值,需要进一步修改。
3. 将.shape和.size的返回值经过int类型转换,可以防止很多问题出现,而且会简化模型,找到yolo.py中Detect类的forward函数,可以看到:
x[i] = x[i].view(bs, self.na, self.no, ny, nx).permute(0, 1, 3, 4, 2).contiguous()其中x[i].view的参数来源:
bs, _, ny, nx = x[i].shape直接用了shape的返回值,加上int后再导出:
bs, _, ny, nx = map(int,x[i].shape)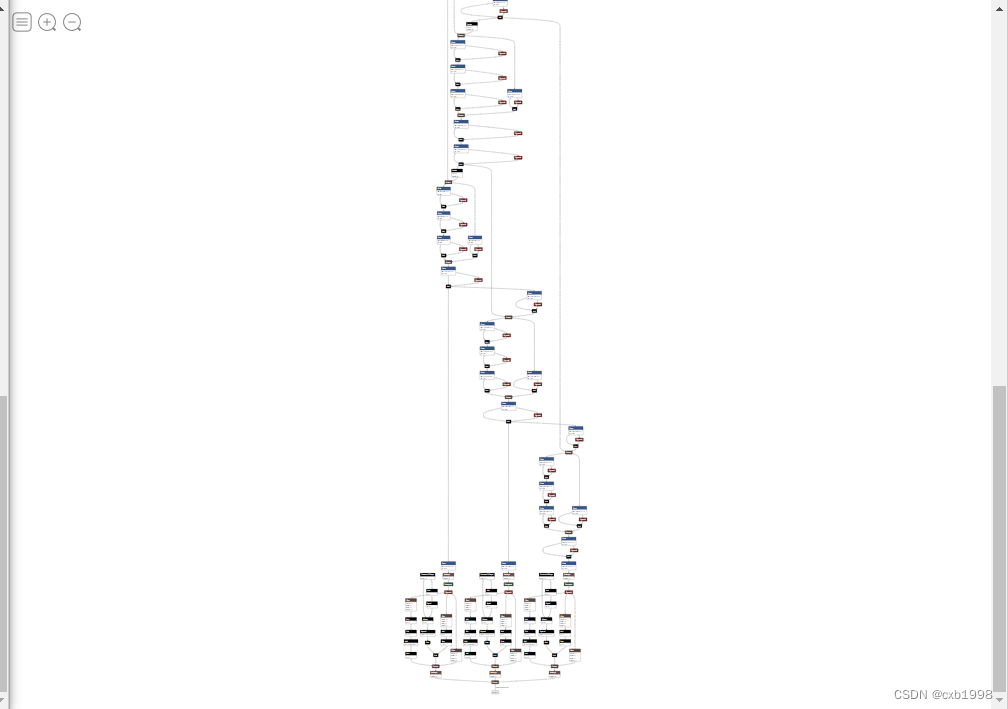
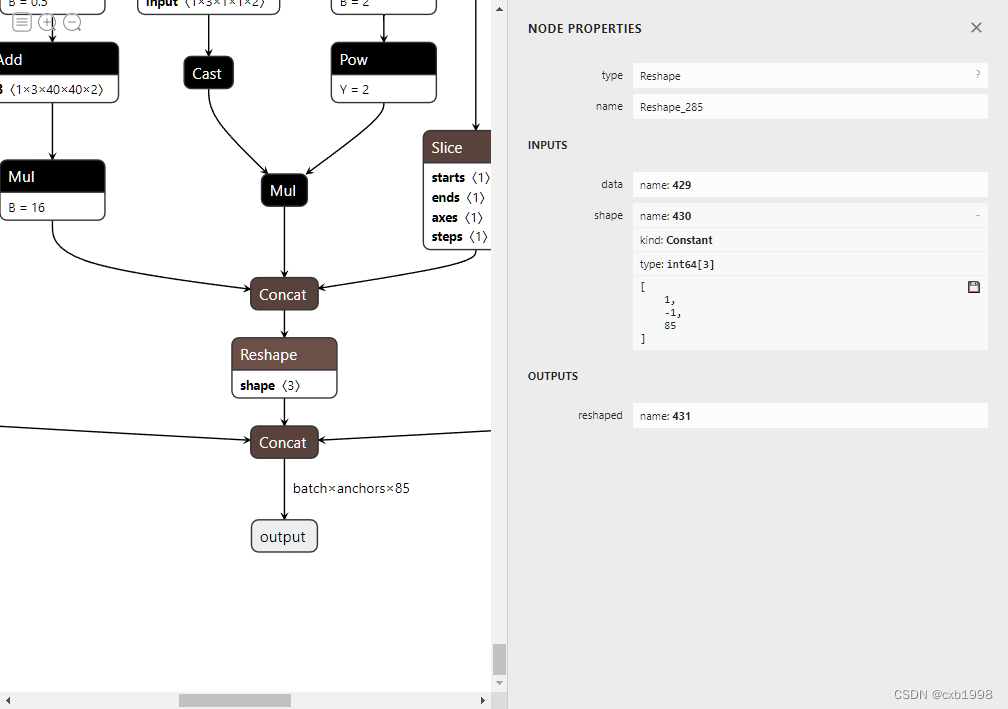
此时模型简洁了不少,但仍没有达到开头看的效果,另外可看到最后concat前的reshape中动态维度并不在batch维度中,需要进一步修改:
4.继续锁定forward函数:
    def forward(self, x):
        z = []  # inference output
        for i in range(self.nl):
            x[i] = self.m[i](x[i])  # conv
            bs, _, ny, nx = map(int,x[i].shape)  # x(bs,255,20,20) to x(bs,3,20,20,85)
            x[i] = x[i].view(bs, self.na, self.no, ny, nx).permute(0, 1, 3, 4, 2).contiguous()

            if not self.training:  # inference
                if self.grid[i].shape[2:4] != x[i].shape[2:4] or self.onnx_dynamic:
                    self.grid[i], self.anchor_grid[i] = self._make_grid(nx, ny, i)

                y = x[i].sigmoid()
                if self.inplace:
                    y[..., 0:2] = (y[..., 0:2] * 2. - 0.5 + self.grid[i]) * self.stride[i]  # xy
                    y[..., 2:4] = (y[..., 2:4] * 2) ** 2 * self.anchor_grid[i]  # wh
                else:  # for YOLOv5 on AWS Inferentia https://github.com/ultralytics/yolov5/pull/2953
                    xy = (y[..., 0:2] * 2. - 0.5 + self.grid[i]) * self.stride[i]  # xy
                    wh = (y[..., 2:4] * 2) ** 2 * self.anchor_grid[i]  # wh
                    y = torch.cat((xy, wh, y[..., 4:]), -1)
                z.append(y.view(bs, -1, self.no))

        # return x if self.training else (torch.cat(z, 1), x)
        return torch.cat(z,1)
可以看到确实将-1置为中间维度了,因此先将bs=-1加入,改变其为动态维度,而中间维度通过计算得到:y与x[i]的shape一致,而x[i]的shape为bs,self.na,ny,nx,self.no,因此中间维度为self.na*ny*nx:
                bs=-1
                z.append(y.view(bs, self.na*ny*nx, self.no))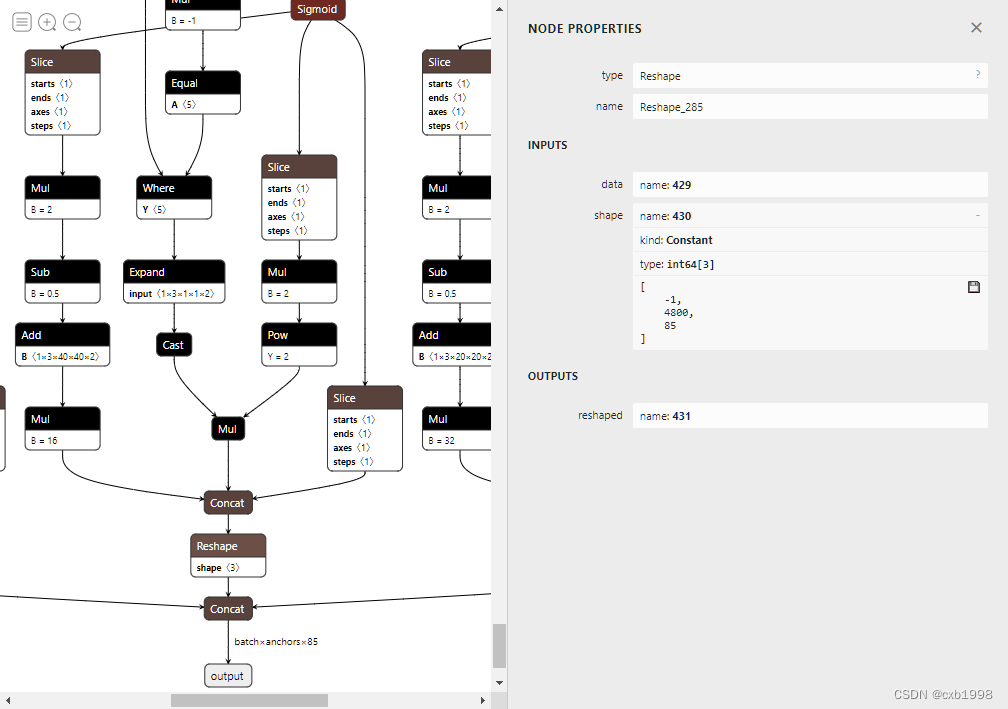
动态维度调整正确。最后我们看到expand、cast等等节点仍然没有达到预期的简介效果,原因是网络结构对anchor_grid的跟踪,而anchor_grid事实上可以直接确定值。
5. 简化expand等节点。
    def _make_grid(self, nx=20, ny=20, i=0):
        d = self.anchors[i].device
        yv, xv = torch.meshgrid([torch.arange(ny).to(d), torch.arange(nx).to(d)])
        grid = torch.stack((xv, yv), 2).expand((1, self.na, ny, nx, 2)).float()
        anchor_grid = (self.anchors[i].clone() * self.stride[i]) \
            .view((1, self.na, 1, 1, 2)).expand((1, self.na, ny, nx, 2)).float()
        return grid, anchor_grid
def forward(self, x):
z = [] # inference output
for i in range(self.nl):
x[i] = self.m[i](x[i]) # conv
bs, _, ny, nx = map(int,x[i].shape) # x(bs,255,20,20) to x(bs,3,20,20,85)
x[i] = x[i].view(bs, self.na, self.no, ny, nx).permute(0, 1, 3, 4, 2).contiguous()
if not self.training: # inference
if self.grid[i].shape[2:4] != x[i].shape[2:4] or self.onnx_dynamic:
self.grid[i], self.anchor_grid[i] = self._make_grid(nx, ny, i)
y = x[i].sigmoid()
if self.inplace:
y[..., 0:2] = (y[..., 0:2] * 2. - 0.5 + self.grid[i]) * self.stride[i] # xy
y[..., 2:4] = (y[..., 2:4] * 2) ** 2 * self.anchor_grid[i] # wh
else: # for YOLOv5 on AWS Inferentia https://github.com/ultralytics/yolov5/pull/2953
xy = (y[..., 0:2] * 2. - 0.5 + self.grid[i]) * self.stride[i] # xy
wh = (y[..., 2:4] * 2) ** 2 * self.anchor_grid[i] # wh
y = torch.cat((xy, wh, y[..., 4:]), -1)
z.append(y.view(bs, -1, self.no))
# return x if self.training else (torch.cat(z, 1), x)
return torch.cat(z,1)self.anchor_grid改掉,并替换相应部分:
    def forward(self, x):
        z = []  # inference output
        for i in range(self.nl):
            x[i] = self.m[i](x[i])  # conv
            bs, _, ny, nx = map(int,x[i].shape)  # x(bs,255,20,20) to x(bs,3,20,20,85)
            x[i] = x[i].view(bs, self.na, self.no, ny, nx).permute(0, 1, 3, 4, 2).contiguous()

            if not self.training:  # inference
                if self.grid[i].shape[2:4] != x[i].shape[2:4] or self.onnx_dynamic:
                    self.grid[i], self.anchor_grid[i] = self._make_grid(nx, ny, i)

                anchor_grid = (self.anchors[i].clone() * self.stride[i]).view(1, -1, 1, 1, 2)
                y = x[i].sigmoid()
                if self.inplace:
                    y[..., 0:2] = (y[..., 0:2] * 2. - 0.5 + self.grid[i]) * self.stride[i]  # xy
                    y[..., 2:4] = (y[..., 2:4] * 2) ** 2 * anchor_grid  # wh
                else:  # for YOLOv5 on AWS Inferentia https://github.com/ultralytics/yolov5/pull/2953
                    xy = (y[..., 0:2] * 2. - 0.5 + self.grid[i]) * self.stride[i]  # xy
                    wh = (y[..., 2:4] * 2) ** 2 * anchor_grid  # wh
                    y = torch.cat((xy, wh, y[..., 4:]), -1)
                bs=-1
                z.append(y.view(bs, self.na*ny*nx, self.no))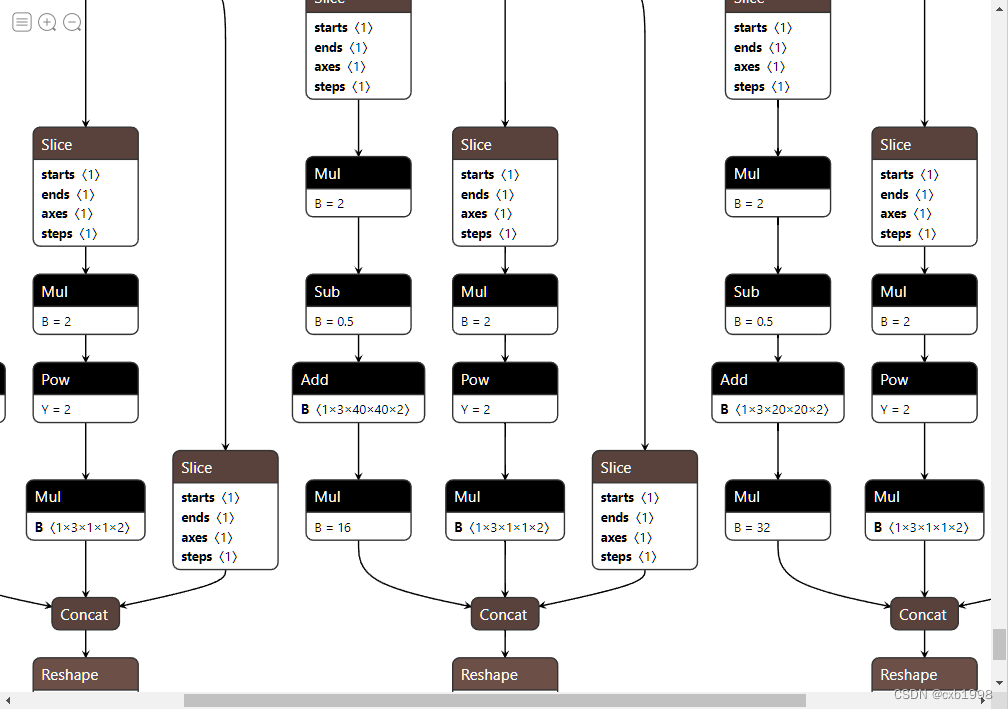
可以看到简化完成,我们尝试使用onnx-simplifier进行对比,发现后者的简化效果是十分不理想的。
trt模型的编译和分类器还是一致的,见文章tensorRT部署实战——分类器:
CSDN https://mp.csdn.net/mp_blog/creation/editor/126450140
void inference(){

    TRTLogger logger;
    auto engine_data = load_file("yolov5s.trtmodel");
    auto runtime   = make_nvshared(nvinfer1::createInferRuntime(logger));
    auto engine = make_nvshared(runtime->deserializeCudaEngine(engine_data.data(), engine_data.size()));
    if(engine == nullptr){
        printf("Deserialize cuda engine failed.\n");
        runtime->destroy();
        return;
    }

    if(engine->getNbBindings() != 2){
        printf("你的onnx导出有问题,必须是1个输入和1个输出,你这明显有:%d个输出.\n", engine->getNbBindings() - 1);
        return;
    }

    cudaStream_t stream = nullptr;
    checkRuntime(cudaStreamCreate(&stream));
    auto execution_context = make_nvshared(engine->createExecutionContext());

    int input_batch = 1;
    int input_channel = 3;
    int input_height = 640;
    int input_width = 640;
    int input_numel = input_batch * input_channel * input_height * input_width;
    float* input_data_host = nullptr;
    float* input_data_device = nullptr;
    checkRuntime(cudaMallocHost(&input_data_host, input_numel * sizeof(float)));
    checkRuntime(cudaMalloc(&input_data_device, input_numel * sizeof(float)));

    ///
    // letter box
    auto image = cv::imread("car.jpg");
    // 通过双线性插值对图像进行resize
    float scale_x = input_width / (float)image.cols;
    float scale_y = input_height / (float)image.rows;
    float scale = std::min(scale_x, scale_y);
    float i2d[6], d2i[6];
    // resize图像,源图像和目标图像几何中心的对齐
    i2d[0] = scale;  i2d[1] = 0;  i2d[2] = (-scale * image.cols + input_width + scale  - 1) * 0.5;
    i2d[3] = 0;  i2d[4] = scale;  i2d[5] = (-scale * image.rows + input_height + scale - 1) * 0.5;

    cv::Mat m2x3_i2d(2, 3, CV_32F, i2d);  // image to dst(network), 2x3 matrix
    cv::Mat m2x3_d2i(2, 3, CV_32F, d2i);  // dst to image, 2x3 matrix
    cv::invertAffineTransform(m2x3_i2d, m2x3_d2i);  // 计算一个反仿射变换

    cv::Mat input_image(input_height, input_width, CV_8UC3);
    cv::warpAffine(image, input_image, m2x3_i2d, input_image.size(), cv::INTER_LINEAR, cv::BORDER_CONSTANT, cv::Scalar::all(114));  // 对图像做平移缩放旋转变换,可逆
    cv::imwrite("input-image.jpg", input_image);

    int image_area = input_image.cols * input_image.rows;
    unsigned char* pimage = input_image.data;
    float* phost_b = input_data_host + image_area * 0;
    float* phost_g = input_data_host + image_area * 1;
    float* phost_r = input_data_host + image_area * 2;
    for(int i = 0; i < image_area; ++i, pimage += 3){
        // 注意这里的顺序rgb调换了
        *phost_r++ = pimage[0] / 255.0f;
        *phost_g++ = pimage[1] / 255.0f;
        *phost_b++ = pimage[2] / 255.0f;
    }
    ///
    checkRuntime(cudaMemcpyAsync(input_data_device, input_data_host, input_numel * sizeof(float), cudaMemcpyHostToDevice, stream));

    // 3x3输入,对应3x3输出
    auto output_dims = engine->getBindingDimensions(1);
    int output_numbox = output_dims.d[1];
    int output_numprob = output_dims.d[2];
    int num_classes = output_numprob - 5;
    int output_numel = input_batch * output_numbox * output_numprob;
    float* output_data_host = nullptr;
    float* output_data_device = nullptr;
    checkRuntime(cudaMallocHost(&output_data_host, sizeof(float) * output_numel));
    checkRuntime(cudaMalloc(&output_data_device, sizeof(float) * output_numel));

    // 明确当前推理时,使用的数据输入大小
    auto input_dims = engine->getBindingDimensions(0);
    input_dims.d[0] = input_batch;

    execution_context->setBindingDimensions(0, input_dims);
    float* bindings[] = {input_data_device, output_data_device};
    bool success      = execution_context->enqueueV2((void**)bindings, stream, nullptr);
    checkRuntime(cudaMemcpyAsync(output_data_host, output_data_device, sizeof(float) * output_numel, cudaMemcpyDeviceToHost, stream));
    checkRuntime(cudaStreamSynchronize(stream));

    // decode box:从不同尺度下的预测狂还原到原输入图上(包括:预测框,类被概率,置信度)
    vector<vector<float>> bboxes;
    float confidence_threshold = 0.25;
    float nms_threshold = 0.5;
    for(int i = 0; i < output_numbox; ++i){
        float* ptr = output_data_host + i * output_numprob;
        float objness = ptr[4];
        if(objness < confidence_threshold)
            continue;

        float* pclass = ptr + 5;
        int label     = std::max_element(pclass, pclass + num_classes) - pclass;
        float prob    = pclass[label];
        float confidence = prob * objness;
        if(confidence < confidence_threshold)
            continue;

        // 中心点、宽、高
        float cx     = ptr[0];
        float cy     = ptr[1];
        float width  = ptr[2];
        float height = ptr[3];

        // 预测框
        float left   = cx - width * 0.5;
        float top    = cy - height * 0.5;
        float right  = cx + width * 0.5;
        float bottom = cy + height * 0.5;

        // 对应图上的位置
        float image_base_left   = d2i[0] * left   + d2i[2];
        float image_base_right  = d2i[0] * right  + d2i[2];
        float image_base_top    = d2i[0] * top    + d2i[5];
        float image_base_bottom = d2i[0] * bottom + d2i[5];
        bboxes.push_back({image_base_left, image_base_top, image_base_right, image_base_bottom, (float)label, confidence});
    }
    printf("decoded bboxes.size = %d\n", bboxes.size());

    // nms非极大抑制
    std::sort(bboxes.begin(), bboxes.end(), [](vector<float>& a, vector<float>& b){return a[5] > b[5];});
    std::vector<bool> remove_flags(bboxes.size());
    std::vector<vector<float>> box_result;
    box_result.reserve(bboxes.size());

    auto iou = [](const vector<float>& a, const vector<float>& b){
        float cross_left   = std::max(a[0], b[0]);
        float cross_top    = std::max(a[1], b[1]);
        float cross_right  = std::min(a[2], b[2]);
        float cross_bottom = std::min(a[3], b[3]);

        float cross_area = std::max(0.0f, cross_right - cross_left) * std::max(0.0f, cross_bottom - cross_top);
        float union_area = std::max(0.0f, a[2] - a[0]) * std::max(0.0f, a[3] - a[1])
                         + std::max(0.0f, b[2] - b[0]) * std::max(0.0f, b[3] - b[1]) - cross_area;
        if(cross_area == 0 || union_area == 0) return 0.0f;
        return cross_area / union_area;
    };

    for(int i = 0; i < bboxes.size(); ++i){
        if(remove_flags[i]) continue;

        auto& ibox = bboxes[i];
        box_result.emplace_back(ibox);
        for(int j = i + 1; j < bboxes.size(); ++j){
            if(remove_flags[j]) continue;

            auto& jbox = bboxes[j];
            if(ibox[4] == jbox[4]){
                // class matched
                if(iou(ibox, jbox) >= nms_threshold)
                    remove_flags[j] = true;
            }
        }
    }
    printf("box_result.size = %d\n", box_result.size());

    for(int i = 0; i < box_result.size(); ++i){
        auto& ibox = box_result[i];
        float left = ibox[0];
        float top = ibox[1];
        float right = ibox[2];
        float bottom = ibox[3];
        int class_label = ibox[4];
        float confidence = ibox[5];
        cv::Scalar color;
        tie(color[0], color[1], color[2]) = random_color(class_label);
        cv::rectangle(image, cv::Point(left, top), cv::Point(right, bottom), color, 3);

        auto name      = cocolabels[class_label];
        auto caption   = cv::format("%s %.2f", name, confidence);
        int text_width = cv::getTextSize(caption, 0, 1, 2, nullptr).width + 10;
        cv::rectangle(image, cv::Point(left-3, top-33), cv::Point(left + text_width, top), color, -1);
        cv::putText(image, caption, cv::Point(left, top-5), 0, 1, cv::Scalar::all(0), 2, 16);
    }
    cv::imwrite("image-draw.jpg", image);

    checkRuntime(cudaStreamDestroy(stream));
    checkRuntime(cudaFreeHost(input_data_host));
    checkRuntime(cudaFreeHost(output_data_host));
    checkRuntime(cudaFree(input_data_device));
    checkRuntime(cudaFree(output_data_device));
}1. 可以看到开始的步骤还是一样的:加载模型—>runtime实例—>反序列化得到engine—>创建流、执行上下文—>分配内存。
    TRTLogger logger;
    auto engine_data = load_file("yolov5s.trtmodel");
    auto runtime   = make_nvshared(nvinfer1::createInferRuntime(logger));
    auto engine = make_nvshared(runtime->deserializeCudaEngine(engine_data.data(), engine_data.size()));
    if(engine == nullptr){
        printf("Deserialize cuda engine failed.\n");
        runtime->destroy();
        return;
    }

    if(engine->getNbBindings() != 2){
        printf("你的onnx导出有问题,必须是1个输入和1个输出,你这明显有:%d个输出.\n", engine->getNbBindings() - 1);
        return;
    }

    cudaStream_t stream = nullptr;
    checkRuntime(cudaStreamCreate(&stream));
    auto execution_context = make_nvshared(engine->createExecutionContext());

    int input_batch = 1;
    int input_channel = 3;
    int input_height = 640;
    int input_width = 640;
    int input_numel = input_batch * input_channel * input_height * input_width;
    float* input_data_host = nullptr;
    float* input_data_device = nullptr;
    checkRuntime(cudaMallocHost(&input_data_host, input_numel * sizeof(float)));
    checkRuntime(cudaMalloc(&input_data_device, input_numel * sizeof(float)));
2. 接下来是预处理,yolov5训练时采用了等比缩放、黑边填充的方式,因此推理端的输入需要先进性同样的预处理。
    ///
    // letter box
    auto image = cv::imread("car.jpg");
    // 通过双线性插值对图像进行resize
    float scale_x = input_width / (float)image.cols;
    float scale_y = input_height / (float)image.rows;
    float scale = std::min(scale_x, scale_y);
    float i2d[6], d2i[6];
    // resize图像,源图像和目标图像几何中心的对齐
    i2d[0] = scale;  i2d[1] = 0;  i2d[2] = (-scale * image.cols + input_width + scale  - 1) * 0.5;
    i2d[3] = 0;  i2d[4] = scale;  i2d[5] = (-scale * image.rows + input_height + scale - 1) * 0.5;

    cv::Mat m2x3_i2d(2, 3, CV_32F, i2d);  // image to dst(network), 2x3 matrix
    cv::Mat m2x3_d2i(2, 3, CV_32F, d2i);  // dst to image, 2x3 matrix
    cv::invertAffineTransform(m2x3_i2d, m2x3_d2i);  // 计算一个反仿射变换

    cv::Mat input_image(input_height, input_width, CV_8UC3);
    cv::warpAffine(image, input_image, m2x3_i2d, input_image.size(), cv::INTER_LINEAR, cv::BORDER_CONSTANT, cv::Scalar::all(114));  // 对图像做平移缩放旋转变换,可逆
    cv::imwrite("input-image.jpg", input_image);
首先得到等比缩放比例scale,例如原图1920*1080,输入为640*640,那么scale_x=0.333,scale_y=0.593,缩放比例选择0.33,,即将最长边缩放到640,缩放后短边不足640的进行黑边填充。
i2d是img2dst的2*3矩阵,关于变换矩阵的确定,可以参照:
    i2d[0] = scale;  i2d[1] = 0;  i2d[2] = (-scale * image.cols + input_width + scale  - 1) * 0.5;
    i2d[3] = 0;  i2d[4] = scale;  i2d[5] = (-scale * image.rows + input_height + scale - 1) * 0.5;
为什么不是
    i2d[0] = scale;  i2d[1] = 0;  i2d[2] = (-scale * image.cols + input_width) * 0.5;
    i2d[3] = 0;  i2d[4] = scale;  i2d[5] = (-scale * image.rows + input_height) * 0.5;
不是很清楚,但修改后差距也不大。
3. 得到仿射变换矩阵m2x3_i2d和仿射逆变换矩阵m2x3_d2i,并利用opencv进行warpaffine。
    cv::Mat m2x3_i2d(2, 3, CV_32F, i2d);  // image to dst(network), 2x3 matrix
    cv::Mat m2x3_d2i(2, 3, CV_32F, d2i);  // dst to image, 2x3 matrix
    cv::invertAffineTransform(m2x3_i2d, m2x3_d2i);  // 计算一个反仿射变换
    cv::warpAffine(image, input_image, m2x3_i2d, input_image.size(), cv::INTER_LINEAR, cv::BORDER_CONSTANT, cv::Scalar::all(114));  // 对图像做平移缩放旋转变换,可逆
    cv::imwrite("input-image.jpg", input_image);
4. 预处理的另一部分,BGR转RGB并归一化,不过这里没有进行标准化,原理在分类器中已经详细介绍。
    int image_area = input_image.cols * input_image.rows;
    unsigned char* pimage = input_image.data;
    float* phost_b = input_data_host + image_area * 0;
    float* phost_g = input_data_host + image_area * 1;
    float* phost_r = input_data_host + image_area * 2;
    for(int i = 0; i < image_area; ++i, pimage += 3){
        // 注意这里的顺序rgb调换了
        *phost_r++ = pimage[0] / 255.0f;
        *phost_g++ = pimage[1] / 255.0f;
        *phost_b++ = pimage[2] / 255.0f;
    }
5. 确定内存大小并分配
    // 3x3输入,对应3x3输出
    auto output_dims = engine->getBindingDimensions(1);
    int output_numbox = output_dims.d[1];
    int output_numprob = output_dims.d[2];
    int num_classes = output_numprob - 5;
    int output_numel = input_batch * output_numbox * output_numprob;
    float* output_data_host = nullptr;
    float* output_data_device = nullptr;
    checkRuntime(cudaMallocHost(&output_data_host, sizeof(float) * output_numel));
    checkRuntime(cudaMalloc(&output_data_device, sizeof(float) * output_numel));
6. 执行推理并将数据搬运回host
    // 明确当前推理时,使用的数据输入大小
    auto input_dims = engine->getBindingDimensions(0);
    input_dims.d[0] = input_batch;

    execution_context->setBindingDimensions(0, input_dims);
    float* bindings[] = {input_data_device, output_data_device};
    bool success      = execution_context->enqueueV2((void**)bindings, stream, nullptr);
    checkRuntime(cudaMemcpyAsync(output_data_host, output_data_device, sizeof(float) * output_numel, cudaMemcpyDeviceToHost, stream));
    checkRuntime(cudaStreamSynchronize(stream));
7. 此时output_data_host中的形式已经和之前的文章NMS里的输入一致,可以回顾:
后处理将预测框映射回原图上:
    // decode box:从不同尺度下的预测狂还原到原输入图上(包括:预测框,类被概率,置信度)
    vector<vector<float>> bboxes;
    float confidence_threshold = 0.25;
    float nms_threshold = 0.5;
    for(int i = 0; i < output_numbox; ++i){
        float* ptr = output_data_host + i * output_numprob;
        float objness = ptr[4];
        if(objness < confidence_threshold)
            continue;

        float* pclass = ptr + 5;
        int label     = std::max_element(pclass, pclass + num_classes) - pclass;
        float prob    = pclass[label];
        float confidence = prob * objness;
        if(confidence < confidence_threshold)
            continue;

        // 中心点、宽、高
        float cx     = ptr[0];
        float cy     = ptr[1];
        float width  = ptr[2];
        float height = ptr[3];

        // 预测框
        float left   = cx - width * 0.5;
        float top    = cy - height * 0.5;
        float right  = cx + width * 0.5;
        float bottom = cy + height * 0.5;

        // 对应图上的位置
        float image_base_left   = d2i[0] * left   + d2i[2];
        float image_base_right  = d2i[0] * right  + d2i[2];
        float image_base_top    = d2i[0] * top    + d2i[5];
        float image_base_bottom = d2i[0] * bottom + d2i[5];
        bboxes.push_back({image_base_left, image_base_top, image_base_right, image_base_bottom, (float)label, confidence});
    }
    printf("decoded bboxes.size = %d\n", bboxes.size());
流程为:
设置置信度阈值0.25用于滤除置信度过低的框,设置nms阈值进行非极大值抑制;
for循环对每个框进行操作,提取每个框的置信度,低于置信度阈值的直接略过节省时间;
找到框类别概率最大的类作为该框代表的label,并获取该概率值和置信度再相乘作进一步置信度滤除;
获得中心点、宽、高转化为框的左上和右下坐标,并通过之前计算的反仿射矩阵将框映射回原图中。
8. 后处理的下一部分就是进行NMS非极大值抑制,这在之前的文章中详细介绍过,并对其python实现,cpu实现和gpu实现都进行了详细的介绍:
https://blog.csdn.net/qq_41389330/article/details/126165954?spm=1001.2014.3001.5502https://blog.csdn.net/qq_41389330/article/details/126165954?spm=1001.2014.3001.5502这里为cpu版本,注意bboxes已经变成image_base_left, image_base_top, image_base_right, image_base_bottom, (float)label, confidence的形式:
    // nms非极大抑制
    std::sort(bboxes.begin(), bboxes.end(), [](vector<float>& a, vector<float>& b){return a[5] > b[5];});
    std::vector<bool> remove_flags(bboxes.size());
    std::vector<vector<float>> box_result;
    box_result.reserve(bboxes.size());

    auto iou = [](const vector<float>& a, const vector<float>& b){
        float cross_left   = std::max(a[0], b[0]);
        float cross_top    = std::max(a[1], b[1]);
        float cross_right  = std::min(a[2], b[2]);
        float cross_bottom = std::min(a[3], b[3]);

        float cross_area = std::max(0.0f, cross_right - cross_left) * std::max(0.0f, cross_bottom - cross_top);
        float union_area = std::max(0.0f, a[2] - a[0]) * std::max(0.0f, a[3] - a[1])
                         + std::max(0.0f, b[2] - b[0]) * std::max(0.0f, b[3] - b[1]) - cross_area;
        if(cross_area == 0 || union_area == 0) return 0.0f;
        return cross_area / union_area;
    };

    for(int i = 0; i < bboxes.size(); ++i){
        if(remove_flags[i]) continue;

        auto& ibox = bboxes[i];
        box_result.emplace_back(ibox);
        for(int j = i + 1; j < bboxes.size(); ++j){
            if(remove_flags[j]) continue;

            auto& jbox = bboxes[j];
            if(ibox[4] == jbox[4]){
                // class matched
                if(iou(ibox, jbox) >= nms_threshold)
                    remove_flags[j] = true;
            }
        }
    }
    printf("box_result.size = %d\n", box_result.size());
流程:
首先对框进行排序,排序规则是置信度由高到低;
定义remove_flags用来标记哪些框是要被滤除掉的,哪些框是要留下的(效率);
for对每个框进行操作,若当前框标记为保留,则与后续框进行比较,比较对象是与当前框类别相同的框,比较内容是iou交并比,若交并比大于某个阈值,则后续框被打上去除的标记,这样就能保证留下了该类别该位置基本只有一个框。
9.最后是在原图上将框画出来:
    for(int i = 0; i < box_result.size(); ++i){
        auto& ibox = box_result[i];
        float left = ibox[0];
        float top = ibox[1];
        float right = ibox[2];
        float bottom = ibox[3];
        int class_label = ibox[4];
        float confidence = ibox[5];
        cv::Scalar color;
        tie(color[0], color[1], color[2]) = random_color(class_label);
        cv::rectangle(image, cv::Point(left, top), cv::Point(right, bottom), color, 3);

        auto name      = cocolabels[class_label];
        auto caption   = cv::format("%s %.2f", name, confidence);
        int text_width = cv::getTextSize(caption, 0, 1, 2, nullptr).width + 10;
        cv::rectangle(image, cv::Point(left-3, top-33), cv::Point(left + text_width, top), color, -1);
        cv::putText(image, caption, cv::Point(left, top-5), 0, 1, cv::Scalar::all(0), 2, 16);
    }
    cv::imwrite("image-draw.jpg", image);
根据类别赋予随机颜色,通过rectangle和putText画框以及写类别和概率的文本信息。
最后是效果图:
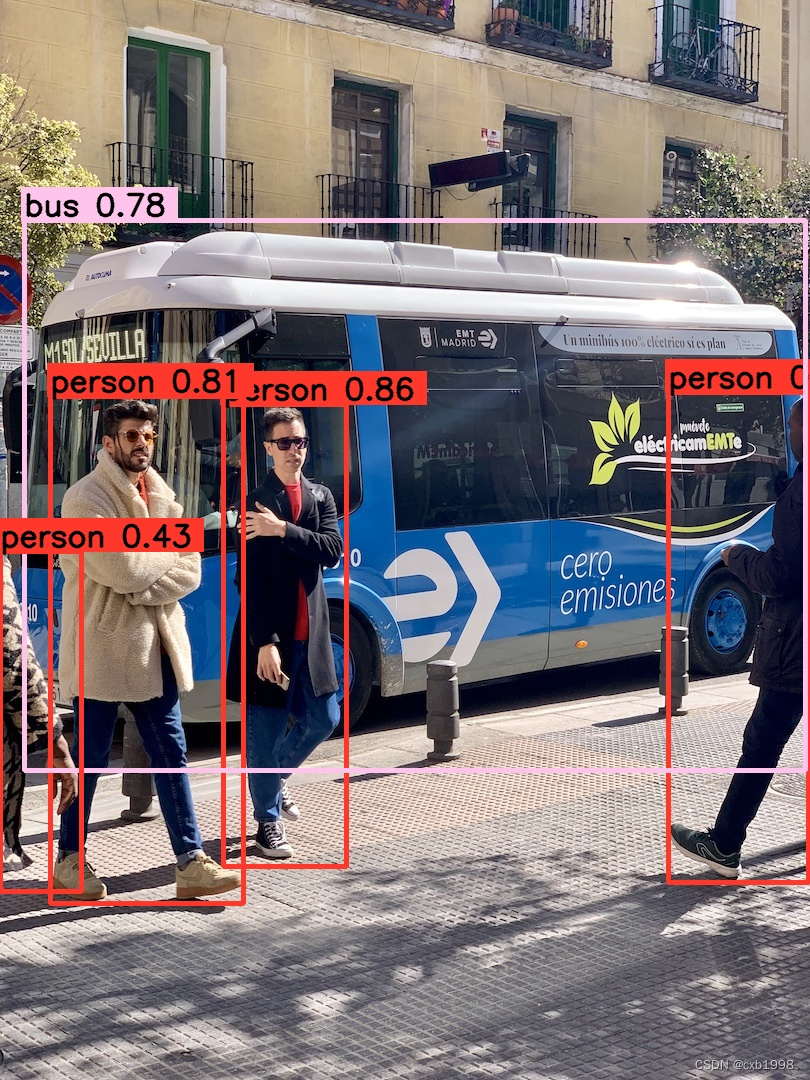
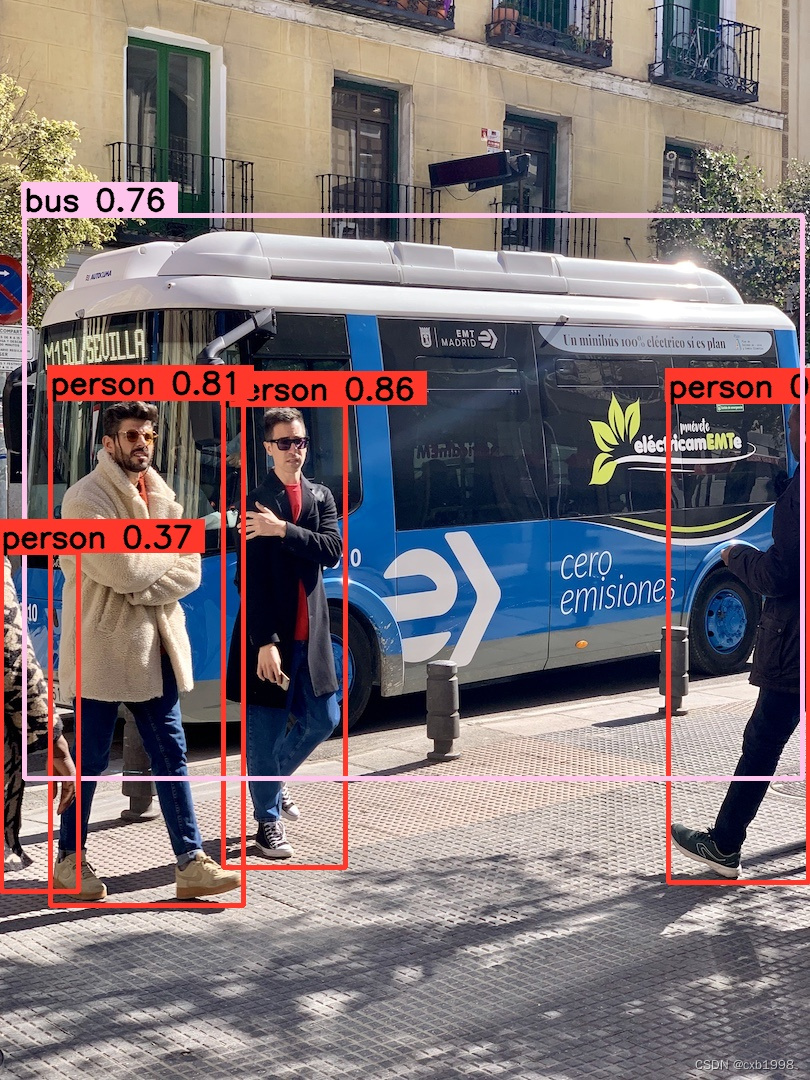
左图是onnx在推理效果,右图是trt推理效果,可以看到基本大差不差。
我是Google云的新手,我正在尝试对其进行首次部署。我的第一个部署是RubyonRails项目。我基本上是在关注thisguideinthegoogleclouddocumentation.唯一的区别是我使用的是我自己的项目,而不是他们提供的“helloworld”项目。这是我的app.yaml文件runtime:customvm:trueentrypoint:bundleexecrackup-p8080-Eproductionconfig.ruresources:cpu:0.5memory_gb:1.3disk_size_gb:10当我转到我的项目目录并运行gcloudprevie
我可以在Azure网站上部署RubyonRails吗? 最佳答案 还没有。目前仅支持.NET和PHP。 关于ruby-on-rails-RubyonRails可以部署在Azure网站上吗?,我们在StackOverflow上找到一个类似的问题: https://stackoverflow.com/questions/12964010/
前置步骤我们都操作完了,这篇开始介绍jenkins的集成。话不多说,看操作1、登录进入jenkins后会让你选择安装插件,选择第一个默认的就行。安装完成后设置账号密码,重新登录。2、配置JDK和Git都需要执行路径,所以需要先把执行路径找到,先进入服务器的docker容器,2.1JDK的路径root@69eef9ee86cf:/usr/bin#echo$JAVA_HOME/usr/local/openjdk-82.2Git的路径root@69eef9ee86cf:/#whichgit/usr/bin/git3、先配置JDK和Git。点击:ManageJenkins>>GlobalToolCon
深度学习部署:Windows安装pycocotools报错解决方法1.pycocotools库的简介2.pycocotools安装的坑3.解决办法更多Ai资讯:公主号AiCharm本系列是作者在跑一些深度学习实例时,遇到的各种各样的问题及解决办法,希望能够帮助到大家。ERROR:Commanderroredoutwithexitstatus1:'D:\Anaconda3\python.exe'-u-c'importsys,setuptools,tokenize;sys.argv[0]='"'"'C:\\Users\\46653\\AppData\\Local\\Temp\\pip-instal
@作者:SYFStrive @博客首页:HomePage📜:微信小程序📌:个人社区(欢迎大佬们加入)👉:社区链接🔗📌:觉得文章不错可以点点关注👉:专栏连接🔗💃:感谢支持,学累了可以先看小段由小胖给大家带来的街舞👉微信小程序(🔥)目录自定义组件-behaviors 1、什么是behaviors 2、behaviors的工作方式 3、创建behavior 4、导入并使用behavior 5、behavior中所有可用的节点 6、同名字段的覆盖和组合规则总结最后自定义组件-behaviors 1、什么是behaviorsbehaviors是小程序中,用于实现
Ocra无法处理需要“tk”的应用程序require'tk'puts'nope'用奥克拉http://github.com/larsch/ocra不起作用(如链接中的一个问题所述)问题:https://github.com/larsch/ocra/issues/29(Ocra是1.9的"new"rubyscript2exe,本质上它用于将rb脚本部署为可执行文件)唯一的问题似乎是缺少tcl的DLL文件我不认为这是一个问题据我所知,问题是缺少tk的DLL文件如果它们是已知的,则可以在执行ocra时将它们包括在内有没有办法知道tk工作所需的DLL依赖项? 最佳答
我有一个类unzipper.rb,它使用Rubyzip解压文件。在我的本地环境中,我可以成功解压缩文件,而无需使用require'zip'明确包含依赖项但是在Heroku上,我得到一个NameError(uninitializedconstantUnzipper::Zip)我只能通过使用明确的require来解决问题:为什么这在Heroku环境中是必需的,但在本地主机上却不是?我的印象是Rails自动需要所有gem。app/services/unzipper.rbrequire'zip'#OnlyrequiredforHeroku.Workslocallywithout!class
出于某种原因,heroku尝试要求dm-sqlite-adapter,即使它应该在这里使用Postgres。请注意,这发生在我打开任何URL时-而不是在gitpush本身期间。我构建了一个默认的Facebook应用程序。gem文件:source:gemcuttergem"foreman"gem"sinatra"gem"mogli"gem"json"gem"httparty"gem"thin"gem"data_mapper"gem"heroku"group:productiondogem"pg"gem"dm-postgres-adapter"endgroup:development,:t
如何使用Capistrano将Rails应用程序部署到无法访问外部网络或存储库的生产或暂存服务器?我已经设法完成部署的一半,并意识到Capistrano没有在我的本地机器上下载gitrepo,但它首先连接到远程服务器并尝试在那里下载Git存储库。我希望有一个类似Javaee的构建系统,其中创建可交付成果并将该可交付成果发送到服务器。就像您构建.ear文件并将其部署到您想要的任何服务器上一样。显然在RoR中,你被迫(据我所知)在该服务器上构建应用程序,在那里创建一个gem存储库,在那里克隆最新的分支等等。有什么方法可以将准备运行的包发送到远程服务器吗? 最佳答
最近在工作中,看到一些新手测试同学,对接口测试存在很多疑问,甚至包括一些从事软件测试3,5年的同学,在聊到接口时,也是一知半解;今天借着这个机会,对接口测试做个实战教学,顺便总结一下经验,分享给大家。计划拆分成4个模块跟大家做一个分享,(接口测试、接口基础知识、接口自动化、接口进阶)感兴趣的小伙伴记得关注,希望对你的日常工作和求职面试,带来一些帮助。注:文章较长有5000多字,希望小伙伴们认真看完,当然有些内容对小白同学不是太友好,如果你需要详细了解其中的一些概念或者名词,请在文章之后留言,后续我将针对大家的疑问,整理输出一些大家感兴趣的文章。随着开发模式的迭代更新,前后端分离已不是新的概念,
