一、前言
二、springboot项目初始化方式实战篇
1.ApplicationRunner
2.CommandLineRunner
3.ApplicationListener监听ContextRefreshedEvent事件
4.InitializingBean
5.@PostConstruct
6.静态代码块
二、各种初始化操作的执行顺序
三、刨根问底,从官方文档看各种初始化操作
1.ApplicationRunner使用说明
2.CommandLineRunner使用说明
3.ApplicationListener监听ContextRefreshedEvent事件使用说明
4.InitializingBean使用说明
5.@PostConstruct使用说明
平常的项目开发中,经常会遇到数据初始化的需求,比如说在项目启动之后需要读取自定义的配置信息、初始化自定义对象信息等等,那springboot项目中进行初始化方式有哪些,今天就一起来聊一下.为方便小伙伴查阅,第二个章节已经将各种方式进行了实现,需要用到的小伙伴可以直接拿去用。至于为什么能那样做,翻阅了相关官方文档,会做出简要说明,感兴趣的小伙伴可以看下第三个章节。
@Component
public class PersonalApplicationRunner implements ApplicationRunner {
    @Override
    public void run(ApplicationArguments args) throws Exception {
        System.out.println("spring容器初始化方式:ApplicationRunner");
    }
}
@Component
public class PersonalCommandLineRunner implements CommandLineRunner {
    @Override
    public void run(String... args) throws Exception {
        System.out.println("spring容器初始化方式:CommandLineRunner");
    }
}
@Component
public class PersonalContextRefreshedEvent implements ApplicationListener<ContextRefreshedEvent> {
    @Override
    public void onApplicationEvent(ContextRefreshedEvent contextRefreshedEvent) {
        System.out.println("spring容器初始化方式:ApplicationListener<ContextRefreshedEvent>");
    }
}
@Configuration
public class PersonalInitializingBean implements InitializingBean {
    @Override
    public void afterPropertiesSet() throws Exception {
        System.out.println("spring容器初始化方式:PersonalInitializingBean");
    }
}
@Configuration
public class PersonalInitializingBean implements InitializingBean {
    @Override
    public void afterPropertiesSet() throws Exception {
        System.out.println("spring容器初始化方式:PersonalInitializingBean");
    }
}
@Component
public class PersonalStacticInit {

    static {
        System.out.println("静态代码块执行。。。。。。。。");
    }
}
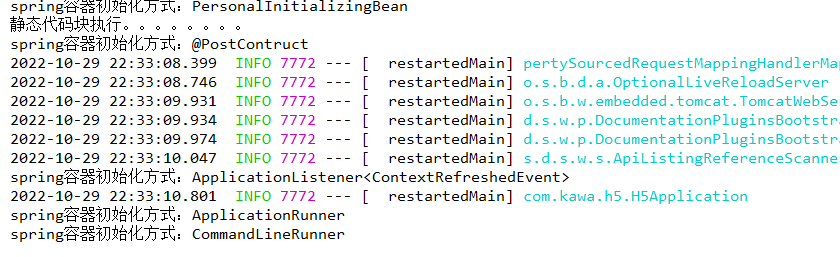
项目启动,控制台输出内容如下:
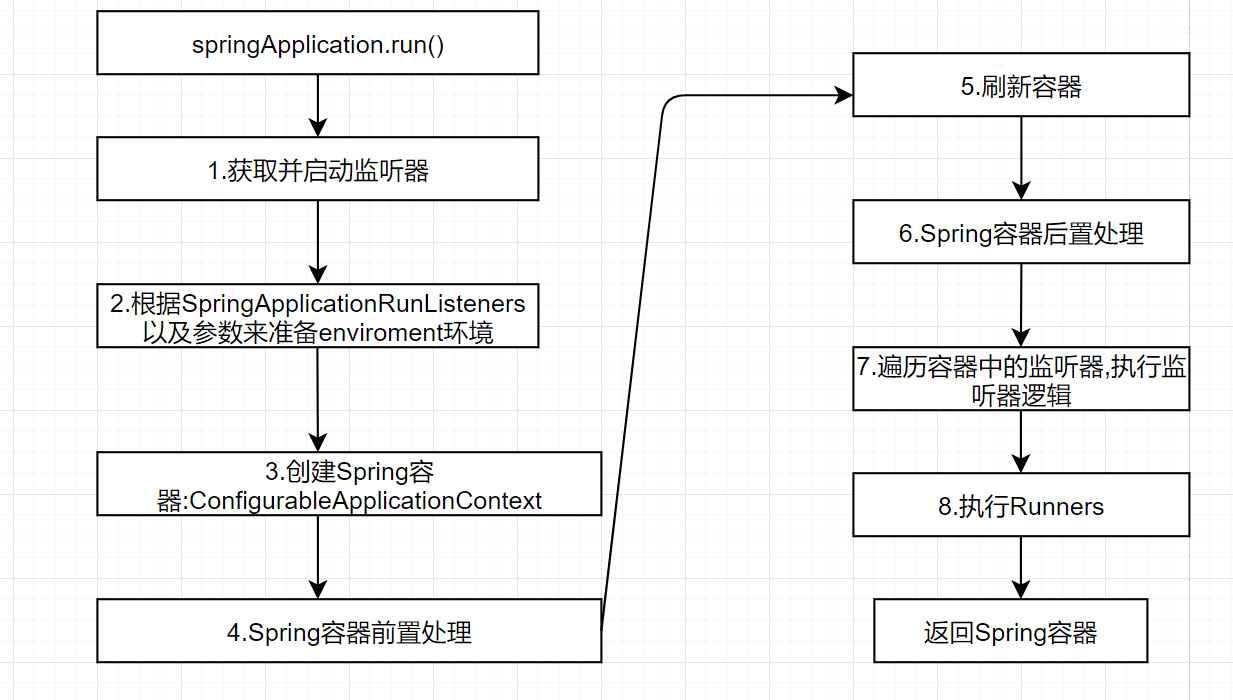
springboot项目启动类中run方法执行逻辑实际上是执行SpringApplication中run方法:
 public ConfigurableApplicationContext run(String... args) {
        //计时工具
        StopWatch stopWatch = new StopWatch();
        stopWatch.start();
        ConfigurableApplicationContext context = null;
        Collection<SpringBootExceptionReporter> exceptionReporters = new ArrayList();
        this.configureHeadlessProperty();
        //第一步,获取并启动监听器
        SpringApplicationRunListeners listeners = this.getRunListeners(args);
        listeners.starting();

        Collection exceptionReporters;
        try {
            ApplicationArguments applicationArguments = new DefaultApplicationArguments(args);
            //第二步,根据SpringApplicationRunListeners以及参数来准备环境
            ConfigurableEnvironment environment = this.prepareEnvironment(listeners, applicationArguments);
            this.configureIgnoreBeanInfo(environment);
            //准备Banner打印器‐就是启动Spring Boot的时候在console上的ASCII艺术字体
            Banner printedBanner = this.printBanner(environment);
            //第三步:创建Spring容器
            context = this.createApplicationContext();
            exceptionReporters = this.getSpringFactoriesInstances(SpringBootExceptionReporter.class, new Class[]{ConfigurableApplicationContext.class}, context);
            //第四步:Spring容器前置处理
            this.prepareContext(context, environment, listeners, applicationArguments, printedBanner);
            //第五步:刷新容器
            this.refreshContext(context);
            //第六步:Spring容器后置处理
            this.afterRefresh(context, applicationArguments);
            stopWatch.stop();
            if (this.logStartupInfo) {
                (new StartupInfoLogger(this.mainApplicationClass)).logStarted(this.getApplicationLog(), stopWatch);
            }
            //第七步:遍历容器中的监听器,执行监听器逻辑
            listeners.started(context);
            //第八步:执行Runners
            this.callRunners(context, applicationArguments);
        } catch (Throwable var10) {
            this.handleRunFailure(context, var10, exceptionReporters, listeners);
            throw new IllegalStateException(var10);
        }

        try {
        // 第九步:遍历容器中的监听器,执行监听器逻辑
            listeners.running(context);
            //返回容器
            return context;
        } catch (Throwable var9) {
            this.handleRunFailure(context, var9, exceptionReporters, (SpringApplicationRunListeners)null);
            throw new IllegalStateException(var9);
        }
    }
代码看的不直观看下启动的流程图:
其中第8的个步骤是执行Runners,具体到代码:callRunners(context, applicationArguments)就是调用ApplicationRunner或是CommandLineRunner,具体调用逻辑如下:
  private void callRunners(ApplicationContext context, ApplicationArguments args) {
		  // 组装runner
        List<Object> runners = new ArrayList();
		// 组装ApplicationRunner类型的runner
runners.addAll(context.getBeansOfType(ApplicationRunner.class).values());
        // 组装CommandLineRunner类型的runner
        runners.addAll(context.getBeansOfType(CommandLineRunner.class).values());
        // 组装的runner集合进行排序
        AnnotationAwareOrderComparator.sort(runners);
        Iterator var4 = (new LinkedHashSet(runners)).iterator();

        while(var4.hasNext()) {
            Object runner = var4.next();
            // 执行ApplicationRunner实现类逻辑
            if (runner instanceof ApplicationRunner) {
                this.callRunner((ApplicationRunner)runner, args);
            }
			// 执行CommandLineRunner实现类逻辑
            if (runner instanceof CommandLineRunner) {
                this.callRunner((CommandLineRunner)runner, args);
            }
        }

    }
callRunner方法用来执行CommandLineRunner或是ApplicationRunner实现类的run逻辑内容,具体实现如下:
private void callRunner(ApplicationRunner runner, ApplicationArguments args) {
		try {
			(runner).run(args);
		}
		catch (Exception ex) {
			throw new IllegalStateException("Failed to execute ApplicationRunner", ex);
		}
	}
看到这里会发现有ApplicationRunner、CommandLineRunner,下面分别说下两个的区别:
ApplicationRunner 中run方法
public interface ApplicationRunner {
    void run(ApplicationArguments var1) throws Exception;
}
看下官方对的说明:
Interface used to indicate that a bean should run when it is contained within a {@link SpringApplication}.
Multiple {@link ApplicationRunner} beans can be defined within the same application context and can be ordered using the {@link Ordered} interface or {@link Order @Order} annotation.
翻译一下就是:
ApplicationRunner这个接口主要用于执行bean,当bean在SpringApplication中.
SpringApplication应该不陌生,springboot项目启动类中main方法就是执行的SpringApplication.run().所以说ApplicationRunner就是为了springboot项目启动过程中执行指定业务逻辑准备的接口.
如果存在多个ApplicationRunner接口的实现类,可以通过@Ordered注解指定执行顺序.
看下CommandLineRunner官方说明:
Interface used to indicate that a bean should run when it is
contained within a {@link SpringApplication}. Multiple {@link
CommandLineRunner} beans can be defined within the same application context and can be ordered using the {@link Ordered} interface or {@link Order @Order} annotation. If you need access to {@link ApplicationArguments} instead of the raw String array consider using {@link ApplicationRunner}.
看完会发现关于CommandLineRunner的说明和ApplicationRunner基本一致,也是用于springboot项目启动用于执行指定业务逻辑准备的接口.唯一的区别就是传递参数不同,官方文档中还明确说明,如果在想获取ApplicationArguments(项目参数信息),推荐使用ApplicationRunner.
CommandLineRunner中run方法
public interface CommandLineRunner {
    void run(String... var1) throws Exception;
}
public void refresh() throws BeansException, IllegalStateException {
		synchronized (this.startupShutdownMonitor) {

				// 省略部分逻辑

				// 发布容器中定义的各种事件
				finishRefresh();
			}
AbstractApplicationContext中finishRefresh具体的执行逻辑如下:
protected void finishRefresh() {

		// 省略部分逻辑
		// 发布ContextRefreshedEvent事件
		publishEvent(new ContextRefreshedEvent(this));

		// 省略部分逻辑
	}
继续往下看,最终调用的监听事件逻辑:
private void doInvokeListener(ApplicationListener listener, ApplicationEvent event) {
		try {
			// 执行监听器实现类中onApplicationEvent具体实现逻辑
			listener.onApplicationEvent(event);
		}
		catch (ClassCastException ex) {
			// 省略部分逻辑
		}
	}
总结一下:项目启动过程中需要进行容器刷新操作,在容器刷新结束之后会发布ContextRefreshedEvent事件,自定义的监听器监听到该事件就会执行自定义的业务逻辑处理.也就想做数据初始化自定义监听器,要在实现ApplicationListener的时候必须指定监听事件为ContextRefreshedEvent的原因.
Interface to be implemented by beans that need to react once all their properties have been set by a {@link BeanFactory}: e.g. to perform custom initialization, or merely to check that all mandatory
properties have been set.
用自己的话翻译一下:
InitializingBean接口用于执行一次当bean的各种属性设置完成之后.每个bean对象会经历实例化、初始化的过程,初始化过程可以简单理解为设置属性过程,适用场景:执行自定义初始化设置或是检查属性是否被设置.当然目前使用到最多的是初始化设置.
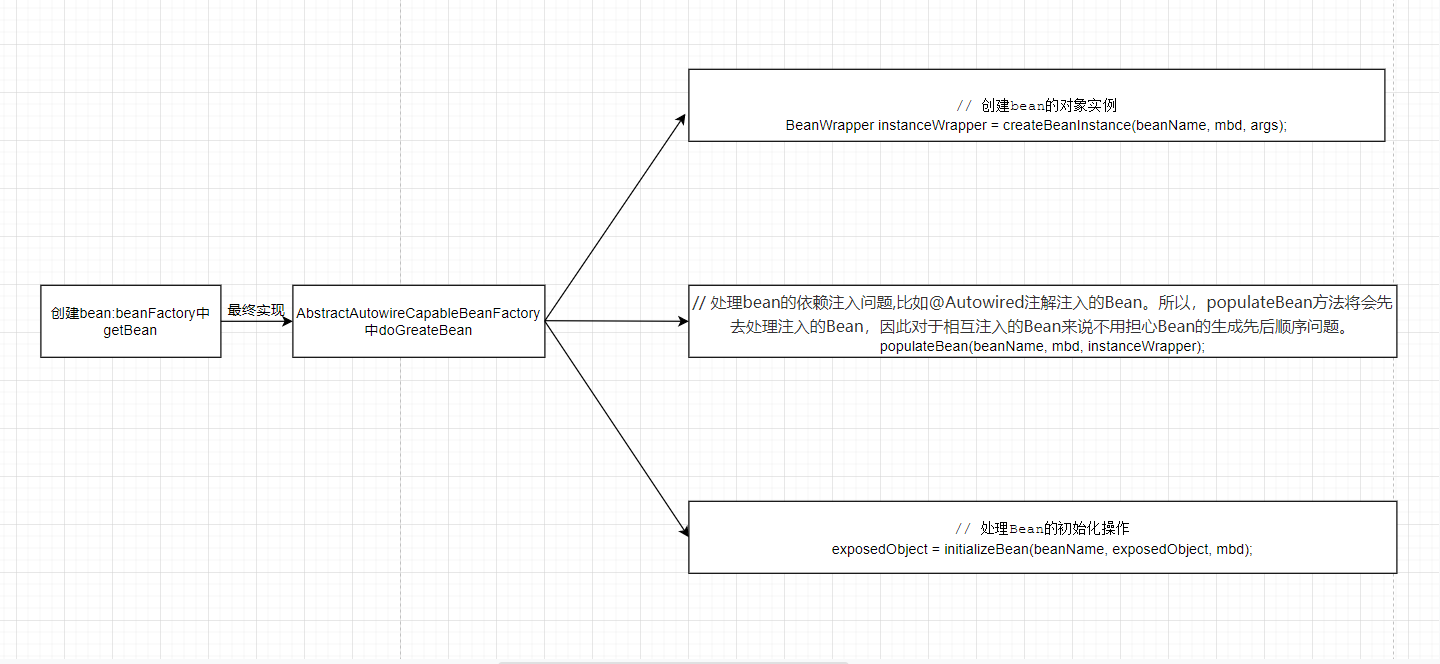
首先看下bean创建的核心逻辑:AbstractAutowireCapableBeanFactory中doCreateBean方法:
protected Object doCreateBean(String beanName, RootBeanDefinition mbd, @Nullable Object[] args)
			throws BeanCreationException {


		// 省略部分逻辑

	// 处理bean的依赖注入
	populateBean(beanName, mbd, instanceWrapper);
	// 实例化bean处理
	exposedObject = initializeBean(beanName, exposedObject, mbd);

		// 省略部分逻辑

		return exposedObject;
	}
继续看initializeBean中的执行逻辑,最终执行的是初始化方法invokeInitMethods,AbstractAutowireCapableBeanFactory中initializeBean方法:
protected Object initializeBean(String beanName, Object bean, @Nullable RootBeanDefinition mbd) {


		// 省略部分逻辑

		// 执行初始化方法
		invokeInitMethods(beanName, wrappedBean, mbd);
		// 省略部分逻辑

		return wrappedBean;
	}
看下invokeInitMethods方法执行的具体逻辑就会发现此逻辑实际上执行的就是InitializingBean中的afterPropertiesSet,AbstractAutowireCapableBeanFactory中invokeInitMethods方法:
protected void invokeInitMethods(String beanName, Object bean, @Nullable RootBeanDefinition mbd)
			throws Throwable {

			// 省略部分逻辑

			// SecurityManager是JAVA安全管理器当运行未知的Java程序的时候,该程序可能有恶意代码(删除系统文件、重启系统等),为了防止运行恶意代码对系统产生影响,需要对运行的代码的权限进行控制,这时候就要启用Java安全管理器。
			if (System.getSecurityManager() != null) {
				AccessController.doPrivileged((PrivilegedExceptionAction<Object>) () -> {
						((InitializingBean) bean).afterPropertiesSet();
						return null;
					}, getAccessControlContext());

			}
			else {
				((InitializingBean) bean).afterPropertiesSet();
			}
		}
		// 省略部分逻辑


	}
也就是说InitializingBean中的afterPropertiesSet会在对象实例化设置完成属性之后才会执行.
AbstractAutowireCapableBeanFactory中initializeBean方法:
protected Object initializeBean(final String beanName, final Object bean, @Nullable RootBeanDefinition mbd) {
    // ...

    Object wrappedBean = bean;
    if (mbd == null || !mbd.isSynthetic()) {
        // 初始化前置处理
        wrappedBean = applyBeanPostProcessorsBeforeInitialization(wrappedBean, beanName);
    }

    try {
        // 调用初始化方法
        invokeInitMethods(beanName, wrappedBean, mbd);
    } catch (Throwable ex) {
        // ...
    }
    if (mbd == null || !mbd.isSynthetic()) {
        // 初始化后置处理
        wrappedBean = applyBeanPostProcessorsAfterInitialization(wrappedBean, beanName);
    }


    return wrappedBean;
}
调试可知@PostConstruct是在applyBeanPostProcessorsBeforeInitialization初始化前置中进行处理的,看下具体实现:
@Override
	public Object applyBeanPostProcessorsBeforeInitialization(Object existingBean, String beanName)
			throws BeansException {

		Object result = existingBean;
		for (BeanPostProcessor processor : getBeanPostProcessors()) {
			Object current = processor.postProcessBeforeInitialization(result, beanName);
			if (current == null) {
				return result;
			}
			result = current;
		}
		return result;
	}
将各种容器中各种BeanPostProcessors后置处理器进行遍历,依次执行前置初始化逻辑,@PostConstruct是由InitDestroyAnnotationBeanPostProcessor中进行的初始化处理,看这个后置处理器的名称就可以看出是用于处理初始化以及销毁操作的后置处理器.看下具体的实现:
@Override
	public Object postProcessBeforeInitialization(Object bean, String beanName) throws BeansException {
	    // 解析元数据
		LifecycleMetadata metadata = findLifecycleMetadata(bean.getClass());

		// 反射执行@PostConstruct或是@PreDestroy所在的方法
		metadata.invokeInitMethods(bean, beanName);
		return bean;
	}
具体解析的逻辑在buildLifecycleMetadata中
private LifecycleMetadata buildLifecycleMetadata(final Class<?> clazz) {


		List<LifecycleElement> initMethods = new ArrayList<>();
		List<LifecycleElement> destroyMethods = new ArrayList<>();
		Class<?> targetClass = clazz;

		do {
			final List<LifecycleElement> currInitMethods = new ArrayList<>();
			final List<LifecycleElement> currDestroyMethods = new ArrayList<>();

			ReflectionUtils.doWithLocalMethods(targetClass, method -> {
				if (this.initAnnotationType != null && method.isAnnotationPresent(this.initAnnotationType)) {
					LifecycleElement element = new LifecycleElement(method);
					currInitMethods.add(element);

				}
				if (this.destroyAnnotationType != null && method.isAnnotationPresent(this.destroyAnnotationType)) {
					currDestroyMethods.add(new LifecycleElement(method));

				}
			});

			// 省略部分逻辑
		}

	}
可以看出来这里主要是用initAnnotationType或是destroyAnnotationType进行组装参数,至于这两个具体是什么可以继续往下看怎么设置的,以initAnnotationType为例,initAnnotationType进行设置的逻辑是
public void setDestroyAnnotationType(Class<? extends Annotation> destroyAnnotationType) {
		this.destroyAnnotationType = destroyAnnotationType;
	}
具体调用的逻辑发现会在
CommonAnnotationBeanPostProcessor创建过程中会初始化initAnnotationType
public CommonAnnotationBeanPostProcessor() {
	setOrder(Ordered.LOWEST_PRECEDENCE - 3);
	setInitAnnotationType(PostConstruct.class);
	setDestroyAnnotationType(PreDestroy.class);
	ignoreResourceType("javax.xml.ws.WebServiceContext");
}
关于@PostConstruct执行原理总结一下:spring项目启动加载bean过程中会将带有@PostConstruct、@PreDestroy的bean信息或是方法信息注册到InitDestroyAnnotationBeanPostProcessor中的initAnnotationType或是destroyAnnotationType,然后InitDestroyAnnotationBeanPostProcessor中postProcessBeforeInitialization会查找出带有@PostConstruct、@PreDestroy注解的方法信息,然后用反射的方式执行方法中的逻辑。
以上是关于springboot中实现初始化操作的常用方式以及各种方式的使用原理说明,小伙伴们如果有其他的实现方式欢迎评论区留言,看完感觉有收获的别忘了点赞或是收藏一下.
大约一年前,我决定确保每个包含非唯一文本的Flash通知都将从模块中的方法中获取文本。我这样做的最初原因是为了避免一遍又一遍地输入相同的字符串。如果我想更改措辞,我可以在一个地方轻松完成,而且一遍又一遍地重复同一件事而出现拼写错误的可能性也会降低。我最终得到的是这样的:moduleMessagesdefformat_error_messages(errors)errors.map{|attribute,message|"Error:#{attribute.to_s.titleize}#{message}."}enddeferror_message_could_not_find(obje
我试图获取一个长度在1到10之间的字符串,并输出将字符串分解为大小为1、2或3的连续子字符串的所有可能方式。例如:输入:123456将整数分割成单个字符,然后继续查找组合。该代码将返回以下所有数组。[1,2,3,4,5,6][12,3,4,5,6][1,23,4,5,6][1,2,34,5,6][1,2,3,45,6][1,2,3,4,56][12,34,5,6][12,3,45,6][12,3,4,56][1,23,45,6][1,2,34,56][1,23,4,56][12,34,56][123,4,5,6][1,234,5,6][1,2,345,6][1,2,3,456][123
如何在buildr项目中使用Ruby?我在很多不同的项目中使用过Ruby、JRuby、Java和Clojure。我目前正在使用我的标准Ruby开发一个模拟应用程序,我想尝试使用Clojure后端(我确实喜欢功能代码)以及JRubygui和测试套件。我还可以看到在未来的不同项目中使用Scala作为后端。我想我要为我的项目尝试一下buildr(http://buildr.apache.org/),但我注意到buildr似乎没有设置为在项目中使用JRuby代码本身!这看起来有点傻,因为该工具旨在统一通用的JVM语言并且是在ruby中构建的。除了将输出的jar包含在一个独特的、仅限ruby
在我的gem中,我需要yaml并且在我的本地计算机上运行良好。但是在将我的gem推送到rubygems.org之后,当我尝试使用我的gem时,我收到一条错误消息=>"uninitializedconstantPsych::Syck(NameError)"谁能帮我解决这个问题?附言RubyVersion=>ruby1.9.2,GemVersion=>1.6.2,Bundlerversion=>1.0.15 最佳答案 经过几个小时的研究,我发现=>“YAML使用未维护的Syck库,而Psych使用现代的LibYAML”因此,为了解决
我主要使用Ruby来执行此操作,但到目前为止我的攻击计划如下:使用gemsrdf、rdf-rdfa和rdf-microdata或mida来解析给定任何URI的数据。我认为最好映射到像schema.org这样的统一模式,例如使用这个yaml文件,它试图描述数据词汇表和opengraph到schema.org之间的转换:#SchemaXtoschema.orgconversion#data-vocabularyDV:name:namestreet-address:streetAddressregion:addressRegionlocality:addressLocalityphoto:i
我在我的Rails项目中使用Pow和powifygem。现在我尝试升级我的ruby版本(从1.9.3到2.0.0,我使用RVM)当我切换ruby版本、安装所有gem依赖项时,我通过运行railss并访问localhost:3000确保该应用程序正常运行以前,我通过使用pow访问http://my_app.dev来浏览我的应用程序。升级后,由于错误Bundler::RubyVersionMismatch:YourRubyversionis1.9.3,butyourGemfilespecified2.0.0,此url不起作用我尝试过的:重新创建pow应用程序重启pow服务器更新战俘
我已经像这样安装了一个新的Rails项目:$railsnewsite它执行并到达:bundleinstall但是当它似乎尝试安装依赖项时我得到了这个错误Gem::Ext::BuildError:ERROR:Failedtobuildgemnativeextension./System/Library/Frameworks/Ruby.framework/Versions/2.0/usr/bin/rubyextconf.rbcheckingforlibkern/OSAtomic.h...yescreatingMakefilemake"DESTDIR="cleanmake"DESTDIR="
我在Rails工作并有以下类(class):classPlayer当我运行时bundleexecrailsconsole然后尝试:a=Player.new("me",5.0,"UCLA")我回来了:=>#我不知道为什么Player对象不会在这里初始化。关于可能导致此问题的操作/解释的任何建议?谢谢,马里奥格 最佳答案 havenoideawhythePlayerobjectwouldn'tbeinitializedhere它没有初始化很简单,因为你还没有初始化它!您已经覆盖了ActiveRecord::Base初始化方法,但您没有调
我有用于控制用户任务的Rails5API项目,我有以下错误,但并非总是针对相同的Controller和路由。ActionController::RoutingError:uninitializedconstantApi::V1::ApiController我向您描述了一些我的项目,以更详细地解释错误。应用结构路线scopemodule:'api'donamespace:v1do#=>Loginroutesscopemodule:'login'domatch'login',to:'sessions#login',as:'login',via::postend#=>Teamroutessc
question的一些答案关于redirect_to让我想到了其他一些问题。基本上,我正在使用Rails2.1编写博客应用程序。我一直在尝试自己完成大部分工作(因为我对Rails有所了解),但在需要时会引用Internet上的教程和引用资料。我设法让一个简单的博客正常运行,然后我尝试添加评论。靠我自己,我设法让它进入了可以从script/console添加评论的阶段,但我无法让表单正常工作。我遵循的其中一个教程建议在帖子Controller中创建一个“评论”操作,以添加评论。我的问题是:这是“标准”方式吗?我的另一个问题的答案之一似乎暗示应该有一个CommentsController参