目录
(1)IoC是使软件组件松耦合;而接下来要学的AOP让你能够捕捉系统中经常使用的功能,把它转化成组件。
(2)AOP(Aspect Oriented Programming):面向切面编程(非业务的逻辑代码提取出来),面向方面编程。(AOP是一种编程技术)
(3)AOP底层使用的就是动态代理来实现的;AOP是对OOP的补充延伸。
(4)Spring的AOP使用的动态代理是:JDK动态代理 + CGLIB动态代理技术;Spring在这两种动态代理中灵活切换,如果是代理接口,会默认使用JDK动态代理,如果要代理某个类,这个类没有实现接口,就会切换使用CGLIB代理。当然,你也可以强制通过一些配置让Spring只使用CGLIB。
(1)一般一个系统当中都会有一些系统服务,例如:日志、事务管理、安全等;这些系统服务被称为:交叉业务!
(2)这些交叉业务几乎是通用的,不管你是做银行账户转账,还是删除用户数据。日志、事务管理、安全,这些都是需要做的!
(3)如果在每一个业务处理过程当中,都掺杂这些交叉业务代码进去的话,存在两方面问题:
①第一:交叉业务代码在多个业务流程中反复出现,显然这个交叉业务代码没有得到复用;并且修改这些交叉业务代码的话,需要修改多处。
②第二:程序员无法专注核心业务代码的编写,在编写核心业务代码的同时还需要处理这些交叉业务。
(4)使用AOP可以很轻松的解决以上问题;将与业务逻辑无关的、通用的非业务逻辑代码(交叉业务)抽取出来,形成一个横向的切面(独立的组件),核心业务是纵向的;把横向的切面以横向交叉的方式应用到业务流程的过程就是面向切面!
(5)请看下图,可以帮助你快速理解AOP的思想:
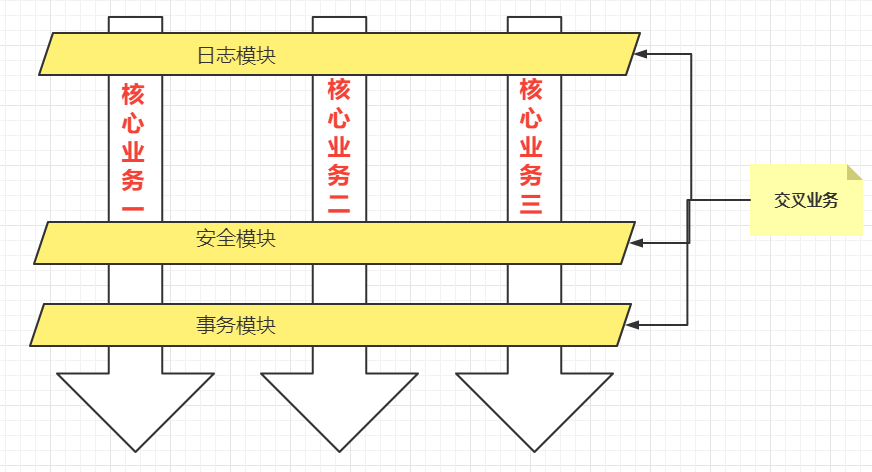
用一句话总结AOP:将与核心业务无关的代码独立的抽取出来(交叉业务),形成一个独立的组件,然后以横向交叉的方式应用到业务流程当中的过程被称为AOP;AOP的优点:
①第一:代码复用性增强。
②第二:代码易维护。
③第三:使开发者更关注业务逻辑。
我们先看下面这段代码
public class UserService{
    public void do1(){
        System.out.println("do 1");
    }
    public void do2(){
        System.out.println("do 2");
    }
    public void do3(){
        System.out.println("do 3");
    }
    public void do4(){
        System.out.println("do 4");
    }
    public void do5(){
        System.out.println("do 5");
    }
    // 核心业务方法
    public void service(){
       try{
            // Joinpoint连接点
            do1(); // Pointcut切点
            // Joinpoint连接点
            do2(); // Pointcut切点
            // Joinpoint连接点
            do3(); // Pointcut切点
            // Joinpoint连接点
            do5(); // Pointcut切点
            // Joinpoint连接点
        }catch(Exception e){
            // Joinpoint连接点
        }finally{
            // Joinpoint连接点
        }
    }
}
(1)连接点JoinPoint
在程序的整个执行流程中,可以织入切面的位置;方法的执行前后,异常抛出之后等位置。
(2)切点Pointcut
在程序执行流程中,真正织入切面的方法。(一个切点对应多个连接点)
(3)通知点Advice
通知又叫增强,就是具体你要织入的代码;通知包括:
①前置通知(在方法的前面)
②后置通知(在方法的后面)
③环绕通知(方法的前后面都有)
④异常通知(catch语句块当中)
⑤最终通知(finally语句块中)
(4)切面Aspect:切点+通知
(5)织入Weaving
把通知应用到目标对象上的过程。
(6)代理对象Proxy
一个目标对象被织入通知后产生的新对象。
(7)目标对象Target
被织入通知的对象。
通过下图,可以很好的理解AOP的相关术语:

总结:
①连接点(Joinpoint),描述的是位置。
②切点(Pointcut),本质上就是方法(真正织入切面的那个方法就做切点)。
③通知(Advice),通知又叫做增强,就是具体增强的代码,例如:具体的事务代码、日志代码、安全代码、统计时长的代码等;通知描述的是代码。
④切面(Aspect),切点+通知就是切面,逻辑概念!
切点表达式用来定义通知(Advice)往哪些方法上切入。
切入点表达式语法格式:
execution([访问控制权限修饰符] 返回值类型 [全限定类名]方法名(形式参数列表) [异常])(1)访问控制权限修饰符:
①可选项。
②没写,就是4个权限都包括。
③写public就表示只包括公开的方法。
(2)返回值类型:
①必填项。
②* 表示返回值类型任意。
(3)全限定类名:
①可选项。
②两个点“..”代表当前包以及子包下的所有类。
③省略时表示所有的类。
(4)方法名:
①必填项。
②*表示所有方法。
③set*表示所有的set方法。
(5)形式参数列表:
①必填项
②() 表示没有参数的方法。
③(..) 参数类型和个数随意的方法。
④(*) 只有一个参数的方法。
⑤(*, String) 第一个参数类型随意,第二个参数是String的。
(6)异常:
①可选项。
②省略时表示任意异常类型。
(1)service包下所有的类中以delete开始的所有方法
execution(public * com.powernode.mall.service.*.delete*(..))(2)mall包下所有的类的所有的方法
execution(* com.powernode.mall..*(..))(3)所有类的所有方法
execution(* *(..))
(1)Spring对AOP的实现包括以下3种方式:
①第一种方式:Spring框架结合AspectJ框架实现的AOP,基于注解方式(重点)。
②第二种方式:Spring框架结合AspectJ框架实现的AOP,基于XML方式(了解)。
③第三种方式:Spring框架自己实现的AOP,基于XML配置方式。
(2)实际开发中,都是Spring+AspectJ来实现AOP,所以重点学习第一种和第二种方式。
(3)什么是AspectJ?(Eclipse组织的一个支持AOP的框架,AspectJ框架是独立于Spring框架之外的一个框架,Spring框架用了AspectJ)AspectJ项目起源于帕洛阿尔托(Palo Alto)研究中心(缩写为PARC)。该中心由Xerox集团资助,Gregor Kiczales领导,从1997年开始致力于AspectJ的开发,1998年第一次发布给外部用户,2001年发布1.0 release。为了推动AspectJ技术和社团的发展,PARC在2003年3月正式将AspectJ项目移交给了Eclipse组织,因为AspectJ的发展和受关注程度大大超出了PARC的预期,他们已经无力继续维持它的发展。
使用Spring+AspectJ的AOP主要需要引入的三个依赖:context依赖、aop依赖、aspects依赖
其中context依赖和aspects依赖是需要手动引入的,aop依赖会在引入context依赖自动关联上,不需要手动引入!
<?xml version="1.0" encoding="UTF-8"?>
<project xmlns="http://maven.apache.org/POM/4.0.0"
         xmlns:xsi="http://www.w3.org/2001/XMLSchema-instance"
         xsi:schemaLocation="http://maven.apache.org/POM/4.0.0 http://maven.apache.org/xsd/maven-4.0.0.xsd">
    <modelVersion>4.0.0</modelVersion>

    <groupId>org.example</groupId>
    <artifactId>spring6-009-spring-aspectj-aop-annotation</artifactId>
    <version>1.0-SNAPSHOT</version>
    <packaging>jar</packaging>

    <!--配置多个仓库-->
    <repositories>
        <!--spring6里程碑的仓库-->
        <repository>
            <id>repository.spring.milestone</id>
            <name>Spring Milestone Repository</name>
            <url>https://repo.spring.io/milestone</url>
        </repository>
    </repositories>

    <dependencies>
        <!--spring context依赖-->
        <dependency>
            <groupId>org.springframework</groupId>
            <artifactId>spring-context</artifactId>
            <version>6.0.0-M2</version>
        </dependency>
        <!--spring aspects依赖-->
        <dependency>
            <groupId>org.springframework</groupId>
            <artifactId>spring-aspects</artifactId>
            <version>6.0.0-M2</version>
        </dependency>
        <dependency>
            <groupId>junit</groupId>
            <artifactId>junit</artifactId>
            <version>4.12</version>
            <scope>test</scope>
        </dependency>
    </dependencies>


    <properties>
        <maven.compiler.source>17</maven.compiler.source>
        <maven.compiler.target>17</maven.compiler.target>
    </properties>

</project>
Spring配置文件中添加context命名空间和aop命名空间
<?xml version="1.0" encoding="UTF-8"?>
<beans xmlns="http://www.springframework.org/schema/beans"
       xmlns:xsi="http://www.w3.org/2001/XMLSchema-instance"
       xmlns:context="http://www.springframework.org/schema/context"
       xmlns:aop="http://www.springframework.org/schema/aop"
       xsi:schemaLocation="http://www.springframework.org/schema/beans http://www.springframework.org/schema/beans/spring-beans.xsd
                           http://www.springframework.org/schema/context http://www.springframework.org/schema/context/spring-context.xsd
                           http://www.springframework.org/schema/aop http://www.springframework.org/schema/aop/spring-aop.xsd">

</beans>注解式开发步骤
第一步:目标类(目标对象)
package com.bjpowernode.spring.service;


import org.springframework.stereotype.Service;

@Service("userService") // 纳入Spring管理
public class UserService { // 目标类

    public void login(){ // 目标方法,在这个方法之前加入通知
        System.out.println("系统正在进行身份认证....");
    }

}
第二步:写一个切面类(通知+切点)
①切面类是需要引入@Aspect注解进行标注的。
②Before注解标注的方法就是一个前置通知,里面写切点表达式。
package com.bjpowernode.spring.service;

import org.aspectj.lang.annotation.Aspect;
import org.aspectj.lang.annotation.Before;
import org.springframework.stereotype.Component;

@Component("logAspect") // 纳入Spring管理
@Aspect // 切面类需要这个注解
public class LogAspect { // 切面 = 通知(增强代码)+切点(切点表达式)
    // 这里通知Advice以方法的形式出现(方法中写增强的代码)
    @Before("execution(* com.bjpowernode.spring.service.UserService.*(..))")
    public void beforeAdvice(){
        System.out.println("我是一个通知,一段增强的代码");
    }

}
第三步:在spring配置文件中添加组建扫描和启用自动代理
开启aspectj的自动代理时,spring容器在扫描类的时候,查看该类上是否有@Aspect注解,如果有,则给这个类生成代理对象:
①proxy-target-class="true" 表示强制使用CGLIB动态代理。
②proxy-target-class="false" 这是默认值,表示接口使用JDK动态代理,反之使用CGLIB动态代理。
<?xml version="1.0" encoding="UTF-8"?>
<beans xmlns="http://www.springframework.org/schema/beans"
       xmlns:xsi="http://www.w3.org/2001/XMLSchema-instance"
       xmlns:context="http://www.springframework.org/schema/context"
       xmlns:aop="http://www.springframework.org/schema/aop"
       xsi:schemaLocation="http://www.springframework.org/schema/beans http://www.springframework.org/schema/beans/spring-beans.xsd
                           http://www.springframework.org/schema/context http://www.springframework.org/schema/context/spring-context.xsd
                           http://www.springframework.org/schema/aop http://www.springframework.org/schema/aop/spring-aop.xsd">
    <!--组件扫描-->
    <context:component-scan base-package="com.bjpowernode.spring.service"/>
    <!--开启aspectj的自动代理-->
    <aop:aspectj-autoproxy proxy-target-class="false"/>
</beans>
第四步:测试程序
package com.bjpowernode.spring.test;

import com.bjpowernode.spring.service.UserService;
import org.junit.Test;
import org.springframework.context.ApplicationContext;
import org.springframework.context.support.ClassPathXmlApplicationContext;

public class SpringAOPTest {

    @Test
    public void testBefore(){
        ApplicationContext applicationContext = new ClassPathXmlApplicationContext("spring.xml");
        UserService userService = applicationContext.getBean("userService", UserService.class);
        userService.login();
    }
}
执行结果:

测试全部的通知类型
通知类型包括:
- 前置通知:@Before 目标方法执行之前的通知。
- 后置通知:@AfterReturning 目标方法执行之后的通知。
- 环绕通知:@Around 目标方法之前添加通知,同时目标方法执行之后添加通知。
- 异常通知:@AfterThrowing 发生异常之后执行的通知。
- 最终通知:@After 放在finally语句块中的通知。
第一种情况:没有发生异常的执行顺序
目标类:没有异常
package com.bjpowernode.spring.service;

import org.springframework.stereotype.Component;

// 目标类
@Component
public class OrderService {
    // 目标方法
    public void generate(){
        System.out.println("订单已生成!");
    }
}
切面类:没有异常通知
package com.bjpowernode.spring.service;

import org.aspectj.lang.ProceedingJoinPoint;
import org.aspectj.lang.annotation.*;
import org.springframework.stereotype.Component;

@Component("orderAspect")
@Aspect
public class OrderAspect {
    // 前置通知
    @Before("execution(* com.bjpowernode.spring.service.OrderService.*(..))")
    public void beforeAdvice(){
        System.out.println("前置通知");
    }
    // 后置通知
    @AfterReturning("execution(* com.bjpowernode.spring.service.OrderService.*(..))")
    public void afterReturningAdvice(){
        System.out.println("后置通知");
    }

    // 环绕通知
    @Around("execution(* com.bjpowernode.spring.service.OrderService.*(..))")
    public void aroundAdvice(ProceedingJoinPoint proceedingJoinPoint) throws Throwable {
        // 环绕通知前
        System.out.println("环绕通知开始");
        // 执行目标方法
        proceedingJoinPoint.proceed();
        // 环绕通知后
        System.out.println("环绕通知结束");
    }

    // 异常通知(暂时没有异常)

    // 最终通知
    @After("execution(* com.bjpowernode.spring.service.OrderService.*(..))")
    public void afterAdvice(){
        System.out.println("最终通知");
    }
}
执行结果:可以得出环绕通知的范围是最大的
没有异常通知;前环绕代码是出现在前置通知前面的,后环绕代码是出现在最终通知最后面的!

第二种情况:发生异常的执行顺序
目标类:有异常抛出
package com.bjpowernode.spring.service;

import org.springframework.stereotype.Component;

// 目标类
@Component
public class OrderService {
    // 目标方法
    public void generate(){
        System.out.println("订单已生成!");
        if(1==1){ // 抛出异常
            throw new RuntimeException("恒成立异常");
        }
    }
}
切面类:有异常通知
package com.bjpowernode.spring.service;

import org.aspectj.lang.ProceedingJoinPoint;
import org.aspectj.lang.annotation.*;
import org.springframework.stereotype.Component;

@Component("orderAspect")
@Aspect
public class OrderAspect {
    // 前置通知
    @Before("execution(* com.bjpowernode.spring.service.OrderService.*(..))")
    public void beforeAdvice(){
        System.out.println("前置通知");
    }
    // 后置通知
    @AfterReturning("execution(* com.bjpowernode.spring.service.OrderService.*(..))")
    public void afterReturningAdvice(){
        System.out.println("后置通知");
    }

    // 环绕通知
    @Around("execution(* com.bjpowernode.spring.service.OrderService.*(..))")
    public void aroundAdvice(ProceedingJoinPoint proceedingJoinPoint) throws Throwable {
        // 环绕通知前
        System.out.println("环绕通知开始");
        // 执行目标方法
        proceedingJoinPoint.proceed();
        // 环绕通知后
        System.out.println("环绕通知结束");
    }

    // 异常通知
    @AfterThrowing("execution(* com.bjpowernode.spring.service.OrderService.*(..))")
    public void afterThrowingAdvice(){
        System.out.println("异常通知");
    }


    // 最终通知
    @After("execution(* com.bjpowernode.spring.service.OrderService.*(..))")
    public void afterAdvice(){
        System.out.println("最终通知");
    }
}
执行结果:有异常抛出,后置通知和环绕通知结束并没有执行
有异常通知;后置通知和环绕通知结束是没有执行的,异常通知在最终通知前面!

切面的先后顺序
我们知道,业务流程当中不一定只有一个切面,可能有的切面控制事务,有的记录日志,有的进行安全控制,如果多个切面的话,顺序如何控制:可以使用@Order注解来标识切面类,为@Order注解的value指定一个整数型的数字,数字越小,优先级越高!
安全类的切面SecurityAspect类,顺序设置为1
package com.bjpowernode.spring.service;

import org.aspectj.lang.annotation.Aspect;
import org.aspectj.lang.annotation.Before;
import org.springframework.core.annotation.Order;
import org.springframework.stereotype.Component;

@Component("securityAspect")
@Aspect
@Order(1)
public class SecurityAspect {
    @Before("execution(* com.bjpowernode.spring.service.OrderService.*(..))")
    public void beforeAspect(){
        System.out.println("安全的前置通知......");
    }

}
日志类的切面OrderAspect类,顺序设置为2
package com.bjpowernode.spring.service;

import org.aspectj.lang.ProceedingJoinPoint;
import org.aspectj.lang.annotation.*;
import org.springframework.stereotype.Component;

@Component("orderAspect")
@Aspect
@Order(2)
public class OrderAspect {
    // 前置通知
    @Before("execution(* com.bjpowernode.spring.service.OrderService.*(..))")
    public void beforeAdvice(){
        System.out.println("前置通知");
    }
    // 后置通知
    @AfterReturning("execution(* com.bjpowernode.spring.service.OrderService.*(..))")
    public void afterReturningAdvice(){
        System.out.println("后置通知");
    }

    // 环绕通知
    @Around("execution(* com.bjpowernode.spring.service.OrderService.*(..))")
    public void aroundAdvice(ProceedingJoinPoint proceedingJoinPoint) throws Throwable {
        // 环绕通知前
        System.out.println("环绕通知开始");
        // 执行目标方法
        proceedingJoinPoint.proceed();
        // 环绕通知后
        System.out.println("环绕通知结束");
    }


    // 最终通知
    @After("execution(* com.bjpowernode.spring.service.OrderService.*(..))")
    public void afterAdvice(){
        System.out.println("最终通知");
    }
}
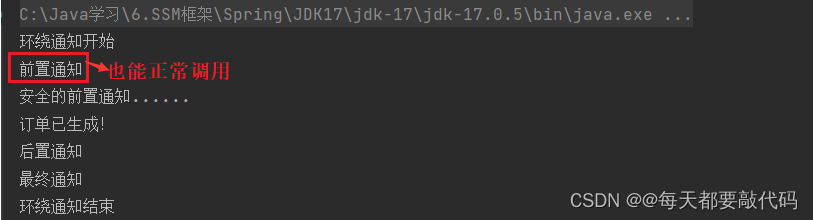
执行结果:

把安全类的切面SecurityAspect类,顺序修改为3,执行结果:

优化使用切点表达式
前面的每个通知都要写上相同的切点表达式,缺点是:
①第一:切点表达式重复写了多次,没有得到复用。
②第二:如果要修改切点表达式,需要修改多处,难维护。
可以这样做:将切点表达式单独的定义出来,在需要的位置引入即可。
①为了醒目方法就定义为中文,方法里面什么都不用写。
②使用Pointcut注解,注解里面定义上通用的切点表达式

在其他通知中,调用这个切点表达式的方法就可以使用

测试结果:
对于跨类的也可以使用,但是需要写上全限定类名

连接点
①环绕通知里面的参数就是连接点,除了环绕通知里面必须传一个ProceedingJoinPoint参数的连接点,其它通知也可以传一个JoinPoint参数的连接点。
②JoinPoint的作用:调用getSignature()方法,得到目标方法的签名
什么是目标方法的签名?public void generate()这些就是目标方法的签名;通过方法的签名可以获取到一个方法的具体信息,例如:目标方法的方法名
    @Before("通用切点表达式()")
    public void beforeAdvice(JoinPoint joinPoint){
        System.out.println("前置通知");
        // 通过签名,获取到目标方法的方法名
        System.out.println("目标方法的方法名:"+joinPoint.getSignature().getName());
    }
基于全注解开发
对于组件扫描和开启aspectj的自动代理,不在spring.xml中进行配置,使用全注解的方式!
①使用@Configuration注解来表示xml文件。
②使用@CompoentSan注解,代表扫描组件,扫描包。
③使用@EnableAspectJAutoProxy注解,代表开启自动代理。
注解类
package com.bjpowernode.spring.service;

import org.springframework.context.annotation.ComponentScan;
import org.springframework.context.annotation.Configuration;
import org.springframework.context.annotation.EnableAspectJAutoProxy;

@Configuration // 代替spring.xml文件
@ComponentScan({"com.bjpowernode.spring.service"}) // 组件扫描
@EnableAspectJAutoProxy(proxyTargetClass = true) // 启动aspectj的自动代理机制--使用CGLIB动态代理
public class SpringConfig {
}
测试程序:
前面有了@Configuration注解,就表示当前类当做xml配置文件使用,创建AnnotationConfigApplicationContext对象,把带有@Configuration注解的.class文件传进去
@Test
public void testNoXML(){
    ApplicationContext applicationContext = new AnnotationConfigApplicationContext(SpringConfig.class);
    OrderService orderService = applicationContext.getBean("orderService", OrderService.class);
    orderService.generate();
}
第一步:编写目标类
没有使用@Service注解注入,需要在xml中注入配置进行注入Spring容器管理。
package com.bjpowernode.spring.service;

public class UserService { // 目标对象
    public void logout(){ //目标方法
        System.out.println("系统正在安全退出...");
    }
}
第二步:编写切面类,并且编写通知
①没有使用@Component注解纳入Spring容器管理;也没有使用@Aspect注解来表示这是一个切面类;这些都要在xml文件中进行配置。
②没有在方法上使用@Around注解(里面是切点表达式),表示这是一个环绕通知,也要在xml中进行配置。
package com.bjpowernode.spring.service;

import org.aspectj.lang.ProceedingJoinPoint;

// 负责计时的切面类
public class TimerAspect {// 环绕通知
    public void time(ProceedingJoinPoint proceedingJoinPoint) throws Throwable {
       // 通知
        long begin = System.currentTimeMillis();
        //执行目标
        proceedingJoinPoint.proceed();
        // 通知
        long end = System.currentTimeMillis();
        System.out.println("耗时"+(end - begin)+"毫秒");
    }
}
第三步:编写spring.xml配置文件
①先把上面两个类进行注入,纳入Spring容器管理。
②使用aop命名空间,编写切点表达式和切面(在切面中指定那个类、把切点表达式放入那个方法)。
<?xml version="1.0" encoding="UTF-8"?>
<beans xmlns="http://www.springframework.org/schema/beans"
       xmlns:xsi="http://www.w3.org/2001/XMLSchema-instance"
       xmlns:context="http://www.springframework.org/schema/context"
       xmlns:aop="http://www.springframework.org/schema/aop"
       xsi:schemaLocation="http://www.springframework.org/schema/beans http://www.springframework.org/schema/beans/spring-beans.xsd
                           http://www.springframework.org/schema/context http://www.springframework.org/schema/context/spring-bcontext.xsd
                           http://www.springframework.org/schema/aop http://www.springframework.org/schema/aop/spring-aop.xsd">
    <!--纳入spring ioc-->
    <bean id="userService" class="com.bjpowernode.spring.service.UserService"/>
    <bean id="timerAspect" class="com.bjpowernode.spring.service.TimerAspect"/>

    <!--aop的配置-->
    <aop:config>
        <!--切点表达式-->
        <aop:pointcut id="mypointcut" expression="execution(* com.bjpowernode.spring.service..*(..))"/>
        <!--切面:通知+方法-->
        <aop:aspect ref="timerAspect">
            <aop:around method="time" pointcut-ref="mypointcut"/>
        </aop:aspect>
    </aop:config>
</beans>
编写测试程序
package com.bjpowernode.spring.test;

import com.bjpowernode.spring.service.UserService;
import org.junit.Test;
import org.springframework.context.ApplicationContext;
import org.springframework.context.support.ClassPathXmlApplicationContext;

public class SpringAOPTest {
    @Test
    public void testXML(){
        ApplicationContext applicationContext = new ClassPathXmlApplicationContext("spring.xml");
        UserService userService = applicationContext.getBean("userService", UserService.class);
        userService.logout();
    }
}
执行结果

项目中的事务控制是在所难免的;在一个业务流程当中,可能需要多条DML语句共同完成,为了保证数据的安全,这多条DML语句要么同时成功,要么同时失败;这就需要添加事务控制的代码。例如以下伪代码:
class 业务类1{
    public void 业务方法1(){
        try{
            // 开启事务
            startTransaction();

            // 执行核心业务逻辑
            step1();
            step2();
            step3();
            ....

            // 提交事务
            commitTransaction();
        }catch(Exception e){
            // 回滚事务
            rollbackTransaction();
        }
    }
    public void 业务方法2(){
        try{
            // 开启事务
            startTransaction();

            // 执行核心业务逻辑
            step1();
            step2();
            step3();
            ....

            // 提交事务
            commitTransaction();
        }catch(Exception e){
            // 回滚事务
            rollbackTransaction();
        }
    }
    public void 业务方法3(){
        try{
            // 开启事务
            startTransaction();

            // 执行核心业务逻辑
            step1();
            step2();
            step3();
            ....

            // 提交事务
            commitTransaction();
        }catch(Exception e){
            // 回滚事务
            rollbackTransaction();
        }
    }
}

class 业务类2{
    public void 业务方法1(){
        try{
            // 开启事务
            startTransaction();

            // 执行核心业务逻辑
            step1();
            step2();
            step3();
            ....

            // 提交事务
            commitTransaction();
        }catch(Exception e){
            // 回滚事务
            rollbackTransaction();
        }
    }
    public void 业务方法2(){
        try{
            // 开启事务
            startTransaction();

            // 执行核心业务逻辑
            step1();
            step2();
            step3();
            ....

            // 提交事务
            commitTransaction();
        }catch(Exception e){
            // 回滚事务
            rollbackTransaction();
        }
    }
    public void 业务方法3(){
        try{
            // 开启事务
            startTransaction();

            // 执行核心业务逻辑
            step1();
            step2();
            step3();
            ....

            // 提交事务
            commitTransaction();
        }catch(Exception e){
            // 回滚事务
            rollbackTransaction();
        }
    }
}
//......
可以看到,这些业务类中的每一个业务方法都是需要控制事务的,而控制事务的代码又是固定的格式,都是:
try{
    // 开启事务
    startTransaction();

    // 执行核心业务逻辑
    //......

    // 提交事务
    commitTransaction();
}catch(Exception e){
    // 回滚事务
    rollbackTransaction();
}这个控制事务的代码就是和业务逻辑没有关系的“交叉业务”。以上伪代码当中可以看到这些交叉业务的代码没有得到复用,并且如果这些交叉业务代码需要修改,那必然需要修改多处,难维护,怎么解决?可以采用AOP思想解决!可以把以上控制事务的代码作为环绕通知,切入到目标类的方法当中。接下来我们做一下这件事,有两个业务类,如下:
银行账户的业务类AccountService
package com.bjpowernode.spring.service;

import org.springframework.stereotype.Service;

@Service("accountService")
public class AccountService { // 目标对象
    // 转账的业务方法
    public void transfer(){ // 目标方法
        System.out.println("银行账户正在完成转账操作...");
    }

    // 取款的业务方法
    public void withdraw(){// 目标方法
        System.out.println("正在取款,请稍后...");
    }

}
订单业务类OrderService
package com.bjpowernode.spring.service;

import org.springframework.stereotype.Service;

@Service("orderService")
public class OrderService { // 目标对象

    // 生成订单的业务方法
    public void generate(){// 目标方法
        System.out.println("正在生成订单...");
    }

    // 取消订单的业务方法
    public void cancel(){ // 目标方法
        System.out.println("订单已取消...");
    }

}
注意,以上两个业务类已经纳入spring bean的管理,因为都添加了@Service注解。
给以上两个业务类的4个方法添加事务控制代码,使用AOP来完成
编写一个控制事务的切面类,前环绕指定开启事务、后环绕指定提交事务、catch语句块中指定回滚事物!
注:此时对于异常的处理方式是try...catch,这样才能在try开始事务和提交事务,在catch中回滚事务。
package com.bjpowernode.spring.service;


import org.aspectj.lang.ProceedingJoinPoint;
import org.aspectj.lang.annotation.Around;
import org.aspectj.lang.annotation.Aspect;
import org.springframework.stereotype.Component;

@Component("transactionAspect")
@Aspect
public class TransactionAspect {

    // 编程式事务解决方案
    @Around("execution(* com.bjpowernode.spring.service..*(..))")
    public void aroundAdvice(ProceedingJoinPoint joinPoint){
        try {
            // 前环绕
            System.out.println("开启事务");
            // 执行目标
            joinPoint.proceed();
            // 后环绕
            System.out.println("提交事务");
        } catch (Throwable e) {
            System.out.println("回滚事务");
        }
    }
}
spring.xml配置
注:aop:aspectj-autoproxy不用指定proxy-target-class参数,默认就是false,表示启用JDK的动态代理!
<?xml version="1.0" encoding="UTF-8"?>
<beans xmlns="http://www.springframework.org/schema/beans"
       xmlns:xsi="http://www.w3.org/2001/XMLSchema-instance"
       xmlns:context="http://www.springframework.org/schema/context"
       xmlns:aop="http://www.springframework.org/schema/aop"
       xsi:schemaLocation="http://www.springframework.org/schema/beans http://www.springframework.org/schema/beans/spring-beans.xsd
                           http://www.springframework.org/schema/context http://www.springframework.org/schema/context/spring-context.xsd
                           http://www.springframework.org/schema/aop http://www.springframework.org/schema/aop/spring-aop.xsd">
    <!--组件扫描-->
    <context:component-scan base-package="com.bjpowernode.spring.service"/>
    <!--启动自动代理-->
    <aop:aspectj-autoproxy/>
</beans>
编写测试
package com.bjpowernode.spring.test;

import com.bjpowernode.spring.service.AccountService;
import com.bjpowernode.spring.service.OrderService;
import org.junit.Test;
import org.springframework.context.ApplicationContext;
import org.springframework.context.support.ClassPathXmlApplicationContext;


public class AOPRealAppTest {

    @Test
    public void testTransaction(){
        ApplicationContext applicationContext = new ClassPathXmlApplicationContext("spring.xml");
        AccountService accountService = applicationContext.getBean("accountService", AccountService.class);
        OrderService orderService = applicationContext.getBean("orderService", OrderService.class);
        accountService.transfer();
        accountService.withdraw();
        orderService.generate();
        orderService.cancel();
    }

}
执行结果:四个方法都会被添加上事务处理

如果转账的时候出现了异常
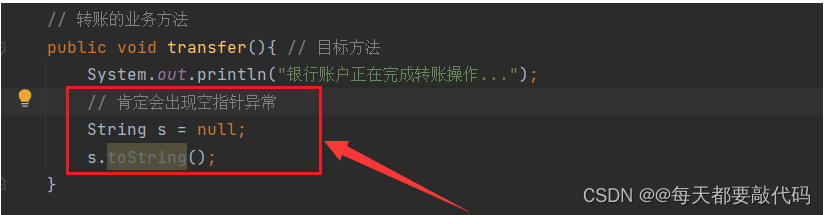
执行结果:也能正常回滚

需求:项目开发结束了,已经上线了。运行正常。客户提出了新的需求:凡事在系统中进行修改操作的,删除操作的,新增操作的,都要把这个人记录下来。因为这几个操作是属于危险行为。例如有业务类和业务方法:
用户业务类UserService
package com.bjpowernode.spring.biz;

import org.springframework.stereotype.Service;

@Service
public class UserService {

    public void saveUser(){
        System.out.println("新增用户信息");
    }

    public void deleteUser(){
        System.out.println("删除用户信息");
    }

    public void modifyUser(){
        System.out.println("修改用户信息");
    }

    public void getUser(){
        System.out.println("获取用户信息");
    }
}
编写一个负责记录日志的切面类
①这里只对增、删、改进行日志的记录,对于查并不记录;所以怎么操作呢?
先使用@Pointcut定义几个切点,把增、删、改使用注解的方式写出来,然后再通过或(||)的方式调用方法即可!
②记录日志信息时,先调用切点JoinPoint的getSignature()方法获取到签名;然后在调用getDeclaringTypeName()方法获取到类名、调用getName()方法获取到方法名
package com.bjpowernode.spring.biz;
import org.aspectj.lang.JoinPoint;
import org.aspectj.lang.annotation.Aspect;
import org.aspectj.lang.annotation.Before;
import org.aspectj.lang.annotation.Pointcut;
import org.springframework.stereotype.Component;
import java.text.SimpleDateFormat;
import java.util.Date;
@Component
@Aspect
public class SecurityLogAspect {
// 定义切点
@Pointcut("execution(* com.bjpowernode.spring.biz..save*(..))")
public void savePointcut(){}
// 定义切点
@Pointcut("execution(* com.bjpowernode.spring.biz..delete*(..))")
public void deletePointcut(){}
// 定义切点
@Pointcut("execution(* com.bjpowernode.spring.biz..modify*(..))")
public void modifyPointcut(){}
@Before("savePointcut() || deletePointcut() || modifyPointcut()")
public void beforeAdvice(JoinPoint joinPoint){
// 系统时间
SimpleDateFormat sdf = new SimpleDateFormat("yyyy-MM-dd HH:mm:ss SSS");
String nowTime = sdf.format(new Date());
// 输出日志信息
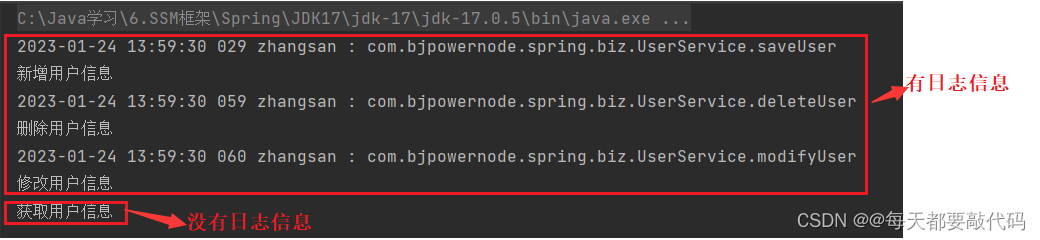
System.out.println(nowTime + " zhangsan : " + joinPoint.getSignature().getDeclaringTypeName() + "." + joinPoint.getSignature().getName());
}
}
spring.xml配置:扫描的是biz包
<?xml version="1.0" encoding="UTF-8"?>
<beans xmlns="http://www.springframework.org/schema/beans"
       xmlns:xsi="http://www.w3.org/2001/XMLSchema-instance"
       xmlns:context="http://www.springframework.org/schema/context"
       xmlns:aop="http://www.springframework.org/schema/aop"
       xsi:schemaLocation="http://www.springframework.org/schema/beans http://www.springframework.org/schema/beans/spring-beans.xsd
                           http://www.springframework.org/schema/context http://www.springframework.org/schema/context/spring-context.xsd
                           http://www.springframework.org/schema/aop http://www.springframework.org/schema/aop/spring-aop.xsd">
    <!--组件扫描-->
    <context:component-scan base-package="com.bjpowernode.spring.service"/>
    <context:component-scan base-package="com.bjpowernode.spring.biz"/>
    <!--启动自动代理-->
    <aop:aspectj-autoproxy/>
</beans>
编写测试
    @Test
    public void testSecurityLog(){
        ApplicationContext applicationContext = new ClassPathXmlApplicationContext("spring.xml");
        UserService userService = applicationContext.getBean("userService", UserService.class);
        userService.saveUser();
        userService.deleteUser();
        userService.modifyUser();
        userService.getUser();
    }
执行结果:符合我们的预想,增、删、改有日志信息,查没有日志信息
规则:评论区抢红包,运气王免费赠送《分布式中间件核心原理与RocketMQ最佳实践一本》
本书从分布式系统的基础概念讲起,逐步深入分布式系统中间件进阶实战,并在最后结合一个大型项目案例进行讲解,重点介绍了使用Spring Cloud框架整合各种分布式组件的过程,让读者不但可以系统地学习分布式中间件的相关知识,而且还能对业务逻辑的分析思路、实际应用开发有更为深入的理解。
全书共分12章,前3个章节是学习分布式系统架构的准备阶段。第1章开篇部分,讲解演进过程中分布式系统是如何出现的;第2章Spring部分,讲解如何搭建目前流行的Spring Boot和Spring Cloud框架;第3章容器部分,讲解目前最流行的Docker容器技术和Kubernetes容器编排工具;第4~8章深入讲解消息中间件RocketMQ的相关知识,理论与实战并存;第9章将深入RocketMQ底层,探索阅读源码的乐趣,掌握精通RocketMQ的同时学会阅读源码的方法;第10章和第11章讲解分布式系统中必须考虑的问题:分布式事务与分布式锁;第12章以一个电商系统业务为例,让读者体验一个项目从无到有的过程,并学以致用。
本书内容由浅入深、结构清晰、实例丰富、通俗易懂、实用性强,适合需要全方位学习分布式中间件相关技术的人员,也适合培训学校作为培训教材,还可作为大、中专院校相关专业的教学参考书。
京东自营购买链接:《分布式中间件核心原理与RocketMQ最佳实践》(刘猛)【摘要 书评 试读】- 京东图书

我正在使用Ruby2.1.1和Rails4.1.0.rc1。当执行railsc时,它被锁定了。使用Ctrl-C停止,我得到以下错误日志:~/.rvm/gems/ruby-2.1.1/gems/spring-1.1.2/lib/spring/client/run.rb:47:in`gets':Interruptfrom~/.rvm/gems/ruby-2.1.1/gems/spring-1.1.2/lib/spring/client/run.rb:47:in`verify_server_version'from~/.rvm/gems/ruby-2.1.1/gems/spring-1.1.
几个月前,我读了一篇关于rubygem的博客文章,它可以通过阅读代码本身来确定编程语言。对于我的生活,我不记得博客或gem的名称。谷歌搜索“ruby编程语言猜测”及其变体也无济于事。有人碰巧知道相关gem的名称吗? 最佳答案 是这个吗:http://github.com/chrislo/sourceclassifier/tree/master 关于ruby-寻找通过阅读代码确定编程语言的rubygem?,我们在StackOverflow上找到一个类似的问题:
网络编程套接字网络编程基础知识理解源`IP`地址和目的`IP`地址理解源MAC地址和目的MAC地址认识端口号理解端口号和进程ID理解源端口号和目的端口号认识`TCP`协议认识`UDP`协议网络字节序socket编程接口`sockaddr``UDP`网络程序服务器端代码逻辑:需要用到的接口服务器端代码`udp`客户端代码逻辑`udp`客户端代码`TCP`网络程序服务器代码逻辑多个版本服务器单进程版本多进程版本多线程版本线程池版本服务器端代码客户端代码逻辑客户端代码TCP协议通讯流程TCP协议的客户端/服务器程序流程三次握手(建立连接)数据传输四次挥手(断开连接)TCP和UDP对比网络编程基础知识
作为新的阿里云用户,您可以50免费试用多种优惠,价值高达1,700美元(或8,500美元)。这将让您了解和体验阿里云平台上提供的一系列产品和服务。如果您以个人身份注册免费试用,您将获得价值1,700美元的优惠。但是,如果您是注册公司,您可以选择企业免费试用,提交基本信息通过企业实名注册验证,即可开始价值$8,500的免费试用!本教程介绍了如何设置您的帐户并使用您的免费试用版。关于免费试用在我们开始此试用之前,您还必须遵守以下条款和条件才能访问您的免费试用:只有在一年内创建的账户才有资格获得阿里云免费试用。通过此免费试用优惠,用户可以免费试用免费试用活动页面上列出的每种产品一次。如果您有多个帐
转自:spring.profiles.active和spring.profiles.include的使用及区别说明下文笔者讲述spring.profiles.active和spring.profiles.include的区别简介说明,如下所示我们都知道,在日常开发中,开发|测试|生产环境都拥有不同的配置信息如:jdbc地址、ip、端口等此时为了避免每次都修改全部信息,我们则可以采用以上的属性处理此类异常spring.profiles.active属性例:配置文件,可使用以下方式定义application-${profile}.properties开发环境配置文件:application-dev
我完全不是程序员,正在学习使用Ruby和Rails框架进行编程。我目前正在使用Ruby1.8.7和Rails3.0.3,但我想知道我是否应该升级到Ruby1.9,因为我真的没有任何升级的“遗留”成本。缺点是什么?我是否会遇到与普通gem的兼容性问题,或者甚至其他我不太了解甚至无法预料的问题? 最佳答案 你应该升级。不要坚持从1.8.7开始。如果您发现不支持1.9.2的gem,请避免使用它们(因为它们很可能不被维护)。如果您对gem是否兼容1.9.2有任何疑问,您可以在以下位置查看:http://www.railsplugins.or
我创建了一个由于“在运行时执行的单例元类定义”而无法编码的对象(这段代码的描述是否正确?)。这是通过以下代码执行的:#defineclassXthatmyusesingletonclassmetaprogrammingfeatures#throughcallofmethod:break_marshalling!classXdefbreak_marshalling!meta_class=class我该怎么做才能使对象编码正确?是否可以从对象instance_of_x的classX中“移除”单例组件?我真的需要一个建议,因为我们的一些对象需要通过Marshal.dump序列化机制进行缓存。
我正在查看Ruby日志记录库Logging.logger方法并从sourceatgithub提出问题与这段代码有关:logger=::Logging::Logger.new(name)logger.add_appendersappenderlogger.additive=falseclass我知道类 最佳答案 这实际上删除了方法(当它实际被执行时)。这是确保close不会被调用两次的保障措施。看起来好像有嵌套的“class 关于Ruby元编程问题,我们在StackOverflow上找到一
使用Paperclip,我想从这样的URL抓取图像:require'open-uri'user.photo=open(url)问题是我最后得到一个像“open-uri20110915-4852-1o7k5uw”这样的文件名。有什么方法可以更改user.photo上的文件名?作为一个额外的变化,Paperclip将我的文件存储在S3上,所以如果我可以在初始分配中设置我想要的文件名就更好了,这样图像就会上传到正确的S3key。像这样:user.photo=open(url),:filename=>URI.parse(url).path 最佳答案
我正在开发一个xcode自动构建系统。在执行一些预构建验证时,我想检查指定的证书文件是否已被撤销。我了解securityverify-cert验证其他证书属性但不验证吊销。我如何检查撤销?我正在用Ruby编写构建系统,但我对任何语言的想法都持开放态度。我阅读了这个答案(Openssl-Howtocheckifacertificateisrevokedornot),但指向底部的链接(DoesOpenSSLautomaticallyhandleCRLs(CertificateRevocationLists)now?)进入的Material对我的目的来说有点过于复杂(用户上传已撤销的证书是一