github官方操作文档:Generating a new SSH key and adding it to the ssh-agent - GitHub Docs
操作流程如下
1.生成一个新的ssh文件(your_email@example.com 替换为自己的邮箱)
ssh-keygen -t ed25519 -C "your_email@example.com"

# 如果系统不支持 Ed25519  算法,可以使用下面方法创建
# ssh-keygen -t rsa -b 4096 -C "your_email@example.com"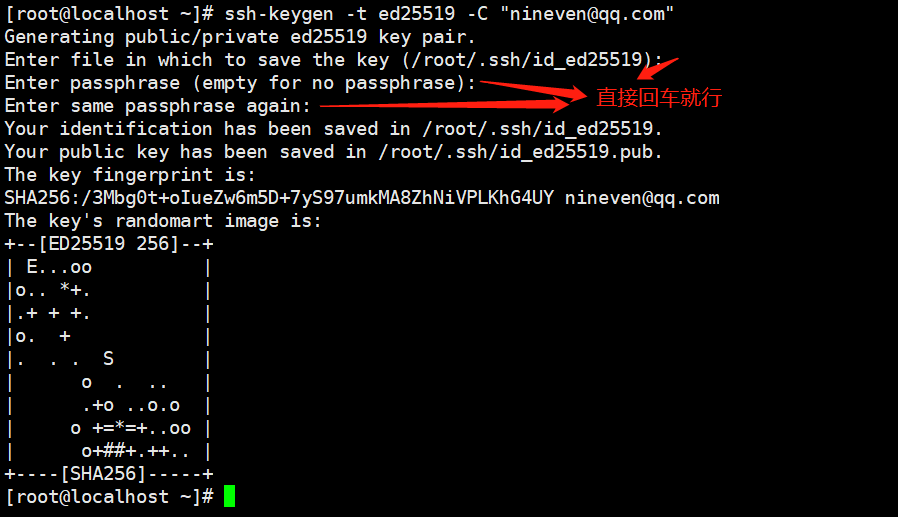
# 如果需要给秘钥设置密码,也可以在这两步的时候,设置密码
> Enter passphrase (empty for no passphrase): [Type a passphrase]
> Enter same passphrase again: [Type passphrase again]
2.添加公钥到github
复制公钥内容到剪贴板

打开浏览器,登录github.com ,右上角,点击settings

找到 SSH and GPG keys ,点击进入

点击添加


测试权限是否正常,能否通过ssh访问git
ssh -T git@github.com a.访问成功如下:
b.访问失败如下:

访问失败,需要检查公钥文件是否添加到github
其他机器通过指定秘钥文件访问【方式一】
1.创建目录,并拷贝秘钥文件该目录下,并修改为0600权限
mkdir -pv ~/.ssh_git

# 将私钥文件拷贝到该目录,并修改权限
chmod 0600 -R ~/.ssh_git
2.启动ssh-agent代理,并添加私钥,然后进行测试
eval "$(ssh-agent -s)"
ssh-add ~/.ssh_git/id_ed25519
ssh -T git@github.com
当ssh-agent进程结束时,将失去访问权限,若想继续访问,还需要重新执行操作

重新添加私有执行

其他机器通过指定秘钥文件访问【方式二】
通过 .gitconfig 配置文件进行配置,该配置针对git命令
core.sshCommand
If this variable is set, git fetch and git push will use the specified command instead of ssh when they need to connect to a remote system. The command is in the same form as the GIT_SSH_COMMAND environment variable and is overridden when the environment variable is set.
git config --global core.sshCommand 'ssh -i ~/.ssh_git/id_ed25519 -p 22'该操作会在用户家目录自动生成.gitconfig配置文件,内容如下

测试,需要指定克隆私有仓库进行测试,下图表示测试成功

其他机器通过指定秘钥文件访问【方式三】
通过 GIT_SSH_COMMAND 环境变量实现访问
$GIT_SSH_COMMAND takes precedence over $GIT_SSH, and is interpreted by the shell, which allows additional arguments to be included. $GIT_SSH on the other hand must be just the path to a program (which can be a wrapper shell script, if additional arguments are needed).
export GIT_SSH_COMMAND="ssh -i ~/.ssh_git/id_ed25519 -p 22"
注意:GIT_SSH_COMMAND 的优先权大于 GIT_SSH
通过 GIT_SSH 环境变量实现访问
GIT_SSH, if specified, is a program that is invoked instead of ssh when Git tries to connect to an SSH host. It is invoked like $GIT_SSH [username@]host [-p <port>] <command>. Note that this isn’t the easiest way to customize how ssh is invoked; it won’t support extra command-line parameters, so you’d have to write a wrapper script and set GIT_SSH to point to it. It’s probably easier just to use the ~/.ssh/config file for that.
大概意思指定了 GIT_SSH ,则当git通过ssh连接主机是,调用GIT_SSH设置的脚本来替换默认的ssh命令
1.创建一个文件,内容如下 ~/.ssh_git/ssh-git.sh
vim ~/.ssh_git/ssh-git.sh#!/bin/bash
if [ -z "$PKEY" ]; then
# if PKEY is not specified, run ssh using default keyfile
ssh "$@"
else
ssh -i "$PKEY" -p 22 "$@"
fi
2.添加可执行权限
chmod a+x ~/.ssh_git/ssh-git.sh3.通过添加私有方式进行访问
export GIT_SSH=~/.ssh_git/ssh-git.sh
PKEY=~/.ssh_git/id_ed25519 git clone git@github.com:nineaiyu/scorems.git

4.整理上面操作步骤,可总结一个脚本git.sh,内容如下:
#!/bin/bash
#

if [ $# -eq 0 ]; then
    echo "git.sh -i ssh-key-file git-command"
    exit 1
fi

git_ssh_tmp=~/.git_ssh.tmp

trap "rm -f ${git_ssh_tmp}" 0

if [ "$1" = "-i" ]; then
    SSH_KEY=$2
    shift
    shift
    echo "ssh -i $SSH_KEY -p 22 \$@" > ${git_ssh_tmp}
    chmod +x ${git_ssh_tmp}
    export GIT_SSH=${git_ssh_tmp}
fi

[ "$1" = "git" ] && shift

git "$@"
执行操作如下:
chmod a+x git.sh
./git.sh -i ~/.ssh_git/id_ed25519  clone git@github.com:nineaiyu/scorems.git

我正在学习如何使用Nokogiri,根据这段代码我遇到了一些问题:require'rubygems'require'mechanize'post_agent=WWW::Mechanize.newpost_page=post_agent.get('http://www.vbulletin.org/forum/showthread.php?t=230708')puts"\nabsolutepathwithtbodygivesnil"putspost_page.parser.xpath('/html/body/div/div/div/div/div/table/tbody/tr/td/div
总的来说,我对ruby还比较陌生,我正在为我正在创建的对象编写一些rspec测试用例。许多测试用例都非常基础,我只是想确保正确填充和返回值。我想知道是否有办法使用循环结构来执行此操作。不必为我要测试的每个方法都设置一个assertEquals。例如:describeitem,"TestingtheItem"doit"willhaveanullvaluetostart"doitem=Item.new#HereIcoulddotheitem.name.shouldbe_nil#thenIcoulddoitem.category.shouldbe_nilendend但我想要一些方法来使用
我有一个Ruby程序,它使用rubyzip压缩XML文件的目录树。gem。我的问题是文件开始变得很重,我想提高压缩级别,因为压缩时间不是问题。我在rubyzipdocumentation中找不到一种为创建的ZIP文件指定压缩级别的方法。有人知道如何更改此设置吗?是否有另一个允许指定压缩级别的Ruby库? 最佳答案 这是我通过查看rubyzip内部创建的代码。level=Zlib::BEST_COMPRESSIONZip::ZipOutputStream.open(zip_file)do|zip|Dir.glob("**/*")d
类classAprivatedeffooputs:fooendpublicdefbarputs:barendprivatedefzimputs:zimendprotecteddefdibputs:dibendendA的实例a=A.new测试a.foorescueputs:faila.barrescueputs:faila.zimrescueputs:faila.dibrescueputs:faila.gazrescueputs:fail测试输出failbarfailfailfail.发送测试[:foo,:bar,:zim,:dib,:gaz].each{|m|a.send(m)resc
我试图在一个项目中使用rake,如果我把所有东西都放到Rakefile中,它会很大并且很难读取/找到东西,所以我试着将每个命名空间放在lib/rake中它自己的文件中,我添加了这个到我的rake文件的顶部:Dir['#{File.dirname(__FILE__)}/lib/rake/*.rake'].map{|f|requiref}它加载文件没问题,但没有任务。我现在只有一个.rake文件作为测试,名为“servers.rake”,它看起来像这样:namespace:serverdotask:testdoputs"test"endend所以当我运行rakeserver:testid时
我的目标是转换表单输入,例如“100兆字节”或“1GB”,并将其转换为我可以存储在数据库中的文件大小(以千字节为单位)。目前,我有这个:defquota_convert@regex=/([0-9]+)(.*)s/@sizes=%w{kilobytemegabytegigabyte}m=self.quota.match(@regex)if@sizes.include?m[2]eval("self.quota=#{m[1]}.#{m[2]}")endend这有效,但前提是输入是倍数(“gigabytes”,而不是“gigabyte”)并且由于使用了eval看起来疯狂不安全。所以,功能正常,
我正在尝试设置一个puppet节点,但rubygems似乎不正常。如果我通过它自己的二进制文件(/usr/lib/ruby/gems/1.8/gems/facter-1.5.8/bin/facter)在cli上运行facter,它工作正常,但如果我通过由rubygems(/usr/bin/facter)安装的二进制文件,它抛出:/usr/lib/ruby/1.8/facter/uptime.rb:11:undefinedmethod`get_uptime'forFacter::Util::Uptime:Module(NoMethodError)from/usr/lib/ruby
Rails2.3可以选择随时使用RouteSet#add_configuration_file添加更多路由。是否可以在Rails3项目中做同样的事情? 最佳答案 在config/application.rb中:config.paths.config.routes在Rails3.2(也可能是Rails3.1)中,使用:config.paths["config/routes"] 关于ruby-on-rails-Rails3中的多个路由文件,我们在StackOverflow上找到一个类似的问题
对于具有离线功能的智能手机应用程序,我正在为Xml文件创建单向文本同步。我希望我的服务器将增量/差异(例如GNU差异补丁)发送到目标设备。这是计划:Time=0Server:hasversion_1ofXmlfile(~800kiB)Client:hasversion_1ofXmlfile(~800kiB)Time=1Server:hasversion_1andversion_2ofXmlfile(each~800kiB)computesdeltaoftheseversions(=patch)(~10kiB)sendspatchtoClient(~10kiBtransferred)Cl
我正在寻找执行以下操作的正确语法(在Perl、Shell或Ruby中):#variabletoaccessthedatalinesappendedasafileEND_OF_SCRIPT_MARKERrawdatastartshereanditcontinues. 最佳答案 Perl用__DATA__做这个:#!/usr/bin/perlusestrict;usewarnings;while(){print;}__DATA__Texttoprintgoeshere 关于ruby-如何将脚