其实小编之前一直都是用的Java来开发Android,但是工作需求,开始了Kotlin的编程,接触到了JetPack,发现其中的Navigation特别有意思,今天来给大家分享一下,我们做一个四个页面吧,从APP的 欢迎页面——>新手引导页面——>注册登录页面——>APP主页面 ,我来带大家入门,希望大家不要嫌弃
站在Fragment角度:不用把Fragment添加到集合里面去操作了,也不用去操作SupportFragmentManager了
站在Activity角度:可以减少大量的Activity,增加Fragment的使用,毕竟Fragment有更加详细的生命周期,更好的传递信息
站在开发者角度:Navigation的可视化导航图非常优美,导航路径清晰可见,让开发人员更方便的开发
    // Kotlin Navigation
    implementation("androidx.navigation:navigation-fragment-ktx:2.5.1")
    implementation("androidx.navigation:navigation-ui-ktx:2.5.1")
在app/java/com.example.项目名目录下 先创建一个Fragment文件夹,在文件夹中创建4个Fragment,分别为 WelcomeFragment(欢迎页面),NoviceGuidePageFragment(新手引导页面),RegistrationLandingPageFragment(注册登录页面),MainFragment(APP主页面),具体如下图所示:
在app/res/layout文件夹下创建4个XML,分别为fragment_welcome.xml,fragment_novice_guide_page.xml,fragment_registration_landing_page.xml,fragment_main.xml,具体如下图所示:

WelcomeFragment.kt:
package com.example.siyi2.fragment

import android.os.Bundle
import android.view.LayoutInflater
import android.view.View
import android.view.ViewGroup
import androidx.fragment.app.Fragment
import com.example.siyi2.R

class WelcomeFragment : Fragment() {

    override fun onCreateView(
        inflater: LayoutInflater, container: ViewGroup?, savedInstanceState: Bundle?
    ): View? {
        val view = inflater.inflate(R.layout.fragment_welcome, container, false)
        return view
    }

}
fragment_welcome.xml:
<?xml version="1.0" encoding="utf-8"?>
<androidx.constraintlayout.widget.ConstraintLayout xmlns:android="http://schemas.android.com/apk/res/android"
    xmlns:tools="http://schemas.android.com/tools"
    android:layout_width="match_parent"
    android:layout_height="match_parent">

    <TextView
        android:id="@+id/to_fragment_novice_guide"
        android:layout_width="match_parent"
        android:layout_height="match_parent"
        android:text="欢迎页面"
        android:textSize="30dp"
        android:textColor="@color/black"
        android:gravity="center"/>

</androidx.constraintlayout.widget.ConstraintLayout>
NoviceGuidePageFragment.kt:
package com.example.siyi2.fragment

import android.os.Bundle
import android.view.LayoutInflater
import android.view.View
import android.view.ViewGroup
import android.widget.TextView
import androidx.fragment.app.Fragment
import androidx.navigation.Navigation
import com.example.siyi2.R

class NoviceGuidePageFragment : Fragment() {

    override fun onCreateView(
        inflater: LayoutInflater, container: ViewGroup?, savedInstanceState: Bundle?
    ): View? {
        val view = inflater.inflate(R.layout.fragment_novice_guide_page, container, false)

        return view
    }
}
fragment_novice_guide_page.xml:
<?xml version="1.0" encoding="utf-8"?>
<androidx.constraintlayout.widget.ConstraintLayout xmlns:android="http://schemas.android.com/apk/res/android"
    android:layout_width="match_parent"
    android:layout_height="match_parent">

    <TextView
        android:id="@+id/to_fragment_registration_landing_page"
        android:layout_width="match_parent"
        android:layout_height="match_parent"
        android:text="新手引导页面"
        android:textSize="30dp"
        android:textColor="#F18C8C"
        android:gravity="center"/>

</androidx.constraintlayout.widget.ConstraintLayout>
RegistrationLandingPageFragment.kt:
package com.example.siyi2.fragment

import android.os.Bundle
import android.view.LayoutInflater
import android.view.View
import android.view.ViewGroup
import android.widget.TextView
import androidx.fragment.app.Fragment
import androidx.navigation.Navigation
import com.example.siyi2.R

class RegistrationLandingPageFragment :Fragment(){

    override fun onCreateView(inflater: LayoutInflater, container: ViewGroup?, savedInstanceState: Bundle?
    ): View? {
        val view = inflater.inflate(R.layout.fragment_registration_landing_page,container,false)

        return view
    }
}
fragment_registration_landing_page.xml
<?xml version="1.0" encoding="utf-8"?>
<androidx.constraintlayout.widget.ConstraintLayout xmlns:android="http://schemas.android.com/apk/res/android"
    android:layout_width="match_parent"
    android:layout_height="match_parent">

    <TextView
        android:id="@+id/to_fragment_main"
        android:layout_width="match_parent"
        android:layout_height="match_parent"
        android:text="登录注册页面"
        android:textSize="30dp"
        android:textColor="#DC0404"
        android:gravity="center"/>

</androidx.constraintlayout.widget.ConstraintLayout>
MainFragment.kt:
package com.example.siyi2.fragment

import android.os.Bundle
import android.view.LayoutInflater
import android.view.View
import android.view.ViewGroup
import android.widget.TextView
import androidx.fragment.app.Fragment
import androidx.navigation.Navigation
import com.example.siyi2.R

class MainFragment :Fragment(){

    override fun onCreateView(inflater: LayoutInflater, container: ViewGroup?, savedInstanceState: Bundle?
    ): View? {
        val view = inflater.inflate(R.layout.fragment_main,container,false)

        return view
    }
}
fragment_main.xml:
<?xml version="1.0" encoding="utf-8"?>
<androidx.constraintlayout.widget.ConstraintLayout xmlns:android="http://schemas.android.com/apk/res/android"
    android:layout_width="match_parent"
    android:layout_height="match_parent">

    <TextView
        android:id="@+id/main_fragment"
        android:layout_width="match_parent"
        android:layout_height="match_parent"
        android:text="APP主页面"
        android:textSize="30dp"
        android:textColor="@color/teal_200"
        android:gravity="center"/>

</androidx.constraintlayout.widget.ConstraintLayout>
在app/res目录下新建一个文件夹取名navigation,在navigation文件夹下新建nav_graph.xml,如下图所示
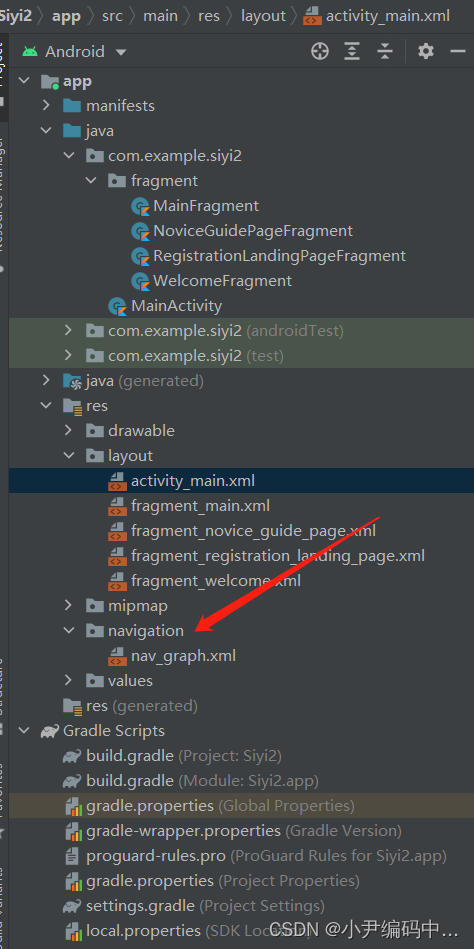
提醒大家一下,我们开发过程中,大家的这个文件夹的名字和XML的名字大家尽量去一些见名知义的名字,方便开发人员和后续维护
nav_graph.xml:
<?xml version="1.0" encoding="utf-8"?>
<navigation xmlns:android="http://schemas.android.com/apk/res/android"
    xmlns:app="http://schemas.android.com/apk/res-auto"
    android:id="@+id/nav_graph"
    app:startDestination="@id/fragment_welcome">

    <fragment
        android:id="@+id/fragment_welcome"
        android:name="com.example.siyi2.fragment.WelcomeFragment"
        android:label="WelcomeFragment" >

        <action
            android:id="@+id/action_fragment_welcome_to_fragment_noviceGuide"
            app:destination="@id/fragment_noviceGuide"
            />
    </fragment>

    <fragment
        android:id="@+id/fragment_noviceGuide"
        android:name="com.example.siyi2.fragment.NoviceGuidePageFragment"
        android:label="NoviceGuideFragment" >
        <action
            android:id="@+id/fragment_noviceGuide_to_fragment_registarationLandingpage"
            app:destination="@+id/fragment_registrationLandingPage" />
    </fragment>

    <fragment
        android:id="@+id/fragment_registrationLandingPage"
        android:name="com.example.siyi2.fragment.RegistrationLandingPageFragment"
        android:label="RegistrationLandingPageFragment" >
        <action
            android:id="@+id/fragment_registrationLandingPage_to_fragment_main"
            app:destination="@+id/fragment_main" />
    </fragment>

    <fragment
        android:id="@+id/fragment_main"
        android:name="com.example.siyi2.fragment.MainFragment"
        android:label="MainFragment" >

    </fragment>

</navigation>
navigation是根标签,通过startDestinationlai配置默认启动时的第一个页面,小编这里配置的第一个fragment_welcome,我们也可以在代码中动态修改启动时的第一个Fragment,也可以在可视化面板中去修改
fragment标签就代表着这是一个Fragment
name指的是Fragment在项目中的路径
action标签定义了页面跳转的行为,也就是Navigation导航图的每一条线
destination定义跳转的Fragment目标,还可以加入跳转时的动画
Navigation首先要有起始页面,叫startDestination,处于栈底,是启动时的第一个页面,也是返回可见的最后一个页面。多个destination连接起来就构成了一个Navigation导航图,类似于一种栈结构,页面先进后出。destination之间的连接叫做action。
Navigation导航图如下图所示:
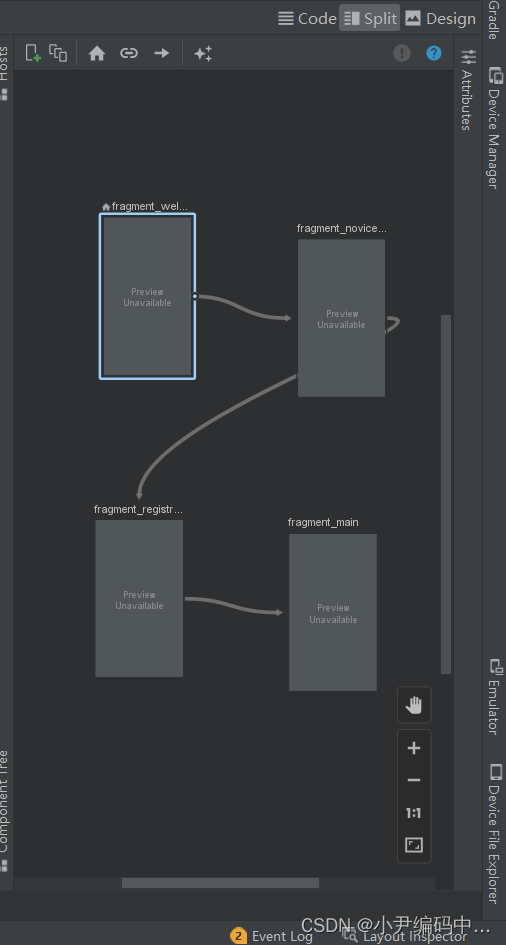
大家可以看到,这样的可视化页面流程导航图非常好看,对吧,这也是Google官方推荐大家使用的,便于开发和维护
我们的navigation导航图也必须依赖于一个Activity上
MainActivity.kt:
package com.example.siyi2

import androidx.appcompat.app.AppCompatActivity
import android.os.Bundle

class MainActivity : AppCompatActivity() {
    override fun onCreate(savedInstanceState: Bundle?) {
        super.onCreate(savedInstanceState)
        setContentView(R.layout.activity_main)
    }
}
activity_main.xml:
<?xml version="1.0" encoding="utf-8"?>
<androidx.constraintlayout.widget.ConstraintLayout xmlns:android="http://schemas.android.com/apk/res/android"
    xmlns:app="http://schemas.android.com/apk/res-auto"
    xmlns:tools="http://schemas.android.com/tools"
    android:layout_width="match_parent"
    android:layout_height="match_parent"
    tools:context=".MainActivity">


    <fragment
        android:id="@+id/nav_host_fragment"
        app:defaultNavHost="true"
        app:navGraph="@navigation/nav_graph"
        android:name="androidx.navigation.fragment.NavHostFragment"
        android:layout_width="match_parent"
        android:layout_height="match_parent" />


</androidx.constraintlayout.widget.ConstraintLayout>
WelcomeFragment.kt:
package com.example.siyi2.fragment

import android.os.Bundle
import android.view.LayoutInflater
import android.view.View
import android.view.ViewGroup
import android.widget.TextView
import androidx.fragment.app.Fragment
import androidx.navigation.Navigation

import com.example.siyi2.R

    class WelcomeFragment : Fragment() {

    override fun onCreateView(
        inflater: LayoutInflater, container: ViewGroup?, savedInstanceState: Bundle?
    ): View? {
        val view = inflater.inflate(R.layout.fragment_welcome, container, false)

        view.findViewById<TextView>(R.id.to_fragment_novice_guide)
            .setOnClickListener {
                Navigation.findNavController(view)
                    .navigate(R.id.action_fragment_welcome_to_fragment_noviceGuide)
            }

        return view
    }

}
NoviceGuidePageFragment.kt:
package com.example.siyi2.fragment

import android.os.Bundle
import android.view.LayoutInflater
import android.view.View
import android.view.ViewGroup
import android.widget.TextView
import androidx.fragment.app.Fragment
import androidx.navigation.Navigation
import com.example.siyi2.R

class NoviceGuidePageFragment : Fragment() {

    override fun onCreateView(
        inflater: LayoutInflater, container: ViewGroup?, savedInstanceState: Bundle?
    ): View? {
        val view = inflater.inflate(R.layout.fragment_novice_guide_page, container, false)


        view.findViewById<TextView>(R.id.to_fragment_registration_landing_page)
            .setOnClickListener {
                Navigation.findNavController(view)
                    .navigate(R.id.fragment_noviceGuide_to_fragment_registarationLandingpage)
            }

        return view
    }
}
RegistrationLandingPageFragment.kt:
package com.example.siyi2.fragment

import android.os.Bundle
import android.view.LayoutInflater
import android.view.View
import android.view.ViewGroup
import android.widget.TextView
import androidx.fragment.app.Fragment
import androidx.navigation.Navigation
import com.example.siyi2.R

class RegistrationLandingPageFragment :Fragment(){

    override fun onCreateView(inflater: LayoutInflater, container: ViewGroup?, savedInstanceState: Bundle?
    ): View? {
        val view = inflater.inflate(R.layout.fragment_registration_landing_page,container,false)

        view.findViewById<TextView>(R.id.to_fragment_main)
            .setOnClickListener {
                Navigation.findNavController(view)
                    .navigate(R.id.fragment_registrationLandingPage_to_fragment_main)
            }

        return view
    }
}
MainFragment.kt:
package com.example.siyi2.fragment

import android.os.Bundle
import android.view.LayoutInflater
import android.view.View
import android.view.ViewGroup
import android.widget.TextView
import androidx.fragment.app.Fragment
import androidx.navigation.Navigation
import com.example.siyi2.R

class MainFragment :Fragment(){

    override fun onCreateView(inflater: LayoutInflater, container: ViewGroup?, savedInstanceState: Bundle?
    ): View? {
        val view = inflater.inflate(R.layout.fragment_main,container,false)

        return view
    }
}
到此为止,我们就万事俱备,只欠东风了,直接运行,上效果图
Navigation开发
不知道大家是否对JetPack中的Navigation感兴趣了呢?请在评论区留言哦!
我正在编写一个包含C扩展的gem。通常当我写一个gem时,我会遵循TDD的过程,我会写一个失败的规范,然后处理代码直到它通过,等等......在“ext/mygem/mygem.c”中我的C扩展和在gemspec的“扩展”中配置的有效extconf.rb,如何运行我的规范并仍然加载我的C扩展?当我更改C代码时,我需要采取哪些步骤来重新编译代码?这可能是个愚蠢的问题,但是从我的gem的开发源代码树中输入“bundleinstall”不会构建任何native扩展。当我手动运行rubyext/mygem/extconf.rb时,我确实得到了一个Makefile(在整个项目的根目录中),然后当
我已经在Sinatra上创建了应用程序,它代表了一个简单的API。我想在生产和开发上进行部署。我想在部署时选择,是开发还是生产,一些方法的逻辑应该改变,这取决于部署类型。是否有任何想法,如何完成以及解决此问题的一些示例。例子:我有代码get'/api/test'doreturn"Itisdev"end但是在部署到生产环境之后我想在运行/api/test之后看到ItisPROD如何实现? 最佳答案 根据SinatraDocumentation:EnvironmentscanbesetthroughtheRACK_ENVenvironm
我们的git存储库中目前有一个Gemfile。但是,有一个gem我只在我的环境中本地使用(我的团队不使用它)。为了使用它,我必须将它添加到我们的Gemfile中,但每次我checkout到我们的master/dev主分支时,由于与跟踪的gemfile冲突,我必须删除它。我想要的是类似Gemfile.local的东西,它将继承从Gemfile导入的gems,但也允许在那里导入新的gems以供使用只有我的机器。此文件将在.gitignore中被忽略。这可能吗? 最佳答案 设置BUNDLE_GEMFILE环境变量:BUNDLE_GEMFI
这似乎非常适得其反,因为太多的gem会在window上破裂。我一直在处理很多mysql和ruby-mysqlgem问题(gem本身发生段错误,一个名为UnixSocket的类显然在Windows机器上不能正常工作,等等)。我只是在浪费时间吗?我应该转向不同的脚本语言吗? 最佳答案 我在Windows上使用Ruby的经验很少,但是当我开始使用Ruby时,我是在Windows上,我的总体印象是它不是Windows原生系统。因此,在主要使用Windows多年之后,开始使用Ruby促使我切换回原来的系统Unix,这次是Linux。Rub
我正在玩HTML5视频并且在ERB中有以下片段:mp4视频从在我的开发环境中运行的服务器很好地流式传输到chrome。然而firefox显示带有海报图像的视频播放器,但带有一个大X。问题似乎是mongrel不确定ogv扩展的mime类型,并且只返回text/plain,如curl所示:$curl-Ihttp://0.0.0.0:3000/pr6.ogvHTTP/1.1200OKConnection:closeDate:Mon,19Apr201012:33:50GMTLast-Modified:Sun,18Apr201012:46:07GMTContent-Type:text/plain
无论您是想搭建桌面端、WEB端或者移动端APP应用,HOOPSPlatform组件都可以为您提供弹性的3D集成架构,同时,由工业领域3D技术专家组成的HOOPS技术团队也能为您提供技术支持服务。如果您的客户期望有一种在多个平台(桌面/WEB/APP,而且某些客户端是“瘦”客户端)快速、方便地将数据接入到3D应用系统的解决方案,并且当访问数据时,在各个平台上的性能和用户体验保持一致,HOOPSPlatform将帮助您完成。利用HOOPSPlatform,您可以开发在任何环境下的3D基础应用架构。HOOPSPlatform可以帮您打造3D创新型产品,HOOPSSDK包含的技术有:快速且准确的CAD
在应用开发中,有时候我们需要获取系统的设备信息,用于数据上报和行为分析。那在鸿蒙系统中,我们应该怎么去获取设备的系统信息呢,比如说获取手机的系统版本号、手机的制造商、手机型号等数据。1、获取方式这里分为两种情况,一种是设备信息的获取,一种是系统信息的获取。1.1、获取设备信息获取设备信息,鸿蒙的SDK包为我们提供了DeviceInfo类,通过该类的一些静态方法,可以获取设备信息,DeviceInfo类的包路径为:ohos.system.DeviceInfo.具体的方法如下:ModifierandTypeMethodDescriptionstatic StringgetAbiList()Obt
@作者:SYFStrive @博客首页:HomePage📜:微信小程序📌:个人社区(欢迎大佬们加入)👉:社区链接🔗📌:觉得文章不错可以点点关注👉:专栏连接🔗💃:感谢支持,学累了可以先看小段由小胖给大家带来的街舞👉微信小程序(🔥)目录自定义组件-behaviors 1、什么是behaviors 2、behaviors的工作方式 3、创建behavior 4、导入并使用behavior 5、behavior中所有可用的节点 6、同名字段的覆盖和组合规则总结最后自定义组件-behaviors 1、什么是behaviorsbehaviors是小程序中,用于实现
了解Rails缓存如何工作的人可以真正帮助我。这是嵌套在Rails::Initializer.runblock中的代码:config.after_initializedoSomeClass.const_set'SOME_CONST','SOME_VAL'end现在,如果我运行script/server并发出请求,一切都很好。然而,在我的Rails应用程序的第二个请求中,一切都因单元化常量错误而变得糟糕。在生产模式下,我可以成功发出第二个请求,这意味着常量仍然存在。我已通过将以上内容更改为以下内容来解决问题:config.after_initializedorequire'some_cl
我有一个使用PDFKit呈现网页的pdf版本的Rails应用程序。我使用Thin作为开发服务器。问题是当我处于开发模式时。当我使用“bundleexecrailss”启动我的服务器并尝试呈现任何PDF时,整个过程会陷入僵局,因为当您呈现PDF时,会向服务器请求一些额外的资源,如图像和css,看起来只有一个线程.如何配置Rails开发服务器以运行多个工作线程?非常感谢。 最佳答案 我找到的最简单的解决方案是unicorn.geminstallunicorn创建一个unicorn.conf:worker_processes3然后使用它: