文章目录
Unity中提供了NavMesh导航寻路的AI功能,如果项目不涉及服务端它应该能满足大部分需求,但如果涉及服务端且使用状态同步技术,可能需要服务端同时实现寻路功能,这时就需要考虑其它实现思路,而AStar寻路算法则是常使用的一种。
AStar算法是一种静态路网中求解最短路径最有效的直接搜索方法,基于广度优先搜索(BFS)和Dijkstra算法,通过不断维护节点的代价来寻求代价最小的路径,代价的估价公式:F(N)=G(N) + H(N)。
其它概念:
算法思路:
地图网格由x * y个Node节点组成,定义节点类,变量包含节点的x、y索引值、父节点信息、G、H、F代价值以及是否为可行走区域的标识信息,代码如下:
namespace SK.Framework.AStar
{
    public class Node
    {
        public int x;
        public int y;

        /// <summary>
        /// 父节点
        /// </summary>
        public Node parent;
        /// <summary>
        /// 是否为可行走区域
        /// </summary>
        public bool IsWalkable { get; private set; }
        /// <summary>
        /// 起始节点到当前节点的代价
        /// </summary>
        public int gCost;
        /// <summary>
        /// 当前节点到终节点的代价
        /// </summary>
        public int hCost;
        /// <summary>
        /// 代价
        /// </summary>
        public int Cost { get { return gCost + hCost; } }

        public Node(int x, int y, bool isWalkable)
        {
            this.x = x;
            this.y = y;
            IsWalkable = isWalkable;
        }
    }
}
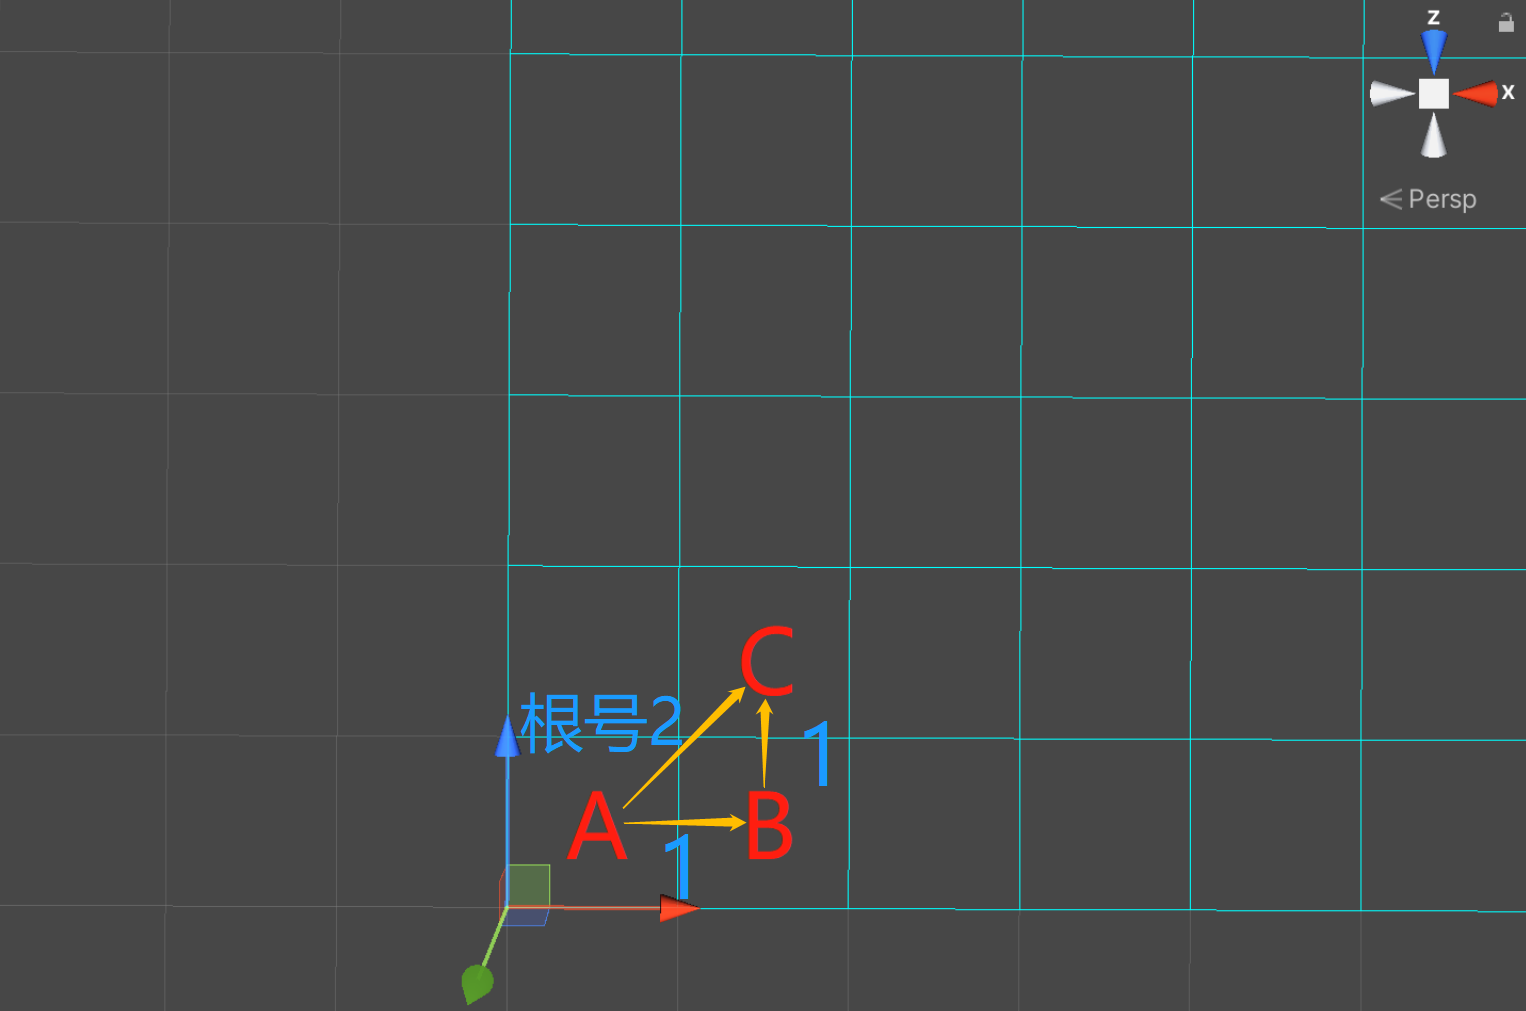
每向正上、下、左右方向走一步代价为1,根据勾股定理,每向斜方向走一步代价为
2
\sqrt{2}
2,近似1.414,而为了便于计算、节省性能,我们将正方向移动一步的代价记为10,斜方向移动一步的代价记为14,都取int整数。
//计算两节点之间的代价
private int CalculateCost(Node n1, Node n2)
{
    //绝对值
    int deltaX = n1.x - n2.x;
    if (deltaX < 0) deltaX = -deltaX;
    int deltaY = n1.y - n2.y;
    if (deltaY < 0) deltaY = -deltaY;
    int delta = deltaX - deltaY;
    if (delta < 0) delta = -delta;
    //每向正上、下、左、右方向走一步代价增加10
    //每斜向走一步代价增加14(勾股定理,精确来说是近似14.14~)
    return 14 * (deltaX > deltaY ? deltaY : deltaX) + 10 * delta;
}
/// <summary>
/// 根据起始节点和终节点获取路径
/// </summary>
/// <param name="startNode">起始节点</param>
/// <param name="endNode">终节点</param>
/// <returns>路径节点集合</returns>
public List<Node> GetPath(Node startNode, Node endNode)
{
    //开放集合
    List<Node> openCollection = new List<Node>();
    //封闭集合
    HashSet<Node> closeCollection = new HashSet<Node>();
    //起始节点放入开放集合
    openCollection.Add(startNode);
    //开放集合中数量为0时 寻路结束
    while (openCollection.Count > 0)
    {
        //当前节点
        Node currentNode = openCollection[0];
        //遍历查找是否有代价更小的节点
        //若代价相同,选择移动到终点代价更小的节点
        for (int i = 1; i < openCollection.Count; i++)
        {
            currentNode = (currentNode.Cost > openCollection[i].Cost
                || (currentNode.Cost == openCollection[i].Cost
                && currentNode.hCost > openCollection[i].hCost))
                ? openCollection[i] : currentNode;
        }
        //将获取到的当前节点从开放集合移除放入封闭集合
        openCollection.Remove(currentNode);
        closeCollection.Add(currentNode);
        //当前节点已经是终节点 寻路结束
        if (currentNode == endNode)
            break;
        //获取邻节点
        List<Node> neighbourNodes = GetNeighbouringNodes(currentNode, SearchMode.Link8);
        //在当前节点向邻节点继续搜索
        for (int i = 0; i < neighbourNodes.Count; i++)
        {
            Node neighbourNode = neighbourNodes[i];
            //判断邻节点是否为不可行走区域(障碍)或者邻节点已经在封闭集合中
            if (!neighbourNode.IsWalkable || closeCollection.Contains(neighbourNode))
                continue;

            //经当前节点到达该邻节点的G值是否小于原来的G值
            //或者该邻节点还没有放入开放集合,将其放入开放集合
            int cost = currentNode.gCost + CalculateCost(currentNode, neighbourNode);
            if (cost < neighbourNode.gCost || !openCollection.Contains(neighbourNode))
            {
                neighbourNode.gCost = cost;
                neighbourNode.hCost = CalculateCost(neighbourNode, endNode);
                neighbourNode.parent = currentNode;
                if (!openCollection.Contains(neighbourNode))
                    openCollection.Add(neighbourNode);
            }
        }
    }

    //倒序获取父节点
    List<Node> path = new List<Node>();
    Node currNode = endNode;
    while (currNode != startNode)
    {
        path.Add(currNode);
        currNode = currNode.parent;
    }
    //再次倒序后得到完整路径
    path.Reverse();
    return path;
}
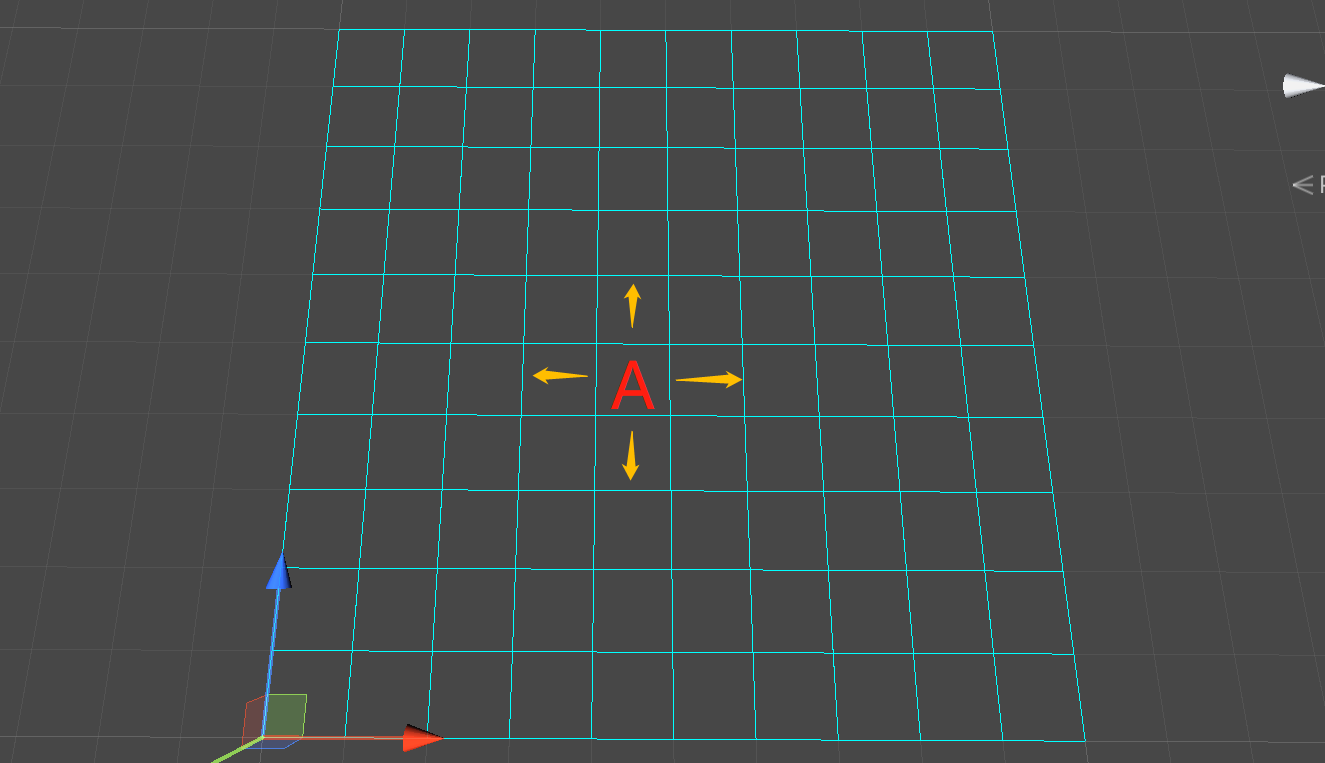
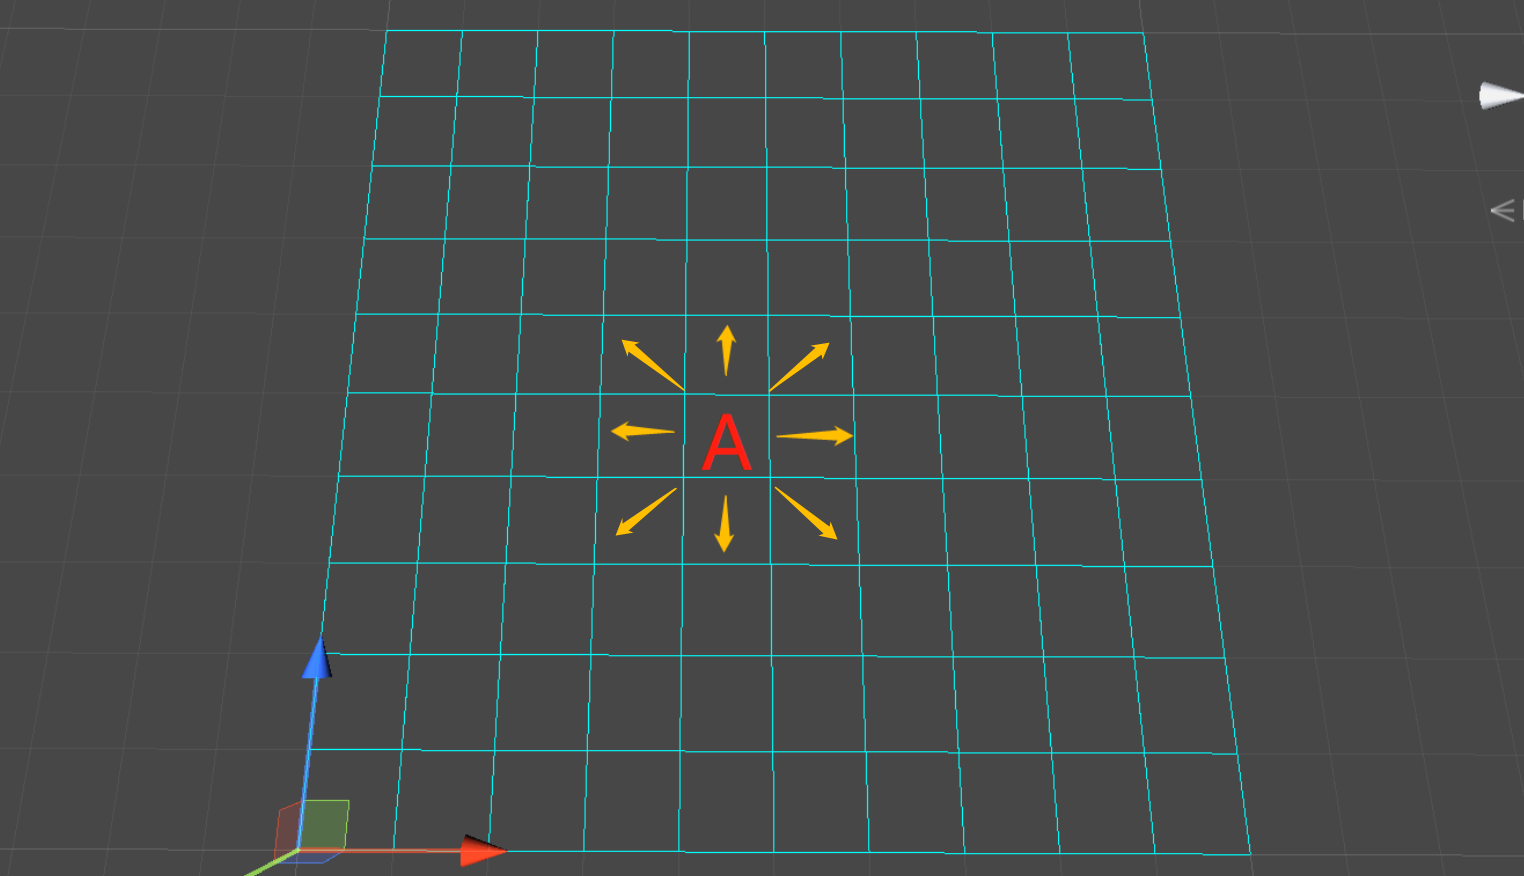
搜索邻节点时有两种搜索方式,四连通和八连通:
/// <summary>
/// 获取指定节点的邻节点
/// </summary>
/// <param name="node">指定节点</param>
/// <param name="searchMode">搜索方式 四连通/八连通</param>
/// <returns>邻节点列表</returns>
public List<Node> GetNeighbouringNodes(Node node, SearchMode searchMode)
{
    List<Node> neighbours = new List<Node>();
    switch (searchMode)
    {
        case SearchMode.Link4:
            for (int i = -1; i <= 1; i++)
            {
                if (i == 0) continue;
                int x = node.x + i;
                if (x >= 0 && x < this.x)
                    neighbours.Add(nodesDic[x * this.x + node.y]);
                int y = node.y + i;
                if (y >= 0 && y < this.y)
                    neighbours.Add(nodesDic[node.x * this.x + y]);
            }
            break;
        case SearchMode.Link8:
            for (int i = -1; i <= 1; i++)
            {
                for (int j = -1; j <= 1; j++)
                {
                    if (i == 0 && j == 0) continue;
                    int x = node.x + i;
                    int y = node.y + j;
                    if (x >= 0 && x < this.x && y >= 0 && y < this.y)
                        neighbours.Add(nodesDic[x * this.x + y]);
                }
            }
            break;
    }
    return neighbours;
}
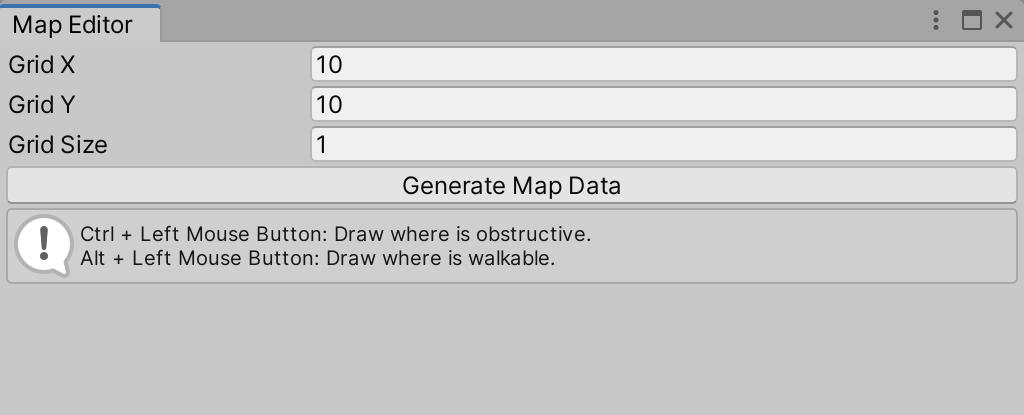
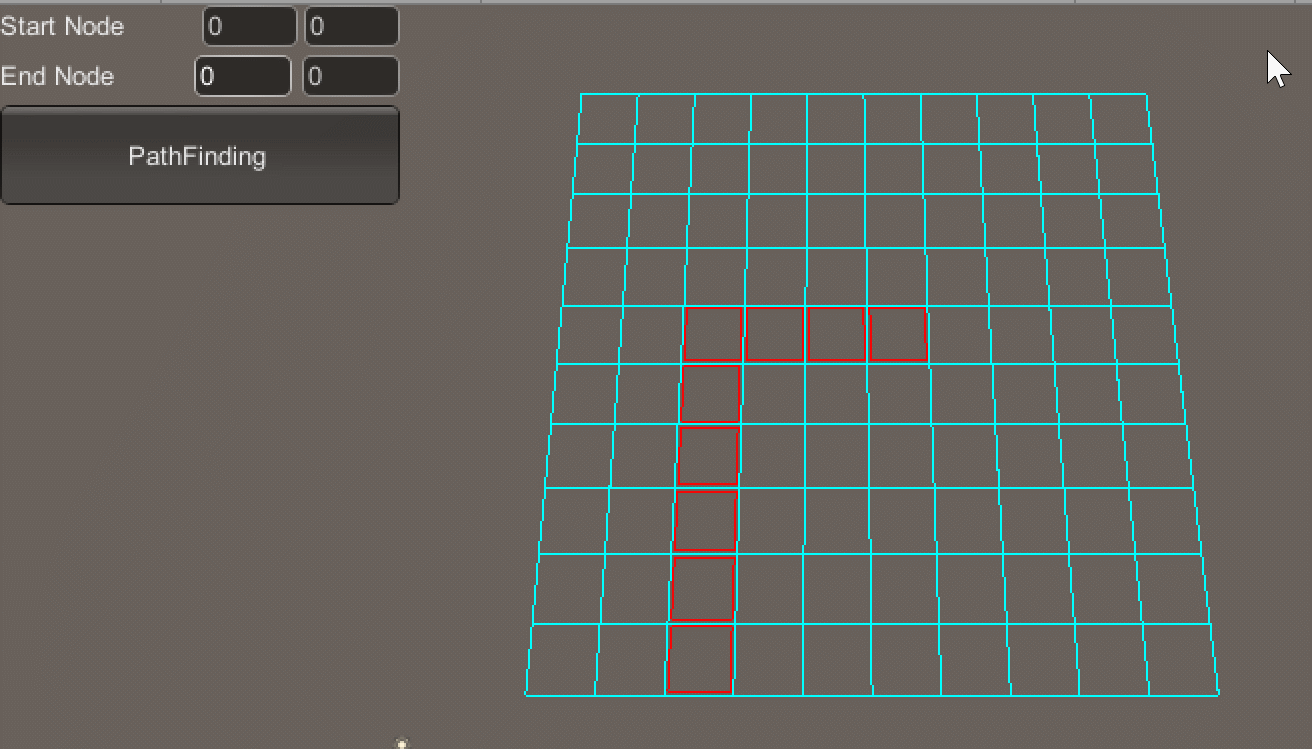
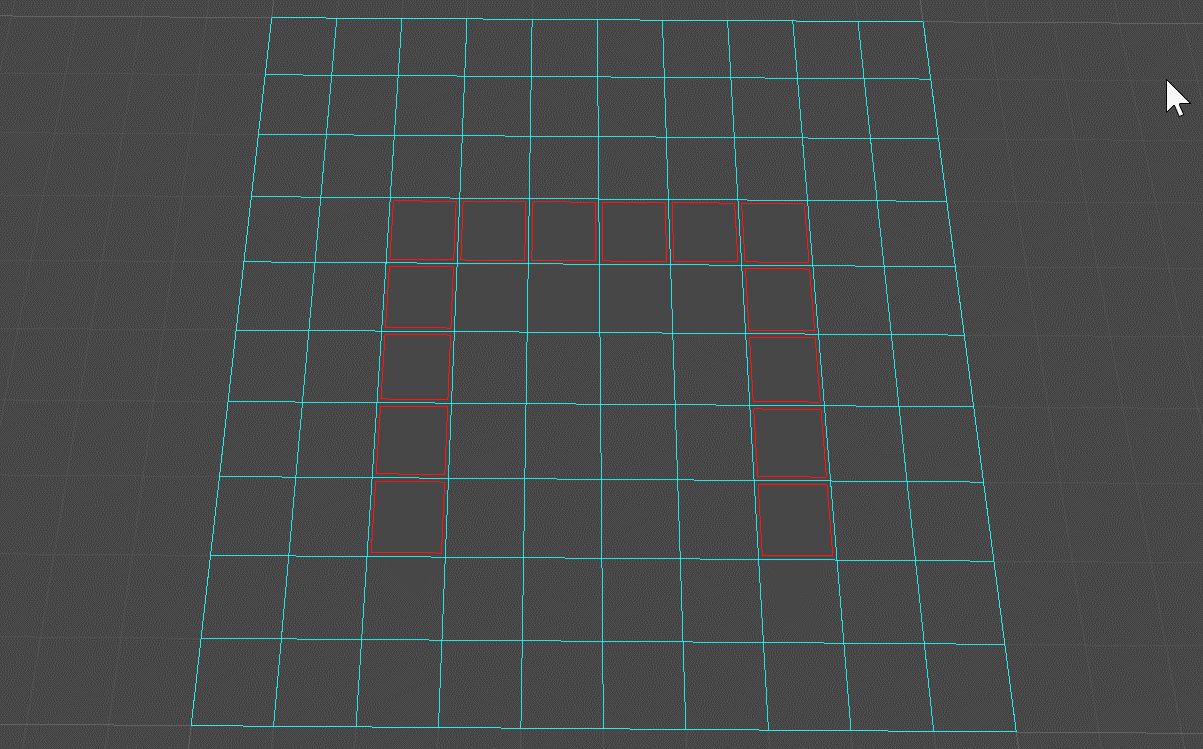
按住Ctrl + 鼠标左键绘制地图障碍区域(如图所示,红色框区域即为障碍区域):
按住Alt + 鼠标左键绘制地图可行走区域(清除障碍区域):
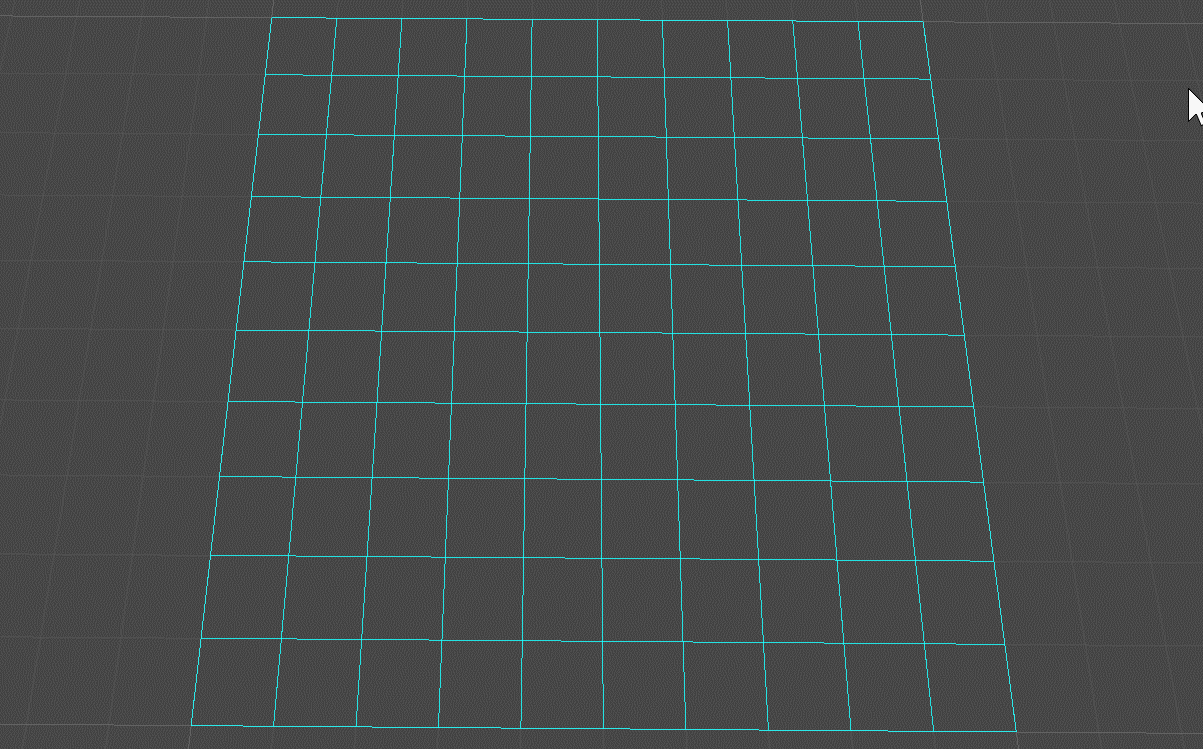
Grid X、Y组成地图网格(x * y);Grid Size指定每个网格(节点)的大小://绘制地图网格
Handles.color = Color.cyan;
for (int i = 0; i <= x; i++)
{
Vector3 start = i * size * Vector3.right;
Vector3 end = start + y * size * Vector3.forward;
Handles.DrawLine(start, end);
}
for (int i = 0; i <= y; i++)
{
Vector3 start = i * size * Vector3.forward;
Vector3 end = start + x * size * Vector3.right;
Handles.DrawLine(start, end);
}
使用二维数组bool[,] map存储各节点网格是否为可行走区域
Ctrl + 鼠标左键 标识障碍区域;Alt + 鼠标左键 标识可行走区域:HandleUtility.AddDefaultControl(GUIUtility.GetControlID(FocusType.Passive));
//Ctrl + 鼠标左键 绘制障碍区域
//Alt + 鼠标左键 绘制可行走区域
var e = Event.current;
if (e != null && (e.control || e.alt) && (e.type == EventType.MouseDown || e.type == EventType.MouseDrag) && e.button == 0)
{
Ray ray = HandleUtility.GUIPointToWorldRay(e.mousePosition);
if (Physics.Raycast(ray, out RaycastHit hit))
{
int targetX = Mathf.CeilToInt(hit.point.x / size);
int targetY = Mathf.CeilToInt(hit.point.z / size);
if (targetX <= x && targetX > 0 && targetY <= y && targetY > 0)
{
map[targetX - 1, targetY - 1] = !e.control;
}
}
e.Use();
}
//红色框绘制障碍区域
Handles.color = Color.red;
for (int m = 0; m < x; m++)
{
for (int n = 0; n < y; n++)
{
if (!map[m, n])
Handles.DrawWireCube(new Vector3(m * size, 0f, n * size) + .5f * size * (Vector3.forward + Vector3.right), .9f * size * (Vector3.forward + Vector3.right));
}
}
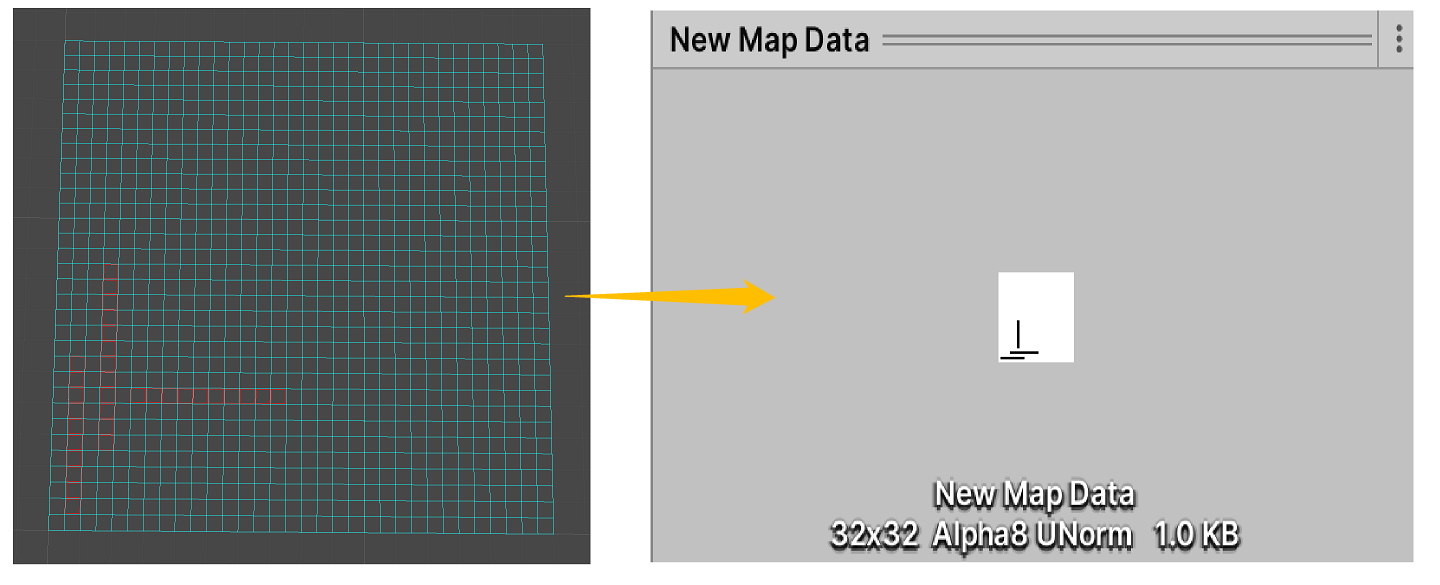
由于地图数据存储于bool[,] map二维数组中,不支持序列化,因此将其转化为存储于Texture2D类型资产中,实现方式如下:
//生成地图
if (GUILayout.Button("Generate Map Data"))
{
    //选择保存路径
    string filePath = EditorUtility.SaveFilePanel("Save Map Data", Application.dataPath, "New Map Data", "asset");
    if (!string.IsNullOrEmpty(filePath))
    {
        //转化为Asset路径
        filePath = filePath.Substring(filePath.IndexOf("Assets"));
        //创建地图Tex
        Texture2D bitmap = new Texture2D(x, y, TextureFormat.Alpha8, false);
        byte[] bytes = bitmap.GetRawTextureData();
        //默认全部为可行走区域
        for (int i = 0; i < bytes.Length; i++)
            bytes[i] = 0;
        for (int m = 0; m < x; m++)
        {
            for (int n = 0; n < y; n++)
            {
                //黑色存储障碍区域 白色存储可行走区域
                bytes[m * x + n] = (byte)(map[m, n] ? 255 : 0);
            }
        }
        bitmap.LoadRawTextureData(bytes);
        //创建、保存资产
        AssetDatabase.CreateAsset(bitmap, filePath);
        AssetDatabase.SaveAssets();
        AssetDatabase.Refresh();
        //选中
        EditorGUIUtility.PingObject(bitmap);
    }
}
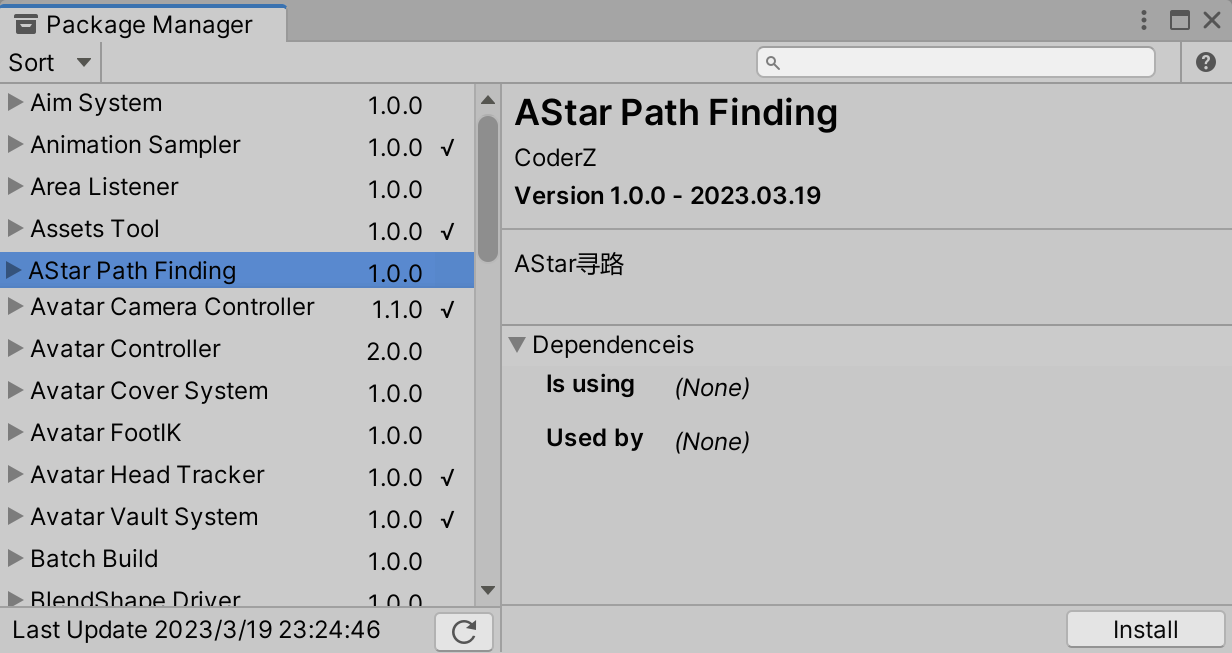
源码以上传至SKFramework框架Package Manager中:
出于纯粹的兴趣,我很好奇如何按顺序创建PI,而不是在过程结果之后生成数字,而是让数字在过程本身生成时显示。如果是这种情况,那么数字可以自行产生,我可以对以前看到的数字实现垃圾收集,从而创建一个无限系列。结果只是在Pi系列之后每秒生成一个数字。这是我通过互联网筛选的结果:这是流行的计算机友好算法,类机器算法:defarccot(x,unity)xpow=unity/xn=1sign=1sum=0loopdoterm=xpow/nbreakifterm==0sum+=sign*(xpow/n)xpow/=x*xn+=2sign=-signendsumenddefcalc_pi(digits
我怎样才能完成http://php.net/manual/en/function.call-user-func-array.php在ruby中?所以我可以这样做:classAppdeffoo(a,b)putsa+benddefbarargs=[1,2]App.send(:foo,args)#doesn'tworkApp.send(:foo,args[0],args[1])#doeswork,butdoesnotscaleendend 最佳答案 尝试分解数组App.send(:foo,*args)
我得到了一个包含嵌套链接的表单。编辑时链接字段为空的问题。这是我的表格:Editingkategori{:action=>'update',:id=>@konkurrancer.id})do|f|%>'Trackingurl',:style=>'width:500;'%>'Editkonkurrence'%>|我的konkurrencer模型:has_one:link我的链接模型:classLink我的konkurrancer编辑操作:defedit@konkurrancer=Konkurrancer.find(params[:id])@konkurrancer.link_attrib
如何在buildr项目中使用Ruby?我在很多不同的项目中使用过Ruby、JRuby、Java和Clojure。我目前正在使用我的标准Ruby开发一个模拟应用程序,我想尝试使用Clojure后端(我确实喜欢功能代码)以及JRubygui和测试套件。我还可以看到在未来的不同项目中使用Scala作为后端。我想我要为我的项目尝试一下buildr(http://buildr.apache.org/),但我注意到buildr似乎没有设置为在项目中使用JRuby代码本身!这看起来有点傻,因为该工具旨在统一通用的JVM语言并且是在ruby中构建的。除了将输出的jar包含在一个独特的、仅限ruby
我正在使用的第三方API的文档状态:"[O]urAPIonlyacceptspaddedBase64encodedstrings."什么是“填充的Base64编码字符串”以及如何在Ruby中生成它们。下面的代码是我第一次尝试创建转换为Base64的JSON格式数据。xa=Base64.encode64(a.to_json) 最佳答案 他们说的padding其实就是Base64本身的一部分。它是末尾的“=”和“==”。Base64将3个字节的数据包编码为4个编码字符。所以如果你的输入数据有长度n和n%3=1=>"=="末尾用于填充n%
exe应该在我打开页面时运行。异步进程需要运行。有什么方法可以在ruby中使用两个参数异步运行exe吗?我已经尝试过ruby命令-system()、exec()但它正在等待过程完成。我需要用参数启动exe,无需等待进程完成是否有任何rubygems会支持我的问题? 最佳答案 您可以使用Process.spawn和Process.wait2:pid=Process.spawn'your.exe','--option'#Later...pid,status=Process.wait2pid您的程序将作为解释器的子进程执行。除
鉴于我有以下迁移:Sequel.migrationdoupdoalter_table:usersdoadd_column:is_admin,:default=>falseend#SequelrunsaDESCRIBEtablestatement,whenthemodelisloaded.#Atthispoint,itdoesnotknowthatusershaveais_adminflag.#Soitfails.@user=User.find(:email=>"admin@fancy-startup.example")@user.is_admin=true@user.save!ende
我正在为一个项目制作一个简单的shell,我希望像在Bash中一样解析参数字符串。foobar"helloworld"fooz应该变成:["foo","bar","helloworld","fooz"]等等。到目前为止,我一直在使用CSV::parse_line,将列分隔符设置为""和.compact输出。问题是我现在必须选择是要支持单引号还是双引号。CSV不支持超过一个分隔符。Python有一个名为shlex的模块:>>>shlex.split("Test'helloworld'foo")['Test','helloworld','foo']>>>shlex.split('Test"
我实际上是在尝试使用RVM在我的OSX10.7.5上更新ruby,并在输入以下命令后:rvminstallruby我得到了以下回复:Searchingforbinaryrubies,thismighttakesometime.Checkingrequirementsforosx.Installingrequirementsforosx.Updatingsystem.......Errorrunning'requirements_osx_brew_update_systemruby-2.0.0-p247',pleaseread/Users/username/.rvm/log/138121
这可能是个愚蠢的问题。但是,我是一个新手......你怎么能在交互式rubyshell中有多行代码?好像你只能有一条长线。按回车键运行代码。无论如何我可以在不运行代码的情况下跳到下一行吗?再次抱歉,如果这是一个愚蠢的问题。谢谢。 最佳答案 这是一个例子:2.1.2:053>a=1=>12.1.2:054>b=2=>22.1.2:055>a+b=>32.1.2:056>ifa>b#Thecode‘if..."startsthedefinitionoftheconditionalstatement.2.1.2:057?>puts"f