最近接到一个客户的订单,需要批量对电影片段截图,为了方便,于是我撸了一下午代码,写了这么一个辅助工具出来,希望对各位有相似需求的朋友们提供帮助。程序是用Python实现的。
1. 使用os.walk遍历当前目录(包括子目录)下所有文件,获得文件路径列表,再对列表中的文件分别处理。这里为了方便显示进度,我使用了tqdm来枚举列表。
2. 使用OpenCV的VideoCapture对视频等距截取9张图片。对视频截图的操作就像读文件时的操作,是存在一个视频帧的“指针”的,一帧图片截完了以后需要根据步长(ceil(总帧数/8)-1,减1是为了防止某些视频最后一帧为空而导致截图失败退出)更新指针。
3. 重点来了:将截取到的9张图片,每3张一组,使用np.concatenate横向拼接得到img0, img1, img2,最后将这三组图片用同样的方法纵向拼接得到img9,即为不带任何信息的纯九宫格图片。
关于numpy中矩阵拼接函数concatenate的用法,可以参考这篇博文:np.concatenate() 使用说明_Tchunren的博客-CSDN博客_np.concatenate([xi, x],axis=1
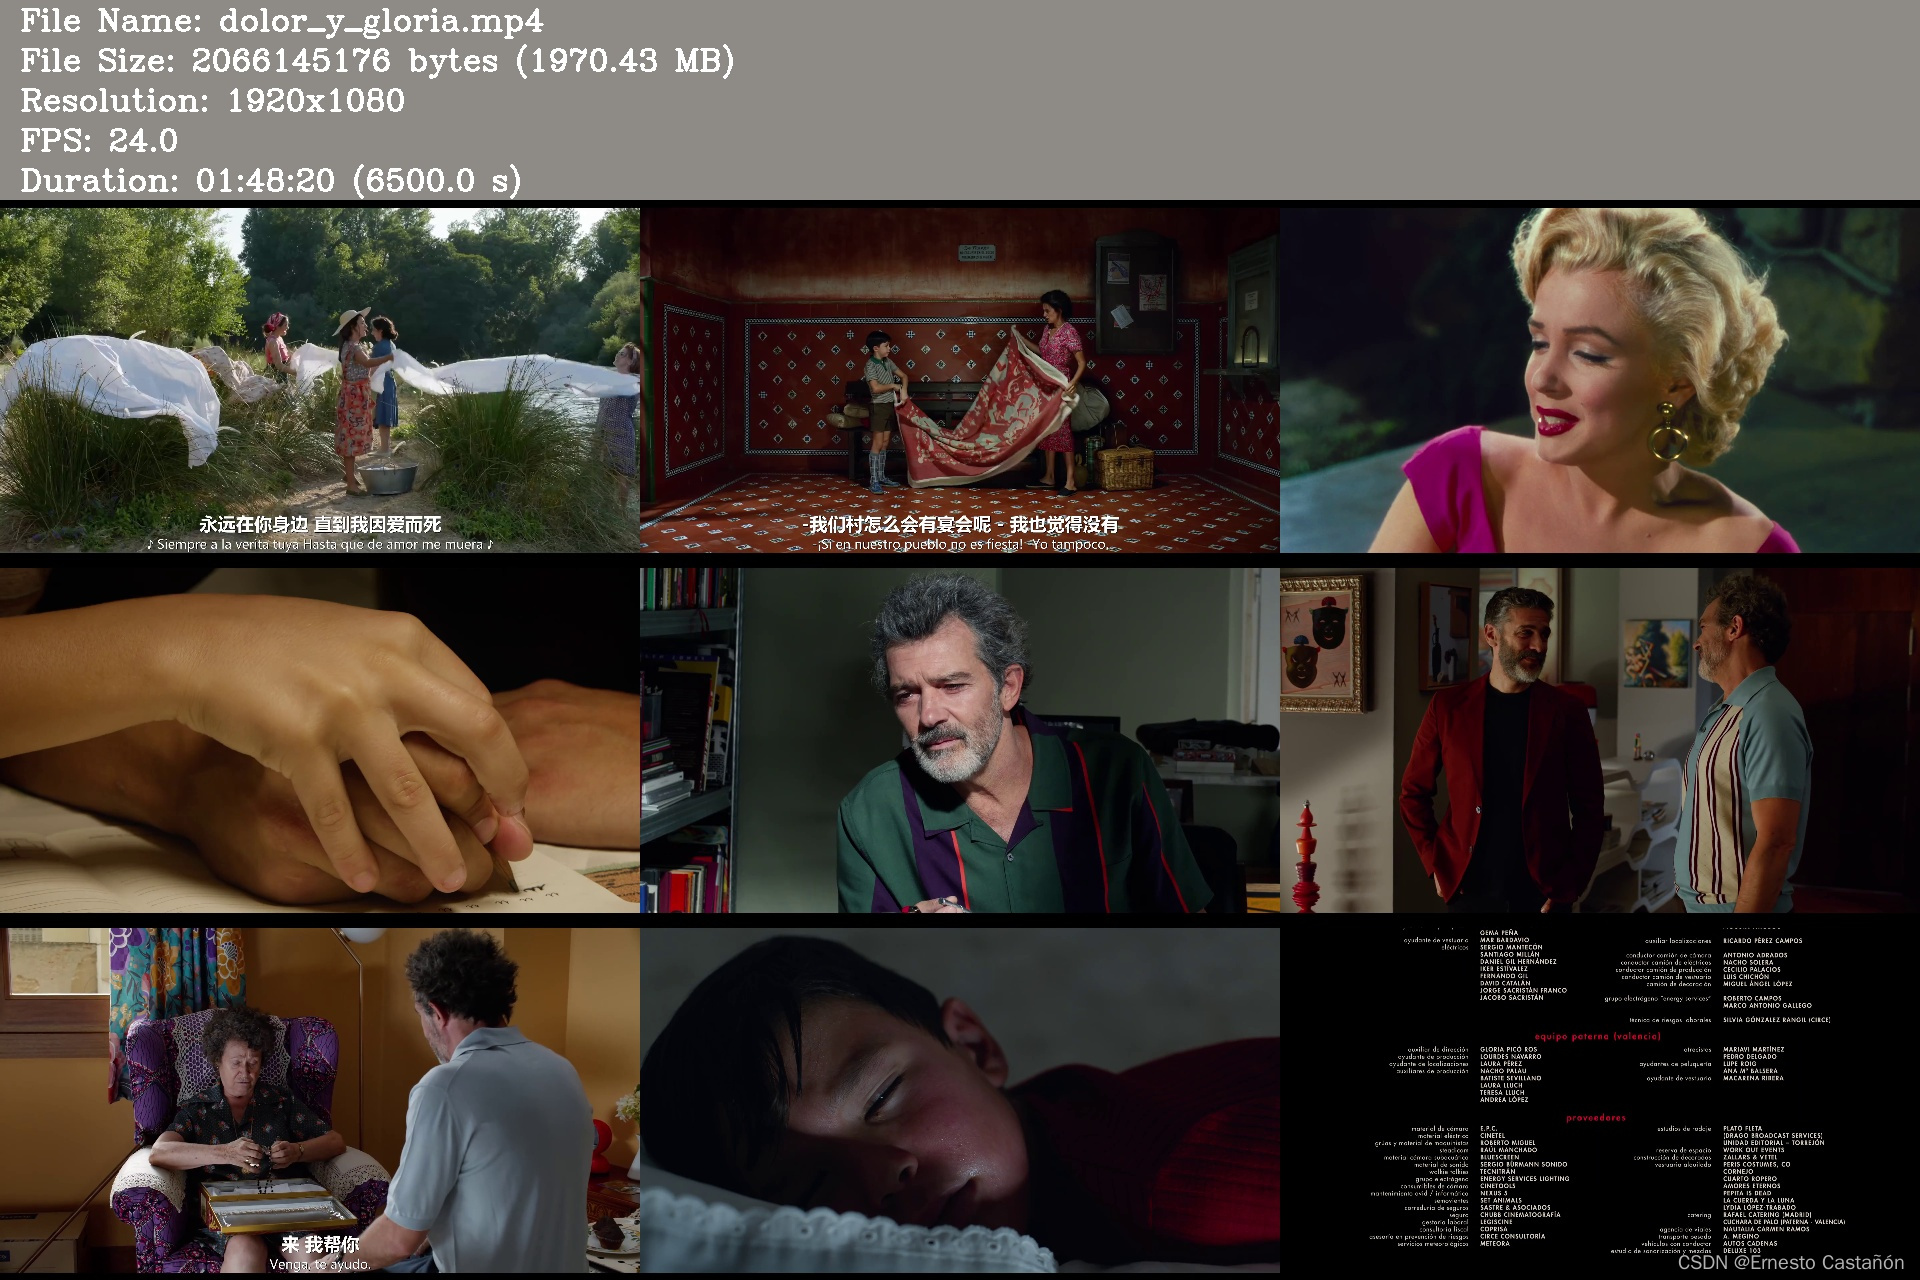
4. 使用cv2.copyMakeBorder在上述的img9的最上方画高为200的灰色边框,用于容纳视频的基本信息文字。然后获取视频的基本信息,包括文件大小、分辨率、时长、帧率等。
提示:opencv中获取分辨率使用cap.get(cv2.CAP_PROP_FRAME_HEIGHT),和cap.get(cv2.CAP_PROP_FRAME_WIDTH),分别取得帧的高和宽;
获取视频帧率使用cap.get(cv2.CAP_PROP_FPS);
获取视频时长,先使用cap.get(cv2.CAP_PROP_FRAME_COUNT)获取总帧数,再除以上述的帧率即可。
最后使用cv2.putText将上面的信息文字写入图片。
关于opencv中copyMakeBorder函数的用法,可以参考这篇博文:
OpenCV-Python: cv2.copyMakeBorder()函数详解_我是大黄同学呀的博客-CSDN博客_copymakeborder函数详解
关于opencv中putText函数的用法,可以参考这篇博文:
opencv中puttext()函数用法总结(03)_洛克家族的博客-CSDN博客_opencv puttext
import cv2
import numpy as np
import os
from tqdm import tqdm

BLACK = [0, 0, 0]
GRAY = [135, 139, 142]

# Turn the large image into a small one, without changing the aspect ratio, and add black borders to make up for the
# shortage.
def my_resize(image, height, width):
    h, w, c = image.shape
    top, bottom, left, right = (0, 0, 0, 0)
    # assert h >= height and w >= width, 'ratio should less than 1'
    long_side = max(h, w)
    if h >= w:
        ratio = float(height) / long_side
    elif h < w:
        ratio = float(width) / long_side

    # resize the long side and add black border to the both size of the short side
    resi = cv2.resize(image, (0, 0), fx=ratio, fy=ratio, interpolation=cv2.INTER_NEAREST)
    res_height, res_width, res_c = resi.shape

    if h >= w:
        if res_width < width:
            dw = width - res_width
            left = dw // 2
            right = dw - left

    elif h < w:
        if res_height < height:
            dh = height - res_height
            top = dh // 2
            bottom = dh - top

    dst = cv2.copyMakeBorder(resi, top, bottom, left, right, cv2.BORDER_CONSTANT, value=BLACK)
    return dst

def get_hms(seconds):
    m, s = divmod(seconds, 60)
    h, m = divmod(m, 60)
    str = "%02d:%02d:%02d" % (h, m, s)
    return str

def escribir_info(img, fname, infos = ()):
    addtext = img.copy()
    msg0 = 'File Name: ' + fname
    msg1 = 'File Size: ' + str(infos[0]) + ' bytes (' + str(round(infos[0] / 1024.0 / 1024.0, 2)) + ' MB)'
    msg2 = 'Resolution: ' + str(int(infos[2])) + 'x' + str(int(infos[1]))
    msg3 = 'FPS: ' + str(round(infos[3], 2))
    seconds = round(infos[4] / infos[3], 3)
    msg4 = 'Duration: ' + get_hms(seconds) + ' (' + str(seconds) + ' s)'
    cv2.putText(addtext, msg0, (20, 30), cv2.FONT_HERSHEY_COMPLEX, 1.0, (255, 255, 255), 2)
    cv2.putText(addtext, msg1, (20, 70), cv2.FONT_HERSHEY_COMPLEX, 1.0, (255, 255, 255), 2)
    cv2.putText(addtext, msg2, (20, 110), cv2.FONT_HERSHEY_COMPLEX, 1.0, (255, 255, 255), 2)
    cv2.putText(addtext, msg3, (20, 150), cv2.FONT_HERSHEY_COMPLEX, 1.0, (255, 255, 255), 2)
    cv2.putText(addtext, msg4, (20, 190), cv2.FONT_HERSHEY_COMPLEX, 1.0, (255, 255, 255), 2)
    return addtext

def gen_captura(img_path, path_dir):
    cap = cv2.VideoCapture(img_path)
    frame_cnt = cap.get(cv2.CAP_PROP_FRAME_COUNT)
    frame_itv = int(frame_cnt // 8) - 1  # 9 pictures
    s_frame = 1
    flag = 1
    imgs = []

    while cap.isOpened():
        cap.set(cv2.CAP_PROP_POS_MSEC, flag)
        cap.set(cv2.CAP_PROP_POS_FRAMES, s_frame)
        ret, img = cap.read()
        try:
            dst = my_resize(img, 360, 640)
        except Exception as e:
            print('Error while capturing thumbnails: ' + str(e) + '\nNow we will use a black image to fill')
            dst = np.zeros((360, 640, 3), np.uint8)
            dst[:] = [0, 0, 0]
        finally:
            imgs.append(dst)
        flag += 1
        s_frame += frame_itv
        if s_frame >= frame_cnt:
            break

    # Stitching images into a nine-box grid
    img0 = np.concatenate(imgs[:3], 1)
    img1 = np.concatenate(imgs[3:6], 1)
    img2 = np.concatenate(imgs[6:], 1)
    img9 = np.concatenate([img0, img1, img2], 0)
    res = cv2.copyMakeBorder(img9, 200, 0, 0, 0, cv2.BORDER_CONSTANT, value=GRAY)
    pint = os.path.basename(img_path)
    res = escribir_info(res, pint, (os.path.getsize(img_path),
                                    cap.get(cv2.CAP_PROP_FRAME_HEIGHT), cap.get(cv2.CAP_PROP_FRAME_WIDTH),
                                    cap.get(cv2.CAP_PROP_FPS), cap.get(cv2.CAP_PROP_FRAME_COUNT)))

    cv2.imwrite(os.path.join(path_dir, os.path.splitext(pint)[0] + '_scr.jpg'), res)

    cap.release()
    cv2.destroyAllWindows()

if __name__ == '__main__':
    path_dir = input('Please input directory path that contains video:')
    if not os.path.exists(path_dir):
        print('Directory does not exist!')
        exit(0)
    proc_list = []
    for r, d, files in os.walk(path_dir):
        for file in files:
            if file.endswith('mp4') or file.endswith('mkv') :
                padre = os.path.join(r, file)
                padre = padre.replace('\\', '/')
                proc_list.append((padre, r))
    for i, tp in tqdm(enumerate(proc_list)):
        print('Now processing video: ' + tp[0])
        gen_captura(tp[0], tp[1])
我有一个Ruby程序,它使用rubyzip压缩XML文件的目录树。gem。我的问题是文件开始变得很重,我想提高压缩级别,因为压缩时间不是问题。我在rubyzipdocumentation中找不到一种为创建的ZIP文件指定压缩级别的方法。有人知道如何更改此设置吗?是否有另一个允许指定压缩级别的Ruby库? 最佳答案 这是我通过查看rubyzip内部创建的代码。level=Zlib::BEST_COMPRESSIONZip::ZipOutputStream.open(zip_file)do|zip|Dir.glob("**/*")d
我试图获取一个长度在1到10之间的字符串,并输出将字符串分解为大小为1、2或3的连续子字符串的所有可能方式。例如:输入:123456将整数分割成单个字符,然后继续查找组合。该代码将返回以下所有数组。[1,2,3,4,5,6][12,3,4,5,6][1,23,4,5,6][1,2,34,5,6][1,2,3,45,6][1,2,3,4,56][12,34,5,6][12,3,45,6][12,3,4,56][1,23,45,6][1,2,34,56][1,23,4,56][12,34,56][123,4,5,6][1,234,5,6][1,2,345,6][1,2,3,456][123
Rackup通过Rack的默认处理程序成功运行任何Rack应用程序。例如:classRackAppdefcall(environment)['200',{'Content-Type'=>'text/html'},["Helloworld"]]endendrunRackApp.new但是当最后一行更改为使用Rack的内置CGI处理程序时,rackup给出“NoMethodErrorat/undefinedmethod`call'fornil:NilClass”:Rack::Handler::CGI.runRackApp.newRack的其他内置处理程序也提出了同样的反对意见。例如Rack
在MRIRuby中我可以这样做:deftransferinternal_server=self.init_serverpid=forkdointernal_server.runend#Maketheserverprocessrunindependently.Process.detach(pid)internal_client=self.init_client#Dootherstuffwithconnectingtointernal_server...internal_client.post('somedata')ensure#KillserverProcess.kill('KILL',
我正在编写一个小脚本来定位aws存储桶中的特定文件,并创建一个临时验证的url以发送给同事。(理想情况下,这将创建类似于在控制台上右键单击存储桶中的文件并复制链接地址的结果)。我研究过回形针,它似乎不符合这个标准,但我可能只是不知道它的全部功能。我尝试了以下方法:defauthenticated_url(file_name,bucket)AWS::S3::S3Object.url_for(file_name,bucket,:secure=>true,:expires=>20*60)end产生这种类型的结果:...-1.amazonaws.com/file_path/file.zip.A
我正在使用active_admin,我在Rails3应用程序的应用程序中有一个目录管理,其中包含模型和页面的声明。时不时地我也有一个类,当那个类有一个常量时,就像这样:classFooBAR="bar"end然后,我在每个必须在我的Rails应用程序中重新加载一些代码的请求中收到此警告:/Users/pupeno/helloworld/app/admin/billing.rb:12:warning:alreadyinitializedconstantBAR知道发生了什么以及如何避免这些警告吗? 最佳答案 在纯Ruby中:classA
我正在尝试修改当前依赖于定义为activeresource的gem:s.add_dependency"activeresource","~>3.0"为了让gem与Rails4一起工作,我需要扩展依赖关系以与activeresource的版本3或4一起工作。我不想简单地添加以下内容,因为它可能会在以后引起问题:s.add_dependency"activeresource",">=3.0"有没有办法指定可接受版本的列表?~>3.0还是~>4.0? 最佳答案 根据thedocumentation,如果你想要3到4之间的所有版本,你可以这
当我的预订模型通过rake任务在状态机上转换时,我试图找出如何跳过对ActiveRecord对象的特定实例的验证。我想在reservation.close时跳过所有验证!叫做。希望调用reservation.close!(:validate=>false)之类的东西。仅供引用,我们正在使用https://github.com/pluginaweek/state_machine用于状态机。这是我的预订模型的示例。classReservation["requested","negotiating","approved"])}state_machine:initial=>'requested
我有一个这样的哈希数组:[{:foo=>2,:date=>Sat,01Sep2014},{:foo2=>2,:date=>Sat,02Sep2014},{:foo3=>3,:date=>Sat,01Sep2014},{:foo4=>4,:date=>Sat,03Sep2014},{:foo5=>5,:date=>Sat,02Sep2014}]如果:date相同,我想合并哈希值。我对上面数组的期望是:[{:foo=>2,:foo3=>3,:date=>Sat,01Sep2014},{:foo2=>2,:foo5=>5:date=>Sat,02Sep2014},{:foo4=>4,:dat
我有这个html标记:我想得到这个:我如何使用Nokogiri做到这一点? 最佳答案 require'nokogiri'doc=Nokogiri::HTML('')您可以通过xpath删除所有属性:doc.xpath('//@*').remove或者,如果您需要做一些更复杂的事情,有时使用以下方法遍历所有元素会更容易:doc.traversedo|node|node.keys.eachdo|attribute|node.deleteattributeendend 关于ruby-Nokog