理解了入门案例之后,接下来我们再来看一下登录表单的详细配置,首先创建一个新的Spring Boot项目,引入Web和Spring Security依赖,代码如下:
<dependency>
    <groupId>org.springframework.boot</groupId>
    <artifactId>spring-boot-starter-security</artifactId>
</dependency>
<dependency>
    <groupId>org.springframework.boot</groupId>
    <artifactId>spring-boot-starter-web</artifactId>
</dependency>
项目创建好之后,为了方便测试,需要在application.yml中添加如下配置,将登录用户名和密码固定下来:
spring:
  security:
    user:
      name: buretuzi
      password: 123456
接下来,我们在resources/static目录下创建一个login.html页而,这个是我们自定义的登录页面:
 <!DOCTYPE html>
<html lang="en">
<head>
    <meta charset="UTF-8">
    <title>登录</title>
    <link href="//maxcdn.bootstrapcdn.com/bootstrap/4.1.1/css/bootstrap.min.css" rel="stylesheet" id="bootstrap-css">
    <script src="//maxcdn.bootstrapcdn.com/bootstrap/4.1.1/js/bootstrap.min.js"></script>
    <script src="//cdnjs.cloudflare.com/ajax/libs/jquery/3.2.1/jquery.min.js"></script>
</head>
<style>
    #login .container #login-row #login-column #login-box {
        border: 1px solid #9c9c9c;
        background-color: #EAEAEA;
    }
</style>
<body>
    <div id="login">
        <div class="container">
            <div id="login-row" class="row justify-content-center align-items-center">
                <div id="login-column" class="col-md-6">
                    <div id="login-box" class="col-md-12">
                        <form id="login-form" class="form" action="/dologin" method="post">
                            <h3 class="text-center text-info">登录</h3>
                            <div class="form-group">
                                <label for="username" class="text-info">用户名:</label><br>
                                <input type="text" name="uname" id="username" class="form-control">
                            </div>
                            <div class="form-group">
                                <label for="password" class="text-info">密码:</label><br>
                                <input type="text" name="passwd" id="password" class="form-control">
                            </div>
                            <div class="form-group">
                                <input type="submit" name="submit" class="btn btn-info btn-md" value="登录">
                            </div>
                        </form>
                    </div>
                </div>
            </div>
        </div>
    </div>
</body>
</html>
这个logmt.html中的核心内容就是一个登录表单,登录表单中有三个需要注意的地方,
login.html定义好之后,接下来定义两个测试接口,作为受保护的资源。当用户登录成功 后,就可以访问到受保护的资源。接口定义如下:
package com.intehel.demo.controller;

import org.springframework.web.bind.annotation.RequestMapping;
import org.springframework.web.bind.annotation.RestController;

@RestController
public class LoginController {
    @RequestMapping("/index")
    public String index(){
        return "login";
    }
    @RequestMapping("/hello")
    public String hello(){
        return "hello";
    }
}
最后再提供一个Spring Security的配置类:
package com.intehel.demo.config;

import org.springframework.context.annotation.Configuration;
import org.springframework.security.config.annotation.web.builders.HttpSecurity;
import org.springframework.security.config.annotation.web.configuration.WebSecurityConfigurerAdapter;

@Configuration
public class SecurityConfig extends WebSecurityConfigurerAdapter {
    @Override
    protected void configure(HttpSecurity http) throws Exception {
        http.authorizeRequests()
                .anyRequest().authenticated()
                .and()
                .formLogin()
                .loginPage("/loginNew.html")
                .loginProcessingUrl("/doLogin")
                .defaultSuccessUrl("/index")
                .failureUrl("/loginNew.html")
                .usernameParameter("uname")
                .passwordParameter("passwd")
                .permitAll()
                .and()
                .csrf().disable();
    }
}
在Spring Security中,如果我们需要自定义配置,基本上都是继承自WebSecurityConfigurerAdapter来实现的,当然WebSecurityConfigurerAdapter本身的配置还是比较复杂,同时也是比较丰富的,这里先不做过多的展开,仅就结合上面的代码来解释,在下节中将会对这里的配置再做更加详细的介绍。
配置完成后,启动Spring Boot项目,浏览器地址栏中输入http://localhost:8080/index,会自动跳转到http://localhost:8080/loginNew.html页面,如图2-5所示。输入用户名和密码进行登录(用 户名为buretuzi,密码为123456),登录成功之后,就可以访问到index页面了,如图2-6所示。
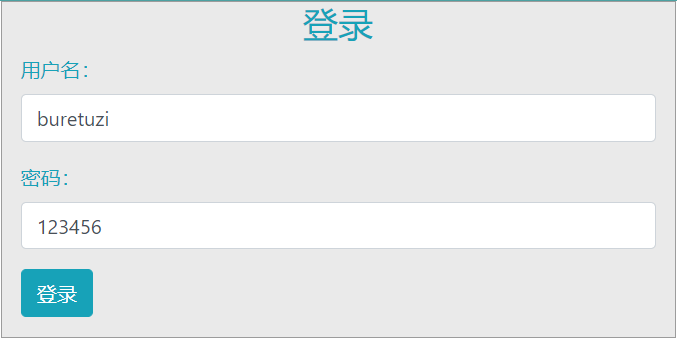
图2-5

图2-6
经过上面的配置,我们已经成功自定义了一个登录页面出来,用户在登录成功之后,就可以访问受保护的资源了。
当然,前面的配置比较粗糙,这里还有一些配置的细节需要和读者分享一下。
在前面的配置中,我们用defaultSuccessUrl表示用户登录成功后的跳转地址,用failureUrl 表示用户登录失败后的跳转地址。关于登录成功和登录失败,除了这两个方法可以配置之外, 还有另外两个方法也可以配置。
当用户登录成功之后,除了 defaultSuccessUrl方法可以实现登录成功后的跳转之外, successForwardUrl也可以实现登录成功后的跳转,代码如下:
@Configuration
public class SecurityConfig extends WebSecurityConfigurerAdapter {
    @Override
    protected void configure(HttpSecurity http) throws Exception {
        http.authorizeRequests()
                .anyRequest().authenticated()
                .and()
                .formLogin()
                .loginPage("/loginNew.html")
                .loginProcessingUrl("/doLogin")
                .successForwardUrl("/index")
                .failureUrl("/loginNew.html")
                .usernameParameter("uname")
                .passwordParameter("passwd")
                .permitAll()
                .and()
                .csrf().disable();
    }
}
defaultSuccessUrl 和 successForwardUrl 的区别如下:
无论是 defaultSuccessUrl 还是 successForwardUrl,最终所配置的都是 AuthenticationSuccessHandler接口的实例。
Spring Security中专门提供了 AuthenticationSuccessHandler接口用来处理登录成功事项:
public interface AuthenticationSuccessHandler {
	default void onAuthenticationSuccess(HttpServletRequest request,
			HttpServletResponse response, FilterChain chain, Authentication authentication)
			throws IOException, ServletException{
		onAuthenticationSuccess(request, response, authentication);
		chain.doFilter(request, response);
	}
	void onAuthenticationSuccess(HttpServletRequest request,
			HttpServletResponse response, Authentication authentication)
			throws IOException, ServletException;
}由上述代码可以看到,AuthenticationSuccessHandler接口中一共定义了两个方法,其中一 个是default方法,此方法是Spring Security 5.2开始加入进来的,在处理特定的认证请求 AuthenticationFilter中会用到;另外一个非default方法,则用来处理登录成功的具体事项,其 中request和response参数好理解,authentication参数保存了登录成功的用户信息。我们将在后面的章节中详细介绍authentication参数。
AuthenticationSuccessHandler接口共有三个实现类,如图2-7所示。
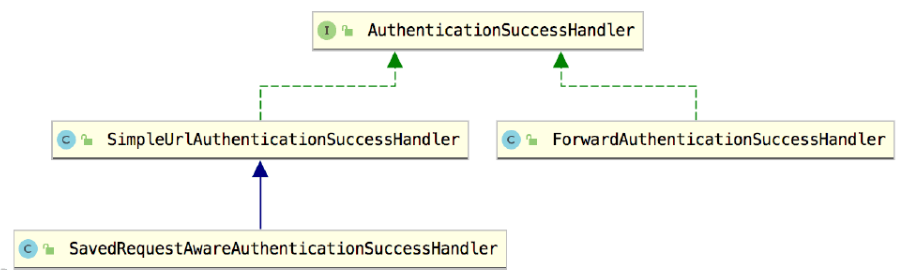
图2-7
(1) SimpleUrlAuthenticationSuccessHandler继承自 AbstractAuthenticationTargetUrlRequestHandler,通过 AbstractAuthenticationTargetUrlRequestHandler 中的 handle 方法实现请求重定向。
(2)SavedRequestAwareAuthenticationSuccessHandler在 SimpleUrlAuthenticationSuccessHandler的基础上增加了请求缓存的功能,可以记录之前请求的地址,进而在登录成功后重定向到一开始访问的地址。
(3) ForwardAuthenticationSuccessHandler的实现则比较容易,就是一个服务端跳转。
我们来重点分析 SavedRequestAwareAuthenticationSuccessHandler和ForwardAuthenticationSuccessHandler的实现。
当通过defaultSuccessUrl来设置登录成功后重定向的地址时,实际上对应的实现类就是 SavedRequestAwareAuthenticationSuccessHandler。
public class SavedRequestAwareAuthenticationSuccessHandler extends
		SimpleUrlAuthenticationSuccessHandler {
	protected final Log logger = LogFactory.getLog(this.getClass());
	private RequestCache requestCache = new HttpSessionRequestCache();
	@Override
	public void onAuthenticationSuccess(HttpServletRequest request,
			HttpServletResponse response, Authentication authentication)
			throws ServletException, IOException {
		SavedRequest savedRequest = requestCache.getRequest(request, response);
		if (savedRequest == null) {
			super.onAuthenticationSuccess(request, response, authentication);
			return;
		}
		String targetUrlParameter = getTargetUrlParameter();
		if (isAlwaysUseDefaultTargetUrl()
				|| (targetUrlParameter != null && StringUtils.hasText(request
						.getParameter(targetUrlParameter)))) {
			requestCache.removeRequest(request, response);
			super.onAuthenticationSuccess(request, response, authentication);

			return;
		}
		clearAuthenticationAttributes(request);
		// Use the DefaultSavedRequest URL
		String targetUrl = savedRequest.getRedirectUrl();
		logger.debug("Redirecting to DefaultSavedRequest Url: " + targetUrl);
		getRedirectStrategy().sendRedirect(request, response, targetUrl);
	}
	public void setRequestCache(RequestCache requestCache) {
		this.requestCache = requestCache;
	}
}
这里的核心方法就是onAuthenticationSuccess:
这就是SavedRequestAwareAuthenticationSuccessHandler的实现逻辑,升发者也可以配置 自己的 SavedRequestAwareAuthenticationSuccessHandler,代码如下:
@Configuration
public class SecurityConfig extends WebSecurityConfigurerAdapter {
    @Override
    protected void configure(HttpSecurity http) throws Exception {
        http.authorizeRequests()
                .anyRequest().authenticated()
                .and()
                .formLogin()
                .loginPage("/loginNew.html")
                .loginProcessingUrl("/doLogin")
                .successForwardUrl("/index")
                .failureUrl("/loginNew.html")
                .usernameParameter("uname")
                .passwordParameter("passwd")
                .permitAll()
                .and()
                .csrf().disable();
    }
    SavedRequestAwareAuthenticationSuccessHandler successHandler(){
        SavedRequestAwareAuthenticationSuccessHandler handler = new SavedRequestAwareAuthenticationSuccessHandler();
        handler.setDefaultTargetUrl("/index");
        handler.setTargetUrlParameter("target");
        return handler;
    }
}
注意在配置时指定了 targetUrlParameter为target,这样用户就可以在登录请求中,通过 target来指定跳转地址了,然后我们修改一下前面login.html中的form表单:
<form id="login-form" class="form" action="/doLogin?target=/hello" method="post">
    <h3 class="text-center text-info">登录</h3>
    <div class="form-group">
        <label for="username" class="text-info">用户名:</label><br>
        <input type="text" name="uname" id="username" class="form-control">
    </div>
    <div class="form-group">
        <label for="password" class="text-info">密码:</label><br>
        <input type="text" name="passwd" id="password" class="form-control">
    </div>
    <div class="form-group">
        <input type="submit" name="submit" class="btn btn-info btn-md" value="登录">
    </div>
</form>
在form表单中,action修改/doLogin?target=/hello,这样当用户登录成功之后,就始终跳转到/hello接口了。
当我们通过successForwardUrl来设置登录成功后重定向的地址时,实际上对应的实现类 就是 ForwardAuthenticationSuccessHandler,ForwardAuthenticationSuccessHandler 的源码特别简单,就是一个服务端转发,代码如下:
public class ForwardAuthenticationSuccessHandler implements AuthenticationSuccessHandler {
	private final String forwardUrl;
	public ForwardAuthenticationSuccessHandler(String forwardUrl) {
		Assert.isTrue(UrlUtils.isValidRedirectUrl(forwardUrl),
				() -> "'" + forwardUrl + "' is not a valid forward URL");
		this.forwardUrl = forwardUrl;
	}
	public void onAuthenticationSuccess(HttpServletRequest request, HttpServletResponse response, Authentication authentication) throws IOException, ServletException {
		request.getRequestDispatcher(forwardUrl).forward(request, response);
	}
}由上述代码可以看到,主要功能就是调用getRequestDispatcher方法进行服务端转发。 AuthenticationSuccessHandler默认的三个实现类,无论是哪一个,都是用来处理页面跳转的,有时候页面跳转并不能满足我们的需求,特别是现在流行的前后端分离开发中,用户登录成功后,就不再需要页面跳转了,只需要给前端返回一个JSON数据即可,告诉前端登录成功还是登录失败,前端收到消息之后自行处理。像这样的需求,我们可以通过自定义 AuthenticationSuccessHandler 的实现类来完成:
package com.intehel.demo.handler;

import com.fasterxml.jackson.databind.ObjectMapper;
import org.springframework.security.core.Authentication;
import org.springframework.security.web.authentication.AuthenticationSuccessHandler;
import javax.servlet.ServletException;
import javax.servlet.http.HttpServletRequest;
import javax.servlet.http.HttpServletResponse;
import java.io.IOException;
import java.util.HashMap;
import java.util.Map;

public class MyAuthenticationSuccessHandler implements AuthenticationSuccessHandler {
    @Override
    public void onAuthenticationSuccess(
            HttpServletRequest request, HttpServletResponse response, Authentication authentication)
            throws IOException, ServletException {
        response.setContentType("application/json;charset=UTF-8");
        Map<String,Object> resp = new HashMap<String,Object>();
        resp.put("status",200);
        resp.put("msg","登录成功");
        ObjectMapper om = new ObjectMapper();
        String s = om.writeValueAsString(resp);
        response.getWriter().write(s);
    }
}
在自定义的 MyAuthenticationSuccessHandler中,重写 onAuthenticationSuccess方法,在该方法中,通过HttpServletResponse对象返回一段登录成功的JSON字符串给前端即可。最后, 在 SecurityConfig中配置自定义的 MyAuthenticationSuccessHandler,代码如下:
@Configuration
public class SecurityConfig extends WebSecurityConfigurerAdapter {
    @Override
    protected void configure(HttpSecurity http) throws Exception {
        http.authorizeRequests()
                .anyRequest().authenticated()
                .and()
                .formLogin()
                .loginPage("/loginNew.html")
                .loginProcessingUrl("/doLogin")
                .successHandler(new MyAuthenticationSuccessHandler())
                .failureUrl("/loginNew.html")
                .usernameParameter("uname")
                .passwordParameter("passwd")
                .permitAll()
                .and()
                .csrf().disable();
    }
}
配置完成后,重启项目,此时,当用户成功登录之后,就不会进行页面跳转了,而是返回一段JSON字符串。

接下来看登录失败的处理逻辑。为了方便在前端页面展示登录失败的异常信息,我们首先在项目的pom.xml文件中引入thymeleaf依赖,代码如下:
<dependency>
    <groupId>org.springframework.boot</groupId>
    <artifactId>spring-boot-starter-thymeleaf</artifactId>
    <version>2.0.7.RELEASE</version>
</dependency>
然后在resources/templates目录下新建mylogin.html,代码如下:
 <!DOCTYPE html>
<html lang="en" xmlns:th="http://www.thymeleaf.org">
<head>
    <meta charset="UTF-8">
    <title>登录</title>
    <link href="//maxcdn.bootstrapcdn.com/bootstrap/4.1.1/css/bootstrap.min.css" rel="stylesheet" id="bootstrap-css">
    <script src="//maxcdn.bootstrapcdn.com/bootstrap/4.1.1/js/bootstrap.min.js"></script>
    <script src="//cdnjs.cloudflare.com/ajax/libs/jquery/3.2.1/jquery.min.js"></script>
</head>
<style>
    #login .container #login-row #login-column #login-box {
        border: 1px solid #9c9c9c;
        background-color: #EAEAEA;
    }
</style>
<body>
<div id="login">
    <div class="container">
        <div id="login-row" class="row justify-content-center align-items-center">
            <div id="login-column" class="col-md-6">
                <div id="login-box" class="col-md-12">
                    <form id="login-form" class="form" action="/doLogin?target=/hello" method="post">
                        <h3 class="text-center text-info">登录</h3>
                        <div th:text="${SPRING SECURITY LAST EXCEPTION}"></div>
                        <div class="form-group">
                            <label for="username" class="text-info">用户名:</label><br>
                            <input type="text" name="uname" id="username" class="form-control">
                        </div>
                        <div class="form-group">
                            <label for="password" class="text-info">密码:</label><br>
                            <input type="text" name="passwd" id="password" class="form-control">
                        </div>
                        <div class="form-group">
                            <input type="submit" name="submit" class="btn btn-info btn-md" value="登录">
                        </div>
                    </form>
                </div>
            </div>
        </div>
    </div>
</div>
</body>
</html>
mylogin.html和前面的login.html基本类似,前面的login.html是静态页面,这里的 mylogin.html是thymeleaf模板页面,mylogin.html页面在form中多了一个div,用来展示登录失败时候的异常信息,登录失败的异常信息会放在request中返回到前端,开发者可以将其直接提取岀来展示。
既然mylogm.html是动态页面,就不能像静态页面那样直接访问了,需要我们给mylogin.html页面提供一个访问控制器:
package com.intehel.demo.controller;

import org.springframework.stereotype.Controller;
import org.springframework.web.bind.annotation.RequestMapping;

@Controller
public class MyLoginController {
    @RequestMapping("/mylogin.html")
    public String myLogin(){
        return "mylogin";
    }
}
最后再在SecurityConfig中配置登录页面,代码如下:
@Configuration
public class SecurityConfig extends WebSecurityConfigurerAdapter {
    @Override
    protected void configure(HttpSecurity http) throws Exception {
        http.authorizeRequests()
                .anyRequest().authenticated()
                .and()
                .formLogin()
                .loginPage("/mylogin.html")
                .loginProcessingUrl("/doLogin")
                .defaultSuccessUrl("/index.html")
                .failureUrl("/mylogin.html")
                .usernameParameter("uname")
                .passwordParameter("passwd")
                .permitAll()
                .and()
                .csrf().disable();
    }
}
failureUrl表示登录失败后重定向到mylogin.html页面。重定向是一种客户端跳转,重定向不方便携带请求失败的异常信息(只能放在URL中)。
如果希望能够在前端展示请求失败的异常信息,可以使用下面这种方式:
@Configuration
public class SecurityConfig extends WebSecurityConfigurerAdapter {
    @Override
    protected void configure(HttpSecurity http) throws Exception {
        http.authorizeRequests()
                .anyRequest().authenticated()
                .and()
                .formLogin()
                .loginPage("/mylogin.html")
                .loginProcessingUrl("/doLogin")
                .defaultSuccessUrl("/index.html")
                .failureForwardUrl("/mylogin.html")
                .usernameParameter("uname")
                .passwordParameter("passwd")
                .permitAll()
                .and()
                .csrf().disable();
    }
}
failureForwardUrl方法从名字上就可以看出,这种跳转是一种服务器端跳转,服务器端跳转的好处是可以携带登录异常信息,如果登录失败,自动跳转回登录页面后,就可以将错误信息展示出来,如图2-8所示。
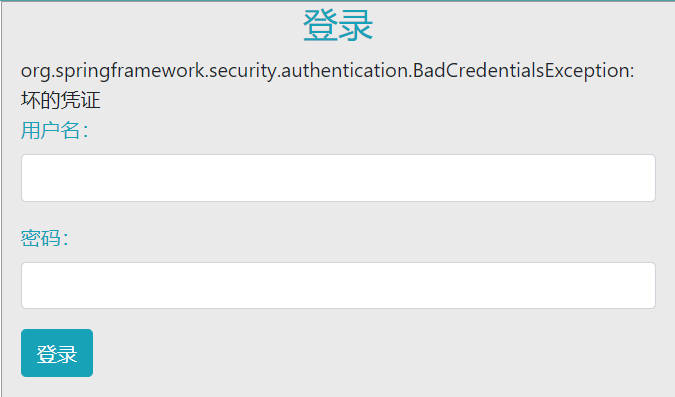
图 2-8
无论是 failureUrl 还是 failureForwardUrl,最终所配置的都是 AuthenticationFailureHandler 接口的实现。Spring Security中提供了 AuthenticationFailureHandler 接口,用来规范登录失败的 实现:
public interface AuthenticationFailureHandler {
	void onAuthenticationFailure(HttpServletRequest request,
			HttpServletResponse response, AuthenticationException exception)
			throws IOException, ServletException;
}
AuthenticationFailureHandler 接口中只有一个 onAuthenticationFailure 方法,用来处理登录 失败请求,request和response参数很好理解,最后的exception则表示登录失败的异常信息。 Spring Security 中为 AuthenticationFailureHandler 一共提供了五个实现类,如图 2-9 所示

图2-9
这里举一个简单的例子。假如不使用failureForwardUrl 方法,同时又想在登录失败后通过服务器端跳转回到登录页面,那么可以自定义SimpleUrlAuthenticationFailureHandler配置,并将forwardToDestination属性设置为true,代码如下:
@Configuration
public class SecurityConfig extends WebSecurityConfigurerAdapter {
    @Override
    protected void configure(HttpSecurity http) throws Exception {
        http.authorizeRequests()
                .anyRequest().authenticated()
                .and()
                .formLogin()
                .loginPage("/mylogin.html")
                .loginProcessingUrl("/doLogin")
                .defaultSuccessUrl("/index.html")
                .failureHandler(failureHandler())
                .usernameParameter("uname")
                .passwordParameter("passwd")
                .permitAll()
                .and()
                .csrf().disable();
    }
    SimpleUrlAuthenticationFailureHandler failureHandler(){
        SimpleUrlAuthenticationFailureHandler handler =
                new SimpleUrlAuthenticationFailureHandler("/mylogin.html");
        handler.setUseForward(true);
        return handler;
    }
}这样配置之后,如果用户再次登录失败,就会通过服务端跳转重新回到登录页面,登录页而也会展示相应的错误信息,效果和failureForwardUrl 一致。
SimpleUrlAuthenticationFailureHandler的源码也很简单,我们一起来看一下实现逻辑(源码比较长,这里列出来核心部分):
public class SimpleUrlAuthenticationFailureHandler implements
		AuthenticationFailureHandler {
	protected final Log logger = LogFactory.getLog(getClass());
	private String defaultFailureUrl;
	private boolean forwardToDestination = false;
	private boolean allowSessionCreation = true;
	private RedirectStrategy redirectStrategy = new DefaultRedirectStrategy();
	public SimpleUrlAuthenticationFailureHandler() {
	}
	public SimpleUrlAuthenticationFailureHandler(String defaultFailureUrl) {
		setDefaultFailureUrl(defaultFailureUrl);
	}
	public void onAuthenticationFailure(HttpServletRequest request,
			HttpServletResponse response, AuthenticationException exception)
			throws IOException, ServletException {

		if (defaultFailureUrl == null) {
			logger.debug("No failure URL set, sending 401 Unauthorized error");

			response.sendError(HttpStatus.UNAUTHORIZED.value(),
				HttpStatus.UNAUTHORIZED.getReasonPhrase());
		}
		else {
			saveException(request, exception);

			if (forwardToDestination) {
				logger.debug("Forwarding to " + defaultFailureUrl);

				request.getRequestDispatcher(defaultFailureUrl)
						.forward(request, response);
			}
			else {
				logger.debug("Redirecting to " + defaultFailureUrl);
				redirectStrategy.sendRedirect(request, response, defaultFailureUrl);
			}
		}
	}
	protected final void saveException(HttpServletRequest request,
			AuthenticationException exception) {
		if (forwardToDestination) {
			request.setAttribute(WebAttributes.AUTHENTICATION_EXCEPTION, exception);
		}
		else {
			HttpSession session = request.getSession(false);

			if (session != null || allowSessionCreation) {
				request.getSession().setAttribute(WebAttributes.AUTHENTICATION_EXCEPTION,
						exception);
			}
		}
	}
	public void setDefaultFailureUrl(String defaultFailureUrl) {
		Assert.isTrue(UrlUtils.isValidRedirectUrl(defaultFailureUrl),
				() -> "'" + defaultFailureUrl + "' is not a valid redirect URL");
		this.defaultFailureUrl = defaultFailureUrl;
	}
	protected boolean isUseForward() {
		return forwardToDestination;
	}
	public void setUseForward(boolean forwardToDestination) {
		this.forwardToDestination = forwardToDestination;
	}
}从这段源码中可以看到,当用户构造SimpleUrlAuthenticationFailureHandler对象的时候, 就传入了 defaultFailureUrl也就是登录失败时要跳转的地址。在onAuthenticationFailure方法中,如果发现defaultFailureUrl为null,则直接通过response返回异常信息,否则调用 saveException 方法。在 saveException 方法中,如果 fowardToDestination 属性设置为ture,表示通过服务器端跳转回到登录页面,此时就把异常信息放到request中。再回到 onAuthenticationFailure方法中,如果用户设置fowardToDestination 为 true,就通过服务器 端跳转回到登录页面,否则通过重定向回到登录页面。
如果是前后端分离开发,登录失败时就不需要页面跳转了,只需要返回JSON字符串给前端即可,此时可以通过自定义AuthenticationFailureHandler的实现类来完成,代码如下
package com.intehel.demo.handler;

import com.fasterxml.jackson.databind.ObjectMapper;
import org.springframework.security.core.AuthenticationException;
import org.springframework.security.web.authentication.AuthenticationFailureHandler;
import javax.servlet.ServletException;
import javax.servlet.http.HttpServletRequest;
import javax.servlet.http.HttpServletResponse;
import java.io.IOException;
import java.util.HashMap;
import java.util.Map;

public class MyAuthenticationFailureHandler implements AuthenticationFailureHandler {
    @Override
    public void onAuthenticationFailure(
            HttpServletRequest request, HttpServletResponse response, AuthenticationException exception)
            throws IOException, ServletException {
        response.setContentType("application/json;charset=UTF-8");
        Map<String,Object> resp = new HashMap<String,Object>();
        resp.put("status",500);
        resp.put("msg","登录失败"+exception.getMessage());
        ObjectMapper om = new ObjectMapper();
        String s = om.writeValueAsString(resp);
        response.getWriter().write(s);
    }
}
然后在SecurityConfig中进行配置即可:
package com.intehel.demo.config;

import com.intehel.demo.handler.MyAuthenticationFailureHandler;
import org.springframework.context.annotation.Configuration;
import org.springframework.security.config.annotation.web.builders.HttpSecurity;
import org.springframework.security.config.annotation.web.configuration.WebSecurityConfigurerAdapter;

@Configuration
public class SecurityConfig extends WebSecurityConfigurerAdapter {
    @Override
    protected void configure(HttpSecurity http) throws Exception {
        http.authorizeRequests()
                .anyRequest().authenticated()
                .and()
                .formLogin()
                .loginPage("/mylogin.html")
                .loginProcessingUrl("/doLogin")
                .defaultSuccessUrl("/index.html")
                .failureHandler(new MyAuthenticationFailureHandler())
                .usernameParameter("uname")
                .passwordParameter("passwd")
                .permitAll()
                .and()
                .csrf().disable();
    }
}
配置完成后,当用户再次登录失败,就不会进行页而跳转了,而是直接返回JSON字符串, 如图2-10所示。
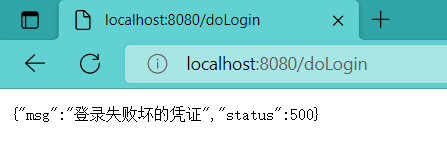
图 2-10
Spring Security中提供了默认的注销页面,当然开发者也可以根据自己的需求对注销登录进行定制。
@Configuration
public class SecurityConfig extends WebSecurityConfigurerAdapter {
    @Override
    protected void configure(HttpSecurity http) throws Exception {
        http.authorizeRequests()
                .anyRequest().authenticated()
                .and()
                .formLogin()
                .loginPage("/mylogin.html")
                .loginProcessingUrl("/doLogin")
                .defaultSuccessUrl("/index.html")
                .failureHandler(new MyAuthenticationFailureHandler())
                .usernameParameter("uname")
                .passwordParameter("passwd")
                .permitAll()
                .and()
                .logout()
                .logoutUrl("/logout")
                .invalidateHttpSession(true)
                .clearAuthentication(true)
                .logoutSuccessUrl("/mylogin.html")
                .and()
                .csrf().disable();
    }
}配置完成后,再次启动项目,登录成功后,在浏览器中输入http://localhost:8080/logout就可以发起注销登录请求了,注销成功后,会自动跳转到mylogin.html页面。
如果项目有需要,开发者也可以配置多个注销登录的请求,同时还可以指定请求的方法。
package com.intehel.demo.config;

import com.intehel.demo.handler.MyAuthenticationFailureHandler;
import org.springframework.context.annotation.Configuration;
import org.springframework.security.config.annotation.web.builders.HttpSecurity;
import org.springframework.security.config.annotation.web.configuration.WebSecurityConfigurerAdapter;
import org.springframework.security.web.util.matcher.AntPathRequestMatcher;
import org.springframework.security.web.util.matcher.OrRequestMatcher;

@Configuration
public class SecurityConfig extends WebSecurityConfigurerAdapter {
    @Override
    protected void configure(HttpSecurity http) throws Exception {
        http.authorizeRequests()
                .anyRequest().authenticated()
                .and()
                .formLogin()
                .loginPage("/mylogin.html")
                .loginProcessingUrl("/doLogin")
                .defaultSuccessUrl("/index.html")
                .failureHandler(new MyAuthenticationFailureHandler())
                .usernameParameter("uname")
                .passwordParameter("passwd")
                .permitAll()
                .and()
                .logout()
                .logoutRequestMatcher(new OrRequestMatcher(new AntPathRequestMatcher("/logout1","GET"),
                        new AntPathRequestMatcher("/logout2","POST")))
                .invalidateHttpSession(true)
                .clearAuthentication(true)
                .logoutSuccessUrl("/mylogin.html")
                .and()
                .csrf().disable();
    }
}
上面这个配置表示注销请求路径有两个:
使用任意一个请求都可以完成登录注销。
如果项目是前后端分离的架构,注销成功后就不需要页面跳转了,只需将注销成功的信息返回给前端即可,此时我们可以自定义返回内容:
@Configuration
public class SecurityConfig extends WebSecurityConfigurerAdapter {
    @Override
    protected void configure(HttpSecurity http) throws Exception {
        http.authorizeRequests()
                .anyRequest().authenticated()
                .and()
                .formLogin()
                .loginPage("/mylogin.html")
                .loginProcessingUrl("/doLogin")
                .defaultSuccessUrl("/index.html")
                .failureHandler(new MyAuthenticationFailureHandler())
                .usernameParameter("uname")
                .passwordParameter("passwd")
                .permitAll()
                .and()
                .logout()
                .logoutRequestMatcher(new OrRequestMatcher(new AntPathRequestMatcher("/logout1","GET"),
                        new AntPathRequestMatcher("/logout2","POST")))
                .invalidateHttpSession(true)
                .clearAuthentication(true)
                .logoutSuccessHandler((req,resp,auth)->{
                    resp.setContentType("application/json;charset=UTF-8");
                    Map<String,Object> result = new HashMap<String,Object>();
                    result.put("status",200);
                    result.put("msg","注销成功!");
                    ObjectMapper om = new ObjectMapper();
                    String s = om.writeValueAsString(result);
                    resp.getWriter().write(s);
                })
                .and()
                .csrf().disable();
    }
}
配置 logoutSuccessHandler 和 logoutSuccessUrl 类似于前面所介绍的 successHandler 和defaultSuccessUrl之间的关系,只是类不同而已,因此这里不再赘述,读者可以按照我们前面的分析思路自行分析。
配置完成后,重启项目,登录成功后再去注销登录,无论是使用/logout1还是/logout2进行注销,只要注销成功后,就会返回一段JSON字符串。
如果开发者希望为不同的注销地址返回不同的结果,也是可以的,配置如下:
 @Configuration
public class SecurityConfig extends WebSecurityConfigurerAdapter {
    @Override
    protected void configure(HttpSecurity http) throws Exception {
        http.authorizeRequests()
                .anyRequest().authenticated()
                .and()
                .formLogin()
                .loginPage("/mylogin.html")
                .loginProcessingUrl("/doLogin")
                .defaultSuccessUrl("/index.html")
                .failureHandler(new MyAuthenticationFailureHandler())
                .usernameParameter("uname")
                .passwordParameter("passwd")
                .permitAll()
                .and()
                .logout()
                .logoutRequestMatcher(new OrRequestMatcher(new AntPathRequestMatcher("/logout1","GET"),
                        new AntPathRequestMatcher("/logout2","POST")))
                .invalidateHttpSession(true)
                .clearAuthentication(true)
                .defaultLogoutSuccessHandlerFor((req,resp,auth)->{
                    resp.setContentType("application/json;charset=UTF-8");
                    Map<String,Object> result = new HashMap<String,Object>();
                    result.put("status",200);
                    result.put("msg","使用logout1注销成功!");
                    ObjectMapper om = new ObjectMapper();
                    String s = om.writeValueAsString(result);
                    resp.getWriter().write(s);
                },new AntPathRequestMatcher("/logout1","GET"))
                .defaultLogoutSuccessHandlerFor((req,resp,auth)->{
                    resp.setContentType("application/json;charset=UTF-8");
                    Map<String,Object> result = new HashMap<String,Object>();
                    result.put("status",200);
                    result.put("msg","使用logout2注销成功!");
                    ObjectMapper om = new ObjectMapper();
                    String s = om.writeValueAsString(result);
                    resp.getWriter().write(s);
                },new AntPathRequestMatcher("/logout1","GET"))
                .and()
                .csrf().disable();
    }
}
通过defaultLogoutSuccessHandlerFor方法可以注册多个不同的注销成功回调函数,该方法第一个参数是注销成功回调,第二个参数则是具体的注销请求。当用户注销成功后,使用了哪个注销请求,就给出对应的响应信息。
我得到了一个包含嵌套链接的表单。编辑时链接字段为空的问题。这是我的表格:Editingkategori{:action=>'update',:id=>@konkurrancer.id})do|f|%>'Trackingurl',:style=>'width:500;'%>'Editkonkurrence'%>|我的konkurrencer模型:has_one:link我的链接模型:classLink我的konkurrancer编辑操作:defedit@konkurrancer=Konkurrancer.find(params[:id])@konkurrancer.link_attrib
我有一个在Linux服务器上运行的ruby脚本。它不使用rails或任何东西。它基本上是一个命令行ruby脚本,可以像这样传递参数:./ruby_script.rbarg1arg2如何将参数抽象到配置文件(例如yaml文件或其他文件)中?您能否举例说明如何做到这一点?提前谢谢你。 最佳答案 首先,您可以运行一个写入YAML配置文件的独立脚本:require"yaml"File.write("path_to_yaml_file",[arg1,arg2].to_yaml)然后,在您的应用中阅读它:require"yaml"arg
我有一个服务模型/表及其注册表。在表单中,我几乎拥有服务的所有字段,但我想在验证服务对象之前自动设置其中一些值。示例:--服务Controller#创建Action:defcreate@service=Service.new@service_form=ServiceFormObject.new(@service)@service_form.validate(params[:service_form_object])and@service_form.saverespond_with(@service_form,location:admin_services_path)end在验证@ser
我已经在Sinatra上创建了应用程序,它代表了一个简单的API。我想在生产和开发上进行部署。我想在部署时选择,是开发还是生产,一些方法的逻辑应该改变,这取决于部署类型。是否有任何想法,如何完成以及解决此问题的一些示例。例子:我有代码get'/api/test'doreturn"Itisdev"end但是在部署到生产环境之后我想在运行/api/test之后看到ItisPROD如何实现? 最佳答案 根据SinatraDocumentation:EnvironmentscanbesetthroughtheRACK_ENVenvironm
之前在培训新生的时候,windows环境下配置opencv环境一直教的都是网上主流的vsstudio配置属性表,但是这个似乎对新生来说难度略高(虽然个人觉得完全是他们自己的问题),加之暑假之后对cmake实在是爱不释手,且这样配置确实十分简单(其实都不需要配置),故斗胆妄言vscode下配置CV之法。其实极为简单,图比较多所以很长。如果你看此文还配不好,你应该思考一下是不是自己的问题。闲话少说,直接开始。0.CMkae简介有的人到大二了都不知道cmake是什么,我不说是谁。CMake是一个开源免费并且跨平台的构建工具,可以用简单的语句来描述所有平台的编译过程。它能够根据当前所在平台输出对应的m
注意:本文主要掌握DCN自研无线产品的基本配置方法和注意事项,能够进行一般的项目实施、调试与运维AP基本配置命令AP登录用户名和密码均为:adminAP默认IP地址为:192.168.1.10AP默认情况下DHCP开启AP静态地址配置:setmanagementstatic-ip192.168.10.1AP开启/关闭DHCP功能:setmanagementdhcp-statusup/downAP设置默认网关:setstatic-ip-routegeteway192.168.10.254查看AP基本信息:getsystemgetmanagementgetmanaged-apgetrouteAP配
1.1.1 YARN的介绍 为克服Hadoop1.0中HDFS和MapReduce存在的各种问题⽽提出的,针对Hadoop1.0中的MapReduce在扩展性和多框架⽀持⽅⾯的不⾜,提出了全新的资源管理框架YARN. ApacheYARN(YetanotherResourceNegotiator的缩写)是Hadoop集群的资源管理系统,负责为计算程序提供服务器计算资源,相当于⼀个分布式的操作系统平台,⽽MapReduce等计算程序则相当于运⾏于操作系统之上的应⽤程序。 YARN被引⼊Hadoop2,最初是为了改善MapReduce的实现,但是因为具有⾜够的通⽤性,同样可以⽀持其他的分布式计算模
我是ruby的新手,正在配置IRB。我喜欢pretty-print(需要'pp'),但总是输入pp来漂亮地打印它似乎很麻烦。我想做的是默认情况下让它漂亮地打印出来,所以如果我有一个var,比如说,'myvar',然后键入myvar,它会自动调用pretty_inspect而不是常规检查。我从哪里开始?理想情况下,我将能够向我的.irbrc文件添加一个自动调用的方法。有什么想法吗?谢谢! 最佳答案 irb中默认pretty-print对象正是hirb被迫去做。Theseposts解释hirb如何将几乎所有内容转换为ascii表。虽
我想在IRB中浏览文件系统并让提示更改以反射(reflect)当前工作目录,但我不知道如何在每个命令后进行提示更新。最终,我想在日常工作中更多地使用IRB,让bash溜走。我在我的.irbrc中试过这个:require'fileutils'includeFileUtilsIRB.conf[:PROMPT][:CUSTOM]={:PROMPT_N=>"\e[1m:\e[m",:PROMPT_I=>"\e[1m#{pwd}>\e[m",:PROMPT_S=>"FOO",:PROMPT_C=>"\e[1m#{pwd}>\e[m",:RETURN=>""}IRB.conf[:PROMPT_MO
我正在使用Ruby/Mechanize编写一个“自动填写表格”应用程序。它几乎可以工作。我可以使用精彩CharlesWeb代理以查看服务器和我的Firefox浏览器之间的交换。现在我想使用Charles查看服务器和我的应用程序之间的交换。Charles在端口8888上代理。假设服务器位于https://my.host.com。.一件不起作用的事情是:@agent||=Mechanize.newdo|agent|agent.set_proxy("my.host.com",8888)end这会导致Net::HTTP::Persistent::Error:...lib/net/http/pe