Android 3.0后引入的一个UI控件——ViewPager(视图滑动切换工具),实在想不到 如何来称呼这个控件,他的大概功能:通过手势滑动可以完成View的切换,一般是用来做APP 的引导页或者实现图片轮播。ViewPager就是一个简单的页面切换组件,我们可以往里面填充多个View,然后我们可以左 右滑动,从而切换不同的View。
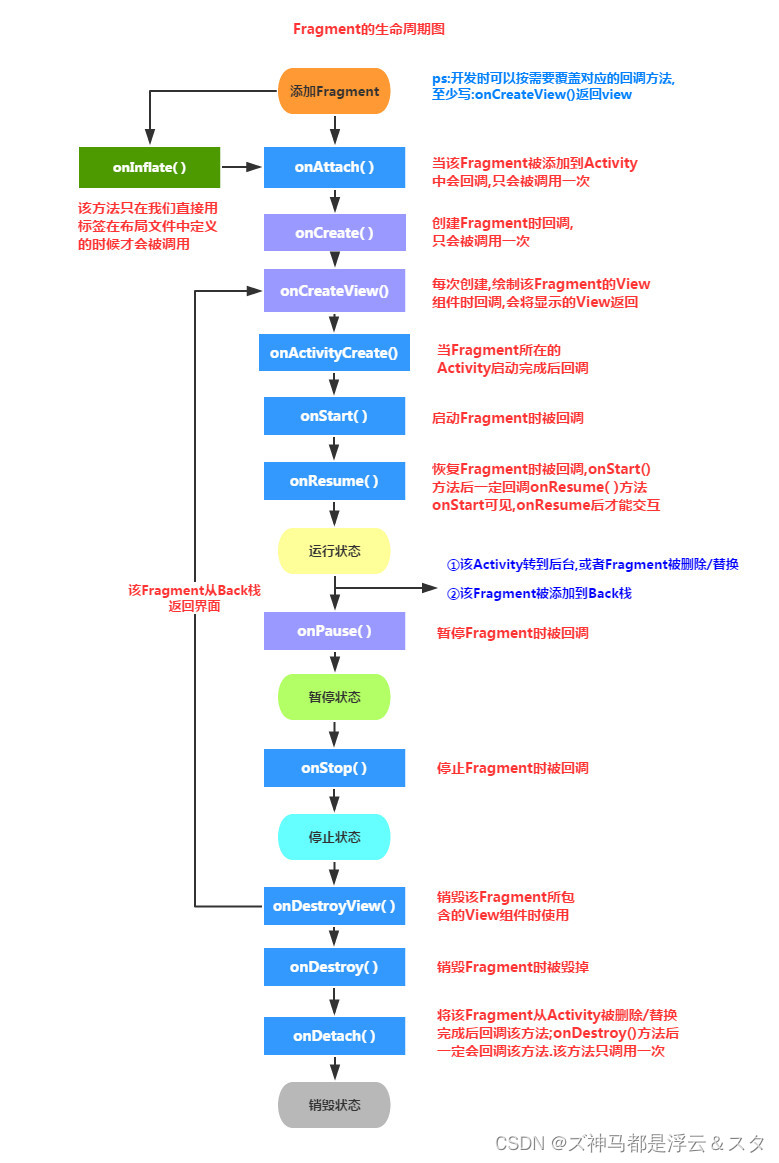
Fragment是Android3.0后引入的一个新的API,他出现的初衷是为了适应大屏幕的平板电脑, 当然现在他仍然是平板APP UI设计的宠儿,而且我们普通手机开发也会加入这个Fragment, 我们可以把他看成一个小型的Activity,又称Activity片段!想想,如果一个很大的界面,我们 就一个布局,写起界面来会有多麻烦,而且如果组件多的话是管理起来也很麻烦!而使用Fragment 我们可以把屏幕划分成几块,然后进行分组,进行一个模块化的管理!从而可以更加方便的在 运行过程中动态地更新Activity的用户界面!另外Fragment并不能单独使用,他需要嵌套在Activity 中使用,尽管他拥有自己的生命周期,但是还是会受到宿主Activity的生命周期的影响,比如Activity 被destory销毁了,他也会跟着销毁!
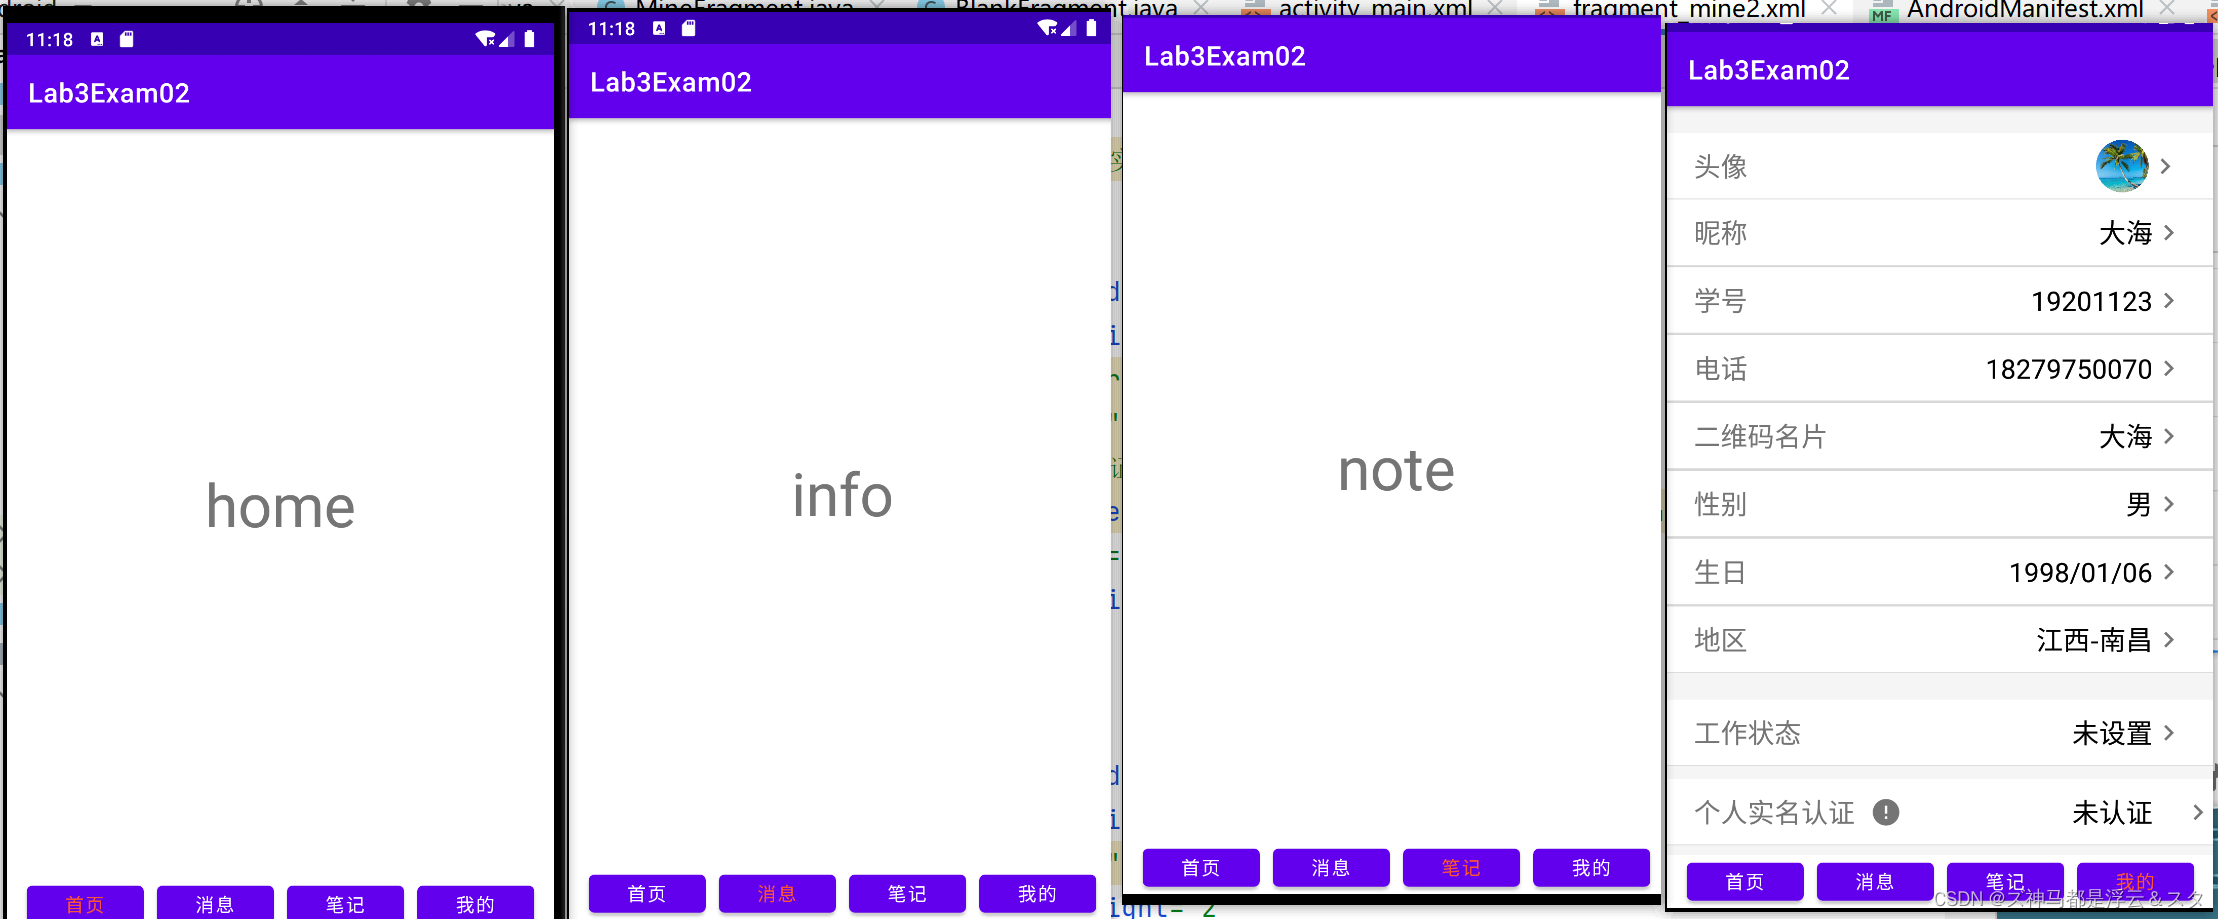
效果演示
<?xml version="1.0" encoding="utf-8"?>
<FrameLayout xmlns:android="http://schemas.android.com/apk/res/android"
    xmlns:tools="http://schemas.android.com/tools"
    android:layout_width="match_parent"
    android:layout_height="match_parent"
    tools:context=".BlankFragment">

    <!-- TODO: Update blank fragment layout -->
    <TextView
        android:id="@+id/text"
        android:layout_width="match_parent"
        android:layout_height="match_parent"
        android:gravity="center"
        android:textSize="45sp"
        android:text="home" />

</FrameLayout>
<?xml version="1.0" encoding="utf-8"?>
<LinearLayout xmlns:android="http://schemas.android.com/apk/res/android"
    xmlns:app="http://schemas.android.com/apk/res-auto"
    xmlns:tools="http://schemas.android.com/tools"
    android:layout_width="match_parent"
    android:layout_height="match_parent"
    android:orientation="vertical"
    tools:context=".MainActivity">

    <androidx.viewpager2.widget.ViewPager2
        android:id="@+id/view_pager"
        android:layout_width="match_parent"
        android:layout_height="wrap_content"
        android:layout_weight="1"></androidx.viewpager2.widget.ViewPager2>
<!--    引入底部导航栏-->
    <include layout="@layout/bottom_nav"></include>

</LinearLayout>
<?xml version="1.0" encoding="utf-8"?>
<LinearLayout
    xmlns:android="http://schemas.android.com/apk/res/android"
    android:layout_width="match_parent"
    android:layout_height="40dp"
    android:gravity="bottom"
    android:orientation="horizontal"
    android:layout_alignParentBottom="true"
    android:layout_alignParentLeft="true"
    android:layout_alignParentStart="true">

    <Button
        android:id="@+id/index"
        android:layout_width="wrap_content"
        android:layout_height="wrap_content"
        android:layout_marginLeft="15dp"
        android:text="首页">
    </Button>
    <Button
        android:id="@+id/info"
        android:layout_width="wrap_content"
        android:layout_height="wrap_content"
        android:layout_marginLeft="10dp"
        android:text="消息">
    </Button>
    <Button
        android:id="@+id/note"
        android:layout_width="wrap_content"
        android:layout_height="wrap_content"
        android:layout_marginLeft="10dp"
        android:text="笔记">
    </Button>
    <Button
        android:id="@+id/mine"
        android:layout_width="wrap_content"
        android:layout_height="wrap_content"
        android:layout_marginLeft="10dp"
        android:text="我的">
    </Button>
</LinearLayout>
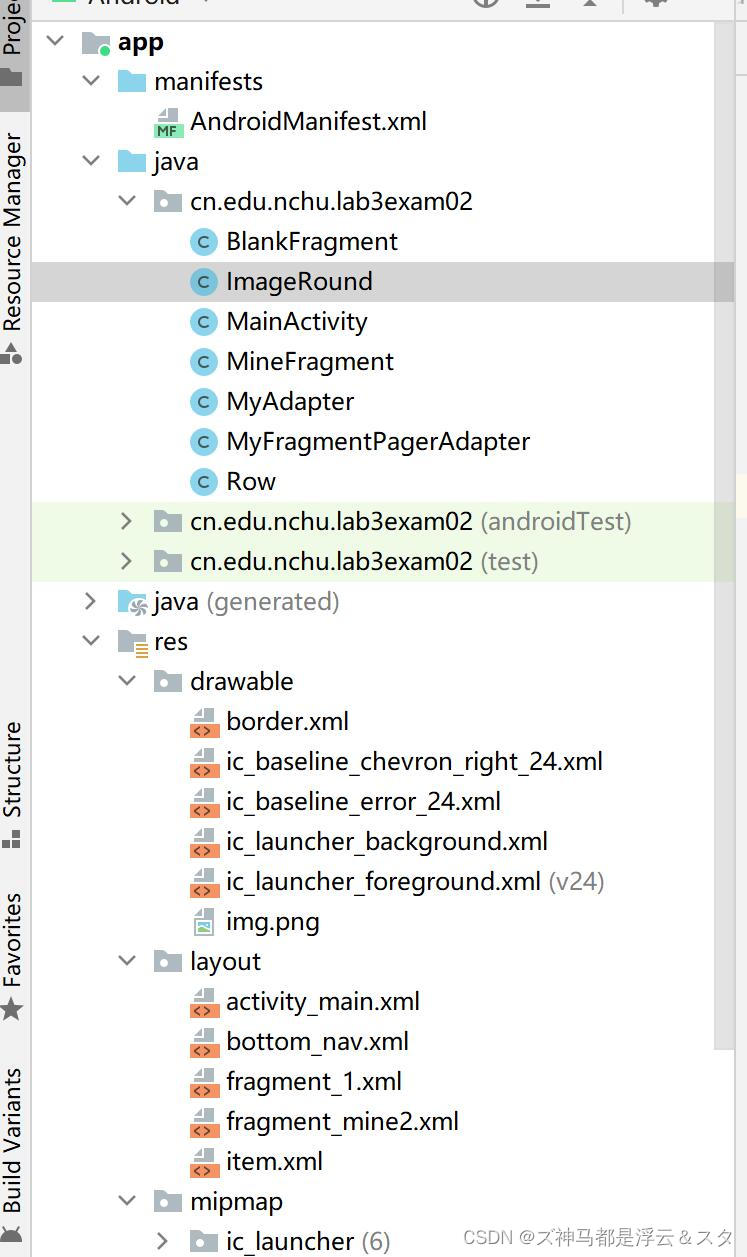
public class MyFragmentPagerAdapter extends FragmentStateAdapter {
    List<Fragment> fragmentList = new LinkedList<>();
    public MyFragmentPagerAdapter(@NonNull FragmentManager fragmentManager, @NonNull Lifecycle lifecycle, List<Fragment> listFragment) {
        super(fragmentManager, lifecycle);
        this.fragmentList = listFragment;

    }

    @NonNull
    @Override
    public Fragment createFragment(int position) {
        return fragmentList.get(position);
    }

    @Override
    public int getItemCount() {
        return fragmentList.size();
    }
}
package cn.edu.nchu.lab3exam02;

import android.os.Bundle;

import androidx.fragment.app.Fragment;

import android.view.LayoutInflater;
import android.view.View;
import android.view.ViewGroup;
import android.widget.TextView;

/**
 * A simple {@link Fragment} subclass.
 * Use the {@link BlankFragment#newInstance} factory method to
 * create an instance of this fragment.
 */
public class BlankFragment extends Fragment {

    private static final String ARG_PARAM1 = "param1";
    View rootView;
    private String mParam1;

    public BlankFragment() {
        // Required empty public constructor
    }

    public static BlankFragment newInstance(String param1) {
        BlankFragment fragment = new BlankFragment();
        Bundle args = new Bundle();
        args.putString(ARG_PARAM1, param1);
        fragment.setArguments(args);
        return fragment;
    }

    @Override
    public void onCreate(Bundle savedInstanceState) {
        super.onCreate(savedInstanceState);
        if (getArguments() != null) {
            mParam1 = getArguments().getString(ARG_PARAM1);
        }
    }

    @Override
    public View onCreateView(LayoutInflater inflater, ViewGroup container,
                             Bundle savedInstanceState) {
        if(rootView == null){
            rootView = inflater.inflate(R.layout.fragment_1, container, false);
        }
        initView();
        return rootView;
    }

    //获取布局文件中的文本内容使用传入的参数进行初始化
    private void initView() {
        TextView textView = rootView.findViewById(R.id.text);
        textView.setText(mParam1);
    }
}
public class MainActivity extends AppCompatActivity implements View.OnClickListener {
    ViewPager2 viewPager;
    Button[]  buttons = new Button[4];
    int current = 0;

    @SuppressLint("ResourceAsColor")
    @Override
    protected void onCreate(Bundle savedInstanceState) {
        super.onCreate(savedInstanceState);
        setContentView(R.layout.activity_main);

        buttons[0] = findViewById(R.id.index);
        buttons[0].setOnClickListener(this);
        buttons[1]= findViewById(R.id.info);
        buttons[1].setOnClickListener(this);
        buttons[2] = findViewById(R.id.note);
        buttons[2].setOnClickListener(this);
        buttons[3] = findViewById(R.id.mine);
        buttons[3].setOnClickListener(this);
        initViewPager();
    }

    public void initViewPager(){
        viewPager = findViewById(R.id.view_pager);
        List<Fragment> fragmentList = new LinkedList<>();
        fragmentList.add(BlankFragment.newInstance("home"));
        fragmentList.add(BlankFragment.newInstance("info"));
        fragmentList.add(BlankFragment.newInstance("note"));
        fragmentList.add(MineFragment.newInstance());//这个由于与其它三个Fragment布局结构不一样所以需要新建一个Fragment类进行初始化
        MyFragmentPagerAdapter myFragmentPagerAdapter = new MyFragmentPagerAdapter(getSupportFragmentManager(),getLifecycle(),fragmentList);
        viewPager.setAdapter(myFragmentPagerAdapter);
        //监听Fragment的界面变化
        viewPager.registerOnPageChangeCallback(new ViewPager2.OnPageChangeCallback() {
            @Override
            public void onPageScrolled(int position, float positionOffset, int positionOffsetPixels) {
                super.onPageScrolled(position, positionOffset, positionOffsetPixels);
                //其中position为当前Fragment的索引
                changePager(position);
            }
            @Override
            public void onPageSelected(int position) {
                super.onPageSelected(position);
            }

            @Override
            public void onPageScrollStateChanged(int state) {
                super.onPageScrollStateChanged(state);
            }
        });
    }


//为按钮添加点击事件获取当前界面索引切换按钮文字颜色
    @Override
    public void onClick(View view) {
        switch(view.getId()){
            case R.id.index:changePager(0);viewPager.setCurrentItem(0);break;
            case R.id.info:changePager(1);viewPager.setCurrentItem(1);break;
            case R.id.note:changePager(2);viewPager.setCurrentItem(2);break;
            case R.id.mine:changePager(3);viewPager.setCurrentItem(3);break;
        }
    }

    @SuppressLint("ResourceAsColor")
    private void changePager(int position) {
        buttons[current].setTextColor(Color.parseColor("#FFFFFF"));
        current = position;
        switch (position){
            case 0: buttons[current].setTextColor(Color.parseColor("#FC5531")); break;
            case 1: buttons[current].setTextColor(Color.parseColor("#FC5531")); break;
            case 2: buttons[current].setTextColor(Color.parseColor("#FC5531")); break;
            case 3: buttons[current].setTextColor(Color.parseColor("#FC5531")); break;
        }
    }
}
<?xml version="1.0" encoding="utf-8"?>
<LinearLayout xmlns:android="http://schemas.android.com/apk/res/android"
    xmlns:tools="http://schemas.android.com/tools"
    android:layout_width="match_parent"
    android:layout_height="match_parent"
    android:orientation="vertical"
    android:background="@color/gray"
    tools:context=".MineFragment">


    <LinearLayout
        android:layout_width="match_parent"
        android:layout_height="50dp"
        android:gravity="center_vertical"
        android:orientation="horizontal"
        android:background="@drawable/border"
        android:layout_marginTop="20dp">
        <TextView
            android:layout_width="100dp"
            android:layout_height="wrap_content"
            android:textSize="20dp"
            android:layout_marginLeft="20dp"
            android:layout_weight="1"
            android:text="头像">
        </TextView>
        <LinearLayout
            android:layout_width="200dp"
            android:layout_height="match_parent"
            android:gravity="right"
            android:layout_weight="2">
            <cn.edu.nchu.lab3exam02.ImageRound
                android:id="@+id/iv"
                android:layout_width="40dp"
                android:layout_height="40dp"
                android:layout_gravity="center_vertical"
                android:src="@drawable/img"></cn.edu.nchu.lab3exam02.ImageRound>
        </LinearLayout>
        <TextView
            android:layout_width="20dp"
            android:layout_height="wrap_content"
            android:textSize="24dp"
            android:layout_weight="2"
            android:drawableLeft="@drawable/ic_baseline_chevron_right_24"
            >
        </TextView>
    </LinearLayout>
    <ListView
        android:id="@+id/lv"
        android:layout_width="match_parent"
        android:layout_height="wrap_content"
        >
    </ListView>
    <LinearLayout
        android:layout_width="match_parent"
        android:layout_height="50dp"
        android:gravity="center_vertical"
        android:orientation="horizontal"
        android:layout_marginTop="20dp"
        android:background="@drawable/border">
        <TextView
            android:layout_width="120dp"
            android:layout_height="wrap_content"
            android:textSize="20dp"
            android:layout_marginLeft="20dp"
            android:layout_weight="1"
            android:text="工作状态">
        </TextView>
        <TextView
            android:layout_width="200dp"
            android:layout_height="wrap_content"
            android:gravity="right"
            android:textSize="20dp"
            android:text="未设置"
            android:textColor="@color/black"
            android:layout_weight="1"
            >
        </TextView>
        <TextView
            android:layout_width="20dp"
            android:layout_height="wrap_content"
            android:textSize="24dp"
            android:layout_weight="2"
            android:drawableLeft="@drawable/ic_baseline_chevron_right_24">
        </TextView>
    </LinearLayout>
    <LinearLayout
        android:layout_width="match_parent"
        android:layout_height="50dp"
        android:gravity="center_vertical"
        android:orientation="horizontal"
        android:layout_marginTop="10dp"
        android:background="@drawable/border">
        <TextView
            android:layout_width="120dp"
            android:layout_height="wrap_content"
            android:textSize="20dp"
            android:layout_marginLeft="20dp"
            android:layout_weight="1"

            android:text="个人实名认证">
        </TextView>
        <TextView
            android:layout_width="200dp"
            android:layout_height="wrap_content"
            android:gravity="right"
            android:textSize="20dp"
            android:text="未认证"
            android:drawableLeft="@drawable/ic_baseline_error_24"
            android:textColor="@color/black"
            android:layout_weight="1"
            >
        </TextView>
        <TextView
            android:layout_width="20dp"
            android:layout_height="wrap_content"
            android:textSize="24dp"
            android:layout_weight="2"
            android:drawableRight="@drawable/ic_baseline_chevron_right_24">
        </TextView>
    </LinearLayout>


</LinearLayout>
public class MineFragment extends Fragment {
    private static ListView listView;

    // TODO: Rename and change types of parameters

    public MineFragment() {
        // Required empty public constructor
    }

    // TODO: Rename and change types and number of parameters
    public static MineFragment newInstance() {
        MineFragment fragment = new MineFragment();
        Bundle args = new Bundle();
        fragment.setArguments(args);
        return fragment;
    }

    @Override
    public void onCreate(Bundle savedInstanceState) {
        super.onCreate(savedInstanceState);
    }

    @Override
    public View onCreateView(LayoutInflater inflater, ViewGroup container,
                             Bundle savedInstanceState) {
        //在创建的时候初始化ListView,并返回这个视图进行创建显示
        View fragmentView= inflater.inflate(R.layout.fragment_mine2, container, false);
        listView = (ListView) fragmentView.findViewById(R.id.lv);
        MyAdapter myAdapter = new MyAdapter(fragmentView.getContext());
        listView.setAdapter(myAdapter);
        return fragmentView;
    }
}
public class MyAdapter extends BaseAdapter {
    List<Row> list = new LinkedList<>();
    Context context;
    TextView title,content;
    LinearLayout box;

    public MyAdapter(Context context) {
        initList();
        this.context = context;
    }

    public void initList(){
        Row r1 = new Row("昵称","大海");
        Row r2 = new Row("学号","19201123");
        Row r3 = new Row("电话","18279750070");
        Row r4 = new Row("二维码名片","大海");
        Row r5 = new Row("性别","男");
        Row r6 = new Row("生日","1998/01/06");
        Row r7 = new Row("地区","江西-南昌");
        this.list.add(r1);
        this.list.add(r2);
        this.list.add(r3);
        this.list.add(r4);
        this.list.add(r5);
        this.list.add(r6);
        this.list.add(r7);
    }

    @Override
    public int getCount() {
        return list.size();
    }

    @Override
    public Object getItem(int i) {
        return list.get(i);
    }

    @Override
    public long getItemId(int i) {
        return i;
    }

    @Override
    public View getView(int i, View view, ViewGroup viewGroup) {
        if(view==null){
            view = LayoutInflater.from(context).inflate(R.layout.item,viewGroup,false);

        }
        title = view.findViewById(R.id.title);
        content = view.findViewById(R.id.content);
        title.setText(list.get(i).getLabel());
        content.setText(list.get(i).getContent());

        if(i==7||i==8){
            box = view.findViewById(R.id.box);
            LinearLayout.LayoutParams lp = new LinearLayout.LayoutParams(LinearLayout.LayoutParams.MATCH_PARENT, LinearLayout.LayoutParams.MATCH_PARENT);
            lp.setMargins(0, 20, 0, 0);
            box.setLayoutParams(lp);
        }
        return view;
    }
}
<?xml version="1.0" encoding="utf-8"?>
<LinearLayout xmlns:android="http://schemas.android.com/apk/res/android"
    android:layout_width="match_parent"
    android:layout_height="match_parent">
    <LinearLayout
        android:id="@+id/box"
        android:layout_width="match_parent"
        android:layout_height="50dp"
        android:gravity="center_vertical"
        android:orientation="horizontal"
        android:background="@drawable/border">
        <TextView
            android:id="@+id/title"
            android:layout_width="120dp"
            android:layout_height="wrap_content"
            android:textSize="20dp"
            android:layout_marginLeft="20dp"
            android:layout_weight="1"
            android:text="昵称">
        </TextView>
        <TextView
            android:id="@+id/content"
            android:layout_width="200dp"
            android:layout_height="wrap_content"
            android:gravity="right"
            android:textSize="20dp"
            android:text="大海"
            android:textColor="@color/black"
            android:layout_weight="1"
            >
        </TextView>
        <TextView
            android:layout_width="20dp"
            android:layout_height="wrap_content"
            android:textSize="24dp"
            android:layout_weight="2"
            android:drawableLeft="@drawable/ic_baseline_chevron_right_24">
        </TextView>
    </LinearLayout>

</LinearLayout>
public class ImageRound extends androidx.appcompat.widget.AppCompatImageView {
    //画笔
    private Paint mPaint;
    //圆形图片半径
    private int mRadius;
    //圆形的缩放比例
    private float mScale;

    public ImageRound(Context context) {
        super(context);
    }

    public ImageRound(Context context, @Nullable AttributeSet attrs) {
        super(context, attrs);
    }

    public ImageRound(Context context, @Nullable AttributeSet attrs, int defStyleAttr) {
        super(context, attrs, defStyleAttr);
    }

    @Override
    protected void onMeasure(int widthMeasureSpec, int heightMeasureSpec) {
        super.onMeasure(widthMeasureSpec, heightMeasureSpec);
        //由于是圆形,宽高应保持一致
        int size = Math.min(getMeasuredWidth(), getMeasuredHeight());
        mRadius = size / 2;
        setMeasuredDimension(size, size);
    }

    @Override
    protected void onDraw(Canvas canvas) {
        mPaint = new Paint();
        Drawable drawable = getDrawable();
        if (drawable != null) {
            Bitmap bitmap = drawableToBitmap(getDrawable());
            //初始化BitmapShader,传入bitmap对象
            BitmapShader bitmapShader = new BitmapShader(bitmap, Shader.TileMode.CLAMP, Shader.TileMode.CLAMP);
            //计算缩放比例
            mScale = (mRadius * 2.0f) / Math.min(bitmap.getHeight(), bitmap.getWidth());
            Matrix matrix = new Matrix();
            matrix.setScale(mScale, mScale);
            bitmapShader.setLocalMatrix(matrix);
            mPaint.setShader(bitmapShader);

            //画圆形,指定好坐标,半径,画笔
            canvas.drawCircle(mRadius, mRadius, mRadius, mPaint);
        } else {
            super.onDraw(canvas);
        }
    }


    /**
     * 写一个drawble转BitMap的方法
     *
     * @param drawable
     * @return
     */
    private Bitmap drawableToBitmap(Drawable drawable) {
        if (drawable instanceof BitmapDrawable) {
            BitmapDrawable bd = (BitmapDrawable) drawable;
            return bd.getBitmap();
        }
        int w = drawable.getIntrinsicWidth();
        int h = drawable.getIntrinsicHeight();
        Bitmap bitmap = Bitmap.createBitmap(w, h, Bitmap.Config.ARGB_8888);
        Canvas canvas = new Canvas(bitmap);
        drawable.setBounds(0, 0, w, h);
        drawable.draw(canvas);
        return bitmap;
    }
}
  <cn.edu.nchu.lab3exam02.ImageRound
                android:id="@+id/iv"
                android:layout_width="40dp"
                android:layout_height="40dp"
                android:layout_gravity="center_vertical"
                android:src="@drawable/img"></cn.edu.nchu.lab3exam02.ImageRound>
参考文章:菜鸟教程
我正在学习如何使用Nokogiri,根据这段代码我遇到了一些问题:require'rubygems'require'mechanize'post_agent=WWW::Mechanize.newpost_page=post_agent.get('http://www.vbulletin.org/forum/showthread.php?t=230708')puts"\nabsolutepathwithtbodygivesnil"putspost_page.parser.xpath('/html/body/div/div/div/div/div/table/tbody/tr/td/div
我有一个Ruby程序,它使用rubyzip压缩XML文件的目录树。gem。我的问题是文件开始变得很重,我想提高压缩级别,因为压缩时间不是问题。我在rubyzipdocumentation中找不到一种为创建的ZIP文件指定压缩级别的方法。有人知道如何更改此设置吗?是否有另一个允许指定压缩级别的Ruby库? 最佳答案 这是我通过查看rubyzip内部创建的代码。level=Zlib::BEST_COMPRESSIONZip::ZipOutputStream.open(zip_file)do|zip|Dir.glob("**/*")d
类classAprivatedeffooputs:fooendpublicdefbarputs:barendprivatedefzimputs:zimendprotecteddefdibputs:dibendendA的实例a=A.new测试a.foorescueputs:faila.barrescueputs:faila.zimrescueputs:faila.dibrescueputs:faila.gazrescueputs:fail测试输出failbarfailfailfail.发送测试[:foo,:bar,:zim,:dib,:gaz].each{|m|a.send(m)resc
很好奇,就使用rubyonrails自动化单元测试而言,你们正在做什么?您是否创建了一个脚本来在cron中运行rake作业并将结果邮寄给您?git中的预提交Hook?只是手动调用?我完全理解测试,但想知道在错误发生之前捕获错误的最佳实践是什么。让我们理所当然地认为测试本身是完美无缺的,并且可以正常工作。下一步是什么以确保他们在正确的时间将可能有害的结果传达给您? 最佳答案 不确定您到底想听什么,但是有几个级别的自动代码库控制:在处理某项功能时,您可以使用类似autotest的内容获得关于哪些有效,哪些无效的即时反馈。要确保您的提
假设我做了一个模块如下:m=Module.newdoclassCendend三个问题:除了对m的引用之外,还有什么方法可以访问C和m中的其他内容?我可以在创建匿名模块后为其命名吗(就像我输入“module...”一样)?如何在使用完匿名模块后将其删除,使其定义的常量不再存在? 最佳答案 三个答案:是的,使用ObjectSpace.此代码使c引用你的类(class)C不引用m:c=nilObjectSpace.each_object{|obj|c=objif(Class===objandobj.name=~/::C$/)}当然这取决于
我正在尝试使用ruby和Savon来使用网络服务。测试服务为http://www.webservicex.net/WS/WSDetails.aspx?WSID=9&CATID=2require'rubygems'require'savon'client=Savon::Client.new"http://www.webservicex.net/stockquote.asmx?WSDL"client.get_quotedo|soap|soap.body={:symbol=>"AAPL"}end返回SOAP异常。检查soap信封,在我看来soap请求没有正确的命名空间。任何人都可以建议我
关闭。这个问题是opinion-based.它目前不接受答案。想要改进这个问题?更新问题,以便editingthispost可以用事实和引用来回答它.关闭4年前。Improvethisquestion我想在固定时间创建一系列低音和高音调的哔哔声。例如:在150毫秒时发出高音调的蜂鸣声在151毫秒时发出低音调的蜂鸣声200毫秒时发出低音调的蜂鸣声250毫秒的高音调蜂鸣声有没有办法在Ruby或Python中做到这一点?我真的不在乎输出编码是什么(.wav、.mp3、.ogg等等),但我确实想创建一个输出文件。
我在我的项目目录中完成了compasscreate.和compassinitrails。几个问题:我已将我的.sass文件放在public/stylesheets中。这是放置它们的正确位置吗?当我运行compasswatch时,它不会自动编译这些.sass文件。我必须手动指定文件:compasswatchpublic/stylesheets/myfile.sass等。如何让它自动运行?文件ie.css、print.css和screen.css已放在stylesheets/compiled。如何在编译后不让它们重新出现的情况下删除它们?我自己编译的.sass文件编译成compiled/t
我想将html转换为纯文本。不过,我不想只删除标签,我想智能地保留尽可能多的格式。为插入换行符标签,检测段落并格式化它们等。输入非常简单,通常是格式良好的html(不是整个文档,只是一堆内容,通常没有anchor或图像)。我可以将几个正则表达式放在一起,让我达到80%,但我认为可能有一些现有的解决方案更智能。 最佳答案 首先,不要尝试为此使用正则表达式。很有可能你会想出一个脆弱/脆弱的解决方案,它会随着HTML的变化而崩溃,或者很难管理和维护。您可以使用Nokogiri快速解析HTML并提取文本:require'nokogiri'h
我想为Heroku构建一个Rails3应用程序。他们使用Postgres作为他们的数据库,所以我通过MacPorts安装了postgres9.0。现在我需要一个postgresgem并且共识是出于性能原因你想要pggem。但是我对我得到的错误感到非常困惑当我尝试在rvm下通过geminstall安装pg时。我已经非常明确地指定了所有postgres目录的位置可以找到但仍然无法完成安装:$envARCHFLAGS='-archx86_64'geminstallpg--\--with-pg-config=/opt/local/var/db/postgresql90/defaultdb/po
