@作者 : SYFStrive
@博客首页 : HomePage
📌:个人社区(欢迎大佬们加入) 👉:社区链接🔗
📌:觉得文章不错可以点点关注 👉:专栏连接🔗
💃:程序员每天坚持锻炼💪
👉 飞机大战专栏(🔥)
目录
单例模式是1种设计模式:👉(Design pattern)代表了最佳的实践,通常被有经验的面向对象的软件开发人员所采用。设计模式是软件开发人员在软件开发过程中面临的一般问题的解决方案。这些解决方案是众多软件开发人员经过相当长的一段时间的试验和错误总结出来的。
单例使用说明:“单例模式是指在内存中只会创建一次对象的设计模式,并且确保一个类只有实例,而且会自行实例化,并向整个系统提供这个实例。
using UnityEngine;

//摘要:Base class for everything attached to GameObjects.
//Component中文说明:所有能挂载到游戏对象上的类型基类
public class Singleton<T> : MonoBehaviour where T :Component
{
    public static T Instance { get; private set; }

    protected virtual void Awake()
    {
        Instance = this as T;
    }
}
using System.Collections;
using System.Collections.Generic;
using UnityEngine;

public class Projectile : MonoBehaviour
{
    //子弹的移动速度
    [SerializeField] float moveSpeed;
    //子弹的移动方向
    [SerializeField] protected Vector3 moveDirection;
    //子弹移动的Obj
    protected GameObject targer;

    protected virtual void OnEnable()
    {
        StartCoroutine(ProjectileMoveIE());
    }

    IEnumerator ProjectileMoveIE()
    {
        while (true)
        {
            //子弹移动
            transform.position += moveSpeed * moveDirection * Time.deltaTime;
            yield return null;
        }
    }
}
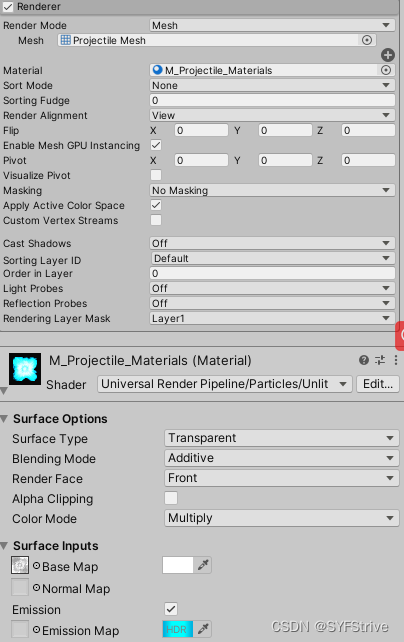
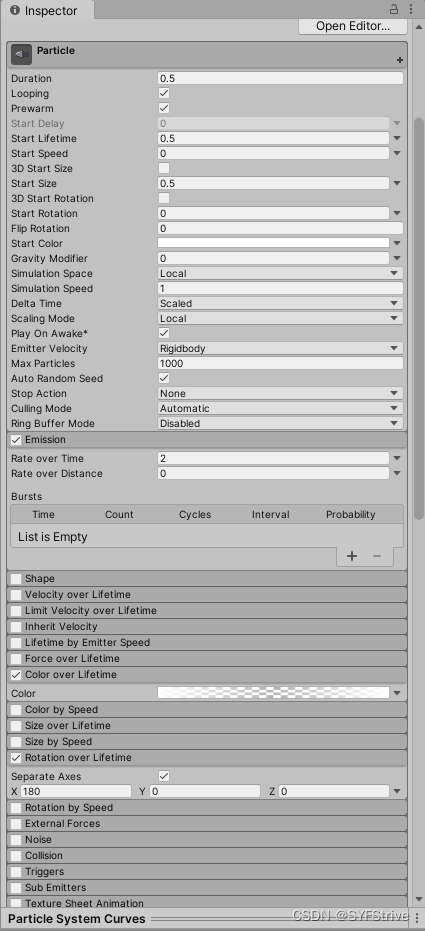
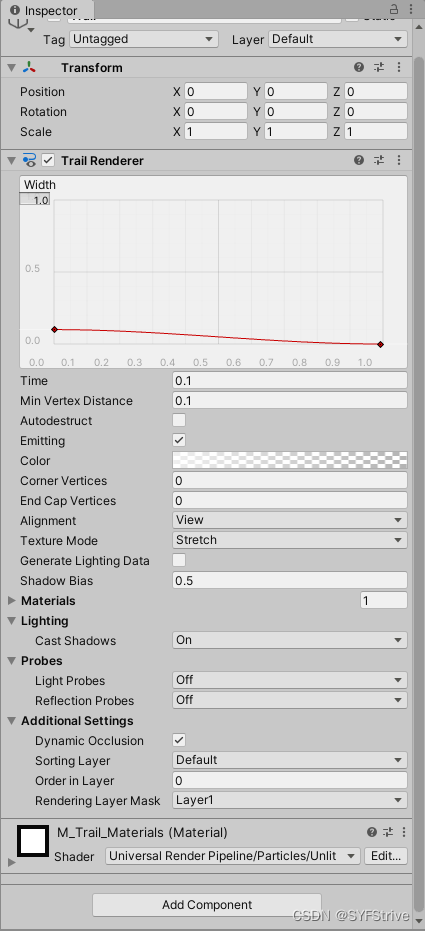
窗口如 👇
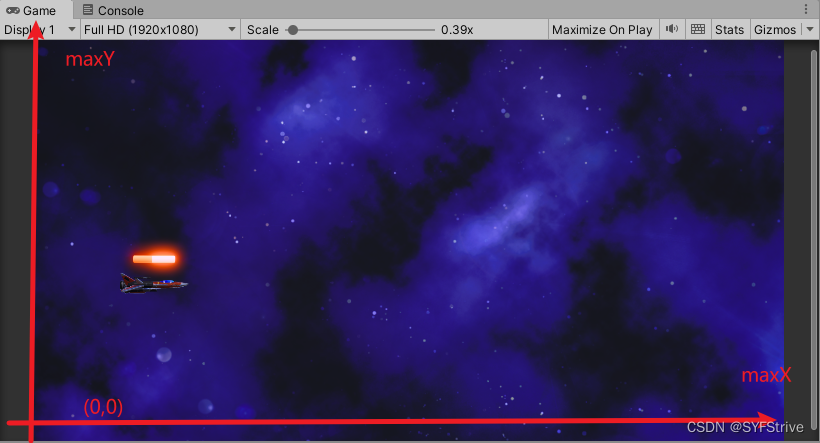
说明:因为是工具脚本所以续成范型单例
视口脚本Viewport 如 👇
using UnityEngine;

public class Viewport : Singleton<Viewport>
{
    //限制player的镜头
    private float maxX;
    private float minX;
    private float maxY;
    private float minY;

    private void Start()
    {
        //获取摄像机
        Camera camera = Camera.main;

        //屏幕坐标转换为世界坐标
        Vector2 bottomLeft = camera.ViewportToWorldPoint(Vector3.zero);
        Vector2 topRight = camera.ViewportToWorldPoint(Vector3.one);

        //获取对应的X、Y值
        maxX = topRight.x;
        minX = bottomLeft.x;
        maxY = topRight.y;
        minY = bottomLeft.y;
    }

	/// <summary>
	/// 限制Player的坐标
	/// </summary>
	/// <param name="playerPosition">玩家位置</param>
	/// <param name="paddingX">X的偏移量</param>
	/// <param name="paddingY">Y的偏移量</param>
	/// <returns></returns>
	public Vector3 AstrictPlayerPosition(Vector3 playerPosition,float paddingX,float paddingY)
   {
      //初始位置
      Vector3 intaialPosition = Vector3.zero;

      //Mathf.Clamp参数说明(值,最小值,最大值)
      //paddingX、paddingY 限制飞机一半身体超出视口外偏移量
      intaialPosition.x = Mathf.Clamp(playerPosition.x, minX+ paddingX, maxX- paddingX);
      intaialPosition.y = Mathf.Clamp(playerPosition.y, minY+ paddingY, maxY- paddingY);

      //返回位置
      return intaialPosition;
   }
}
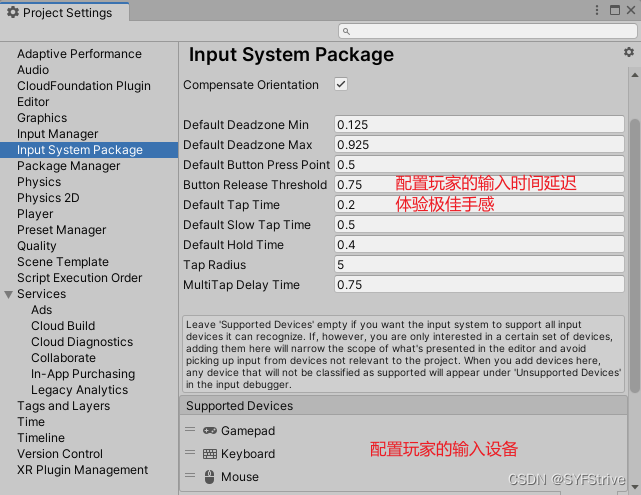
实现共能: 添加系统事件 👉 使系统事件与新输入系统绑定
添加代码如 👇
using UnityEngine;
//运行时自动添加Rigidbody组件
[RequireComponent(typeof(Rigidbody2D))]
public class Player : MonoBehaviour
{

  	[Header("---Input---")]
    [SerializeField]PlayerInput playerInput;

    //获取刚体
    private new Rigidbody2D rigidbody;

	[Header("---Move---")]
    //移动的速度
    [SerializeField] float moveSpeed=10;

    //限制飞机的一半身体超出视口
    float paddingX;
    float paddingY;

    private void Awake()
    {
        //获取刚体组件
        rigidbody=GetComponent<Rigidbody2D>();
    }
    private void Start()
    {
        //初始化重力为0
        rigidbody.gravityScale = 0f;
        //初始化激活动作表
        playerInput.AstrictImport();

    //玩家的尺度
    //GetComponent<MeshFilter>().sharedMesh.bounds.size获得的是未经缩放的大小。
    //GetComponent<Renderer>().bounds.size获得是是经过缩放后的大小。
    var size = transform.GetChild(0).GetComponent<Renderer>().bounds.size;
    paddingX = size.x / 2;
    paddingY = size.y / 2;
    }

    private void OnEnable()
    {
        //订阅事件
        playerInput.onMove += Move;
        playerInput.onStopMove += StopMove;
    }

    private void OnDisable()
    {
        //移除事件
        playerInput.onMove -= Move;
        playerInput.onStopMove -= StopMove;
    }

    /// <summary>
    /// 移动
    /// </summary>
    private void Move(Vector2 moveInput)
    {
        //好理解先接受移动的值
        var moveSpeedS = moveInput * moveSpeed;
        //刚体移动
        rigidbody.velocity= moveSpeedS;
    }

    /// <summary>
    /// 停止移动
    /// </summary>
    private void StopMove()
    {
        //刚体移动
        rigidbody.velocity = Vector3.zero;
	    //停止携程(限制范围)
	    StopCoroutine("AstrictPlayerPositionIE");
    }

	/// <summary>
	/// 移动
	/// </summary>
	private void Move(Vector2 moveInput)
	{
	    //好理解先接受移动的值
	    var moveSpeedS = moveInput * moveSpeed;
	    //刚体移动
	    rigidbody.velocity= moveSpeedS;
	    //开启携程(限制范围)
	    StartCoroutine("AstrictPlayerPositionIE");
	}

	//限制飞机的位置 方法:1、可以在Update调用(消耗性能的神) 2、可以在携程调用(这里使用携程)
	IEnumerator AstrictPlayerPositionIE()
	{
	    while (true)
	    {
	        transform.position = Viewport.Instance.AstrictPlayerPosition(transform.position, paddingX, paddingY);

	        yield return null;
	    }
	}
}
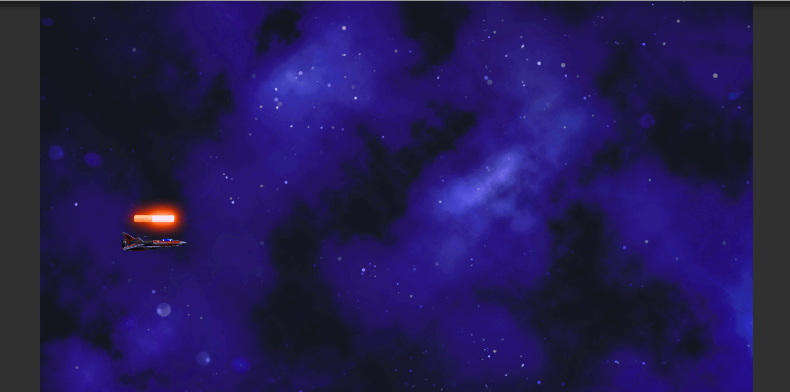
效果如 👇

实现共能: 实现加速与减速携程
添加代码如 👇
using UnityEngine;
//运行时自动添加Rigidbody组件
[RequireComponent(typeof(Rigidbody2D))]
public class Player : MonoBehaviour
{
  	[Header("---Input---")]
    [SerializeField]PlayerInput playerInput;

    //获取刚体
    private new Rigidbody2D rigidbody;

	  [Header("---Move---")]
	  //移动的速度
	  [SerializeField] float moveSpeed = 10;
	  //限制飞机的一半身体超出视口
	  float paddingX;
	  float paddingY;
	  //飞机的加速与减速时间
	  [SerializeField] float speedUpTime = 3;
	  [SerializeField] float speedCutTime = 3;
	  //飞机移动旋转的角度
	  [SerializeField] float playerMoveRosition = 10;
	  //防止被刚体碰到短暂停止BUG
	  private Vector2 moveDirection;
	  //玩家移动旋转的初始化值 防止频繁触发GC
	  private float t;
	  private Vector2 moveVelocity;
	  private Quaternion moveQuaternion;
	  private WaitForFixedUpdate moveWaitForFixedUpdate = new WaitForFixedUpdate();

	  [Header("---停止待参数的携程---")]

	  //停止携程的第三种方法
	  private Coroutine moveCoroutine;
	  private Coroutine relfRecoverCoroutine;


    private void Awake()
    {
        //获取刚体组件
        rigidbody=GetComponent<Rigidbody2D>();
    }
    private void Start()
    {
        //初始化重力为0
        rigidbody.gravityScale = 0f;
        //初始化激活动作表
        playerInput.AstrictImport();
	    //视口的尺度
	    //GetComponent<MeshFilter>().sharedMesh.bounds.size获得的是未经缩放的大小。
	    //GetComponent<Renderer>().bounds.size获得是是经过缩放后的大小。
	    var size = transform.GetChild(0).GetComponent<Renderer>().bounds.size;
	    paddingX = size.x / 2;
	    paddingY = size.y / 2;
    }

    private void OnEnable()
    {
        //订阅事件
        playerInput.onMove += Move;
        playerInput.onStopMove += StopMove;
    }

    private void OnDisable()
    {
        //移除事件
        playerInput.onMove -= Move;
        playerInput.onStopMove -= StopMove;
    }

	  #region Move
	  /// <summary>
	  /// 玩家移动
	  /// </summary>
	  private void Move(Vector2 moveInput)
	  {
	    //再次移动前应该停止之前的携程(使用第三种参数停止携程)
	    if (moveCoroutine != null)
	      StopCoroutine(moveCoroutine);

	    好理解先接受移动的值
	    //var moveSpeedS = moveInput * moveSpeed;
	    刚体移动
	    //rigidbody.velocity= moveSpeedS;

	    //移动的初始值
	    moveDirection = moveInput.normalized;
	    //获取旋转的值
	    Quaternion moveRosition = Quaternion.AngleAxis(playerMoveRosition * moveInput.y, Vector3.right);
	    //开启携程(限制加速减速)
	    moveCoroutine = StartCoroutine(PlayerMoveCoroutine(speedUpTime, moveDirection * moveSpeed, moveRosition));
	    //开启携程(限制范围)
	    stopMoveCoroutine = StartCoroutine(nameof(AstrictPlayerPositionIE));
	  }

	  /// <summary>
	  /// 停止移动
	  /// </summary>
	  private void StopMove()
	  {
	    //再次移动前应该停止之前的携程(使用第三种参数停止携程)
	    if (moveCoroutine != null)
	      StopCoroutine(moveCoroutine);

	    刚体移动
	    //rigidbody.velocity = Vector3.zero;

	    //停止携程(限制加速减速)
	    moveDirection = Vector3.zero;
	    moveCoroutine = StartCoroutine(PlayerMoveCoroutine(speedCutTime, moveDirection, Quaternion.identity));

	    //停止携程(限制范围)
	    StopCoroutine(stopMoveCoroutine);
	  }


	//限制飞机的位置 方法:1、可以在Update调用(消耗性能的神) 2、可以在携程调用(这里使用携程)
	IEnumerator AstrictPlayerPositionIE()
	{
	    while (true)
	    {
	        transform.position = Viewport.Instance.AstrictPlayerPosition(transform.position, paddingX, paddingY);

	        yield return null;
	    }
	}


	/// <summary>
	/// 加速与减速携程
	/// </summary>
	/// <param name="time">加速的时间</param>
	/// <param name="moveTarget">移动的目标位置</param>
	/// <param name="rositionTarget">旋转的目标位置</param>
	/// <returns></returns>
	IEnumerator PlayerMoveCoroutine(float time, Vector2 moveTarget, Quaternion rositionTarget)
	{
	  t = 0f;
	  //初始化移动速度
	  moveVelocity = rigidbody.velocity;
	  //初始化旋转角度
	  moveQuaternion = transform.rotation;

	  while (t < 1f)
	  {
	    t += Time.fixedDeltaTime / time;

	    //lerp移动体验极佳手感
	    rigidbody.velocity = Vector2.Lerp(moveVelocity, moveTarget, t);

	    //玩家移动旋转
	    transform.rotation = Quaternion.Lerp(moveQuaternion, rositionTarget, t);

	    //空返回
	    yield return moveWaitForFixedUpdate;
	  }
	}
	#endregion

	  /// <summary>
	  /// 停止移动
	  /// </summary>
	  private void StopMove()
	  {
	    //再次移动前应该停止之前的携程(使用第三种参数停止携程)
	    if (moveCoroutine != null)
	      StopCoroutine(moveCoroutine);

	    刚体移动
	    //rigidbody.velocity = Vector3.zero;

	    刚体移动
	    //rigidbody.velocity = Vector3.zero;

	    //停止携程(限制加速减速)
	    moveDirection = Vector3.zero;
	    moveCoroutine = StartCoroutine(PlayerMoveCoroutine(speedCutTime, moveDirection, Quaternion.identity));

	    //停止携程(限制范围)
	    StopCoroutine(stopMoveCoroutine);
	  }
}

相机处理如 👇
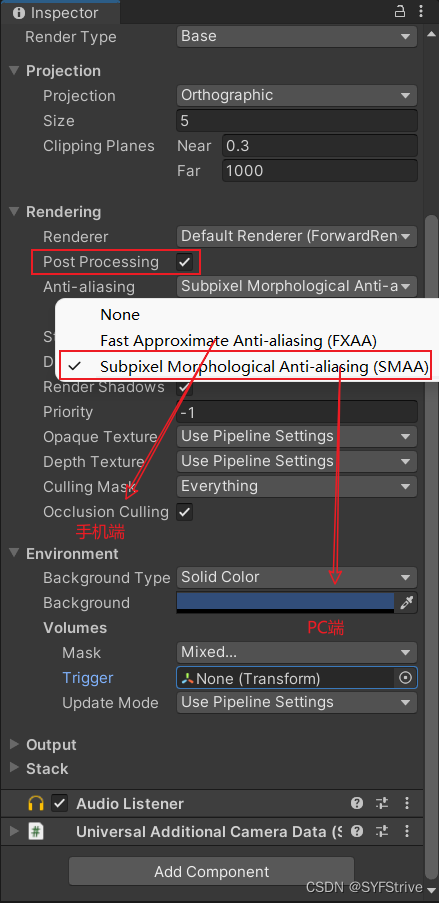
添加后处理效果
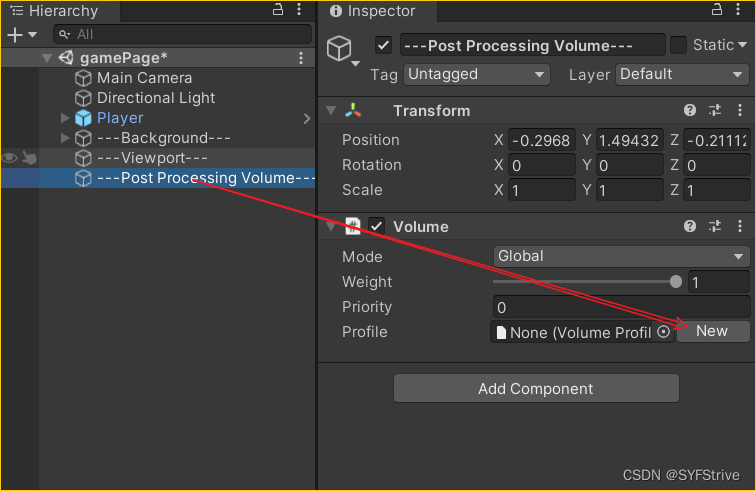
说明:当主摄像机碰到局部Volume对象的碰撞体后就会应用这个局部的镜头变形效果。
使用场景:水波纹等效果。
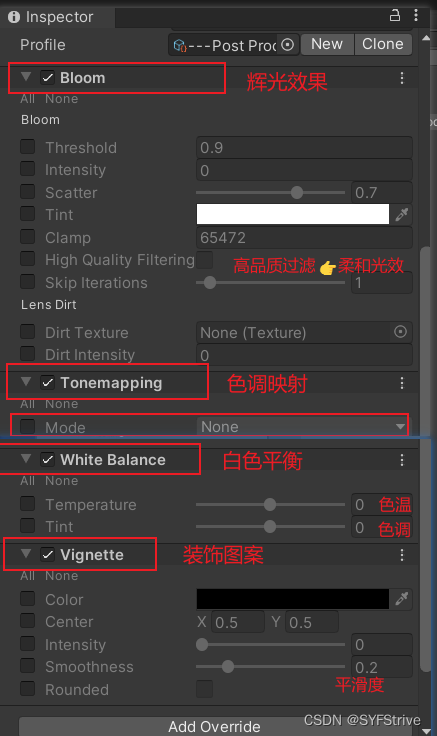
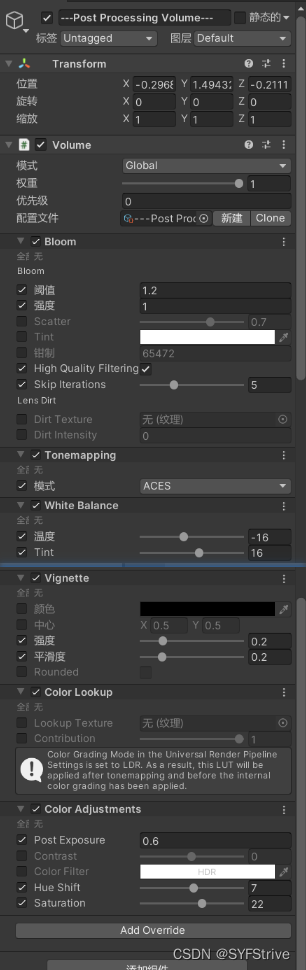
后处理参数如 👇

实现:每按下时发射子弹
using UnityEngine;
public class PlayerProjectile : Projectile
{

}
public class Player : MonoBehaviour
{
	  [Header("---Fire---")]
	  //子弹的预制体
	  [SerializeField] GameObject ProjectileTOP90;
	  [SerializeField] GameObject ProjectileTOP;
	  [SerializeField] GameObject ProjectileCenter;
	  [SerializeField] GameObject ProjectileDown;
	  [SerializeField] GameObject ProjectileDown90;

	  //子弹模式
	  [SerializeField, Range(0, 4)] int attackPattern = 0;

	  //发射的位置
	  [SerializeField] Transform fireTranPosTop90;
	  [SerializeField] Transform fireTranPosCenter;
	  [SerializeField] Transform fireTranPosTop;
	  [SerializeField] Transform fireTranPosDown;
	  [SerializeField] Transform fireTranPosDown90;

	  //发射子弹的间隔
	  [SerializeField] float fireTime = 0.3f;
	  //发射子弹间隔携程
	  WaitForSeconds fireProjectileTimeIE;
	  //生命自动恢复的间隔携程
	  WaitForSeconds selfRecoverTimeIE;
	  //使用技能下的开火时间携程
	  WaitForSeconds areSkillFireProjectileTimeIE;

  //发射子弹携程
  IEnumerator FireProjectileIE()
  {
    //创建预制体
    while (true)
    {
	  Instantiate(projectile1, fireTranPosCenter.position, Quaternion.identity);

      //协程间隔 👉 判断是否是仅能子弹
      yield return isEnetgySkill ? areSkillFireProjectileTimeIE : fireProjectileTimeIE;
	}
  }
}
ProjectileDestroy 实现如 👇
using System.Collections;
using UnityEngine;

public class ProjectileDestroy : MonoBehaviour
{
  //删除或隐藏的间隔时间
  [SerializeField] float destroyTimer=1.3f;
  //是否删除
  [SerializeField] bool isDestroy;
  //删除的子弹的间隔携程
  [SerializeField] WaitForSeconds destroyTime;

  private void Awake()
  {
    //初始化
    destroyTime = new WaitForSeconds(destroyTimer);
  }
  private void OnEnable()
  {
    //显示时执行携程
    StartCoroutine(DestroyProjectile());
  }


  IEnumerator DestroyProjectile()
  {
    yield return destroyTime;

    if (isDestroy)
    {
      Destroy(gameObject);
    }
    else
    {
      gameObject.SetActive(false);
    }
  }
}
本文到这里就结束了,大佬们的支持是我持续更新的最大动力,希望这篇文章能帮到大家💪
下篇文章再见ヾ( ̄▽ ̄)ByeBye
我正在学习如何使用Nokogiri,根据这段代码我遇到了一些问题:require'rubygems'require'mechanize'post_agent=WWW::Mechanize.newpost_page=post_agent.get('http://www.vbulletin.org/forum/showthread.php?t=230708')puts"\nabsolutepathwithtbodygivesnil"putspost_page.parser.xpath('/html/body/div/div/div/div/div/table/tbody/tr/td/div
我有一个Ruby程序,它使用rubyzip压缩XML文件的目录树。gem。我的问题是文件开始变得很重,我想提高压缩级别,因为压缩时间不是问题。我在rubyzipdocumentation中找不到一种为创建的ZIP文件指定压缩级别的方法。有人知道如何更改此设置吗?是否有另一个允许指定压缩级别的Ruby库? 最佳答案 这是我通过查看rubyzip内部创建的代码。level=Zlib::BEST_COMPRESSIONZip::ZipOutputStream.open(zip_file)do|zip|Dir.glob("**/*")d
类classAprivatedeffooputs:fooendpublicdefbarputs:barendprivatedefzimputs:zimendprotecteddefdibputs:dibendendA的实例a=A.new测试a.foorescueputs:faila.barrescueputs:faila.zimrescueputs:faila.dibrescueputs:faila.gazrescueputs:fail测试输出failbarfailfailfail.发送测试[:foo,:bar,:zim,:dib,:gaz].each{|m|a.send(m)resc
很好奇,就使用rubyonrails自动化单元测试而言,你们正在做什么?您是否创建了一个脚本来在cron中运行rake作业并将结果邮寄给您?git中的预提交Hook?只是手动调用?我完全理解测试,但想知道在错误发生之前捕获错误的最佳实践是什么。让我们理所当然地认为测试本身是完美无缺的,并且可以正常工作。下一步是什么以确保他们在正确的时间将可能有害的结果传达给您? 最佳答案 不确定您到底想听什么,但是有几个级别的自动代码库控制:在处理某项功能时,您可以使用类似autotest的内容获得关于哪些有效,哪些无效的即时反馈。要确保您的提
假设我做了一个模块如下:m=Module.newdoclassCendend三个问题:除了对m的引用之外,还有什么方法可以访问C和m中的其他内容?我可以在创建匿名模块后为其命名吗(就像我输入“module...”一样)?如何在使用完匿名模块后将其删除,使其定义的常量不再存在? 最佳答案 三个答案:是的,使用ObjectSpace.此代码使c引用你的类(class)C不引用m:c=nilObjectSpace.each_object{|obj|c=objif(Class===objandobj.name=~/::C$/)}当然这取决于
我正在尝试使用ruby和Savon来使用网络服务。测试服务为http://www.webservicex.net/WS/WSDetails.aspx?WSID=9&CATID=2require'rubygems'require'savon'client=Savon::Client.new"http://www.webservicex.net/stockquote.asmx?WSDL"client.get_quotedo|soap|soap.body={:symbol=>"AAPL"}end返回SOAP异常。检查soap信封,在我看来soap请求没有正确的命名空间。任何人都可以建议我
关闭。这个问题是opinion-based.它目前不接受答案。想要改进这个问题?更新问题,以便editingthispost可以用事实和引用来回答它.关闭4年前。Improvethisquestion我想在固定时间创建一系列低音和高音调的哔哔声。例如:在150毫秒时发出高音调的蜂鸣声在151毫秒时发出低音调的蜂鸣声200毫秒时发出低音调的蜂鸣声250毫秒的高音调蜂鸣声有没有办法在Ruby或Python中做到这一点?我真的不在乎输出编码是什么(.wav、.mp3、.ogg等等),但我确实想创建一个输出文件。
我在我的项目目录中完成了compasscreate.和compassinitrails。几个问题:我已将我的.sass文件放在public/stylesheets中。这是放置它们的正确位置吗?当我运行compasswatch时,它不会自动编译这些.sass文件。我必须手动指定文件:compasswatchpublic/stylesheets/myfile.sass等。如何让它自动运行?文件ie.css、print.css和screen.css已放在stylesheets/compiled。如何在编译后不让它们重新出现的情况下删除它们?我自己编译的.sass文件编译成compiled/t
我想将html转换为纯文本。不过,我不想只删除标签,我想智能地保留尽可能多的格式。为插入换行符标签,检测段落并格式化它们等。输入非常简单,通常是格式良好的html(不是整个文档,只是一堆内容,通常没有anchor或图像)。我可以将几个正则表达式放在一起,让我达到80%,但我认为可能有一些现有的解决方案更智能。 最佳答案 首先,不要尝试为此使用正则表达式。很有可能你会想出一个脆弱/脆弱的解决方案,它会随着HTML的变化而崩溃,或者很难管理和维护。您可以使用Nokogiri快速解析HTML并提取文本:require'nokogiri'h
我想为Heroku构建一个Rails3应用程序。他们使用Postgres作为他们的数据库,所以我通过MacPorts安装了postgres9.0。现在我需要一个postgresgem并且共识是出于性能原因你想要pggem。但是我对我得到的错误感到非常困惑当我尝试在rvm下通过geminstall安装pg时。我已经非常明确地指定了所有postgres目录的位置可以找到但仍然无法完成安装:$envARCHFLAGS='-archx86_64'geminstallpg--\--with-pg-config=/opt/local/var/db/postgresql90/defaultdb/po