SpringCloud Alibaba全集文章目录:
一、手把手教你搭建SpringCloud Alibaba之生产者与消费者
二、手把手教你搭建SpringCloudAlibaba之Nacos服务注册中心
三、手把手教你搭建SpringCloudAlibaba之Nacos服务配置中心
四、手把手教你搭建SpringCloudAlibaba之Nacos服务集群配置
五、手把手教你搭建SpringCloudAlibaba之Nacos服务持久化配置
六、手把手教你搭建SpringCloudAlibaba之Sentinel实现流量实时监控
七、手把手教你搭建SpringCloudAlibaba之Sentinel实现流量控制
八、手把手教你搭建SpringCloudAlibaba之Sentinel服务降级
九、手把手教你搭建SpringCloudAlibaba之Sentinel热点key限流
十、手把手教你搭建SpringCloudAlibaba之Sentinel系统保护规则
十一、手把手教你搭建SpringCloudAlibaba之Sentinel服务熔断
十二、手把手教你搭建SpringCloudAlibaba之Sentinel规则持久化
十三、手把手教你搭建SpringCloudAlibaba之Seata分布式事务
点击跳转学习 -------------->手把手教你搭建SpringCloud项目
1、直接贴父项目的pom文件
<?xml version="1.0" encoding="UTF-8"?>
<project xmlns="http://maven.apache.org/POM/4.0.0"
xmlns:xsi="http://www.w3.org/2001/XMLSchema-instance"
xsi:schemaLocation="http://maven.apache.org/POM/4.0.0 http://maven.apache.org/xsd/maven-4.0.0.xsd">
<modelVersion>4.0.0</modelVersion>
<groupId>com.study.springcloud</groupId>
<artifactId>springcloud</artifactId>
<!-- 首先修改打包方式 -->
<packaging>pom</packaging>
<version>1.0-SNAPSHOT</version>
<!--引入其他的服务 -->
<modules>
</modules>
<properties>
<project.build.sourceEncoding>UTF-8</project.build.sourceEncoding>
<maven.compiler.source>1.8</maven.compiler.source>
<maven.compiler.target>1.8</maven.compiler.target>
<mysql.version>5.1.47</mysql.version>
<druid.version>1.1.10</druid.version>
<junit.version>4.1.2</junit.version>
<lombok.version>1.16.10</lombok.version>
<log4j.vsrsion>1.2.17</log4j.vsrsion>
</properties>
<!-- 因为是总项目 所以用dependencyManagement来管理 因为其他的子项目就不会来管理版本了了 可以直接引用 -->
<dependencyManagement>
<dependencies>
<!-- springcloud的依赖-->
<dependency>
<groupId>org.springframework.cloud</groupId>
<artifactId>spring-cloud-dependencies</artifactId>
<version>Hoxton.SR1</version>
<type>pom</type>
<scope>import</scope>
</dependency>
<!--spring-cloud-alibaba-->
<dependency>
<groupId>com.alibaba.cloud</groupId>
<artifactId>spring-cloud-alibaba-dependencies</artifactId>
<version>2.1.0.RELEASE</version>
<type>pom</type>
<scope>import</scope>
</dependency>
<!-- springboot的依赖-->
<dependency>
<groupId>org.springframework.boot</groupId>
<artifactId>spring-boot-dependencies</artifactId>
<version>2.2.2.RELEASE</version>
<type>pom</type>
<scope>import</scope>
</dependency>
<!-- 数据库-->
<dependency>
<groupId>mysql</groupId>
<artifactId>mysql-connector-java</artifactId>
<version>${mysql.version}</version>
</dependency>
<dependency>
<groupId>com.alibaba</groupId>
<artifactId>druid</artifactId>
<version>${druid.version}</version>
</dependency>
<!-- springboot启动器-->
<dependency>
<groupId>org.mybatis.spring.boot</groupId>
<artifactId>mybatis-spring-boot-starter</artifactId>
<version>1.3.2</version>
</dependency>
<!--单元测试 -->
<dependency>
<groupId>junit</groupId>
<artifactId>junit</artifactId>
<version>4.12</version>
</dependency>
<!-- lombok-->
<dependency>
<groupId>org.projectlombok</groupId>
<artifactId>lombok</artifactId>
<version>1.18.8</version>
</dependency>
<!-- log4j-->
<dependency>
<groupId>log4j</groupId>
<artifactId>log4j</artifactId>
<version>${log4j.vsrsion}</version>
</dependency>
<dependency>
<groupId>ch.qos.logback</groupId>
<artifactId>logback-core</artifactId>
<version>1.2.3</version>
</dependency>
</dependencies>
</dependencyManagement>
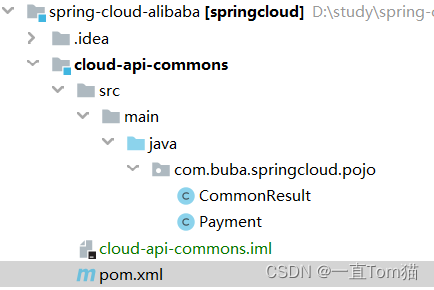
</project>2、新建Module命名为cloud-api-commons,用来存放实体类和公用的类。如下图:
使用到的pom文件:
<?xml version="1.0" encoding="UTF-8"?>
<project xmlns="http://maven.apache.org/POM/4.0.0"
         xmlns:xsi="http://www.w3.org/2001/XMLSchema-instance"
         xsi:schemaLocation="http://maven.apache.org/POM/4.0.0 http://maven.apache.org/xsd/maven-4.0.0.xsd">
    <parent>
        <artifactId>springcloud</artifactId>
        <groupId>com.study.springcloud</groupId>
        <version>1.0-SNAPSHOT</version>
    </parent>
    <modelVersion>4.0.0</modelVersion>

    <artifactId>cloud-api-commons</artifactId>
    <dependencies>
        <dependency>
            <groupId>org.springframework.boot</groupId>
            <artifactId>spring-boot-devtools</artifactId>
            <scope>runtime</scope>
            <optional>true</optional>
        </dependency>
        <dependency>
            <groupId>org.projectlombok</groupId>
            <artifactId>lombok</artifactId>
            <optional>true</optional>
        </dependency>
        <!-- 工具包-->
        <dependency>
            <groupId>cn.hutool</groupId>
            <artifactId>hutool-all</artifactId>
            <version>5.1.0</version>
        </dependency>
    </dependencies>

</project>
创建生产者实体类Payment
package com.buba.springcloud.pojo;


import lombok.AllArgsConstructor;
import lombok.Data;
import lombok.NoArgsConstructor;
import lombok.experimental.Accessors;

import java.io.Serializable;

@Data
@NoArgsConstructor
@AllArgsConstructor
@Accessors(chain = true)
public class Payment implements Serializable {
    private Long id;
    // 微服务 一个服务对应一个数据库,同一个信息可能存在不同的数据库
    private  String serial;
}
为了数据传输的方便,也为了前后端分离项目,我们将返回的数据进行封装,封装成一个实体类。
package com.buba.springcloud.pojo;


import lombok.AllArgsConstructor;
import lombok.Data;
import lombok.NoArgsConstructor;
import lombok.experimental.Accessors;

@Data
@NoArgsConstructor
@AllArgsConstructor
@Accessors(chain = true)
public class CommonResult<T> {

    private Integer code;//返回状态码
    private String  message;//返回是否调用成功
    private  T data; //返回的数据

    public CommonResult(Integer code, String message) {
        this(code,message,null);
    }

}
我们首先将该工程clean,确保当前工程的maven的配置是否成功。

出现如下界面说明当前工程的maven配置环境没有问题
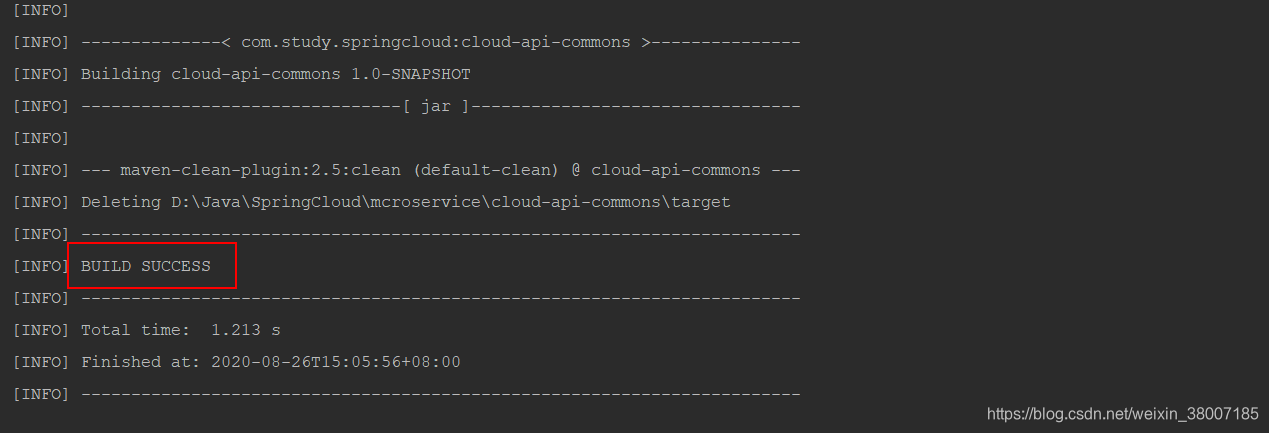
那接下来我们就开始install打包放到本地库中。如下为成功界面:

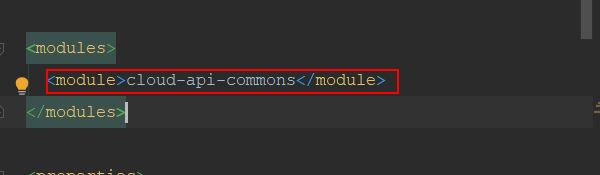
此时我们可以看到我们总工程的pom.xml文件成功引入了cloud-api-commons,如下图:
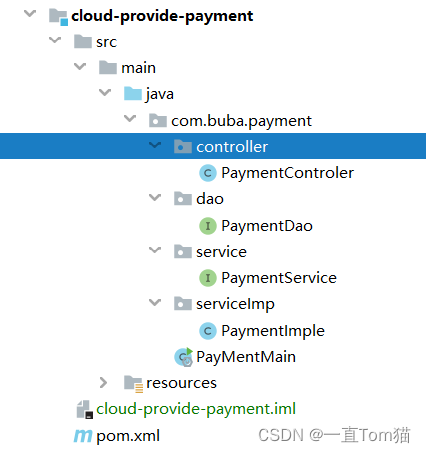
3、新建生产者Module命名为cloud-provide-payment,生产者我们可以这样理解就是我们的服务端,是我们使用代码写的业务逻辑接口,而消费者就是我们用户,用户通过app或者web调用我们生产者服务端的接口,获取信息。我们首先搭建一个专门放我们支付业务的服务,来让其他服务来调用使用。支付服务就是其中的一个生产者。
目录结构如下:
pom文件:
<?xml version="1.0" encoding="UTF-8"?>
<project xmlns="http://maven.apache.org/POM/4.0.0"
         xmlns:xsi="http://www.w3.org/2001/XMLSchema-instance"
         xsi:schemaLocation="http://maven.apache.org/POM/4.0.0 http://maven.apache.org/xsd/maven-4.0.0.xsd">
    <parent>
        <artifactId>springcloud</artifactId>
        <groupId>com.study.springcloud</groupId>
        <version>1.0-SNAPSHOT</version>
    </parent>
    <modelVersion>4.0.0</modelVersion>

    <artifactId>cloud-provide-payment</artifactId>

    <dependencies>

        <!-- 引入实体Module的包 -->
        <dependency>
            <groupId>com.study.springcloud</groupId>
            <artifactId>cloud-api-commons</artifactId>
            <version>${project.version}</version>
        </dependency>
        <dependency>
            <groupId>org.springframework.boot</groupId>
            <artifactId>spring-boot-starter-web</artifactId>
        </dependency>
        <dependency>
            <groupId>org.springframework.boot</groupId>
            <artifactId>spring-boot-starter-actuator</artifactId>
        </dependency>
        <dependency>
            <groupId>org.mybatis.spring.boot</groupId>
            <artifactId>mybatis-spring-boot-starter</artifactId>
        </dependency>
        <dependency>
            <groupId>com.alibaba</groupId>
            <artifactId>druid-spring-boot-starter</artifactId>
            <version>1.1.10</version>
        </dependency>
        <!--mysql-connector-java-->
        <dependency>
            <groupId>mysql</groupId>
            <artifactId>mysql-connector-java</artifactId>
        </dependency>
        <!--jdbc-->
        <dependency>
            <groupId>org.springframework.boot</groupId>
            <artifactId>spring-boot-starter-jdbc</artifactId>
        </dependency>
        <dependency>
            <groupId>org.springframework.boot</groupId>
            <artifactId>spring-boot-devtools</artifactId>
            <scope>runtime</scope>
            <optional>true</optional>
        </dependency>
        <dependency>
            <groupId>org.projectlombok</groupId>
            <artifactId>lombok</artifactId>
            <optional>true</optional>
        </dependency>
        <dependency>
            <groupId>org.springframework.boot</groupId>
            <artifactId>spring-boot-starter-test</artifactId>
            <scope>test</scope>
        </dependency>
    </dependencies>

</project>
在resources文件下新建application.yml配置文件
server:
  port: 8001 #服务端口
#spring相关配置
spring:
  application:
    name: mcroservice-payment  #服务名
  datasource:
    type: com.alibaba.druid.pool.DruidDataSource  #当前数据源操作类型
    driver-class-name: org.gjt.mm.mysql.Driver  #数据库驱动包
    url: jdbc:mysql://localhost:3306/db01?autoReconnect=true&useUnicode=true&characterEncoding=utf8&zeroDateTimeBehavior=convertToNull&useSSL=false
    username: root
    password: roo
#mybatis:配置
mybatis:
  mapperLocations: classpath:dao/*.xml
  type-aliases-package: com.buba.springcloud.pojo    # 所有pojo别名类所在包
启动类代码
package com.buba.payment;


import org.springframework.boot.SpringApplication;
import org.springframework.boot.autoconfigure.SpringBootApplication;
import org.springframework.cloud.client.discovery.EnableDiscoveryClient;

@SpringBootApplication
public class PayMentMain {
    public static void main(String[] args) {
        SpringApplication.run(PayMentMain.class,args);
    }
}
下面开始写业务,就是三层结构,如下图:

PaymentDao.java代码
package com.buba.payment.dao;


import com.buba.springcloud.pojo.Payment;
import org.apache.ibatis.annotations.Mapper;
import org.apache.ibatis.annotations.Param;
import org.springframework.stereotype.Repository;

@Mapper
@Repository
public interface PaymentDao {
    int create(Payment payment);
    Payment queryById(@Param("id")long id);
}
PaymentService.java代码
package com.buba.payment.service;

import com.buba.springcloud.pojo.Payment;
import org.apache.ibatis.annotations.Param;

public interface PaymentService {
    int create(Payment payment);

    Payment queryById(@Param("id")long id);
}
PaymentImple.java代码
package com.buba.payment.serviceImp;

import com.buba.payment.dao.PaymentDao;
import com.buba.payment.service.PaymentService;
import com.buba.springcloud.pojo.Payment;
import org.springframework.beans.factory.annotation.Autowired;
import org.springframework.stereotype.Service;

@Service
public class PaymentImple implements PaymentService {


    @Autowired
    PaymentDao paymentDao;

    @Override
    public int create(Payment payment) {
        return paymentDao.create(payment);
    }

    @Override
    public Payment queryById(long id) {
        return paymentDao.queryById(id);
    }
}
PaymentControler.java代码
package com.buba.payment.controller;


import com.buba.payment.service.PaymentService;
import com.buba.springcloud.pojo.CommonResult;
import com.buba.springcloud.pojo.Payment;
import lombok.extern.slf4j.Slf4j;
import org.springframework.beans.factory.annotation.Autowired;
import org.springframework.web.bind.annotation.*;

@RestController
@Slf4j
public class PaymentControler {
    @Autowired
    private PaymentService paymentService;

    @PostMapping("/payment/create")
    public CommonResult create(@RequestBody Payment dept){
        int i = paymentService.create(dept);
        log.info("***************插入成功*******"+i);
        if(i>0){
            return new CommonResult(200,"插入数据库成功",i);
        }else{
            return new CommonResult(444,"插入数据库失败",null);
        }
    }
    @GetMapping("/payment/get/{id}")

    public CommonResult queryById(@PathVariable("id") Long id){
        Payment payment = paymentService.queryById(id);
        log.info("***************查询成功*********"+payment);
        if(payment!=null){
            return new CommonResult(200,"查询成功",payment);
        }else{
            return new CommonResult(444,"查询失败",null);
        }
    }

}
在resources\dao\文件夹下新建PaymentDao.xml文件,与PaymentDao映射,这里注意新建要新建spring的可识别的配置的xml文件,不会报错说找不到方法。
<?xml version="1.0" encoding="UTF-8"?>
<!DOCTYPE mapper
PUBLIC "-//mybatis.org//DTD Config 3.0//EN" "http://mybatis.org/dqueryByidtd/mybatis-3-mapper.dtd">
<mapper namespace="com.buba.payment.dao.PaymentDao">
<resultMap id="BaseResultMap" type="com.buba.springcloud.pojo.Payment">
<id column="id" property="id" jdbcType="BIGINT"/>
<id column="serial" property="serial" jdbcType="VARCHAR"/>
</resultMap>
<insert id="create" parameterType="com.buba.springcloud.pojo.Payment" useGeneratedKeys="true" keyProperty="id">
insert into payment (serial) values (#{serial});
</insert>
<select id="queryById" resultType="com.buba.springcloud.pojo.Payment" parameterType="Long" resultMap="BaseResultMap">
select * from payment where id = #{id};
</select>
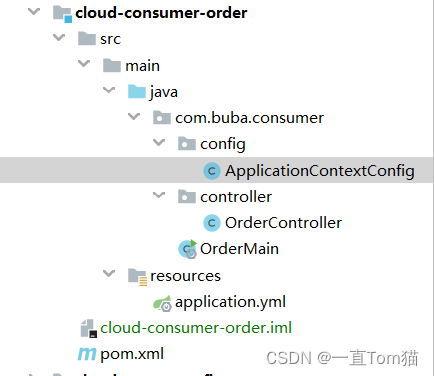
</mapper>4、新建消费者者Module命名为cloud-consumer-order,用来调用我们生产者的服务。
目录结构如下:
使用到的pom文件:
<?xml version="1.0" encoding="UTF-8"?>
<project xmlns="http://maven.apache.org/POM/4.0.0"
         xmlns:xsi="http://www.w3.org/2001/XMLSchema-instance"
         xsi:schemaLocation="http://maven.apache.org/POM/4.0.0 http://maven.apache.org/xsd/maven-4.0.0.xsd">
    <parent>
        <artifactId>springcloud</artifactId>
        <groupId>com.study.springcloud</groupId>
        <version>1.0-SNAPSHOT</version>
    </parent>
    <modelVersion>4.0.0</modelVersion>

    <artifactId>cloud-consumer-order</artifactId>
    <dependencies>

        <dependency>
            <!-- 引入实体的包-->
            <groupId>com.study.springcloud</groupId>
            <artifactId>cloud-api-commons</artifactId>
            <version>${project.version}</version>
        </dependency>
        <dependency>
            <groupId>org.springframework.boot</groupId>
            <artifactId>spring-boot-starter-web</artifactId>
        </dependency>
        <dependency>
            <groupId>org.springframework.boot</groupId>
            <artifactId>spring-boot-starter-actuator</artifactId>
        </dependency>

        <dependency>
            <groupId>org.projectlombok</groupId>
            <artifactId>lombok</artifactId>
            <optional>true</optional>
        </dependency>
        <dependency>
            <groupId>org.springframework.boot</groupId>
            <artifactId>spring-boot-starter-test</artifactId>
            <scope>test</scope>
        </dependency>
        <dependency>
            <groupId>com.study.springcloud</groupId>
            <artifactId>cloud-api-commons</artifactId>
            <version>1.0-SNAPSHOT</version>
            <scope>compile</scope>
        </dependency>

    </dependencies>


</project>
在resources文件下新建application.yml配置文件
server:
  port: 80
spring:
  application:
    name: mcroservice-order  #服务名
启动类代码
package com.buba.consumer;


import org.springframework.boot.SpringApplication;
import org.springframework.boot.autoconfigure.SpringBootApplication;
import org.springframework.cloud.client.discovery.EnableDiscoveryClient;

@SpringBootApplication
public class OrderMain {
    public static void main(String[] args) {
        SpringApplication.run(OrderMain.class,args);
    }
}
新建RestTemplate配置类注入到Spring中ioc容器中
这里服务间的调用,我们使用了RestTemplate,RestTemplate提供了多种便捷访问远程Http服务的方法,是一种简单便捷的访问restful服务的模板类,是spring提供的用于访问Rest服务的客户端模板工具集。
package com.buba.consumer.config;


import org.springframework.context.annotation.Bean;
import org.springframework.context.annotation.Configuration;
import org.springframework.web.client.RestTemplate;

@Configuration
public class ApplicationContextConfig {
    @Bean
    public RestTemplate getRestTemplate(){
        return new RestTemplate();
    }
}
消费者的业务调用接口OrderController.java
package com.buba.consumer.controller;


import com.buba.springcloud.pojo.CommonResult;
import com.buba.springcloud.pojo.Payment;
import lombok.extern.slf4j.Slf4j;
import org.springframework.beans.factory.annotation.Autowired;
import org.springframework.web.bind.annotation.GetMapping;
import org.springframework.web.bind.annotation.PathVariable;
import org.springframework.web.bind.annotation.RestController;
import org.springframework.web.client.RestTemplate;

@RestController
@Slf4j
public class OrderController {
    //调用支付订单服务端的ip+端口号
    public static final  String PAYMENT_URL = "http://localhost:8001";

    @Autowired
    private RestTemplate restTemplate;
    //创建支付订单的接口
    @GetMapping("/consumer/payment/create")
    public CommonResult<Payment> create(Payment payment){
        return restTemplate.postForObject(PAYMENT_URL+"/payment/create",payment, CommonResult.class);
    }
    //获取id获取支付订单
    @GetMapping("/consumer/payment/get/{id}")
    public CommonResult<Payment> getPayment(@PathVariable("id") Long id) {
        return restTemplate.getForObject(PAYMENT_URL + "/payment/get/" + id, CommonResult.class);

    }
}
公共服务,生产者服务和消费者服务就搭建完成啦。那我们现在就测试一下看看,支付消费者能否成功调用支付生产者。分别启动两个工程。首先自测一下生产者的服务是否可以访问,端口为8001,访问http://localhost:8001/payment/get/1,如下图可以访问成功,说明生产者的服务是没有问题的。

我们消费者的端口配置为80,访问就可以省略端口,直接输入:http://localhost/consumer/payment/get/1访问。成功获取到id为1的支付订单。

现在两个服务之间就可以调用啦。下节直接加入Ncaos,将这两个服务注册到我们Nacos当中。

我已经在Sinatra上创建了应用程序,它代表了一个简单的API。我想在生产和开发上进行部署。我想在部署时选择,是开发还是生产,一些方法的逻辑应该改变,这取决于部署类型。是否有任何想法,如何完成以及解决此问题的一些示例。例子:我有代码get'/api/test'doreturn"Itisdev"end但是在部署到生产环境之后我想在运行/api/test之后看到ItisPROD如何实现? 最佳答案 根据SinatraDocumentation:EnvironmentscanbesetthroughtheRACK_ENVenvironm
您如何在Rails中的实时服务器上进行有效调试,无论是在测试版/生产服务器上?我试过直接在服务器上修改文件,然后重启应用,但是修改好像没有生效,或者需要很长时间(缓存?)我也试过在本地做“脚本/服务器生产”,但是那很慢另一种选择是编码和部署,但效率很低。有人对他们如何有效地做到这一点有任何见解吗? 最佳答案 我会回答你的问题,即使我不同意这种热修补服务器代码的方式:)首先,你真的确定你已经重启了服务器吗?您可以通过跟踪日志文件来检查它。您更改的代码显示的View可能会被缓存。缓存页面位于tmp/cache文件夹下。您可以尝试手动删除
Unity自动旋转动画1.开门需要门把手先动,门再动2.关门需要门先动,门把手再动3.中途播放过程中不可以再次进行操作觉得太复杂?查看我的文章开关门简易进阶版效果:如果这个门可以直接打开的话,就不需要放置"门把手"如果门把手还有钥匙需要旋转,那就可以把钥匙放在门把手的"门把手",理论上是可以无限套娃的可调整参数有:角度,反向,轴向,速度运行时点击Test进行测试自己写的代码比较垃圾,命名与结构比较拉,高手轻点喷,新手有类似的需求可以拿去做参考上代码usingSystem.Collections;usingSystem.Collections.Generic;usingUnityEngine;u
假设我有200个昂贵的方法调用(每个都有不同的参数)。出于某种原因,我可以并行执行其中的5个调用,但不能更多。我可以一次执行一个,但一次执行5个要快5倍。我想一直执行五件事。不想排五个,等五个都排完了,再排五个。如果我排队A、B、C、D、E并且C先完成,我想立即用F替换它,即使A和B还没有完成。我一直在研究这个问题,因为我可以想象它会定期发生。解决方案似乎是生产者-消费者模式,Ruby在其标准库中内置了一些用于该模式的结构(Queue和SizedQueue)。我玩过代码示例,阅读了一些文档,我想我对它有一个粗略的了解。但是我有一些问题我对我的解决方案没有信心,而且多线程的整个领域对我来
我有带有gemwebsocket-rails0.7的Rails3.2应用程序。在开发机上,一切正常在生产环境中,我使用Nginx/1.6作为代理服务器,Unicorn作为http服务器。Thin用于独立模式(在https://github.com/websocket-rails/websocket-rails/wiki/Standalone-Server-Mode之后)。nginx配置:location/websocket{proxy_passhttp://localhost:3001/websocket;proxy_http_version1.1;proxy_set_headerUp
有时您会制作特定于项目的gem。这有助于将一些“责任”从主Rails应用程序中抽象出来并转移到一个更加模块化的地方。gem将位于您应用程序的此处:gem'example_gem',path:'./example_gem'你捆绑,一切都很好。现在,您gitinitgem并将其存储在github上它自己的repo中。您尝试这样做以使其对开发人员友好:group:development,:testdogem'example_gem',path:'./example_gem'endgroup:productiondogem'example_gem',github:'company/exampl
我正在将我的第一个Rails应用程序放到互联网上,我已经阅读了有关安全性的Rails指南并实现了其中列出的要点,但有兴趣了解其他信息吗?另外,我目前将上传的内容存储在公共(public)/文档中,这样可以吗?我注意到没有保护目录的htaccess文件。 最佳答案 如果您想保密,将上传的内容存储在可预测的位置是个坏主意。如果您不关心访问它的人,那也没关系。使用.htaccess密码保护目录是一个很好的解决方案。您应该使用Acunetx测试您的应用程序是否存在漏洞($$)或Wapiti(开源)。您还应该阅读:Whatshouldadev
(免责声明:在Heroku上部署Sinatra的新手。)我看过http://www.sinatrarb.com/configuration.html它告诉我set:environment,:production。我的问题是,我该如何指定它:“在Heroku中,将环境设置为生产环境,否则留在测试/开发中。”此外,即使在set:environment,:production这行之后,我也不认为它在工作,因为当我尝试在本地rackup应用程序时,它是仍在运行(当我知道(或者我认为我知道)它不应该因为我没有在我的计算机上安装postgres时)。gem文件group:productiondog
我想将我的基础架构迁移到jRuby。我看到的最完整的选项是torquebox。任何人都可以分享一些关于它的东西吗?与tomcat/jetty相比? 最佳答案 我正在使用TorqueBox1.0ReleaseCandidate作为24x7关键任务生产解决方案。它已被用作我项目中所有新开发的首选平台,取代了非常昂贵的商业ESB。虽然HornetQ还没有(还)取代我们企业的企业JMS提供者,但我们正在大量使用HornetQ来处理越来越多的松散耦合的JRuby组件。在我看来,TorqueBox是具有内置高可用性功能的世界级应用服务器、高性能
我正在尝试将数据从我的生产数据库传输到我的登台数据库,但没有成功。我正在关注heroku的相关文档:http://devcenter.heroku.com/articles/pgbackups#transfers这些是我运行的命令...$herokuaddons:addpgbackups--remotestaging$herokuaddons:addpgbackups--remoteproduction$herokupgbackups:capture--remoteproduction$herokupgbackups:restoreDATABASE`herokupgbackups:ur